OwnCloud Desktop Client Manual - The ownCloud Team Version: 2.8, September 28, 2021
←
→
Page content transcription
If your browser does not render page correctly, please read the page content below
ownCloud Desktop Client Manual
                         The ownCloud Team

             Version: 2.8, September 28, 2021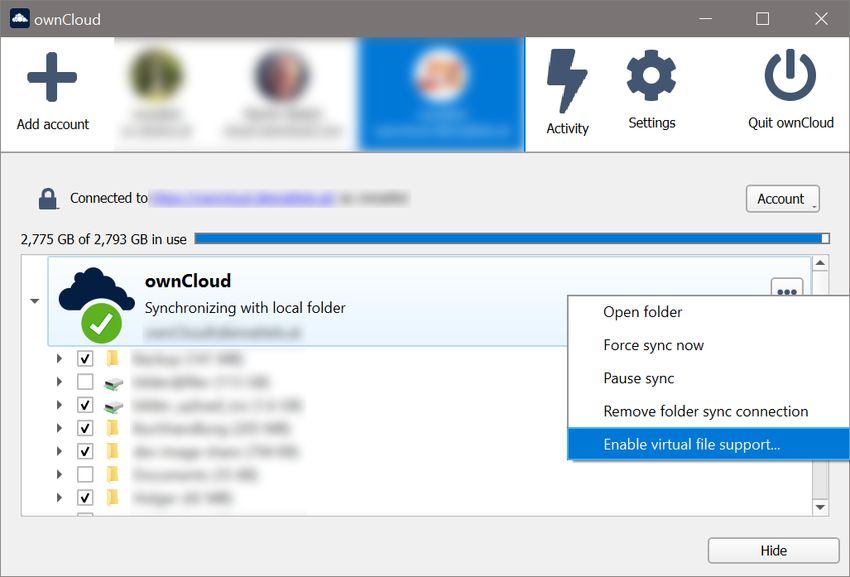
Table of Contents
Introduction. . . . . . . . . . . . . . . . . . . . . . . . . . . . . . . . . . . . . . . . . . . . . . . . . . . . . . . . . . . . . . . . . . . . . . . . . . . . . 1
    Improvements and New Features. . . . . . . . . . . . . . . . . . . . . . . . . . . . . . . . . . . . . . . . . . . . . . . . . . . . . . . . 1
Installing the Desktop Synchronization Client. . . . . . . . . . . . . . . . . . . . . . . . . . . . . . . . . . . . . . . . . . . . . . . . 2
    Introduction . . . . . . . . . . . . . . . . . . . . . . . . . . . . . . . . . . . . . . . . . . . . . . . . . . . . . . . . . . . . . . . . . . . . . . . . . . 2
    System Requirements . . . . . . . . . . . . . . . . . . . . . . . . . . . . . . . . . . . . . . . . . . . . . . . . . . . . . . . . . . . . . . . . . . 2
    Customizing the Windows Installation . . . . . . . . . . . . . . . . . . . . . . . . . . . . . . . . . . . . . . . . . . . . . . . . . . . . 2
    Installation Wizard . . . . . . . . . . . . . . . . . . . . . . . . . . . . . . . . . . . . . . . . . . . . . . . . . . . . . . . . . . . . . . . . . . . . . 5
Using the Synchronization Client . . . . . . . . . . . . . . . . . . . . . . . . . . . . . . . . . . . . . . . . . . . . . . . . . . . . . . . . . . 7
    Introduction . . . . . . . . . . . . . . . . . . . . . . . . . . . . . . . . . . . . . . . . . . . . . . . . . . . . . . . . . . . . . . . . . . . . . . . . . . 7
    Used Client Icons . . . . . . . . . . . . . . . . . . . . . . . . . . . . . . . . . . . . . . . . . . . . . . . . . . . . . . . . . . . . . . . . . . . . . . 7
    Systray Icon . . . . . . . . . . . . . . . . . . . . . . . . . . . . . . . . . . . . . . . . . . . . . . . . . . . . . . . . . . . . . . . . . . . . . . . . . . . 8
    File Manager Overlay Icons . . . . . . . . . . . . . . . . . . . . . . . . . . . . . . . . . . . . . . . . . . . . . . . . . . . . . . . . . . . . . 9
    Sharing From Your Desktop. . . . . . . . . . . . . . . . . . . . . . . . . . . . . . . . . . . . . . . . . . . . . . . . . . . . . . . . . . . . 10
    Activity Window . . . . . . . . . . . . . . . . . . . . . . . . . . . . . . . . . . . . . . . . . . . . . . . . . . . . . . . . . . . . . . . . . . . . . . 11
    Server Notifications . . . . . . . . . . . . . . . . . . . . . . . . . . . . . . . . . . . . . . . . . . . . . . . . . . . . . . . . . . . . . . . . . . . 11
    General Window . . . . . . . . . . . . . . . . . . . . . . . . . . . . . . . . . . . . . . . . . . . . . . . . . . . . . . . . . . . . . . . . . . . . . 12
    Using the Network Window . . . . . . . . . . . . . . . . . . . . . . . . . . . . . . . . . . . . . . . . . . . . . . . . . . . . . . . . . . . . 13
    Using the Ignored Files Editor . . . . . . . . . . . . . . . . . . . . . . . . . . . . . . . . . . . . . . . . . . . . . . . . . . . . . . . . . . 13
Using the Virtual Filesystem . . . . . . . . . . . . . . . . . . . . . . . . . . . . . . . . . . . . . . . . . . . . . . . . . . . . . . . . . . . . . . 15
    Introduction . . . . . . . . . . . . . . . . . . . . . . . . . . . . . . . . . . . . . . . . . . . . . . . . . . . . . . . . . . . . . . . . . . . . . . . . . 15
    Microsoft VFS Implementation . . . . . . . . . . . . . . . . . . . . . . . . . . . . . . . . . . . . . . . . . . . . . . . . . . . . . . . . . 15
    ownCloud VFS Implementation. . . . . . . . . . . . . . . . . . . . . . . . . . . . . . . . . . . . . . . . . . . . . . . . . . . . . . . . . 16
Filename Considerations . . . . . . . . . . . . . . . . . . . . . . . . . . . . . . . . . . . . . . . . . . . . . . . . . . . . . . . . . . . . . . . . 25
    Introduction . . . . . . . . . . . . . . . . . . . . . . . . . . . . . . . . . . . . . . . . . . . . . . . . . . . . . . . . . . . . . . . . . . . . . . . . . 25
    Forbidden Printable ASCII Characters . . . . . . . . . . . . . . . . . . . . . . . . . . . . . . . . . . . . . . . . . . . . . . . . . . . 25
    Non-Printable Characters. . . . . . . . . . . . . . . . . . . . . . . . . . . . . . . . . . . . . . . . . . . . . . . . . . . . . . . . . . . . . . 25
    Reserved File Names. . . . . . . . . . . . . . . . . . . . . . . . . . . . . . . . . . . . . . . . . . . . . . . . . . . . . . . . . . . . . . . . . . 26
    Other Rules. . . . . . . . . . . . . . . . . . . . . . . . . . . . . . . . . . . . . . . . . . . . . . . . . . . . . . . . . . . . . . . . . . . . . . . . . . 26
    Examples and Pitfalls . . . . . . . . . . . . . . . . . . . . . . . . . . . . . . . . . . . . . . . . . . . . . . . . . . . . . . . . . . . . . . . . . 26
Manage Synchronisation Conflicts . . . . . . . . . . . . . . . . . . . . . . . . . . . . . . . . . . . . . . . . . . . . . . . . . . . . . . . . 27
    Introduction . . . . . . . . . . . . . . . . . . . . . . . . . . . . . . . . . . . . . . . . . . . . . . . . . . . . . . . . . . . . . . . . . . . . . . . . . 27
    Example Situation . . . . . . . . . . . . . . . . . . . . . . . . . . . . . . . . . . . . . . . . . . . . . . . . . . . . . . . . . . . . . . . . . . . . 27
    Uploading Conflicts (experimental) . . . . . . . . . . . . . . . . . . . . . . . . . . . . . . . . . . . . . . . . . . . . . . . . . . . . . 27
Automatic Updating of the Desktop Client . . . . . . . . . . . . . . . . . . . . . . . . . . . . . . . . . . . . . . . . . . . . . . . . . 28
    Introduction . . . . . . . . . . . . . . . . . . . . . . . . . . . . . . . . . . . . . . . . . . . . . . . . . . . . . . . . . . . . . . . . . . . . . . . . . 28
    Basic Workflow . . . . . . . . . . . . . . . . . . . . . . . . . . . . . . . . . . . . . . . . . . . . . . . . . . . . . . . . . . . . . . . . . . . . . . . 28
    Preventing Automatic Updates . . . . . . . . . . . . . . . . . . . . . . . . . . . . . . . . . . . . . . . . . . . . . . . . . . . . . . . . . 28
Removing the Desktop Synchronization Client. . . . . . . . . . . . . . . . . . . . . . . . . . . . . . . . . . . . . . . . . . . . . . 31
    Removing the Configuration File . . . . . . . . . . . . . . . . . . . . . . . . . . . . . . . . . . . . . . . . . . . . . . . . . . . . . . . . 31
    Windows Navigation Sidebar . . . . . . . . . . . . . . . . . . . . . . . . . . . . . . . . . . . . . . . . . . . . . . . . . . . . . . . . . . . 31
FAQ . . . . . . . . . . . . . . . . . . . . . . . . . . . . . . . . . . . . . . . . . . . . . . . . . . . . . . . . . . . . . . . . . . . . . . . . . . . . . . . . . . . 32
    Some Files Are Continuously Uploaded to the Server, Even When They Are Not Modified. . . . . . 32
    Syncing Stops When Attempting to Sync Deeper Than 100 Sub-Directories . . . . . . . . . . . . . . . . . . 32
I See a Warning Message for Unsupported Versions . . . . . . . . . . . . . . . . . . . . . . . . . . . . . . . . . . . . . . 32
   There Was a Warning About Changes in Synchronized Folders Not Being Tracked Reliably . . . . . 33
   I Want to Move My Local Sync Folder. . . . . . . . . . . . . . . . . . . . . . . . . . . . . . . . . . . . . . . . . . . . . . . . . . . . 33
   I Want to Change My Server URL . . . . . . . . . . . . . . . . . . . . . . . . . . . . . . . . . . . . . . . . . . . . . . . . . . . . . . . 34
Advanced Usage. . . . . . . . . . . . . . . . . . . . . . . . . . . . . . . . . . . . . . . . . . . . . . . . . . . . . . . . . . . . . . . . . . . . . . . . 36
   Command Line Options . . . . . . . . . . . . . . . . . . . . . . . . . . . . . . . . . . . . . . . . . . . . . . . . . . . . . . . . . . . . . . . 36
   Configuration File. . . . . . . . . . . . . . . . . . . . . . . . . . . . . . . . . . . . . . . . . . . . . . . . . . . . . . . . . . . . . . . . . . . . . 36
   Environment Variables . . . . . . . . . . . . . . . . . . . . . . . . . . . . . . . . . . . . . . . . . . . . . . . . . . . . . . . . . . . . . . . . 38
   The Command Line Client . . . . . . . . . . . . . . . . . . . . . . . . . . . . . . . . . . . . . . . . . . . . . . . . . . . . . . . . . . . . . 40
   Low Disk Space . . . . . . . . . . . . . . . . . . . . . . . . . . . . . . . . . . . . . . . . . . . . . . . . . . . . . . . . . . . . . . . . . . . . . . 41
Appendices . . . . . . . . . . . . . . . . . . . . . . . . . . . . . . . . . . . . . . . . . . . . . . . . . . . . . . . . . . . . . . . . . . . . . . . . . . . . 43
   Appendix Building the Client . . . . . . . . . . . . . . . . . . . . . . . . . . . . . . . . . . . . . . . . . . . . . . . . . . . . . . . . . . . 43
   Appendix History and Architecture . . . . . . . . . . . . . . . . . . . . . . . . . . . . . . . . . . . . . . . . . . . . . . . . . . . . . 49
   Appendix Troubleshooting. . . . . . . . . . . . . . . . . . . . . . . . . . . . . . . . . . . . . . . . . . . . . . . . . . . . . . . . . . . . . 56
   Release Notes. . . . . . . . . . . . . . . . . . . . . . . . . . . . . . . . . . . . . . . . . . . . . . . . . . . . . . . . . . . . . . . . . . . . . . . . 61
Introduction
Available for Windows, Mac OS X, and various Linux distributions, the ownCloud
Desktop Sync client enables you to:

• Specify one or more directories on your computer that you want to synchronize to
  the ownCloud server.
• Always have the latest files synchronized, wherever they are located.

Your files are always automatically synchronized between your ownCloud server and
local PC.

Desktop Sync clients older than. 2.2.1 are not allowed to connect and sync with
ownCloud 8.1+ server. It is highly recommended to keep your server and client
updated.

Improvements and New Features
Each release of the ownCloud Desktop Sync client             has   new    features    and
improvements, for details see the complete changelog.

                                                         Improvements and New Features | 1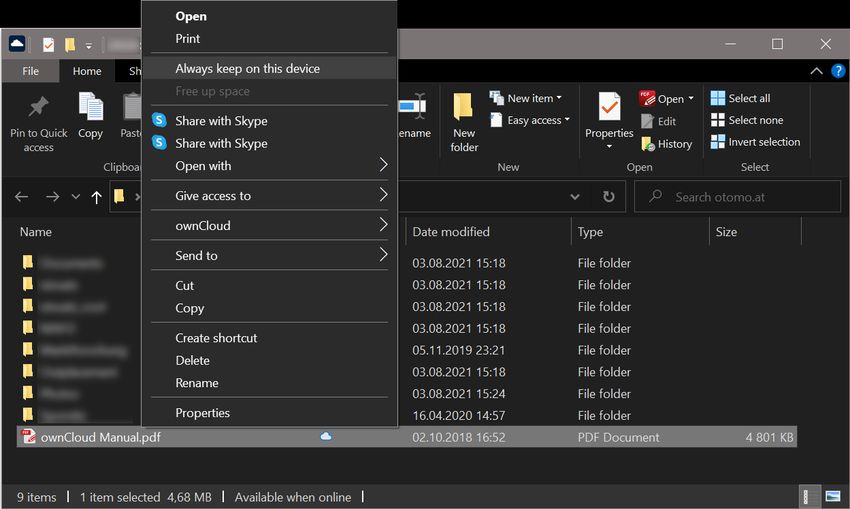
Installing the Desktop Synchronization
Client
Introduction
You can download the latest version of the ownCloud Desktop Synchronization Client
from the ownCloud download page. There are clients for Linux, macOS, and Microsoft
Windows.
Installation on Mac OS X and Windows is the same as for any software application:
download the program and then double-click it to launch the installation, and then
follow the installation wizard. After it is installed and configured the sync client will
automatically keep itself updated; see autoupdate for more information.
Linux users must follow the instructions on the download page to add the appropriate
repository for their Linux distribution, install the signing key, and then use their
package managers to install the desktop sync client. Linux users will also update their
sync clients via package manager, and the client will display a notification when an
update is available.
Linux users must also have a password manager enabled, such as GNOME Keyring or
KWallet, so that the sync client can login automatically.
You will also find links to source code archives and older versions on the download
page.
System Requirements
• Windows 7+ (x86 with 32-bit or x86-64; Native WinVFS available for Windows 10
version 1709 or later)
• macOS 10.12+ (x86-64 or Apple M in Rosetta 2 emulation; unsupported legacy
builds for Mac OS X 10.10 & 10.11 available)
• CentOS 7.6+ & 8 (x86-64)
• Debian 9.0 & 10 (x86-64)
• Fedora 31 & 32 & 33 (x86-64)
• Ubuntu 18.04 & 20.04 & 20.10 & 21.04 (x86-64)
• openSUSE Leap 15.1 & 15.2 (x86-64)
For Linux distributions, we support, if technically feasible, the latest 2
versions per platform and the previous Ubuntu LTS.
Customizing the Windows Installation
If you just want to install ownCloud Desktop Synchronization Client on your local
system, you can simply launch the .msi file and configure it in the wizard that pops up.
Features
The MSI installer provides several features that can be installed or removed
individually, which you can also control via command-line, if you are automating the
installation, then run the following command:
2 | Introduction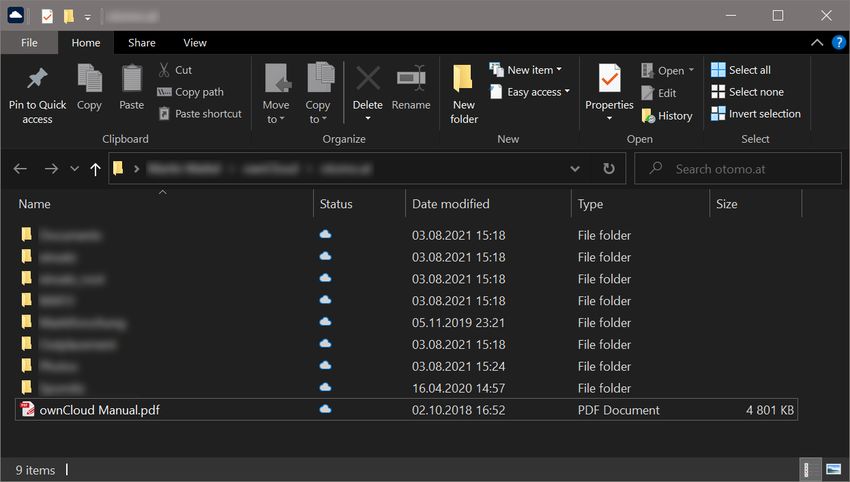
msiexec /passive /i ownCloud-x.y.z.msi.
The command will install the ownCloud Desktop Synchronization Client into the
default location with the default features enabled. If you want to disable, e.g., desktop
shortcut icons you can simply change the above command to the following:
msiexec /passive /i ownCloud-x.y.z.msi REMOVE=DesktopShortcut.
See the following table for a list of available features:
Feature Enabled by Description Property to disable.
default
Client Yes, The actual client
required
DesktopShortcut Yes Adds a shortcut to the NO_DESKTOP_SHORTCUT
desktop.
StartMenuShortcuts Yes Adds shortcuts to the NO_START_MENU_SHORTC
start menu. UTS
ShellExtensions Yes Adds Explorer NO_SHELL_EXTENSIONS
integration
Installation
You can also choose to only install the client itself by using the following command:
msiexec /passive /i ownCloud-x.y.z.msi ADDDEFAULT=Client.
If you for instance want to install everything but the DesktopShortcut and the
ShellExtensions feature, you have two possibilities:
• You explicitly name all the features you actually want to install (whitelist) where
Client is always installed anyway.
msiexec /passive /i ownCloud-x.y.z.msi ADDDEFAULT=StartMenuShortcuts.
• You pass the NO_DESKTOP_SHORTCUT and NO_SHELL_EXTENSIONS properties.
msiexec /passive /i ownCloud-x.y.z.msi NO_DESKTOP_SHORTCUT="1"
NO_SHELL_EXTENSIONS="1"
The ownCloud .msi file remembers these properties, so you don’t need
to specify them on upgrades.
You cannot use these to change the installed features, if you want to do
that, see the next section.
Customizing the Windows Installation | 3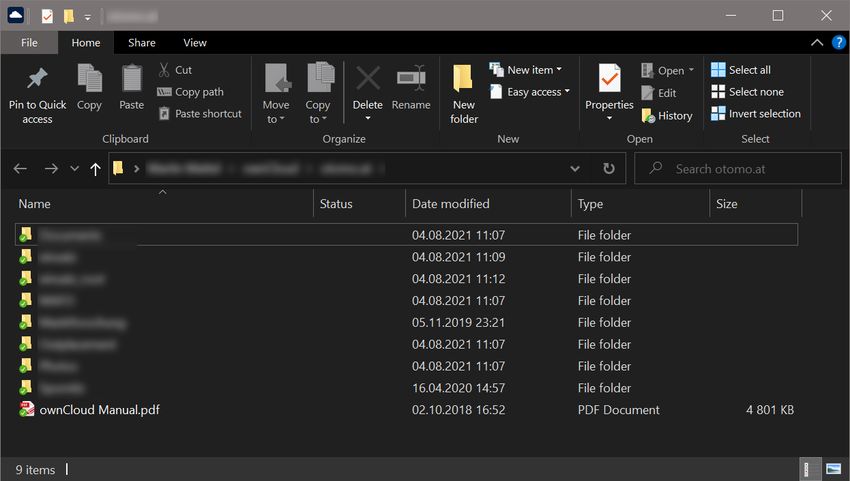
Changing Installed Features
You can change the installed features later by using REMOVE and ADDDEFAULT
properties.
• If you want to add the desktop shortcut later, run the following command:
msiexec /passive /i ownCloud-x.y.z.msi ADDDEFAULT="DesktopShortcut"
• If you want to remove it, simply run the following command:
msiexec /passive /i ownCloud-x.y.z.msi REMOVE="DesktopShortcut"
Windows keeps track of the installed features and using REMOVE or ADDDEFAULT will
only affect the mentioned features.
Compare REMOVE and ADDDEFAULT on the Windows Installer Guide.
You cannot specify REMOVE on initial installation as it will disable all
features.
Installation Folder
You can adjust the installation folder by specifying the INSTALLDIR property like this.
msiexec /passive /i ownCloud-x.y.z.msi INSTALLDIR="C:\Program Files (x86)\Non
Standard ownCloud Client Folder"
Be careful when using PowerShell instead of cmd.exe, it can be tricky to get the
whitespace escaping right there. Specifying the INSTALLDIR like this only works on
first installation, you cannot simply re-invoke the .msi with a different path. If you still
need to change it, uninstall it first and reinstall it with the new path.
Disabling Automatic Updates.
To disable automatic updates, you can pass the SKIPAUTOUPDATE property.
msiexec /passive /i ownCloud-x.y.z.msi SKIPAUTOUPDATE="1"
Launch After Installation
To launch the client automatically after installation, you can pass the LAUNCH
property.
msiexec /i ownCloud-x.y.z.msi LAUNCH="1"
This option also removes the checkbox to let users decide if they want to launch the
client for non passive/quiet mode.
This option does not have any effect without GUI.
4 | Customizing the Windows Installation
No Reboot After Installation
The ownCloud Client schedules a reboot after installation to make sure the Explorer
extension is correctly (un)loaded. If you’re taking care of the reboot yourself, you can
set the REBOOT property.

 msiexec /i ownCloud-x.y.z.msi REBOOT=ReallySuppress.

This will make msiexec exit with error ERROR_SUCCESS_REBOOT_REQUIRED
(3010). If your deployment tooling interprets this as an actual error and you want to
avoid that, you may want to set the DO_NOT_SCHEDULE_REBOOT instead.

 msiexec /i ownCloud-x.y.z.msi DO_NOT_SCHEDULE_REBOOT="1"

Installation Wizard
The installation wizard takes you step-by-step through configuration options and
account setup. First you need to enter the URL of your ownCloud server.

Enter your ownCloud login on the next screen.

On the "Local Folder Option" screen you may sync all of your files on the ownCloud
server, or select individual folders. The default local sync folder is ownCloud, in your
home directory. You may change this as well.

                                                                      Installation Wizard | 5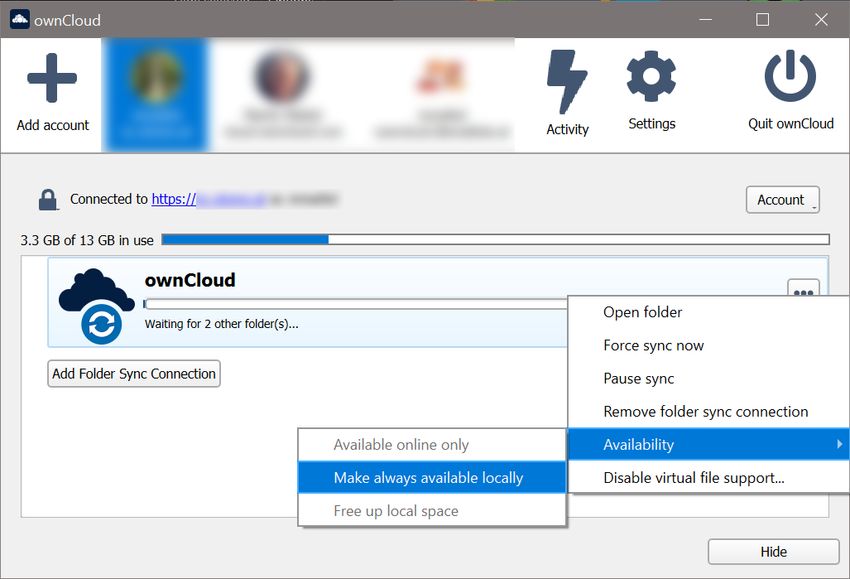
When you have completed selecting your sync folders, click the "Connect" button at
the bottom right. The client will attempt to connect to your ownCloud server, and
when it is successful you’ll see two buttons:

• One to connect to your ownCloud Web GUI.
• One to open your local folder.

It will also start synchronizing your files.

6 | Installation Wizard
Using the Synchronization Client
Introduction
The ownCloud Desktop Client remains in the background and is visible as an icon in
the system tray (Windows, KDE), menu bar (macOS), or notification area (Linux).

Used Client Icons

The status indicator uses icons to indicate the current status of your synchronization.
The green circle with the white checkmark tells you that your synchronization is
current and you are connected to your ownCloud server.

The blue icon with the white semi-circles means synchronization is in progress.

The yellow icon with the parallel lines tells you your synchronization has been paused.
(Most likely by you.)

The gray icon with three white dots means your sync client has lost its connection with
your ownCloud server.

When you see a white circle with the letter "i" that is the informational icon, so you
should click it to see what it has to tell you.

The red circle with the white "x" indicates a configuration error, such as an incorrect
login or server URL.

                                                                          Introduction | 7
Systray Icon A right-click on the systray icon opens a menu for quick access to multiple operations. This menu provides the following options: • Quick access to your accounts. • Sync status. • Recent Changes, showing latest activities. • Settings. • Help menu. • Pause synchronizations. • An option to log in or log out of all of your accounts at once. • Quit ownCloud, logging out and closing the client. A left-click on your systray icon opens the desktop client to the account settings window. Configuring ownCloud Account Settings At the top of the window are tabs for each configured sync account, and three others for Activity, General and Network settings. On your account tabs you have the following features: • Connection status, showing which ownCloud server you are connected to, and your ownCloud username. 8 | Systray Icon
• An Account button, which contains a dropdown menu with Add New, Log Out,
and Remove.
• Used and available space on the server.
• Current synchronization status.
• Add Folder Sync Connection button.
The little button with three dots (the overflow menu) that sits to the right of the sync
status bar offers four additional options:
• Open Folder.
• Choose What to Sync (This appears only when your file tree is collapsed, and
expands the file tree)
• Pause Sync / Resume Sync.
• Remove folder sync connection.
Open Folder opens your local ownCloud sync folder.
Pause Sync pauses sync operations without making any changes to your account. It
will continue to update file and folder lists, without downloading or updating files. To
stop all sync activity use Remove Folder Sync Connection.
ownCloud does not preserve the mtime (modification time) of
directories, though it does update the mtimes on files. See Wrong folder
date when syncing for discussion of this.
Adding New Accounts
You may configure multiple ownCloud accounts in your desktop sync client. Simply
click the Account › Add New button on any account tab to add a new account, and
then follow the account creation wizard. The new account will appear as a new tab in
the settings dialog, where you can adjust its settings at any time. Use Account ›
Remove to delete accounts.
To use Two-Factor Authentication (2FA), ownCloud server must have
the OAuth2 app installed, configured, and enabled. Please contact your
ownCloud administrator for more details.
File Manager Overlay Icons
The ownCloud sync client provides overlay icons, in addition to the normal file type
icons, for your system file manager (Explorer on Windows, Finder on Mac and
Nautilus on Linux) to indicate the sync status of your ownCloud files.
The overlay icons are similar to the systray icons introduced above. They behave
differently on files and directories according to sync status and errors.
The overlay icon of an individual file indicates its current sync state. If the file is in
sync with the server version, it displays a green checkmark.
File Manager Overlay Icons | 9If the file is ignored from syncing, for example because it is on your exclude list, or because it is a symbolic link, it displays a warning icon. If there is a sync error, or the file is blacklisted, it displays an eye-catching red X. If the file is waiting to be synced, or is currently syncing, the overlay icon displays a blue cycling icon. When the client is offline, no icons are shown to reflect that the folder is currently out of sync and no changes are synced to the server. The overlay icon of a synced directory indicates the status of the files in the directory. If there are any sync errors, the directory is marked with a warning icon. If a directory includes ignored files that are marked with warning icons that does not change the status of the parent directories. Sharing From Your Desktop The ownCloud desktop sync client integrates with your file manager: Finder on Mac OS X, Explorer on Windows, and Nautilus on Linux. (Linux users must install the owncloud-client-nautilus plugin.) You can create share links, and share with internal ownCloud users the same way as in your ownCloud Web interface. Right-click your systray icon, hover over the account you want to use, and left-click Open folder › "folder name" to quickly enter your local ownCloud folder. Right-click the file or folder you want to share to expose the share dialog, and click Share with ownCloud. The share dialog has all the same options as your ownCloud Web interface. 10 | Sharing From Your Desktop
Use Share with ownCloud to see who you have shared with, and to modify their
permissions, or to delete the share.

Activity Window
The Activity window contains the log of your recent activities, organized over three
tabs: Server Activities, which includes new shares and files downloaded and deleted,
Sync Protocol, which displays local activities such as which local folders your files
went into, and. Not Synced shows errors such as files not synced. Double clicking an
entry pointing to an existing file in Server Activities or Sync Protocol will open the
folder containing the file and highlight it.

Server Notifications
Starting with version 2.2.0, the client will display notifications from your ownCloud
server that require manual interaction by you. For example, when a user on a remote
ownCloud creates a new Federated share for you, you can accept it from your desktop

                                                                     Activity Window | 11
client. The desktop client automatically checks for available notifications automatically on a regular basis. Notifications are displayed in the Server Activity tab, and if you have Show Desktop Notifications. enabled (General tab) you’ll also see a systray notification. This also displays notifications sent to users by the ownCloud admin via the Announcements app. General Window The General window has configuration options such as "Launch on System Startup", "Use Monochrome Icons", and "Show Desktop Notifications". This is where you will find the "Edit Ignored Files" button, to launch the ignored files editor, and "Ask confirmation before downloading folders larger than [folder size]". 12 | General Window
While you can elect whether to show or hide the crash reporter, from
the General window, you can also configure whether to show or hide it
from the general section of the configuration file as well. Doing so can
help with debugging on-startup-crashes.
Using the Network Window
proxy settings, SOCKS, bandwith, throttling, limiting.
The Network settings window enables you to define network proxy settings, and also
to limit download and upload bandwidth.
Using the Ignored Files Editor
Ignored files, exclude files, patterns.
You might have some local files or directories that you do not want to backup and
store on the server. To identify and exclude these files or directories, you can use the
General Tab › Ignored Files Editor
For your convenience, the editor is pre-populated with a default list of typical ignore
patterns. These patterns are contained in a system file. (typically sync-exclude.lst)
located in the ownCloud Client application directory. You cannot modify these pre-
populated patterns directly from the editor. However, if necessary, you can hover over
Using the Network Window | 13any pattern in the list to show the path and filename associated with that pattern,
locate the file, and edit the sync-exclude.lst file.
Modifying the global exclude definition file might render the client
unusable or result in undesired behavior.
Each line in the editor contains an ignore pattern string. When creating custom
patterns, in addition to being able to use normal characters to define an ignore
pattern, you can use wildcards characters for matching values. As an example, you can
use an asterisk (*) to identify an arbitrary number of characters or a question mark (?)
to identify a single character.
Patterns that end with a slash character (/) are applied to only directory components of
the path being checked.
Custom entries are currently not validated for syntactical correctness
by the editor, so you will not see any warnings for bad syntax. If your
synchronization does not work as you expected, check your syntax.
Each pattern string in the list is preceded by a checkbox. When the check box contains
a check mark, in addition to ignoring the file or directory component matched by the
pattern, any matched files are also deemed "fleeting metadata" and removed by the
client.
In addition to excluding files and directories that use patterns defined in this list:
• The ownCloud Client always excludes files containing characters that cannot be
synchronized to other file systems.
• Files are removed that cause individual errors three times during a
synchronization. However, the client provides the option of retrying a
synchronization three additional times on files that produce errors.
For more detailed information see the Ignored Files section.
14 | Using the Ignored Files EditorUsing the Virtual Filesystem
Introduction
ownCloud offers the possibility for users to enable a virtual file system (VFS) when
synchronizing data. This has the big advantage that all files and folders are visible to
the client, but the files are not downloaded until the user requests to do so. Here are
some of the key benefits:
• Full access to files and folders without having to download them all first
• Selectively sync folders and files based on user requirements
• Optimize space usage on the client
The quote below gives you a brief overview of what a virtual file system is about.
A virtual file system (VFS) or virtual filesystem switch is an
abstract layer on top of a more concrete file system. The purpose
of a VFS is to allow client applications to access different types of
concrete file systems in a uniform way. A VFS can, for example, be
used to access local and network storage devices transparently
without the client application noticing the difference. It can be
used to bridge the differences in Windows, classic Mac OS/macOS
and Unix filesystems, so that applications can access files on local
file systems of those types without having to know what type of
file system they are accessing.
— https://en.wikipedia.org/wiki/Virtual_file_system
Microsoft VFS Implementation
Background
A sync engine is a service that syncs files, typically between a
remote host and a local client. Sync engines on Windows often
present those files to the user through the Windows file system
and File Explorer.
— https://docs.microsoft.com/en-us/windows/win32/cfapi/build-a-cloud-file-sync-engine
Files can exist in three states:
Full pinned file
The file has been hydrated explicitly by the user through File Explorer and is
guaranteed to be available offline.
Full file
The file has been hydrated implicitly and could be dehydrated by the system if space
is needed.
Placeholder file
An empty representation of the file and only available if the sync service is
available.
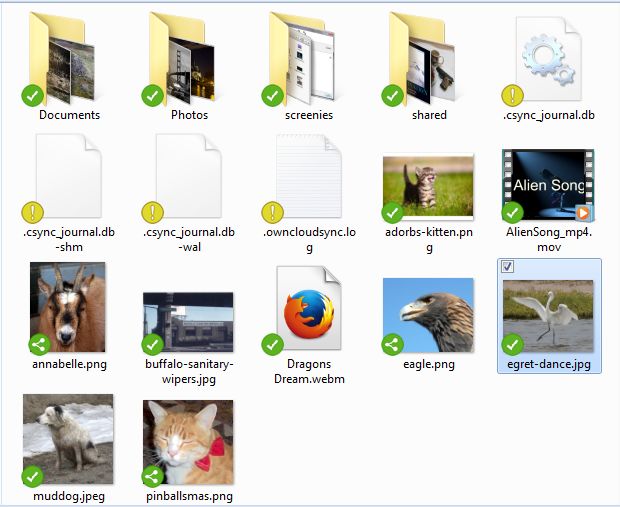
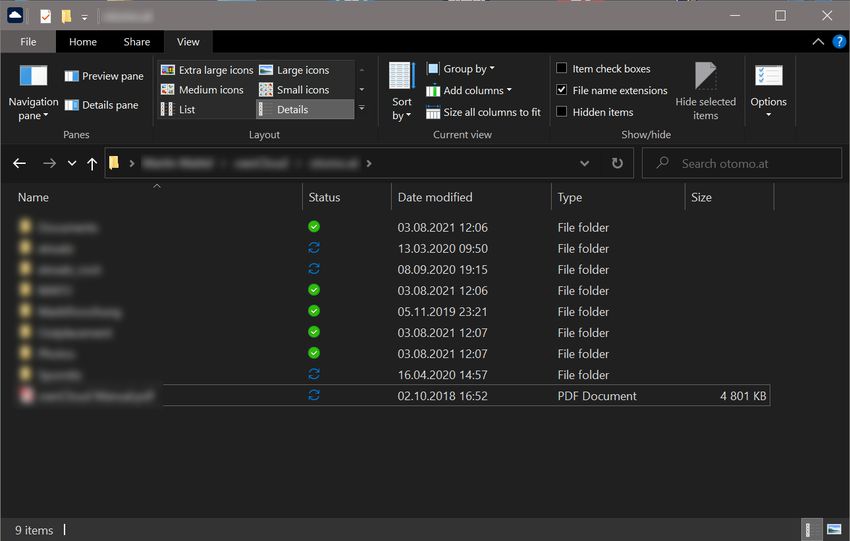
The following image demonstrates how the full pinned, full and placeholder file states
Introduction | 15are shown in File Explorer. Limitations and Restrictions Limitations A virtual file system needs a root folder all synchronization items will be stored in. The following locations are not allowed as synchronization root: • The root of a disk like D:\ • A non-NTFS Filesystem • Mounted network shares • Symbolic links or junction points • Assigned drives Restrictions Similar to OneDrive as it also uses Microsoft’s virtual file system, there are some additional restrictions which should be considered like the maximum file size, invalid file or folder names, etc. See the Restrictions and limitations in OneDrive and SharePoint for more information. ownCloud VFS Implementation New Sync with VFS enabled To set up a new synchronization with virtual file system enabled, perform the following steps: 1. Add a new synchronization by clicking the [+ Add account] button. 2. Enter the server address and your credentials in the following dialogs. 3. Select the radio button [Use virtual files] and set the local folder where your synchronization data will reside. 16 | ownCloud VFS Implementation
4. When everything is done, you should see a similar screen as below, showing that
the setup completed successfully.
5. After the first sync, your synchronization folder will show your items with the
Placeholder icon.
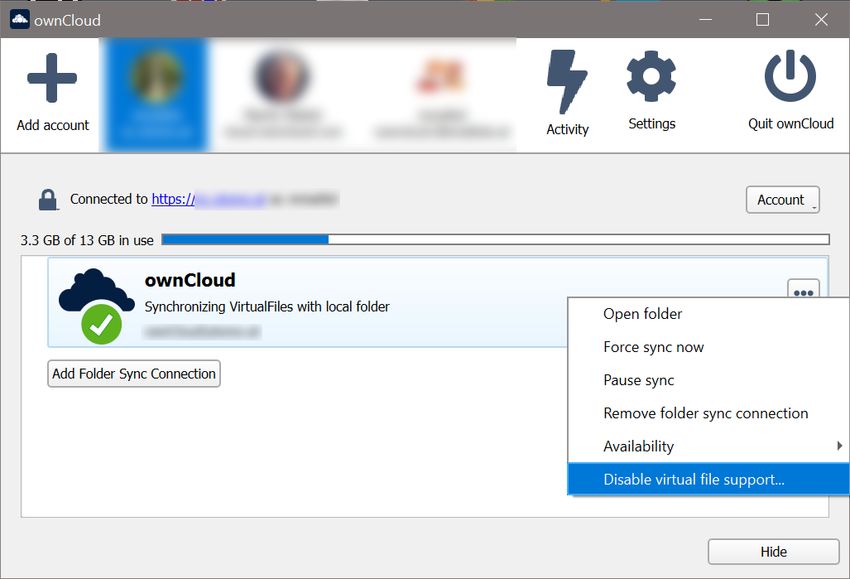
ownCloud VFS Implementation | 176. When opening a file, the file gets downloaded and its synchronization icon changes to Full. Convert Full Sync to VFS If you have full synchronization enabled, you can change to a virtual file system at any time. 1. Open your existing synchronization, click the […] button and Enable virtual file support. 2. Your local files will get replaced by placeholders, thus freeing up the space previously occupied. Convert VFS to Full Sync You can also change the synchronization setting from virtual file system to full sync. 1. Open your existing synchronization, click the […] button and Disable virtual file support. 18 | ownCloud VFS Implementation
2. A notification window will ask you to confirm before completing the conversion.

3. When done, your files will be fully downloaded, which you can tell by the sync
   icons, see the example image below. Depending on the quantity and size of the files,
   this may take a while.

Manage VFS from ownCloud
You can manage the synchronization for all files and folders via ownCloud. This can be
beneficial if you e.g. want all files to be downloaded (pinned) without you having to
open every single one, or if you want to free up all space at once.

                                                          ownCloud VFS Implementation | 19
Make All Files Full Pinned 1. Open your existing synchronization, click the […] button and Availability › Make always available locally. 2. When opening the Explorer, you will see that all files get the sync icon . 3. The icon will change to Full Pinned when downloaded. 20 | ownCloud VFS Implementation
Make All Files Placeholders

You can free up space by unpinning all files at once and making them placeholders
with only a view clicks.

1. Open your existing synchronization, click the […] button and Availability › Free
   up local space.

2. When done, Explorer will show the files in Placeholder state.

                                                          ownCloud VFS Implementation | 21
Manage VFS from Windows Explorer You can manage individual files in the Explorer window by right-clicking on them. This opens a drop-down menu of actions that can be performed on a specific file. Create a Local Copy of a File 1. To create a Full Pinned file (have a local copy of it), use the action [Always keep on this device]. The state of the file will change to synchronizing. 22 | ownCloud VFS Implementation
When the local copy has been created, the state (icon) changes to Full Pinned.

Free up Space of a File

1. To free up the space the file occupied, use the action [Free up space].

                                                          ownCloud VFS Implementation | 23
2. When done, Explorer will show the file in Placeholder state. 24 | ownCloud VFS Implementation
Filename Considerations
Introduction
When using the client, depending the operating system (OS) you are using, file and
folder names can have different restrictions. Creating files and folders with allowed
names on one OS, may have issues or even can´t be synced because of different rules
in another OS. This page gives you a brief overview of limitations of different OS for
file and folder names.
This is not an ownCloud rule but an OS dependency
Here are some rules of thumb
1. Do not use any of the mentioned characters or words in any OS
when using the Desktop Sync Client.
2. When the sync client is on Linux/Unix and the target mount to sync
on is on SMB, file and folder names on Linux/Unix must comply with
the Windows rules for successful syncing.
3. When the sync client is on Linux/Unix and the target mount to sync
on is on SMB and you want to just rename the file with different
casings, rename the file to a total different name, let it sync and
then rename it again to the name that you want.
Forbidden Printable ASCII Characters
Linux/Unix
/ (forward slash)
Windows
< (less than)
> (greater than)
: (colon - sometimes works, but is actually NTFS Alternate Data Streams)
" (double quote)
/ (forward slash)
\ (backslash)
| (vertical bar or pipe)
? (question mark)
* (asterisk)
Non-Printable Characters
If your files are created via a program, do not use non-printable characters. See the
Wikipedia "Control code chart" section for more information on ASCII control
characters.
Linux/Unix
0 (NULL byte)
While it is legal under Linux/Unix file systems to create files with
control characters in the filename, they might be inaccessible and/or
unsyncable.
Windows
0-31 (ASCII control characters)
Introduction | 25Reserved File Names The following file names are reserved: Windows CON, PRN, AUX, NUL COM1, COM2, COM3, COM4, COM5, COM6, COM7, COM8, COM9, LPT1, LPT2, LPT3, LPT4, LPT5, LPT6, LPT7, LPT8, LPT9 Other Rules Linux/Unix When the sync client is on Linux/Unix and the target mount to sync on is on SMB, you cannot have the same file or folder name but with different casings. A cross icon will be shown that indicates that the file can’t be synced. Files on Linux/Unix must comply with the Windows rules for successful syncing. Windows Filenames cannot end in a space or dot Examples and Pitfalls 1. When creating a file in Linux/Unix like my-filename. (see the dot at the end) or my- filename.LPT1 (see the reserved name LPT1), you can sync the file to your ownCloud if the mount target is Linux/Unix. When a Windows user tries to sync these files, Windows rejects the file. Comparing the file list in both environments shows that one side has more files than the other. There will be no notification as this is an OS dependency. 2. When renaming an existing file in Linux/Unix by just changing the casing like owncloud → ownCloud, you might get issues on the windows sync side as for Windows the file looks the same. 26 | Reserved File Names
Manage Synchronisation Conflicts
Introduction
The ownCloud desktop client uploads local changes and downloads remote changes.
When a file has changed on the local and on the remote side between synchronization
runs, the client will be unable to resolve the situation on its own. It will create a
conflict file with the local version, downloads the remote version and notifies the user
that a conflict occurred which needs attention.

Example Situation
Imagine there is a file called mydata.txt your synchronized folder. It has not changed
for a while and contains the text "contents" locally and remotely. Now, nearly at the
same time you update it locally to say "local contents" while the file on the server gets
updated to contain "remote contents" by someone else.

When attempting to upload your local changes the desktop client will notice that the
server version has also changed. It creates a conflict and you will now have two files
on your local machine:

• mydata.txt containing "remote contents"
• mydata (conflicted copy 2018-04-10 093612).txt containing "local contents"

In this situation the file mydata.txt has the remote changes (and will continue to be
updated with further remote changes when they happen), but your local adjustments
have not been sent to the server (unless the server enables conflict uploading, see
below).

The desktop client notifies you of this situation via system notifications, the system
tray icon and a yellow "unresolved conflicts" badge in the account settings window.
Clicking this badge shows a list that includes the unresolved conflicts and clicking one
of them opens an explorer window pointing at the relevant file.

To resolve this conflict, open both files, compare the differences and copy your local
changes from the "conflicted copy" file into the base file where applicable. In this
example you might change mydata.txt to say "local and remote contents" and delete
the file with "conflicted copy" in its name. With that, the conflict is resolved.

Uploading Conflicts (experimental)
By default the conflict file (the file with "conflicted copy" in its name that contains your
local conflicting changes) is not uploaded to the server. The idea is that you, the
author of the changes, are the best person for resolving the conflict and showing the
conflict to other users might create confusion.

However, in some scenarios it makes a lot of sense to upload these conflicting changes
such that local work can become visible even if the conflict won’t be resolved
immediately.

In the future there might be a server-wide switch for this behavior. For now it can
already     be      tested    by      setting    the      environment      variable:
OWNCLOUD_UPLOAD_CONFLICT_FILES = 1.

                                                                             Introduction | 27
Automatic Updating of the Desktop Client
Introduction
The Automatic Updater ensures that you always have the latest features and bug fixes
for your ownCloud Desktop synchronization client. The Automatic Updater updates
only on Mac OS X and Windows computers; Linux users only need to use their normal
package managers. However, on Linux systems the Updater will check for updates and
notify you when a new version is available.
Basic Workflow
The following sections describe how to use the Automatic Updater on different
operating systems.
Windows
The ownCloud client checks for updates and downloads them when available. You can
view the update status under Settings › General › Updates in the ownCloud client.
If an update is available, and has been successfully downloaded, the ownCloud client
starts a silent update prior to its next launch and then restarts itself. Should the silent
update fail, the client offers a manual download.
Administrative privileges are required to perform the update.
Mac OS X
If a new update is available, the ownCloud client initializes a pop-up dialog to alert you
of the update and requesting that you update to the latest version. Due to their use of
the Sparkle frameworks, this is the default process for Mac OS X applications.
Linux
Linux distributions provide their own update tools, so ownCloud clients that use the
Linux operating system do not perform any updates on their own. The client will
inform you (Settings › General › Updates) when an update is available.
Preventing Automatic Updates
In controlled environments, such as companies or universities, you might not want to
enable the auto-update mechanism, as it interferes with controlled deployment tools
and policies. To address this case, it is possible to disable the auto-updater entirely.
The following sections describe how to disable the auto-update mechanism for
different operating systems.
Preventing Automatic Updates in Windows Environments
Users may disable automatic updates by adding this line to the [General] section of
their owncloud.cfg files:
owncloud.cfg is usually located in
C:\Users\\AppData\Roaming\ownCloud\owncloud.cfg.
skipUpdateCheck=true
28 | IntroductionWindows administrators have more options for preventing automatic updates in
Windows environments by using one of two methods. The first method allows users to
override the automatic update check mechanism, whereas the second method
prevents any manual overrides.
To prevent automatic updates, but allow manual overrides:
1. Edit these Registry keys:
a. (32-bit-Windows) HKEY_LOCAL_MACHINE\Software\ownCloud\ownCloud
b. (64-bit-Windows)
HKEY_LOCAL_MACHINE\Software\Wow6432Node\ownCloud\ownCloud
2. Add the key skipUpdateCheck (of type DWORD).
3. Specify a value of 1 to the machine.
To manually override this key, use the same value in HKEY_CURRENT_USER. To prevent
automatic updates and disallow manual overrides:
This is the preferred method of controlling the updater behavior using
Group Policies.
1. Edit this Registry key:
HKEY_LOCAL_MACHINE\Software\Policies\ownCloud\ownCloud
2. Add the key skipUpdateCheck (of type DWORD).
3. Specify a value of 1 to the machine.
Enterprise branded clients (Building Branded ownCloud Clients) have
different key names, which are set in ownBrander using the Application
Vendor and Application Name fields.
Your key names look like this:
HKEY_LOCAL_MACHINE\Software\Policies\myCompanyName\myAppName
Preventing Automatic Updates in Mac OS X Environments
You can disable the automatic update mechanism, in the Mac OS X operating system,
by copying the file
owncloud.app/Contents/Resources/deny_autoupdate_com.owncloud.desktopclient.plist
to /Library/Preferences/com.owncloud.desktopclient.plist.
Preventing Automatic Updates in Linux Environments
Because the Linux client does not provide automatic updating functionality, there is no
need to remove the automatic-update check. However, if you want to disable it edit
your desktop client configuration file, $HOME/.config/ownCloud/owncloud.cfg, add this
line to the [General] section:
Preventing Automatic Updates | 29skipUpdateCheck=true 30 | Preventing Automatic Updates
Removing the Desktop Synchronization
Client
Removing the Configuration File
When you remove the client - the configuration file remains on your system. If you
then decide to install the client again, you won’t need to re-enter the connection
information.

In case you want a clean removal of the client, you manually have to delete the
configuration file. The location of the configuration file is operating system dependent
and can be found in the Configuration File description.

Windows Navigation Sidebar
If you have removed the Windows Synchronization Client but still have the ownCloud
shortcut or symbol in the Windows Navigation Side Bar, here is how you to remove it:

1. Open regedit. (press the Windows Key and type regedit)
2. Search (CTL+F) for the name of the client, in this case `owncloud `.
3. Press F3 for next search result.
4. Look for the key System.IsPinnedToNameSpaceTree.
5. Right click on the key name, change, set to 0 instead of 1.

You have to do this twice. Once for the x64 and x32 system settings.

Once this is done, you don’t need a reboot, just open and close your explorer - the
sidebar is clean.

                                                          Removing the Configuration File | 31
FAQ Some Files Are Continuously Uploaded to the Server, Even When They Are Not Modified It is possible that another program is changing the modification date of the file. If the file has an .eml extension, Windows automatically and continually changes the file, unless you remove it. \HKEY_LOCAL_MACHINE\SOFTWARE\Microsoft\Windows\CurrentVersion\PropertySystem\ PropertyHandlers from the windows registry. See http://petersteier.wordpress.com/ 2011/10/22/windows-indexer-changes-modification-dates-of-eml-files/ for more information. Syncing Stops When Attempting to Sync Deeper Than 100 Sub-Directories The sync client has been intentionally limited to sync no deeper than 100 sub- directories. The hard limit exists to guard against bugs with cycles like symbolic link loops. When a deeply nested directory is excluded from synchronization it will be listed with other ignored files and directories in the "Not synced" tab of the "Activity" pane. I See a Warning Message for Unsupported Versions Keeping software up to date is crucial for file integrity and security – if software is outdated, there can be unfixed bugs. That’s why you should always upgrade your software when there is a new version. The ownCloud Desktop Client talks to a server, e.g. the ownCloud server, so you don’t only have to upgrade your client when there is a new version for it, also the server has to be kept up-to-date by your sysadmin. Starting with version 2.5.0, the client will show a warning message if you connect to an outdated or unsupported server: Because Earlier Versions Are Not Maintained Anymore, Only ownCloud 10.0.0 or Higher Is Supported So if you encounter such a message, you should ask your administrator to upgrade ownCloud to a secure version. An important feature of the ownCloud Client is checksumming – each time you download or upload a file, the client and the server both check if the file was corrupted during the sync. This way you can be sure that you don’t lose any files. There are servers out there which don’t have checksumming implemented on their side, or which are not tested by ownCloud’s QA team. They can’t ensure file integrity, they have potential security issues, and we can’t guarantee that they are compatible with the ownCloud Desktop Client. 32 | Some Files Are Continuously Uploaded to the Server, Even When They Are Not Modified
We Care About Your Data and Want It to Be Safe
That’s why you see this warning message, so you can evaluate your data security.
Don’t worry – you can still use the client with an unsupported server, but do so at your
own risk.

There Was a Warning About Changes in Synchronized
Folders Not Being Tracked Reliably
On Linux, when the synchronized folder contains a high number of subfolders, the
operating system may not allow for enough inotify watches to monitor the changes in
all of them.

In this case the client will not be able to immediately start the synchronization process
when a file in one of the unmonitored folders changes. Instead, the client will show the
warning and manually scan folders for changes in a regular interval (two hours by
default).

This problem can be solved by setting the fs.inotify.max_user_watches sysctl to a
higher value and can usually be done either temporarily:

  echo 524288 > /proc/sys/fs/inotify/max_user_watches.

or permanently by adjusting /etc/sysctl.conf.

I Want to Move My Local Sync Folder
The ownCloud desktop client does not provide a way to change the local sync folder
directly. However, it can be done in two ways:

1. Copy the folder and avoid a full re-sync:
   a. Stop the client and edit the localPath= line in the configuration file according
      your needs.
   b. Copy (or move) all your data from the current to the new location manually and
      start the client.
2. Create a new sync connection with a new location:
   a. Remove the existing connection which syncs to the old directory.

      To do so, in the client UI, which you can see below, click the drop down menu
      Account › Remove.

           There Was a Warning About Changes in Synchronized Folders Not Being Tracked Reliably | 33
This will display a "Confirm Account Removal" dialog window. If you’re sure,
click [Remove connection].
b. Add a new connection which syncs to the desired directory.
Click the drop-down menu Account › Add new.
This opens the ownCloud Connection Wizard, which you can see below, but with
an extra option. This option provides the ability to either keep the existing data
(synced by the previous connection) or to start a clean sync (erasing the existing
data).
Be careful before choosing the "Start a clean sync" option. The
old sync folder may contain a considerable amount of data,
ranging into the gigabytes or terabytes. If it does, after the client
creates the new connection, it will have to download all of that
information again.
Instead, first move or copy the old local sync folder, containing a
copy of the existing files, to the new location. Then, when
creating the new connection choose "keep existing data" instead.
The ownCloud client will check the files in the newly-added sync
folder and find that they match what is on the server and not
need to download anything.
Make your choice and click [Connect…] This will then lead you through the
Connection Wizard, just like when you set up the previous sync connection, but
giving you the opportunity to choose a new sync directory.
I Want to Change My Server URL
Since changing server urls is a potentially dangerous operation the ownCloud desktop
client does not provide a user interface for this change. Typically, server url changes
should be implemented by serving a permanent redirect to the new location on the old
url. The client will then permanently update the server url the next time it queries the
old url.
34 | I Want to Change My Server URLFor situations where arranging for a redirect is impossible, url changes can be done by
editing the config file. Before doing so make sure that the new url does indeed point to
the same server, with the same users and the same data. Then go through these steps:
1. Shut down the ownCloud client.
2. Locate the configuration file
3. Open it with a text editor.
4. Find your old server url and adjust it.
5. Save the file and start the ownCloud client again.
I Want to Change My Server URL | 35Advanced Usage
In this section, you find information about advanced usage.
Command Line Options
Introduction
Depending on your operating system, you can start the ownCloud client from the
command line by typing owncloud or owncloud.exe. You may need to change to the
directory of the binary first. When starting owncloud manually, you can add options to
this command.
List Options
To get the list of options, run the following example command:
owncloud -h
or
owncloud --help
Use Options
Option Description
--logwindow Opens a window displaying log output.
-s --showsettings Show the settings dialog while starting
-q --quit Quit the running instance
--logfile Write log output to the file specified. To write to stdout,
specify - as the filename.
--logdir Writes each synchronization log output in a new file in the
specified directory.
--logexpire Removes logs older than the value specified (in hours).
This command is used with --logdir.
--logflush Clears (flushes) the log file after each write action.
--logdebug Also output debug-level messages in the log equivalent to
setting the environment variable QT_LOGGING_RULES =
"qt.=true;.debug=true".
--confdir Uses the specified configuration directory.
Configuration File
Introduction
The ownCloud Client uses a configuration file. It has several sections for particular
settings. You will find more sections in the configuration file than described here. Do
not change any of those settings except support advises you to do so.
Location of the Configuration File
The location of the configuration file depends on the operating system used. You can
locate this configuration file as follows:
36 | Command Line OptionsSystem Location
Linux $HOME/.config/ownCloud/owncloud.cfg
Microsoft %APPDATA%\ownCloud\owncloud.cfg
Windows
macOS $HOME/Library/Preferences/ownCloud/owncloud.cfg
The configuration file contains settings using the Microsoft Windows .ini file format.
You can overwrite changes using the ownCloud configuration dialog.
Use caution when making changes to the ownCloud Client
configuration file. Incorrect settings can produce unintended results.
Section [ownCloud]
Variable Default Meaning
remotePollInterval 30000 Specifies the poll time for the remote repository
in milliseconds.
forceSyncInterval 7200000 The duration of no activity after which a
synchronization run shall be triggered
automatically.
fullLocalDiscoveryInte 3600000 The interval after which the next synchronization
rval will perform a full local discovery.
notificationRefreshInt 300000 Specifies the default interval of checking for new
erval server notifications in milliseconds.
Section [General]
Variable Default Meaning
chunkSize 10000000 Specifies the initial chunk size of uploaded files in
(or 10 MB) bytes. The client will dynamically adjust this size
within the maximum and minimum bounds (see
below).
maxChunkSize 100000000 Specifies the maximum chunk size of uploaded
(or 100 files in bytes.
MB)
minChunkSize 1000000 Specifies the minimum chunk size of uploaded
(or 1 MB) files in bytes.
targetChunkUploadDu 60000 Target duration in milliseconds for chunk uploads.
ration (1 minute) The client adjusts the chunk size until each chunk
upload takes approximately this long. Set to 0 to
disable dynamic chunk sizing.
promptDeleteAllFiles true If a UI prompt should ask for confirmation if it
was detected that all files and folders were
deleted.
crashReporter true Whether to show the crash reporter when a crash
occurs.
timeout 300 The timeout for network connections in seconds.
Configuration File | 37Variable Default Meaning
moveToTrash false If non-locally deleted files should be moved to
trash instead of deleting them completely. This
option only works on linux
showExperimentalOpt false Whether to show experimental options that are
ions still undergoing testing in the user interface.
Turning this on does not enable experimental
behavior on its own. It does enable user interface
options that can be used to opt in to experimental
features.
Section [Proxy]
Variable Default Meaning
host 127.0.0.1 The address of the proxy server.
port 8080 The port were the proxy is listening.
type 2 * 0 for System Proxy
* 1 for SOCKS5 Proxy
* 2 for No Proxy
* 3 for HTTP(S) Proxy
Environment Variables
Introduction
The behavior of the client can also be controlled using environment variables.
The value of the environment variables override the values in the
configuration file.
Most environment variables only exist for debugging or testing. They
are not officially supported and may change from version to version. If
you end up relying on a setting only available through an environment
variable, please create a bug report.
Available Environment Variables
Setting Default Description
OWNCLOUD_CHUNK_ 10000000 Specifies the initial chunk size of uploaded files in
SIZE (or 10 MB) bytes. The client will dynamically adjust this size
within the maximum and minimum bounds (see
below). To disable chunking completely, set
OWNCLOUD_CHUNK_SIZE=0 .
OWNCLOUD_MAX_CH 100000000 Specifies the maximum chunk size of uploaded
UNK_SIZE (or 100 files in bytes.
MB)
OWNCLOUD_MIN_CHU 1000000 Specifies the minimum chunk size of uploaded
NK_SIZE (or 1 MB) files in bytes.
38 | Environment VariablesSetting Default Description
OWNCLOUD_TARGET_ 60000 Target duration in milliseconds for chunk uploads.
CHUNK_UPLOAD_DUR The client adjusts the chunk size until each chunk
ATION upload takes approximately this long. Set to 0 to
disable dynamic chunk sizing.
OWNCLOUD_CHUNKIN depend on Force-enable ("1") or force-disable ("0") the NG
G_NG server chunking algorithm.
capability
OWNCLOUD_NO_TUS Set to any value to disable uploads using the tus
protocol
OWNCLOUD_TIMEOUT 300 The timeout for network connections in seconds.
OWNCLOUD_CRITICAL 50*1000*1 The minimum disk space needed for operation. A
_FREE_SPACE_BYTES 000 bytes fatal error is raised if less free space is available.
OWNCLOUD_FREE_SP 250*1000* Downloads that would reduce the free space
ACE_BYTES 1000 bytes below this value are skipped. More information
available under the "Low Disk Space" section.
OWNCLOUD_MAX_PA 6 Maximum number of parallel jobs.
RALLEL
OWNCLOUD_BLACKLI 25 Minimum timeout, in seconds, for blacklisted
ST_TIME_MIN files.
OWNCLOUD_BLACKLI 24*60*60 Maximum timeout, in seconds, for blacklisted
ST_TIME_MAX (or one files.
day)
OWNCLOUD_HTTP2_E depend on Force-enable ("1") or force-disable ("0") HTTP2
NABLED Qt version support. Note that HTTP2 use also depends on
whether the server supports it.
OWNCLOUD_MINIMAL unset If set a minimal tray menu is used. Helpful if a
_TRAY_MENU platform’s tray has problematic behavior.
OWNCLOUD_TRAY_UP 0 Set to "1" to allow the tray menu to be updated
DATE_WHILE_VISIBLE while it’s visible to the user.
OWNCLOUD_FORCE_T unset Set to "1" to reestablish the tray icon every time
RAY_SHOW_HIDE the menu changes.
OWNCLOUD_FORCE_T unset Set to "1" if single tray clicks sometimes get
RAY_FAKE_DOUBLE_C recognized as double clicks.
LICK
OWNCLOUD_FORCE_T unset Set to "1" if the tray menu is flickering while
RAY_MANUAL_VISIBILI opened.
TY
OWNCLOUD_FORCE_T unset Set to "1" if the tray menu sometimes contains
RAY_NO_ABOUT_TO_S stale entries.
HOW
OWNCLOUD_FULL_LO 3600000 Maximum time in milliseconds that fast local
CAL_DISCOVERY_INTE (1 hour) discovery is allowed for after a full local
RVAL discovery. Set to 0 to always require full local
discovery. Set to -1 to never require full local
discovery.
Environment Variables | 39Setting Default Description
OWNCLOUD_SQLITE_J depends on Set a specific sqlite journal mode.
OURNAL_MODE filesystem
OWNCLOUD_SQLITE_L EXCLUSIV Set a specific sqlite locking mode.
OCKING_MODE E
OWNCLOUD_SQLITE_T unset Set the given temp_store on the sqlite database.
EMP_STORE
OWNCLOUD_DISABLE unset Set to disable all file checksum computations.
_CHECKSUM_COMPUT
ATIONS
OWNCLOUD_DISABLE unset Set to disable computing checksums for uploaded
_CHECKSUM_UPLOAD files.
OWNCLOUD_CONTEN SHA1 Select the file checksumming algorithm.
T_CHECKSUM_TYPE "Adler32", "MD5", "SHA1", "SHA256", "SHA3-
256" are valid, but not all have server support.
OWNCLOUD_UPLOAD_ unset Set to "1" to enable uploading conflict files to the
CONFLICT_FILES server.
QT_LOGGING_RULES unset Set to "sync.httplogger=true" to enable verbose
http logging. See also troubleshooting.adoc for
more.
The Command Line Client
Introduction
The ownCloud Client packages contain a command line client, owncloudcmd, that can
be used to synchronize ownCloud files to client machines.
owncloudcmd performs a single sync run and then exits the synchronization process.
In this manner, owncloudcmd processes the differences between client and server
directories and propagates the files to bring both repositories to the same state.
Contrary to the GUI-based client, owncloudcmd does not repeat synchronizations on
its own. It also does not monitor for file system changes.
To invoke owncloudcmd, you must provide the local and the remote repository URL
using the following command:
owncloudcmd [OPTIONS...] sourcedir owncloudurl.
sourcedir is the local directory and owncloudurl is the server URL. Other command line
switches supported by owncloudcmd include the following:
Switch Description
--user, -u [user] Use user as the login name.
--password, -p [password] Use password as the password.
-n Use netrc (5) for login.
--non-interactive Do not prompt for questions.
--silent, --s Inhibits verbose log output.
40 | The Command Line ClientYou can also read