Respondus 4.0 User Guide for the Blackboard
←
→
Page content transcription
If your browser does not render page correctly, please read the page content below
Respondus 4.0
               User Guide for the Blackboard

Getting Started
      Computer Requirements
      Installation & Setup
      Activation Password
      Choose a Learning management system (LMS) Personality
      On-line Help

Start Menu
       Overview
       Opening a File
       Creating a File
       Test Bank Network
       Exam Wizard
       Importing Questions to Respondus
       Archive Wizard
       Changing the LMS Personality and Converting Files

Editing a File
      Overview
      Common Features Across all Question Types
      Question List and Expanded View
               - Multiple Choice
               - True and False
               - Essay
               - Matching
               - Ordering
               - Fill in the Blank
               - Multiple Answers
               - Calculated
               - Jumbled Sentence
               - Either/Or
               - File Response
               - Opinion Scale
               - Numeric
               - Quiz Bowl
               - Fill in Multiple Blanks
      Adding Bold, Italics, Underline, and Super/Subscript
      Media Wizard
      HTML Editor
      Equation Editor
      Power Edit
               - Tables
               - Fonts, Formatting and Lists
      Spell Check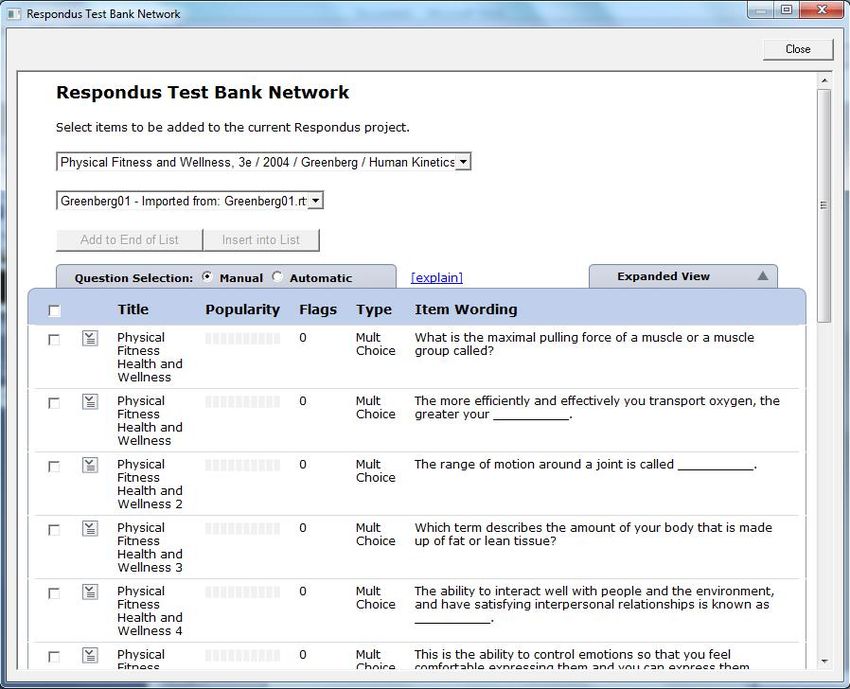
Keyword Searches

Settings
      Overview
      Random Blocks
      Settings
      How to Save New Default Settings

Preview & Publish
      Overview
      Preview
      Publish to Blackboard
      Printing an Exam

Retrieval and Reports
      Overview
      Retrieving Reports for Exams/Surveys
      Retrieving an Exam, Survey or Pool from Blackboard
      Download Data

Other Tools & Features
      Overview
      Save As Copy
      Save As StudyMate Class Format
      Preferences
      Update License
      Cleanup HTML Tool
      Question Title Tool
      Check for Update

Disclaimer of Warranty

Copyright, Ownership, and Use of Software

                                       2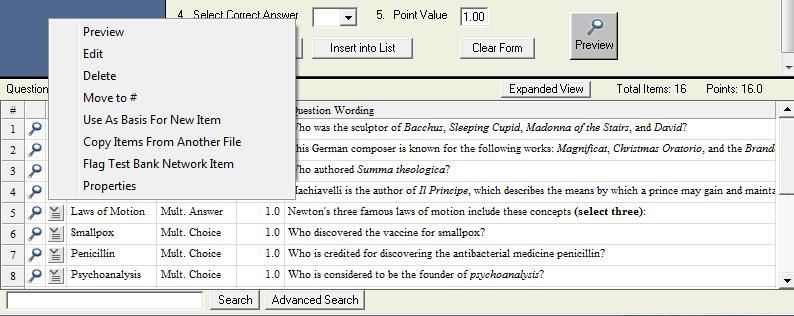
Getting Started
      Computer Requirements
      Installation & Setup
      Activation Password
      Choose a Learning management system (LMS) Personality
      On-line Help

Respondus is a powerful tool for creating and managing exams that can be
printed to paper or published directly to ANGEL, Blackboard, Desire2Learn,
eCollege, WebCT, and other eLearning systems. Exams can be created offline
using a familiar Windows environment, or moved from one eLearning system to
another.

Computer Requirements
Respondus requires Windows XP or higher, 32 MB of RAM, 6 MB of free hard disk
space, and a 800x600 monitor (1024x768 recommended). Respondus is generally
used in conjunction with a learning management system such as ANGEL,
Blackboard, eCollege, WebCT, and can also be used with IMS QTI-compliant
assessment systems.

Installation and Setup
The Respondus installation program can be downloaded from the Respondus
website (www.respondus.com). To begin the installation process, locate the
Respondus4.exe file once it is downloaded to your hard drive. Double-click the
file to start the Respondus installation program and follow the instructions on
the screen. Once Respondus is installed, start the program by double-clicking the
Respondus icon that appears on the Windows desktop. Or, follow these steps to
start the software.

      Click [Start] from the Windows desktop
      Click [Programs]
      Click [Respondus]
      Click [Respondus X.x]

The first time you start Respondus (and each time thereafter until the program is
registered), you will be presented with a screen that provides the “Product ID#”.
The Product ID# is used to obtain the Activation Password (see below) which is
needed to complete the installation.

Activation Password
Once the Respondus installation program is finished, you will need to obtain a
password from www.respondus.com to activate the installation. Be sure to have
the “Product ID#” (see previous paragraph) readily available. After you have
directed your browser to www.respondus.com, go to the “Registration” section.
You have the choice of purchasing a permanent activation password or obtaining

                                        3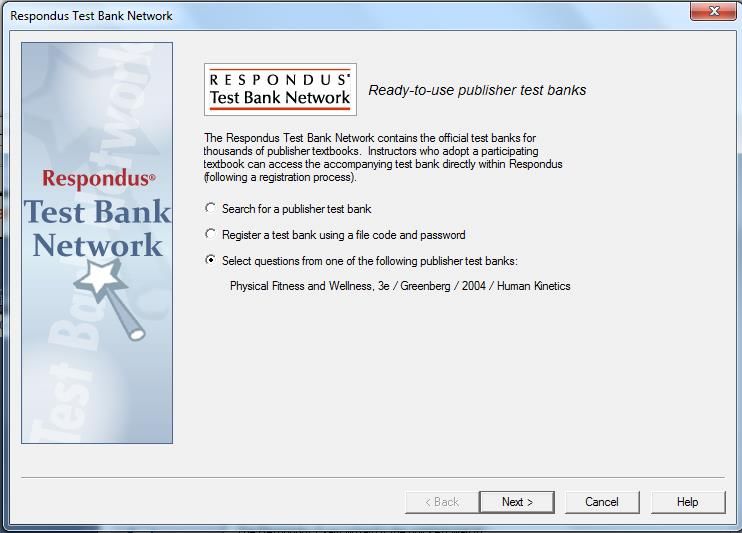
a 30-day trial password. In both cases you will be required to enter a valid e-mail
address and the Product ID# that displays on the opening screen of Respondus.
Once the information is submitted, the activation password is immediately sent
to the e-mail address you specified.

Once the password is received by e-mail, it must be entered into the Respondus
program. If you haven’t done so already, start Respondus and then enter the
password when prompted (you may want to “copy and paste” the password from
the e-mail message in order to prevent typing mistakes). Click [OK] to continue.
The Respondus software is now activated, either permanently or for a 30-day
trial period.

Choose a Learning management system (LMS) Personality
Immediately after the Respondus software is activated, you are prompted to
select a Learning management system (LMS) “personality.” Respondus offers
various user environments (called personalities) that parallel the features and
terminology used by specific learning management systems, such as Blackboard,
eCollege and WebCT. You can change the “personality” at any time in Respondus
from the Start menu.

On-line Help
Respondus includes a full-featured help system that includes an index and
context-sensitive help. To view the on-line help, choose “Help Topics” from the
pull-down Help menu and select a topic. You can also press the F1 key from
within Respondus to obtain context-sensitive help. Throughout the program you
will additionally see small buttons having a “?” symbol. When the button is
clicked, information on that particular option or task is provided.

If you encounter a question that is not answered in the on-line help or in this
manual, you are encouraged to visit the “Support” section of our web site
(www.respondus.com). There you will find Frequently Asked Questions (FAQ)
and other resources.

The remainder of this user manual is organized according to the five menus used
in the “Blackboard” personality of Respondus: Start, Edit, Settings, Preview &
Publish, and Retrieval & Reports.

                                         4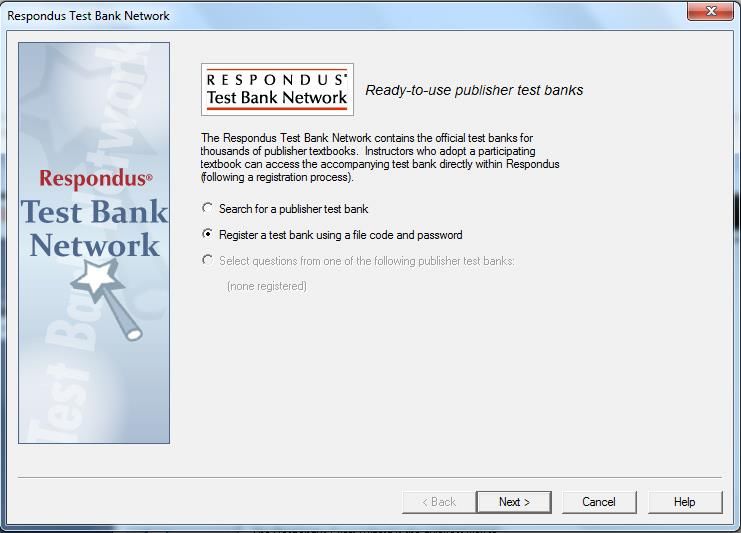
Start Menu (Blackboard Personality)
       Overview of Start Menu
       Opening a File
       Creating a File
       Test Bank Network
       Exam Wizard
       Importing Questions to Respondus
       Archive Wizard
       Changing the LMS Personality and Converting Files

Overview of Start Menu
The Start menu provides the ability to Open a Respondus file, Create a new file,
access publisher test banks from the Respondus Test Bank Network, and Import
questions from a MS Word or text file. The Exam Wizard provides an easy way to
create an exam from an existing set of questions. The Archive Wizard allows you
to archive an exam or survey, including all media components and equations,
with a single click.

Opening a File
From the Start menu, click the Open button. The following window will appear:

Highlight an exam or survey project by clicking it once. To obtain information on
the project, select either of the two center buttons located to the top right of
the file list. Select the “Item List” button (right of center) to view a list of the
questions that are available in the highlighted project. To preview a particular
question, click the “title” of the question. To open a highlighted project, click the
[Open] button at the bottom of the window. (Double-clicking a file name will
also open it.)

                                          5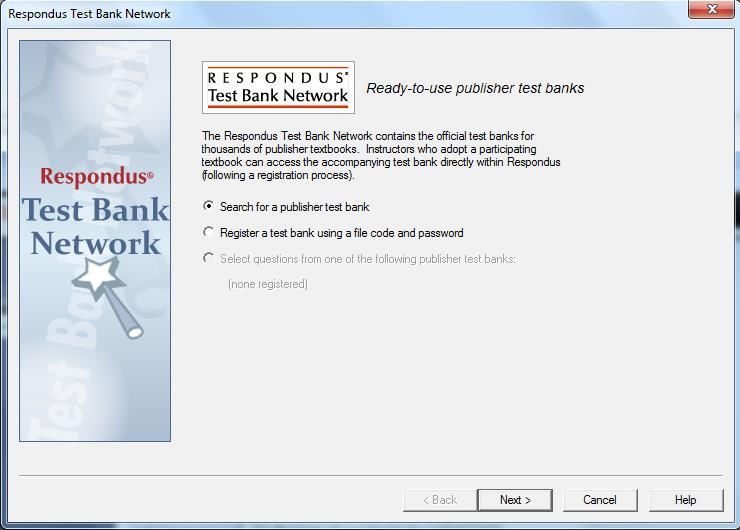
Respondus allows projects to be organized within folders. For example, you can
place the exams for a particular course within a folder rather than having exams
for all courses listed together. To create a new folder, click the “Create New
Folder” button located second from left. To navigate down a level within a
folder, double-click on the folder itself. To navigate up a level, click the “Up One
Level” leftmost button on the row.

The [Browse…] button, located on the lower left side of the window, allows you
to find a Respondus file (.rsp) located elsewhere on your hard drive and copy the
file to the “c:\Respondus Projects” folder. It does not move the file or open it
directly, rather, it creates a new “Projects” folder based on that file. The
[Browse…] button can also be used to locate a Respondus “archive” file (.rsa or
.rpa) and to restore it to the Projects directory (see Restoring an Archive File).

The [Search] button allows a file to be searched prior to opening it (it can only be
used if the “Item List” button is selected). Searching is particularly useful if you
are trying to locate a file that contains a particular question or set of questions.

The [Test Bank Network] button is used to start the Respondus Test Bank
Network wizard. The Respondus Test Bank Network contains the official test
banks for thousands of publisher textbooks. Instructors who adopt a
participating textbook can access the accompanying test bank directly within
Respondus (following a registration process). For complete details, see the
“Respondus Test Bank Network” at www.respondus.com.

Once a file is opened, the screen automatically changes to the Edit menu.

Creating a File
From the Start menu, select the Create button to create a new file. You are first
prompted to enter a file name and a description for the file. Then you must
indicate whether the file is an “Exam” or a “Survey.” The type of file you create
(or open) will determine the features that are available throughout the program.
Click [OK] when you are finished. Once a file is created, you are automatically
switched to the Edit menu. This is where you add questions to the file.

Test Bank Network
The Respondus Test Bank Network contains the official test banks for thousands
of publisher textbooks. Instructors who adopt a participating textbook can
access the accompanying test bank from within Respondus by selecting the Test
Bank Network button on the Start menu.

Note: all interactions with the Test Bank Network require an internet
connection.

The Test Bank Network wizard allows instructors to search for a publisher test
bank, submit a request form for the test bank, register a test bank using the

                                          6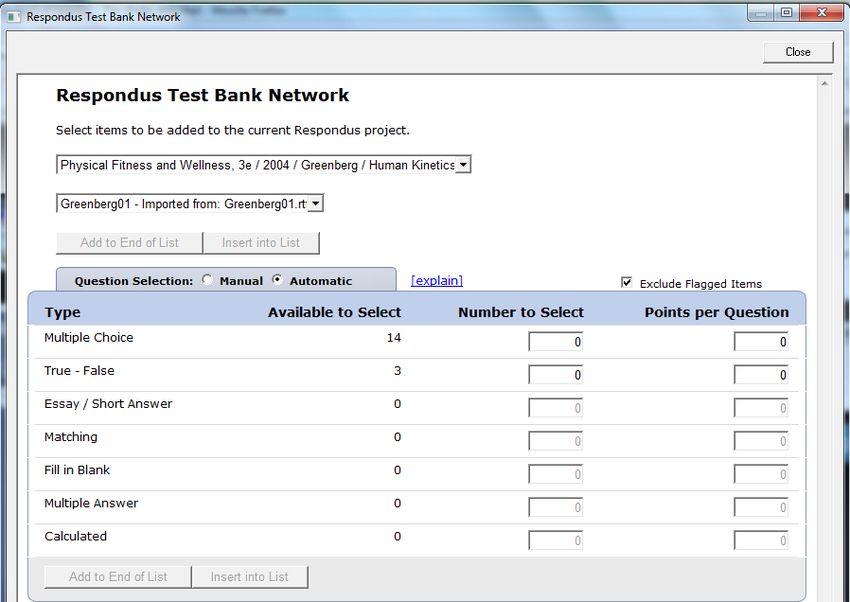
registration code and password sent by the publisher, and finally, select
questions from the test bank for use in a Respondus file.

The first selection “Search for a publisher test bank” will open a browser window
and enable instructors to search for textbooks adopted for their classes. Once a
textbook is located, a request form is filled out and submitted. This information
is sent directly to the publisher for verification.

The textbook publisher will send an email to the instructor containing a “file
code” and password for registering the test bank using the Respondus software.
The instructor should then return to the Test Bank Network wizard in
Respondus to register the test bank, which is the second option listed: “Register
a test bank using a file code and password”.

                                        7
In the next step of the wizard, enter the “File Code” and “File Password” (if
required) provided by the publisher, along with the information requested. This
will register the test bank with this copy of Respondus. It won’t be necessary to
repeat the process on this computer.

Once the test bank has been registered in Respondus, the third option on the
Test Bank Network wizard become available: “Select question from one of the
following publisher test banks:”.

                                        8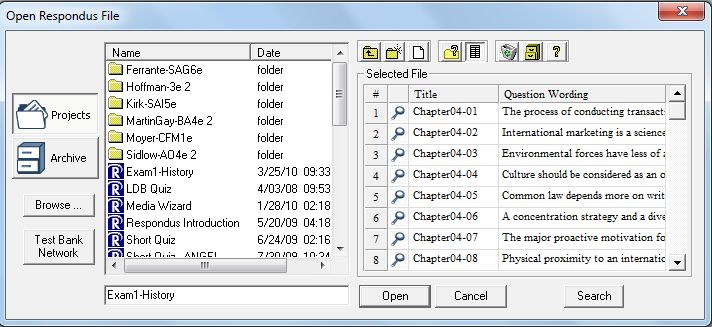
The next page of the wizard allows the selection of a registered test bank and
then a specific chapter file from the test bank.

Questions can be manually selected or automatically selected depending on the
Question Selection toggle. With Manual selection, individual test bank
questions can be previewed and copied to the current Respondus project. To do
so, simply select the box to the left of the questions wanted and click the “Add to
End of List” or “Insert into List” button.

                                         9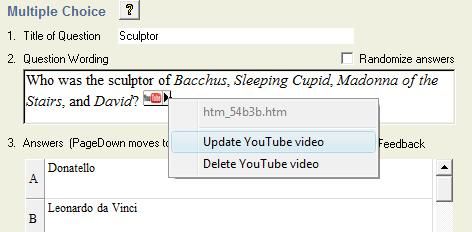
Each question listed has a context menu that provides the following operations:

Preview – Preview the question.
Add to End of List – Add this question to the end of the list.
Insert into List – Insert this question into a specific point in the list.
Flag this item – Flag this question as being incorrect or unclear.
Properties – View the properties for the question.

Questions that have been flagged (by any instructor using the test bank) will
appear with a flag next to the item in the list. The contents of the flag can be
viewed by hovering the mouse over the flag or clicking it.

                                           10
When Automatic selection is used, the number of available questions of each
question type is shown. Enter the number of questions to be selected for each
question type and the point value to be assigned to it.
Questions copied from the test bank using either Manual or Automatic selection
will be copied to the currently open Respondus file.
11Exam Wizard
The Exam Wizard helps familiarize new users with the basic functions of
Respondus. In addition, the Exam Wizard is an easy way to create an exam using
questions contained in one or more Respondus files. The Exam Wizard allows
questions to be randomly selected from the files and point values can be
assigned across an entire question type. (The discussion below primarily relates
to Exam files. Fewer features are available if the file being created or appended
is a Survey file.)
To begin, select the Exam Wizard button from the Start menu. The first page of
the wizard offers three choices. Select the top choice that states “Create a new
exam and then copy questions to it from other Respondus files” and click [Next].
The next page of the wizard requires you to provide a name and description for
the exam being created. Click [Next] once this information has been entered. The
next page of the wizard prompts you to select the Respondus files from which
the questions will be copied. Highlight a file and click the [Select] button. Repeat
this process until all files from which you want to select questions are selected.
Click [Next] to continue.
The next page of the wizard prompts you to select one of the source files chosen
in the previous step. You then have the choice of using Automatic Selection or
Manual Selection. When Automatic Selection is chosen, the current number of
questions for each question type is displayed in the “Available to Select” column.
In the next column, enter the number of questions you want selected for each
question type. Then enter the point values to be assigned to each question type
(this step is optional--if you leave the “points per question” field blank, the point
values from the original file will be used). When all entries are finished, click
either the [Add to End of List] button or the [Insert Into List] button. Repeat
this process for each source file.
The Manual Selection option allows the questions for each file to be viewed
before making a selection. In fact, you can preview individual questions by
clicking the title of a question, or by searching the entire list of questions by
clicking the [Keyword Search] button at the top right. To select questions from
this list, simply click in the column furthest to the left--a checkmark will appear
next to the question. When you are finished with your selections, click either the
[Add to End of List] button or the [Insert Into List] button. Repeat this process
for each source file.
The Automatic Selection and Manual Selection options may be combined. You may
also reselect a file from the pull-down list and choose additional questions from
it. However, Respondus will prevent you from selecting a question more than
once.
Once questions have been added to the list at the bottom of the screen, you may
edit the point values manually. To delete a question from the bottom list, or to
12move it to a different location in the list, click the blue title and select the desired
option. Finally, notice that a tally of the total number of questions and point
values appears at the top right corner of the lower grid.
The next and final page of the wizard is self-explanatory. It provides a variety of
options as to what can occur next. For example, to edit questions in the file, you
would select the option to go to the Edit menu. To preview or print the exam,
you would select that option, and so on.
Click [Finish] to complete the wizard. (Note: Respondus does not permit you to
copy questions from a Survey file to an Exam file. Also, some features in this task
are disabled when the file being created is a Survey.)
Importing Questions
Respondus allows you to import multiple choice, true-false, essay, fill in the
blank, fill in multiple blanks, matching, ordering, jumbled sentence, and multiple
answer questions from a file. The questions must be organized in a format that is
acceptable to Respondus and the file must be stored in one of the following
formats: plain text (.txt), rich-text (.rtf), MS Word (.doc and .docx), tab/comma
delimited (.csv) format, StudyMate Class format (.zip and .xml).
Note: Importing questions from the Microsoft Word .docx format requires that
Word 2007 or Word 2010 be installed on the same computer. The docx format
has better support for importing text with formatting like auto-numbers and
auto-letters.
The formatting required for all file formats except for .csv files is described in the
section entitled “The Standard Format for Importing Documents.” The formatting
required for .csv files is described in the section “Importing Tab/Comma Delimited
Files (CSV)”. Once the file is in the Standard Format, follow these steps to import
it into Respondus.
Starting the Import
From the Start menu, select the [Import Questions] task. The following dialog
will appear:
13Step 1
The first step is to select the type of file that will be imported. The “Standard
Format” for organizing questions is the same for Plain Text (.txt), Rich Text (.rtf)
files, and Microsoft Word (.doc and .docx) files. Files that are in rich text (.rtf) and
MS Word (.doc and .docx) format will retain some of the enhanced question
formatting such as bold, italic, underline, superscript, and subscript. Embedded
graphics can only be imported if the file is in Microsoft Word (.doc or .docx)
format, although an alternative method is available for .rtf and .txt files (see
Importing Images below). Note that certain types of enhanced importing cannot
be imported. If the enhanced formatting causes a problem with an import,
consider saving the file to rich text or plain text format and then try the import
again.
Next, use the [Browse] button to locate and select the file to be imported.
14Images embedded in MS Word files will import automatically. However, if images
are being imported with csv, rich-text, or txt files (see Importing Images below),
browse to the folder that contains those images.
Step 2
Specify whether the questions should be appended to the currently open file or
whether to create an entirely new file. If you select the second option you will
need to enter the name of the file to be created and indicate whether the file
should be an “Exam” or “Survey.”
Each question being imported will have a “title”. If you don’t specify a title for
each question in the text file itself (discussed below), Respondus will
automatically use the first 20 characters of the question wording as the question
title. Alternatively, titles can be based on a specific “stem” (or string of text)
which will then be followed by consecutive numbering starting with 001. For
example, if you select the “Use stem...” checkbox and enter the text “Chapter1-”,
the title for the first question being imported will be Chapter1-001, the title for
the second question will be Chapter1-002, and so on. (You are not required to
enter a stem phrase--this feature is entirely optional.)
Step 3
Click the [Preview] button to preview the file being imported and to see if there
are any warning messages. If warning messages are shown at the bottom of the
screen, you need to determine whether to make changes to the text file or
whether to continue with the import.
Note that some warning messages can be ignored. For instance, Respondus
might give the warning “2 duplicate titles were changed by adding `2’ (or 3, 4...)”.
This is simply indicating that two of the question titles for the file being imported
are identical (remember, question titles are generated from the first 20
characters of the question wording). Since two question titles in Respondus
cannot be identical, the warning message is simply indicating that the duplicate
title is having a number such as “2” added to the end of it to make it distinct. This
change does not affect the question itself (titles aren’t displayed during an
exam), so most users can safely ignore this warning.
Step 4
If you are satisfied with how the results look in Preview, click [Finish] to
complete the import. The Respondus file has now been created or appended.
Switch to the Edit menu to modify the file, or go to the Preview tab to view the
file using a browser-like window.
The Standard Format for Importing
Respondus will import multiple choice, true-false, essay, fill in the blank, and
multiple answer questions. The plain text, rich-text, or MS Word file must be
15organized in a “Standard Format” before it can be imported into Respondus. The
Standard Format for multiple choice questions has required elements and optional
elements, each of which is described below. This section is followed by an
explanation of the formatting required for true/false, essay, fill in the blank, and
multiple answer questions.
Required Elements (Multiple Choice)
Each question must begin with a question number, followed by either a period “.”
or a parentheses “)”.
Example: 3)
Example: 3.
The question wording must follow the question number. (Note: at least one space
should be between the question number and the question wording.)
Example: 3) Who determined the exact speed of light?
Example: 3. Who determined the exact speed of light?
Each answer must begin with a letter (A-T) followed by a period “.” or a
parentheses “)”.
Example: 3) Who determined the exact speed of light?
a. Albert Einstein
b. Albert Michelson
c. Thomas Edison
d. Guglielmo Marconi
Optional Elements (Multiple Choice)
A “title” can be imported with each question. If a title is not provided for a
question, the first 20 characters from the question wording will be used as the
question title. Titles must be placed at the beginning of a question and begin
with “Title:” followed by the actual text for the title. If the title exceeds 20
characters, the remaining characters will be dropped during the import.
Example: Title: Speed of Light
3) Who determined the exact speed of light?
a. Albert Einstein
b. Albert Michelson
c. Thomas Edison
d. Guglielmo Marconi
16For imports into an exam file, correct answers can be indicated in two ways. First,
you may place an asterisk (*) directly in front of the answer choice (do not put a
space between the asterisk and the answer choice).
Example: Title: Speed of Light
3) Who determined the exact speed of light?
a. Albert Einstein
*b) Albert Michelson
c) Thomas Edison
d. Guglielmo Marconi
The second option is to place a list of correct answers at the end of the file. The
list must begin with the word “Answers:” and must be positioned at the end of
the file. (Note: Any text after the answer list will be ignored.)
Example: Answers:
1. A
2. C
3. B
If neither method is used to select a correct answer, Respondus will
automatically select the letter “A” as the correct answer. Don’t worry, you will be
warned if a question does not have an answer selected for it prior to completing
the import. (Note that survey files should not have “correct answers” indicated. If
you are importing questions into a survey file, any correct answer designations
will be ignored.)
With an Exam file, general feedback can be imported by placing the tilde “~”
symbol in front of the feedback for a correct answer. The @ symbol can be used
to indicate the feedback for incorrect answers. There must be at least one space
to the right of the ~ and @ symbols and the text you want displayed for the
feedback. The feedback must appear before the answer choices.
Example: Title: Speed of Light
3) Who determined the exact speed of light?
~ Yes. Albert Michelson won the Nobel Prize for Physics
for determining the exact speed of light.
@ No. The correct answer is Albert Michelson, who won
the 1907 Nobel Prize for Physics for determining the
exact speed of light.
17a. Albert Einstein
*b) Albert Michelson
c) Thomas Edison
d. Guglielmo Marconi
(Note: if you are importing questions into a survey file, all feedback designations
will be ignored.)
To import feedback for individual answer choices of multiple-choice questions
(only available with Blackboard 6 and higher), place the feedback immediately
after the answer choice and begin the line with the @ symbol. There must be at
least one space between the @ symbol and the feedback text.
Example: Title: Speed of Light
3) Who determined the exact speed of light?
a. Albert Einstein
@ No. Albert Michelson determined the exact speed
of light.
*b) Albert Michelson
@ Yes. Albert Michelson won the Nobel Prize for Physics
for determining the exact speed of light.
c) Thomas Edison
@ No, Thomas Edison did not determine the exact
speed of light.
d. Guglielmo Marconi
@ No. Marconi did not discover the exact speed of light,
but he did win the Nobel Prize for Physics for his work
with radio waves.
Point values can be set for each question or for a group of questions. Points are
set by adding “Points:” followed by a space and the point value. The points value
is used for the next question and all following questions until a new point value is
set.
Example: Points: 2.5
3) Who determined the exact speed of light?
....
4) Who determined the exact speed of sound?
18Both questions 3 and 4 will be given a value of 2.5 points.
Importing True and False Questions
The process of importing “true and false” questions is similar to that used for
importing multiple choice questions (see above). Both of the following examples
are valid ways to format a true and false question for importing purposes.
Example: 3) Albert Michelson determined the exact speed of
light?
*a) True
b) False
Example: 3) Albert Michelson determined the exact speed of
light?
*a. T
b. F
It’s important to note that the “True” (or “T”) answer choice must be listed prior
to the “False” (or “F”) answer choice in order for Respondus to recognize it as a
true and false question type. (If “False” appears first in the list, the question will
be imported as a “multiple choice” question).
To include a “title” or “feedback” with the true and false question, follow the
same formatting rules described above for multiple choice questions. For
instance,
Example: Title: Light speed
3) Albert Michelson determined the exact speed of light?
~ Correct. Albert Michelson won the Nobel Prize for
Physics for determining the exact speed of light.
@ Incorrect. Albert Michelson determined the exact
speed of light and won the 1907 Nobel Prize for Physics
for his efforts.
*a. True
b. False
A second way to designate a correct answer for a true and false question is to
place it in a list of correct answers at the end of the file. The list must begin with
the word “Answers:” and must be positioned at the end of the file. (Note: Any
19text after the answer list will be ignored.) The correct answer for a true and false
question can be designated in three ways: (1) the complete word “True” or
“False,” (2) the letter “T” or “F,” or (3) the alphabetical letter “A” (for true) or “B”
(for false). For example, the formatting of each of the following answers is
acceptable for true and false questions in which all of the answers are “true”:
Example: Answers:
1. True
2. T
3. A
Importing Essay Questions
The logic for importing essay questions is similar to what is described above for
Multiple Choice and True & False questions. The primary difference is that the
first line of formatting must begin with “Type: E”. This is followed by the “Title”
(which is optional), the question number, and the question wording.
Example: Type: E
Title: Michelson-Morely experiment
4) How is the Michelson-Morely experiment related to
Albert Einstein’s theory of relativity?
If you are importing an essay question into an Exam file, you can supply an
answer two different ways. First, you may provide an answer immediately after
the question wording, beginning the answer with “a.” or “a)” (without the
quotes).
Example: Type: E
Title: Michelson-Morely experiment
4) How is the Michelson-Morely experiment related to
Albert Einstein’s theory of relativity?
a) In 1887, Albert Michelson and Edward Morely carried
out experiments to detect the change in speed of light
due to ether wind when the Earth moved around the sun.
The result was negative. They found the speed of light is
always the same regardless of Earth's motion around the
sun. Scientists were puzzled with this negative result, and
they didn't know how to explain it. Albert Einstein came
up with the answer in his famous second postulate in
theory of relativity: that the speed of light (in vacuum) is
always constant and absolute, regardless of its source's
motion and observer's movement.
20The second way to supply an answer for an essay question is to place it in a list of
correct answers at the end of the file. As described above with multiple choice
questions, the list must begin with the heading “Answers:” and must be
positioned at the end of the file. The answer to an essay question should begin
with the corresponding question number, followed by either a period “.” or a
parentheses “)”. This is then followed by a space and then the answer.
Example: Answers:
1. A
2. C
3. B
4. In 1887, Albert Michelson and Edward Morely carried
out experiments to detect the change in speed of light
due to ether wind when the Earth moved around the sun.
The result was negative. They found the speed of light is
always the same regardless of Earth's motion around the
sun. Scientists were puzzled with this negative result, and
they didn't know how to explain it. Albert Einstein came
up with the answer in his famous second postulate in
theory of relativity: that the speed of light (in vacuum) is
always constant and absolute, regardless of its source's
motion and observer's movement.
5. B
Again, all answers are ignored if they are imported into survey files.
Importing Fill in the Blank Questions
Fill in the blank questions may be imported by starting the first line of formatting
with “Type: F”. This is followed by the “Title” (which is optional), the question
number, and the question wording.
Example: Type: F
Title: Who invented television?
5. Who is known as the "father of television”?
Respondus allows only one correct answer per question, but it does permit you
to enter multiple forms of that answer.
Example: Type: F
Title: Who invented television?
5. Who is known as the "father of television"?
a. Zworykin
21b. Vladimir Zworykin
c. Vladimir Kosma Zworykin
Answers can also be placed at the end of the file, using a format similar to
multiple choice questions. The only difference is that you can enter multiple
forms of an answer by repeating the question number.
Example: Answers:
1. A
2. C
3. B
4. C
5. Zworykin
5. Vladimir Zworykin
5. Vladimir Kosma Zworykin
6. B
Importing Multiple Fill in the Blanks Questions
Fill in multiple blanks questions may be imported by starting the first line of
formatting with “Type: FMB”. This is followed by the “Title” (which is optional),
the question number, and the question wording with the words to be filled in
provided in [square brackets]. The wording can include up to 10 [words] to be
filled in, each of which can have up to 20 correct answers.
Example: Type: FMB
Title: Multiple blanks
5. A [rose] by any other [name] would smell as
[sweet].
Respondus allows multiple correct answers per blank to be specified by
separating each correct answer inside the brackets with commas.
Example: Type: FMB
Title: Multiple blanks
5. A [rose, red flower] by any other [name] would smell
as [sweet, good].
General feedback can be imported by placing the tilde “~” symbol in front of the
feedback for a correct answer. The @ symbol can be used to indicate the
feedback for incorrect answers. There must be at least one space to the right of
the ~ and @ symbols and the text you want displayed for the feedback. The
feedback must appear after the question wording
Example: Type: FMB
Title: Multiple blanks
225. A [rose, red flower] by any other [name] would smell
as [sweet, good].
~ Correct. Well done.
@ Incorrect. A rose by any other name would smell as
sweet – or – A red flower by any other name would smell as
good.
Importing Matching Questions
The process of importing a “matching” question is similar to what is described
above for importing multiple choice questions, but there are some key
differences. The first line of formatting must begin with “Type: MT”. This is
followed by the “title” (which is optional), the question number, and the question
wording.
Each answer (which consists of both parts of a correct match) must begin with a
letter (a-t) followed by a period “.” or a parentheses “)”. The two parts of the
match must be separated with an “=” symbol and there should not be any hard
returns or blank lines within either parts of the answer.
Example: Type: MT
Title: Scientific discoveries
4) Match the correct name to the discovery or theory.
a. Michelson-Morely = Speed of light
b. Einstein = Theory of Relativity
c. Marconi = radio waves
Spaces before or after the “=” symbol are optional, but it is important that an
answer only uses the = symbol for the purpose of separating the two parts of the
match. If you plan to list correct answers for other questions at the bottom of
the document, simply skip the number for all questions that are of the matching
variety.
Importing Ordering Questions
Ordering questions may be imported by starting the first line of formatting with
“Type: ORD”. This is followed by the “Title” (which is optional), the question
number, the question wording, and the answer choices which must be in the
correct order.
Example: Type: ORD
Title: Presidential Order
5. Put the following presidents in order of service?
23a. George Washington
b. John Adams
c. Thomas Jefferson
d. James Madison
e. James Monroe
Each answer (which must be in the correct order) must begin with a letter (a-t)
followed by a period “.” or a parentheses “)”.
General feedback can be imported by placing the tilde “~” symbol in front of the
feedback for a correct answer. The @ symbol can be used to indicate the
feedback for incorrect answers. There must be at least one space to the right of
the ~ and @ symbols and the text you want displayed for the feedback. The
feedback must appear before the answer choices.
Example: Type: ORD
Title: Olympic Order
5. Put the following Summer Olympic host cities in
chronological order of when they hosted the Olympics?
~ Correct. You know your Olympic history.
@ Incorrect. Montreal, Moscow, Los Angeles, Seoul and
Barcelona are the correct order.
a. Montreal, Canada
b. Moscow, Soviet Union
c. Los Angeles, United States
d. Seoul, South Korea
e. Barcelona, Spain
Importing Jumbled Sentence Questions
Jumbled Sentences may be imported by starting the first line of formatting with
“Type: JUM”. This is followed by the “Title” (which is optional), the question
number, and question wording with the phrases to jumble in [square brackets].
Example: Type: JUM
Title: Jumbled Sentence
6. A [rose] by [any other name] would [smell] as
[sweet].
General feedback can be imported by placing the tilde “~” symbol in front of the
feedback for a correct answer. The @ symbol can be used to indicate the
feedback for incorrect answers. There must be at least one space to the right of
24the ~ and @ symbols and the text you want displayed for the feedback. The
feedback must appear after the question wording and before any additional
distracters. Additional distracters may be added below the question wording
and optional feedback. Distracters must begin with a letter (a-t) followed by a
period “.” or a parentheses “)”.
Example: Type: JUM
Title: Jumbled quote
6. [Dream] as if you'll [live] forever, live as if you'll [die]
tomorrow.
~ Correct. Good job.
@ Incorrect. Dream as if you’ll live forever, live as if
you’ll die tomorrow.
a. Swim
b. float
c. sink
Importing “Multiple Answers” Questions
The logic for importing questions that have multiple answers is similar to what is
described above for importing multiple choice questions. (Multiple Answers
questions are, essentially, multiple choice questions in which more than one
correct answer can -- and generally should -- be selected by the student). The
primary difference is that the first line of the formatting must begin with “Type:
MA”. This is followed by the “Title” (which is optional), the question number, and
the question wording. Correct answers are designated with an asterisk.
Example: Type: MA
3) Which of the following individuals are credited with
determining the exact speed of light?
a. Albert Einstein
*b. Albert Michelson
c. Thomas Edison
*d. Edward Williams Morley
To include a “title” or “feedback” with the Multiple Answers question, follow the
same formatting rules described above for multiple choice questions. For
instance,
Example: Title: Speed of Light
3) Which of the following individuals are credited with
determining the exact speed of light?
25~ Yes. Albert Michelson and Edward Williams Morley
collaborated on a series of experiments that eventually
led to the exact determination of the speed of light.
@ No. Albert Michelson and Edward Williams Morley
collaborated on a series of experiments that eventually
led to the exact determination of the speed of light.
a. Albert Einstein
*b. Albert Michelson
c. Thomas Edison
*d. Edward Williams Morley
A second way to designate correct answers for questions with multiple answers
is to place them in a list of correct answers at the end of the file. The list must
begin with the word “Answers:” and must be positioned at the end of the file. If a
question has been designated as a Multiple Answers type using “Type: MA”, then
correct answers can be shown in a list in one of three ways: (1) placing a blank
space between the letters representing the correct answers, (2) placing a comma
between the letters representing the correct answers, or (3) placing a comma
and a blank space between the letters representing the correct answers. For
example, the formatting of each of the following answers is acceptable for
multiple answer questions.
Example: Answers:
1. B D
2. B, D
3. B,D
Important: Once the import file is organized to the specifications described
above, it should be saved to MS Word (.doc or .docx), rich-text (.rtf) or a text (.txt)
file. It is then ready to be imported by Respondus.
Importing Images with Questions
Images embedded in MS Word files will import automatically. However, it is
possible to import images with rich-text or txt files using an alternate method.
First, be sure that the images in gif, jpg, or jpeg format and are contained in a
separate folder. Then place the following tag at each place where an image
should appear: [ img: “filename.jpg” ] . The word “filename.jpg” should be
replaced with the actual file name.
Example: 3) The interferometer, shown here [img:
“interferometer.jpg”], was
used by which of the following scientists.
26a. Albert Einstein
*b. Albert Michelson
c. Thomas Edison
d. Vladimir Zworykin
To include alternative text for ADA-compliant screen readers, place the desired
text in a second set of quotes immediately following the quotes that contain the
file name:
[ img: “interferometer.jpg” “Picture of an interferometer” ].
All images that are being imported must be placed in a single folder. During the
import process, the location of the image folder must be specified in the first
step. After the import is complete, the images will appear inline with the
question text.
Importing HTML with Questions
It is possible to import blocks of HTML so that they are treated by Respondus as
HTML rather than standard text. This is accomplished by placing the tag [HTML]
immediately before the block of HTML and another tag [/HTML] immediately
after the block of HTML. So, for example, if you imported the following line:
[HTML] CLICK HERE [/HTML]
to download Respondus.
it would appear as follows when viewed in Blackboard:
CLICK HERE to download Respondus.
Of course, keep in mind that HTML will have variable results if you print the exam
from Respondus rather than using it exclusively within online examinations.
Importing Tab/Comma Delimited Files (CSV)
Questions can be imported from tab/comma delimited files (.csv). This type of
importing is best done by someone who has experience with databases or CSV-
structured files.
The CSV file can have a maximum of 34 columns. If all columns are used, they
should follow this order: Type, Title/ID, Points, Question Wording, Correct
Answer, Choice 1, Choice 2, Choice 3, Choice 4, Choice 5, Choice 6, Choice 7,
Choice 8, Choice 9, Choice 10, General Feedback, Correct Feedback, Incorrect
Feedback, Feedback 1, Feedback 2, Feedback 3, Feedback 4, Feedback 5,
Feedback 6, Feedback 7, Feedback 8, Feedback 9, Feedback 10, Topic, Difficulty
Level, Meta 1, Meta 2, Meta 3, Meta 4.
27The first column, “Type” should use the two-letter abbreviation shown below:
MC = Multiple Choice
TF = True/False
MR = Multiple Response/Answer
FB = Fill in the Blank/Short Answer
ES = Essay/Paragraph
The following columns must always be present in the .csv file: Type, Title/ID,
Points, and Question Wording, although the Points and Title/ID columns can be
empty. If the Type is “ES” (essay), no further columns are required. If the Type is
“MC” (multiple choice), “MR” (Multiple Response/Answer), “FB” (Fill in the
Blank/Short Answer), or “TF” (True/False) there must also be a Correct Answer
column (although for FB questions, this column is not used and can be blank). For
MC, MR, and FB questions, “Choice 1” column must also be present.
If the “Points” column is not empty, the value can range from 0-100 and will be
rounded to two decimal places. If no value is provided, Respondus will assign the
point value of 1.00.
The formatting requirements for the “Correct Answer” column depend on the
question type:
MC - Supports numbers 1-10 or letters A-J (ignoring the case)
TF - Supports numbers (1,2) and letters (A,B), where 1/A= true, 2/B= false.
The words “true” and “false” are also supported. Capitalization is ignored
for all answer types.
MR - Supports a list of numbers/letters within the range of 1-10 or A-J.
The numbers/letters must be separated by a comma or space; all must be
contained within quotes. (e.g. "a,c,h,j" or “a c h j”). A trailing separator
(e.g. "1,4,") is acceptable.
ES - (This column isn’t used; use the Choice 1 column instead)
FB - (This column isn’t used, use the Choice # columns instead)
The following notes will be helpful in the development of your CSV file:
- At the current time, the Topic, Difficulty, and Meta fields are being
ignored and discarded. We are specifying these fields now so that they will
be compatible with a future version of Respondus that will support them.
- Blank lines between records are ignored.
28- Embedded line breaks within quotes are supported.
- Literal column separators (within quotes) are supported.
- Literal quotes (2 quote characters in sequence) are supported.
The following notes are specific to the feedback fields:
- all feedback columns are optional
- general feedback is not supported in Blackboard, nor for
essay/paragraph questions
- correct answer feedback is not supported outside of Blackboard, nor for
essay/paragraph questions
- incorrect answer feedback is not supported outside of Blackboard, nor
for essay/paragraph questions
- choice-specific feedback is not supported in Blackboard prior to version
6, or for question types other than Multiple Choice; it is also not
supported for fill-in-the-blank or essay/paragraph questions
- choice-specific feedback for more than 2 answer choices is not supported
for TF questions
- choice-specific feedback is not supported for answer choices which do
not exist
To import the tab/comma delimited file with Respondus, select the “Import
Questions” task from the Start menu in Respondus. Change the “Type of File” to
“Tab/Comma Delimited (CSV)” and then browse to the file. A window will open
and ask you to describe the type of data being imported (plain text or HTML, the
number of header rows to skip, the type of delimiter, etc.). The Preview allows
you to look at the data before the import is complete. If everything looks good,
click OK to close the window.
If the CSV file contains HTML, it is possible to include image links such as . (Notice that any single quote in the HTML must be
changed to a pair of quotes in the HTML.) If images are referenced in the CSV file
using HTML, then select the location of the image folder next.
Finally, select from the remaining options that are available from the “Import
Questions” task. Click Finish to complete the import.
29Archive Wizard
The Archive Wizard in Respondus allows you to archive an exam or survey,
including all media components and equations that may be associated with it. An
entire “tree” of folders can also be archived. The Archive Wizard and related tasks
are useful for doing routine backups, to create a ready-to-use exam/survey file
that can be e-mailed to a colleague, or for organizing the “Projects” folder so
that only current files are displayed. Archive files require considerably less hard
drive space because the contents are stored in a compressed format.
Creating an Archive File
To create a Respondus archive file, go to the Start menu and select the “Archive
Wizard” tab. A directory of the Respondus Projects folder is now displayed.
Highlight the file or folder that you want to archive and click [Next]. The next
screen specifies the name of the file or folder that will be archived, plus the
location of the archive file once it is created. (It is possible to choose a different
location, but this is not recommended since it will later require additional steps
to restore the archived file). The final screen of the wizard indicates that the
archiving is complete and provides the location of the archived file. Additional
information is provided in a “Notes” section.
There is a faster way create Respondus archive files, albeit without the guidance
of a wizard. From the Start menu, select the Open task. Two large buttons appear
on the left side of the window: Projects and Archive. The Projects folder is where
all active Respondus files and folders are stored. When files are archived, they
are placed in the Archive folder. To archive a file, click once on a file (or folder) in
the Projects area and then click the small button on the toolbar at the right
named Create Archive File (the icon looks like a filing cabinet). A name for the
archive file is suggested by Respondus; you may accept this name or provide a
different one. When the [OK] button is clicked, all files associated with the exam
(including media objects) are compressed into one file and it is placed in the
Archive. If you are archiving a folder that contains multiple Respondus files, all
the files contained within the folder will be included in the archive file. It is
important to note that the original Respondus files are not deleted from the
Projects area when they are archived. If you want to delete the original
Respondus files, highlight them again in the Projects area and select the Delete
File button (it looks like a “recycle waste basket”) located on the toolbar at the
right.
If you accepted the standard settings when Respondus was installed, the
archived files will be located on your hard drive at c:\Respondus
Projects\Archives . The files will have the extension “.rsa”. The .rsa files can then
be copied to another location for backup purposes or sent to a fellow user of
Respondus.
Restoring an Archive File
30There are two ways to restore a Respondus archive file (.rsa, .rpa) to the Projects
area. The first approach works only if the archive file was saved to the default
Archives folder (which can generally be found at c:\Respondus Projects\Archives.
From the Start menu in Respondus, click the Open button. Select the large
Archive button on the left side of the screen, highlight the file you want to
restore, and click the [Open] button at the bottom right. The archived file or
folder will then be restored and copied to the Projects folder. To then open the
restored file in Respondus, click the Projects button and select the restored file.
If the archive file (.rsa, .rpa) is not located in the Archive folder, make sure the
Projects button is selected and click [Browse…]. Navigate to the location of the
archive file, highlight it with your mouse, and then click [Open]. The archive file
will be restored and copied to the Projects folder at this point. You will then need
to open the file in the Projects folder in order to view or edit it.
Please note that an archive file is not deleted from its original location when it is
restored to the Projects folder.
Changing the LMS “Personality” and Converting Files
Each learning management system (e.g., Blackboard, eCollege, WebCT) is
different in terms of the question types it offers, the approach it uses to create
and manage exams, and even the terminology that is used. This is why
Respondus allows the user to select an environment or “personality” that
matches a particular learning management system. For example, one user might
use the “WebCT” personality, another might select the “eCollege” personality,
yet another might choose a “Blackboard” personality, and so forth. Each user will
feel right at home because the features and terminology will closely parallel their
learning management system.
Changing the Personality
To switch to a different personality in Respondus, go to the Start menu and
select the desired personality from the list that appears at the top of the screen.
If the currently open file was created (or imported) using a different Respondus
personality, a message will warn you of this and indicate that the file will be
converted to the new personality if you continue. Click [OK] to continue and you
will see one or more warnings of what will be modified when the file is
converted. In some situations, you will be given a choice of how certain items will
be converted. For instance, if you are converting a file from the WebCT 4.x
personality to the Blackboard 9.x personality, you may encounter a message
asking how “feedback” for answers should be handled.
After the file is converted, a screen will detail every modification or change that
occurred to the file during the conversion process. You must then determine
whether to “replace the current file” with the newly converted file, or to “save as
a new file”.
31If you plan to convert a large number of files and you want to use the same
conversion settings, it is recommended that you go to the
File>Preferences>Conversion screen and set your conversion settings
accordingly. In this way you won’t have to specify your conversion preferences
each time you convert a file.
If you are unsure which LMS personality was used to create a file, go to the Start
menu, select Open, highlight the Respondus file, and select the “General
Information” button from the small toolbar at the right (represented by a file
folder with an overlaying question mark.) The LMS personality that was used to
create the file will be displayed in the information window below.
Quarantined Questions (after a file is converted)
Some learning management systems have question types that simply cannot be
used by other learning management systems. During the conversion process,
Respondus will provide the option to drop such questions or have them
“quarantined” in the newly converted file. In most situations it is best to drop the
question entirely. But if, at a later time, you plan to use the converted file with
the original learning management system, the quarantine option will preserve
the questions for this purpose.
The title of a quarantined question will appear in red in Respondus (instead of
the normal color of blue). Also, if a quarantined question is included in the file
when it is published to a learning management system, the question will be
filtered out during the publishing step.
32Editing a File
Overview
Common Features Across all Question Types
Question List and Expanded View
- Multiple Choice
- True and False
- Essay
- Matching
- Ordering
- Fill in the Blank
- Multiple Answers
- Calculated
- Jumbled Sentence
- Either/Or
- File Response
- Opinion Scale
- Numeric
- Quiz Bowl
- Fill in Multiple Blanks
Adding Bold, Italics, Underline, and Super/Subscript
Media Wizard
HTML Editor
Equation Editor
Power Editor
- Tables
- Fonts, Formatting and Lists
Spell Check
Keyword Searches
Overview of Edit Menu
The Edit menu allows questions to be added to the currently open file. Eight
question types are available: Calculated, Jumbled Sentence, Either/Or, File
Response, Opinion Scale, Numeric, Quiz Bowl, and Fill in Multiple Blanks.
Feedback and point values can also be added to questions, as can images, media
files, tables, HTML, and other types of enhanced formatting.
The appearance of the Edit menu is dependent on whether you open an exam or
a survey file. This is because fewer options are available for survey files (correct
answers, point values, and feedback are not used with surveys). The discussion
below primarily describes the use of the Edit menu as it relates to exam files.
33To create a new question, select the desired question type on the left side of the
screen. The entry form on the right side of the screen will change accordingly.
Common Features Across All Question Types
All question types require you to enter a “Title.” (Note: since Blackboard doesn’t
use titles, this information is not retained when the file is uploaded to
Blackboard). The title can be up to 64 characters. If you do not enter a title,
Respondus will use the first 20 characters for it.
All question types have a “Question Wording” section. This is where the main
body of the question is entered.
All question types allow the entry of “feedback.” If feedback is enabled for a
particular exam (determined later using the “Settings” menu), students will see
the feedback for the answers they selected as soon as they submit their
completed exam--or at the time that the settings are changed to allow feedback
to be viewed. To enter feedback for a question (regardless of whether you later
decide to have it displayed), select the [Feedback] option on the edit form. This
will reveal the fields for entering feedback.
Four buttons appear at the bottom of all edit forms. The [Add to End of List]
button adds the current question to the end of the “Question List” (located at
34the bottom of the screen). The [Insert Into List] button lets you insert the
current question into the Question List at a specified location. The [Clear Form]
button will erase all data that currently shows in the form. Finally, the [Preview]
button opens a browser-like window that lets you view how the question will
appear in the final exam--feedback and scoring information is also shown in this
window. The Preview button can be selected at any stage in the editing process.
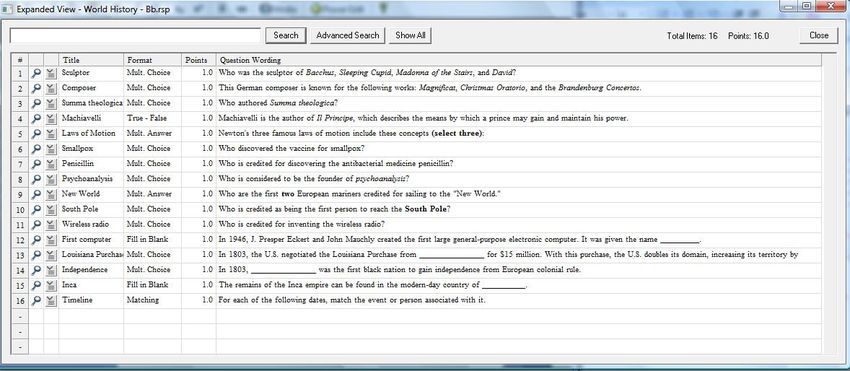
Question List and Expanded View
The “Question List” displays the title, question type, points, and question
wording for each question in the file. The total number of questions and point
values is shown at the top of the list. The first column enables you to preview an
item by clicking the magnifying glass icon. The context menu in the next column
will display a pop-up dialog with various operations that can be performed on
that item.
The context menu offers the following operations:
Preview – Preview the question.
Edit – Edit the question.
Delete – Delete the question.
Move to # - Move the question to a new location in the list.
Use As Basis For New Item – Open the question in the edit template and use it
as the basis for a new item. The original title will be modified slightly – for
example, the number “2” will be added to the end of the name.
Copy Items From Another File – Items can be selected and copied from another
Respondus file into the current file.
Flag Test Bank Network Item – An item copied from the Test Bank Network can
be flagged if problems are discovered with it. This operation will only appear in
the context menu if the item originated from the Test Bank Network and has not
been modified.
Properties – Displays a window that summarizes the properties for the item.
35You can also read