HP DESIGNJET AND PAGEWIDE XL PRINTERS - SECURITY FEATURES
←
→
Page content transcription
If your browser does not render page correctly, please read the page content below
HP DesignJet and PageWide XL
Printers
Security features
HP DesignJet and PageWide XL Printers                  Security Features

© 2014, 2016, 2021 HP Development Company, L.P.

Reproduction, adaptation, or translation without
prior permission is prohibited, except as allowed
under the copyright laws.

The information contained herein is subject to
change without notice. The only warranties for HP
products and services are set forth in the express
warranty statements accompanying such products
and services. Nothing herein should be construed as
an additional warranty. HP shall not be liable for
technical or editorial errors or omissions contained
herein.

September 2021 Edition

                                                                      2
HP DesignJet and PageWide XL Printers                                                                                                                                  Security Features

Table of Contents
        1.    Introduction & Overview ........................................................................................................................................5
        2.    Security concepts explanation..............................................................................................................................5
        2.1   Device security ........................................................................................................................................................5
           UEFI secure boot.........................................................................................................................................................5
           Firmware protection ..................................................................................................................................................6
           Integration with SIEM tools .......................................................................................................................................6
        2.2 Device configuration protection ...........................................................................................................................6
           Disable protocols........................................................................................................................................................6
           SNMP compatibility ....................................................................................................................................................8
           Disable connectivity interfaces .................................................................................................................................9
           Control Panel Access .............................................................................................................................................. 11
           SCL certificates ........................................................................................................................................................ 17
           Embedded Web Server (EWS) access control ...................................................................................................... 18
           USB drive control ..................................................................................................................................................... 26
           Jetdirect Security Wizard (HP T9x0-T15x0-T25x0-T3500-PageWide XL) ...................................................... 28
           Hide IP from front panel ......................................................................................................................................... 28
        2.3 Data security: encrypted communications ...................................................................................................... 28
           IPSec 28
           Encrypt web communications ............................................................................................................................... 29
           Access control list.................................................................................................................................................... 29
           802.1X authentication ............................................................................................................................................ 30
        2.4 Authentication ..................................................................................................................................................... 30
        2.5 Protected data in storage .................................................................................................................................. 30
           Self-encrypted hard disk ........................................................................................................................................ 30
           Secure File Erase (SFE) ........................................................................................................................................... 30
           Secure Disk Erase (SDE).......................................................................................................................................... 31
           Scan to network (HP DesignJet T2500, T2530, T3500, T2600, XL3600 eMFP Series) ................................. 33
           Scan to FTP folder ................................................................................................................................................... 41
           Exclude personal info from accounting................................................................................................................ 43
           Disable internet connection ................................................................................................................................... 44
        2.6 Document security .............................................................................................................................................. 44
           Job storage and PIN printing .................................................................................................................................. 44
           ePrint center connection ........................................................................................................................................ 46
        3.    Advanced workflows ........................................................................................................................................... 48
        3.1 Printing using LPR protocol. .............................................................................................................................. 48
           How to use the LPR command in Windows. ........................................................................................................ 48
        3.2 Printing using FTP protocol. ............................................................................................................................... 48
           How to use FTP in Windows ................................................................................................................................... 49
           How to use FTP from DOS command ................................................................................................................... 49
           How to use FTP combined with DMS server ........................................................................................................ 49
           Possible issue .......................................................................................................................................................... 50
        3.3 Printing with PJLs ................................................................................................................................................ 50
           How to use PJLs....................................................................................................................................................... 52
        4.    Large Format printers: security features summary ....................................................................................... 53
        5.    Large Format scanners: security features summary ..................................................................................... 63
        6.    Ports used in HP printers.................................................................................................................................... 65
        Appendix 1 – Web Jetadmin .......................................................................................................................................... 71

                                                                                                                                                                                          3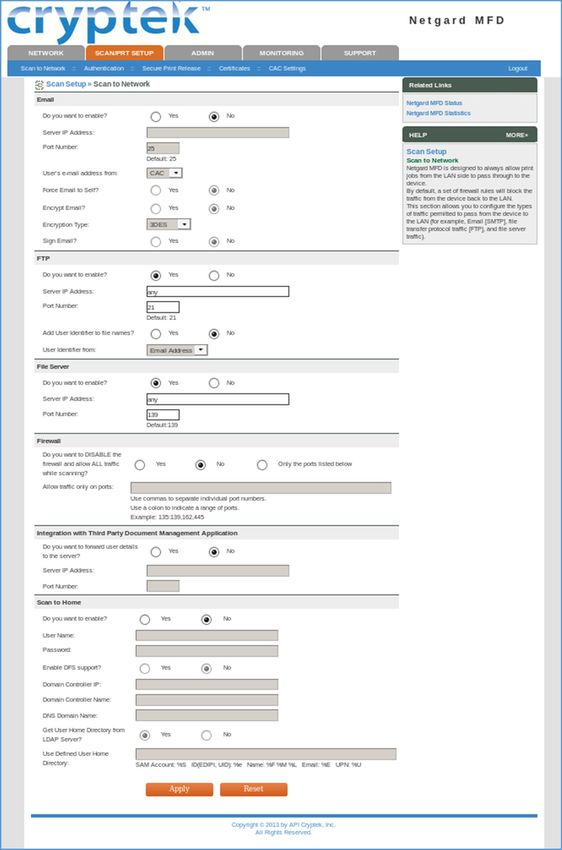
HP DesignJet and PageWide XL Printers                                                                                                                                         Security Features

        Manageability contract for Large Format Printers ..................................................................................................... 71
             MC DJA 1.0 ................................................................................................................................................................ 72
             MC DJA 2.0 - Only additions are shown ............................................................................................................... 72
        Appendix 2 – JetAdvantage Security Manager............................................................................................................ 73
             Policy compatibility features (HP DesignJet T1700/Z6/Z9+ Printer Series) ................................................... 73
        Appendix 3 - Security Manager ..................................................................................................................................... 75
        Plug-in modules: ............................................................................................................................................................. 75
        Appendix 4 - Netgard overview .................................................................................................................................... 77
        Introduction ..................................................................................................................................................................... 77
        User account.................................................................................................................................................................... 77
        FP settings ....................................................................................................................................................................... 77
        EWS settings .................................................................................................................................................................... 79
        Netgard MFD configuration ........................................................................................................................................... 80
             Basic configuration of Netgard MFD for HP printers........................................................................................... 80
             Netgard MFD user interface access ...................................................................................................................... 80
        Additional information ................................................................................................................................................... 86
        Security Glossary ............................................................................................................................................................ 87
        Device protection related .............................................................................................................................................. 88
        Data protection related .................................................................................................................................................. 90
        Document protection related ........................................................................................................................................ 93

                                                                                                                                                                                                 4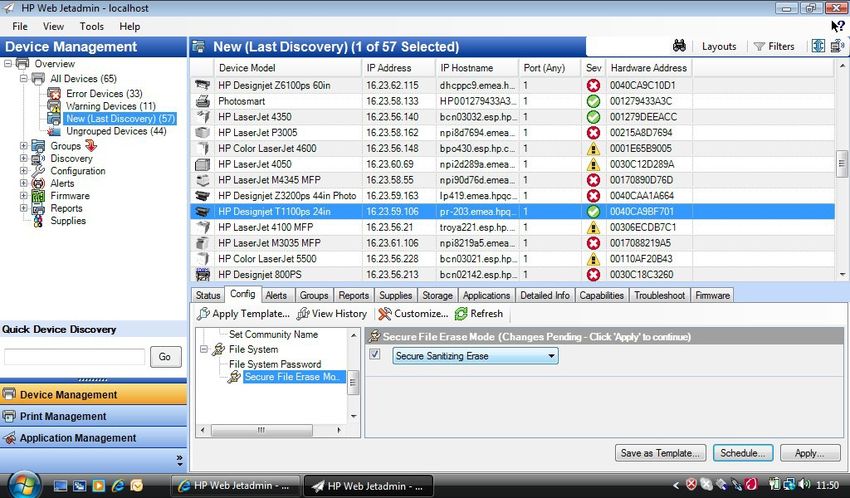
HP DesignJet and PageWide XL Printers                                                               Security Features

1. Introduction & Overview
This document provides an overview of the security and connectivity features supported by HP DesignJet and
PageWide XL printers as of October 2018.

The security features described in this document make the HP DesignJet and PageWide XL printer series particularly
well suited for deployment in environments where network, data, and access control security are important.

In this document, you will find:

      •   The description of the features, where to configure them and some recommended values (Section 2,
          Security concepts explanation).
      •   Description of the advanced printing workflows that can be used with the HP DesignJet (only
          T1700/Z6/Z9+/Z6 Pro/Z9+ Pro) and PageWide XL printers (Section 3, Advanced workflows).
      •   The tables summarizing the new and existing security features of the HP DesignJet and PageWide XL
          printer series and how they are configured using the control panel, Embedded Web Server and/or HP Web
          Jetadmin (WJA). Please make sure that your printer has the latest firmware version to benefit from all the
          security features (Section 4, Large Format printers: security features summary).
      •   The table summarizing the new and existing security features of the HP Scanners compatible with the HP
          DesignJet and PageWide XL printers (Section 5, Large Format scanners: security features summary).
      •   The list of ports used by the printer and the effect of keep them blocked (Section 5, Ports used in HP
          printers).

NOTE: If your printer is not listed in the table, then these features are not implemented.

2. Security concepts explanation
2.1   Device security

UEFI secure boot
It prevents the loading of unauthorized operating systems (OS) during system startup. This feature is compliant with
the UEFI specification. Non-configurable feature.

HP Secure Boot
HP Secure Boot is another security feature that further protects the printer during boot process by making the BIOS
validate its own integrity at the very start before continues execution. Secure Boot ensures a clean bootup to avoid
any usage of external software installed in the printer and blocking backdoors to prevent hacking of the BIOS of the
device.

To achieve this, file whitelisting ensures that the firmware and datafiles are originals and not modified or replaced
files by unknown sources.

Security Event Logging (Sysslog)
Security Event Logging ensures the device can register all the security-related events. It is achieved through
integration with Splunk and McAfee’s SIEMS.

All sensitive information, such as keys and passwords, are stored in an independent hardware item. To access this
hardware, the system uses different keys, protecting the printer’s identity when authenticating.
                                                                                                                   5
HP DesignJet and PageWide XL Printers Security Features
Integration with SIEM tools
SIEM tools are software products and services that result from the combination of Security Information Management
and Security Event Management. They provide real-time analysis and recording of security alerts generated by
applications and network hardware.
Connection Inspector
Connection Inspector monitors the printer connections to the internet, detecting patterns from malicious software
connections and acts on them. It can display 3 different system errors, based on severity:
• Warning
• Severe Continuable
• Severe not Continuable (requires printer restart). By restarting the printer, during the disk check, traces and
injected malware will be cleared.
Firmware protection
All HP portfolio use signed firmware package, that means firmware packages are digitally signed by the HP Code
Signing group.
The printer is able to check the authenticity of any firmware and install only those signed by HP.
It is really important to keep the printer updated with the latest firmware, that provides you the highest security and
new features.
The firmware can be updated in various ways, although not all them are available in all the printers:
• Plugging a USB drive with the firmware file in the root folder.
• Sending the firmware file through EWS.
• Sending the firmware file through the port 9100, as any other job.
• Activating the Automatic Firmware Upgrade (AFU): This function connects the printer with the HP server,
checks if there is a new firmware and downloads it. The installation should always be launched from EWS
or printer control panel.
Despite the signature system, the recommendation is to protect the printer from unauthorized firmware upgrades:
• Protect the EWS access with an admin account (see section 2.2.6, Embedded Web Server (EWS) access
control).
• Disable the firmware upgrade from USB (see section 2.2.7, USB drive control)
• Use the Automatic Firmware Upgrade to download the firmware.
2.2 Device configuration protection
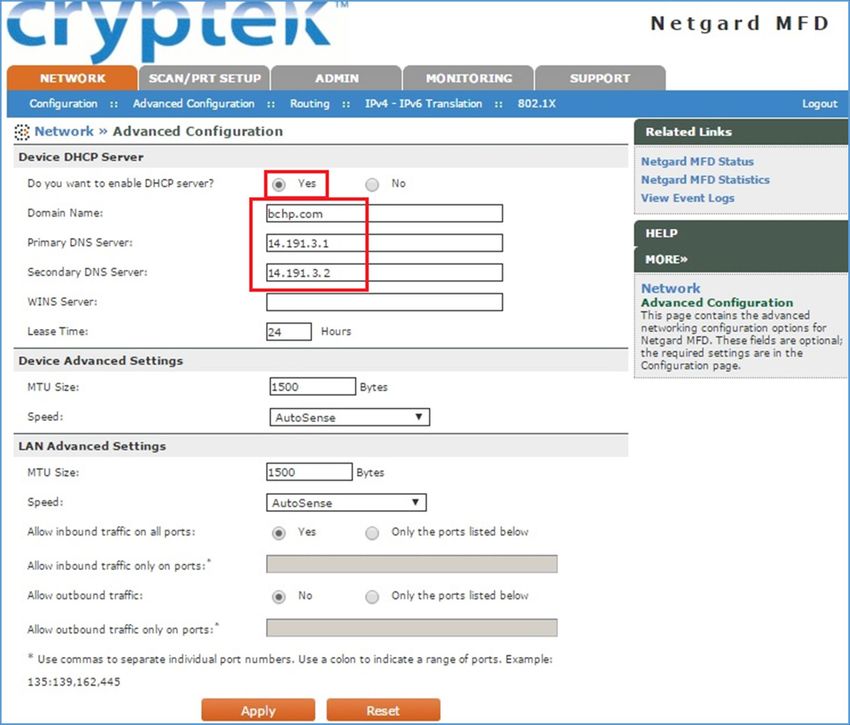
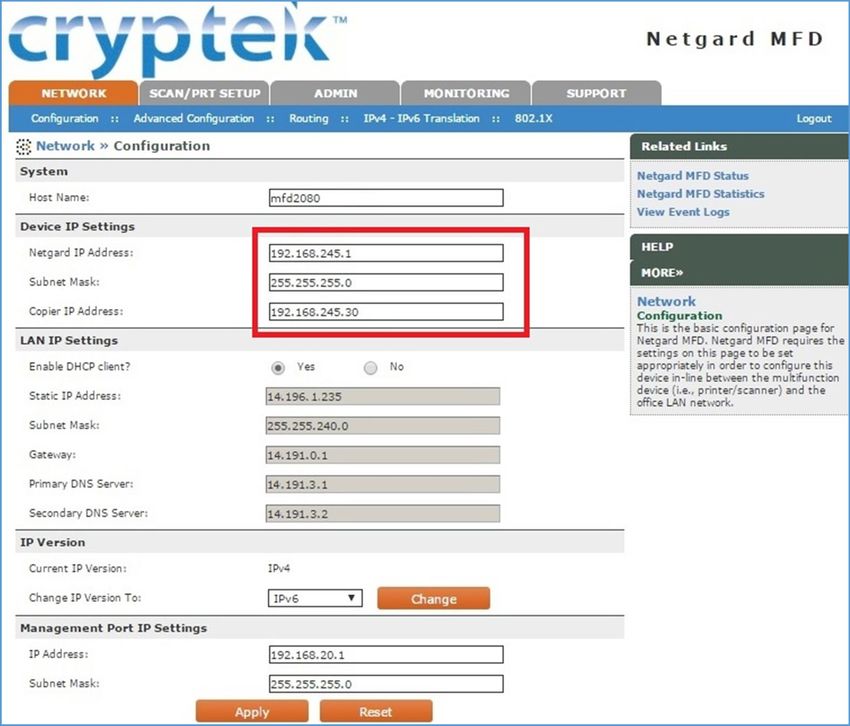
Disable protocols
In some cases, you might want to disable all protocols that you do not plan to use to access your printer. For example,
you might prevent users from sending files via ftp or connecting through telnet to manage the printer network
settings. You can disable unused protocols through the Mgmt. Protocols option in the Embedded Web Server, or the
6
HP DesignJet and PageWide XL Printers                                                      Security Features

Network Enable Features in Web Jetadmin.

In the HP DesignJet T830 MFP/T730 printer and HP DesignJet T200/600/Studio Printer, the network Management
Protocols can be configured from the Network > Advanced Settings menu.

                                                                                                          7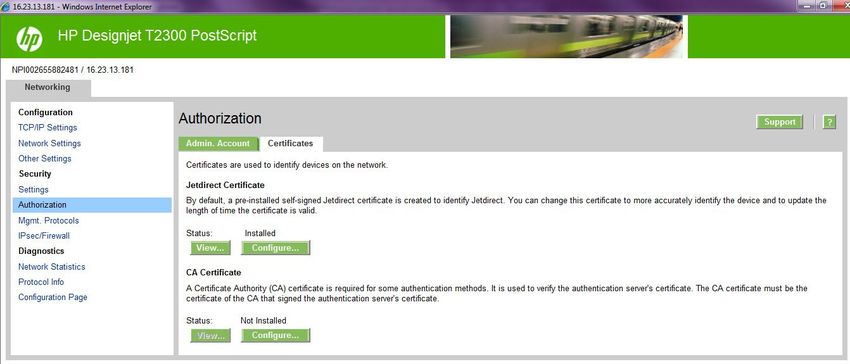
HP DesignJet and PageWide XL Printers                                                                Security Features

SNMP compatibility
SNMP is a protocol to get printer information and to configure it. SNMPv3 is its encrypted version. Enabling it, only
the client applications knowing the keys will be able to access the printer using this protocol.

The main benefits of using SNMPv3 are:

      •   Integrity: protects data flowing from side-to-side from being modified by a third party.
      •   Authentication: verifies the data source.
      •   Encryption: protects data from being accessed by a third party.
      •   Access control: restricts the Managed Device data that can be accessed by each Network Management
          System.
You can enable and disable the SNMPv3 agent from your printer. You may set up an account that allows a
management application to access the SNMPv3 agent.

The recommendation is to work with SNMPv3 and keep SNMPv1/v2 disabled if your system allows it.

                                                                                                                    8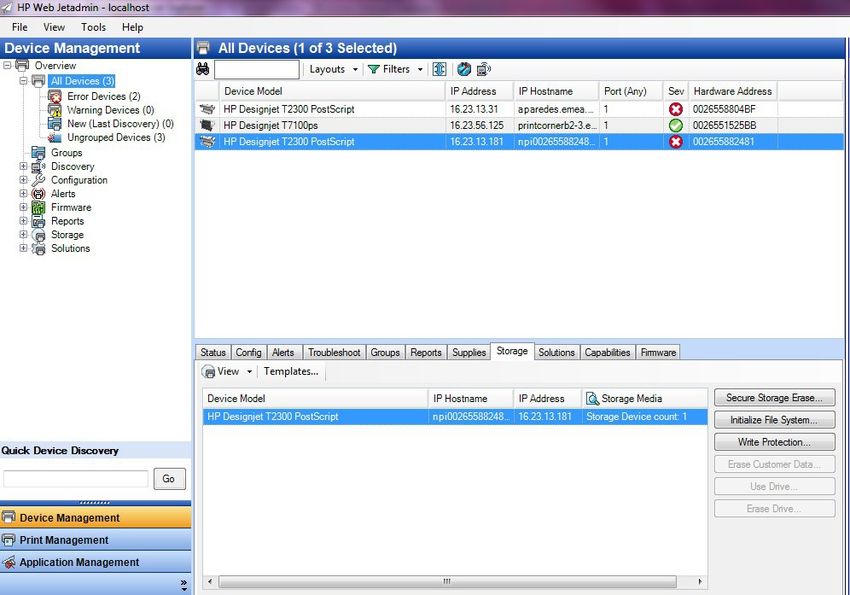
HP DesignJet and PageWide XL Printers                                                                    Security Features

Disable connectivity interfaces
Depending on the printer series, there are some USB network interfaces that can be disabled to restrict access to the
printer through these interfaces.

In some products, you can install a Jetdirect card to add extra security features, in this case, you might want to disable
the onboard Ethernet.

The HP Jetdirect 640n is a print networking device that offers high-speed wired functionality, easy set-up, full
manageability, backward compatibility and enterprise-class security features.

Ideal for enterprise and workgroup SMBs requiring full-featured, secure, and backward-compatible print
management of printers and MFPs over shared, wired networks.

                                                                                                                        9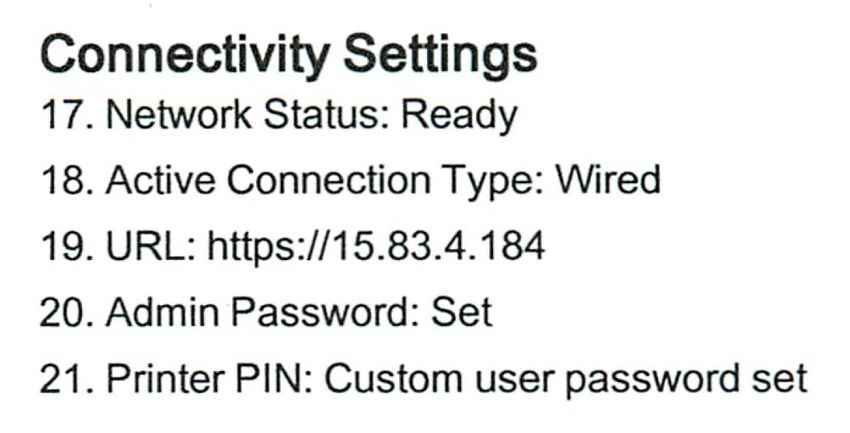
HP DesignJet and PageWide XL Printers                                                               Security Features

Features: Print at high speed over gigabit networks

    •   Quickly connect to shared printers and MFPs throughout your office, over a gigabit network.

    •   Maintain rigorous standards through IPv6 network features: more IP addresses than IPv4 and IPsec security.

    •   Help reduce administration and operation costs with off-the-shelf functionality and backward compatibility.

See http://www8.hp.com/emea_africa/en/products/print-servers/product-detail.html?oid=5305778 for more
information about the Jetdirect card.

If you enable or disable a connectivity option, the printer will automatically restart. Keep in mind that disabling a
connectivity option could cut off network access to the printer. As a security measure, you cannot disable the
connection that you use to access the Embedded Web server.

                                                                                                                  10
HP DesignJet and PageWide XL Printers Security Features
Control Panel Access
The DesignJet and PageWide technologies allow the printer administrator to lock some features in the control panel
of the device. Currently, there are two modes of control access “Control Panel Access Lock” and “Access Control”,
depending on the model. To use these features, it is compulsory to define an administrator account and password.
In some printers, when setting an Embedded Web Server admin password, you also restrict access to certain front
panel features by default. The protected features on the front panel are:
• Network connectivity & Internet connectivity
• Control firmware upgrades
• Reset factory defaults
• External hard disk connection
• Security
2.2.1.1 Control Panel Access lock
The control panel access lock is a feature intended for IT administrators, which enables them to lock the device’s
control panel by using either the HP Web Jetadmin or the printer’s Embedded Web Server (depending on the printer
model). This feature prevents unauthorized users from accessing some features on the control panel. Administrators
can specify the level of access as follows:
• Unlock
• Minimum lock
• Moderate lock
• Intermediate lock
• Maximum lock
This option can be enabled from the HP Web Jetadmin as shown below:
11HP DesignJet and PageWide XL Printers Security Features
This option can also be enabled from the T1200 Embedded Web Server as shown below:
The following table shows the features enabled or disabled for each lock level:
Lock level Functionality locked when the Lock level is set
0 – Unlock
1 – Minimum Lock Resets, CIP config, Security, Service Menu 1
2 – Moderate Lock Resets, CIP config, Security config
Connectivity, AFU, IDS workflows, System info, Job Queue
3 – Intermediate Lock Resets, CIP config, Security
Connectivity config, AFU, IDS workflows, System info, Job Queue
Media mgmt. workflows, Pause printer, Maintenance & IQ workflows
4 – Maximum Lock Resets, CIP config, Security
Connectivity config, AFU, IDS workflows, System info, Job Queue
Media mgmt. workflows, Pause printer, Maintenance & IQ workflows
Any settings, Connectivity info, IDS info, Paper Info, Cancel jobs, Calibration info
12HP DesignJet and PageWide XL Printers Security Features
Grouped by categories:
Actions Permission denied if FP lock level is at least:
Settings App Access 4 - Maximum
Connectivity App Access 4 - Maximum
Connectivity App Details Access 2 - Moderate
Settings App Internet connectivity 2 - Moderate
Settings App Connectivity Troubleshooting 2 - Moderate
IDS App Access 4 - Maximum
IDS App Actions i.e. replacement, alignment, etc. 2 - Moderate
IDS Widget – Access to IDS App 4 - Maximum
IDS Widget – Cartridge Replacement 3 - Intermediate
Settings App Inks Entry Access 3 - Intermediate
Paper App Access 4 - Maximum
Paper App Load Media 3 - Intermediate
Paper App Unload Media 3 - Intermediate
Paper App Change Paper Type 3 - Intermediate
Paper Widget – Access to Paper App 4 - Maximum
Settings App Paper Entry Access 4 - Maximum
Printer Information App Access 4 - Maximum
Printer Information App AFU Access 2 - Moderate
Job Queue App Access 2 - Moderate
Pause printing 3 - Intermediate
Cancel printing 4 - Maximum
Settings App Calibration Info Entry Access 4 - Maximum
Settings App IQ maintenance Entry Access: Test plots,
3 - Intermediate
Align PH, IQ
Settings App Maintenance Entry Access 3 - Intermediate
Settings App System Entry Access 2 - Moderate
Settings App CIP Entry Access 1 - Minimum
Settings App Restore Factory Settings 1 - Minimum
Settings App FW Update 2 - Moderate
Settings App Printer Logs 3 - Intermediate
Settings App Allow SNMP 1 - Minimum
Settings App Service Level 1 1 - Minimum – PIN needs to be provided
NOTE: When the Intermediate or Maximum locks are set, you will not able to load/unload paper or replace
printheads/ink cartridges without first unlocking the front panel. These options should only be set in specific
circumstances where the implications are known and understood.
NOTE: None of these levels locks the copy, scan, or print applications.
13HP DesignJet and PageWide XL Printers Security Features
When the control panel is locked, the applicable menus show a ‘lock’ symbol in the front panel. If a user attempts to
access a “locked” menu entry, a warning message is displayed.
NOTE: In PageWide XL, when the user attempts to access a “locked” menu, the printer asks for the User password
that is not available when the Control Panel Access Lock is used. To insert the Admin password, click on the top left
corner.
2.2.1.2 Access Control
The Access Control page is placed in the Setup tab, in the subsection called Access Control.
This function allows you to manage at least three roles of use (depending on the firmware version), defining which
applications are available for each of them.
The Control Panel Access Lock (Setup > Security) should be set to unlocked (see 3.5.1. Control Panel Access Lock).
How to configure Access Control
The Access Control page has three main sections for the three main actions that can be performed:
• Sign-in methods: this section shows the enabled sign-in methods that can be used to sign in to the device.
• Device user accounts: in this section you can create, edit or delete the user accounts that are available on
the printer.
• Sign-in and permission policies: here you can set up the sign-in requirements for specific tasks and restrict
user access by role.
14HP DesignJet and PageWide XL Printers Security Features
Figure 1 - Access Control page
a. Sign-in methods
This section shows the enabled sign-in methods that can be used to sign in on the device.
Currently, sign-in methods are Local device, LDAP and Windows Sign-in (Kerberos).
Figure 2 - Sign-in methods
b. Device user accounts
In this section, there are four actions available:
• New: to add a new user account.
• Edit: to edit the selected user account.
• Delete: to delete the selected user account.
• Delete all: to delete all the user accounts.
15HP DesignJet and PageWide XL Printers Security Features
Figure 3 - Empty user accounts list
To add a new user:
• Click the New button; a section is expanded. It is required to fill in the name and password fields.
• It is possible to change the User access code and the Permission that is set. You can select from the
following permission roles.
User type Role details
Admin user This role has all the access privileges granted to it and cannot be edited.
Device user This role has some access privileges granted to it that can be edited in the Access
Control page.
Guest user This role has some access privileges granted to it that can be edited in the Access
Control page.
Figure 4 - Creating a user account
After adding the user, you will see the following screen.
Figure 5 - User accounts list
c. Sign-in and permissions policies
You can change the permissions for the roles guest and user. Select the permissions and click Apply.
16HP DesignJet and PageWide XL Printers Security Features
Figure 6 - Defining permissions
NOTE: Users have at least the Guest permission.
NOTE: Any app that forces the user to log in will cause the Guest column to be disabled.
Front Panel log in
When the user clicks on any blocked function for the first time, a window appears. The user must enter in his/her
password. Session expiration can be managed in Settings.
To log in as Admin, click the menu in the corner.
2.2.1.3 Deadlock: Front Panel locked + EWS password forgotten
Under certain circumstances, a printer might become inaccessible if the control panel has been locked and the
administrator has lost the password needed to unlock it. This could happen if the front panel is locked through the
printer’s Embedded Web Server and the Administrative password for the EWS is lost. In this situation, it would not be
possible to unlock the front panel from the Embedded Web Server and it would not be possible to reset the
Embedded Web Server from the front panel.
NOTE: If the printer’s front panel becomes locked and you are unable to unlock it, then you should contact HP support
as soon as possible.
SCL certificates
• Jetdirect identity certificate
You can request, install, and manage digital certificates on the HP Jetdirect print server. Certificates are used
to identify the Jetdirect print server both as a valid web server for network clients, and as a valid client
requesting access on a secure network. By default, the Jetdirect print server contains a self-signed, pre-
installed certificate.
17HP DesignJet and PageWide XL Printers Security Features
• Certificate Authority certificate
You can install and manage a CA certificates in the printer. The CA certificate is used to validate the identity
of the network servers you may connect to, such as SSL or LDAP servers secured with SSL.
Unique Admin password for EWS access control
New regulatory policies in some states worldwide state that governmental devices should have a non-blank default
administrative password and that all printer administration/configuration resources should be protected by an admin
password.
For this reason and to increase HP LFP Printers default security level, HP DesignJet and PageWide Printer Series now
come with a new Security feature, the default unique admin password. This feature is currently only present in
DesignJet and PageWide printers listed in the below table but will be extended to further products. A default admin
password will be assigned at manufacturing stage to all HP DesignJet and PageWide Printer Series printers going
forwards that is unique for every printer.
18HP DesignJet and PageWide XL Printers Security Features
Similarly, to other technical devices, this default admin password is already set when the user purchases the product.
Depending on the printer model the default admin password may be found in different places. In some models this
password can be located on a sticker on the rear of the printer. In other models the user will have a front panel menu
option to obtain this default admin password. By referencing the below table, you can see where to find your printer’s
unique default password and steps on how it can be changed/customized in each case.
DesignJet and PageWide Printer Series Location of default Admin password
PageWide XL 3920 MFP Front panel of the printer
PageWide XL 4200 Printer/MFP Settings Menu --> Security --> Administrator password:
PageWide XL 4700 Printer/MFP
PageWide XL 5200 Printer/MFP
PageWide XL 5200 Printer
PageWide XL Pro 5200 Printer/MFP
PageWide XL 8200 Printer/MFP
PageWide XL 8200 Printer
PageWide XL Pro 8200 Printer/MFP
PageWide XL Pro10000 Printer
DesignJet Z6 Pro Printer
DesignJet Z9+ Pro Printer
HP DesignJet T200/600/Studio Printer On the serial number label located on the back of printer
Using the Front Panel to discover the default admin password.
Using the Front Panel, navigate to Settings Menu > Security > Administrator password:
It can also be discovered from the Front Panel through Printer Information:
19HP DesignJet and PageWide XL Printers Security Features
When the default admin password is modified, under these menu paths you will see: Administrator password “Your
password has been modified by the administrator, in case you lost it and need to recover, please contact your HP
Service Representative”
NOTE: This is only an example. In every LFP printer the default admin password will be different.
2.2.1.4 How to change my printer’s default admin password
The printer’s admin password can be changed for any of your own (except a blank password). The process to change
admin password can be performed in different ways.
Printer users can change the admin password through the web browser going to:
Settings > Security > Administrator password > Click on the Pen Icon:
20HP DesignJet and PageWide XL Printers Security Features
A new window will ask both the default admin password and the new admin password. Note that the new admin
password will have no constraint except that blank passwords are not allowed.
The admin password will remain between reboots.
NOTE: Default User name: admin
2.2.1.5 Reset admin password to default
In printers where the Unique Admin Password can be found on the printer front panel, users cannot reset the admin
password to the default without assistance. If, for any reason, the customer admin password of the printer is not
known, it is necessary to call a service representative to reset this password.
Only developers and servicing personnel will be allowed to reset admin password.
Unique Admin Password on printer label
Some Printer models are not able to display the unique admin password on the printer front panel and are
therefore shipped with the default unique admin password on the printer label. These models can be identified
from the above table. In these printer models there are 2 ways to find the default EWS password:
1. A label on the back of printer.
2. “Printer PIN” on “Printer Status Report”. Printable from front panel if it has not been changed from the
default. If you change the PIN, the status report will no longer show it. It will show “Custom user
password set” in the report instead.
NOTE: Default User name: admin
21HP DesignJet and PageWide XL Printers Security Features
In printer models where the default admin password is found on the printer label it is possible to reset the admin
password to its default through a factory rest of the printer.
Perform Setup > Printer Maintenance > Restore > Reset Factory Default
22HP DesignJet and PageWide XL Printers Security Features
Embedded Web Server (EWS) access control
The Embedded Web Server is a powerful tool which enables direct management of devices such as the HP LaserJet
or the HP DesignJet printers. With no security in place, however, this tool also has the potential to have a negative
effect on many features, as they can be configured using just a web browser and knowing the IP address of the
printer. To solve this situation, we have implemented two levels of access to our compatible HP DesignJet printers.
The Security page enables users to:
• Restrict access to the printer by setting an administrator user account.
• Define two levels of access: Administrator and Guest (Guest account not available in HP PageWide).
If the two levels of access have been set, and you have neither of the passwords, then you will not be able to gain
access to the EWS information, as in the image below.
2.2.1.6 Administrator password
Access control is enabled by setting the Admin account password, i.e. specifying a password for the user account at
admin level. You must then provide the admin password to perform any of the following restricted operations:
• Cancel, delete or preview a job in the job queue.
• Delete a stored job.
• Clear accounting information and configure cost assignment, in some models.
• Change printer settings on the Device Setup page.
• Access the setup tab to configure the printer.
• View protected printer information pages.
• Access the Customer Involvement Program page.
• Access the Service Support.
23HP DesignJet and PageWide XL Printers Security Features
24HP DesignJet and PageWide XL Printers Security Features
If there is no administrator account, then the restricted operations can be accessed without a password.
2.2.1.7 Guest password
Once the administrator user account has been set, the administrator can also set up a guest user account by
specifying a password for the guest.
If the guest user account is set up, a username and password are required for all EWS operations: users identified as
guests have access to restricted operations, whilst users identified as administrators have access to all operations.
If the guest account is not set up, a username and password are not required for unrestricted operations.
25HP DesignJet and PageWide XL Printers Security Features
Notes:
• Some printers only have 1-level password access to the Embedded Web Server.
• The networking tab of the Embedded Web Server asks for another admin account and password. This
password is synchronized with the admin password for the complete EWS.
• For most printers that have EWS password capability, it is also possible to setup the admin password
through Web Jetadmin. Only one level can be set in this way, however, so the guest password cannot be
set up from Web Jetadmin.
• Passwords have no minimum complexity requirements; the maximum length is 16 characters.
• Printers with touchscreen front panels only allow the use of the limited set of characters shown below
(capital letters are also supported).
• These limitations do not apply to printers without touchscreen front panels, as the password can be set
using EWS.
• Some printer drivers rely on the EWS for creating the preview. In cases where an administrator password
is set, the administrator password will be required to access job preview.
USB drive control
All printers allow you to control the USB use, in two ways:
• USB drive: enable or disable the use of the USB to print or scan.
• Firmware upgrade from USB: enable or disable the possibility of upgrading the firmware from a USB.
These features are available in the control panel, the Embedded Web Server and Web Jetadmin.
26HP DesignJet and PageWide XL Printers Security Features
27HP DesignJet and PageWide XL Printers Security Features
Jetdirect Security Wizard (HP T9x0-T15x0-T25x0-T3500-PageWide XL)
The HP Jetdirect Security Configuration Wizard enables you to configure security settings for HP Jetdirect print server
management. There are 3 levels of Network Security that can be set:
Security level Details
Basic Configure an admin password that is shared on other tools such as Telnet and
SNMPv1/v2.
Enhanced Disable unsecure management protocols (FTP, Telnet, RCFG, SNMP v1/v2c).
Enable SNMPv3.
Enable SNMPv1/v2 read only access.
Custom Manually adjust all the settings.
Hide IP from front panel
Some printers include an option in the Service Menu, accessible with the help of an HP Support agent only, that
enables you to hide all IP information from the printer’s front panel. This prevents that people physically around the
printer could obtain the IP and connect to it.
2.3 Data security: encrypted communications
IPSec
A Firewall or IP Security (IPsec) policy enables you to control traffic to or from the device by using network-layer
protocols. Either a firewall or IPsec/firewall pages will appear, depending on whether IPsec is supported by the print
server and device. If IPsec is not supported, firewall pages will be displayed and a firewall policy can be configured.
NOTE: Before you enable a firewall or IPsec policy, you should make sure that access to your configuration
management settings is secured (for example, through an administrator password). This will ensure that your policy
is not easily disabled through Telnet, control panel menus, or other management tools.
Firewall. Use this page to view or configure a firewall policy. A firewall policy consists of up to 10 rules, where each
28HP DesignJet and PageWide XL Printers Security Features
rule specifies the IP addresses and services that are allowed by the print server and device. To add a rule, click Add
Rule. This setting runs a wizard that will help you to configure each rule.
IPsec/Firewall. Use this page to view or configure an IPsec/firewall policy. An IPsec/firewall policy consists of up to
10 rules. As with a firewall policy, each rule specifies the IP addresses and services that are allowed by the print
server and device. With IPsec support, you can apply IPsec authentication and encryption protocols for those
addresses and services. To add a rule, click Add Rule. This runs a wizard that will help you to configure each rule.
For a detailed description of wizard settings and additional help, visit Jetdirect IPsec/Firewall Help.
Encrypt web communications
You can securely manage your network-connected printers using a web browser and the HTTPS protocol. To
authenticate the HP Jetdirect web server when HTTPS is used, you may configure a certificate, or you may use the
pre-installed, self-signed X.509 Certificate. The encryption strength specifies what ciphers the web server will use
for secure communications. SSL/TLS Protocols used in the communications can be configured in the printer’s EWS.
Supported cipher suites can also be checked at EWS.
When you enable encryption, the web server encrypts all web communication, forcing all connections to use HTTPS.
You can also configure encryption options to allow both HTTP (unencrypted) and HTTPS connections. In secure
environments, you should choose to encrypt all web communications. Otherwise, sensitive management data
(administrator password, SNMP community names, and secret keys) may be compromised.
Access control list
This feature lets you determine the access control list (ACL), which is used to specify the IP addresses on your
network that are allowed access to the device. The ACL is normally used for security purposes and supports up to 10
entries. The device blocks communications from all other addresses. If the list is empty, any system is allowed
access. By default, host systems with HTTP connections (such as web browser or IPP connections) are allowed access
regardless of ACL entries. This allows hosts to access the device when proxy servers or Network Address Translators
(NATs) are used. However, unfiltered access by HTTP hosts may be disabled by clearing the Check ACL for HTTP
checkbox.
Host systems that have access are specified by their IP host or network address. If the network contains subnets, an
address mask may be used to specify whether the IP address entry is for an individual host system or a group of host
systems. For an individual host system, the mask “255.255.255.255” is assumed and is not required.
29HP DesignJet and PageWide XL Printers Security Features
CAUTION! You may lose your ability to communicate with the device if your system is not properly specified in the
list, or access through HTTP is disabled. If communication with the device is lost, then it may be necessary to restore
the network settings to their factory-default values.
802.1X authentication
802.1X is an IEEE Standard for port-based Network Access Control. It provides an authentication mechanism for
devices that want to connect to a LAN.
For most 802.1X networks, the infrastructure components (such as LAN switches) must use 802.1X protocols to
control a port's access to the network. If these ports do not allow partial or guest access, then the print server may
need to be configured with your 802.1X parameters prior to connection.
To configure initial 802.1X settings before connecting to your network, you can use an isolated LAN, or a direct
computer connection via a cross-over cable.
The supported 802.1X authentication protocols and associated configuration depend on the print server model and
firmware version.
2.4 Authentication
2.5 Protected data in storage
Self-encrypted hard disk
The Self Encrypted hard disk ensures data is automatically encrypted every time data is sent to the printer and is
written to the drive. This is achieved using AES 256-bit encryption.
Secure File Erase (SFE)
Secure File Erase is a feature that manages how files are deleted from the printer’s hard disk.
There are three security modes in the Secure Files Erase feature. These settings can be changed via Web Jetadmin,
EWS and control panel (via the Service Menu with the HP support representative help).
• Non-Secure Fast Erase: In this mode, all file pointers to the data (table indexes) are erased. Temporary
data remains on the Hard Disk Drive until the disk space it occupies is needed for another purpose, and is
then overwritten. This is the fastest mode of operation and is the default for all printers.
• Secure Fast Erase: In this mode of operation, file pointers are erased and the disk space where the
temporary job was stored is also overwritten with a fixed character pattern. This mode of operation is
slower than Non-Secure Fast Erase, but all data is overwritten.
• Secure Sanitizing Erase: In this mode of operation, file pointers are erased and the disk space where the
temporary job was stored is repeatedly overwritten using an algorithm that prevents any residual data.
This mode of operation may affect product performance. The Secure Sanitizing Erase mode of operation
meets the US Department of Defense 5220.22-M requirements for clearing and sanitization of disk media.
When the Secure Sanitizing Erase feature is enabled, all temporary files that might contain sensitive data
are erased with this method. No temporary files are left after a job has been completed (scan, copy, or
print).
Furthermore, if you do not want to store jobs in the printer, you can set the number of jobs to be stored in the printer’s
queue to 0. To configure this setting, perform the following steps:
30HP DesignJet and PageWide XL Printers Security Features
• Go to the printer’s front panel,
• Select the Setup menu.
• Select Job management setup.
For further information, refer to the printer’s user manual, as the actual menu options may differ for a specific printer.
The following is an example of how to change the Secure File Erase setting for the HP DesignJet T1100 printer.
Secure Disk Erase (SDE)
In either of the two secure methods described above (Secure Fast Erase and Secure Sanitizing Erase), there is also
the option to sanitize the whole disk. The sanitizing method removes any user data in a secure manner, so that the
device can safely be moved from a secure location to an unsecure location. All disk erasing will be carried out via the
same level of security erase.
This setting can be used via Web Jetadmin, EWS or the Control Panel’s Service menu, which is only accessible with
the help of an HP Support representative.
• HP Web Jetadmin access: The user interface that manages the Secure File Erase and Secure Disk Erase
functionality is the HP Web Jetadmin. This is the same functionality that is used in the Web Jetadmin device
plug-ins for LaserJet printers, which enables you to set the same global options across your fleet of HP
LaserJets and HP DesignJets. The following example shows how to configure the HP DesignJet T2300
using the Web Jetadmin. Note that in the Web Jetadmin this option is called Secure Storage Erase.
31HP DesignJet and PageWide XL Printers Security Features
• Printer Front Panel access: Once you have entered the Service Menu with the help of an HP Support
representative, you can perform the Secure Disk Erase using the same 3 options that you have in Web
Jetadmin. Note that the name of the feature in the front panel is Disk Wipe DoD 5220.220M, and that the
three options are called Insecure Mode, 1-pass mode and 5-pass mode.
Before you start the erase operation, you must first select the security level (sometimes referred to as sanity level).
The printer will then warn you that the erase operation is a process which deletes all data and takes a long time.
Once you accept, the printer will begin the process, and will display a progress bar until complete. All data will be
wiped using the selected method, and the printer’s firmware will be restored to the latest version installed before
this operation.
The time that this action will take depends on the amount of information stored on the HDD, the printer model and
the option selected to perform it. The average time is:
Insecure Mode: 1 minute
1-pass mode: 2 days
5-pass mode: 2 weeks
The following screens show how to perform a secure hard disk erase on the HP DesignJet T2300 printer.
32HP DesignJet and PageWide XL Printers Security Features
Scan to network (HP DesignJet T2500, T2530, T3500, T2600, XL3600 eMFP Series)
A scanned image may be saved on a USB flash drive or in a network folder. The USB flash drive option requires no
preparation, but the network folder option will not work until it has been set up in the following way.
1. Create a folder on a computer that the scanner can access through the network.
2. Create a user account on the same computer for the printer (scanner user).
3. Change the sharing options of the folder, so that it is shared with the scanner user, and assign full control of
33HP DesignJet and PageWide XL Printers Security Features
the folder to that user.
4. Create a share name for the folder.
NOTE: It is important to complete the above steps before starting the remaining steps below.
5. In the printer's Embedded Web Server, select the Setup tab and then Scan to network.
6. On the Scan to network page, click Add folder details, and fill in the various fields.
• The Server name should contain the network name of the remote computer. This remote computer
must be connected in the local network to the printer.
• The Folder name should contain the share name of the folder.
• The User name should contain the name of the scanner user.
• The User password should contain the password of the scanner user.
• The Domain name should contain the name of the domain in which the user name exists. If the
scanner user does not belong to any domain, leave this field empty.
The server and folder names are used to connect to the shared folder by building a network folder path as
follows: \\SERVER NAME\FOLDER NAME
7. Click Apply to save the configuration.
The printer automatically checks that it can access the network folder.
EXAMPLE: CREATE A SCAN-TO-NETWORK FOLDER USING WINDOWS
1. Create a new user account for the scanner user on the remote computer. You can use an existing user
account for this purpose, but it is not recommended.
2. Create a new folder on the remote computer (unless you want to use an existing folder).
3. Right-click the folder and select Properties.
4. In the Sharing tab, click the Advanced Sharing button.
34HP DesignJet and PageWide XL Printers Security Features
5. Check the Share this folder box.
6. You need to ensure that the scanner user has full read/write control over the shared folder. To do this, click
Permissions and grant Full Control to the user (or to any suitable group that includes that user).
7. If there is a Security tab in the Properties window for your folder, then you must also grant the same user
Full Control over the folder in the Security tab. Only some file systems such as NTFS require this.
35HP DesignJet and PageWide XL Printers Security Features
The scanner user can now access the folder and write files to it. Next, you must configure the printer to send
scans to the folder.
8. In the Home screen of the printer's Embedded Web Server, select the Scan to network tab.
9. On the Scan to Network page, click Add folder details:
If the printer has already been configured for scanning to the network and you now want to use a different
shared folder, click Modify.
36HP DesignJet and PageWide XL Printers Security Features
Enter the Host name or IP address of the remote computer, the name of the shared folder, and the user
name and password of the scanner user that you have already created on the remote computer.
Leave the user domain field empty unless the user is a member of a Windows domain. If the user is only a
local user of the remote computer, leave the field empty.
You can use the host name (instead of the IP address) in the server name field only if the shared folder is on
a Windows computer in the same local network. This must be a simple name (up to 16 characters long)
without a domain suffix (i.e. without any dots in the name). Fully qualified DNS domain names are supported,
except for T2300.
10. Click Apply to save the configuration.
The printer automatically checks that it can access the network folder.
You can check at any later time that the shared folder remains accessible by clicking Verify in the Embedded
Web Server. A correctly configured shared folder can become inaccessible if the user’s password is changed,
or if the shared folder is moved or deleted.
EXAMPLE: CREATE A SCAN-TO-NETWORK FOLDER USING MAC OS
NOTE: Scan to Network is currently supported on Mac OS 10.9 (Maverick) and previous versions.
1. Create a new user account for the scanner user on the remote computer. You can use an existing user
account for this purpose, but it is not recommended.
2. Create or choose a folder on the remote computer. By default, Mac OS users have a “Public Folder” that can
easily be used for this purpose.
3. Open System Preferences and select the Sharing icon.
37HP DesignJet and PageWide XL Printers Security Features
4. Make sure the scanner user has Read & Write access to the folder.
5. Click Options.
6. Check the Share files and folder using SMB box, and make sure that the scanner user is checked in the On
column.
7. Click Done. You will now see file sharing enabled and Windows sharing: On.
38HP DesignJet and PageWide XL Printers Security Features
The scanner user can now access the folder and write files to it. Next, you must configure the printer to send
scans to the folder.
8. From the Home screen of the printer's Embedded Web Server, select the Setup tab and then Scan to
network.
9. On the Scan to network page, click Add folder details.
If the printer has already been configured for scanning to the network and you now want to use a different
shared folder, click Modify.
Enter the IP address of the remote computer, the name of the shared folder, and the user name and
password of the scanner user that you have already created on the remote computer.
You cannot use the remote computer’s host name as the server name, as this is only supported for
computers running Windows. You must use the IPv4 or IPv6 address.
Leave the user domain field empty.
10. Click Apply to save the configuration.
The printer automatically checks that it can access the network folder.
39HP DesignJet and PageWide XL Printers Security Features
You can check at any later time that the shared folder remains accessible by clicking Verify in the
Embedded Web Server. A correctly configured shared folder can become inaccessible if the user’s
password is changed, or if the shared folder is moved or deleted.
2.5.1.1 Troubleshooting scan to network connectivity issues
If you are unable set the Scan to network, try the following:
• Check that you have filled in each field correctly.
• Check that the printer is connected to the network.
• Check that the folder is shared.
• Check that you can put files into the same folder from a different computer on the network, using the
printer's logon credentials.
• Check that the printer and the remote computer are on the same network subnet.
• Check that the Firewall does not block de CIFS/SMB ports.
• Try a basic network configuration, connect the printer directly to the computer.
Notes:
• Direct hosted SMB traffic (not using NetBIOS) uses port 445 (TCP and UDP).
• NetBIOS over TCP uses the following ports: UDP ports 137,138; TCP ports 137,139.
• Scan to network is not supported within the following environments/protocols: Active Directory, Kerberos,
NFS and SSPI protocols.
• Scan to Cluster Server environment is supported in newer printers regardless if DFS is installed or not.
Previous MFP series do not support scan to cluster server environment. You can check the current models
that support this feature in the following table.
Printer model Product Number Scan to Cluster Server
environment supported
HP DesignJet T2600 36-in Multifunction Printer 3XB77A Yes
HP DesignJet T2600 36-in PostScript Multifunction Printer 3XB78A Yes
3XB78F
HP DesignJet T2600dr 36-in Multifunction Printer Y3T75A Yes
HP DesignJet T2600dr 36-in PostScript Multifunction Printer 3EK15A Yes
3EK15B
3EK15F
HP DesignJet XL 3600 36-in Multifunction Printer 6KD23A Yes
6KD23G
6KD23H
6KD23F
6KD23L
6KD23M
6KD23N
40HP DesignJet and PageWide XL Printers Security Features
HP DesignJet XL 3600 36-in Multifunction Printer PS 6KD24A Yes
6KD24G
6KD24H
6KD24F
6KD24L
6KD24M
6KD24N
HP DesignJet XL 3600dr 36-in Multifunction Printer 6KD25A Yes
6KD25G
6KD25H
6KD25F
6KD25L
6KD25M
6KD25N
HP DesignJet XL 3600dr 36-in Multifunction Printer PS 6KD26A Yes
6KD26G
6KD26H
6KD26F
6KD26L
6KD26M
6KD26N
4VW11A Yes
HP PageWide XL 3920 Multifunction Printer
4VW13A
HP PageWide XL 4200 Multifunction Printer 4VW15A
HP PageWide XL 4700 Multifunction Printer 4VW17A
4VW19A
HP PageWide XL 5200 Multifunction Printer 4VW20A
HP PageWide XL Pro 5200 MFP Printer
HP PageWide XL Pro 8200 MFP Printer
Scan to FTP folder
1. Create a folder on an FTP server.
2. Ensure that you know the server name, user name, and password for the FTP server.
NOTE: You must complete the above steps for one option or the other before starting the remaining steps
below.
3. In the printer's Embedded Web Server, select the Setup tab and then Scan to network. See Access the
Embedded Web Server.
41You can also read