OWNER'S MANUAL - Version 1.0 - Origin Effects
←
→
Page content transcription
If your browser does not render page correctly, please read the page content below
OWNER’S MANUAL

Version 1.0
OR IGIN RAILWAYS
BRITISH EFFECTS
www.origineffects.com
Origin Effects®, Cali76®, SlideRIG®, and RevivalDRIVE® are all registered trademarks.
All other product names and trademarks are the property of their respective owners and are hereby
acknowledged.
No part of this publication may be reproduced in any form or by any means, whether mechanical or
electronic, without the written permission of Origin Effects Limited.
Origin Effects Limited reserves the right to change the features and specifications described herein without
notice or obligation. Origin Effects Limited cannot be held responsible for any loss or damage arising
directly or indirectly from any error or omission in this manual.
PLEASE READ ALL INSTRUCTIONS, PAY SPECIAL ATTENTION TO SAFETY WARNINGS.
Document version 1.0
© Origin Effects Limited 2020
IMPORTANT:
This product is designed to be powered from a 9VDC, >120mA power supply with 2.1mm centre-
negative barrel connector.
The voltage is boosted internally for optimised headroom. Powering from more than 9V will not
increase headroom further and may cause damage if connected for prolonged periods of time. Do
not exceed 18V.
An isolated, regulated, linear power supply is recommended to minimise power-related noise and
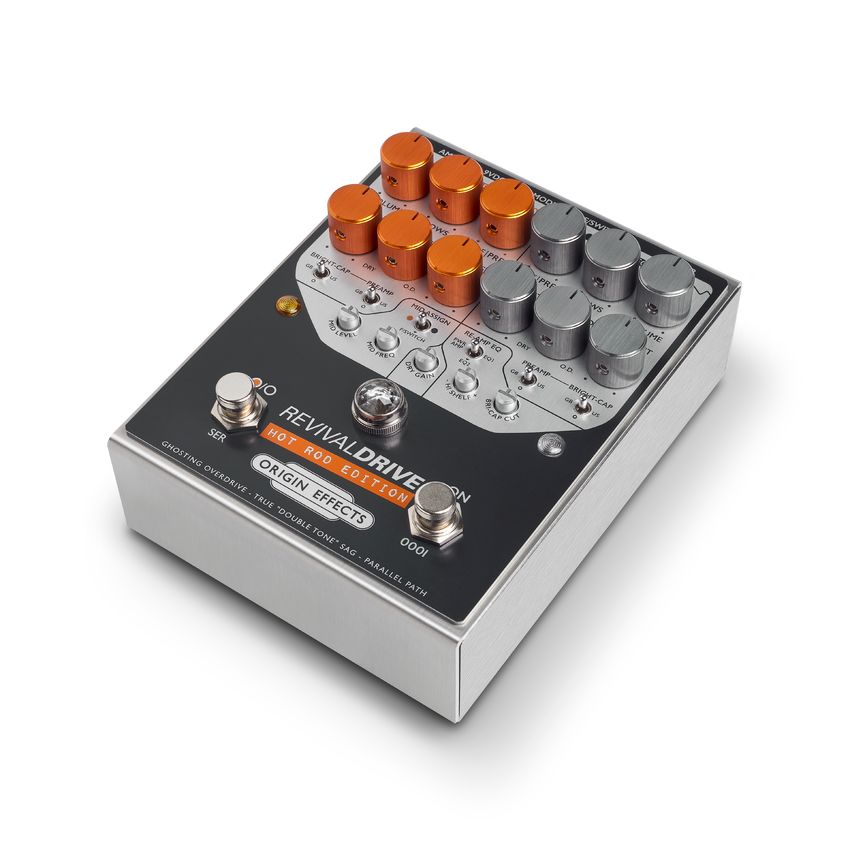
avoid damage from voltage surges and other over-voltage conditions.Welcome to the RevivalDRIVE Hot Rod
Welcome to the RevivalDRIVE Hot Rod
From searing lead tones to super-saturated chords and palm-muted riffs, the RevivalDRIVE Hot Rod
delivers two channels of aggressive high-gain.
This super-charged version of our celebrated RevivalDRIVE pedal is designed to deliver massive amounts
of overdrive and sustain, by paying homage to the heavily modified amps that came to define the sound of
hard rock and heavy metal.
In developing the RevivalDRIVE Hot Rod, we analysed the most influential amp mods and altered the
RevivalDRIVE’s signal path to create a range of hot rodded tones worthy of the greatest rock gods.
Using all-analogue components and replacing the valves with discrete transistor-based circuitry, we have
reproduced the sound and circuit behaviour of these “hot rods”, all in a fully variable and controllable way.
This means that you can use the RevivalDRIVE Hot Rod to nail the sound of a particular amp or recording,
or you can mix and match the various properties of different amps to create your own sound.
At the same time, the RevivalDRIVE Hot Rod incorporates a range of controls that will tailor its response to
suit the amp you’re plugging into. Unlike the vast majority of overdrive pedals, the RevivalDRIVE Hot Rod is
genuinely designed to sound fantastic with any amp.
With tons of tweakability, including a full adjustable mid boost, dry blend controls, and the unique GHOST
feature, the RevivalDRIVE Hot Rod is a fairly complex device. We invite you read through this manual
so you can gain a full understanding of all it can do. But if you can’t wait, by all means skip ahead to the
Sample Settings on page 14 and start playing!
Simon Keats
Designer and Origin Effects founder
3Welcome to the RevivalDRIVE Hot Rod
Table of Contents
Welcome to the RevivalDRIVE Hot Rod. . . . . . . . . . . . . . . . . . . . . . . . . . . . 3
Connecting the RevivalDRIVE Hot Rod. . . . . . . . . . . . . . . . . . . . . . . . . . . . 5
Operating the Pedal . . . . . . . . . . . . . . . . . . . . . . . . . . . . . . . . . . . . . . 5
Suggested Connection Settings . . . . . . . . . . . . . . . . . . . . . . . . . . . . . . . . 6
Plugging into a guitar amp, bass amp or amp modeller . . . . . . . . . . . . . . . . . . 6
Plugging into a flat-response power amp, recording interface or mixer DI . . . . . . . . 6
Valve & Silicon Rectifier Channel Controls . . . . . . . . . . . . . . . . . . . . . . . . . . 7
Mid Boost Controls . . . . . . . . . . . . . . . . . . . . . . . . . . . . . . . . . . . . . . 9
DRY GAIN Control . . . . . . . . . . . . . . . . . . . . . . . . . . . . . . . . . . . . . . 10
Re-amp EQ Controls . . . . . . . . . . . . . . . . . . . . . . . . . . . . . . . . . . . . . 10
Custom Panel Controls: “RevivalDRIVE Hot Rod CUSTOM”. . . . . . . . . . . . . . . . . 11
Mode DIP Switch . . . . . . . . . . . . . . . . . . . . . . . . . . . . . . . . . . . . . . . 12
Revival Footswitch . . . . . . . . . . . . . . . . . . . . . . . . . . . . . . . . . . . . . . 13
Sample Settings. . . . . . . . . . . . . . . . . . . . . . . . . . . . . . . . . . . . . . . . 14
Appendices. . . . . . . . . . . . . . . . . . . . . . . . . . . . . . . . . . . . . . . . . . 16
Appendix A: Physical Specification. . . . . . . . . . . . . . . . . . . . . . . . . . . . 16
Appendix B: Performance Specification . . . . . . . . . . . . . . . . . . . . . . . . . 16
Appendix C: Connector Pin Outs. . . . . . . . . . . . . . . . . . . . . . . . . . . . . 17
Appendix D: Safety Notices . . . . . . . . . . . . . . . . . . . . . . . . . . . . . . . 17
Appendix E: Warranty . . . . . . . . . . . . . . . . . . . . . . . . . . . . . . . . . . 18
About Origin Effects. . . . . . . . . . . . . . . . . . . . . . . . . . . . . . . . . . . . . . 19
4Connecting the RevivalDRIVE Hot Rod
Connecting the RevivalDRIVE Hot Rod
INSTR input: Connect to your guitar, bass or other instrument.
AMP output: Connect to your amp, power amp, mixer or recording interface.
9VDC input: Connect a 9VDC 2.1mm centre-negative mains power supply which can provide at least
120mA.
F/SWITCH input: Connect the Revival Footswitch (sold separately).
AMP 9VDC C F/SWITCH INSTR
Operating the Pedal
ON footswitch: Toggles between BYPASS (“off”) and EFFECT (“on”) modes.
O/O channel footswitch: Toggles between the VALVE RECTIFIER and SILICON RECTIFIER channels.
Channel indicator LEDs: The currently selected channel is indicated by the VALVE RECTIFIER (orange)
and SILICON RECTIFIER (white) LEDs. These remain active when the effect is bypassed.
Jewel light: The central jewel lamp will illuminate when the effect is engaged. Because it’s directly
connected to the power supply, the lamp will dim as the power amp “sags”, just like the jewel lamp on a
vintage amp.
O/O ON
5Suggested Connection Settings
Suggested Connection Settings
Plugging into a guitar amp, bass amp or amp modeller
RE-AMP EQ: Select EQ1 (for brighter sounding
amps) or EQ2 (for darker sounding amps) on the
RE-AMP EQ switch. Use the HI SHELF boost/cut
control and BRI-CAP CUT filter to adjust for the high-
frequency response of your amp.
Note that in the case of the “Custom” model,
switching to the EQ2 setting enables the custom
panel controls, which offer compatibility with bright
and dark amps alike. Please see Custom Panel
ON Controls: “RevivalDRIVE Hot Rod CUSTOM” on
page 11 for more information.
1 2 3
Plugging into a flat-response power amp, recording interface or mixer DI
RE-AMP EQ: Select PWR AMP on the RE-AMP EQ switch and use the HI SHELF boost/cut control to
fine-tune the high-frequency response. Set the BRI-CAP CUT filter control fully counter-clockwise (no treble
roll-off).
MODE DIP switch: On the rear of the pedal, set switch 1 on the MODE DIP switch to the upward position.
When the RevivalDRIVE Hot Rod is in BYPASS mode, your input signal will still pass through the preamp
EQ filters.
Cabinet simulation
device or software
ON
1 2 3
Please note that a cabinet simulator will be required for DI applications where the signal is to be reproduced
via a full-range speaker system.
6Valve & Silicon Rectifier Channel Controls
Valve & Silicon Rectifier Channel Controls
The RevivalDRIVE Hot Rod features two channels, selectable via footswitch. While the controls are
identical, the two channels offer a choice of rectifier styles.
Please note: the VALVE RECTIFIER channel can be switched to a second SILICON RECTIFIER channel
using the rear-panel MODE DIP switch. See Mode DIP Switch on page 12 for more information.
VOLUME: In true vintage amp style, we’ve gone with the term “VOLUME”, but we could equally have called
this control “gain”. Turn clockwise for more overdrive, counter-clockwise to clean things up.
LOWS: Having set the desired treble response using the PREAMP switch, the LOWS control allows you to
adjust the amount of bass pushing the drive circuitry.
OUTPUT: Sets the overall output level of the channel. Adjust the VOLUME and OUTPUT controls to
achieve the desired combination of distortion and level.
BLEND: This control lets you adjust the mix between the dry input signal (DRY) and the overdriven signal
O/O ON
created by the RevivalDRIVE Hot Rod (O.D.). From 100% O.D. when the control is turned fully clockwise,
you can progressively mix your original clean tone back in to add more clarity and definition by turning the
control counter-clockwise.
Please see notes on the DRY GAIN Control on page 10 and the BLEND OVERRIDE function under
Revival Footswitch on page 13 for more on this control.
7Valve & Silicon Rectifier Channel Controls
MORE/PRES: This control combines two parameters, both related to the effects of negative feedback in the
power amp stage.
PRES (turn clockwise): The classic “Presence” knob, the PRES control releases the higher
frequencies from the effects of negative feedback as you turn it clockwise from the centre position.
This has the effect of progressively boosting higher frequencies in vintage Marshall and Trainwreck
fashion.
MORE (turn counter-clockwise): The MORE control progressively reduces negative feedback in
the pedal’s output stage, increasing gain but also varying playing feel by modifying the clean-to-
overdriven transition characteristics.
With the control centred at 12 o’clock, there is a definite threshold to this transition, with an abrupt
switch from clean to overdriven once you pick hard enough. Turning the control fully counter-
clockwise completely removes negative feedback, delivering maximum gain, early onset of distortion
and a smooth, gradual transition from clean to fully overdriven. It will also slightly increase the
amount of background hiss, which would otherwise be counteracted by negative feedback.
In general terms, the response at 12 o’clock is akin to a Marshall with the “Presence” knob at zero.
Turn the knob fully counter-clockwise and the pedal behaves like a Vox AC30, with no negative
feedback whatsoever. In between, you’ll find Fender Blackface territory.
Please refer to the Sample Settings on page 14 to learn how to set this control to match the performance
of your favourite style of amp.
GHOST: This control lets you introduce “ghost tones” by varying the amount of capacitance in the pedal’s
virtual amp-style power supply. Turn clockwise to lower capacitance and create more of the ghosting effect.
The GHOST control also affects power amp sag onset and recovery timing – how quickly the output level
drops and then returns to normal when hit with a loud note. This is more noticeable when using the VALVE
RECTIFIER channel. Turned fully clockwise (lower capacitance), the transition in and out of sag is almost
immediate. Turned fully counterclockwise (higher capacitance), the onset and recovery times are at their
slowest.
In general, faster transition times will allow the pedal to sag in response to the individual notes contained
in a musical passage, as the power supply has time to recover in the pauses between notes. However, too
fast and you may struggle to hear the rapid onset of sagging. Slower transition times will tend to sag across
entire passages of notes, which can also be less noticeable. Setting the GHOST control between these two
extremes results in a “spongey” playing feel.
PREAMP: The PREAMP switch offers three hot-rodded amp tone-shapes.
Centre position: A less extreme tone shape – almost flat but with a
subtle treble lift. Overall, this position is warm and round.
GB (switch left): Modelled after a ‘70s master volume Marshall – treble
and mid tone controls set full, with the bass set very low. This equates to
a tone rich in mids, with a tight, “mush-free” bass.
US (switch right): Applies a similar approach to a modified Fender amp
for a cutting, bright tone.
8Valve & Silicon Rectifier Channel Controls
BRIGHT-CAP: This switch connects a capacitor to the VOLUME control, allowing high frequencies to
sidestep any attenuation in exactly the same way as the “Bright” switch found on many Fender amps or
using a Marshall’s bright channel.
Off (centre position): No capacitor added – VOLUME control affects all
frequencies.
US (switch right): High frequencies see maximum gain while the low
and mid frequencies remain clean, or overdriven, depending on where
the user sets the VOLUME control. Perfect for bright, sparkly lower-gain
sounds.
GB (switch left): The effect is far more pronounced, with both upper-
mids and high frequencies allowed to bypass the volume control.
Mid Boost Controls
The RevivalDRIVE Hot Rod features a powerful mid-range boost that can be used to modify the overdriven
tone or provide a solo boost to help you cut through the mix. Fully variable in both level and centre
frequency, the MID BOOST can be applied to either channel or remotely activated using the optional
footswitch.
ON
MID ASSIGN: This three-way switch applies the MID BOOST to either the VALVE RECTIFIER channel
(switch left) or the SILICON RECTIFIER CHANNEL (switch right). With the switch in the central, F/SWITCH
position, the MID BOOST is deactivated but can be switched in at any time using the optional footswitch.
Please note: in F/SWITCH mode, the MID BOOST is applied to both the DRY and O.D. signals when
activated. In all cases, the MID BOOST is not active when the pedal is in BYPASS mode.
MID LEVEL: Sets the level of the MID BOOST, from +2dB to +8.5dB.
MID FREQ: Sets the centre frequency of the MID BOOST, ranging from 800Hz to 2kHz.
9DRY GAIN Control
DRY GAIN Control
The DRY GAIN trimmer adjusts the level of the DRY signal that is mixed with
the O.D. signal using each channel’s BLEND control.
Since the pedal’s overdrive circuitry can introduce considerable additional
gain, the DRY GAIN control allows you to effectively balance the relative
levels of the DRY and O.D. signals when using the BLEND control and the
footswitchable BLEND OVERRIDE function (see FOOTSWITCH below).
Please note: the DRY GAIN control is not active when the pedal is in BYPASS
mode.
Re-amp EQ Controls
The RE-AMP EQ ensures compatibility with a wide range of amplifiers. Instead of altering your amp tone
controls to suit the RevivalDRIVE Hot Rod, set your amp for the desired clean sound then use the RE-AMP
EQ controls to adjust the RevivalDRIVE Hot Rod’s output accordingly.
RE-AMP EQ switch: The RE-AMP EQ switch offers a choice of three different output filters.
PWR AMP: Use this setting when plugging into a flat-response power amp. This EQ is set more or
less flat, with a subtle bass boost applied after the overdrive circuit to imitate the resonant loading of
the speaker in a guitar amp.
EQ1: Designed to suit the response of a Blackface Fender amp, EQ1 applies a low-pass filter to roll
off excessive highs. Use this setting when plugging into a bright-voiced guitar amp.
EQ2: Voiced for a Marshall amp with the channels bridged, EQ2 sits between the other two,
applying a high shelf cut to gently rein in high frequencies.
With the additional front-mounted filter controls on the RevivalDRIVE Hot Rod CUSTOM, the EQ2
position on the standard RevivalDRIVE Hot Rod gives way to a highly tweakable custom filter,
designed to deliver universal compatibility for most mainstream guitar amplifiers.
See Custom Panel Controls: “RevivalDRIVE Hot Rod CUSTOM” below for more information.
10Custom Panel Controls: “RevivalDRIVE Hot Rod CUSTOM”
HI SHELF: A fairly conservatively voiced treble boost/cut control for making small adjustments to the
high-frequency component of your tone. In particular, it’s designed to counteract Fender-style treble tone
controls. This shelving filter provides up to +/-6dB. Starting from 12 o’clock (no boost or cut), turn counter-
clockwise to tame highs if your amp sounds too bright, or turn clockwise to boost highs on a dark-sounding
amp.
BRI-CAP CUT: This low-pass/high-cut filter is designed to compensate for the tonal effects of the “Bright
Cap” (if any) wired to the host amplifier’s volume control, which can lead to a very bright and harsh sound
when fed by an overdrive pedal. In the fully counter-clockwise position, the BRI-CAP CUT control has no
effect. Turn clockwise to progressively cut more highs. For best results, the BRI-CAP CUT trimmer should
be adjusted whenever you make significant changes to your amp’s volume settings.
Custom Panel Controls: “RevivalDRIVE Hot Rod CUSTOM”
Working in tandem with the RE-AMP EQ controls on top of the RevivalDRIVE Hot Rod (see above), the
RevivalDRIVE Hot Rod CUSTOM’s Custom Panel controls provide additional options to fine-tune the
pedal’s output to the response of your chosen amp.
SHELF FREQ: This three-way toggle switch varies the shelf frequency of the HI SHELF filter trimpot on top
of the pedal, allowing greater flexibility.
CUT FREQ: Varies the low-pass frequency of the BRI-CAP CUT filter trimpot on top of the pedal, for
optimal compatibility with all vintage Fender and Marshall amps.
The SHELF FREQ and CUT FREQ controls are active in all RE-AMP EQ switch positions.
To activate the ADJ, FREQ, and MODE controls set the RE-AMP EQ switch on top of the pedal to the
central EQ2 position.
ADJ: Turn clockwise to reduce treble and boost bass, and counter-clockwise to increase treble and reduce
bass.
FREQ: This three-way switch shifts the frequency focus of the EQ up or down.
MODE: Select MODE I when using a full-range amp that sounds wooly or muddy. Select MODE II when
addressing an overly bright amp that needs taming.
11Mode DIP Switch
Mode DIP Switch
Located on the rear panel, the MODE DIP switch controls the following settings.
ON
1 2 3
1 DRY/BYPASS DIP SWITCH: This switch is only active when the REAMP switch is set to the PWR AMP
position. With PWR AMP selected, the DRY/BYPASS DIP switch modifies the BYPASS and DRY signal
path to incorporate the pedal’s PREAMP circuitry.
In bypass, with switch 1 in the downward position, the signal present at the input connector is routed to the
pedal’s output via a high-quality buffer. With the pedal engaged, any blended DRY component is fed from
the same buffer. Use this setting when plugging into a guitar amp.
When plugging into a flat-response power amp, move the switch to the upward position. When the pedal is
bypassed, the input signal now passes through the preamp filter stage, controlled by the PREAMP switch
on the currently active channel. This means you can still take advantage of the RevivalDRIVE Hot Rod’s
classic amp-style tone shaping, even when not using the main overdrive circuit. The pedal’s two channels
remain switchable even in BYPASS mode, allowing you to set up two distinct tones.
2 RECTIFER DIP SWITCH: Move switch 2 to the up position to transform the VALVE RECTIFIER channel
into a second SILICON RECTIFIER channel.
3 GHOSTING DIP SWITCH: Switch 3 toggles between 50Hz/British (switch down) and 60Hz/USA (switch
up) simulated mains frequencies, subtly altering the pitch of the ghost tones generated.
12Revival Footswitch
Revival Footswitch
Connecting the Revival Footswitch (sold separately) to the F/SWITCH input at the rear of the pedal
provides two further functions.
MID-ENGAGE: With the pedal’s MID ASSIGN switch set to F/SWITCH, this allows you to apply the
adjustable mid boost to whichever channel is currently selected.
Please note: the MID BOOST is applied to both the DRY and O.D. signals mixed by the BLEND control.
The MID BOOST function is not active when the pedal is in BYPASS mode.
BLEND OVERRIDE: This footswitch “overrides” or removes each channel’s BLEND control from the signal
path. With the BLEND knob set for a mix of DRY and O.D. signals, engaging the BLEND OVERRIDE
effectively removes the DRY component and reverts to a 100% O.D. signal.
This offers additional flexibility akin to having another channel on your amp. For example, with the channel
controls set for medium gain and the BLEND knob at 12 o’clock, engaging the BLEND OVERRIDE
footswitch lets you go from an organic clean tone with a little grit to a fully overdriven sound for solos.
By carefully adjusting the DRY GAIN trimmer, you can control the change in volume – up, down or unity
gain – that occurs when engaging BLEND OVERRIDE. For example, you could set up your core drive
tone with BLEND OVERRIDE engaged, then transition to a cleaner sound of equal or greater volume by
disengaging BLEND OVERRIDE and turning the DRY GAIN control up.
13Sample Settings
Sample Settings
Princeton Boogie
Valve rectifier channel
Inspired by the lead tones of Santana’s modded
Fender Princeton, these settings deliver a controlled,
mid focused overdrive sound. In the late 60s, Randall
Smith was hot rodding Fender Princeton combos for
more gain and sustain. This venture later turned into
MESA/Boogie.
Step into Boogie MK1 territory by transforming the
spongey simulated valve rectifier channel into a
harder sounding silicon rectifier using MODE DIP
switch 2.
Hot Rod Plexi
O/O ON
Silicon rectifier channel
Experience the soaring lead tones of a late 70s Plexi
modded with cascaded gain stages.
We’ve replicated the response of an early master
volume Marshall, a predecessor to the much loved
JCM800 series.
‘Snip’ the bright cap by moving the BRIGHT CAP
switch to the centre position, further modifying your
tone.
14
O/O ONSample Settings
Sample Settings Continued...
Orange Squash
Valve rectifier channel
Max out the VOLUME control with these settings
for pure power amp explosion! A powerful sound
reminiscent of a wall of cranked Orange stacks.
The sagging power stage in conjunction with the
simulated valve rectifier compresses each note and
adds harmonic complexity to sustained chords.
Liverpool Hot Rod
Silicon rectifier O/O
channel ON
Like an AC30 on steroids! We’ve voiced this
setting after the well respected Trainwreck
Liverpool amps which pushed the British EL84
design to the limit.
These settings provide a glassy lead tone with
ultra-sensitive dynamics. Assign some MID
BOOST to the SILICON RECTIFIER channel to
fatten up the sound of singlecoil pickups.
15
O/O ONAppendices
Appendices
Appendix A: physical specification
RevivalDRIVE Hot Rod:
Unboxed Boxed
Weight 1200g 42oz 1450g 51oz
Length 160mm 6 5/16” 190mm 7 8/16”
Depth 117mm 4 10/16” 180mm 7”
Height 59mm 2 5/16” 95mm 3 11/16”
RevivalDRIVE Hot Rod CUSTOM:
Unboxed Boxed
Weight 1250g 44oz 1500g 53oz
Length 165mm 6 8/16” 190mm 7 8/16”
Depth 117mm 4 10/16” 180mm 7”
Height 59mm 2 5/16” 95mm 3 11/16”
Appendix B: performance specification
Measurement Value
Input impedance 1M Ω
Output impedance 1k Ω
Current draw 120mA
Power supply requirements 9V 2.1mm centre negative adapter
16Appendices
Appendix C: connector pin outs
Footswitch 1/4” jack socket:
Pin Description
Tip MID BOOST
Ring BLEND OVERRIDE
Sleeve Ground
Appendix D: safety notices
General safety
Keep these instructions and heed all warnings. Do not use this apparatus near water. Clean only with a
dry cloth. Do not install near any heat sources such as radiators, heat registers, stoves or other apparatus
(including amplifiers) that produce heat. Refer all servicing to qualified service personnel. No user
serviceable parts inside.
When using an external power supply, use only attachments/accessories specified by Origin Effects.
Protect the power cord from being walked on or pinched particularly at plugs, convenience receptacles,
and the point where they exit from the apparatus. Do not defeat the safety purpose of the polarised or
grounding-type plug. A polarised plug has two blades with one wider than the other. A grounding type plug
has two blades and a third grounding prong. The wide blade or the third prong are provided for your safety.
If the provided plug does not fit into your outlet, consult an electrician for replacement of the obsolete outlet.
Unplug this apparatus during lightning storms or when unused for long periods of time.
FCC certification
This equipment has been tested and found to comply with the limits for a Class B digital device, pursuant
to part 15 of the FCC Rules. These limits are designed to provide reasonable protection against harmful
interference in a residential installation. This equipment generates, uses and can radiate radio frequency
energy and, if not installed and used in accordance with the instructions, may cause harmful interference
to radio communications. However, there is no guarantee that interference will not occur in a particular
installation. If this equipment does cause harmful interference to radio or television reception, which can be
determined by turning the equipment off and on, the user is encouraged to try to correct the interference by
one or more of the following measures:
• Reorient or relocate the receiving antenna.
• Increase the separation between the equipment and receiver.
• Connect the equipment into an outlet on a circuit different from that to which the receiver is connected.
• Consult the dealer or an experienced radio/TV technician for help.
17Appendices
Warning
Any changes or modifications not expressly approved by Origin Effects Limited could void the user’s
authority to operate the equipment.
For customers in Canada: This Class B digital apparatus complies with Canadian Interference Regulations
CAN ICES-3(B)/NMB-3(B). Pour le Canada: Où indiquée sur le produit: Cet appareil numérique de la
classe B est conforme à la norme CAN ICES3(B)/NMB-3(B) du Canada.
RoHS
The crossed out wheely bin symbol indicates this product is classified as Waste Electrical and Electronic
Equipment (WEEE) in the European Union and should not be discarded with household waste. Other
territories may vary. Contact your local authority or Origin Effects for more information.
WARNING: This product can expose you to chemicals including nickel, which is known to the State of
California to cause cancer. For more information, go to www.P65Warnings.ca.gov
Evaluation of apparatus based on altitude not exceeding 2000m. There may be some potential safetyAbout Origin Effects
About Origin Effects
Origin Effects is the brainchild of Simon Keats, a guitarist, electronic engineer and analogue circuit
designer who has worked for the likes of Vox, Focusrite and Trident Audio. Having built bespoke effects
for professional musicians and producers for many years, he launched the Origin Effects brand in 2012 to
bring his exceptional designs to a wider audience.
His first two pedals – the Cali76 compressor and the unique SlideRig dual-chained compressor – were
soon followed by the Compact Series of compressors for guitar and bass. Widely recognised as some of
the best pedal compressors ever made, they have found favour with guitarists and bass players like David
Gilmour, Pino Palladino and John Mayer, as well as Grammy Award-winning producers like Paul Epworth,
Ross Hogarth and Terry Britten.
In 2018, Origin began a new chapter with the launch of the RevivalDRIVE, a groundbreaking overdrive
pedal that recreates the circuit topology, sound and response of a cranked non-master-volume valve amp.
www.origineffects.com
19You can also read