Paint and Colour Practical Conservation Guide for Heritage Properties
←
→
Page content transcription
If your browser does not render page correctly, please read the page content below
Practical Conservation Guide for Heritage Properties
Paint and Colour
In this guide: Introduction
Conservation of Paint and Paint and colour are important aspects to your home or
Colour commercial building as it accentuates the building’s features
Types of Modern Paint and lines, expresses design tastes and mood of a particular
Selecting Your Paint time, and protects the underlying materials from the
Colour elements. Maintaining painted surfaces is an ongoing job.
Paint Samples and Exterior paint will, on average, last five to eight years on
Documentation wooden surfaces. It is important that exterior paint be kept
Maintenance & Repair of in good condition, as it protects the underlying material
Wooden Painted Surfaces from moisture and consequent deterioration. Interior paint
Safety Precautions will typically last longer as it sustains less damage from the
Paint Removal Methods elements.
Removal of Paint on
Masonry Heritage conservationists recommend that paint should be
Graffiti Removal retained and repaired instead of replaced, whenever
Paint & Metals possible to preserve your home’s authenticity. Paint
removal and re-painting is one of the most demanding
conservation tasks and can present many health hazards.
We advise you to contact a qualified professional and/or resources for technical information, as well
as advice and safety precautions for paint removal, paint testing, and waste management.
Conservation of Paint and Colour
Prior to undertaking a painting project on your heritage property it is important to decide what type
of conservation project you wish to undertake: a preservation, rehabilitation or restoration project.
Preservation: No desired changes to the paint and colour. Paint is cleaned, maintained and repaired
as needed. If the paint requires new application, the new paint will match the existing paint in terms
of colour and type.
1446209 Page 1 of 14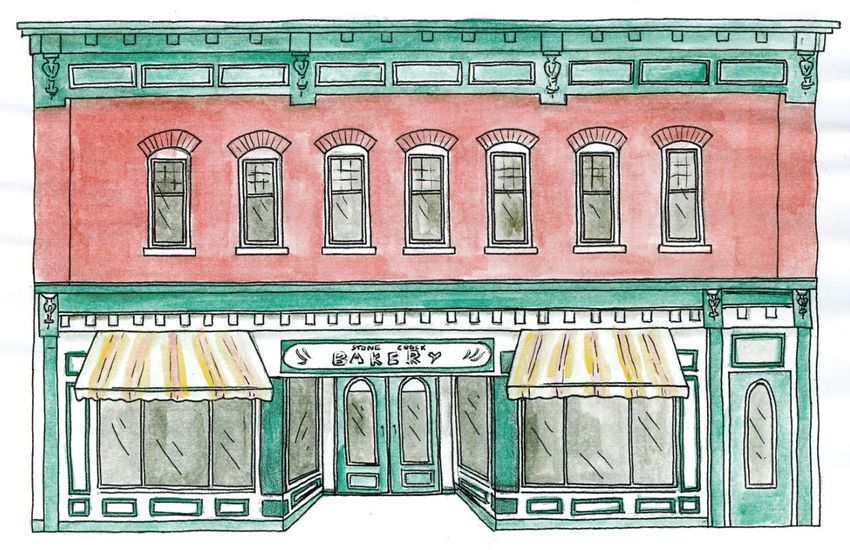
Paint and Colour
                                  Practical Conservation Guide for Heritage Properties

Rehabilitation: Aims for an efficient reuse or renovation of spaces or features. Paint colour
decisions can be based on research of similar examples with comparable architectural style and
era, historic paint research, the taste and opinion of the current owner, and economical factors.

Restoration: Aims to faithfully represent the property as seen during a carefully selected
period, most often the period of greatest significance for the property. The paint colours and
textures will be based on historical research, onsite collection of paint samples and laboratory
analysis. The evidence takes precedence over the preferences and tastes of the current owner.

Types of Modern Paints
A first step in all painting projects is determining the type of paint that you will be using. This
decision is based on the existing paint, the surface material and your desired finish. There are
several types of modern paint to choose from:

Primers and Sealers
Primers and sealers can be either oil or water based and should be matched to the existing
coating as well as the expected top coat. Primers are applied before the application of a new
coat of paint on an existing paint layer for optimal adhesion. Water-based paints should not be
applied to existing oil-based paint without an oil-based primer. Metal surfaces are prepared
with anti-rust or galvanized primers. Primer and paint should be bought in combination from
the same manufacturer.

Sealers are applied to prevent top coats of paint from soaking into unpainted wood or to
surfaces that have lost all previous paint in an effort to provide a uniform surface.

Oil-based and Alkyd Paints
Prior to the 1870’s, colour pigments mixed into linseed oil had only been used to cover the
homes of the wealthy due to its expense. Pre-mixed oil-based exterior paints were made widely
available in the 1870s.

Oil-based paints are best applied with brushes, and provide efficient adhesion and durability,
especially over previously painted surfaces with oil-based paints. These paints are slow drying.
Today, oil-based paints used for architectural coatings are steadily being phased out due to
newly developed latex and waterborne paints that are more environmentally friendly and
provide lower volatile organic compound (VOC) emissions.

Within the family of oil-based paints, alkyd paints refer to paints using alkyd resins as a binder.

1446209                                                                                         Page 2 of 14
Paint and Colour
Practical Conservation Guide for Heritage Properties
The use of these resins creates a quicker drying paint with the ability to sustain daily wear and
tear. Traditional alkyd paints have, for the most part, been discontinued due to their high level
of VOCs. Following the Government of Canada’s 2010 VOC regulations, the production of alkyd
paints have ceased with the exception of the following products, identified by Dulux Paints:
Flat for Calcimine (Stucco) Ceilings
Alkyd Dry fall
Stain sealing primers
Rust preventative metal paints
High gloss floor enamels
Although the use of traditional paints may be preferred by some, alternatives have since been
developed and continue to improve. Waterborne alkyd primers and paints preserve the high
performance of traditional alkyd paints, yet provide safer alternatives for interior application
due to their low VOC levels and minimal odour. These paints can also be cleaned with water
and soap, a much safer alternative to the use of mineral spirits required for traditional alkyd
paints.
Latex (Acrylic Waterborne) Paints
Latex paints are quick drying synthetic resins carried in water. They can be applied to surfaces
with a roller. They are very porous and will permit water from within to evaporate. They are
therefore recommended for exterior surfaces, such as masonry and shutters that might retain
water. They are also encouraged for their low level of VOCs. Latex paints need to be applied
following an oil-based primer for best adhesion results if the paint previously applied was oil-
based. Selections from historical colour palettes are available today.
Milk Paints
Milk paint is a historic type of paint that is environmentally friendly with no VOCs. It is
composed of milk protein (casein), limestone, clay, chalk, and natural pigments, with slight
variances. Although it does not have long retail longevity, it is mold resistant and very durable
once applied. It is appropriate for interior and exterior surfaces, and best applied on porous
surfaces. Milk Paint Bonding Agent (purchased online or from some paint retailers) can be
included in the mixture for better adhesion on previously painted and lacquered surfaces.
Calcimine/ Whitewash
Until the availability of pre-mixed oil-based exterior paints, building exteriors were primarily
white-washed. Whitewash consisted of a mixture of lime, water, with a little linseed oil.
Page 3 of 14
1446209Paint and Colour
Practical Conservation Guide for Heritage Properties
Calcimine, a type of modern water-based paint, produces the same appearance as traditional
whitewash. Today’s whitewashes however have a different texture in comparison to earlier
whitewashes.
Clear Coat Finishes
Glazes originally consisted of an oil and turpentine mixture. Today, they are also made using a
water base and can be applied by brush to stimulate the deep finish of heritage paints. A
heritage professional should be consulted to distinguish between the need of a glaze or high-
gloss enamel for your project.
Selecting Your Paint Colour
Regardless of the type of project the design guidelines listed below should be followed when
selecting paint colours:
1. The paint colours should be appropriate
Exterior paint colours are often chosen to accentuate the traditional building material. The
chosen colours should be appropriate to the style and period of the property, and respectful of
the neighborhood. Colours can be determined from paint samples (see “Paint Samples and
Documentation” below,) Heritage Conservation District (HCD) studies, historical research and
examples, and historical colour palettes.
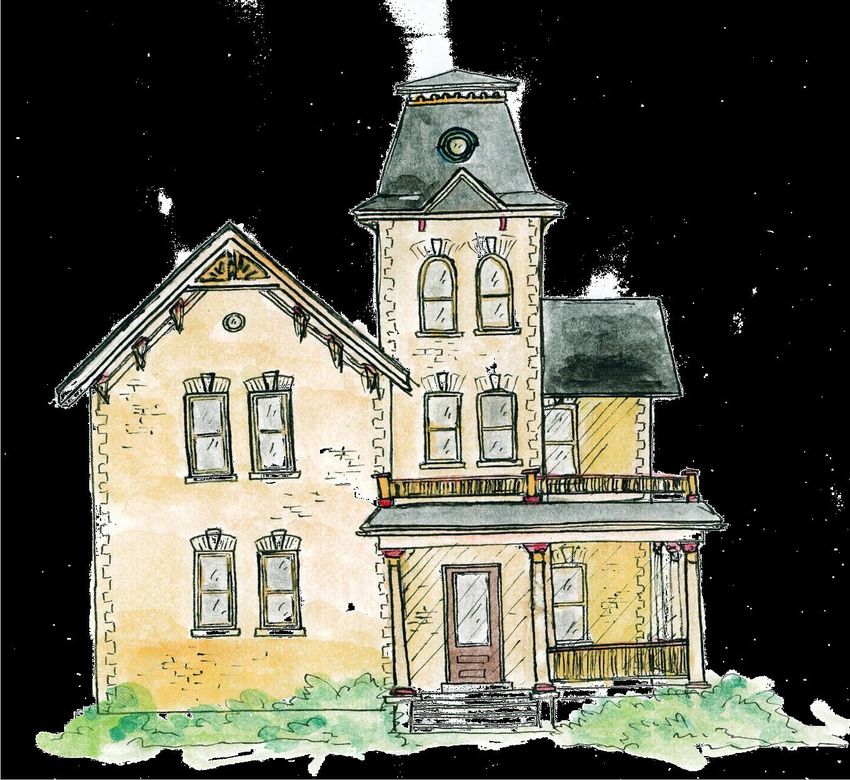
Ideal Colour
Palette
Cornice
(Dark with light
accents)
Brick
(Do not paint)
Window Sash
(Dark)
Window Frame
(Medium)
Sandstone Sill
(Do not paint)
Cornice
(Dark with light
accents)
Bracket Accent
(Light)
Bracket
(Dark)
Pilasters
(Medium)
1446209 Illustration: Commercial structure - Stone Crock Bakery, St. Jacobs, Woolwich Township (Amanda Sherrington, 2013)
Page 4 of 14Paint and Colour
Practical Conservation Guide for Heritage Properties
Ideal Colour Palette
Dentils
(Light)
Bargeboard
(Medium)
Cornice
(Light)
Bracket
(Dark with light accents)
Window Sash
(Dark)
Handrail
Window Frame
(Dark)
(Medium)
Balustrade
Keystone (Medium)
(Light)
Capital
Brick Lintel (Dark)
(Do not paint)
Column
Sandstone Sill (Light)
(Do not paint)
Column Base
Brick (Dark)
(Do not paint)
Brick Quoins
(Do not paint)
Door
(Wood—Do not paint)
Illustration: Residential structure – Governor’s House, City of Kitchener (Amanda Sherrington, 2013)
Note: The colour palettes depicted above were taken from appropriate examples within the
Region of Waterloo. Although a building may not possess a technically perfect colour palette, it
can achieve a compatible colour contrast between architectural features. In choosing colour
palettes, it is recommended that you select from colours identified with the help of paint
samples, historical research and/or professional advice. Use sound judgement as each project is
unique.
1446209 Page 5 of 14Practical
Practical Conservation
Paint and Colour
Conservation
GuideGuide for Homeowners
for Heritage Properties
2. Maintain architectural integrity
Ensure that your exterior colours hold a relationship in both hue and value, as to not segregate different
features of your home. The colours should unite your home’s features, and remember that any paint
scheme will be dominated by the primary exterior wall colour.
Lighter colours will best reflect shadows on your home, which add intricate value to the façade. You can
also choose a darker colour to hide surface imperfections, and choose lighter colours to highlight
broader surface areas of interest.
3. Colour to instill balance of proportions and details
Visual unity and balance is achieved by an even distribution of colour that complements your home’s
features and height.
4. Don’t over-do it with accent colours
Since stronger colours will fade more quickly, save these accents for small details. Do not use too many
colours. A selection of dark, medium, and light colours was typically applied to buildings built before
1915. Your home will require less painting that way, especially if you grow tired of the accent colour.
Paint Samples and Documentation
Before you start a painting project, document the existing form,
material, and condition of the painted surface for future
reference. To do this, collect samples of paint from each exterior
or interior surface. Samples should be taken in the form of chips
of peeled paint, and can be feathered to show underlying tones
(see Image 3). These should be analyzed and saved for future
reference, along with any documentation provided
(photographs, drawings, and notes). Use a high-powered
magnifier or microscope at 30x to 100x magnification to examine
the layers of paint and help distinguish between primer and
finish colours. The finish colour can often be identified by traces
of dust on its exterior surface. Distinctions between varnish and
paint layers may not be apparent, however.
Although this sampling technique is not 100% accurate, it can
help inspire your rehabilitation project or guide your restoration
efforts. Keep in mind that since colour does fade, it is
recommended that you try to match your paint sample with a
historical colour palette. Colours, techniques, and varnishes
manufactured and sold today may not comply with those
previously applied in your home, so select a colour as similar as
possible.
Image How to sample paint layers
(Fram, 2003, p. 165)
1446209 Page 6 of 14Paint and Colour
Practical Conservation Guide for Heritage Properties
Maintenance and Repair of Wooden Painted Surfaces
All required maintenance and repairs of the surface, including any intricate woodwork, should be
undertaken prior to painting. Refer to the Region of Waterloo’s Practical Guide: Windows, Shutters &
Doors for instructions on maintaining and removing paint from your wooden windows, shutters and
doors.
As mentioned above, in order to best conserve the history of your property previous paint applications
should be retained or documented. The paint should be completely removed only when the surface
displays continuous patterns of deep cracks, extreme blistering, or bare wood.
The charts below outline the most appropriate remedy for various paint conditions. They were created
with the aid of the National Preservation Services’ Preservation Brief #10, “Exterior Paint Problems on
Historic Wood,” and Ken Marchtaler’s “Paint,” published in “Your Old House Series #1.”
No paint removal required:
Condition Cause Remedy
It is common for organic matter to adhere Grime can be hosed down or washed with a
Organic
to a painted surface, especially where it is solution of detergent and water. Inspect the
Matter or
protected (i.e. eaves). This is not a problem area after it has completely dried to assess if
Grime
unless grime is painted over. re-painting is necessary.
Mildew is caused by fungi that feed on the First alter the environment in which mildew can
nutrients within the paint film. Fungi thrive. To clean, apply a solution of one cup
prosper in moisture and warm climate, non-ammoniated detergent, one quart
particularly in damp and shaded areas. household bleach, and one gallon water. The
Mildew
Mildew can be distinguished from dirt, as it solution should be scrubbed over the affected
Growth
will turn white with a drop of household area with a medium soft brush before being
bleach. rinsed off with a garden hose. When
repainting the area, choose a mildew-resistant
paint.
Chalking is caused by the disintegration of To avoid future excessive chalking, ensure the
the resin in the paint film due to ultraviolet surface is properly primed before painting, and
(UV) rays. When moderate, chalking is the do not spread the paint too thin.
optimal way for paint to age since the chalk
If chalk appears after wiping your hand on the
Excessive will rid the surface of stains and dirt when
surface, clean the surface with a solution of ½
Chalking washed off to provide a clean surface for
cup of household detergent to one gallon of
re-painting. When in excess, however, the
water with a medium soft bristle brush. Rinse
chalk can imbed into previous layers of
with a garden hose and let it dry before
paint to create streaking and inhibit
recoating with a non-chalking paint.
bonding of new paint.
1446209 Page 7 of 14Paint and Colour
Practical Conservation Guide for Heritage Properties
Staining can be caused due to: First, locate the source of the stain.
1) Oxidation or rusting of metal features 1) Sand the metal feature by hand, coat with a
(iron, steel, copper, etc.) rust-inhibitive primer, and paint with two layers
Staining of finish
2) Chemical reaction between moisture and 2) Wash colour extractives with a solution of 1-
natural extractives in wood (red cedar or 1 denatured alcohol and water and rinse
redwood) thoroughly. Apply a stain blocking primer after
the area has dried.
Limited paint removal required:
Condition Cause Remedy
Crazing, recognized by its jagged surface Sand the surface, mechanically or by hand,
cracking of the top layer, is caused when the before repainting. A new coat will protect
Crazing
old paint layers are no longer flexible enough to the surface from moisture penetration. The
respond to the wood’s contracting/expanding. hairline cracks may still be visible.
Peeling is caused by the layers’ inability to Ensure that the surface is void of any salts
bond, most likely due to poor preparation or impurities before painting. Always sand
before paint application. the surface for best paint adhesion. Apply
Inter-coat
oil-based paint on oil, and latex paint on
Peeling
latex. To ensure bonding of different paint,
always apply an oil type primer (for oil and
latex paint) before the top coat.
Blistering is caused when solvent-rich paint Scrape and sand the surface, mechanically
dries too quickly when applied in direct or by hand, before repainting. Ensure that
sunlight. Un-dried solvents are trapped the surface is not in direct sunlight to
underneath the dried paint film, eventually enable it to dry properly.
Solvent
creating blisters. To discern between solvent
Blistering
and moisture blistering, cut open a blister. If
the underlying paint layer can be seen, it is
likely solvent blistering, while it is probably
moisture blistering if the wood is revealed.
Wrinkling is caused when the top layer dries Scrape and sand the surface, mechanically
before the layer beneath it. Common errors: or by hand, before repainting. Ensure that
1) paint layer is too thick each layer beneath has dried before
Wrinkling
2) the first layer (most likely a primer) was still applying a new coat of paint.
wet when the top coat was applied
3) the paint applied in high temperatures
1446209 Page 8 of 14Paint and Colour
Practical Conservation Guide for Heritage Properties
Paint Removal Required:
Condition Cause Remedy
When peeling paint reveals bare wood, The moisture problem will need to be resolved
there is an excess of interior or exterior before re-painting, since any future coats will
moisture collecting behind the paint not adhere to the surface otherwise. After
layer. The paint is no longer able to locating the source(s) of moisture, let the
Peeling
bond with the surface, which usually wood dry before scraping off damaged paint
begins as blistering, since the wooden with a putty knife. Sand the surface,
surface swells due to the excess of mechanically or by hand, before priming and
moisture. painting.
Cracking and alligatoring are advanced If the cracking and alligatoring have not
stages of crazing. If the crazing is not progressed to the wood’s surface, scrape and
attended to, moisture penetrates the sand, mechanically or by hand, the affected
Cracking/ surfaces and the wood will swell. paint layers. The paint will need to be
Alligatoring Cracking will continue parallel to the completely removed if it has begun to flake.
wood grain, eventually extending into The paint can be removed by abrasive, thermal
the wood, at which time the paint will or chemical methods. Prime the wood within
also flake. 48 hours of paint removal, and paint.
Safety Precautions
Lead-based Paints
If your home was built before 1960, it most likely contains one or more layers of lead-based paint. If it
was built and painted between 1960 and 1990, although unlikely, your home may contain a small
amount of lead-based paint on certain interior surfaces. For more information on lead-based paint and
safety precautions, please refer to the Region of Waterloo’s Practical Guide for Asbestos, Mold & Lead
Abatement.
Volatile Organic Compounds (VOCs)
Certain architectural coatings, such as oil and alkyd paints, wood stains and varnishes contain a high
quantity of organic chemicals hazardous to the environment and our health called volatile organic
compounds (VOCs). VOCs have been used in paints for their effectiveness in controlling the paint’s
thickness, ease of application and drying time. They can unfortunately present health hazards with
extended exposure, especially in interior spaces. These products have been heavily regulated following
the Government of Canada’s introduction of the 2010 VOC regulations requiring paint compliance on
limited VOC levels.
1446209 Page 9 of 14Paint and Colour
Practical Conservation Guide for Heritage Properties
Health Canada recognizes 2-butanone, oxime, to cause reversible damage to the tissue lining the nose.
To avoid health hazards associated with VOCs, you should always apply paint in a well-ventilated area
and read the manufacturer’s safety and application instructions. Although VOCs are not worrisome in
paint that has dried, their use in interior spaces should be limited.
Paint Removal Methods
It is recommended that historic/original paint and finishes, including stencilling, marbling, and graining,
be preserved during restoration efforts to conserve your home’s heritage character, and minimize
damages done to the underlying layers of paint and base material. Previous layers of paint could be
helpful to you and future owners for analysis.
It is possible, as described below, to remove deteriorated paints and finishes to the next underlying
layer using the gentlest possible method of paint stripping or cleaning. If replacing deteriorated paint,
replace in kind where there are surviving prototypes, and match the new work to the old in form and
detailing. It is important to be prepared before beginning a painting project.
Thermal
This removal method is recommended for extensive paint removal. There are two main methods of
thermal removal: for flat surfaces use an electric heat plate; and for solid decorative molding, balusters,
fretwork, and “gingerbread” detailing use an electric heat gun. Do not use a blowtorch as you can ignite
dust within the paint or wood.
Chemical
This removal method is recommended for extensive paint removal. The method, consisting of solvent-
based strippers or caustic strippers, should be used with caution, and the manufacturer’s instructions
read carefully, to take proper precautions against inhalation of toxic fumes and to limit damage done to
the material’s surface. Chemical removers also work well on smaller decorative features, window
muntins, doors, exterior shutters, balusters, railings, and columns.
Abrasive
Abrasive cleaning should only be resorted to after gentler methods have proven ineffective. This
removal method can be extremely destructive and should be used only when it is necessary to halt
deterioration or remove heavy soiling. It is applicable for flat surfaces without detailed features, for
limited to extensive paint removal. An orbital sander or belt sander is recommended, operated by skilled
individual. Rotary drill attachments, high pressure water blasting, or sandblasting are not recommended.
1446209 Page 10 of 14Paint and Colour
Practical Conservation Guide for Heritage Properties
Removal of Paint on Masonry
Before removing the paint on your masonry façade, consider the following:
Why was the masonry painted?
Masonry might have been painted to help protect softer masonry, conceal deteriorating stone, protect
the masonry from moisture, or imitate stone.
Will the removal of paint affect the heritage significance or image of the building?
If the building has been painted for a long time, how will the removal of paint affect the building, the
streetscape? If buildings were painted at the time of construction, or shortly thereafter, the paint could
be considered historically important.
Will the paint removal methods damage the masonry?
Identify, with the help of a conservation professional, which cleaning method is appropriate for the type
of masonry and paint. Paint retention or removal can often be justified by the anticipated damage to the
masonry. It is often best not to remove paint from masonry. Paint may, however, need to be removed to
ensure a good bonding surface if there have been too many consecutive layers built-up on the surface.
Graffiti Removal
The removal of graffiti should not be attempted by untrained professionals. Removal techniques will
vary depending on the type of the surface and paint applied to it. Inappropriate removal methods can
permanently damage the surface. Painting over graffiti is also not recommended, as it will damage the
architectural character and material of your home or business.
Paint and Metals
Metals, like masonry, vary in hardness and durability. It is important to cover ferrous metals to stop
their quick oxidation and subsequent deterioration, and to uncover metals that are supposed to be
uncovered, such as copper, bronze, and stainless steel. An architectural conservator should be consulted
prior to any paint removal from metals as the removal method will depend on the type of metal and any
paint previously applied. As well, the paint should be sampled to determine the composition of previous
layers’ (i.e. Was sand added for texture? Was the texture matte or gloss? Was the surface polychrome
or marbleized?).
Paint covering ferrous metals should always be kept in good condition to discourage rust. If the topcoat
of paint does not show signs of deterioration or damage, it can be prepared for re-painting by lightly
sanding the surface. A well prepared surface will protect the underlying paint and provide “teeth” for
adhesion of new paint. Ferrous metals should be primed with a rust-inhibitive primer within a few hours
1446209 Page 11 of 14Paint and Colour
Practical Conservation Guide for Heritage Properties
of cleaning. Do not use any water, water-based chemical cleaners or high-pressure grit to clean ferrous
metals. Architectural metal features that will be subject to heavy pedestrian use should be protected
with a final lacquer or wax coating.
Paint Removal on Soft Metals
To remove paint from metals, such as lead, tin, copper and zinc, use the appropriate chemical removal
method. Abrasive methods are not recommended for soft metals as their finishes are easily scratched.
Paint Removal on Hard Metals
To remove paint from hard metals such as cast iron, wrought iron and steel, use a wire brush or scraper.
If the paint cannot be removed by hand, use very low-pressure dry-grit blasting (100psi). Alkaline
compounds, such as methylene chloride or potassium hydroxide, can also effectively be used instead of
abrasive blasting.
Summary
This practical guide has described how paint will highlight and accentuate your home’s exterior
architectural features, while protecting the underlying surface material from the elements, specifically
unwanted moisture penetration. As there is no paint removal method that is completely safe to you and
the surface material, potential hazards and safety precautions should be well understood before
undertaking work or hiring a professional.
References
If you would like to learn more paint and colour for your heritage home, please refer to the
following primary sources:
Canada Mortgage & Housing Corporation. (2005). “Lead in Older Homes.” http://www.cmhc-
schl.gc.ca/odpub/pdf/64064.pdf?lang=en
Chase, S. B. (1992). “Painting Interiors.” National Preservation Services: Preservation Brief 28.
http://www.nps.gov/tps/how-to-preserve/briefs/28-painting-interiors.htm
City of Saint John. (2010). “Paint and Colour,” Saint John Heritage Conservation Areas: Practical
Conservation.
http://www.heritagecanada.org/sites/www.heritagecanada.org/files/SaintJohn_PaintColou
r.pdf
1446209 Page 12 of 14Paint and Colour
Fram, M. (2003). “Well-Preserved: The Ontario Heritage Foundation’s Manual of Principles and
Practice for Architectural Conservation.” Boston: Boston Mills Press.
Practical Conservation Guide for Heritage Properties
Grimmer, A.E. (1979). “Dangers of Abrasive Cleaning on Historic Buildings.” National
Preservation Services: Preservation Briefs 6. http://www.nps.gov/tps/how-to-
preserve/briefs/6-dangers-abrasive-cleaning.htm
Hanson, S. & Hubby, N. (1983). “Preserving and Maintaining the Older Home.” New York:
McGraw-Hill.
Health Canada. (n.d.). “Lead-Based Paint.” http://www.hc-sc.gc.ca/hl-vs/iyh-vsv/prod/paint-
peinture-eng.php
Home Hardware. (2013). “Common Exterior Paint Problems.”
http://www.homehardware.ca/en/index/beauti-tone/problem-solver/exterior.htm
Knaebe, M. (2013). “Stripping Paint from Exterior Wood Surfaces.” USDA Forest Service, Forest
Products Laboratory, FinishLine.
http://www.fpl.fs.fed.us/products/publications/specific_pub.php?posting_id=1023&header
_id=p
Parks Canada. (2003). “The Standards and Guidelines for the Conservation of Historic Places in
Canada.” Parks Canada.
Weaver, M.E. (1995). “Removing Graffiti from Historic Masonry.” National Preservation
Services: Preservation Briefs 38. http://www.nps.gov/tps/how-to-preserve/briefs/38-
remove-graffiti.htm
Weeks, K.D. & Look D.W. (1982). “Exterior Paint Problems on Historic Woodwork.” National
Preservation Services: Preservation Briefs 10. http://www.nps.gov/tps/how-to-
preserve/briefs/10-paint-problems.htm
Additional resources:
Bock, G. (n.d.). “Putting Period Colors in Their Place.” The Old House Journal.
http://www.oldhousejournal.com/putting_period_colors_in_their_place/magazine/1394
Delux. (2013). “VOC Regulations.” PPG Industries. http://www.dulux.ca/en/voc-
regulations.html
Health Canada. (2010). “Frequently Asked Questions (FAQs) - Batch 7 Final Screening
Assessments.” http://www.hc-sc.gc.ca/ahc-asc/media/nr-cp/_2010/2010_33bk-eng.php
“Historical Architectural Metals.” The Old House. http://www.oldhouseweb.com/how-to-
advice/historical-architectural-metals.shtml
Lernley, Brad. (2013). “A pro confides his best tips for painting exteriors.” This Old House.
http://www.thisoldhouse.com/toh/m/article/0,,202236,00.html
1446209 Page 13 of 14Paint and Colour
Practical Conservation Guide for Heritage Properties
Jordan, S. “The Changing Landscape for Household Paint.” The Old House Journal.
www.oldhousejournal.com/changing_landscape_for_household_paints/magazine/1131
Marchtaler, K. (2000). “Paint,” in Your Old House Series #1. Vancouver Heritage Foundation and
Victoria Heritage Foundation.
www.heritagecanada.org/sites/www.heritagecanada.org/files/VHF_YourHouse_Paint_1.pdf
Matsen, C.R. (n.d.). “Hue’s Clues: Inside Historic Paint Research.” The Old House Journal.
http://www.oldhousejournal.com/historic-paint-research/magazine/1637
“Milk Paint.” (n.d.). The Homestead House Co.
http://www.homesteadhouse.ca/products/milkpaint/index.html
National Park Service. (2000). “Assessing Cleaning and Water-Repellent Treatments for Historic
Masonry Buildings.” National Preservations Services: Brief 1.
http://www.nps.gov/tps/how-to-preserve/briefs/1-cleaning-water-repellent.htm
OHJ staff. (n.d.) “Managing Lead Removal.”
http://www.oldhousejournal.com/Living_with_Lead/magazine/1056
Olenick, A. (n.d.). “Tested: Safer Paint Strippers.” Old House Online.
http://www.oldhouseonline.com/tested-safer-paint-strippers/
Sidler, S. (2014). “How to: Remove Paint from Hardware.” The Craftsman Blog.
http://thecraftsmanblog.com/how-to-remove-paint-from-hardware/?utm _content
=bufferd5558&utm_medium=social&utm_source= facebook.com&utm_campaign=buffer
Waite, J. (1991). “The Maintenance and Repair of Architectural Cast Iron.” National
Preservation Services: Preservation Briefs 27. http://www.nps.gov/tps/how-to-
preserve/briefs/27-cast-iron.htm
Alternate formats of this document are available upon request. Please contact Lindsay
Benjamin at LBenjamin@regionofwaterloo.ca, 519-575-4757 ext. 3210, TTY 519-575-4608 to
request an alternate format.
Disclaimer
This practical guide contains useful information on restoring and preserving heritage buildings, but it is
intended as a general resource only. Content from third parties with specific expertise has been heavily
relied upon and their original works have been acknowledged in the list of references included at the end
of this document. The Region of Waterloo has taken all reasonable steps to ensure the accuracy of the
information in this publication. However, it is recommended that building owners consult with trained
specialists, such as contractors, builders, plumbers, heating and air professionals and electricians, before
undertaking any renovations, repairs or construction on their properties. The Region does not assume
responsibility for any loss or damage resulting from adherence to the information in this practical guide
1446209 Page 14 of 14You can also read