PermaTimber The perfect DIY deck - Perma Composites
←
→
Page content transcription
If your browser does not render page correctly, please read the page content below
PermaTimber®
     The perfect DIY deck

          Decking Install Guide
            Congratulations on your new deck!
              Please ensure you follow these instructions
           carefully when installing your PermaTimber® deck.
            You can view the installation video by scanning
                      the QR code or heading to

                  www.permatimber.com.au

             PermaTimber®
A B 103
Installation Guidelines
With correct installation, PermaTimber® Decking will
provide years and years of enjoyment. Please read these
instructions before installing your deck and refer to them
                     during installation.
  Thanks to its special combination                    be aware, timber has different
  of reclaimed hardwoods and                           natural appearances and to ensure
  recycled plastics, PermaTimber®                      PermaTimber® does indeed look like
  Decking is a long lasting, low                       timber, it may also experience similar
  maintenance outdoor living                           variationdin colour, tone and grain.
  product.
                                                       As a result of this Perma
  PermaTimber® Decking maintains                       Composites® may have natural
  a natural wood look and feel, yet                    variation in each decking board and
  can far outlast all natural timbers                  in some instances slight vartiation
  with an ability to handle even the                   between sample and final colour.
  toughest of conditions.
                                                       The customer / installer is
  Due to the natural wood elements                     responsible for inspecting each
  in PermaTimber®, it has some                         decking board for colour, finish,
  unique behavioural characteristics                   size and other issues prior to
  (expansion/contraction) that must                    installation.
  be considered when installing.
                                                       Perma Composites® warranty
  PermaTimber® contains natural                        information can be found at
  timber elements. As you would                        www.permatimber.com.au

Important Information
All instructions must be followed to ensure proper installation. Failure to follow all instructions may
void warranty. Perma Composites® suggests using an experienced installer when building your deck.

                                               Page 2
Subframe Information
PermaTimber® Decking can be installed on Treated Pine,
 PermaTimber® Composite Bearers or Metal Sub Frames.

PermaTimber® Decking can be installed onto any new or existing
subframe, provided the existing frame is of sound strength, meets the
recommended spans and is in good condition. When designing your
subframe, be sure to note the following;

✓ PermaTimber® can supply                 3-4mm fall (per metre) in your
  composite bearers. Please               subframe going away from any
  contact us for stockists and            adjoining structures to allow
  information.                            water to easily run off.
✓ All perimeter edges of your         ✓ Do not install directly onto
  PermaTimber® Deck are to be           a solid surface or watertight
  supported by joists. There is to      flooring such as concrete,
  be no overhang of boards              pavers, bricks or tiles. Airflow
                                        and drainage beneath the area
✓ If a cut out is required to allow
                                        is crucial to its longevity. A min
  for any existing structures, this
                                        100mm clearance is required
  is to be supported around all
                                        underneath decking boards.
  edges of the cutout.
                                      ✓ If laying a commercial
✓ All bearers run perpendicular to
                                        deck, please consult Perma
  the decking boards.
                                        Composites® to ensure spans,
✓ It is recommended an                  product & design is suitable
  allowance is made for a               prior to laying.

                                 Page 3
Subframe Information

               Stainless
               Steel Screws                    Start/Stop Clips                Fix Clips

                Drivers                      Anti-Creep Clips                  End Caps

PermaTimber® fixings MUST be used to install your deck or you may risk
voiding your warranty.

Please Note: Face fixing through PermaTimber® Decking is not
recommended and may void your warranty.

Once your subframe is complete, you will need to measure out the fit of
the decking boards to determine if any end pieces will require trimming. If
there are intricate cuts to be made we suggest you consult a professional
installer or chat to a PermaTimber® consultant.

We don’t recommend cutting any pieces of decking below 45mm widths.

                MAXIMUM SPANS (centre to centre)
       Decking         Residential Use        Commercial Use
  PermaTimber® 146        450mm                  400mm
 PermaTimber® 225HD       750mm                  600mm
 The above noted spans must not be exceeded. Failure to adhere to spans may increase the risk of board failure.

                                                  Page 4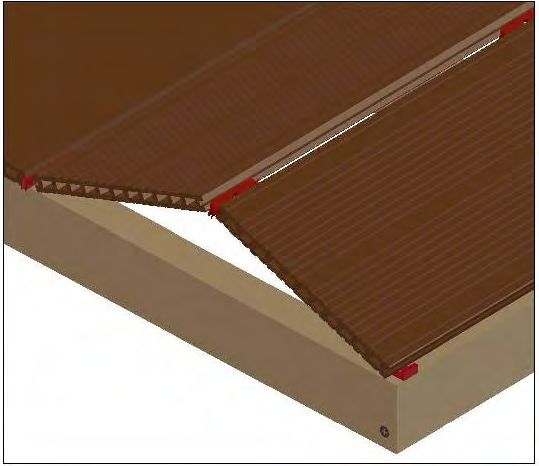
Expansion Gaps
Thanks to its special combination     The effects of expansion can
of recycled materials,                be reduced by cutting the
PermaTimber® Decking will expand      PermaTimber® Decking boards to
and contract along its length by up   shorter lengths prior to installing,
to 2mm per metre over a 40 degree     such as 2700mm (half original
Celsius temperature change.           length) or by using breaker boards.

Ordinarily this does not cause        Note: When constructing your
any problems, provided special        PermaTimber® Deck, be sure to
attention is given at the time        always let the ends of the boards
of installation. Take note of the     overhang the end of your last joist.
ambient temperature at the time       Then cut all of the PermaTimber®
of installation, and adjust butt      Decking boards at the same time
joins accordingly as per the table.   along the outside edge.

                                  Page 5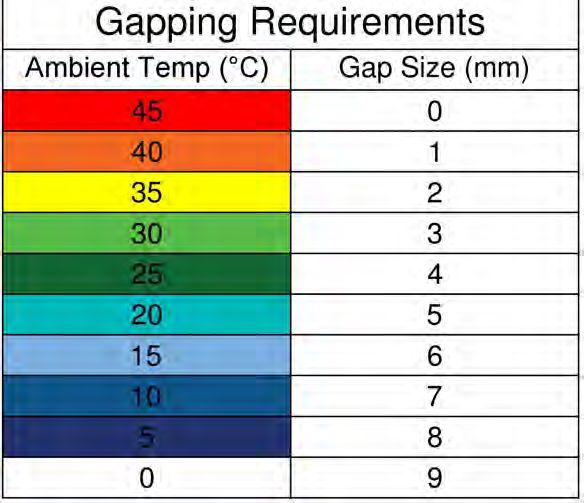
Board Joining Methods
     1. Breaker Boards are suggested on decks over 5.4m in length

Butt Joints

Butt joints should only be used on boards that are less than 3 metres in
length. (ie if butt joins are your preferred method of installation, cut all
5.4 metre boards in half or shorter than 3 metre lengths).

Butt joins must always occur over a double joist. Staggering butt joints is
the best way to manage any effects from expansion and contraction.

Breaker boards are the recommended method of installation in larger
decks.

                                                                    Page 6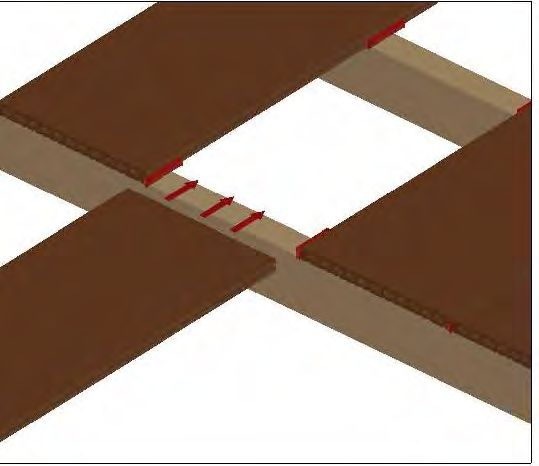
Breaker Boards
A breaker board is simply a normal PermaTimber® decking board
installed at 90 degrees to other boards.

Running full boards with butt joints may result in gaps of over 10mm
once boards have cooled and contracted. Breaker boards are an effective
way to reduce this issue and is the preferred method of installation for
PermaTimbe® Decking. Breaker boards can enhance your deck design,
minimise wastage and eliminate expansion issues.

If the breaker board required is longer than 5.4 metres, it is
recommended to divide the length evenly between 2 or more boards,
ensuring breaker boards are no longer than 3 metres. Please ensure
breaker boards are supported by double joists on either side, and held
down by start / stop or anti-creep clips.

See examples of different breaker board configurations below.

                                 Page 7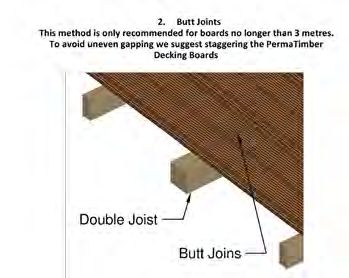
Installation Steps 1-3
            STEP ONE

            Begin laying your deck from the outside
            of the deck, working towards the wall or
            house.

            If the deck is against the wall or house,
            use a fixing clip against the house /wall
            to provide the correct spacing.

            First, set your start/stop clips up at the
            end of each joist. Begin by screwing in a
            Start/Stop clip to the joist. This will hold
            your decking boards in position.

            STEP TWO

            Slide the first board in against the Start/
            Stop clips.

            Ensure that the clips are positioned into
            the manufactured grooves of the decking
            board.
            STEP THREE

            Now install your first Fixing Clip.

            On each joist, insert a fixing clip so that
            it is positioned within the groove on the
            decking board and the screw is threaded
            into the clip only.

            Slide the second board into the first,
            ensuring the clips slide into position into
            the grooves.

            Fix Clips must be used on each and every
            bearer, failure to do so may allow the
            board to flex unnecessarily and will void
            the warranty.

         Page 8
Installation Steps 4-6
             STEP FOUR

             Screw the fixing clip with the supplied
             screws to the joist using a slow speed on
             your drill, while applying lateral pressure
             to the decking boards. The type of fixing
             screws that you use will be determined by
             the sub-frame material.

             After the board has comfortably slid into
             place, partially screw the fix clip down.
             Then slide your next board into place
             before fully fixing. Be sure to use a slow
             speed on your drill when fixing.

             STEP FIVE

             Anti creep clips prevent the boards from
             creeping side to side along the joist.

             First, align your decking board in its final
             position. Fix (a) an Anti-Creep clip to the
             middle of the board, adjacent to a bearer.
             Then (b) screw the anti creep clip into the
             bearer to stop any movement. Use one
             anti creep clip per board on the middle
             bearer. Ensure you pre-drill the side of
             the Decking board prior to installing the
             anti-creep clip to prevent splitting.

             STEP SIX

             Repeat steps 3 to 5 until finished

             Continue this process until your decking
             area reaches its final stages. For your last
             board installation please refer to steps 7a
             and 7b.

          Page 9
Installation Step 7a

If your deck is not framed by a wall on both sides, you can use the following method.

At the end of your deck, fix a Start/Stop Clip to all joists after measuring the correct
position.

Leaving the second last board from the edge of the deck out, install the final decking
board so that the Start/Stop Clips are positioned within the grooves of the board.

These Start/Stop clips will give a clean finish to the edges of the deck.

Then insert the fix clips to the remaining joists, ensuring the screw makes contact
with the subframe to hold them into position and then slide the second last board in
from the edge of the deck.

Now you can fully fix the screws.

                                        Page 10
Installation Step 7b
If your deck is framed by a wall on either side, you can use the following method.
At the end of your deck, fix a Start/Stop Clip to all joists after measuring the correct
position.
Leaving the second last board from the edge of the deck out, install the final decking
board so that the Start/Stop Clips are positioned within the grooves of the board.
These Start/Stop clips will give a clean finish to the edges of the deck.
Place fixings clips in between the third last and second last boards. Now you can
drop your final board into place. In the last groove begin inserting fixings clips and
slide them into place using a screwdriver. Be careful not to scratch your boards.
Align the fix clips with your sub frame ensuring you have one for each joist. Once the
fix clips and board are in their final positions, you can firmly screw down the fixings.
Page 11Using Finishing Board
PermaTimber® Finishing Boards can be
cut down to your preferred width prior
to installation and come in a standard of
3600mm long, 300mm wide and 13mm
thick. We recommend cutting finishing
boards to an 1800mm length (in half).
You have the option to sand the exposed
edge of the finishing board before you
begin fixing it in place.
For the best results, we highly
recommend the following fixing screws:
Grade 316 Stainless Steel, Wafer Head
Screw, or equivalent
You can use touch up paint to cover the
heads of the screws if you wish.
It is necessary to pre drill a clearance
hole in the Finishing Board. Ensure
that the pilot hole is 2 to 3mm larger
than the gauge of the screw to allow
for the expansion and contraction of
PermaTimber Finishing Boards.
Fix the screws into the Finishing Boards
at every 600-800mm at the top and
bottom of the board/sub frame.
If you are using the Finishing Boards
to hide hollow sections, then ensure
you screw into the sub frame and not
the decking boards. Screwing into the
boards can split them and will void your
warranty.
This will give your deck a complete finish,
with no fixings being visible from the
front, back or sides.
Page 12Using End Caps
PermaTimber® End Caps are an
alternative to the PermaTimber Finishing
Board. These are to be inserted into
the end of each PermaTimber® Decking
board.
For added security of the end caps,
Perma Composites® suggest to also use
a construction adhesive to securely hold
caps in. Apply the adhesive to the core of
the deck rather than to the end cap.
This will give the deck a clean and solid
finish.
Maintenance
No maintenance is required!
One of the great benefits of all PermaTimber® products is that they don’t require any
oiling, painting or staining. Simply sit back and enjoy your deck after installation.
Scratched your deck?
Don’t stress! Scratches will sand right off so that your deck looks fantastic for life!
If you need to clean your deck simply hose it down and use a brush to remove any
stubborn stains. You can also use a light pressure cleaner and some mild detergent.
There is a complete care guide available on our website to detail how best to clean
your decking. Visit www.permatimber.com.au
Page 13Congratulations - you’re done!
Enjoy your new PermaTimber® deck!
Page 14Page 15
The PermaTimber®
                      range:

                                       Eco Cladding

                  QuickBoard ceiling
                    & wall lining

Eco Screening

                                            Decking

  www.permatimber.com.au
                                                      A B 103
You can also read