INTERNET & FM RADIO DR 410 - Portable - User Manual
←
→
Page content transcription
If your browser does not render page correctly, please read the page content below
Portable
INTERNET & FM RADIO

       DR 410
     User Manual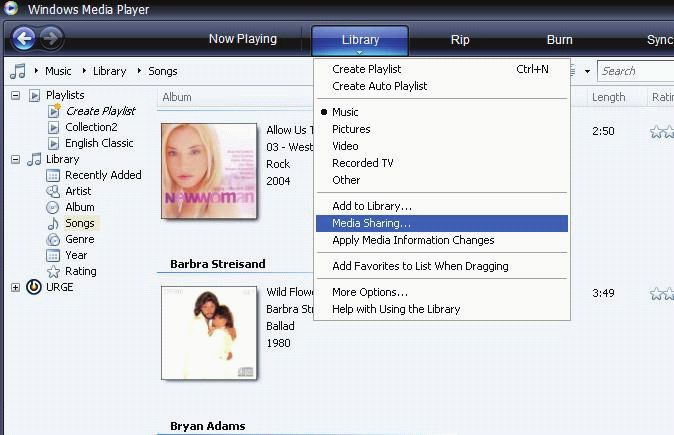
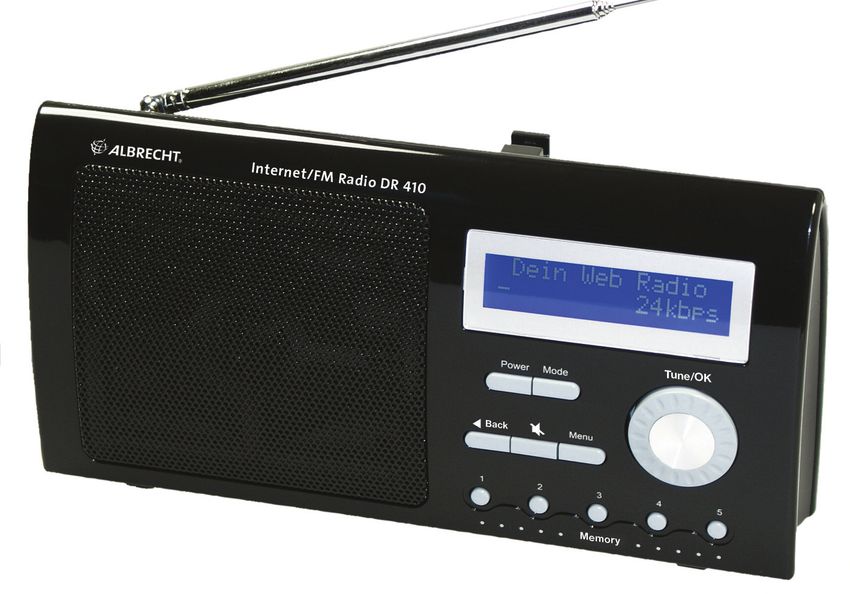
Functional Modes and Features
The product is a small, lightweight and stylish design battery operated Internet Radio.
This radio incorporates an Internet radio, an FM radio and additionally a Music
streaming feature to be used with a Wi-Fi home network. Powered by alka l i ne
bat te ri es o r e xt e rn a l DC Power Adaptor, the product provides hours of network
audio streaming from Internet radio stations and music steaming from your own
networked PC connected to your Wi-Fi access point.

A brief description of the features is listed below:
                          Internet Radio gets you connected to various radio
                          stations around the world via Wi-Fi connection.

                          Media Stream plays music streams from your Windows
                          media player version11 application in your PC or Notebook
                          running Windows XP or Vista OS over Wi-Fi connection.

                          FM radio - connects to the local FM
                          Radio Stations

                          Setting, used for performing all the settings in your
                          product

                                               1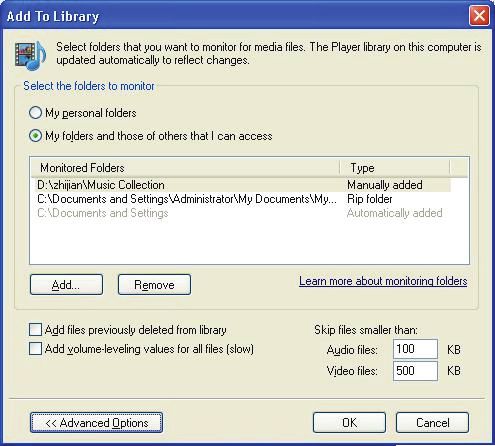
Product Button Definition

                     3.5 mm Stereo socket, for connecting earphones. Insert the
1    Earphone        plug until it clicks. Socket can also be used to connect home
     socket          stereo amplifier.

2    DC input        +6V DC adaptor input

3    Power           Power On/Off

4    Mode            Direct access button to access to Internet Radio, Media
                     Stream and FM functions

5    Dot Matrix      2X16 dot matrix LCM display

                     Turn to scroll through the menu listing in down or up
 6   TUNE / OK       directions / play previous or next song / go down or up
                     in pop up menu list and use button as Enter (OK) key to
                     select an item.

7     BACK           Press to go up one list screen level or to return to
                     previous menu

8     Mute           Mute the speaker output or the earphone jack output

9      MENU          Press this button to bring you back to top main menu

10     P1 – P5       Preset (Memory) Station Buttons. Press and hold to save
                     a station to that preset memory number, and press particular
                     memory button to call back the saved station

11    Volume Up      Increase volume level

12    Volume Down     Decrease volume level

13     Battery          To hold 4 X AA-size battery dry cell or rechargeable
       Compartment      NiMH (in that case an External battery charger is necessary)

                                    2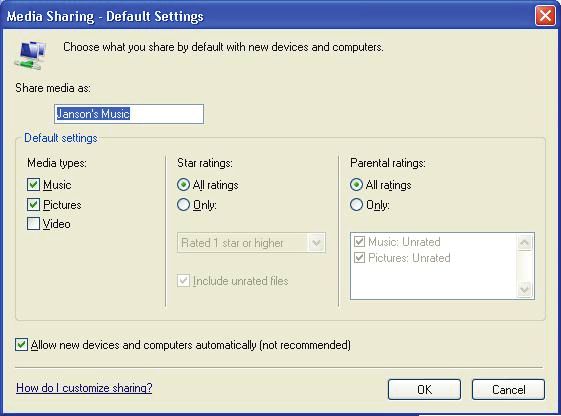
Getting Started
  The package contents:
       •   Internet & FM radio unit
       •   Power Adaptor
       •   User Manual
To Power on your radio, press and hold the Power key, you will see the Albrecht Internet
Radio screen.
After the startup is complete, you will see the Main Menu screen that shows you the
Internet Radio, Media Stream, FM Radio and Setting modes as option in a list. Use the
Navigation Knob to scroll through the list as you like and press the Navigation Knob to
confirm the selection.
At any time in any of this mode, if you press the Menu button it will bring you back to the
Main Menu.

Setting up the Wi-Fi
Your radio can be easily connected to the Wi-Fi networks. When a Wi-Fi connection is
required (for instance, to play Internet Radio or Media stream) the unit will automatically
look for a network and try to connect to it.
When you are connecting the radio for the first time, you will have to setup the
network by select the Network
Configure option from the Setting mode in the Main Menu. To do this pleases following
the steps listed below:

          From the main menu select the Setting option
          by using the Tune/OK knob

          Next select the Network Configure option from
          the list using the
          Tune/OK Knob.
                                                                <    Use Wi-Fi

          Select Wi-Fi Setup from the menu list by using
          Tune/OK to
          navigate and select it.

  Of course, if you directly enter into the “Internet radio” menu, the unit can pop up
  the wizard also as below

                                           3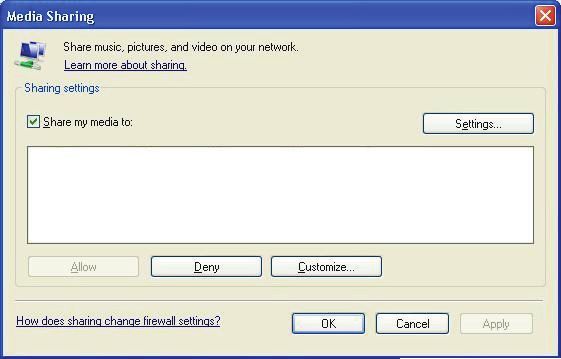
For the case of using the Wi-Fi network you will
see this screen that
list two options for you, the Load profile and
Search network option respectively.

The Load profile option let you load back a profile that you have
saved in the previous section, please use the Tune/ OK Knob to
navigate and select it. If the saved profile has the correct information
that
match to the current AP you are going to connect to, product will try to
connect to it and put a tick beside the AP name once the product
successfully connected to the AP.

To search for a new wireless Access Point before
using the Wi-Fi
connectivity, please select the Search network from the
above screen.

Then you will see a screen showing “Searching” while
the product
trying to search and show you all the available Access
Points that the product able to find. The product will
then show all the Wi-Fi networks SSID in the range as
shown in the screen for example.

Once you have got the list of Wi-Fi AP SSID’s use
Tune/OK to navigate and select the AP SSID that
you wish to use. Once the network AP is selected the
radio will prompt you for the default network key
which is the WEP/WPA default secure key of the
Wi-Fi network access point.

                              4
Use Tune/OK to key in the network key. Turning
     the knob left and right will change the numbers,
     characters and symbols that you wish to show in the
     center of upper line of the screen. In this example, the
     ‘5’ is the current active number, to select it press
     Tune/OK once. Turning the knob counter clockwise
     or right will shift the ‘character’ to the center of the
     screen for selection and pressing the knob will select
     it. Use the Back button to delete a selected character.

     Once the Network Key has been completed, next press and hold
     Tune/OK to confirm the network key.

     Now the product should try to access the Access point that you
     have selected
     Once the product managed to connect to the AP it
     will now put a star next to the network AP SSID
     name that you have selected. Press Tune/OK and
     save the profile. So that the future connection to this
     Wi-Fi AP you don’t have to go through the Wi-Fi AP
     selection process again, if you are using the same
     Wi-Fi AP for Internet Radio or Media Streaming

     Once you select to save the profile, it will prompt
     where to save as shown. Use Tune/OK to select
     Yes or No.

Now your Wi-Fi AP connection setup is completed.

Remark for troubleshooting: When the device connects with the AP and can’t
get IP address from DHCP server automatically, it will prompt an error
message as IP 0.0.0.0.
Please check whether router's DHCP service is enabled or not, and try to
connect with the AP again. In company networks it can often happen, that the
network administrator does not provide any DHCP service. In such cases you
can enter the local IP address manually together with Subnet mask, Gateway
and DNS address.(You may ask network administrator for these numbers).
For example: IP Address: 192.168. 0.15 Subnet Mask : 255.255.255.0 ,
Gateway & DNS 192.168.0.1 (everything depends on LAN settings by

                                       5
Internet
Internet radio gives you the access to all the Radio stations available worldwide. Once
your product is connected to Wi-Fi, you can listen to either all the preset memory
channels by direct memory buttons1 to 5 or select any Internet Radio Station
worldwide from Radio Search option. Here you can find all your favorite Radio
channels, which are arranged in different categories. Please refer to Radio Search
section below for details.
Listening to the Internet Radio
To listen to the Internet Radio, first connect the radio to the Internet as explained on
the above section, then select Internet Radio from the Main Menu.
Radio Search is an advance search which is organized into
different categories. Please read on the below section on
Radio Search for details.
Press Memory 1-5 to access to the saved preset station,
then you turning Tune/OK button to the left or right to select
one preset station, then pressing Tune/OK knob button to
confirm. If you want to save the current station to one of the
memories, you can turn Tune/OK to the left or right and
select the position, then press Tune/OK button to save it.
Radio Search
The Radio Search is organized to search the stations in the following groups:
Local stations includes stations organized by the type of stations( All stations,
Adult contemporary, Business news, Classical, Comedy, News , News Talk,
Sports , Talk, Top 40, Varity, World Asia)
Genres includes stations organized by the type of music
played (e.g. Ambient Big Band, Blues, Classic Rock,
Classical, Country, Dance, Electronic, Folk, Hard Rock,
Hip Hop, Jazz, New Age, News, Oldies, Public,
Religious, RnB, Rock, Soft Rock, Soundtracks, Sports, Talk,
Weather, Web Audio and World).
Countries are a search based on the different
geographical locations of the world.
New Stations Contains list of new Radio Stations.
Most Popular Stations include stations based on the
popularity.
Note: All above listings are Music Portal side dependent it
may vary from time to time.
In the Internet Radio mode, if you turn the Tune/OK knob, it will show the options -
Radio Search and Preset (Memory buttons 1 to 5).
6Media Streaming
Now after setup of the connection, you can access any songs from your PC that
running Windows Media Player Version 11 in Windows XP or Vista OS.
Listening to Media
Select the Media Stream from the Main Menu. It will start
scanning the WIFI network to find a music server on Your
PC. It will prompt you the menu screen as shown after
successful connection. If you should already got a
successful connection previously, the display will
directly show you the list of found servers.
Now you can select the server that you want to access by
using Tune/OK. Scroll through it and lastly confirm by
pressing it.
Depending on the Media Server you are accessing it may
be organized into a few folders and you can select the
Music or Playlists to stream your favorite music
Select the folder by Tune/OK and confirm by pressing the
same Knob. Below may be the folder that you may see:
Music, has the list of the Music
Make sure that you have your PC or Notebook turned-on and
it is running the Windows Media Player (Version 11) in
Windows XP or the Vista OS. You should also share the
Music streaming to new device in your PC or Notebook
Media Player. [See Setting up PC Media Player 11].
If it should display “server id not available” after scanning,
then o back to previous menu.
Streaming the Music
Once you select the Music folder in your PC server,
you can stream and listen to all the music from your PC’s
Media Player over Wi-Fi.
Select the Music Folder or Song that you wish to listen to
by turn and press the Tune / OK knob and the product
will start to play the song as shown.
After a song has finished it will continue to play the next
song under the same folder.
Now you can stream your favorite music from your PC, acting as your Juke
Box for the product.
7Setting up Windows Media Player version 11
You should be running Windows XP OS on your PC/Laptop, and Windows Media
Player version 11. Now open the
Windows Media Player, and choose Library. From the drop down list of the menu select
the Media sharing.
Now tick the ‘Share my media to’ and select settings
8Please un-tick Pictures and video under Media type.
Next tick the ‘Allow new devices and computers automatically
and press OK
To select the folders for monitor and for sharing, choose Library.
From the drop down list of the menu select the Add to Library. Select
the folders to monitor as below
After selected the folders to monitor and share in the Player Library, click OK
9FM Radio
FM Radio connects you to the local radio channels available in your city.
To listen to the FM Radio, select the FM Radio from the main menu and it will start
playing the last played channel.
To change the channels use Tune/ OK knob. Press the
knob once you will get the “Auto Scan” appear at the
bottom line of the screen, this shows you that currently you
are in the “Auto Scan” Mode.
If you press the second time you will get the “Fine Tune”
option, from there you can enter to the Auto or Fine tune
option respectively.
Auto Scan, allows you to do auto scan for available
channel by using the Tune/ OK knob to scan forward
or backward from a current channel to next available
channel.
Fine tune, allows you to do fine tuning on a channel by
using the Tune/ OK knob
to adding or subtracting by 0.1MHz from a channel station.
Memory station buttons allow you to save and call back those
prefered stations:
To save a station while listening to a radio station to a
preset number just press and hold that memory button.
Press a particular memory button to call back the saved station
and listen to it. To play next available station just turns the
Tune/OK knob.
10Setting
Setting allow you to customize the settings of your
product. Select the Setting from the main menu and you
will see the settings menu. It includes the following < User Wi-Fi >
categories:
Network Configuration, helps you set up and disconnect
from the Wi-Fi network
and show you the current network status of the product, for
more details on how to do Wi-Fi Setup please refer Setting up
the Wi-Fi section above.
Disconnect, will disconnect product from the W-Fi Network
Connection.
Networks Status, show you the below:
- SSID: the SSID of the AP that currently the product is
connected to
- IP: the IP of the product assigned to by the Wi-Fi AP
and can configue
- MAC: the MAC Address of your product
Sample Screens shown the SSID, IP and MAC
address of the product that is connected
connected to an AP
Language, let you choice the prefer Languages
to use
11Factory Reset, allow you set bring back all the setting
to the factory default setting.
Use the Tune / OK knob to select the Yes or No option.
About, details of the player Model name and the
firmware version. HW:IR-100
See the sample screen shot shown. SW:999.999.999
12Glossary
Wi-Fi
Wi-Fi, popularly known as an acronym for wireless fidelity, was originally a brand
licensed by the Wi-Fi Alliance to describe the embedded technology of wireless local
area networks (WLAN) based on the IEEE 802.11 specifications. Use of the term has
now broadened to generically describe the wireless interface of mobile computing
devices, such as laptops in LANs. Wi-Fi is now increasingly used for more services,
including Internet and VoIP phone access, gaming, and basic connectivity of consumer
electronics such as televisions, DVD players, and digital cameras.
Source - http://en.wikipedia.org/wiki/Wi-Fi
WEP
Wired Equivalent Privacy (WEP) is a scheme to secure IEEE 802.11 wireless networks.
It is part of the IEEE 802.11 wireless networking standard. Because wireless networks
broadcast messages using radio, they are susceptible to eavesdropping.
Source - http://en.wikipedia.org/wiki/Wired_Equivalent_Privacy
WPA – Enterprise Version
Wi-Fi Protected Access (WPA and WPA2) is a class of Settings to secure wireless
(Wi-Fi) computer networks. It was created in response to several serious
weaknesses researchers had found in the previous Setting, Wired Equivalent
Privacy (WEP). WPA implements the majority of the IEEE 802.11i standard, and
was intended as an intermediate measure to take the place of WEP while 802.11i
was prepared. WPA is designed to work with all wireless network interface cards, but
not necessarily with first generation wireless access points. WPA2 implements the full
standard, but will not work with some older network cards. Both provide good security,
with two significant issues:
Source - http://en.wikipedia.org/wiki/Wi-Fi_Protected_Access
DHCP is a set of rules used by communications devices such as a computer, router or
network adapter to allow the device to request and obtain an IP address from a server
which has a list of addresses available for assignment.
DHCP is a protocol used by networked computers (clients) to obtain IP addresses and
other parameters such as the default gateway, subnet mask, and IP addresses of
DNS servers from a DHCP server. It facilitates access to a network because these
settings would otherwise have to be made manually for the client to participate in the
network. Many company networks do not use DHCP, while most of the private home
networks
Source - http://en.wikipedia.org/wiki/Dynamic_Host_Configuration_Protocol
13SSID
In Wi-Fi Wireless LAN computer networking, a service set identifier (SSID) is a
code attached to all packets on a wireless network to identify each packet as part
of that network. The code is a case sensitive text string which consists of a
maximum of 32 alphanumeric characters. All wireless devices attempting to
communicate with each other must share the same SSID. Apart from identifying each
packet, SSID also serves to uniquely identify a group of wireless network devices
used in a given "Service Set".
Source - http://en.wikipedia.org/wiki/SSID
Troubleshooting and FAQ
Question: When browsing the Internet Radio I got the message ‘Unformatted
Channel’. What does that mean?
Answer: That’s because the station is closed.
Question: Why can’t I play the Music even when I have selected my Media Player?
Answer: Please check whether you have shared the Music streaming of the entire
new device in the Media Player 11 in Windows XP or Vista. Please read setting the
Windows media player 11 described in this manual.
Please note that we add the streaming function as an additional and non-supported
function only.
Question: Why is my player not streaming even I have done the setup of the Windows
media player 11?
Answer: Please check if your PC or Notebook has gone to Hibernate mode. The
Media streaming does not work in the hibernate mode.
Question: Can I download the music folder or music file to my Music Player?
Answer: No the device do not support music file download
Question: What is Radio search? And am I required to subscribe to Radio search
service for my product in order to listen to Internet Radio?
Answer: Radio search service provides online internet radio directory which
aggregates tens of thousands of radio stations and podcasts. The directory
maintained by Radio search are updated time to time in order to make sure the
maximum level of accessibility of individual Internet Radio channel. Your product
product is shipped with bundling Radio search service to make sure customer
have seamless user experience. So, customer needs no individual subscription
for Radio search service.
Question: How do I connect my product to a Wi-Fi network?
Answer: When you use a feature that requires an internet connection, like Internet
Radio and Media Stream, the product will automatically connect to available
network. This process is called “Wi-Fi zero-configuration”. Once the network is
connected, you can automatically enter into the function modes.
14Question: What is product Wi-Fi zero-configuration? How does it work?
Answer: product Wi-Fi zero-configuration is an intelligent service used to provide
end customer like you a harass- free user experience on Wi-Fi setup. It will
automatically connect to open Wi-Fi access point or load saved profiles.
Question: What is product Wi-Fi profile?
Answer: product Wi-Fi profile is a configuration set for your Wi-Fi connection. It
contains all the information you need to access a Wi-Fi access point. The profile helps
you to ease the trouble to remember all the details regarding access
point.
Question: What is Wi-Fi setup wizard?
Answer: Wi-Fi setup wizard will help you setup up Wi-Fi network in step by step
manner in certain special case, like when you access a fresh access point with security
protection for the very first time.
Question: How do I bring up Wi-Fi setup wizard?
Answer: When Wi-Fi zero-configuration is in progress, you can switch it to choose Wi-
Fi setup wizard by pressing the Tune/OK knob once. Also, you may like to go into
“Setting” then “Network” menu then choose the “Use WIFI” option
from there.
Question: How do I input password for Wi-Fi security?
Answer: An input screen (Soft keypad) will automatically come up when
necessary. Simple soft keypad interface gives a quick way to key in letters, numeric
and symbols. You can also do simple editing like cursor locating, delete, etc.
Question: What wireless standards are compatible with my product?
Answer: product is an 802.11 wireless b/g compatible device. It includes
support for WEP and WPA/WPA2
Personal authentication security standards. WPA/WPA2 Enterprise authentication
security is not supported.
Question: Why does my product only have Wi-Fi antenna icon but no signal bar?
Answer: Please check your Wi-Fi access point and network server configuration
on DHCP portion. This indicates there is no DHCP server is presented in the
network environment. In that case it may b necessary to add IP number, Subnetz
info, Gateway IP address and DNS address manually. This will not happen in most
private home networks, but can happen in larger company networks, which usually
do not provide DHCP
15Question: Can I connect to public access Wi-Fi networks (hot-spot)?
Answer: You can not connect to hot-spot access point because it usually needs
an application level web-based authentication. Try first with a notebook. If you need to
go to a certain website and enter access data from a voucher, then an internet radio
cannot be connected.
Question: Which bit rate will my product player support?
Answer: The product player will support 64-320Kbps for MP3 and
32-320 Kbps for WMA.
Disposal of defective electronic items
The European WEEE Directive does not any more allow to dispose any used electronic items via
household trash bins. The local communities will provide containers for disposal of electronic waste.
Please use these facilities, it will be Your contribution to proper recycling of electronic material, and it
is free of charge for You!
European 2 years warranty
The distributor, dealer or retail shop warrants to the original retail purchaser of this product that should this
product or any part of it, under normal use and conditions, be proven defective in material or workmanship
within 2 years from the date of original purchase, such defect(s) will be repaired or replaced with new or
reconditioned product (at the company's option) without charge for parts and repair labor. To obtain repair or
replacement within the terms of this warranty, the product is to be delivered with proof of warranty coverage
(e.g. a copy of your bill of sale), specification of defect(s), to the distributor, dealer or his authorized repair
center.
The Company disclaims liability for communications range of this product. The warranty does not apply to any
product or part there of which, in the opinion of the company, has suffered or been damaged through alteration,
improper installation, mishandling, misuse, neglect, accident, or by removal or defacement of the factory serial
number/bar code label(s). The warranty does not apply to accessory parts or problems caused through not
authorized or not recommended accessories like of the units like batteries, external power supplies and over
voltage caused through external power supplies, light bulbs, broken antennas, broken belt clips, broken or
damaged acrylic glass windows and cabinet parts.
Please contact the dealer or person where You have purchased Your radio.
CE declaration of Conformity
This device contains a VHF FM broadcast radio + internet radio and WiFi module. It corresponds to all relevant
European directives like LVD: 73/23/EEC and EMC:2004/108/EG and is constructed according to European
standards like EN 60 950-1:2006, EN 55 013 / EN 55020 and EN 300 328-2, EN 301 489-17. The complete
declarations may be downloaded any time from our server http://service.alan-germany.de, where all technical
documentation can be found as well.
© 2009 - Alan Electronics GmbH
Service Address (in Germany):
PST professional support technologies GmbH
Breitscheider Weg 117a
D- 40885 Ratingen
Hotline: 01805-012204 (14 Cents/Minute from German fixed phone network , mobile
may be different)
e-mail: alan-service@ps-tech.de
16You can also read