PREMIUM STAND MIXER User Manual
←
→
Page content transcription
If your browser does not render page correctly, please read the page content below
User Manual

PREMIUM STAND MIXER
Contents
Overview .................................................................................................................. 3
Use............................................................................................................................. 5
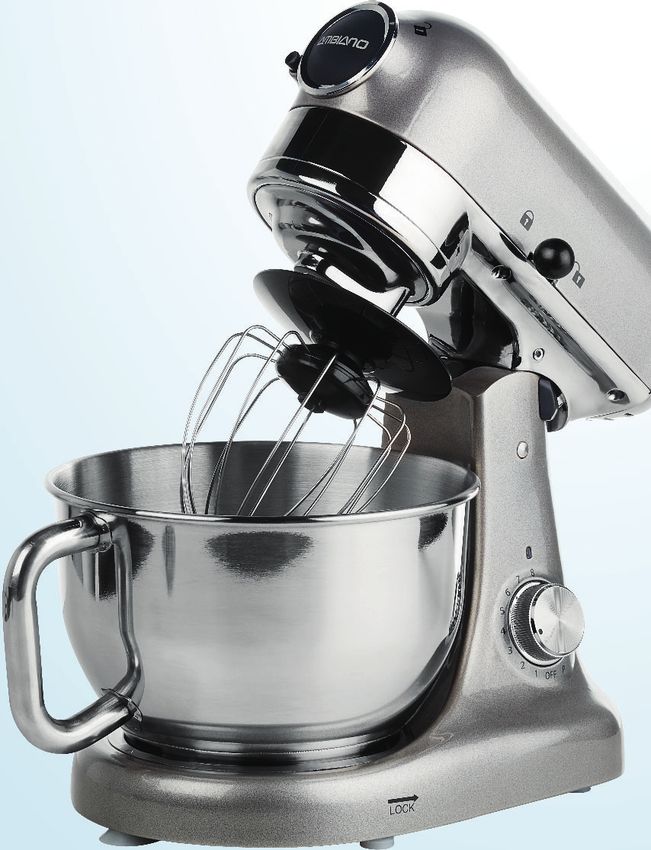
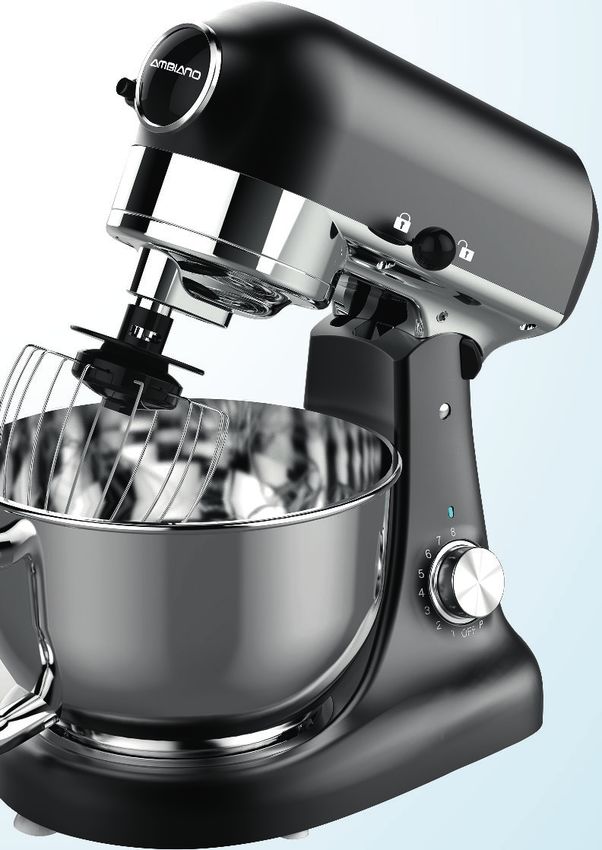
Device parts .............................................................................................................. 6
Introduction ..............................................................................................................7
Warning symbols and key words used in these operating instructions ....................7
Proper use ................................................................................................................ 8
Safety information ................................................................................................... 8
Unpacking the appliance................................................................................................... 8
Electrical Safety .................................................................................................................... 9
Cleaning ...............................................................................................................................10
Operating Times .................................................................................................................10
Package contents .....................................................................................................11
Using the appliance for the first time .................................................................... 12
Operation................................................................................................................. 13
Getting started .................................................................................................................... 13
Mixing and kneading dough............................................................................................ 13
Beating eggs ....................................................................................................................... 13
Whipping cream.................................................................................................................. 13
Mixing shakes, cocktails or other liquids ....................................................................... 13
Instructions for use of the mincer ......................................................................... 13
Chopping meat .................................................................................................................. 13
Making sausages ................................................................................................................14
Piping biscuits .....................................................................................................................14
Dok./Rev.-Nr. 16480 EN ALDI UK Cover 5006 5612_5613 final
Speed control guide................................................................................................14
Speed settings for different use.......................................................................................15
Working with the mincer ........................................................................................16
Setting up the mincer to mince meat .............................................................................16
Fitting the mixer with the sausage attachment............................................................ 17
Setting up the mincer to produce cookies .....................................................................18
Setting up the mincer to produce pasta.........................................................................18
Setting up the mincer to produce kebab .......................................................................19
End of operation .....................................................................................................19
Cleaning ...................................................................................................................19
Troubleshooting..................................................................................................... 20
Disposal................................................................................................................... 20
Technical specifications .......................................................................................... 21
Conformity information .......................................................................................... 21
Legal Notice ............................................................................................................. 21
Service information ................................................................................................22
Privacy statement ...................................................................................................22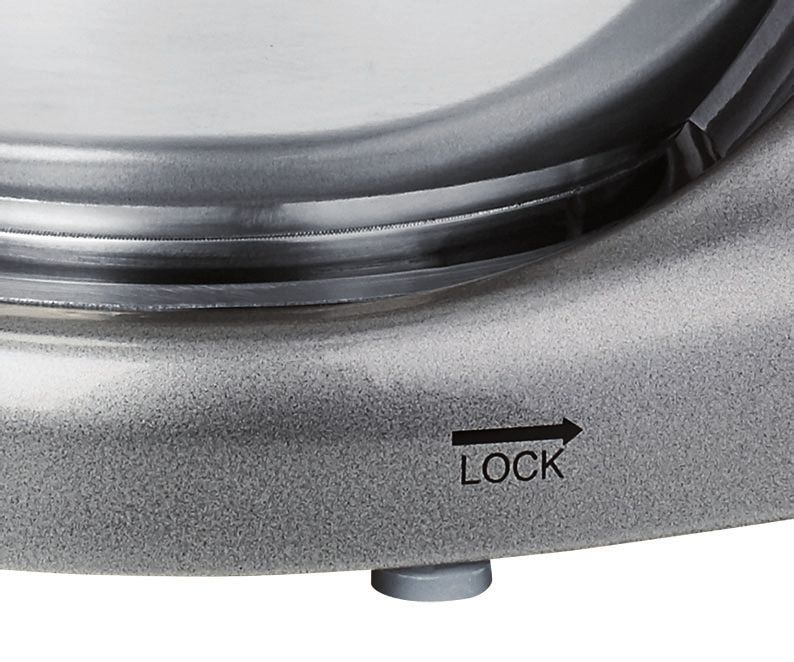
Overview

A

    10
                                                            1
    9
                                                           2
                                                           3
    8

                                                           4
    7
                                                           5

                                                           6

B
    11        12        7        13   14   15    16    17         18

         25        24       13    24 23     22   21   20         19

                                                                      3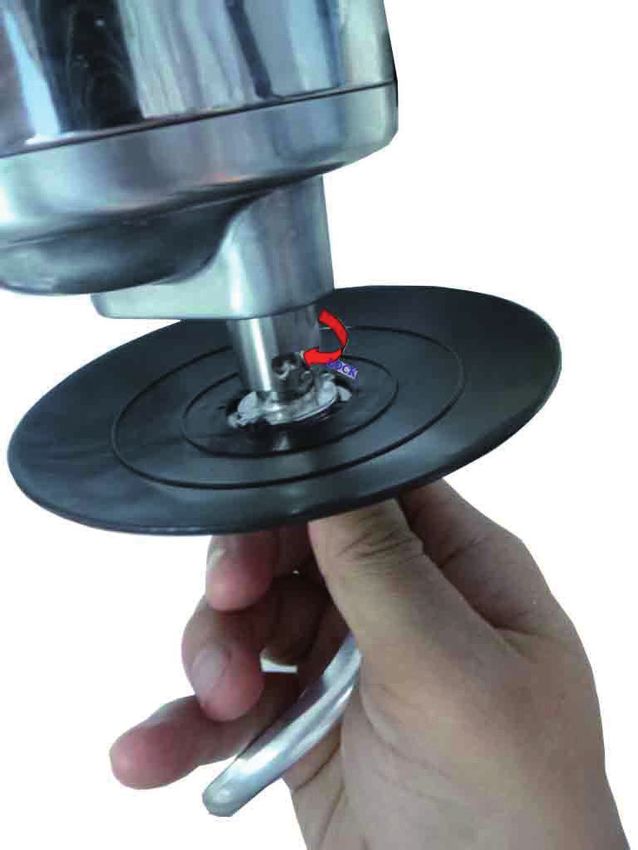
Overview

 C

           14             13    26        27        15

 D

                28   14        12    29        27        15

 4
Use

E   F

G

        5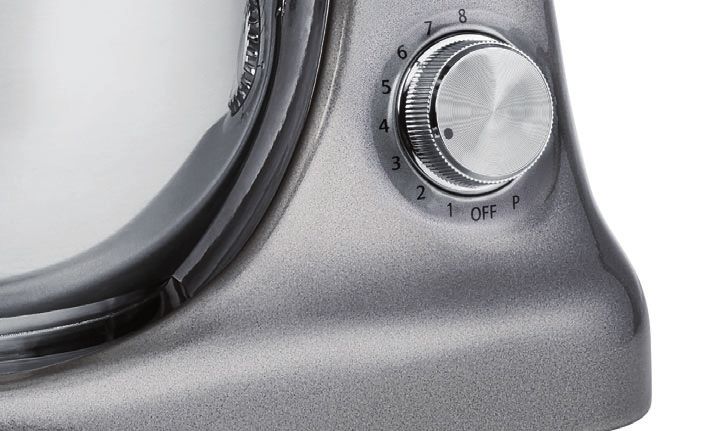
Device parts

Device parts
  1    Rear cover
  2    Tilt lever
  3    Support grip for tilting
  4    Operating LED
  5    Control knob
  6    Base plate with feet
  7    Mixing bowl
  8    Splash guard lid for mixing bowl
  9    Front cover of mincer drive
 10 Knob to release front cover
  11   Feed tray
 12    Biscuit adapter with shaping attachment 28
 13    Meat cutter discs
 14    Fixing ring
 15 Feed tube of screw housing
 16    Whisk
 17    Pusher
 18    Sausage filling tube
 19    Kebab attachment
 20 Splash guard for mixing tools
 21    Kebab spout
 22 Dough hook
 23 Beater
 24 Pasta attachments
 25 Sausage attachment
 26 Meat cutter
 27 Auger
 28 Biscuit shaping attachment
 29 Biscuit attachment

  6
Introduction

Introduction
         Please read the user guide, and in particular the safety instructions, thoroughly before using the
         appliance. You will find a range of important and useful information that should be understood and
         followed by everyone using the appliance. Keep the guide in a safe place and be sure to enclose it with
         the appliance if you give it to another user.

Warning symbols and key words used in these operating instructions

              DANGER!
This signal word indicates a hazard with a high level of risk which, if not avoided, will result in death or serious
injury.

             WARNING!
This signal word indicates a hazard with a medium level of risk which, if not avoided, could result in death or
serious injury.

              CAUTION!
This signal word indicates a hazard with a low level of risk which, if not avoided, could result in minor or moderate
injury.

           NOTICE!

This signal word warns of possible damage to property.

             This symbol gives you useful additional information on assembly or operation.

             Follow the guidelines in the operating instructions!

             Recycling symbol

             WEEE symbol (in accordance with the directive on electrical waste)

             Declaration of conformity (See chapter “Declaration of Conformity”): products marked with this
             symbol meet EC directive requirements.

             Symbol used in the EU to indicate food contact materials such as packaging or appliance surfaces.

                                                                                                                       7
Proper use

Proper use
The appliance may only be used for kneading or mixing foodstuffs such as dough, mousse, cream
or egg whites.
The appliance is not suitable for commercial or industrial use.
This product is for indoor use only - do not use outdoors!
Please note that we shall not be liable in cases of improper use:
− Do not modify the appliance without manufacturer’s consent.
− Do not use any replacement parts or accessories that have not been supplied or approved by
   the manufacturer.
− Heed all the information in these operating instructions, especially the safety information.
   Any other use is deemed improper and can cause personal injury or property damage.
− Do not expose the appliance to any extreme conditions. The following should be avoided:
  • High levels of humidity or moisture
  • Extremely high or low temperatures
  • Direct sunlight
  • Naked flames

Safety information

             WARNING!

Risk of injury!
There is a risk of injury due to improper handling.
− This appliance shall not be used by children. Keep the appliance and it’s cord out of reach of
   children.
− Appliances can be used by persons with reduced physical, sensory or mental capabilities
   or lack of experience and knowledge if they have been give supervision or instruction
   concerning use of the appliance in a safe way and if they understand the hazards involved.
− Children shall not play with the appliance.
Unpacking the appliance

             DANGER!

Risk of suffocation!
There is a risk of suffocation from plastic packaging!
− You should therefore keep plastic packaging out of the reach of children.

             WARNING!

Risk of injury!
There is a risk of injury from electric shock.
− Before using the appliance for the first time and after each use, check the mains cable for
   damage.
− If damage has occurred, DO NOT use the appliance. Contact the Medion Service Centre for
   advice and repair.
8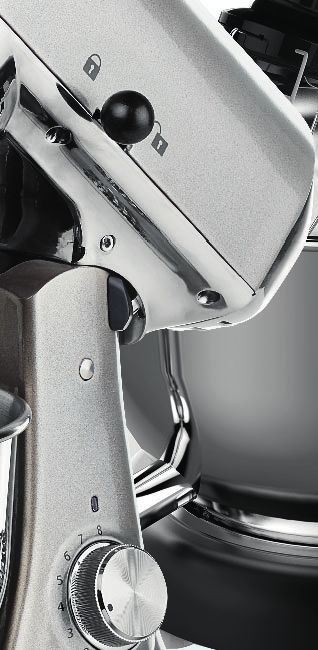
Safety information

Electrical Safety

           WARNING!

Risk of injury!
There is a risk of injury from electric shock.
− Make sure that the mains cable does not present a trip hazard. Do not allow the connecting
   cable to become trapped or squashed.
− Do not operate the appliance if there appears to be any damage to the machine or the mains
   cable.
− There are dangerous voltages inside the appliance. Never open the housing or insert objects
   into the ventilation slots.
− In order to disconnect the appliance completely from the power supply, remove the plug from
   the socket. Always remove the plug using the plug, never by pulling on the cable.
− Ensure that a defective appliance is repaired immediately by a specialist workshop. In order to
   reduce risks: if the mains cable for this appliance is damaged then it must be replaced by the
   Medion Service Centre or a similarly qualified person.
− Do not expose the appliance to any extreme conditions. The following should be avoided:
  • High levels of humidity or moisture
  • Extremely high or low temperatures
  • Direct sunlight
  • Naked flames

         NOTICE!

Storm damage to the appliance
− Appliances left connected to the mains power supply during thunderstorms may be
  damaged. Therefore, always remove the mains plug if there is a thunderstorm.

           WARNING!

Risk of injury!
There is a risk of injury by rotating and moving parts.
− DO NOT TOUCH moving parts. Keep hair, clothing, hands, cutlery, mixing spoons or similar
   items away from the appliance during operation to avoid injuries or damage to property.
   Never use different operating modes (e.g. mincer and mixer) at the same time
− The appliance must be switched off and disconnected from the supply before changing
   accessories or attachments that move when in operation.
− Before switching on, make sure that the accessory attachment is correctly fitted and firmly
   seated.
− As soon as you turn on the appliance, the drive shaft will rotate. During operation, do not
   reach into the area of the drive shaft! For your own safety, always fit the mixing bowl.

                                                                                                  9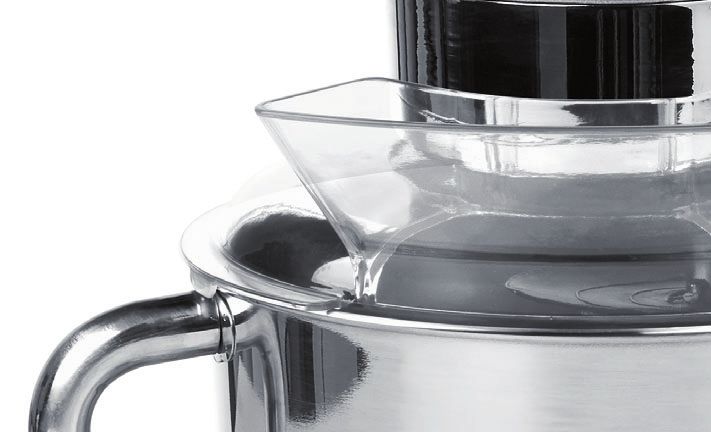
Safety information

           NOTICE!

Risk of damage!
There is a risk of damage to the appliance due to improper installation.
− Place the appliance on a firm, level surface.
− Do not use an extension cable.
− Never place the appliance on the edge of a table - it could tip over and fall.
− Remove the plug from the mains socket after each use, before cleaning and during periods
   when the appliance is left unattended.
− Unwind the cable fully when using the appliance.
− Do not allow the mains cable to come into contact with hot objects or surfaces (e.g. cooker
   hob).

              DANGER!

Risk of injury!
There is a risk of injury due to improper handling
− Do not allow the mains cable to come into contact with water or other liquids.
− Never immerse the appliance in liquids!
− Do not use the appliance outdoors.
− Do not leave the appliance unattended during operation.
− Ensure that no foreign objects (spoon, dough scraper or similar items) are in the mixing bowl
   during operation.
− Do not unlock the tilting arm when the mixer is in operation.
− There is a risk of scalding if the appliance is being used with foodstuffs that are hotter than
   60°C. Do not fill the mixing bowl with hot foodstuffs.
Cleaning

             WARNING!

Risk of injury!
There is a risk of injury from electric shock.
− Before cleaning, turn the control knob to speed setting “OFF” and remove the plug.
− Before cleaning, remove all attachments.
− Never immerse the appliance in water or other liquids!
− Always unplug the appliance from the outlet before removing attachments and cleaning.
Operating Times

           NOTICE!

Risk of damage!
There is a risk of overheating due to excessive operation.
− Do not operate the appliance continuously for longer than the times stated below.
− Maximum Operating Time: approx. 5 minutes
− After operating for 5 minutes, allow to cool for 10 minutes before using again.
10
Package contents
Package contents
DANGER!
Risk of choking and suffocation!
Risk of choking and suffocation from swallowing or inhaling small parts or plastic wrap.
− Keep the plastic wrap out of the reach of children.
Please check your purchase to ensure that all items are included. If anything is missing, please contact us within 14
days of purchase.
The following items are supplied with your product:
• Stand mixer
• 1 Mixing bowl
• 1 Flat beater
• 1 Dough hook
• 1 Egg whisk (stainless steel)
• 1 Splash cover with filler hole
• 1 mincer
• 3 mincing discs
• 1 filter tray
• 1 plastic plunger
• 1 set pasta discs (4 pieces)
• 1 set cookie making attachment (3 pieces)
• 1 set sausage making attachment (2 pieces)
• 1 set kebab making attachment (2 pieces)
• Operating instructions and warranty documents
11Using the appliance for the first time
Using the appliance for the first time
− Remove the packaging materials and all protective wraps.
− Clean the accessories and the appliance thoroughly before using for the first time (see „Cleaning“ on page
19).
− After cleaning, dry the accessories thoroughly before switching the appliance on for the first time.
− Connect the appliance only to a properly installed electrical outlet that matches the technical specifications for
this appliance on page 21.
− Set the control knob 5 to “OFF” and press the tilt lever 2 to raise the tilting arm.
− Place the mixing bowl 7 on the bracket in the base 6 and rotate it as far as it will go in the direction
indicated by the LOCK arrow to lock it in place (see fig. E).
WARNING!
Risk of injury!
There is a risk of injury by rotating and moving parts.
− Before changing accessories or attachments that move when in operation, the appliance
must be switched off and unplugged. There is a risk of a crushing injury!
1. For added protection against splashes while using the whisk, fit the moulded plastic onto the whisk (see
fig. F).
2. Fit the tool to the machine as illustrated.
The mixing tools can only be inserted in the machine and rotated if the guidance lug are seated in the
corresponding guide groove (see fig. G).
The guard disc on the tools prevents the drive shaft from coming into contact with dough.
3. The splash guard 8 for the mixing bowl is ready to fit and can simply be placed over the bowl after it has
been locked in place.
4. Press the tilt lever and lower the tilting arm. Make sure that it is latched home on the bottom part of the
housing. Reconnect the appliance to the outlet.
5. The control knob can now be set for the required speed. The recommended speed settings for various uses
are listed below.
− Use the dough hook 22 at speed 1, 2 or 3 for heavy doughs like bread, shortcrust pastry or pasta.
− You can use the beater 23 for many ingredients ranging from medium-weight doughs, such as cake mixes,
to lighter mixtures, such as pancake batter or stir-fry dough. Use the beater at speed 4, 5, 6, 7 or 8 as required.
− If you are whipping cream, eggs (whole, yolks or whites), or pudding, use the whisk 16 at high speed (7 or 8).
− For short, powerful and continuous pulse movements, turn the control knob repeatedly to the “P” position.
6. After operation, turn the control knob to “OFF”.
7. Press the tilt lever and lift the tilting arm, then remove the mixing tool from the bayonet fitting. Return the
tilting arm to its lowered position.
8. Unplug the cord.
12Operation
Operation
Getting started
1. Fit the dough hook 22 , whisk 16 or beater 16 to the machine and then insert the mixing bowl 7 .
2. Fit the splash guard 8 on the mixing bowl.
3. Now put the ingredients into the mixing bowl. Take care not to overfill the mixing bowl (about 12 ½ cups flour
maximum).
4. Press the tilt lever 2 and lower the tilting arm. Make sure that it is latched in place on the bottom part of the
housing.
Mixing and kneading dough
Use the dough hook or the beater for kneading dough.
• The best dough mixture for kneading is a ratio of 5 parts flour to 3 parts water. Fill the mixing bowl to a
maximum level of 3/4 full.
• When filling the mixing bowl, be sure not to exceed the maximum quantity of 12.5 cups.
• Use the dough hook or beater for mixing.
− If you use the dough hook or beater, switch to speed setting 1 for at least 30 seconds, followed by at least 30
seconds at speed setting 2 and, finally, speed setting 3 for up to 5 minutes.
Do not operate for longer than 5 minutes. If more time is necessary, wait 10 minutes with the appliance turned off
and then resume use.
Beating eggs
To beat eggs (whole, yolks or whites), use the whisk.
− Use speed setting 7 or 8 and beat the egg white continuously for some 3 to 5 minutes until stiff.
Do not beat the whites of more than 12 eggs at once.
Do not operate for longer than 5 minutes. If more time is necessary, wait 10 minutes with the appliance turned off
and then resume use.
Whipping cream
To whip cream, use the whisk. Use fresh cream.
− For whipped cream, use speed setting 7 or 8 and whip for some 3 to 5 minutes.
Be sure not to exceed the maximum quantity when adding fresh milk, cream or other ingredients to the mixing
bowl.
Do not operate for longer than 5 minutes. If more time is necessary, wait 10 minutes with the appliance turned off
and then resume use.
Mixing shakes, cocktails or other liquids
To mix shakes, cocktails and other liquids, use the whisk.
− Mix the ingredients in accordance with the required recipe for some 3 to 5 minutes at a speed setting of 1 to 8.
Do not exceed the maximum volume of in the mixing bowl.
Do not operate for longer than 5 minutes. If more time is necessary, wait 10 minutes with the appliance turned off
and then resume use.
Instructions for use of the mincer
Chopping meat
• Do not include any hard matter such as bones.
− Cut the meat into small pieces, about 20 x 20 x 60 mm, without gristle or bone, so that they are easily broken
up in the feed screw housing.
13Speed control guide
Making sausages
• You can use either natural or artificial sausage skin.
• If you are using natural skin, allow it to soften for a while in water. Knot one end of the sausage skin.
− Push the sausage skin onto the sausage filling tube 18 .
− The sausage meat will be pushed through the sausage attachment to fill the sausage skin.
• Make sure that the sausage skin is “loosely” filled since the sausage meat expands when cooked and could
burst the skin.
− Once the desired length for the first sausage is reached, press the skin at the end of the sausage attachment
together with your fingers
− and then twist the sausage once or twice on its own axis.
• For easier handling, you can switch off the machine after each sausage length.
Piping biscuits
− Prepare a place to lay out the biscuits once made.
− With the shaping attachment 28 , you can give the prepared biscuit dough various shapes.
− After you have mounted the screw housing with biscuit attachment 29 on the appliance, push the shaping
attachment into the biscuit adapter 12 .
− Set the desired biscuit shape.
Speed control guide
Speed Use for
Stirring
1 Use speed 1 to start all kind of mixing processes like stirring, mashing or combining. Use this to
add liquids to dry ingredients or to add dry ingredients (e.g. flour) to batter and to combine heavy
mixtures.
Slow Mixing
2-3 Use speed 2 for faster stirring, mashing and slow mixing. Applicable to mix heavy batters and candies,
start mashing potatoes or vegetables, cut shortening into flour, mixing thin, splashy, heavy batters.
Also use it to mix and knead yeast dough.
Mixing, Beating
4-5 Use speed 4 to mix semi-heavy batters (e.g. cookies) and cake mixes at mid-level speed. Also use it to
combine sugar and shortening or to add sugar to egg whites for meringues.
Beating, Creaming
5-6 Use speed 6 for mid-level beating, creaming or whipping. It is appropriate to finish cake mixes,
doughnut and other batters. High speed for cake mixes.
Fast Beating, Whipping
6-8
Use speed 6-7 for whipping cream, egg whites and boiled frostings.
Fast Whipping
8
Use speed 8 to whip smaller amounts of cream or egg whites.
14Speed control guide
Speed settings for different use
Application Tool Speed setting Ingredient amount
Kneading heavy dough
(e. g. bread, shortcrust or pasta Dough hook 1-3 max. 1.5 kg
dough)
Mixing medium to heavy dough
Flat beater 3-5 max. 1.5 kg
(e. g. cake mixture)
Mixing light dough min. 200 ml
Flat beater 1-5
(e. g. crêpes dough or oustard) max. 1.5 l
Creaming min. 200 ml
Egg whisk 5-8
(e. g. cake filling or cream) max. 1.0 l
Fast Whipping
min. 4 eggs
(e. g. whipping smaller amount of Egg whisk 8
max. 20 eggs
cream or egg whites)
Mincing meat Meat cutter 6-8
Forming pasta Pasta attachments 6-8
Forming cookies Cookie attachments 6-8
Making saugages Sausage attachments 6-8
Making kebab Kebabv attachments 6-8
15Working with the mincer
Working with the mincer
WARNING!
Risk of injury!
There is a risk of injury by rotating and moving parts.
− When using the mincer, put the mixing bowl 7 in position to protect the rotating fitting for
the mixing tool. There is a risk of a crushing injury!
− Be careful when handing the sharp cutting blades of the meat cutter 26 .
Setting up the mincer to mince meat
14 13 26 27 15
For mincing, use the most appropriate of the three meat cutting discs 13 for the desired result together with the
meat cutter.
1. Pull out the mains plug to isolate the machine from the supply.
2. Hold in the knob to release the front cover 10 and turn the front cover 9 to the right to release.
3. If needed, press the tilt lever 2 and lower the tilting arm. Make sure that it is latched home on the bottom
part of the housing.
4. Assemble the mincer 15 , the auger 27 , the meat cutter 26 and the most appropriate meat cutting disc with
accessory parts in the order illustrated above.
5. Screw the end fixing ring 14 clockwise onto the thread.
6. Hold in the knob to release the front cover and, with the bayonet fitting tilted slightly to the right, fit the
mincer onto the mincer drive shaft.
7. Rotate the mincer to the left to screw it on. Make sure that the mincer is firmly seated on its connection to the
machine.
8. Fit the feed tray 11 on the top end of the mincer feed tube.
9. Place the meat in the feed tray and use the pusher 17 to push it down the tube.
Do not use the mincer for longer than 5 minutes and then allow a pause of at least 10 minutes.
16Working with the mincer
Fitting the mixer with the sausage attachment
Processing prepared sausage meat
14 18 25 27 15
To fill suitable natural or artificial sausage skin with sausage meat, use the sausage attachment 25 and the
sausage filling tube 18 .
To process prepared sausage meat, proceed as follows:
− Assemble the mincer as illustrated above, following the assembly procedure as described in „Setting up the
mincer to mince meat“.
Mincing meat and making sausages in a single pass
14 18 13 26 27 15
To mince meat and make sausages in a single pass, assemble the mincer and meat cutting disc and cutter as
described in „Setting up the mincer to mince meat“.
Put on the sausage attachment next and screw the fixing ring onto the thread of the mincer body.
17Working with the mincer
Setting up the mincer to produce cookies
28 14 12 29 27 15
To produce cookies from shortbread dough, use the cookie adapter with shaping attachment 12 and the cookie
attachment 28 .
− Assemble the mincer as illustrated above, following the assembly procedure as described in „Setting up the
mincer to mince meat“.
Setting up the mincer to produce pasta
14 24 27 15
To produce pasta from pasta dough, choose one of the four pasta attachments 24 .
− Assemble the mincer as illustrated above, following the assembly procedure as described in „Setting up the
mincer to mince meat“.
18End of operation
Setting up the mincer to produce kebab
14 21 19 27 15
To produce kebab use the kebab spout 21 and the kebab attachment 19 .
− Assemble the mincer as illustrated above, following the assembly procedure as described in „Setting up the
mincer to mince meat“.
End of operation
1. Switch off the appliance.
2. Disconnect the mains plug.
3. Press down on the tilt lever 2 to allow the arm to raise itself.
4. Remove the mixing tool. To release the tool, rotate it anticlockwise.
5. Rotate the mixing bowl 7 slightly clockwise to remove it.
6. When the dough is ready, use a spatula to remove it from the mixing bowl.
7. Clean the parts used as described under “Cleaning”
Cleaning
WARNING!
Risk of injury!
There is a risk of injury from electric shock.
− Before cleaning, turn the control knob to speed setting “OFF” and remove the plug.
− Before cleaning, remove all attachments.
− Never immerse the appliance in water or other liquids!
− Always unplug the appliance from the outlet before removing attachments and cleaning.
19Troubleshooting
NOTICE!
Risk of damage to the appliance if handled incorrectly
− Do not use a wire brush, scouring pad or scouring cleaning agents.
Motor housing:
− Only clean the external housing of the appliance, using a damp cloth with a small amount of
soap. Dry off with a cloth.
Whisk, dough hook, beater and mixing bowl:
− These parts can be cleaned with hot water and soap or in the dishwasher. Do not use any
scouring agents.
Other accessories and splash guard:
− These parts can be cleaned with hot water and soap. Do not use any scouring agents.
Troubleshooting
Problem Possible cause Solution
The appliance will The mains plug is not Pull out the plug, wait 10 seconds and then plug it back in
not start properly inserted. again.
The socket is defective. Check the socket by connecting another appliance.
Disposal
Disposal of packaging
Sort packaging before disposal. Dispose of card and cardboard with waste paper and
dispose of film with recyclable materials.
SLEEVE TRAY FILM
Don‘t Don‘t
Recycle
Recycle Recycle
Disposal of old appliances
(Applicable in the European Union and other European states with systems for separate collection of recyclable
materials)
Do not dispose of old appliances in normal household waste!
If the appliance can no longer be used, the consumer is obliged by law to dispose of the old appliance
separately from household waste, e.g. at a local authority/district collection point. This guarantees that
old appliances are recycled correctly and avoids negative effects on the environment. For this reason,
electrical appliances are marked with the above symbol.
− Before disposal cut off the cable.
20Technical specifications
Technical specifications
Model: MD 16480
Nominal voltage: 220-240 V~50/60 Hz
Protection Class: I (this appliance must be earthed)
Nominal power: 1000 W
Mixing bowl: 4.6 litres
Max. capacity (flour): 1.5 kg
Dimensions
Appliance: approx. 34.5 x 20.5 x 32.0 cm (H x W x L)
Net weight: 7.8 kg
Conformity information
Medion AG hereby declares that the product MD 16480 conforms to the following European
requirements:
• EMC Directive 2014/30/EU
• Low Voltage Directive 2014/35/EU
• RoHS Directive 2011/65/EU
Legal Notice
Copyright © 2020
Date: 22.06.2020
All rights reserved.
These operating instructions are protected by copyright.
Mechanical, electronic and any other forms of reproduction are prohibited without the written permission of the
manufacturer.
Copyright is owned by the company:
MEDION AG
Am Zehnthof 77
45307 Essen
Germany
Please note that you cannot use the address above for returns. Please always contact our Customer Service team
first.
21Service information
Service information
Please contact our Customer Service team if your device ever stops working the way you want or expect it to.
There are several ways for you to contact us:
• In our Service Community, you can meet other users, as well as our staff, and you can exchange your
experiences and pass on your knowledge there.
You will find our Service Community at community.medion.com.
• Alternatively, use our contact form at www.medion.com/contact.
• You can also contact our Service team via our hotline or by post.
Opening times Hotline number UK
Mon – Fri: 08.00 – 20.00 0333 3213106
Sat – Sun: 10.00 – 16.00 Hotline number Ireland
1 800 992508
Service address
MEDION Electronics Ltd.
120 Faraday Park, Faraday Road, Dorcan
Swindon SN3 5JF, Wiltshire
United Kingdom
You can download this and many other sets of operating instructions from our service portal at
www.medion.com/gb/service/start/.
You will also find drivers and other software for a wide range of devices there.
You can also scan the QR code on the side of the screen, to download the operating instructions
onto your mobile device from the service portal.
Privacy statement
Dear customer,
We wish to inform you that we, MEDION AG, Am Zehnthof 77, 45307 Essen, Germany process your personal data as a
data controller.
For matters regarding data protection, we are supported by our company data protection officer who can be
contacted at MEDION AG, Datenschutz, Am Zehnthof 77, D – 45307 Essen; datenschutz@medion.com. We process
your data for the purpose of warranty processing and associated processes (e.g. repairs) and therefore rely on
processing your data for the sales contract concluded with us.
Your data will be provided to repairers contracted to us for the purpose of warranty processing and associated
processes. We generally store your personal data for a period of three years in order to fulfil your legal warranty
rights.
You have the right to be informed of the personal data concerned as well as the right to rectification, deletion,
restriction of processing, the right to object to processing, as well as the right to data portability.
In case of access and cancellation rights, restrictions apply according to S 34 and S 35 of BDSG (Federal Data
Protection Act) (Art. 23 GDPR). In addition, there is a right of appeal to a competent data protection supervisory
authority (Article 77 GDPR in conjunction with S 19 BDSG). The state official for data protection and freedom of
information for MEDION AG is Nordrhein Westfalen, P box 200444, 40212 Düsseldorf, Germany. www.ldi.nrw.de.
The processing of your data is necessary for warranty processing: it is not possible to process the warranty without
the provision of the required data.
22Great care has gone into the manufacture of this product and it should
therefore provide you with years of good service when used properly. In
the event of product failure within its intended use over the course of the
first 3 years after date of purchase, we will remedy the problem as quickly
as possible once it has been brought to our attention. In the unlikely event
of such an occurrence, or if you require any information about the product,
please contact us via our helpline support services, details of which are to
be found both in this manual and on the product itself.
GB IE
PRODUCED IN CHINA FOR:
ALDI STORES LTD. PO BOX 26, ATHERSTONE
WARWICKSHIRE, CV9 2SH.
ALDI STORES (IRELAND) LTD.
PO BOX 726, NAAS, CO. KILDARE.
WWW.ALDI.COM
3
AFTER SALES SUPPORT
706148
GB 0333 3213106 IE 1 800 992508
National rate Free Hotline
www.medion.co.uk
MODEL: YEAR
MD 16480 09/2020 WARRANTYYou can also read