Prodigy ONE.2 Quick Start Guide
←
→
Page content transcription
If your browser does not render page correctly, please read the page content below
®

 Prodigy ONE.2
Quick Start Guide
This Prodigy ONE.2 Quick Start Guide is based on carefully
documented material and research using Prodigy ONE.2.
Every attempt has been made include accurate and up-
to-date information. INTRAPHEX and/or AAMP OF
AMERICA cannot be held responsible for discrepancies or
inconsistencies contained in this publication, particularly
due to updates in technology applied to Prodigy ONE.2 or to
specific vehicle applications.

Copyright © 2012 by INTRAPHEX / AAMP OF AMERICA.
All Rights Reserved

No part of this work covered by the copyright hereon may
be reproduced or used in any form or by any means —
graphic, electronics, or mechanical, including photocopying,
recording, taping or information storage and retrieval
systems — without the written permission of the publisher,

INTRAPHEX - Total Vehicle Technologies
A Division of AAMP OF AMERICA
Email: sales@intraphex.com                                      Visit our web site:
Phone: +1 (810) 355-2266                                       www.intraphex.com
Fax: +1 (866) 431-0676
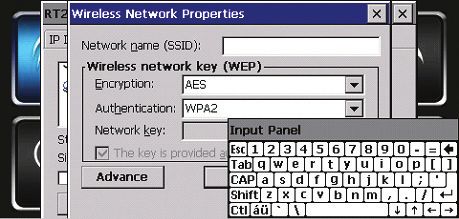
Table of Contents

Welcome to Prodigy ONE.2                                            5
   Prodigy ONE.2 Menu Icons                                          6
   Prodigy ONE.2 Menu Screens                                        7
   Prodigy ONE.2 Remote Control                                      8

Getting Started                                                     9
   Controlling Prodigy ONE.2                                         9
   Configuring Prodigy ONE.2                                         9

Navigation10
   Automatic Start of Navigation                                   10
   Getting Started - Configurations                                10
   Main Menu Screen Buttons                                        11
   Methods of Choosing a Destination                               12
     Example   of   a Direct Address Entry                          12
     Example   of   Navigating to an Intersection	                  13
     Example   of   Navigating to a POI (From a Preset List)        14
     Example   of   Navigating to a POI (From a Category List)      15
     Example   of   Navigating to a POI (Direct Entry)              16
   Other Navigation Features                                       17
     Smart Zoom                                                     17
     Color Themes for Day/Night                                     17
     Route Planning Preferences                                     17
     Speed Limit Warnings                                           17

Digital Media Player                                              18
   Compatible Media File Formats                                   18
   Choosing and Playing Media Files                                18
     Tips for Media Player                                          19

Bluetooth Hands Free Calling                                      20
   Connecting to a Bluetooth device                                20
   Placing a call by Direct Entry                                  21
   Placing a call from the Phone Book                              21
   Receiving Calls                                                 22
   Other Bluetooth Settings                                        22
     Supported BT Profiles                                          23

Radar / Laser Detectors                                           24
   Auto Radar Speed Settings                                       24
   Radar Band and Laser Settings                                   25
Quick Start Guide                                                 Page 3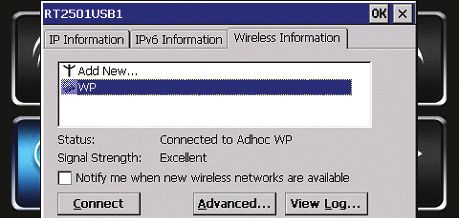
Optional Laser Diffuser                                25

Setting up an Internet Connection                           26
     Wireless (802.11) Settings                             26
     Accessing the Internet (Browser Icon)                  27
         Opera27

Cameras27
     Display of Camera 1                                    27
     Display of Camera 2                                    27

Settings28
System28
     Auto Run Navigation Launch                             28
     Firmware Update                                        28

Power Mode                                                  29
     Recommended Power Mode Settings                        29
         Setting or Changing the Power Mode                  29

Prodigy ONE.2 Info                                          30
Firmware and Operating System Info                          30
   Serial Number                                            30

Adding USB and UART Devices                                 31
     USB Devices                                            31
     UART Devices                                           31

Troubleshooting32
Warranty Information                                        36
End User License Agreement                                  37

Page 4                                         Quick Start Guide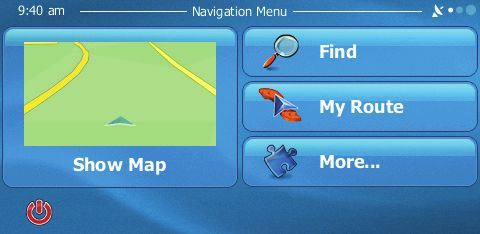
I M P ORTA NT !
                                     PLEASE R EAD TH ESE
                                 I NSTR U C TI O NS C ARE FULLY

Welcome to Prodigy ONE.2
Thank you for your Prodigy ONE.2 purchase!

Prodigy ONE.2 is an in-vehicle entertainment, safety, and productivity device unlike any other product on the
market today. It is intended to connect to a compatible OEM or aftermarket host in-dash head unit to provide
the means to view and control the Prodigy ONE.2 features and functionality.

To maximize safe use and enjoyment of Prodigy ONE.2, it’s important to read and understand this Quick
Start Guide. Please read the operational instructions carefully and completely, also noting that your particular
application of Prodigy ONE.2 may use only some of the features listed in this guide.

Prodigy ONE.2 operates like an in-vehicle computer because it IS a computer. The Prodigy ONE.2 is based on
a Windows CE operating system mobile platform and provides many of the flexible operations that computer
users expect, yet the easy to navigate on-screen interface conveys intuitive commands and source selections
to enjoy the benefits of Prodigy ONE.2 technology safely while behind the wheel.

At INTRAPHEX, our goal is to provide you with technology that is easy to use and understand while making
sure we provide the highest degree of reliability for our valued customers.

          Please document your unit’s Serial Number. Serial Number is on the bottom or the Prodigy
        ONE.2 unit as well as on the box. Firmware Version (FW) and Operating System Version (OS)
         for future reference, in the event of any technical support or warranty needs, can be found by
                 selecting the “INFO” menu icon in the secondary menu page of Prodigy ONE.2.

           Serial Number
                                        Found on the bottom of Prodigy ONE.2 or on the side of the packaging

           Firmware Version
           OS Version

                                                                                  Serial Number for Prodigy
                                                                               ONE.2 is located on the side of
                                                                               the packaging as well as on the
                                                                                   bottom of the unit itself.

Quick Start Guide                                                                                                Page 5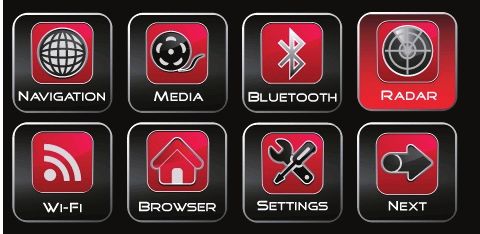
Prodigy ONE.2 Menu Icons

         Navigation                       Digital Media Player
         See Page 10 for Details          See Page 18 for Details

          Bluetooth                       Radar
          See Page 20 for Details         See Page 24 for Details

         WiFi                             Browser
         See Page 26 for Details          See Page 28 for Details

         Settings                         System
         See Page 29 for Details          See Page 29 for Details

         Power Mode                       Camera 2
         See Page 30 for Details          See Page 31 for Details

         Info
         See Page 33 for Details

         Back Button                      Next Button
         Returns to the previous screen   Advances to the next screen

Page 6                                        Quick Start Guide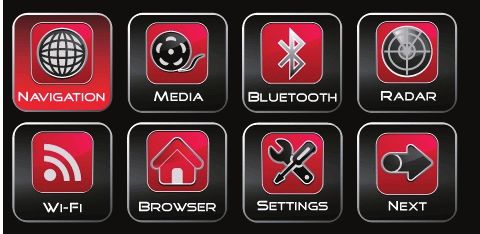
Prodigy ONE.2 Menu Screens

                    Primary Main Menu Screen

                    Second Main Menu Screen

                Default Navigation Menu Screen
Quick Start Guide                                Page 7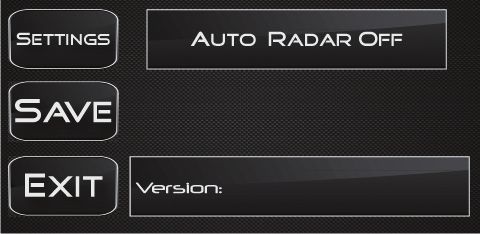
Prodigy ONE.2 Remote Control                                                Optional except in non-touch screen applications

Main ON / OFF Switch is
   on the back side
      ON     OFF

              1
                                                                                                                   2
                                                                                                           Touch Pad Area
                                                                                                          (Moves cursor on
                                                                                                               screen)

              3                                                                                                   10

              4                                                                                                   11

              5                                                                                                   12

              6                                                                                                   13

              7                                                                                                   14

              8                                                                                                   15

              9

      Main ON / OFF Switch. Switch             G Button. Press and hold for 1                 Power Button. Press 1 second
 1    to OFF when unused for long          6   second returns to Main Menu             11     for Navigation menu. Press 3
      periods to preserve battery life.        without exiting Navigation                     seconds turns off Prodigy ONE.2.

      Touch Pad Mouse. Moves                   Return Button. Press while                     V+ / PU Button. Press while
 2    cursor around if touch screen        7   in Navigation to return to the          12     in Navigation to increase the
      control is not available.                mapping screen.                                volume of voice prompts.
      Enter Button and Arrow                   Zoom In. Press while in                        V- / PD Button. Press while
 3    Controls. Use to scroll and          8   Navigation to zoom the screen           13     in Navigation to decrease the
      select screen commands.                  in closer to the map detail.                   volume of voice prompts.
      Route Button. Use to jump to             LED Indicator. These light                     Home Button. Use to jump to
 4    the route information screen
                                           9   up whenever the remote is               14     the route information screen
      while in Navigation.                     transmitting a command.                        while in Navigation.

      ESC Button. Press and hold for           Setup Button. Press while in                   Zoom Out. Press while in
 5    1 second to turn LCD display        10 Navigation to setup preferences           15     Navigation to zoom the screen
      on or off.                               for route guidance.                            out for a broader map view.

          NOTE: Only in applications of non touch-screen installations is the use of the Prodigy ONE.2 remote
           control necessary and included as a standard item. For most applications the direct touch-screen
         control of Prodigy ONE.2 functions is the primary control mechanism, but if you wish to control Prodigy
                       ONE.2 with the RF remote as well, it is available as an optional accessory.

Page 8                                                                                          Quick Start Guide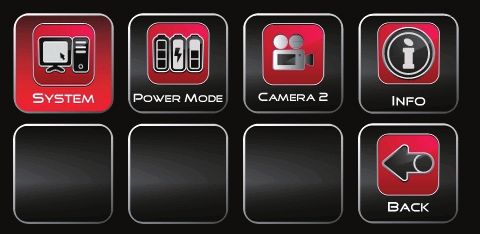
Getting Started
Controlling Prodigy ONE.2
Depending on your application, you have a few ways you can control your Prodigy ONE.2 system.

Option 1
If you have a vehicle with a compatible touch-screen head unit, most instances of Prodigy ONE.2 integration
will allow direct, on screen control of the Prodigy ONE.2 menu icons and functions. Your installer will be able
to clarify if your vehicle is capable and includes touch screen control. Most Prodigy ONE.2 systems will have
touch-screen control capability. There are some instances (such as using Prodigy ONE.2 through an A/V AUX
input) where the touch screen control capability simply does not exist for Prodigy ONE.2 interface.

Option 2
Controlling Prodigy ONE.2 can also be done with the wireless RF remote control. It features a track pad to
move an on-screen cursor, UP/DOWN/LEFT/RIGHT navigation arrows and several other dedicated function
soft key buttons for quick access of features.This remote is optional on all Prodigy ONE.2 systems except for
non-touch screen applications where it is standard because it’s the primary method of control.

Option 3
A third (optional) measure of controlling Prodigy ONE.2 is to use a USB Windows compatible mouse to move
the on-screen cursor and activate the various features. There are numerous wired and wireless options for
these devices, so please check with your installer if you wish to operate Prodigy ONE.2 in this way. Please
keep in mind that traditional “desktop” mouse devices are not recommended because of the safety issues they
impose on operating Prodigy ONE.2 with such a device while driving.

Configuring Prodigy ONE.2
Prodigy ONE.2 is configured for your application from the factory so many of the critical settings are already
done. You’ll need to choose whether or not you want to automatically launch Navigation every time Prodigy
ONE.2 begins. This should only take a few minutes.

Auto Run Navigation Launch
Prodigy ONE.2 is default configured to launch into Navigation mode each time it turns on. This is so that,
when you access Prodigy ONE.2 screens, the Navigation application is already running and ready to go. Most
installations that utilize a Prodigy ONE.2 will have this as the primary application, so INTRAPHEX engineers
made it easy to access. If you wish to have Prodigy ONE.2 boot to the main menu screen instead of directly
into Navigation, you can simply go to the System menu icon and choose “Auto Run Navi Off” . Please see page
28 for details.

The remaining adjustments of screen resolution and type are configured at the factory for your particular
application of Prodigy ONE.2, so there are no user adjustable parameters for you to worry about beyond what’s
described in this section.

Quick Start Guide                                                                                         Page 9
Navigation
Prodigy ONE.2 Navigation functionality is intuitive and easy to learn. This section contains instruction on these
functions and features of the Navigation software:

• Getting Started - Configuring Your Navigation System
• Menu and Map Screen Detail (what the icons/symbols mean)
• Methods of Choosing a Destination
  • Example of Direct Address Entry
  • Example of Navigating to an Intersection
  • Examples of Navigating to a POI

Automatic Start of Navigation
Prodigy ONE.2 starts for the first time in Navigation rather than the Main Menu screen with the icons. Should
you wish to change Prodigy ONE.2 to start up with the Main Menu screen first, you can set the system to “Auto
Navi Off” in the System menu. See page 28.

Getting Started - Configurations
When you use the Prodigy ONE.2’s Navigation software for the first time, you must configure it with your
preferences of language, voice prompts, regional settings, route planning options and acceptance of the End
User License Agreement.

Chances are your installer will have completed this step for you and the configurations are already set. Should
you need to complete the initial configurations, simply start Navigation and follow the on-screen prompts
choosing the appropriate choice for the selection. Please note that you can change any of these configurations
at any time later, but you must at least complete the Configuration Wizard to provide the initial (default) settings
to begin using Navigation.

1) Select Language, then choose “Done”.
2) Accept the End User License Agreement by
   choosing the “Accept” button.
3) When the Configuration Wizard begins and you’re
   ready, choose “Next”.
4) Select your preferred language and voice style
   for any voice prompts that the navigation system
   will provide (if you have voice prompts enabled in
   your Sound and Warning settings). Once selected,
   choose “Next”.
                                                                                                       x4
5) If needed, modify the time format and unit settings.
    Once selected, choose “Next”. If no changes need
    to be made simply leave as is and choose “Next”.
6) If needed, modify the route planning options. Once
    selected, choose “Next”. If no changes need to be
    made simply leave as is and choose “Next”.
7) The initial setup should be complete at this step.
   The final step asks if you wish to allow anonymous
   collection data to validate mapping and GPS
   accuracy. Choose “Yes” or “No”.
8) After the Setup Wizard is complete, the Navigation menu appears and you can start using Prodigy ONE.2
   Navigation.

Page 10                                                                               Quick Start Guide
Main Menu Screen Buttons
Once Prodigy ONE.2 Navigation begins, the main menu displays. This allows the user to quickly enter a
destination in one of several ways, view the map directly or configure any of the additional Navigation settings
and preferences.
Show Map - Select this to start navigating on the map. The button itself is a miniature live
map that shows your current position, the recommended route and the surrounding map
area. Select the button to enlarge the map to the full screen. Choose “Menu” in the lower left
corner to return to the main menu screen (as shown above).
Find - Select this to choose a destination by entering an address or selecting a point of
interest (POI), a location on the map or one of your Favorite destinations. You can also look
up your recent destinations from the Smart History, enter a coordinate or use the location
saved in a photo. When internet connection is available, Google Local search can be a
further help to find your destination.
My Route - Select this to display the route parameters and the route in its full length on the
map. You can also perform route-related actions such as editing or cancelling your route,
setting a start point for the route, picking route alternatives, avoiding parts of the route,
simulating navigation or adding the destination to your Favorites.
More - Select this to change the way the Prodigy ONE.2 Navigation software preferences
and settings.
Power (Exit) Screen Icon - Select this to exit Prodigy ONE.2 Navigation. Remember that
you do not have to completely exit Navigation to switch between other Prodigy ONE.2
applications.
G Button (Prodigy ONE.2 Remote) - You can switch between applications without exiting
Navigation by pressing (and holding) the “G” button on the Prodigy ONE.2 remote for 1
second (if remote is present in your system).
This Quick Start Guide covers basic route entry options for the Prodigy ONE.2 Navigation system.
Please visit the INTRAPHEX web site for additional resources on the complete navigation user’s guide,
including Advanced Settings and Preferences.
Quick Start Guide Page 11Methods of Choosing a Destination
The Prodigy ONE.2 Navigation software offers you several ways of choosing your destination:
• Enter a full street address to a specific destination.
• Enter a full street address with zip code (doing so speeds up the search for street names).
• Enter part of an address with a just a street name or an intersection to get in the general vicinity.
• Use a built-in Point of Interest (POI) as your destination.
• Select a location on the map with the Find on Map feature.
• Use a previously saved Favorite destination.
• Select a location from the History of previously used destinations.
• Enter the GPS coordinates of the destination (including coordinates you have in digital photos).
Example of a Direct Address Entry
If you know at least a part of the address to which you wish to navigate, it is the quickest way to select the exact
destination of the route. Conveniently by using the same “Find Address” screen, you can choose to navigate by
entering even partial address information or an intersection.
To navigate to a direct address from the main menu:
1) Choose “Find”.
2) Choose “Find Address”.
3) If necessary, change the state and/or city displayed by choosing
the “State” or “City” button as needed.
Hint: If the desired entry does not display upon entry of the first
few letters in the entry line, choose the “Results” button to display
more possibilities quickly without needing to finish typing long
entries.
When the correct entry is selected, choose the “OK” button (green
check mark) in the entry line.
4) Enter the street name by choosing the “Street” button. When the
correct entry is selected, choose the “OK” button (green check
mark) in the entry line.
5) Enter the house number by choosing the “”
button. The keyboard’s “123” button enables numeric entry.
6) After entering the street address, choose the “Done” button.
7) When the map screen appears choose “Next” to review the route
parameters. After a short summary of the route parameters, the
12345 map appears showing the entire route.
8) Finally, choose “Go” to begin navigating to your chosen
destination.
Tip: If the chosen destination is one you will use frequently,
before choosing “Next” to confirm the destination, put it
on the list of your Favorites first by choosing the “More”
button, then “Add to Favorites”, give a name for the new
Favorite and choose “Done” to save the location.
Name It!
The map with the destination returns automatically, then
choose “Go” just as in Step 8 above!
Page 12 Quick Start GuideExample of Navigating to an Intersection
You can navigate to a general destination by choosing to navigate to an intersection. By using the same “Find
Address” screen, you can choose to navigate by entering even partial address information or an intersection.
To navigate to an intersection from the main menu:
1) Choose “Find”.
2) Choose “Find Address”.
3) If necessary, change the state and/or city displayed by choosing
the “State” or “City” button as needed.
Hint: If the desired entry does not display upon entry of the
first few letters in the entry line, choose the “Results” button
to display more possibilities quickly without needing to finish
typing long entries.
When the correct entry is selected, choose the “OK” button
(green check mark) in the entry line.
4) Enter the street name by choosing the “Street” button. When
the correct entry is selected, choose the “OK” button (green
check mark) in the entry line.
5) Enter the second street name by choosing the “” button.
• If only a few intersecting streets exist, their list appears
immediately.
• In case of a longer street, the keyboard screen appears. Start
entering the name of the intersecting street on the keyboard. As
soon as the street names that match the entered string can be
Street 2 shown on one screen, their list appears automatically. Select
from the list.
6) After entering the second street name of the intersection,
choose the “Done” button.
7) When the map screen appears choose “Next” to review
the route parameters. After a short summary of the route
parameters, the map appears showing the entire route.
8) Finally, choose “Go” to begin navigating to your chosen
destination.
Tip: If one or both of the intersections happens to be a numbered street
instead of alphabetical, you can easily switch to numeric entry by hitting
the “123” button at the lower left corner of the keyboard screen.
Quick Start Guide Page 13Example of Navigating to a POI (From a Preset List)
There a couple ways in which you can utilize a Point of Interest (POI) as your target for establishing a
destination. Since many people utilize the POI listings to discover what’s around them, choosing the destination
based on what’s listed nearby or en route is one of the most intuitive ways to determine that destination.
“Find Places” Right Side Menu Preset Choices
• If an active route is already entered, choosing the
named preset searches along the route (or at the
destination if indicated) for matches.
• If there is no active route entered, choosing the named
preset searches around the current GPS position.
• If the current position is not available (no GPS signal),
Find Places Preset List Menu searching occurs around the last known GPS position.
To navigate to a preset listed POI from the main menu:
1) Choose “Find”.
2) Choose “Find Places”.
3) From the right side menu preset choices, select the category
from which you’d like to display results.
Gas Station / Parking / Restaurant / Accommodation (Hotel)
Hint: Remember if you do not have a route already entered,
the listing will show choices that are nearest your current or last
known GPS position.
4) Upon choosing a category, a list of choices will display and you
can use the “UP” and “DOWN” arrow keys at right to scroll
the list. Choose the entry you wish to use for your POI
navigation target.
5) When the map screen appears choose “Next” to review the route
Choose Category parameters. After a short summary of the route parameters, the
map appears showing the entire route.
6) Finally, choose “Go” to begin navigating to your chosen POI
destination.
Choose
Entry
Tip: If you wish to collect information about your
destination, simply press the “i” button when the
map screen appears in Step 5 to learn any additional
information before selecting that as your chosen POI
destination.
Page 14 Quick Start GuideExample of Navigating to a POI (From a Category List)
Rather than the previous example of a pre-selected list of what the navigation system thinks you might be
seeking, you also have the choice to navigate to a POI by selecting from a custom category listing. This method
could cover virtually any scenario of possibilities that encompass searching and selecting a POI.
“Find Places Custom Search” Menu Choices
• Around Here - Searches based on GPS position or last known
GPS position if no GPS signal is found.
• In a Town/City - Searches a specific town or city you must
input. Results display by distance from city center.
• Around Destination - Searches destination (if entered).
Results display by distance from destination.
Find Places Custom Search POI Menu
• Along Route - Searches along a route (if entered). This is
useful to minimize a lengthy detour from the route.
To navigate to a category listing POI from the main menu:
1) Choose “Find”.
2) Choose “Find Places”.
3) Choose “Custom Search”
4) From the menu choices, select the method from which you’d like
search for a POI category.
Around Here / Town/City / Destination / Along Route
Hint: Remember if you do not have a route already entered,
the listing will show choices that are nearest your current or last
known GPS position (or not at all if it involves a destination). Also
remember if you select “Town/City”, you must input the name.
5) Upon choosing a search method (and city if applicable), a list
of categories displays. Use the “UP” and “DOWN” arrow keys
at right to scroll the list. Choose the category you wish to use
for your POI search or you can choose “List All Places” to
display everything.
6) Next, a list of sub-category choices displays. Use the “UP” and
“DOWN” arrow keys at right to scroll the list. Choose the sub-
Choose Category category you wish to use for your POI navigation target.
Choose Sub-Category Hint: A list of brands may appear. Select one brand or choose
Choose Brand/Company “List All Places” to list all POI entries in the sub-category around
the location or route.
7) Upon choosing a sub-category (and brand) POI choices appear.
Choose Use the “UP” and “DOWN” arrow keys at right to scroll the
Entry list. Choose the entry you wish to use for your final POI
navigation target.
8) When the map screen appears choose “Next” to review the route
parameters. After a short summary of the route parameters, the
map appears showing the entire route.
9) Finally, choose “Go” to begin navigating to your chosen POI
destination.
Quick Start Guide Page 15Example of Navigating to a POI (Direct Entry)
If you already know the name and category of a POI you would like to identify for creating a route (or even to
find its location from where you are presently), you can use the POI direct entry method. You can narrow the
search to reflect only POI locations near a specific map location along your route, searching either the entire
POI database or just a subsection of the database in a specific category. The more you narrow a search before
entering a POI name, the shorter the lists will be for you to sort when choices appear on the screen.
The same “Find Places Custom Search” menu is used as in previous POI Search
examples with the same four main search filters - Around Here / Town/City /
Destination / Along Route.
Find Places Custom Search
POI Menu
To navigate to a specific POI entry from the main menu:
1) Choose “Find”.
2) Choose “Find Places”.
3) Choose “Custom Search”
4) From the menu choices, select the method from which you’d
like search for a POI category.
Around Here / Town/City / Destination / Along Route
Hint: Remember if you do not have a route already entered,
the listing will show choices that are nearest your current or last
known GPS position (or not at all if it involves a destination). Also
remember if you select “Town/City”, you must input the name.
5) Upon choosing a search method (and city if applicable), a list
of categories displays. Use the “UP” and “DOWN” arrow keys at
right to scroll the list. Choose the category you wish to use for
your POI search or you can directly enter the category name
by selecting the “Find by Name” button and entering text.
Choose or Enter Name 6) Next, choose the sub-category from a list or you can
directly enter the category name by selecting the “Find by
Category Name” button and entering text.
Sub-Category
Hint: A list of brands may appear. Select one brand or choose
POI Name
“List All Places” to list all POI entries in the sub-category around
the location or route, or simply choose “Find by Name” to
type in the name directly. After entering a few letters, choose
Choose “Results” to display the POI choices.
POI 7) Upon choosing a sub-category (and brand) and displaying
“Results”, POI choices appear. Use the “UP” and “DOWN” arrow
keys at right to scroll the list. Choose the entry you wish to
use for your final POI navigation target.
8) When the map screen appears choose “Next” to review the
route parameters. After a short summary of the route parameters,
the map appears showing the entire route.
9) Finally, choose “Go” to begin navigating to your chosen POI
destination.
Page 16 Quick Start GuideOther Navigation Features
The Prodigy ONE.2 Navigation software has several other interesting features.
Smart Zoom
Smart Zoom provides a close up viewpoint to allow better view of the mapping screen in certain instances.
• While following a route you have entered - When approaching a turn, it will zoom in and raise
the view angle to let you easily recognize your maneuver at the next junction. If the next turn is at a
distance, it will zoom out and lower the view angle to be flat so you can see the road in front of you.
• While driving without an active route - Smart Zoom will zoom in if you drive slowly and zoom out
when you drive at high speed.
Color Themes for Day/Night
Prodigy ONE.2 Navigation software offers different daytime and night color profiles for both the map and the
menu screens. It can also switch automatically between the daytime and the night profiles based on the current
time and GPS position a few minutes before sunrise, when the sky has already turned bright, and a few minutes
after sunset, before it becomes dark.
• Daytime color themes are similar to paper road maps, and the menus are bright and easy to read.
• Night time color themes use dark colors for large objects to keep the average brightness of the screen
low for easier visual recognition and to reduce driver distraction when looking at the screen then back
at the road.
Route Planning Preferences
Prodigy ONE.2 Navigation software offers four distinct preset route preference profiles.
• Fast - Gives a quick route if you can travel at or near the speed limit on all roads. Usually the best
selection for fast and normal cars.
• Short - Gives a route that has the smallest total distance of all possible routes. It can be practical for
slow vehicles.
• Green - Gives a quick, but fuel efficient route based on the fuel consumption data given in Route
settings. Travel cost and CO2 emission calculations that are displayed are estimations only. They
cannot take elevations, curves and traffic conditions into account.
• Easiest - Results in a route with fewer turns and no difficult maneuvers. With this option, you can make
your software to take, for example, the freeway instead of a series of smaller roads or streets.
Speed Limit Warnings
Maps may contain information about the speed limits of the road segments. The software is able to warn you if
you exceed the current limit. This information may not be available for your region or may not be fully correct for
all roads in the map depending on circumstances that may have recently changed (such as new construction)
or due to mapping data accuracy. Speed warning can be fine-tuned in Sound and Warning settings.
You can set the relative speed above which the application initiates the warning. There are two ways in which
you can be alerted:
• Audio Warning - You receive a verbal warning when you exceed the speed limit with the given
percentage.
• Visual Warning - The current speed limit is shown on the map as a number with a red circle when you
exceed it and is otherwise hidden when speed is under the limit. You can also choose to see the speed
limit sign on the map all the time which is useful when you are unaware of the speed limits.
Please visit the INTRAPHEX web site for additional resources on the complete navigation user’s guide,
including Advanced Settings and Preferences.
Quick Start Guide Page 17Digital Media Player
Prodigy ONE.2 plays virtually all your digital media files. You can store media on a self-
powered, portable USB hard drive or USB thumb drive (neither is included) for use with
the Prodigy ONE.2 Media Player. Do not store media files on the internal SD card!
Compatible Media File Formats
The file types compatible with the Media Player are:
Audio Formats
MP3, WMA, AAC, MKA, WAV, OGG, Speex, WAVPACK, FLAC, MPC, AMR,
GSM, ADPCM, ALaw, MuLaw and MIDI Files
Video Formats
CoreAVC (H.264), AVCHD, MKV, MPEG-1, MPEG-4 part 2 (ASP), DivX, XviD, MJPEG,
MSVIDEO1, FLV, Matroska, ASX, ASF, TS, PS, M2TS, 3GPP, MOV, AVI, MPEG-4 and NSV Files
Photo Image Formats
JPG (420, 422, 440), BMP, PNG, GIF and TIFF Files
Choosing and Playing Media Files
There are several ways in which to organize available media files and select them for play, both individually and
as selected files in a group.
►The most intuitive way is to simply browse the files on your USB drive through the top menu bar “File”
command menu. Look for the drive labeled “Hard Drive” and you will find your media files there in the
same fashion they were organized when you placed them on that drive.
►A second method is to use the “View” command menu’s “Media Library” function and let the Media Player
organize attributes of the files on your USB drive to display by Genre, Artist, Song Title, Recently Played,
etc. This may be a useful way to access files in similar groupings if not already separated within folders
on your USB drive.
Once you have selected the file(s) you wish to play, simply use the Play/Pause, Next and Back command
buttons at the lower left corner of the screen to navigate the media file.
WARNING: INTRAPHEX does not recommend storing any media files on the supplied 8GB internal
SD card where the Navigation and Boot Instructions reside. This card is the only licensed version of
the proprietary Prodigy ONE.2 software. Storage of any added files of any type on the SD card or
copying its contents to another storage device will void the Prodigy ONE.2 warranty.
Page 18 Quick Start GuideTips for Media Player
It’s best to organize audio, video and photo files in separate folders so that browsing in the Media Player for
one type does not randomly attempt to mix another type in the rotation. For example, you would not really want
to listen to a few songs and then have it automatically begin a video because the files shared the same folder.
Playing Audio Files
When choosing audio files, you may want to use the “View” command menu’s “Media Library” function and
let the Media Player organize attributes of the files on your USB drive to display by Genre, Artist, Song Title,
Recently Played, etc. You can also click the list icon on the lower right of the screen to access the Media
Library menu choices. This is particularly useful if you have a lot of files and you’d rather allow the Media Player
organize them in a more intuitively navigated manner with many more ways to sort than the filename alone.
Of course you always have the simple option to browse the contents of the drive from the “File” drop down
menu as shown below. In this case it will show all files on the drive (including any video and photo files
contained on the drive). This is why it’s recommended to arrange files for audio into separate folders than video
or photos. It’s much easier for a user to access the folder they want by storing files on the USB drive that way.
Open File allows a
search of the entire
drive and shows
folders
The “List” icon
provides quick
access to all media
on the drive
Playing Video Files
When playing video files, please select the “View” command and then “Fullscreen” to allow the Media Player to
display the video without any of the controls and information visible on screen. The controls will become visible
again simply by touching the screen (if touch screen capable) or by operating the touchpad of the wireless
remote control.
Choose the
Fullscreen command
when viewing videos
to hide the on
screen controls and
information
WARNING: INTRAPHEX does not recommend storing any media files on the supplied 8GB internal
SD card where the Navigation and Boot Instructions reside. This card is the only licensed version of
the proprietary Prodigy ONE.2 software. Storage of any added files of any type on the SD card or
copying its contents to another storage device will void the Prodigy ONE.2 warranty.
Quick Start Guide Page 19Bluetooth Hands Free Calling
Prodigy ONE.2 lets you use your Bluetooth ® enabled mobile phone to place and
receive calls hands free. This is an optional feature not included with the base Prodigy
ONE.2 system. If you’ve already got Bluetooth Hands Free calling functionality through
your host head unit or have not chosen to add the Prodigy ONE.2 Bluetooth option,
you can disregard this section.
Please note that if you do have the Prodigy ONE.2 Bluetooth calling feature, you
must have that accessory device enabled in the UART menu by the installer at
the time of the Bluetooth device installation. For more information on UART
configuration, please see page 31.
Connecting to a Bluetooth device
When you first connect a new Bluetooth device to Prodigy ONE.2,
you must select the “Devices” icon in the Bluetooth menu to
access the “Search Devices” and “Add New Device” functions.
First ensure that your phone is Bluetooth compatible and that it’s in the “discoverable”
mode. These settings can generally be found or confirmed in your phone’s settings or
configuration menus. Please refer to your phone’s operation manual for specific details. To be discovered by
Prodigy ONE.2, the phone must be within 30 feet of the Prodigy ONE.2 main unit. As long as you are seated in
the vehicle, range should not be a problem.
Once the phone is discoverable, choose the “Search Devices”. Within a minute or less, the available Bluetooth
devices should begin to appear on the device list. Select your phone by checking the round circle in the gray
status box next to the device name. It may say “Occupied”. Once the phone is selected, choose the “Add New
Device” button to pair the phone with Prodigy ONE.2. Your phone will respond by asking the PIN Code. Input
the code (PIN = 0000) and press done or pair on the phone to complete pairing. Your device status should now
say “Paired” in the gray status box. Choose the “Back” command to return to the Bluetooth menu choices.
“Search Devices” first......
Choose the
Phone should “Search Device”
appear, then select button to find the
the circle in the gray phone
area to identify the
phone for pairing
Status
Display will indicate
detail of the search for
device
.....then “Add New Device”
The phone should
show “Paired” once Choose the “Add
pairing is complete. New Device”
Pairing will be button to pair the
automatic thereafter. phone
Status PIN Code: 0000
Display will indicate
“Pair OK” if the phone
pairs correctly
Choose “Back” to display
the choices for calling
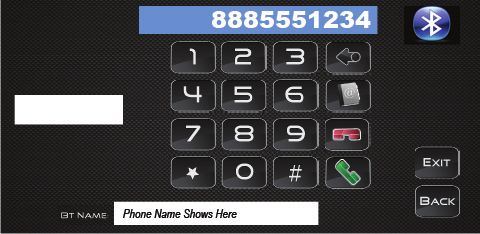
Page 20 Quick Start GuidePlacing a call by Direct Entry
From the Bluetooth menu, select “Phone”. To ensure your phone is connected, look for the
Bluetooth ® logo in the top right corner of the screen.
The easiest way to place calls is simply by direct phone number entry. Enter the phone
number as you normally would enter it on your mobile phone. You can do this from the on-screen dial pad and
the number will display in the top blue area. Next, select the green “Place Call” icon to initiate the call. When
the call is connected the white status area will say “Connected” and you are talking to your caller. Once you
have completed the call, select the red “End Call” icon.
Bluetooth ® logo indicates a phone is paired and
ready to proceed with a hands-free call
Placing a Call (Dial Pad)
Phone number
appears here
(no spaces)
Call Status Place Call
Display
End Call
Placing a call from the Phone Book
Prodigy ONE.2’s Bluetooth system has the capability to download your
phone contacts, either from the SIM card or from the phone’s memory
itself. To be able to dial from the phonebook, you must first download the
contacts. From the Bluetooth menu, select “Phone Book” or from the Phone List Icon
dial pad select the “Phone List” icon (shown at right). Once loaded, the list sorts by number.
How to Download Contacts to the Prodigy ONE.2 Phone Book
Choose whether you are downloading from the phone’s memory or the SIM card and
select the appropriate command button at the left side of the screen.
Choose the location
Once you have selected to download the contacts, Prodigy ONE.2 begins to search from which contacts
for and download your contacts to its onboard memory. Depending on the number of are downloaded
contacts you have to download, this can take several minutes. Typically the contacts
download at about the rate of 150 per minute (as a rule of thumb).
If you wish to stop the download at any time during the process, simply select “Download Stop”.
Placing a Call (Phone Book)
Status of download progress Navigate the contact
shows here list here (UP and
DOWN). They are
Highlighted Contact listed in order by the
Name in the blue telephone number as
box is the one that displayed (includes if
will be called you have “1” in front
of the area code).
Choose the “Place Call” button when you’re ready to make the call to
the selected contact and Prodigy ONE.2 dial pad screen appears.
Quick Start Guide Page 21Receiving Calls
When an incoming call is received, the Prodigy ONE.2 screen will display the incoming phone call notification
overlay screen regardless of what source is currently running. For example, if the Media Player or Navigation
is running and a call comes in, the audio from the source will mute and the incoming phone call notification
overlay screen will display to allow you to take the call.
Incoming Phone Call Notification Overlay
To answer the call, choose the green “Answer Call” icon and begin speaking. Your source material’s audio
content will be muted for the duration of your hands free conversation. Once you have completed the call,
select the red “End Call” icon.
Phone number Answer Call
appears here
(no spaces)
End Call
Example of the Incoming Phone Call Notification Overlay while in
the Media Player Application
Please note that incoming calls are displayed by the telephone number and not by the contact’s name in
your phone. Many phones will show the contact’s name on their screen (rather than the number) even when
paired to a Bluetooth device. In this case, you’ll want to look for the area code and/or phone number that you
recognize to determine if you wish to accept the call.
Other Bluetooth Settings
There are a few settings that you can configure to suit your particular Prodigy ONE.2
Bluetooth accessory device installation, namely how the output of sound for the caller’s
voice is routed and the relative volume of the of the speaker to allow it to be audible, but
not create interference with the hands-free microphone.
Routing the sound for the caller’s voice should be configured by your installation
technician. The choices “BT”, “Mic In” or “Line In” will be set based on how and to which host head unit you
have Prodigy ONE.2 connected. Once these are set and functioning, there is no reason for you to alter them.
Generally speaking, it’s best to have the microphone and speaker positioned far enough away from each other
where they do not have audible feedback (a screeching or hollow sound). This distance is typically 3 or more
feet when the microphone is placed in the visor/rear view mirror area and the sound of the caller’s voice plays
through speakers in low door or kick panel locations. Your installation technician should be able to assist you
with ensuring an ideal placement for your specific Prodigy ONE.2 installation.
Prodigy ONE.2’s Bluetooth accessory device will pair with up to five Bluetooth phones that have been
previously added/learned to the system. Switching between phones can be done in the “Devices” menu by
simply highlighting the dot in the gray box next to the phone you wish to enable. When enabled, the gray box
will show “Occupied” to confirm it’s paired with the phone name that appears next to it.
Page 22 Quick Start GuideSupported BT Profiles
The Prodigy ONE.2 Bluetooth accessory supports the following Bluetooth profiles:
• HFP - Hands Free Profile
• PBAP - Phone Book Access Profile
While the profiles are supported by the Prodigy ONE.2 Bluetooth accessory module, your particular phone and/
or service provider may not support the all of those profile functionalities even if the phone you are using has
Bluetooth connectivity. Generally speaking with Bluetooth enabled phones, the bare minimum of functionality
would be to provide some method of conducting calls in a hands free way, through either a Bluetooth headset
ear piece or an installed device such as Prodigy ONE.2 (or both). Added features may not have Bluetooth
support in the phone itself, may not be “enabled” by the service provider or may simply not match the profile.
PBAP - Phone Book Access Profile Details
Many phones have a phone book, some can even “push” that phone book into a host device one or several
contacts at a time. Be sure your phone supports PBAP so that the contacts still reside on your phone, but will
display on Prodigy ONE.2 (rather than when the contact is “pushed” to the host device and a copy of it resides
there). Phones that only push contacts generally support the Object Push Profile (OPP) instead of PBAP. If you
are having trouble uploading and viewing contacts, compatibility of the profiles would be the first thing to check.
The advantage of PBAP is that you upload all contacts at one time (instead of individually through OPP) and
they show any updates as you update your phone.
Quick Start Guide Page 23Radar / Laser Detectors
Prodigy ONE.2 features and optional radar and laser detection system as well as a
laser diffuser accessory. If you have these features installed, Prodigy ONE.2 has the
capability to enable or disable each of the radar band and laser coverages individually
as well as turning the system on only beyond a preset vehicle speed. This is useful in
many states to provide fewer false readings from coverage in a radar band that is not
used in your particular state or avoiding common false triggers at low speed (such as the
automatic doors at many grocery stores).
Please note that if you do have the Prodigy ONE.2 radar/laser detection
accessory installed, you must have that accessory device enabled in the
UART menu by the installer at the time of the radar/laser device installation. For
more information on UART configuration, please see page 31.
Auto Radar Speed Settings
This feature can be turned on or off. If Auto Radar is turned on, the radar detection capabilities are not enabled
until the vehicle reaches the preset speed selected in the Auto Radar menu. The vehicle speed is determined
by the GPS signal and is very accurate.
From the main menu, choose the “Radar” icon to access the initial radar entry screen. Select whether you wish
to have Auto Radar ON or OFF. If you choose to have Auto Radar ON, you must also choose a vehicle speed
at which the unit becomes enabled. Once you have all your settings complete, choose “Save” and then “OK”
to confirm. Next, choose “Exit” to return to the main menu screen or “Settings” to select which radar band and
laser settings you wish to enable or disable.
If Auto Radar is OFF If Auto Radar is ON
If Auto Radar is set to the OFF position, the radar and If Auto Radar is set to the ON position, the menu button
laser settings chosen in the radar’s “Settings” menu will turns blue to indicate the change and you can select your
be available to indicate presence of radar and/or laser at trigger speed at which (and above) it turns on the radar and
any vehicle speed, including while parked with the ignition laser detection enabling whichever settings chosen in the
on. Remember to “Save” any changes before you exit this radar’s “Settings” menu. Remember to “Save” any changes
menu. before you exit this menu.
Remember
to SAVE any
changes!
WARNING: Radar detector systems are not legal for use on passenger vehicles in The State
of Virginia, Washington DC or on any US Military Base. Further, the use of radar detector
systems on commercial vehicles is prohibited in The States of New York, Illinois, and New Jersey.
Please check your own local and state laws to ensure compliance with radar and/or laser speed
detection devices.
Page 24 Quick Start GuideRadar Band and Laser Settings
This feature allows you to select which specific coverages in radar and laser you wish to enable in the system.
Since not all states utilize all bands of radar nor do all states use laser speed detection, you can optimize the
settings to work with radar bands you know are used for speed detection in your state. Of course there’s no
drawback to having all the settings enabled full time, it’s just that if you happen to have other radar operated
devices (such as motion sensing entry doors, lighting, etc.) operating nearby, sometimes this can increase the
possibility of false triggers. If you do leave all the bands enabled, INTRAPHEX recommends that you set
the Auto Radar setting to “ON” and provide a low vehicle speed like 20-25 MPH as it will filter out many of the
probabilities for low speed false readings.
From the initial radar entry screen, choose “Settings”. Next select which radar bands you wish to enable or
disable. A red X is disable and a green check mark is enable. Once you have all your settings complete, choose
“Save” and then “OK” to confirm. Next, choose “Exit” to return to the initial radar entry screen and choose
“Exit” again to return to the main menu screen.
Remember
to SAVE any
changes!
Example of Radar Band settings for a Prodigy ONE.2 installation in which the
optional Radar and Laser Detector systems are installed. You can individually
select to enable or disable X, K, KU and KA band radar as well as laser detection.
Optional Laser Diffuser
Certain law enforcement agencies choose to use laser speed detection, particularly on roads with high speed.
Laser speed detection is also known as LIDAR (Light Detection and Ranging). As a separate, additional
accessory from the radar/laser detectors, INTRAPHEX offers an optional laser diffuser device to mitigate the
degree to which a laser can “lock on” to your vehicle. This is not a laser jammer (those are not legal in the US),
rather it simply diffuses the signal that the laser collects as a return from the car it targets. Please be sure to
check with your specific state laws and regulations about use of laser diffusion devices to abate speed
detection.
For more information about the INTRAPHEX Laser Diffuser, please visit the INTRAPHEX website or
contact your Prodigy ONE.2 installing retailer.
WARNING: Radar detector systems are not legal for use on passenger vehicles in The State
of Virginia, Washington DC or on any US Military Base. Further, the use of radar detector
systems on commercial vehicles is prohibited in The States of New York, Illinois, and New Jersey.
Please check your own local and state laws to ensure compliance with radar and/or laser speed
detection devices.
Quick Start Guide Page 25Setting up an Internet Connection
Prodigy ONE.2 has optional connectivity to the Internet using 802.11 WiFi. Once enabled with internet access,
Prodigy ONE.2 has Opera internet browser for ease of use. Please note that these icons are disabled unless
Prodigy ONE.2 detects a WiFi device connected to the USB port.
Wireless (802.11) Settings
To enable the WiFi functionality, Prodigy ONE.2 must have the USB WiFi adapter
installed and the vehicle must be within range of a 802.11 wireless network. This can
be a home/office wireless network, a business that offers WiFi, or it can be the “WiFi
Hotspot” on your mobile phone.
When connecting to a WiFi network for the first time AND if the network’s SSID
(network name) does not appear on the opening screen, you will need to choose
“Add New” to set up the network connection. This type of network connection would
generally be the case for networking computers together for shared access rather than
finding a dedicated wireless Internet connection. In most cases you will not need
to do this unless you intend to share files (such as media files) with your home/
office computer wirelessly. If within range, the dedicated wireless internet
connection should already broadcast its SSID and appear in the list on the
screen.
Please note that if you are not computer savvy, you may wish to have your Prodigy ONE.2 Installer setup and
configure any wireless networking capability at the time they install the WiFi adapter.
If SSID Does Not Appear If SSID Appears
Choose “Add New” if the network you want to connect to In most cases for WiFi internet connections, one or more
does not appear in the list of available networks or if it’s not WiFi networks (when within range) will appear with their
yet set up. In most cases you will not need to do this unless SSID name broadcast as possible network choices that
you intend to share files (such as media files) with your you can use to connect to the Internet. Simply highlight the
home/office computer wirelessly. network you want and then choose “Connect”
Define Encryption and Password
Once the network is defined and selected, you may
need to enter the Network Key (password) to gain
access. The only circumstance where this is not
necessary is when the network is unsecured without
any authentication as it might be with a public WiFi
connection.
If you are connecting to an existing network, the
Encryption type and Authentication should already
be pre-selected by the broadcast signal so that all Whether you set up a new network or connect into an
you are required to provide is the Network Key. existing one, you will often be required to setup the
If you do not know this password, please contact password (called the “Network Key”) to allow Prodigy ONE.2
the administrator of that wireless network or check to connect with that network. To enter the Network Key, use
the instructions that are provided for that network’s the on-screen keyboard and when done select “OK”
hardware device(s) such as the wireless router.
Page 26 Quick Start GuideAccessing the Internet (Browser Icon)
Your Prodigy ONE.2 system will only be able to access the internet through the on board
browser if it has a WiFi connection enabled.
Once an internet connection is established, Prodigy ONE.2 can navigate the World Wide
Web in Opera.
To Select a Browser and navigate the Internet:
1) Choose the “Browser” icon from the menu screen
2) Input the URL of choice into the browser with the on-screen keyboard and
choose “ENTER” or the appropriate icon in the browser to launch the URL
Opera
Although Opera does not come pre-packaged with many laptop or desktop computers, it’s actually the most
used browser for mobile devices, including devices like Prodigy ONE.2. For this reason, INTRAPHEX
recommends that you use Opera to visit web sites on a WiFi enabled Prodigy ONE.2 system. The browsing
flexibility is considered better for a mobile device and, unlike other browsers, the Opera browser allows for
multiple windows to be open simultaneously. Many users with smartphones may find the Opera browser to
be more intuitive because it’s designed exclusively for mobile devices that don’t necessarily navigate with a
traditional mouse and keyboard.
Cameras
You may or may not have a rear view camera and/or secondary camera integrated into
the Prodigy ONE.2 depending on your particular installation.
Display of Camera 1
Prodigy ONE.2 provide back up camera functionality and (if installed) the camera
image is triggered automatically any time the vehicle’s ignition is on and placed into
reverse. There is no need to choose any menu icons to trigger this back up camera on
the “Camera 1” input. It’s automatic when backing up.
Display of Camera 2
Prodigy ONE.2 also integrates a second on-board camera input. This can be
used for a front view camera, second input for (full time) rear view camera,
rear seat “baby cam” application, or any other way you might use an onboard
camera. Please note, use of this input requires purchase and installation of an
additional camera in most cases, except where the same rear view camera is used for
both camera inputs (1 & 2).
To exit the Camera 2 screen,
simply press or select the EXIT
button on the screen and you will
return to the menu page.
Quick Start Guide Page 27Settings
Prodigy ONE.2 has some factory settings accessible with a pin code. These are not
user adjustable settings and would only be accessed by the installer or someone
reconfiguring Prodigy ONE.2 in a second installation. This section is also used when
adding any UART devices to Prodigy ONE.2 (see page 31 for more details).
There are no user adjustable settings or configurations in this menu
item. Configurations are completed by the installer at the time of
Prodigy ONE.2 installation or at the factory.
System
In the System menu icon, Prodigy ONE.2 has a setting for the Navigation program
launch and a firmware update utility.
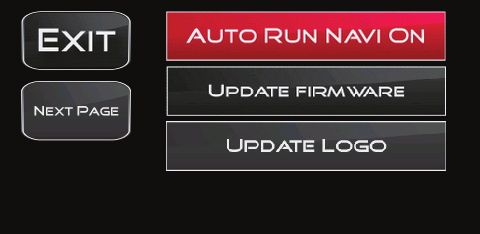
Auto Run Navigation Launch
Prodigy ONE.2 is default configured to launch into Navigation mode each time it turns
on. This is so that, when you access Prodigy ONE.2 screens, the Navigation application
is already running and ready to go. Most installations that utilize a Prodigy ONE.2
will have this as the primary application, so INTRAPHEX engineers made it
easy to access. If you wish to have Prodigy ONE.2 boot to the main menu
screen instead of directly into Navigation, you can simply select the System
menu icon and choose “Auto Run Navi Off” .
If you wish to have Prodigy ONE.2 boot to the main menu screen instead of
directly into Navigation, you can simply select the System menu icon and choose
“Auto Run Navi Off” as shown in this example .
Firmware Update
If there is a firmware update necessary for your Prodigy ONE.2 system, you will have to contact the
INTRAPHEX technical support department for specific instruction on how to acquire the necessary update
and how to load it into Prodigy ONE.2 from this menu.
Page 28 Quick Start GuideYou can also read