Grandstream Networks, Inc - HT801/HT802 Administration Guide
←
→
Page content transcription
If your browser does not render page correctly, please read the page content below
Grandstream Networks, Inc.
HT801/HT802
Analog Telephone Adaptors
Administration Guide

COPYRIGHT

©2021 Grandstream Networks, Inc. http://www.grandstream.com
All rights reserved. Information in this document is subject to change without notice. Reproduction or
transmittal of the entire or any part, in any form or by any means, electronic or print, for any purpose without
the express written permission of Grandstream Networks, Inc. is not permitted.
The latest electronic version of this user manual is available for download here:
http://www.grandstream.com/support
Grandstream is a registered trademark and Grandstream logo is trademark of Grandstream Networks, Inc.
in the United States, Europe and other countries.

CAUTION
Changes or modifications to this product not expressly approved by Grandstream, or operation of this
product in any way other than as detailed by this User Manual, could void your manufacturer warranty.

WARNING
Please do not use a different power adaptor with your devices as it may cause damage to the products and
void the manufacturer warranty.

                                                                                                      Page | 1
                                     HT801/HT802 Administration Guide
                                            Version 1.0.23.5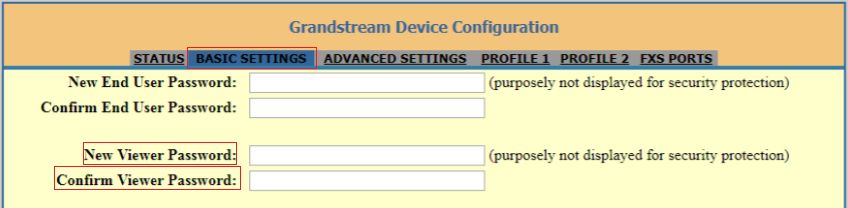
GNU GPL INFORMATION
HT801/HT802 firmware contains third-party software licensed under the GNU General Public License
(GPL). Grandstream uses software under the specific terms of the GPL. Please see the GNU General
Public License (GPL) for the exact terms and conditions of the license.

Grandstream GNU GPL related source code can be downloaded from Grandstream web site from:
http://www.grandstream.com/support/faq/gnu-general-public-license/gnu-gpl-information-download

                                                                                                 Page | 2
                                    HT801/HT802 Administration Guide
                                           Version 1.0.23.5
Table of Content
DOCUMENT PURPOSE ................................................................................................. 7
CHANGE LOG ................................................................................................................ 8
Firmware version 1.0.23.5 ................................................................................................................ 8
Firmware version 1.0.21.4 ................................................................................................................ 8
Firmware version 1.0.19.11 ............................................................................................................... 8
Firmware Version 1.0.17.5 ................................................................................................................ 8
Firmware Version 1.0.15.4 ................................................................................................................ 9
Firmware Version 1.0.13.7 ................................................................................................................ 9
Firmware Version 1.0.11.6 ................................................................................................................ 9
Firmware Version 1.0.10.6 .............................................................................................................. 10
Firmware Version 1.0.9.3 ................................................................................................................ 10
Firmware Version 1.0.8.7 ................................................................................................................ 10
Firmware Version 1.0.5.11 .............................................................................................................. 10
Firmware Version 1.0.3.7 ................................................................................................................ 11
Firmware Version 1.0.3.2 ................................................................................................................ 11
Firmware Version 1.0.2.5 ................................................................................................................ 11
Firmware Version 1.0.2.3 ................................................................................................................ 11
Firmware Version 1.0.1.9 ................................................................................................................ 12
GUI INTERFACE EXAMPLES ...................................................................................... 13
WELCOME ................................................................................................................... 14
PRODUCT OVERVIEW ................................................................................................ 15
Feature Highlights .......................................................................................................................... 15
HT801/HT802 Technical Specifications ........................................................................................... 16
GETTING STARTED..................................................................................................... 18
Equipment Packaging ..................................................................................................................... 18
HT801/HT802 Ports Description ..................................................................................................... 19
Page | 3
HT801/HT802 Administration Guide
Version 1.0.23.5Connecting HT801/HT802 .............................................................................................................. 20
HT801/HT802 LEDs Pattern ........................................................................................................... 20
CONFIGURATION GUIDE ............................................................................................ 22
Obtain HT801/HT802 IP Address via Connected Analogue Phone .................................................. 22
Understanding HT801/HT802 Interactive Voice Prompt Response Menu ........................................ 22
Configuration via Web Browser ....................................................................................................... 24
Accessing the Web UI.............................................................................................................. 24
Web UI Access Level Management.......................................................................................... 25
Saving the Configuration Changes ........................................................................................... 25
Changing Admin Level Password............................................................................................. 25
Changing User Level Password ............................................................................................... 25
Changing Viewer Password ..................................................................................................... 26
Changing HTTP Web Port ....................................................................................................... 26
Web Configuration Pages Definitions .............................................................................................. 27
Status Page Definitions............................................................................................................ 27
Basic Settings Page Definitions ............................................................................................... 39
Advanced Settings Page Definitions ........................................................................................ 27
FXS Ports Pages Definitions .................................................................................................... 43
NAT Settings .................................................................................................................................. 62
DTMF Methods............................................................................................................................... 63
Preferred Vocoder (Codec) ............................................................................................................. 63
Configuring HT801/HT802 Through Voice Prompts ......................................................................... 63
Register a SIP Account ................................................................................................................... 64
Call Features .................................................................................................................................. 66
Rebooting HT801/HT802 from Remote ........................................................................................... 68
UPGRADING AND PROVISIONING............................................................................. 69
Firmware Upgrade procedure ......................................................................................................... 69
Upgrading via Local Directory ......................................................................................................... 70
Upgrading via Local TFTP/HTTP/HTTPS/FTP/FTPS Servers .......................................................... 70
Page | 4
HT801/HT802 Administration Guide
Version 1.0.23.5Firmware and Configuration File Prefix and Postfix ......................................................................... 71
Managing Firmware and Configuration File Download ..................................................................... 71
Configuration File Download ........................................................................................................... 71
RESTORE FACTORY DEFAULT SETTINGS ............................................................... 73
Using the Reset Button ................................................................................................................... 73
Using the IVR Command ................................................................................................................ 73
Reset from Web Interface (Reset Type) .......................................................................................... 74
Reset using SIP NOTIFY ................................................................................................................ 74
EXPERIENCING HT801/HT802 .................................................................................... 75
Page | 5
HT801/HT802 Administration Guide
Version 1.0.23.5Table of Tables
Table 1: HT801/HT802 Features at a Glance ......................................................................................... 15
Table 2: HT801/HT802 Technical Specifications ..................................................................................... 16
Table 3: Definition of the HT801/HT802 Connectors ............................................................................... 19
Table 4: HT801/HT802 LEDs Pattern Description................................................................................... 20
Table 5: Voice Prompt Menu .................................................................................................................. 22
Table 6: Status Page Definitions ............................................................................................................ 38
Table 7: Basic Settings Page ................................................................................................................. 39
Table 8: Advanced Settings.................................................................................................................... 27
Table 9: FXS Ports................................................................................................................................. 43
Table 10: HT801/HT802 Call Features ................................................................................................... 66
Table 11: MAC Address Key Mapping .................................................................................................... 73
Table of Figures
Figure 1: HT801 Package Contents ....................................................................................................... 18
Figure 2: HT802 Package Contents ....................................................................................................... 18
Figure 3: HT801 Back Panel .................................................................................................................. 19
Figure 4: HT802 Back Panel .................................................................................................................. 19
Figure 5: Connecting the HT801/HT802 ................................................................................................. 20
Figure 6: HT801/HT802 LEDs Pattern ................................................................................................... 20
Figure 7: Admin Level Password ............................................................................................................ 25
Figure 8: User Level Password .............................................................................................................. 26
Figure 9: Viewer Level Password ........................................................................................................... 26
Figure 10: Web HTTP Port..................................................................................................................... 27
Figure 11: SIP Accounts Settings ........................................................................................................... 65
Figure 12: Account Status ...................................................................................................................... 66
Figure 13: Firmware Upgrade Page ....................................................................................................... 70
Figure 14: XML Config File - MAC Header ............................................................................................. 72
Page | 6
HT801/HT802 Administration Guide
Version 1.0.23.5DOCUMENT PURPOSE
This document describes the basic concept and tasks necessary to use and configure your
HT801/HT802. And it covers the topic of connecting and configuring the HT801/HT802, making basic
operations and the call features. Please visit http://www.grandstream.com/support to download the latest
“HT801/HT802 User Guide”.
This guide covers following topics:
Product overview
Getting started
Configuration guide
Upgrade and provisioning
Restore factory default settings
Page | 7
HT801/HT802 Administration Guide
Version 1.0.23.5CHANGE LOG
This section documents significant changes from previous versions of administration guide for
HT801/HT802. Only major new features or major document updates are listed here. Minor updates for
corrections or editing are not documented here.
Firmware version 1.0.23.5
Added support for “DNS SRV Failover Mode”. [DNS SRV Failover Mode]
Added support of “Register Before DNS SRV Failover”. [Register Before DNS SRV Failover]
Added support for “Offhook Auto-Dial DTMF”. [Off Hook Auto-Dial DTMF]
Added Special Feature IZZI to support N-Way conference hosted on Nokia IMS. [Special Feature]
Firmware version 1.0.21.4
Added support for IPv6 address without square brackets. [Primary SIP Server] [Failover SIP Server]
[Outbound Proxy] [Backup Outbound Proxy]
Added support for DHCP Domain Name configuration. [DHCP domain name]
Added support of “Use Configured IP” for “DNS Mode”. [Use Configured IP]
Added support for “Play Busy Tone When Account is unregistered”. [Play Busy Tone When Account is
unregistered]
Firmware version 1.0.19.11
Added “Disable" option for Web access mode. [Web Access Mode]
Moved “Trusted CA certificates” from Profile1/Profie2 to Advanced Settings and renamed as Trusted
CA Certificates A and Trusted CA Certificates B. [Trusted CA certificates A] [Trusted CA certificates B]
Added Feature “Disable User Level Web Access” and “Disable Viewer Level Web Access”. [Disable
User Level Web Access][Disable Viewer Level Web Access]
Added Feature “Use P-Asserted-Identity Header”. [ Use P-Asserted-Identity Header]
Added Feature” Load CA Certificates”. [Load CA Certificates]
Added Feature “Connection Request Port”. [Connection Request Port]
Added OI_BR to special feature. [Special Feature]
Added support to set Ring Timeout to 0 for unlimited ring timeout. [Ring Timeout]
Added New Zealand Standard for Pulse Dialing Standard. [Pulse Dialing Standard]
Added support for Russian Language. [Language]
Increased “SIP TLS Certificate” and “SIP TLS Private Key” supported maximum length from 2048 to
4096.[SIP TLS Certificate][SIP TLS Private Key]
Firmware Version 1.0.17.5
Added support for Minimum TLS Version. [Minimum TLS Version]
Page | 8
HT801/HT802 Administration Guide
Version 1.0.23.5 Added support for Maximum TLS Version. [Maximum TLS Version]
Added support for Traditional Chinese language.[Language]
Firmware Version 1.0.15.4
Added more choices to feature “Disable Weak TLS Ciphers”. [Disable Weak TLS Cipher Suites]
Added feature “Syslog Protocol”. [Syslog Protocol]
Added support for “Distinctive Call Waiting Tone”. [Distinctive Call Waiting Tone]
Added support for “Call Waiting Tones”. [Call Waiting Tones]
Added support for DHCP option 67. [Configuration File Download]
Added support for GDMS platform. [ACS URL]
Firmware Version 1.0.13.7
Added ability to support provisioning server path containing the server authentication credentials for
the DHCP option 66. [Allow DHCP Option 66 to Override Server]
Added support to send SNMP trap to 3 different servers. [SNMP Trap IP Address]
Added feature “Call Features Settings”. [Call Features Settings]
Added feature “Use SIP User Agent”. [SIP User-Agent]
Updated “Use SIP User Agent Header” to “SIP User Agent Postfix”. [SIP User Agent Postfix].
Added feature “Disable Reminder Ring for DND”. [Disable Reminder Ring for DND]
Added feature “CDR File Option”. [CDR File Option]
Added feature “SIP File Option”. [SIP File Option]
Added feature “Disable Weak TLS Cipher Suites”. [Disable Weak TLS Cipher Suites]
Added feature “Pulse Dialing Standard”. [Pulse Dialing Standard]
Added feature “Callee Flash to 3WC”. [Callee Flash to 3WC]
Added feature “RFC2833 Count”. [RFC2833 Events Count] [RFC2833 End Events Count]
Added feature “Replace Beginning ‘+’ with 00 in Caller ID”. [Replace Beginning '+' with 00 in Caller ID]
Added feature “Disable Unknown Caller ID”. [Disable Unknown Caller ID]
Added feature “Disable # as Redial Key”. [Disable # as Redial Key]
Added feature “Reset Call Features”. [Reset Call Features]
Added support to view, download, and delete the call history through device Web UI. [CDR File]
Added support to store SIP file locally. [SIP File]
Firmware Version 1.0.11.6
Added support to display CPU load on the device web STATUS page. [CPU Load]
Added support for SIP keep-alive to use SIP NOTIFY. [Enable SIP OPTIONS/NOTIFY Keep Alive]
Added feature “Network Cable Status” on Web UI status page. [Network Cable Status]
Added support for Management Interface. [Enable Management Interface]
Added feature “SSH Idle Timeout”. [SSH Idle Timeout]
Added feature “Telnet Idle Timeout”. [Telnet Idle Timeout]
Page | 9
HT801/HT802 Administration Guide
Version 1.0.23.5 Added feature “Use ARP to detect network connectivity”. [Use ARP to detect network connectivity]
Added feature “Call Record”. [CDR File]
Firmware Version 1.0.10.6
Added feature “Inband DTMF Duration”. [Inband DTMF Duration]
Added feature “RFC2543 Hold”. [RFC2543 Hold]
Added feature “Visual MWI Type”. [Visual MWI Type]
Added feature “Ring Frequency”. [Ring Frequency]
Added feature “Allow SIP Factory Reset”. [Allow SIP Factory Reset] [Reset using SIP NOTIFY]
Added support for G722 Codec. [HT801/HT802 Technical Specifications]
Added support for allow user to choose preference codec from PCMU and PCMA for FAX pass-through
codec. [Fax Mode]
Firmware Version 1.0.9.3
Added feature “Custom Certificate”. [Custom Certificate]
Added feature “Use P-Access-Network-Info Header”. [Use P-Access-Network-Info Header]
Added feature “Use P-Emergency-Info Header”. [Use P-Emergency-Info Header]
Added feature “Conference Party Hang up Tone” when “Special Feature” is set to MTS. [Call Progress
Tones]
Add support for HTTPS based on TLS v1.2
Firmware Version 1.0.8.7
Added [CenturyLink, MTS] to Special Feature.
Added support for upgrade device via [FTP/FTPS] server. [UPGRADING AND PROVISIONING]
Added support to have the call waiting tone through SIP INFO.
Added feature “Validate Server Certificates”. [Validate Server Certificates]
Added support for [DDNS]
Added feature Blacklist for Incoming Calls. [Blacklist for Incoming Calls]
Added support for [Telnet]
Added feature [Play busy/reorder tone before Loop Current Disconnect]
Firmware Version 1.0.5.11
Changed default "Upgrade Via" from HTTP to HTTPS. [Upgrade via] [UPGRADE PROTOCOL]
Added the ability to schedule [Automatic Reboot]
Added support for [SNMP]
Added support for 3 level access through RADIUS authorization (Admin, User and [viewer])
Added option to customize number of failed [Web Access Attempt Limit] to access web GUI
Added option to customize idle time to logout the web access with [Web Session Timeout]
Added option to disable WAN side ports [Black List for WAN Side Port]
P a g e | 10
HT801/HT802 Administration Guide
Version 1.0.23.5 Added feature “Caller ID Fetch Order” option under FXS port settings. [Caller ID Fetch Order]
Added feature “Enable High Ring Power” option under FXS port settings. [Enable High Ring Power]
Added feature “Internet Protocol” to choose from “IPv4 Only”, “IPv6 Only”, “Both, prefer IPv4”, “Both,
prefer IPv6”. [Internet Protocol]
Added feature “IPv6 Address” to configure IPv6 Address. [IPv6 Address]
Firmware Version 1.0.3.7
Added option “Use Actual Ephemeral Port in Contact with TCP/TLS” to force device to use actual
ephemeral port. [Use Actual Ephemeral Port in Contact with TCP/TLS]
Added option “SIP URI Scheme When Using TLS” to choose between ‘SIP’ and ‘SIPS’. [SIP URI
Scheme When Using TLS]
Added Option “Backup Outbound Proxy” to use backup Outbound Proxy if Outbound Proxy registration
expires. [Backup Outbound Proxy]
Added option “Prefer Primary Outbound Proxy” to enable registration through primary outbound proxy
if registration expires. [Prefer Primary Outbound Proxy]
Added option “Enable RTCP” to enable RTCP function through Web UI. [Enable RTCP]
Added option “Hold Target Before Refer” to enable device to hold before being referred. [Hold Target
Before Refer]
Added Option “Enable Session Timer” to disable session timer. [Enable Session Timer]
Added feature “Conference URI” to support Conference URI. [Conference URI]
Added feature “White List for WAN Side” for remote management. [White List for WAN Side]
Added feature “Black List for WAN Side” for remote management. [Black List for WAN Side]
Added option “Web Access Mode” to choose between “HTTPS” and “HTTP” to access device Web UI.
Added feature “HTTPS Web Port” to set HTTPS web port instead of using default HTTPS port. [HTTPS
Web Port]
Added feature “SSH Port” to self-configure SSH port. [SSH Port]
Added SNMP related features.
Firmware Version 1.0.3.2
This is the initial version for HT801.
Added option “DNS SRV use Registered IP” [DNS SRV use Registered IP].
Changed default NTP server from us.pool.ntp.org to pool.ntp.org.
Firmware Version 1.0.2.5
Changed OPUS Payload Type default value to 123 to match other GS products. [OPUS Payload Type].
Firmware Version 1.0.2.3
Added a re-enter box to confirm change user and admin password on web GUI to avoid typo or mistakes
[Confirm Admin Password][Confirm End User Password].
P a g e | 11
HT801/HT802 Administration Guide
Version 1.0.23.5 Add new iLBC libraries to improve iLBC audio quality.
Firmware Version 1.0.1.9
This is the initial version.
P a g e | 12
HT801/HT802 Administration Guide
Version 1.0.23.5GUI INTERFACE EXAMPLES
http://www.grandstream.com/sites/default/files/Resources/ht80x_web_gui.zip
1. Screenshot of Login Page.
2. Screenshots of Status Page.
3. Screenshots of Basic Settings Page.
4. Screenshots of Advanced Settings Page.
5. Screenshots of FXS Port 1 Page.
6. Screenshots of FXS Port 2 Page.
P a g e | 13
HT801/HT802 Administration Guide
Version 1.0.23.5WELCOME
The HT801/HT802 analog telephone adaptors provide transparent connectivity for analog phones and
faxes to the world of internet voice. Connecting to any analog phone, fax or PBX, the HT801/HT802 are an
effective and flexible solution for accessing internet-based telephone services and corporate intranet
systems across established LAN and internet connections. The Grandstream handy tones HT801/HT802
are new additions to the popular handy tone ATA product family. This manual will help you learn how to
operate and manage your HT801/HT802 analog telephone adaptor and make the best use of its many
upgraded features including simple and quick installation, 3-way conferencing, direct IP-IP Calling, and new
provisioning support among other features. The HT801/HT802 are very easy to manage and configure and
are specifically designed to be an easy to use and affordable VoIP solution for both the residential user and
the teleworker.
P a g e | 14
HT801/HT802 Administration Guide
Version 1.0.23.5PRODUCT OVERVIEW
The HT801 is a one-port analog telephone adapter (ATA) while the HT802 is a 2-port analog telephone
adapter (ATA) that allows users to create a high-quality and manageable IP telephony solution for residential
and office environments. Its ultra-compact size, voice quality, advanced VoIP functionality, security
protection and auto provisioning options enable users to take advantage of VoIP on analog phones and
enables service providers to offer high quality IP service. The HT801/HT802 are an ideal ATA for individual
use and for large scale commercial IP voice deployments.
Feature Highlights
The following table contains major features of HT801 and HT802:
Table 1: HT801/HT802 Features at a Glance
1 SIP profile through 1 FXS port on HT801, 2 SIP profiles through 2 FXS
ports on HT802 and single 10/100Mbps port on both models.
HT801
3-way voice conferencing.
Wide range of caller ID formats.
Advanced telephony features, including call transfer, call forward, call-
waiting, do not disturb, message waiting indication, multi-language prompts,
flexible dial plan and more.
T.38 Fax for creating Fax-over-IP and GR-909 Line Testing Functionalities.
HT802 TLS and SRTP security encryption technology to protect calls and accounts.
Automated provisioning options include TR-069 and XML config files.
Failover SIP server automatically switches to secondary server if main server
loses connection.
Use with Grandstream’s UCM series of IP PBXs for Zero Configuration
provisioning.
P a g e | 15
HT801/HT802 Administration Guide
Version 1.0.23.5HT801/HT802 Technical Specifications
Following tables resumes all the technical specifications including the protocols/standards supported,
voice codecs, telephony features, languages and upgrade/provisioning settings for the HT801 and the
HT802.
Table 2: HT801/HT802 Technical Specifications
Interfaces
HT801 HT802
Telephone Interfaces One (1) RJ11 FXS port Two (2) RJ11 FXS ports.
Network Interface One (1) 10/100Mbps auto-sensing Ethernet port (RJ45).
POWER, INTERNET, PHONE1,
LED Indicators POWER, INTERNET, PHONE
PHONE2.
Factory Reset Button Yes.
Voice, Fax, Modem
HT801 HT802
Caller ID display or block, call waiting, flash, blind or attended transfer, forward,
Telephony Features
hold, do not disturb, 3-way conference.
G.711 with Annex I (PLC) and Annex II (VAD/CNG), G.723.1, G.729A/B, G.726,
Voice Codecs
G.722, iLBC, OPUS, dynamic jitter buffer, advanced line echo cancellation.
T.38 compliant Group 3 Fax Relay up to 14.4kpbs and auto-switch to G.711 for
Fax over IP
Fax Pass-through.
Short/Long Haul
5 REN: Up to 1km on 24 AWG. 2 REN: Up to 1km on 24 AWG.
Ring Load
Caller ID Bellcore Type 1 & 2, ETSI, BT, NTT, and DTMF-based CID.
Disconnect Methods Busy Tone, Polarity Reversal/Wink, Loop Current.
Signaling
HT801 HT802
TCP/IP/UDP, RTP/RTCP, FTP/FTPS, HTTP/HTTPS, ARP/RARP, ICMP, DNS,
Network Protocols DDNS, DHCP, NTP, TFTP, SSH, Telnet, STUN, SIP (RFC3261), SIP over
TCP/TLS, SRTP, TR-069.
QoS Layer 3 (ToS, DiffServ, MPLS).
DTMF Methods In-audio, RFC2833 and/or SIP INFO.
Provisioning and HTTP, HTTPS, FTP, FTPS, SSH, Telnet, TFTP, TR-069, secure and automated
Control provisioning using AES encryption, syslog.
P a g e | 16
HT801/HT802 Administration Guide
Version 1.0.23.5Security
HT801 HT802
Media SRTP.
Control TLS/SIPS/HTTPS/SSH/Telnet.
Management Syslog support, SSH, Telnet remote management using web browser.
Physical
HT801 HT802
Universal Power Input: 100-240VAC, 50-60Hz.
Supply Output: 5.0VDC/1.0A.
Operational: 32o – 104oF or 0º – 40ºC.
Environmental Storage: 14o – 140oF or -10º – 60ºC.
Humidity: 10 – 90% Non-condensing.
Dimensions and 100mm x 100mm x 29.5mm 100mm x 100mm x 29.5mm
Weight 102g 114g (without package).
Compliance
HT801 HT802
FCC Part15B EN55032, EN55024, FCC 15B, AS/NZS CISPR22,
EN61000-3-2, EN61000-3-3, AS/NZS60950, EN55022, EN55024,
Compliance
EN60950-1, AS/NZS CISPR22, EN60950, EN61000-3-2, EN61000-3-
AS/NZS60950.1, S003 3, UL (Power supply).
P a g e | 17
HT801/HT802 Administration Guide
Version 1.0.23.5GETTING STARTED
This chapter provides basic installation instructions including the list of the packaging contents and
information for obtaining the best performance with the HT801/HT802.
Equipment Packaging
The HT801 ATA package contains:
1x HT801 1x 5V Power Adapter
1x Quick Installation Guide
1x Ethernet Cable
1x GPL Statement
Figure 1: HT801 Package Contents
The HT802 ATA package contains:
1x HT802 1x 5V Power Adapter
1x Quick Installation Guide
1x Ethernet Cable
1x GPL Statement
Figure 2: HT802 Package Contents
Note: Check the package before installation. If you find anything missing, contact your system administrator.
P a g e | 18
HT801/HT802 Administration Guide
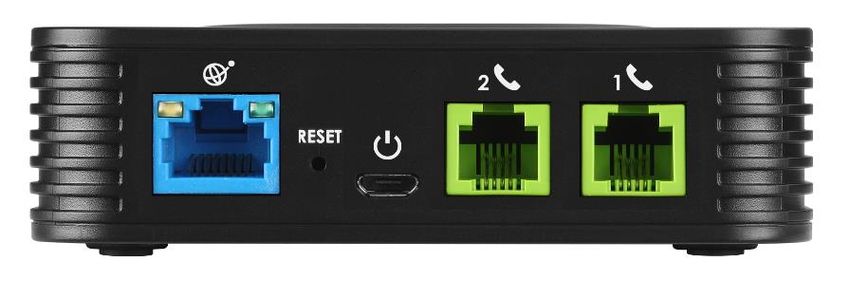
Version 1.0.23.5HT801/HT802 Ports Description
The following figure describes the different ports on the back panel of the HT801.
Internet Micro USB Phone
Port Power DC (RJ-11 FXS Port)
Figure 3: HT801 Back Panel
The following figure describes the different ports on the back panel of the HT802.
Internet Micro USB Phone 1 & 2
Port Power DC (RJ-11 FXS Ports)
Figure 4: HT802 Back Panel
Table 3: Definition of the HT801/HT802 Connectors
Phone for HT801 Connects the analog phones / fax machines to the phone adapter using
Phone 1 & 2 for HT802 an RJ-11 telephone cable.
Connects the phone adapter to your router or gateway using an Ethernet
Internet port
RJ45 network cable.
co
Micro-USB Power Connects the phone adapter to PSU (5V – 1A).
Reset Factory reset button. Press for 7 seconds to reset factory default settings.
P a g e | 19
HT801/HT802 Administration Guide
Version 1.0.23.5Connecting HT801/HT802
The HT801 and HT802 are designed for easy configuration and easy installation, to connect your HT801
or HT802, please follow the steps above:
1. Insert a standard RJ11 telephone cable into the p hone port and connect the other end of the
telephone cable to a standard touch-tone analog telephone.
2. Insert the Ethernet cable into the internet or LAN port of the HT801/ht802 and connect the other
end of the Ethernet cable to an uplink port (a router or a modem, etc.)
3. Insert the power adapter into the HT801/HT802 and connect it to a wall outlet.
Power, Ethernet and Phone LEDs will be solidly lit when the HT801/HT802 is ready for use.
HT801
or
HT802
Figure 5: Connecting the HT801/HT802
HT801/HT802 LEDs Pattern
There are 3 LED buttons on HT801 and 4 LED buttons on HT802 that help you manage the status of your
Handy Tone.
Figure 6: HT801/HT802 LEDs Pattern
Table 4: HT801/HT802 LEDs Pattern Description
P a g e | 20
HT801/HT802 Administration Guide
Version 1.0.23.5LED Lights Status
Power LED The Power LED lights up when the HT801/HT802 is powered on and it
flashes when the HT802 is booting up
Internet LED The Ethernet LED lights up when the HT801/HT802 is connected to your
network through the Ethernet port and it flashes when there is data being
sent or received.
Phone LED for HT801 The phone LED 1 & 2 indicate status of the respective FXS port-phone on
the back panel
OFF - Unregistered
Phone LED 1&2 for ON (Solid Blue) - Registered and Available
HT802 Blinking every second - Off-Hook / Busy
Slow blinking - FXS LEDs indicates voicemail
P a g e | 21
HT801/HT802 Administration Guide
Version 1.0.23.5CONFIGURATION GUIDE
The HT801/HT802 can be configured via one of two ways:
The IVR voice prompt menu.
The Web GUI embedded on the HT801/HT802 using PC's web browser.
Obtain HT801/HT802 IP Address via Connected Analogue Phone
HT801/HT802 is by default configured to obtain the IP address from DHCP server where the unit is located.
To know which IP address is assigned to your HT801/HT802, you should access to the “Interactive Voice
Response Menu” of your adapter via the connected phone and check its IP address mode.
Please refer to the steps below to access the interactive voice response menu:
1. Use a telephone connected to phone ports of your HT801/HT802.
2. Press *** (press the star key three times) to access the IVR menu and wait until you hear “Enter
the menu option “.
3. Press 02 and the current IP address will be announced.
Understanding HT801/HT802 Interactive Voice Prompt Response Menu
The HT801/HT802has a built-in voice prompt menu for simple device configuration which lists actions,
commands, menu choices, and descriptions. The IVR menu works with any phone connected to the
HT801/HT802. Pick up the handset and dial “***” to use the IVR menu.
Table 5: Voice Prompt Menu
Menu Voice Prompt Options
Main “Enter a Menu Option” Press “*” for the next menu option
Menu Press “#” to return to the main menu
Enter 01-05, 07,10, 13-17,47 or 99 menu options
01 “DHCP Mode”, Press “9” to toggle the selection
“Static IP Mode” If using “Static IP Mode”, configure the IP address
information using menus 02 to 05.
If using “Dynamic IP Mode”, all IP address information
comes from the DHCP server automatically after
reboot.
02 “IP Address “+ IP address The current WAN IP address is announced
If using “Static IP Mode”, enter 12-digit new IP
address. You need to reboot the HT801/HT802 for
the new IP address to take Effect.
03 “Subnet “+ IP address Same as menu 02
P a g e | 22
HT801/HT802 Administration Guide
Version 1.0.23.504 “Gateway “+ IP address Same as menu 02
05 “DNS Server “+ IP Same as menu 02
address
07 Preferred Vocoder Press “9” to move to the next selection in the list:
PCM U / PCM A
iLBC
G-726
G-723
G-729
OPUS
G722
10 “MAC Address” Announces the Mac address of the unit.
13 Firmware Server IP Announces current Firmware Server IP address.
Address Enter 12-digit new IP address.
14 Configuration Server IP Announces current Config Server Path IP address.
Address Enter 12-digit new IP address.
15 Upgrade Protocol Upgrade protocol for firmware and configuration
update. Press “9” to toggle between TFTP / HTTP /
HTTPS / FTP / FTPS. Default is HTTPS.
16 Firmware Version Announces Firmware version information.
17 Firmware Upgrade Firmware upgrade mode. Press “9” to toggle among
the following three options:
always check
check when pre/suffix changes
never upgrade
47 “Direct IP Calling” Enter the target IP address to make a direct IP call,
after dial tone. (See “Make a Direct IP Call”.)
86 Voice Mail Access to your voice mails messages.
99 “RESET” Press “9” to reboot the device
Enter MAC address to restore factory default setting
(See Restore Factory Default Setting section)
701-702 Phone calls between HT802 supports inter-port calling from voice menu.
different ports of the same 70X (X is the port number)
HT802
“Invalid Entry” Automatically returns to main menu
“Device not registered” This prompt will be played immediately after off hook
If the device is not registered and the option “Outgoing
Call without Registration” is in NO
P a g e | 23
HT801/HT802 Administration Guide
Version 1.0.23.5Five success tips when using the voice prompt
“*” shifts down to the next menu option and “#” returns to the main menu.
“9” functions as the ENTER key in many cases to confirm or toggle an option.
All entered digit sequences have known lengths - 2 digits for menu option and 12 digits for IP
address. For IP address, add 0 before the digits if the digits are less than 3 (i.e. - 192.168.0.26
should be key in like 192168000026. No decimal is needed).
Key entry cannot be deleted but the phone may prompt error once it is detected.
Configuration via Web Browser
The HT801/HT802 embedded Web server responds to HTTP GET/POST requests. Embedded HTML
pages allow a user to configure the HT801/HT802 through a web browser such as Google Chrome, Mozilla
Firefox and Microsoft’s IE.
Accessing the Web UI
1. Connect the computer to the same network as your HT801/HT802.
2. Make sure the HT801/HT802 is booted up.
3. You may check your HT801/HT802 IP address using the IVR on the connected phone.
Please see Obtain HT801/HT802 IP Address via Connected Analogue Phone
4. Open Web browser on your computer.
5. Enter the HT801/HT802’s IP address in the address bar of the browser.
6. Enter the administrator’s password to access the Web Configuration Menu (default password is:
admin).
Notes:
The computer must be connected to the same sub-network as the HT801/HT802. This can be
easily done by connecting the computer to the same hub or switch as the HT801/HT802.
Recommended Web browsers:
o Microsoft Internet Explorer: version 10 or higher.
o Google Chrome: version 58.0.3 or higher.
o Mozilla Firefox: version 53.0.2 or higher.
o Safari: version 5.1.4 or higher.
o Opera: version 44.0.2 or higher.
P a g e | 24
HT801/HT802 Administration Guide
Version 1.0.23.5Web UI Access Level Management
There are two default passwords for the login page:
User Level Username Password Web Pages Allowed
End User Level user 123 Only Status and Basic Settings
Administrator Level admin admin All pages
Viewer Level viewer viewer View all pages. Changes not
allowed.
The password is case sensitive with maximum length of 25 characters. When changing any settings, always
submit them by pressing Update or Apply button on the bottom of the page. After submitting the changes
in all the Web GUI pages, reboot HT801/HT802 to have the changes take effect if necessary; most of the
options under the Advanced Settings and FXS Port (x) pages require reboot.
Saving the Configuration Changes
After users makes changes to the configuration, pressing Update button will save but not apply the changes
until Apply button is clicked. Users can instead directly press Apply button. We recommend rebooting or
powering cycle the phone after applying all the changes.
Changing Admin Level Password
1. Access your HT801/HT802 web UI by entering its IP address in your favorite browser
(screenshots below are from HT802 but the same applies to HT801).
2. Enter your admin password (default: admin).
3. Press Login to access your settings and navigate to Advanced SettingsAdmin Password.
4. Enter the new admin password.
5. Confirm the new admin password.
6. Press Apply at the bottom of the page to save your new settings.
Figure 7: Admin Level Password
Changing User Level Password
1. Access your HT801/HT802 web UI by entering its IP address in your favorite browser.
2. Enter your admin password (default: admin).
3. Press Login to access your settings and navigate to Basic SettingsEnd User Password.
4. Enter the new end-user password.
5. Confirm the new end-user password.
P a g e | 25
HT801/HT802 Administration Guide
Version 1.0.23.56. Press Apply at the bottom of the page to save your new settings.
Figure 8: User Level Password
Changing Viewer Password
1. Access your HT812/HT814 web UI by entering its IP address in your favorite browser.
2. Enter your admin password (default: admin).
3. Press Login to access your settings.
4. Go to Basic Settings New Viewer Password and enter the new viewer password.
5. Confirm the new viewer password.
6. Press Apply at the bottom of the page to save your new settings.
Figure 9: Viewer Level Password
Changing HTTP Web Port
1. Access your HT801/HT802 web UI by entering its IP address in your favorite browser.
2. Enter your admin password (default: admin).
3. Press Login to access your settings and navigate to Basic SettingsWeb Port.
4. Change the current port to your desired/new HTTP port. Ports accepted are in range [1-65535].
5. Press Apply at the bottom of the page to save your new settings.
P a g e | 26
HT801/HT802 Administration Guide
Version 1.0.23.5Figure 10: Web HTTP Port
Web Configuration Pages Definitions
This section describes the options in the HT801/HT802 Web UI. As mentioned, you can log in as an
administrator or an end user.
Status: Displays the system info, network status, account status, and line options.
Basic Settings: Configures the end user level password, IP address modes, web access, time zone
settings and language.
Advanced Settings: Configures networks, upgrading and provisioning, TR-069, security settings,
date and time, syslog, audio settings, call settings and call progress tones.
FXS Port (1,2): Configures SIP settings, SIP registration, accounts settings, NAT settings, call features,
ring tones.
Advanced Settings Page Definitions
Table 6: Advanced Settings
Advanced Settings
Defines the administrator level password to access the Advanced Web
Configuration page. This field is case sensitive. Only the administrator can
New Admin Password
configure the “Advanced Settings” page. Password field is purposely left
blank for security reasons after clicking update and saved. Max. length is 25
P a g e | 27
HT801/HT802 Administration Guide
Version 1.0.23.5characters.
Confirm Admin Password Confirms the new admin password.
Disable User Level Web
Disable or enable User Level Web Access. Default is No.
Access
Disable Viewer Level Web
Disable or enable Viewer Level Web Access Default is No.
Access
Sets values for 802.1Q/VLAN Tag. Default is 0. Valid range is 0-4094.
Layer 2 QoS SIP 802.1p. Default is 0. Valid range is 0-7.
RTP 802.1p. Default is 0. Valid range is 0-7.
Black List for WAN Side Port It could be either port range or single port separated by a “,”
Example: “5000-6000, 7000 “.
Configures IP address or domain name of STUN server. Only non-
STUN Server is
symmetric NAT routers work with STUN.
Sends periodically a blank UDP packet to SIP server to keep the "ping hole"
Keep-alive interval
on the NAT router open. Default is 20 seconds.
Uses STUN keep-alive to detect WAN side network problems. If keep-alive
request does not yield any response for configured number of times
Use STUN to detect network (minimum 3), the device will restart the TCP/IP stack.
connectivity If the STUN server does not respond when the device boots up, the feature
is disabled.
Default setting is No.
Use DNS to detect network Uses DNS to detect WAN side network problems.
connectivity Default setting is “No”.
Use ARP to detect network Uses ARP to check the network connectivity.
connectivity Default is “Yes”.
Verify host when using
Enables / disables the host verification when using HTTPS.
HTTPS
Selects firmware upgrade/provisioning method: TFTP, HTTP, HTTPS, FTP
Upgrade via
or FTPS. Default is HTTPS.
P a g e | 28
HT801/HT802 Administration Guide
Version 1.0.23.5Sets IP address or FQDN of firmware server. The URL of the server that
Firmware Server Path
hosts the firmware release. Default is fm.grandstream.com/gs.
Sets IP address or FQDN of configuration server. The URL of the server that
Config Server Path hosts the configuration file to provision HT801/HT802.
Default is fm.grandstream.com/gs.
Decrypts XML configuration file when encrypted. The password used for
XML Config File Password
encrypting the XML configuration file using OpenSSL.
HTTP/HTTPS FTP/FTPS User
Enters user name to authenticate with HTTP/HTTPS FTP/FTPS server.
Name
HTTP/HTTPS FTP/FTPS
Enters password to authenticate with HTTP/HTTPS FTP/FTPS server.
Password
Checks if firmware file is with matching prefix before downloading it. This
Firmware File Prefix field enables user to store different versions of firmware files in one directory
on the firmware server.
Checks if firmware file is with matching postfix before downloading it.
Firmware File Postfix This field enables user to store different versions of firmware files in one
directory on the firmware server.
Checks if configuration files are with matching prefix before downloading
Config File Prefix them. This field enables user to store different configuration files in one
directory on the provisioning server.
Checks if configuration files are with matching postfix before downloading
Config File Postfix them. This field enables user to store different configuration files in one
directory on the provisioning server.
Obtains configuration and upgrade server’s information using options 66 from
DHCP server.
Note: If DHCP Option 66 is enabled, the HT801/HT802 will attempt
Allow DHCP Option 66 to
downloading the firmware file from the server URL provided by DHCP, even
Override Server
though Config Server Path is left blank.
The server URL provided by DHCP can include authentication credentials
using following format: “username:password@Provisioning_Server_IP”.
P a g e | 29
HT801/HT802 Administration Guide
Version 1.0.23.5Sends multicast “SUBSCRIBE” message for provisioning at booting stage,
3CX Auto Provision
used for PnP (Plug-and-Play) configuration. Default is Yes.
Specifies when the firmware upgrade process will be initiated; there are 4
options:
No: The HT801/HT802 will only do upgrade once at boot up.
Check every X minutes: User needs to specify a period in minutes.
Automatic Upgrade Check every day: User needs to specify the start hour and the end
hour of the day (0-23).
Check every week: User needs to specify “Day of the week (0-6)”.
(Day of week is starting from Sunday).
Default is No.
Randomized Automatic Randomized Automatic Upgrade within the range of hours of the day or
Upgrade postpone the upgrade every X minute(s) by random 1 to X minute(s).
Configures the HT801/HT802 to always search for the new firmware at boot
Always Check for New up. During the boot stage, the HT801/HT802 will contact the firmware
Firmware at Boot up upgrade server to search for a new firmware, when available it will start the
upgrade process, otherwise it will boot normally.
Configure the HT801/HT802 to search for the new firmware when the
Check New Firmware only firmware prefix / suffix changes.
when F/W pre/suffix changes When this option is selected, the HT801/HT802 will check for updates only
when the pre/suffix has been changed.
Always Skip the Firmware Configures the HT801/HT802 to skip the firmware check, when this option
Check is selected the HT801/HT802 will always skip searching for a new firmware.
Disables the SIP NOTIFY Authentication on the phone adapter. If set to
Disable SIP NOTIFY
“Yes”, the phone adapter will not challenge NOTIFY with 401.
Authentication
The default setting is “No”
Authenticates configuration before being accepted. This protects the
Authenticate Conf File
configuration from unauthorized modifications. Default is No.
This feature allows users to validate server certificates with our trusted list
Validate Server Certificates of TLS connections. The device needs to reboot after changing the setting.
Default is enabled. DDNS
P a g e | 30
HT801/HT802 Administration Guide
Version 1.0.23.5Uses the certificate for Authentication if “Check Domain Certificates” is set
Trusted CA certificates A
to “Yes” under “Account”--> “SIP Settings”.
Uses the certificate for Authentication if “Check Domain Certificates” is set
Trusted CA certificates B
to “Yes” under “Account”--> “SIP Settings”.
This feature allows user to specify which certificate to trust when performing
server authentication.
Build-in trusted : (Default) Build-in trusted certificates
Load CA Certificates
Custom trusted certificate: Uploaded Certificates
All trusted Certificates: Both built-in and uploaded Certificates
Specifies SSL certificate used for SIP over TLS is in X.509 format. The
SIP TLS Certificate HT801/HT802 has built-in private key and SSL certificate.
Maximum supported length is 4069.
Specifies TLS private key used for SIP over TLS is in X.509 format.
SIP TLS Private Key
Maximum supported length is 4069.
SIP TLS Private Key
Specifies SSL Private key password used for SIP Transport in TLS/TCP.
Password
Custom Certificate Allows users to update to the device their own certificate signed by custom
(Private Key + Certificate) CA certificate to manage client authentication.
Sets the phone adapter system to enable the “CPE WAN Management
Enable TR-069
Protocol” (TR-069). Default setting is Yes.
Specifies URL of TR-069 Auto Configuration Servers (e.g.,
ACS URL http://acs.mycompany.com), or IP address.
Default setting is: “https://acs.gdms.cloud”
ACS Username Enters username to authenticate to ACS.
ACS Password Enters password to authenticate to ACS.
Periodic Inform Enable Sends periodic inform packets to ACS. Default is Yes.
Sets frequency that the inform packets will be sent out to ACS.
Periodic Inform Interval
Default is 86400 seconds.
P a g e | 31
HT801/HT802 Administration Guide
Version 1.0.23.5Connection Request
Enters username for ACS to connect to the HT801/HT802.
Username
Connection Request
Enters password for ACS to connect to the HT801/HT802.
Password
Configures the TR-069 connection request port. The value range is 0 to
Connection Request Port
65535.Default is 7547
Configures the Cert File for the phone adapter to connect to the ACS via
CPE SSL Certificate
SSL.
CPE SSL Private Key Specifies the Cert Key for the phone adapter to connect to the ACS via SSL.
Enable SNMP Default is No.
SNMP Version Choose between (Version 1, Version 2c, or Version 3).
SNMP Port Listening Port of SNMP daemon (Default 161).
SNMP Trap IP Address IP address of trap destination. Up to 3 trap destinations are supported. Users
should enter the IP addresses separated with comma (,).
SNMP Trap port Port of Trap destination (Default 162)
SNMP Trap Version Choose between (Version 1, Version 2c, or Version 3).
SNMP Trap Interval Time interval between traps (Default is 5).
SNMPv1/v2c Community Name of SNMPv1/v2c community.
SNMPv1/v2c Trap Community Name of SNMPv1/v2c trap community.
SNMPv3 User Name User name for SNMPv3.
SNMPv3 Security Level noAuthUser: Users with security level noAuthnoPriv and context name as
noAuth.
authUser: Users with security level authNoPriv and context name as auth.
privUser: Users with security level authPriv and context name as priv.
SNMPv3 Authentication Select the Authentication Protocol: “None” or “MD5” or “SHA.”
Protocol
P a g e | 32
HT801/HT802 Administration Guide
Version 1.0.23.5SNMPv3 Privacy Protocol Select the Privacy Protocol: “None” or “AES/AES128” or “DES”.
SNMPv3 Authentication Key Enter the Authentication Key.
SNMPv3 Privacy Key Enter the Privacy Key.
SNMPv3 Trap User Name User name for SNMPv3 Trap.
SNMPv3 Trap Security Level noAuthUser: Users with security level noAuthnoPriv and context name as
noAuth.
authUser: Users with security level authNoPriv and context name as auth.
privUser: Users with security level authPriv and context name as priv.
SNMPv3 Trap Authentication Select the Authentication Protocol: “None” or “MD5” or “SHA”.
Protocol
SNMPv3 Trap Privacy Select the Privacy Protocol: “None” or “AES/AES128” or “DES”.
Protocol
SNMPv3 Trap Authentication Enter the Trap Authentication Key.
Key
SNMPv3 Trap Privacy Key Enter the Trap Privacy Key.
Enable RADIUS Web Access Default is No.
Control
Action upon RADIUS Auth Choose action upon RADIUS server error. Default is Authenticate Locally
Server Error (Default Authenticate Locally)
RADIUS Auth Server Address Address of RADIUS Auth server.
RADIUS Auth Server Port Port of RADIUS Auth server.
RADIUS Shared Secret Set RADIUS shared secret.
RADIUS VSA Vendor ID Configure RADIUS VSA Vendor ID to match RADIUS server's configuration.
Default is 42397 for Grandstream Networks Inc.
RADIUS VSA Access Level Configure RADIUS VSA Access Level Attribute to match RADIUS server's
Attribute configuration. Incorrect setting would cause Radius authenticate fail.
P a g e | 33
HT801/HT802 Administration Guide
Version 1.0.23.5Enable DDNS Allow users to use DDNS.
DDNS Server Selects DDNS Server: dyndns, freedns.afraid.org, zoneedit.com, no-ip.com,
oray.net.
Default is dyndns.
DDNS Username 64 characters as Max String Length.
DDNS Password 64 characters as Max String Length.
DDNS Hostname 64 characters as Max String Length.
DDNS Hash 64 characters as Max String Length.
System Ring Cadence Configuration option is set ring cadence on FXS port for all incoming calls.
Syntax: c=on1/off1-on2/off2-on3/off3; (3 cadences maximum)
Default is set to c=2000/4000; (US standards)
Call Progress Tones: Using these settings, users can configure tone frequencies and cadence
Dial Tone according to their preference. By default, they are set to North American
frequencies.
Ringback Tone
Configure these settings with known values to avoid uncomfortable high pitch
Busy Tone
sounds. ON is the period of ringing (“On time” in ‘ms’) while OFF is the period
Reorder Tone of silence. In order to set a continuous tone, OFF should be zero. Otherwise
Confirmation Tone it will ring ON ms and a pause of OFF ms and then repeat the pattern.
Call Waiting Tone Example configuration for N.A.
Prompt Tone Dial tone:
Conference Party f1=350@-13, f2=440@-13, c=0/0;
Syntax: f1=freq@vol, f2=freq@vol, c=on1/off1-on2/off2-on3/off3; [...]
Hangup Tone *
(Note: freq: 0 - 4000Hz; vol: -30 - 0dBm)
* “Conference Party Hang-up Tone” will apply only if the “Special Feature” is
set to “MTS”.
Prompt Tone Access Code Key pattern to get Prompt Tone. Maximum 20 digits.
Lock Keypad Update Configuration update via keypad (analog phone connected to FXS port
keypad using IVR menu) is disabled if set to Yes.
Disable Voice Prompt Voice prompt is disabled if set to Yes.
Disable Direct IP Call Direct IP call is disabled if set to Yes.
P a g e | 34
HT801/HT802 Administration Guide
Version 1.0.23.5You can also read