User Guide Version 5.0 - Addvalue Technologies
←
→
Page content transcription
If your browser does not render page correctly, please read the page content below

Model: SH-100
User Guide
Version 5.0

SAFETY INSTRUCTIONS              01

                                 COPYRIGHT         03

                                 WARRANTY          03

                              TRADEMARKS           03

           REGULATORY INFORMATION                  04

                           1 INTRODUCTION          06
                                  Key features     06
                       Configuration interface     06
                         System requirements       06

                        2 GETTING STARTED          07
                     Connect to the network        10
         Method 1: LED Visual Pointing Mode        10
                 Magnetometer interference         11
      Method 2: Audio Assisted Pointing Mode       12
              Method 3: IsatHub Control app        13
                        Access data and calls      14
            Power down and remove battery          16

        3 NAVIGATING THE WEB CONSOLE               17
                               Menu overviewr      17
                               Terminal status     17
                                           Data    18
                           Data profile settings   18
                               BGAN Streaming      20
                    Firewall protection settings   21
Access rights setting according to MAC address     27
                                  Data settings    28

                                     Telephony     29
                                    SIP settings   29

                                          SMS      29
                            Compose new SMS        29
                            View received SMS      30
                                View sent SMS      30
                               View draft SMS      31
Settings     31
                     Create account for Web Console access      31
                           Change SSID and Wi-Fi password       32
                                Configure security settings     34
                                          Terminal settings     35
                                         Upgrade firmware       35
                        Antenna pointing LED configuration      36
                          Terminal Information and log files    37
                                           Select language      37
                                         Technical support      37

                        4 WEB CONSOLE IN SAFE MODE
                                          Enable Safe Mode      38
                                             Menu overview      38
                                          Upgrade firmware      39
                                 Factory reset of Safe Mode     40
                          Terminal Information and log files    40
                               Calibrate the magnetometer       41
           Access Safe Mode through Micro USB Connection        45
         Install Micro USB driver for Windows XP/Windows 7      45
                       Install Micro USB driver for Windows 8   46
                        Install Micro USB driver for MAC OS X   49
                   5 METHODS OF DATA OPTIMISATION
                        Data access and cost management         52
                        Method 1: Use IsatHub Control app       52
                               Method 2: Use iSavi firewall     53
                       Method 3: Use smart devices settings     54
                             Method 4: Computer settings        54
                           Method 5: Use network support        55

                        6 TROUBLESHOOTING AND FAQ               56

                             7 CARE AND MAINTENANCE             62

Appendix A: ANTENNA POINTING LED STATUS TABLE                   63

         Appendix B: TECHNICAL SPECIFICATIONS                   67

             Appendix C: ISATHUB COVERAGE MAP                   69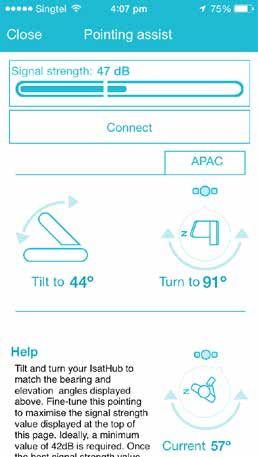
SAFETY INSTRUCTIONS                                                                                 ™
For safety and protection, please read the user guide before using the Satellite Terminal iSavi Model:
SH-100. In particular, do read this safety section carefully. Keep this safety information where you can refer
to it, if necessary.

The following general safety precautions must be observed during all phases of operation, service and
repair of this equipment. Failure to comply with these precautions or with specific warnings elsewhere in
this user guide violates safety standards of design, manufacture and intended use of the equipment.

Addvalue Innovation Pte Ltd assumes no liability for customer’s failure to comply with these requirements.

HAZARD SYMBOLS
          ™
Your iSavi terminal can generate a significant amount of heat depending on the system activities such as
continuous transmission over a period of time and the underside surface will be hot.

Note: Reduce the risk of heat related injury by adhering to the following:
1. Handle with caution when touching the underside surface of theterminal, especially when in use or
   just after powering down.
2. Wait for the terminal to cool after powering down before stowing the device in an unventilated manner.
3. Do not leave children unattended within reach of the terminal.
                                     ™
Votre récepteur/terminal “iSavi” peut générer une grande quantité de chaleur selon les activités du
système, telles que la transmission continue pour une longue période, et la surface inférieure sera chaud.

Veuillez noter qu’on peut diminuer le risque d’une blessure causée par la chaleur en vous conformant aux
directives suivantes:
1. Manipuler avec précaution lorsqu’on touche la surface inférieure du récepteur/terminal, en particulier
   au moment de l’utilisation ou juste après avoir éteint le récepteur/terminal.
2. Attendre jusqu’à le récepteur/terminal se soit refroidi après l’avoir éteint, avant l’entreposage dans un
   espace non ventilé.
3. Ne laissez pas les enfants sans surveillance à portée du récepteur/terminal.

                   CAUTION
              Hot Surface
              Do Not Touch
              Allow to cool before
              handling

ANTENNA RADIATION WARNING
During operation, iSavi™ radiates radio frequency energy within the safe MPE (Maximum Permissible
Exposure) level.

However, it is highly recommended that for safety reasons, keep a distance of 1 metre or more from iSavi™.

SERVICE
Users should not attempt to access the interior of the transceiver. Only qualified personnel authorized by
its manufacturer may service the device. Failure to comply with this rule will result in the warranty being
void.

iSavi™ User Guide                                     1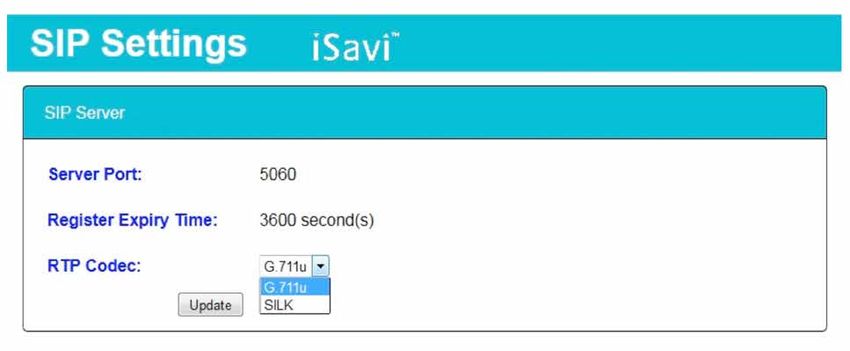
BATTERY SAFETY
Use only Addvalue-supplied or approved AC adapters with the terminal and for recharging the batteries.
The use of batteries that are not Addvalue-supplied or approved may pose increased safety risks.

Do not dispose of batteries in a fire, as they may explode.

Batteries may burn or explode if damaged.

Do not dismantle, open, bend or cut cells or batteries.

Do not attempt to modify or remanufacture the battery.

Do not immerse or expose the battery to water or other liquids.

In the event of a battery leak, avoid the contents coming into contact with the skin or the eyes. If this
happen, flush the affected areas with water and seek medical help as appropriate.

CAUTION
RISK OF EXPLOSION IF BATTERY IS REPLACED BY AN INCORRECT TYPE.
DISPOSE OF USED BATTERIES ACCORDING TO THE INSTRUCTIONS.

ATTENTION
IL Y A DANGER D’EXPLOSION S’IL Y A REMPLACEMENT INCORRECT DE LA BATTERIE, REMPLACER
UNIQUEMENT AVEC UNE BATTERIE DU MEME TYPE OU D’UN TYPE ÉQUIVALENT RECOMMANDÉ
PAR LE CONSTRUCTEUR.
METTRE AU REBUT LES BATTERIES USAGÉES CONFORMÉMENT AUX INSTRUCTIONS DU
FABRICANT.

iSavi™ User Guide                                    2
COPYRIGHT
© Copyright 2017 Addvalue Innovation Pte Ltd.
All rights reserved. This publication and its contents are proprietary to Addvalue Innovation Pte Ltd. No
part of this publication may be reproduced in any form or by any means without the written permission of
Addvalue Innovation Pte Ltd., 8, Tai Seng Link, Level 5 (Wing 2), Singapore 534158.

WARRANTY
Addvalue Innovation Pte Ltd has made every effort to ensure the correctness and completeness of the
material in this document. Addvalue Innovation Pte Ltd shall not be liable for errors contained herein.
The information in this document is subjected to changes without prior notice. Addvalue Innovation Pte
Ltd makes no warranty of any kind with regard to this material, including, but not limited to, the implied
warranties of merchantability and fitness for a particular purpose.

TRADEMARKS
All trademarks, marks, names, or product names referenced in this publication are the property of their
respective owners, and Addvalue Innovation Pte Ltd neither endorses nor otherwise sponsors any such
products or services referred to herein.

Wideye, the Wideye logo, iSavi and iSavi logo are either trademarks or registered trademarks of Addvalue
Innovation Pte Ltd and/or its affiliates in Singapore and/or other countries.

Microsoft, Windows and Internet Explorer are registered trademarks of Microsoft Corporation in the U.S.A.
and/or other countries.

Inmarsat is a trademark of The International Mobile Satellite Organisation and is licensed exclusively to
Inmarsat. The Inmarsat logo, IsatHub and the IsatHub logo are trademarks of Inmarsat. Inmarsat, the
Inmarsat logo, IsatHub and the IsatHub logo are used by Addvalue Innovation Pte Ltd under licence from
Inmarsat.

IOS is a trademark or registered trademark of Cisco in the U.S. and other countries.

Android and Google Chrome are either trademarks or registered trademarks of Google Inc.

Macintosh, Mac OS, iPhone, iPad and Safari are trademarks or registered trademarks of Apple Inc.,
registered in the U.S. and other countries.

Java is a registered trademark of Oracle and/or its affiliates.

Firefox is a registered trademark of Mozilla Foundation.

All other company and product names may be the registered trademarks or trademarks of their respective
owners.
     ™
iSavi Model: SH-100 User’s Guide [APRIL 2017]

This user manual is prepared based on Firmware Version R02.0.0

iSavi™ User Guide                                     3
REGULATORY INFORMATION

              Federal Communication Commission Notice

FCC Identifier: QO4-ISAVISH100

USE CONDITIONS:
This device complies with part 15 of the FCC Rules. Operation is subject to the following two conditions:

This device may not cause harmful interference, and this device must accept any interference received,
including interference that may cause undesired operation.

NOTE:
This equipment has been tested and found to comply with the limits for a Class B digital device, pursuant
to Part 15 of the FCC Rules. These limits are designed to provide reasonable protection against harmful
interference in a residential installation. This equipment generates, uses and radiates radio frequency
energy and, if not installed and used in accordance with the instructions, may cause harmful interference
to radio communications. However, there is no guarantee that interference will not occur in a particular
installation.

If this equipment does cause harmful interference to radio or television reception, which can be determined
by turning the equipment off and on, the user is encouraged to try to correct the interference by one of the
following measures:
• Reorient or relocate the receiving antenna.
• Increase the separation between the equipment and receiver.
• Connect the equipment into an outlet on a circuit different from that to which the receiver is connected.
• Consult the dealer or an experienced radio/TV technician for help.

IMPORTANT NOTE: EXPOSURE TO RADIO FREQUENCY RADIATION
This Device complies with FCC & IC radiation exposure limits set forth for an uncontrolled environment.
The Antenna used for this transmitter must be installed to provide a separation distance of at least 1
metre from all persons and must not be co-located or operating in conjunction with any other antenna or
transmitter.

FCC CAUTION:
Any Changes or modifications not expressly approved by the manufacturer could void the user’s authority,
which is granted by FCC, to operate this Satellite Terminal, iSavi™ Model: SH-100.

Industry Canada Statement:
IC Identifier: 5023B-SH100ISAVI
This device complies with Industry Canada license-exempt RSS-170 and RSS-GEN210 standard(s).
Operations subject to the following two conditions: (1) this device may not cause interference, and (2) this
device must accept any interference, including interference that may cause undesired operation of the
device.

Le présent appareil est conforme aux CNR d’Industrie Canada applicables aux appareils radio exempts
de licence. L’exploitation est autorisée aux deux conditions suivantes : (1) l’appareil ne doit pas produire
de brouillage, et (2) l’utilisateur de l’appareil doit accepter tout brouillage radioélectrique subi, même si le
brouillage est susceptible d’en compromettre le fonctionnement.

iSavi™ User Guide                                      4
IMPORTANT NOTE: Radiation Exposure Statement
This equipment complies with IC radiation exposure limits set forth for an uncontrolled environment. This
antenna used for this transmitter must be installed to provide a separation distance of at least 1 metre from
all persons and must not be co-located or operating in conjunction with any other antenna or transmitter.

NOTE IMPORTANTE: l’exposition aux radiations
Cet appareil est conforme aux limites d’exposition aux rayonnements définies pour un environnement
non contrôlé. Cette antenne utilisée pour ce transmetteur doit être installé pour fournir une distance de
séparation d’au moins 100cm de toutes les personnes et ne doit pas être co-localisées ou opérant en
conjonction avec une autre antenne ou émetteur.

Under Industry Canada regulations, this radio transmitter may only operate using an antenna of a
built-in patch and maximum 8dBi gain (or lesser) approved for the transmitter by Industry Canada. To
reduce potential radio interference to other users, the antenna type and its gain should be so chosen
that the equivalent isotropically radiated power (e.i.r.p.) is not more than that necessary for successful
communication.

Conformément à la réglementation d’Industrie Canada, le présent émetteur radio peut fonctionner avec une
antenne d’un type et d’un 8dBi gain maximal (ou inférieur) approuvé pour l’émetteur par Industrie Canada.
Dans le but de réduire les risques de brouillage radioélectrique à l’intention des autres utilisateurs, il faut
choisir le type d’antenne et son gain de sorte que la puissance isotrope rayonnée quivalente (p.i.r.e.) ne
dépassepas l’intensité nécessaire à l’établissement d’une communication satisfaisante.

Declaration of Conformity:
Addvalue Innovation Pte Ltd., 8, Tai Seng Link, Level 5 (Wing 2), Singapore 534158 declares under our
sole responsibility that the Product, brand name as Wideye and model: SH-100 Satellite Terminal, iSavi™
to which this declaration relates, is in conformity with the following standards and/or other normative
documents:
ETSI EN 301 489-1, -17, -19, -20, ETSI EN 301 681, ETSI EN 300 328, EN 50385, EN 62311, ITU-R M.1480,
IEC 60950–1 and EN 60950-1.

We hereby declare that all essential radio test suites have been carried out and that the above named
product is in conformity to all the essential requirements of Directive 1999/5/EC.

The Conformity Assessment procedure referred to Article 10 and detailed in Annex [III] or [IV] of Directive
1999/5/EC has been followed with involvement of the following notified body(ies):

TIMCO ENGINEERING, INC., P.O BOX 370, NEW BERRY, FLORIDA 32669, U.S.A.
Identification mark: 1177 (Notified Body number)

The technical documentation relevant to the above equipment is held at:
• Addvalue Innovation Pte Ltd., 8, Tai Seng Link, Level 5 (Wing 2), Singapore 534158.
• Signed by
   Mr. Tan Khai Pang (Chief Technology Officer, July 17, 2014) and
   Mr. Prabakar Kuttaniseeri (Manager-Quality Management, July 17, 2014).

iSavi™ User Guide                                     5

01
INTRODUCTION
     ™
iSavi satellite terminal is specially designed to be compact and easy to use with a standby battery lifespan
that is comparable to laptops and smart phones. Together with a corresponding service package from
                 ™
Inmarsat, iSavi can meet the data and voice communications needs for the modern global business
traveller, NGO field workers and many more types of user.

KEY FEATURES
• Built-in 802.11 b/g/n access point with 30 metre range (with built in Wi-Fi antenna)
• Data connectivity using Wi-Fi
• Voice connectivity using VoIP over Wi-Fi
        ™
• iSavi terminal management via web console or smart phone and tablet Control app
• Detachable rechargeable battery module with built-in charging circuit
• Single unit with integrated antenna (all-in-one)
• Easy antenna pointing (with audio tone and LED feedback )
• Lightweight, robust, reliable
• IP65 Compliant (dust tight and protected against water jets)

CONFIGURATION INTERFACES
                            ™
You can configure the iSavi terminal via three different interfaces:
• Web Console (through web browser)
• Smart phone and tablet Control app*
• Voice app* (VoIP configuration for voice calls)

*Supplied separately- Search for IsatHub on your iOS or Android device (iOS App Store or Google Play).

SYSTEM REQUIREMENTS
Network Requirements            • IEEE 802.11b/g/n wireless clients
                                • Inmarsat IsatHub/BGAN Micro-SIM card

Browser based Web               Smart devices or personal computer with
Console Requirements            the following operating systems:
                                                ™
                                • iOS or Android ,
                                • Windows®, Macintosh®, or Linux-based operating system

                                Recommended Browsers:
                                                  ™
                                • Google Chrome
                                • Safari®
                                • Firefox®
                                • Internet Explorer®
                                Users have to ensure they have the latest version of Java™ installed where necessary.
                                Visit www.java.com to download the latest version.

IsatHub Control app and         Smart phone or tablet:
Voice app Requirements          iOS 6 or higher (minimum requirement: iPhone 4 / iPad 2 )
                                Android 4.1 or higher

iSavi™ User Guide                                          6
02
GETTING STARTED

WELCOME
                                                                   ™        ™
Congratulations on purchasing Addvalue’s Wideye iSavi satellite terminal.

SHARED ACCESS TO DATA CONNECTIVITY
                                          ™
Devices connected to your iSavi satellite terminal over Wi-Fi can access data and telephone calls.

CONTROL SHARED ACCESS
                           ™
The features of iSavi terminal can be conveniently controlled remotely.

                                   Use a tablet or smart phone to share and control data access*.

                                                           For control of your iSavi™: IsatHub Control app
                                                           For satellite calls: IsatHub Voice app

                                   DOWNLOAD NOW
                                   Apps are available on App Store & Google Play for iOS & Android.

                                   Alternatively use any web browser (http://iSavi or http://192.168.1.35) to control your iSavi™
                                   satellite terminal.

                                   * Apps are supplied by Inmarsat

                                   Note:
                                   Downloading applications using Isathub services will incur satellite airtime charges.
QUICK REFERENCE
                                                              Micro SIM / USB Cover

                                   Antenna
                                   Pointing LED
Power Button                                                                                            Elevation Angle
                        Exit Pointing                                                                   Indicator
                        Mode Button                              Battery Power                     DC Power Input
                                                                 Indicator Button                  Connector Cover

                                                             Other contents in the box
                                 Battery Pack

                   Transceiver

Note:                                                           Charger         Micro USB  USB Drive Quick Start           My iSavi™
The antenna is embedded inside the transceiver.                & Adapters         Cable   (User Guide) Guide                  Bag

iSavi™ User Guide                                                      7
Insert the Micro-SIM card with its gold-contacts facing down.
Note:
Ensure iSavi™ is switched OFF before removing or installing
the SIM card.
ATTACH BATTERY
Attach the battery gently in the direction as shown.
Use a finger to press the latch until you heard a ‘click’ sound. Ensure that the transceiver is
properly attached to the terminal.
76% - 100% Capacity
51% - 75% Capacity
26% - 50% Capacity
1% - 25% Capacity
Note:
The charging time will be longer when iSavi™ is switched ON
Insert charger lead and then plug the adapter into a power source.
iSavi™ should be charged 8 hours before first use.
Charging will cease automatically once the battery is fully charged. Battery LEDs stop flashiing.
You can check the battery level by pressing the ‘Battery Power Indicator Button’.
iSavi™ User Guide 8Power Button
After charging, place iSavi™ outside at a position with an unobstructed view of the sky.
™
Press and hold Power Button for 5 seconds to turn On iSavi .
Leave it for at least 1 minute so that the terminal is powered up properly.
™.
Refer to page 63, Appendix A: Antenna Pointing LED Status Table for the status of iSavi
To connect iSavi™ to the satellite network, you need to acquire a Global Positioning System (GPS).
Note:
The GPS location information is required for the iSavi™ to assist you in pointing It correctly to the
satellite.
™
iSavi TERMINAL CONTROL
™
Your iSavi can be configured in 2 ways:
• IsatHub Control app:
You use this application to configure the terminal settings, including monitor and manage the data
usage. It has fewer configurations option compare to the Web Console.
The app for smart phones and tablets are available from iOS App Store or Google Play for iOS or
Android devices respectively.
• Web console:
Any browser provides access to configure and operate the terminal.
Refer to page 17, Navigating the web console.
iSavi™ User Guide 9CONNECT TO THE NETWORK
Make sure you place your iSavi™ in the open air, with an unobstructed view of the sky. Next, you point
iSavi™ towards the satellite in the correct direction for connection.
Press and hold the Power button for five seconds to turn it On.
™
It takes around one to two minutes for iSavi to power up and enter antenna pointing mode.
There are three methods for antenna pointing:
• LED visual pointing mode
• Audio assisted pointing mode
• IsatHub Control app
METHOD 1: LED VISUAL POINTING MODE
™
You can point iSavi terminal to the satellite network by using the Antenna Pointing LEDs.
Note:
By default, the antenna pointing is in LED visual pointing mode. In some cases , you might encounter magnetic interference. Refer to the
next page for more information.
™
Tilt iSavi up or down in the
direction of the flashing green
light until both ‘up’ and ‘down’
LEDs display in solid green.
™
Turn iSavi left or right in the
direction of the flashing green
light until both ‘left’ and ‘right’
LEDs display in solid green.
When all four tilt & turn LEDs
are solid green, press the
flashing ‘Exit Pointing Mode’
™
button. iSavi is now connected
to the network.
Note:
Once the network is available, all four antenna pointing LEDs will be turned off after one minute.
The LEDs of ‘Power’ button and ‘Exit Pointing Mode’ button may sometimes be hard to see under bright sunlight.
Use the signal strength indicator in the Control app or web console in the bright environments.
If LEDs display any other pattern of illumination, please refer to Appendix A: Antenna Pointing LED Status Table on page 63 to
understand the status of the iSavi™.
During operation, the iSavi radiates radio frequency energy within the safe MPE
(Maximum Permissible Exposure) level.
However, it is highly recommended that for safety reasons, keep a distance of 1
metre or more from the iSavi™ when use.
Handle with caution when touching the underside surface of theterminal, especially
Caution when in use or just after powering down.
Hot surface
iSavi™ User Guide 10Magnetometer interference
Occasionally, if your iSavi™ is in close proximity to any ferrous objects, the sensors will have difficulty
determining its correct orientation.
When this happens, the LEDs will flash in the following sequence while the magnetic interference
message will appear on your IsatHub Control app:
The following steps should resolve the issue.
Step 1: M
ove iSavi™ to a new location. Ensure the terminal is situated away from other electronic
devices, metal objects and appliances that generate RF noise.
Step 2: P ress the ‘Exit Pointing Mode’ Button once to exit from this state and repeat the steps of the
LED Visual Pointing Mode procedure. The above LEDs status will appear again if the new location is
still having magnetic interference. Repeat step 2 until the LEDs status indicates the LED Visual Pointing
Mode.
If this does not solve the problem, please try Method 2: Audio Assisted Pointing Mode on next page.
Note:
You may need to perform a Magnetometer Calibration to obtain a better accuracy from the LED Visual
Pointing. For details, please refer to page 41.
Magnetic Interference does not affect the basic operation of iSavi™.
iSavi™ User Guide 11METHOD 2: AUDIO ASSISTED POINTING MODE
™
You can point iSavi terminal to the satellite network by using the built-in buzzer.
STEP 1
To switch into audio assisted pointing mode, press and hold the ‘Exit Pointing Mode Button’ for 5
seconds when your iSavi™ is in LED visual pointing mode .
Exit Pointing Mode Button
All 4 LEDs will be flashing green when the audio assisted pointing mode is activated.
The beeping sound indicates the signal strength.
The frequency of the beeping will become higher when the signal is stronger.
STEP 2
Tilt the terminal up to 45 degrees from the horizontal.
45°
STEP 3
Turn the terminal slowly in clockwise or counterclockwise until the beeping frequency
is maximised.
STEP 4
Tilt the terminal up or down slowly until the beeping frequency is maximised.
Fine tune the position until no further increase of the beeping frequency is heard.
‘Exit Pointing Mode Button’ will turn to flashing green when the signal strength is satisfactory for network
registration.
STEP 5
Press the ‘Exit Pointing Mode Button’ to exit antenna pointing mode and start network registration.
iSavi™ User Guide 12METHOD 3: ISATHUB CONTROL APP
™
You can point iSavi terminal to the satellite network by using the IsatHub Control app.
STEP 1
Download the IsatHub Control app from the iOS App Store or Google Play on your smart device(s).
Note:
Data downloaded over the iSavi™ is chargeable.
Use a free data service to acquire these apps whenever possible.
For Android users in China, please download the application through Wandoujia.
STEP 2
Connect to iSavi™ over the Wi-Fi by selecting it from the list of available Wi-Fi networks.
The default Wi-Fi network name (SSID) and password can be obtained from the product label on the
rear of iSavi™ or the label on the packaging box.
STEP 3
Open the IsatHub Control app on the smart phone or tablet.
STEP 4
Follow the on screen instructions and tap ‘Pointing assist’ for antenna pointing suggestion.
STEP 5
Tilt and turn iSavi™ terminal according to the
suggested orientations.
STEP 6
Tap “Connect” on your smart phone or
tablet to register with the network once you
receive a minimum of 42dB signal strength.
You can now carry out your incoming/outgoing
voice calls, data and text messaging.
Note:
You need to allow GPS location access in the smart
device for the ‘Pointing assist” to work properly.
iSavi™ User Guide 13ACCESS DATA AND CALLS
STEP 1
Disable the 3G or 4G service from your smart
™
devices. Connect to iSavi over the Wi-Fi Note:
by selecting it from the list of available Wi-Fi For added security,
networks. please change the
Wi-Fi password at your
earliest opportunity.
The default Wi-Fi network name (SSID) and
password can be obtained from the product label on
™
the rear of your iSavi .
STEP 2
™
For smart device control of your iSavi , open the
IsatHub Control app and follow the instructions
presented to get started. R
efer to Pointing Assist
functionality in IsatHub Control app.
iOS and Android apps are available from App
Store and Google Play respectively.
™
For control of iSavi using your web browser,
access the web console by opening any
web browser and type http://iSavi or
http://192.168.1.35 into the address bar.
STEP 3
To access your chosen control interface, the
default credentials are:
USERNAME: admin
PASSWORD: 1234
STEP 4
Once iSavi is connected to the network, you
™
are ready to start making calls or sending text
messages on any iOS or Android smart device
with the IsatHub Voice app.
Note:
To get optimum data experience and
The IsatHub Voice app is available from the iOS avoid unwanted traffic over satellite,
App Store and Google Play. It is advised to install please get advice from your distributor.
the application using a free data service before Please ensure the number format you
™ dialed has included the full
connecting to the iSavi satellite terminal. international prefix.
Before you first access data over the network, you may need to enter
the APN username and password supplied to you with your SIM card
by your service provider. Please make sure you have these available.
Refer to the Data Profile section for the setting if required.
iSavi™ User Guide 14STEP 5
™
Once iSavi is connected to the network, you are
ready to start a data session. Press the ‘Connect
data’ button to begin and ‘Disconnect data’ to end
all connection to the Internet.
The web console provides data access through
the ‘Activate data connection’ button on the Home
page when using a web browser.
To stop access to data press ‘Deactivate data
connection’
Note:
Signal strength needs to be at least 42dB and above for an acceptable service to commence. You may
check the signal strength and registration status using the home page of the web console or the smart
phone Control app.
If the signal strength level indicated in the web console is low under registered conditions, you can
slowly adjust the terminal angle and monitor the signal strength displayed in web console.
Turn off the terminal by pressing the ‘Power’ button for five seconds.
iSavi™ User Guide 15POWER DOWN AND REMOVE BATTERY
STEP 1
™
Press and hold the power button for 5 seconds to switch off iSavi .
Power Button
STEP 2
The powering down process takes about 20 seconds.
Wait until all the LEDs are off.
STEP 3
Pull down the battery latch in the direction as shown.
Battery latch
STEP 4
Remove the battery pack gently.
nsure your iSavi™ is off before removing the battery pack.
Note: E
The battery pack can be charged seperately without attached to your iSavi™.
iSavi™ User Guide 1603
NAVIGATING THE WEB CONSOLE
To control iSavi from a web browser, open a web browser after connected the Wi-Fi and enter http://
™
iSavi or http://192.168.1.35 on the address bar.
MENU OVERVIEW
DATA TELEPHONY SMS SETTINGS
Data Profile SIP Settings Compose Account
- Primary Profiles
- Secondary Profiles Inbox Wi-Fi
(only for BGAN SIM) - System Info
Sent - Wireless Setting
Firewall - Security Setting
- Setup Drafts
- Filters Security
- Backup/Restore - SIM PIN
- Terminal PIN
Device Management
Terminal Settings
Data Settings - Reboot Terminal
- VPN Passthrough - Factory Reset
- ALG - Firmware Upgrade
- Antenna Pointing
Configuration
Terminal Info
- Information
- Logs
- Call Log
Language
Support
TERMINAL STATUS
The Home page provides the status information of the terminal, pointing information and allows a data
connection to be established.
Navigate to Home page for terminal status checking. You can check for the service plan (Example:
IsatHub or BGAN) through the area indicated in red box below:
iSavi™ User Guide 17Status Indicates registration and data connection status. Signal Indicates terminal received signal strength. GPS Indicates GPS information. Battery Indicates available capacity of the battery. Temperature Indicates current operating temperature status. Click “Activate Data Connection” or “Deactivate Data Connection” in order to activate or deactivate data connection. Note: Signal strength must be 42dB or above for the iSavi™ terminal to successfully connect or register to the network. Signal strength can be improved by pointing more accurately. If the signal strength level indicated in the web console is low under registered condition, you can slowly adjust the terminal’s elevation and azimuth angles and monitor the signal strength displayed in web console. DATA DATA PROFILE SETTINGS Navigate to Data > Data Profile in order to modify the connection type. Connection profile defines the connection type. You can select from a list of profiles to be the default primary profile and connection type. Click “Edit” to modify the data profile. Note: From a smart phone or tablet, the Control app will always use the connection profile defined as default. iSavi™ User Guide 18
You can create your customized primary profile.

                                         ‘Static IP Address APN

                                                                        Note:
                                                                        Please note that the ‘Static
                                                                        IP Address APN Username’
                                                                        and ‘Static IP Address APN
                                                                        password’ stated are not
                                                                        WebConsole login purpose.

                                                                        These are provided by your
                                                                        Service Provider under a static
                                                                        IP address subscription. Leave
                                                                        it blank if you do not have such
                                                                        subscription.

Profile Name
Change the profile name as desired.

Access Point Name (APN)
By default, the APN from your SIM card is selected.

Follow these steps to change the Access Point Name (APN):
   1. Select User Defined.
   2. Enter the new APN in the field space provided (e.g. STRATOS.BGAN.INMARSAT.COM).
   3. Enter the username and password if required (these details have been supplied by your service
      provider) if required.

Static IP Address APN
By default, a Dynamic IP Address is selected.

To use a Static IP Address:
   1. Select Static IP Address and enter the APN address and password in the space provided.

Limited Connection (available only for iSatHub Control app)
By using this feature, the Administrator can configure and control the data usage of the user using limited
volume options. Usage warning percentage is used to remind the user when their usage exceeds the
specified percentage of the data limit.

Note:
The data connection will be automatically deactivated when the volume used has reached the defined
limit. The usage warning will prompt in the Control app and the Web Console.

iSavi™ User Guide                                      19
BGAN STREAMING BGAN Streaming is an Inmarsat service which provides “guarantee” bandwidth to the users. It is charged by “per minute” connection. For iSavi, this feature is available only with BGAN SIM. Note: Select Connection Type: Standard if port configuration is required. Configure the desired rate and minimum rate under secondary profiles. Streaming without port configuration: 1. Navigate to Data > Data Profile> Primary Profile. 2. Select Connection Type: Streaming. 3. Select Desired Rate and Minimum Rate of the Parameters (32k or 64k). 4. Click Update Settings. 5. Navigate to Home page to activate data connection. Primary profiles is activated now. Streaming with port configuration: 1. Navigate to Data > Data Profile> Primary Profile. 2. Select Connection Type: Standard. 3. Click Update Settings at the bottom for this settings to take effect. 4. Navigate to Data > Data Profile> Secondary Profile. 5. Select Desired Rate and Minimum Rate of the Parameters (32k or 64k). 6. Select ‘+’ sign to add Destination Port ranges and Protocol type. 7. Click Update Profile at the bottom for this settings to take effect. 8. Navigate to Home page to activate data connection. The settings are activated. iSavi™ User Guide 20
FIREWALL PROTECTION SETTINGS
Firewall is a built-in network security feature in the iSavi™ to monitor and control the incoming and outgoing
network traffic by analysing the data packets based on predetermined security rules. It is highly secure and
reliable that uses packet inspections to prevent hacker’s attack.

With Firewall feature, you can:
• Block the unwanted traffic from the Internet network to your terminal.
• Block access from your terminal to Internet network locations.
• Filter the host names.
• Control the internet network access by using the keywords on the web addresses.

You can define up to 10 rules to allow or reject incoming IP packets from the public network. The filtering
rules are based on the protocols, IP addresses (source/destination) and port numbers (source/destination).
Firewall function is disabled by default. Navigate to the firewall setup page to enable it.

Scenario: Allow only internet browsing but block all other traffics on any connected devices

To block all other traffics on any PCs but only allow Internet Browsing, we have to reject all incoming
packets and allow only two ports under both incoming and outgoing rules.

Port 80: Internet Browsing
Port 53: DNS lookup

Navigate to Data > Firewall > Setup, select Edit to modify the Firewall protection profile setup.

                                                                                   Note:
                                                                                   By default, Custom
                                                                                   1 and Custom 2
                                                                                   block everything
                                                                                   from the internet.

Follow these steps to change the profile setting.
   1. Select profile name.
   2. Click Edit to modify the predefined profile settings.
      You can edit the profile name and predefined rules to allow or reject incoming packets.

iSavi™ User Guide                                    21
Incoming Rule
1. Set the default action of Incoming Rule as Reject and click Update.
2. Under Incoming Rule tab, click Add to add new rules.
3. Enter your desired rule name and fill in the necessary information.
Rule Name: Allow internet browsing
Source IP Address: 0.0.0.0-0.0.0.0 (Note: to accept all IP address for range 0.0.0.0-0.0.0.0)
Protocol: TCP
Source Port: 80-80
Action: Allow
4. Select Action: Allow to allow port 80 only.
5. Click Apply to save the new incoming rules.
6. Click Update for this rules to take effects.
7. Click Add on the second row for the second incoming rule.
8. Repeat similar steps again to add new rule for port 53 to allow DNS lookup.
9. Click Apply to the save the new incoming rules.
Note: The firewall settings allow internet browsing only and block all other traffics on all the
connected devices to the range 0.0.0.0-0.0.0.0 in the source IP address. To specify which device
to be accessed to the terminal, check the device IP address under “Source IP Address” for both
the incoming and outgoing rules.
iSavi™ User Guide 22Outgoing Rule
1. Set the default action of Outgoing Rule as Reject and click Update.
2. Under Outgoing Rule tab, click the ‘+’ symbol besides the rule name to edit the existing rules.
or click Add to add new rules.
3. You can create your desired rule name and fill in the necessary information.
Rule Name: Allow internet browsing
Source IP Address: 0.0.0.0-0.0.0.0 (Note: to accept all IP address for range 0.0.0.0-0.0.0.0)
Protocol: TCP
Source Port: 80-80
Action: Allow
4. Click Apply to the save the new incoming rules.
iSavi™ User Guide 235. Click Update for this rules to take effects. 6. Click Add on the second row for the second incoming rule. 7. Repeat similar steps again to add new rule for port 53 to allow DNS lookup. 8. Click Apply to the save the new incoming rules. Note: STMP,IMAP, POP3 are for Email purpose. HTTP is for browsing protocol purpose. You can add new rule to the list. Re-activate your data connection for the new firewall setting to take effect. iSavi™ User Guide 24
Hostname Filtering

To stop the users from accessing certain websites through the internet, you can configure the filtering
settings in your iSavi™.

Navigate to Data > Firewall > Filters to enable the filtering based on the hostname or the keywords.

Follow these steps to apply hostname filtering:
   1. Select Enabled.
   2. Click Update to modify the settings.
   3. Click Add to add new keywords (eg. facebook).
   4. You can modify existing keywords by selecting the Text from the list.
   5. Click Edit to modify or Delete to delete the selected keywords.
Note:
Hostname filters will only take effect when HTTP/HTTPS rules are enabled under Data> Firewall> Setup.
Re-activate your data connection for the new settings to take effect.

Backup/ Restore the Firewall Settings
Firewall settings can be saved and kept as a reference for the future reference.

Navigate to Data > Firewall > Backup to save or restore the firewall settings.
Backup firewall settings:
  1. Click Backup.
  2. The firewall settings will be saved as a document.
     (eg. iSavi_FirewallBackup_20141218170807.bin)

Restore firewall settings:
  1. Browse the file location of previous backup file.
  2. Click Restore.
  3. Navigate to Settings > Terminal Settings > Reboot Terminal for the new settings to take effect.

iSavi™ User Guide                                                  25
ACCESS RIGHTS SETTING ACCORDING TO MAC ADDRESS
Navigate to Data > Device Management to set the allowed MAC address and the access rights.
The MAC address is a number that uniquely identifies any device connected to a network. Once the device
is connected to the terminal, the MAC address will be shown on the page.
From this page, you can also check the number of connected devices, their MAC addresses and the data
usage of the terminal.
You can add a new MAC address by clicking Add or create a nickname for an existing MAC address by
clicking on the Edit button. Data usage of the device is available at the bottom of the page.
Note:
The actual value of the data usage might be slightly different from the readings in Control app and Web Console.
1. Define a nickname for the device.
2. Check if the MAC address belongs to the smart phone or tablet used to host the Control app.
Only one device is allowed to use the Control app at a time.
3. You can define access rights selecting the relevant permission options.
4. The settings are stored temporarily and are not retained after terminal is rebooted.
If you plan to keep the same access rights settings, deselect Temporary entry so that the
access rights are stored even after the terminal is rebooted.
iSavi™ User Guide 26DATA SETTING A Virtual Private Network (VPN), is a network technology that constructs a secure network connection over a public network (usually the internet) or a private network owned by a service provider. It enables remote users to securely connect to a private network. VPN tunnel is the link between the two locations. Note: The VPN Passthrough is disabled by default and users need to navigate to the Data Setting page to enable it. Navigate to Data > Data Settings > VPN Passthrough to change the VPN Passthrough setup. PPTP Passthrough: Point-to-Point Tunneling Protocol (PPTP) allows the Point-to-Point Protocol (PPP) to be tunneled through an IP network. IPSec Passthrough: Internet Protocol security (IPSec) is a suite of protocols for ensuring private, secure communications over Internet Protocol (IP) networks by using the cryptographic security services. To enable VPN Passthrough 1. Click Enabled. 2. Click Update for the new configuration to take effect. Application Layer Gateways (ALGs) manage specific protocols by intercepting traffic as it passes through the security device. After analyzing the traffic, the ALG allocates resources to permit the traffic to pass securely Application Layer Gateway (ALG). It allows customized Network Address Translation (NAT) traversal filters to be attached into your iSavi™ and support address and port translation for certain application layer protocols (control/data). To allow the data transmission across NAT 1. Click Enabled. 2. Click Update for the new configuration to take effect. iSavi™ User Guide 27
TELEPHONY
SIP SETTINGS
Navigate to Telephony > SIP setting > SIP Server to change the RTP Codec.
The RTP codec is an audio encoding. The quality of the voice depends on your smart devices.
You may change the RTP codec for better voice quality.

Note:
SIP calls with the iSavi™ terminal require a special SIP client application on your smart phone or tablet. The IsatHub Voice app is available from
the App Store or Google Play.

SIP calls from a Windows or Macintosh PC are not supported. For best results, please use the Isathub Voice App, other SIP clients may work but
are not recommended and will need configuration.

SMS
COMPOSE NEW SMS
Navigate to SMS > Compose to enter compose page.

1.   Enter the recipient’s phone number in the Phone no. box. Type the message in the text editor box.
2.   Click Send to send the SMS.
3.   To save an unsent SMS, click Save and the unsent SMS will be saved in Drafts.
4.   Check the box ☑       if you wish to store a sent SMS on to the SIM card.
5.   Click Append GPS to include your GPS location in the SMS.
Note:
When sending an SMS with your iSavi™ terminal you should always enter the full international phone number format for your recipient. This is true
even if you are located in the same country as the recipient when sending the message.
Larger SMS content with more than 160 characters are supported as multi-segmented SMS.

iSavi™ User Guide                                                      28
VIEW RECEIVED SMS
Navigate to SMS > Inbox to view Received SMSs.

Reply to an SMS from Inbox:
1. Select the SMS you plan to reply to by selecting the particular SMSs.
2. Click Reply.
   The inbox console is switched to Compose mode.
3. Enter your reply in the text box.
4. Click Send.

Forward an SMS from the Inbox:
1. Select the SMS you plan to forward and click Forward.
   The inbox console is switched to Compose mode.
2. Enter your reply in text box.
3. Click Send.

Delete an SMS from the Inbox:
1. Select the SMS you plan to delete and click Delete.
   A single SMS or multiple SMSs can be deleted based on the selection.
2. Click OK to confirm the deletion, or Cancel to abort.

To Refresh the Inbox list:
1. Click Refresh.

VIEW SENT SMS
Navigate to SMS > Sent to view Sent SMS.

Resend a sent SMS:
1. Select the SMS you plan to resend and click Resend.
   The SMS is sent to the recipient.

Forward a sent SMS:
1. Select the SMS you plan to forward and click Forward.
   The Sent console is switched to the Compose mode.
2. Enter the recipient’s number in the Phone No. field.
3. Click Send.
4. The SMS is sent to the recipient.

Delete a sent SMS:
1. Select the SMS you plan to delete.
2. Click Delete.
3. Click OK to confirm the deletion, or Cancel to abort.

Note:
Sending or receiving SMSs through the Voice app do not leave a copy in the SIM card for privacy reason.
User have to open Control app in parallel for any SMS sending through Voice app.
SMS sending can be done once your iSavi™ terminal is registered to the network. Data connection is not required for voice call and SMSs

iSavi™ User Guide                                                    29
VIEW DRAFT SMS
Stored SMSs are saved inside the draft folder.
Navigate to SMS > Draft to view Draft SMSs.

Send a draft SMS:
1. Select the draft SMS you plan to send.
2. Click Send.
   The SMS is sent to the recipient.

Forward a draft SMS to other recipient:
1. Select the draft SMS you plan to send and click Send.
2. Click Forward.
3. The draft console is switched to the Compose console.
4. Enter the recipient’s number in the Phone No. field.
5. Click Send.
   The SMS is sent to the recipient.

Delete a draft:
1. Select the draft SMS you plan to send.
2. Click Delete.
3. Click OK to confirm the deletion, or Cancel to abort.

SETTINGS
CREATE ACCOUNT FOR WEB CONSOLE ACCESS
Navigate to Settings > Account to create or edit an account for Web Console and Control app access.
By default, the password for admin is 1234. You are recommended to change the admin password for
security reasons.
                                                            ™
Only one User and one Admin account are allowed for iSavi .

Most of the configuration changes are done by admin account.
User account are basically for the user to change APN settings, extract terminal information such as serial
numbers and logs.

Differences of access right for user account (Web Console and Control app Interface):
Web Console- User Account
• Data-> Data Profile for SIM card APN settings
• SMS features
• Terminal info such as Information of terminal, Logs
• Language of the Web Console
• Support team contact
• Device Management are not accessible.

Control App- User Account
• Firewall and Wi-Fi password are not accessible.
• Others tab can be accessed as normal in the Control app.
• Device Management can be done through Control app (access right based on devices).

iSavi™ User Guide                                   30
Navigate to Settings > Account to create or edit an account for Web Console and Control app access. By default, the password for admin is 1234. You are recommended to change the admin password for security reasons. Add a new account: 1. Click Add. 2. Type New Password and Re-type Password. 3. Click Add. The new account is added into the account list. Delete an account: 1. Select the account which you want to delete. 2. Click Delete. Account name is deleted successfully. Change account password: 1. Select the account which you want to change the password (example: admin). 2. Type the old password, the new password, and then re-enter the new password. 3 . Click Update for the new password to take effect. iSavi™ User Guide 31
CHANGE SSID AND WI-FI PASSWORD
Navigate to Settings > Wi-Fi> Wireless Settings to change network mode and network name.
Note:
SSID network name is the Wi-Fi network name that other users will see on their smart phone, tablets or personal computers when they view a list
of available networks.
You can get the default SSID of your iSavi™ from the product label.
After changing the Wi-Fi setting, the Wi-Fi connection will be disconnected.
Please wait for about 30 seconds and establish the Wi-Fi connection again.
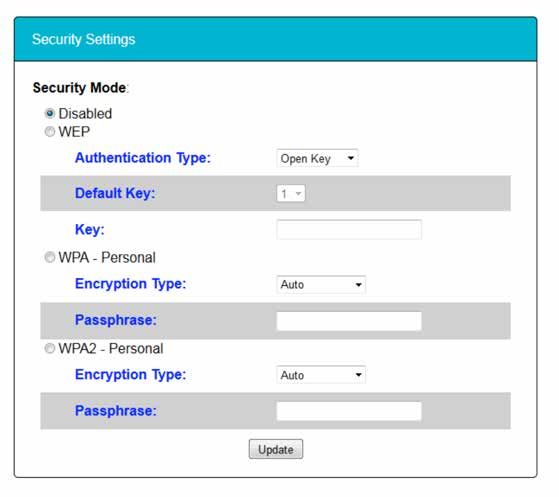
Navigate to Settings > Wi-Fi> Security Settings to set password of your Wi-Fi network.
Security Mode: Disabled or select the security mode for the wireless local area network.
Three different security modes are available:
• Wired Equivalent Privacy (WEP)
For 64-bit encryption - You can enter either 5 ASCII characters or 10 hexadecimal digits
(any combination of 0-9, a-f, A-F, empty string is not permitted).
For 128-bit encryption - You can enter either 13 ASCII characters or 26 hexadecimal digits
(any combination of 0-9, a-f, A-F, empty string is not permitted)
• Wi-Fi Protected Access® Personal (WPA)
You can enter 8-63 characters of keys for the password.
• Wi-Fi Protected Access® 2 Personal (WPA2)
You can enter 8-63 characters of keys for the password.
Note: WPA2 is highly recommended over WEP for a higher level of security.
iSavi™ User Guide 32Note: The default SSID password of iSavi™ is configured under WPA2 mode. To help safeguard your data connection and the associated bill, please change the default SSID password printed on the product label of iSavi™ to your preferred password as soon as possible. After changing the Wi-Fi setting, the Wi-Fi connection will be disconnected. Please wait for about 30 seconds and establish the Wi-Fi connection again. To reset SSID and Wi-Fi password, follow these steps: 1. With the terminal off, remove the SIM card. 2. Press and hold the ‘Power’ button for 5 seconds to turn on iSavi™. 3. Once the ‘Power’ button LED is steady red, press and release the ‘Exit Pointing Mode’ button for 3 times continuously. 4. Press and hold the ‘Exit Pointing Mode’ button for 5 seconds before releasing the button . 5. All the LEDs will flash in red once the reset is triggered. 6. iSavi™ will reboot automatically once the reset is completed. 7. Once the ‘Power’ button LED is steady red, press and hold the ‘Power’ button for 5 seconds to turn off iSavi™. 8. Insert the SIM card. 9. Press and hold the ‘Power’ button for 5 seconds to turn on iSavi™. 10.Re-establish again the Wi-Fi connection about 1 minute after the terminal is power on. iSavi™ User Guide 33
CONFIGURE SECURITY SETTING
SIM PIN

If the security feature is enabled, a prompt requests you to enter the SIM PIN each time you power up
          ™
your iSavi . This helps to prevent unauthorised use of your SIM. Disable this feature to skip the PIN entry
process.

Navigate to Settings > Security> SIM PIN to enable SIM PIN.
1. Select Enabled to set the SIM PIN.
2. Select Disabled if you do not need to set the SIM PIN.
3. Enter the PIN number in the space provided and click Apply.
Note:
The SIM PIN depends on the SIM card. Consult your service provider if necessary.

TERMINAL PIN
                                                         ™
Once Terminal PIN is activated, your iSavi will prompt for the password everytime when you reboot the
terminal. The same password is used for the Factory Reset PIN.

Navigate to Settings > Security> Terminal PIN to enable Terminal PIN.

1. Select Enabled to enable Terminal PIN.
2. Select Disabled if you do not need to enable Terminal to SIM.
3. Enter the PIN number in the space provided and click Update PIN.

     Note:
     With SIM PIN or Terminal PIN enabled, the Power Button of your iSavi™ LED is solid red after powering up process.
     Login to Web Console to enter the PIN number.

iSavi™ User Guide                                                   34
TERMINAL SETTINGS Navigate to Settings > Terminal Settings> Reboot Terminal to reboot the terminal. Navigate to Settings > Terminal Settings > Factory Reset to factory reset the terminal. Enter security code for factory reset (Default:0000). Note: By default, the security code is 0000. Once you change the Terminal PIN, the Factory Reset password is changed to match the Terminal PIN. From firmware R02.0.0 onwards, after factory reset, Web Console will remind you to change a password with higher security requirement. The password should be minimum 6 characters long with a combination of uppercase and lowercase letters, numbers and symbols. iSavi™ User Guide 35
UPGRADE FIRMWARE
                                                                     ™
Firmware upgrade allows you to update your iSavi with the latest operating software.
          ™
Your iSavi has to be in Safe Mode for firmware upgrading.

Navigate to Settings > Terminal Settings> Firmware Upgrade to perform a firmware upgrade.
          ™
Your iSavi will reboot in Safe Mode once you click the Firmware Upgrade button.
Refer to page 34, Web Console in Safe Mode for details.
Note:
It takes about 90 seconds for your terminal to reboot into safe mode. Please establish the Wi-Fi connection again.

CONFIGURE ANTENNA POINTING LED
By default, all the Antenna Pointing LEDs would be switched off when the LED status is ready for service
or Data is activated.
Navigate to Setting > Terminal Settings> Antenna Pointing LED Configuration to change the setting.
You can select Always On (Antenna Pointing LED) and click Update for the new settings to take effect.

iSavi™ User Guide                                                     36
TERMINAL INFORMATION AND LOG FILES Navigate to Setting > Terminal Info> Information in order to check for the detail of the terminal. You may need to supply this information when contacting your service provider. Event Logs and Error Logs Navigate to Setting > Terminal Info> Logs to view the Event Log or Error Log of the terminal. Click Export all Logs in order to export the logs. SELECT LANGUAGE Navigate to Setting > Terminal Info> Language to select the desired language for the Web Console. The default language is English. English, Chinese Simplified, Chinese Traditional, Japanese, Portuguese, Russian, Spanish, French, German and Arabic are available for your selection. TECHNICAL SUPPORT Navigate to Settings > Support to get the contact information of your service provider’s support team. iSavi™ User Guide 37
04
WEB CONSOLE IN SAFE MODE
Safe Mode is a simple version of the normal Web Console with some basic settings.
If you could not access the Web Console in normal way, you can try to access the Web Console in the
Safe Mode.

ENABLE SAFE MODE
There are two methods of enabing Safe Mode.
Method 1: Enter Safe Mode by Web Console (Normal Mode)
                                                                                                 ™
1. With the terminal on, connect your smart devices or personal computer to the Wi-Fi of iSavi .
2. Login to Web Console by typing http://iSavi or http://192.168.1.35 into the address bar of any web
   browser.
3. Navigate to Settings > Terminal Settings> Firmware Upgrade to perform firmware upgrade.
        ™
   iSavi will be rebooted in the safe mode once you click the Firmware Upgrade button.
4. If Safe Mode is enabled successfully, all of the four Antenna Pointing LEDs are amber, refer to
   page 56, Appendix A: Antenna Pointing LED Status Table.
                                                  ™
5. Connect the computer to the Wi-Fi of your iSavi .
6. Login to the Web Console in safe mode by typing http://iSavi or http://192.168.1.35 into the address bar
   of any web browser.

Method 2: Enter Safe Mode by using physical buttons.
1. With the terminal off, press and hold ‘Exit Pointing Mode’ button.
2. Press the ‘Power’ button for 5 seconds.
3. Release both ‘Exit Pointing Mode’ button and ‘Power’ button.
4. If Safe Mode is enabled successfully, all the four Antenna Pointing LEDs will turn to Amber
   colour, refer to page 56 , Appendix A: Antenna Pointing LED Status Table.
                                                     ™
5. Connect the computer to the Wi-Fi of your iSavi .
6. Log in to the Web Console by typing http://iSavi or http://192.168.1.35 into the address bar of any
   web browser.

Note:
The username and password of the Web Console are the same for Normal Mode and Safe Mode.

MENU OVERVIEW

 SETTINGS

 Factory reset

 Terminal Info

 Logs

 Calibration

iSavi™ User Guide                                   38
UPGRADE FIRMWARE
The Home page of Safe Mode is for the firmware upgrade purpose.
Navigate to Home page in order to perform a firmware upgrade.
™
Plug in the power adapter to iSavi before the firmware upgrades .
1. Browse to the file location of the new firmware, select and click Upload.
2. Firmware upgrade will take less than 10 minutes to complete.
You will be prompted with the Result: Firmware Upgrade Completed message.
3. Click Reboot Terminal for the new firmware to take effect.
Note:
Ensure the battery level is at least 75% before performing the firmware upgrade or have the terminal
on charge.
iSavi™ User Guide 39FACTORY RESET OF SAFE MODE To reset the terminal, navigate to Settings >Factory Reset. 1. Click Factory Reset. 2. Enter security code for factory reset (Default: 0000). iSavi™ will be rebooted within 90 seconds. 3. Re-establish the Wi-Fi connection again. Note: By default, the security code is 0000. Once you change Terminal PIN, the Factory Reset password is depends on the Terminal PIN. All the system configuration settings are set to default value after factory reset is completed. You are recommended to backup the firewall settings before triggering the factory reset. TERMINAL INFORMATION AND LOG FILES Navigate to Setting > Terminal Info in order to check for the details of the terminal’s operation. You may need to supply this information when contacting your service provider. Event Logs and Error Logs Navigate to Setting > Logs to view the Event Log or Error Log of the terminal. Click Export All Logs in order to export the logs. iSavi™ User Guide 40
You can also read