NETWORK SECURITY SCANNER USER GUIDE - POWERED BY RETINA - BEYONDTRUST
←
→
Page content transcription
If your browser does not render page correctly, please read the page content below
Network Security Scanner
                                                  User Guide
                                                                            Powered By Retina

©2003-2019 BeyondTrust Corporation. All Rights Reserved. BEYONDTRUST, its logo, and JUMP are trademarks of BeyondTrust Corporation. Other trademarks are the property of their respective owners.   TC:3/28/2019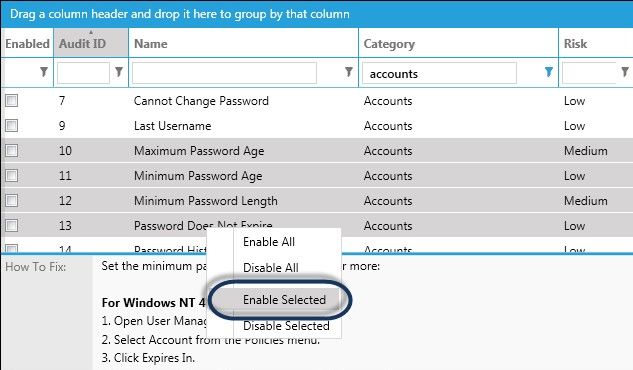
NETWORK SECURITY SCANNER
                                                                                                                                                                                                    USER GUIDE

                                Table of Contents

                                      BeyondTrust Network Security Scanner Overview                                                                                               5
                                         Architectural Overview                                                                                                                   5
                                         Scan Process                                                                                                                             6

                                      Get Started                                                                                                                                 7
                                         Quick Scan                                                                                                                               7
                                      Manage Credentials                                                                                                                          9
                                         Create a Stored Credential                                                                                                               9
                                         Create an SSH Credential                                                                                                               10
                                         Create Oracle Credentials                                                                                                              11
                                         Create SNMP Credentials                                                                                                                11
                                         Create a Credential Group                                                                                                              11
                                      Configure Address Groups in the Network Security Scanner                                                                                  13
                                         Create Address Groups                                                                                                                  13
                                         Modify Address Groups                                                                                                                  14
                                         Delete Address Groups                                                                                                                  15
                                         Import Addresses                                                                                                                       15
                                         Use the Always Address Group                                                                                                           15
                                      Manage Ports in the BeyondTrust Network Security Scanner                                                                                  17
                                      Run Discovery Scans with BeyondTrust Network Security Scanner                                                                             19

                                         Configure a Discovery Scan                                                                                                             19
                                         Run a Discovery Scan                                                                                                                   19
                                         Schedule a Discovery Scan                                                                                                              20
                                         Add Audits to Address Groups                                                                                                           20
                                         Clear Discovery Scan Data                                                                                                              21
                                      Run Audit Scans                                                                                                                           22
                                         Configure Audit Scans                                                                                                                  22
                                         Run Scans                                                                                                                              27
                                         Export Scan Results to CyberScope                                                                                                      29
                                         Delete Scan Jobs                                                                                                                       29
                                         Abort Large Scans                                                                                                                      30
                                      Remediate Vulnerabilities Using BeyondTrust Network Security Scanner                                                                      31

SALES: www.beyondtrust.com/contact               SUPPORT: www.beyondtrust.com/support                 DOCUMENTATION: www.beyondtrust.com/docs                                                                     2
©2003-2019 BeyondTrust Corporation. All Rights Reserved. BEYONDTRUST, its logo, and JUMP are trademarks of BeyondTrust Corporation. Other trademarks are the property of their respective owners.      TC: 3/28/2019
NETWORK SECURITY SCANNER
USER GUIDE
Generate Remediation Reports 31
Review Remediation Reports 32
Use CVSS Scores 33
Generate Reports in the BeyondTrust Network Security Scanner 34
Run Executive Reports 34
Run Summary Reports 35
Run Vulnerability Export Reports 35
Run Access Reports 36
Run PCI Compliance Reports 36
Run a Dashboard Report 38
Run an Alert Report 38
Run a Consolidated Remediation Report 38
Run a Docker Instaces Report 39
View Report Results 39
Customize Reports 42
Customize Audits 43
Search the Audit Database 43
Change Risk Levels 44
Modify Customizable Settings 44
Reset Audits to Default Values 44
Run Audit Customization Reports 45
View Modified Audits 45
Create Custom Audits 45
Create Custom Audit Modules 48
Run Web Application Scans 50
Run Database Application Scans 52
Run a Docker Instances Scan 53
Configure the Scan 53
View Scan Results 53
Run a Docker Instance Report 54
View Report Results 54
SCAP Scanning in BeyondTrust Network Security Scanner 57
Copy SCAP Content (Optional) 57
SALES: www.beyondtrust.com/contact SUPPORT: www.beyondtrust.com/support DOCUMENTATION: www.beyondtrust.com/docs 3
©2003-2019 BeyondTrust Corporation. All Rights Reserved. BEYONDTRUST, its logo, and JUMP are trademarks of BeyondTrust Corporation. Other trademarks are the property of their respective owners. TC: 3/28/2019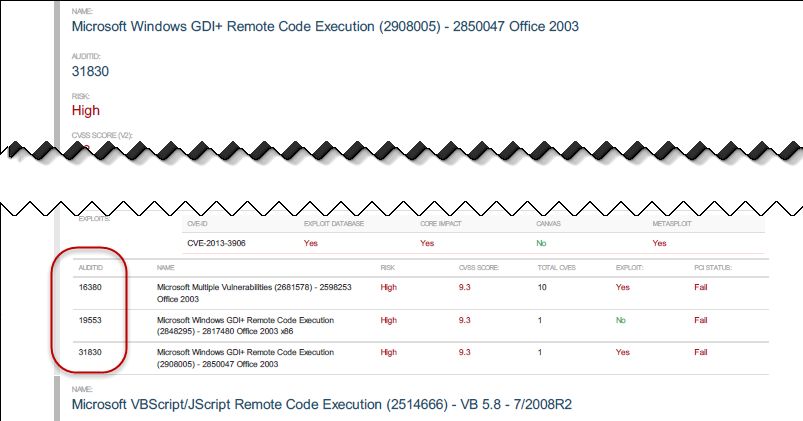
NETWORK SECURITY SCANNER
                                                                                                                                                                                                    USER GUIDE

                                         Run SCAP Scans                                                                                                                         57
                                         View SCAP Scan Results                                                                                                                 59
                                         Convert SCAP Output to ARF Format                                                                                                      59
                                      Set Scanner Options                                                                                                                       60
                                         Generate Log Files                                                                                                                     60
                                         Automatically Check for Updates                                                                                                        60

                                         Enable Event Routing                                                                                                                   60
                                         Scan Multiple Targets Simultaneously                                                                                                   61
                                         Set Timeout Values                                                                                                                     62
                                         Set Scan Restrictions                                                                                                                  62
                                         Enable Central Policy                                                                                                                  62
                                      Configure Email Notifications for Events                                                                                                  64
                                      Update TCP OS Fingerprints                                                                                                                65
                                      Exploit Vulnerabilities                                                                                                                   66
                                      Use the Command Line                                                                                                                      68
                                         Retina.Report.Console.exe CLI                                                                                                          68
                                         Network Security Scanner PowerShell Module CLI                                                                                         69
                                         RetRPC_client.exe CLI                                                                                                                  69
                                      Database and XML Schema                                                                                                                   72
                                      Troubleshoot the BeyondTrust Network Security Scanner                                                                                     82

SALES: www.beyondtrust.com/contact               SUPPORT: www.beyondtrust.com/support                 DOCUMENTATION: www.beyondtrust.com/docs                                                                     4
©2003-2019 BeyondTrust Corporation. All Rights Reserved. BEYONDTRUST, its logo, and JUMP are trademarks of BeyondTrust Corporation. Other trademarks are the property of their respective owners.      TC: 3/28/2019
NETWORK SECURITY SCANNER
                                                                                                                                                                                                    USER GUIDE

      BeyondTrust Network Security Scanner Overview
      This guide shows system administrators and security administrators how to configure and use the BeyondTrust Network Security
      Scanner. This guide provides an overview of how the scanner works and instructions for its configuration and use.
      The Network Security Scanner provides vulnerability testing for multiple platforms, assessment of vulnerabilities, and the ability to
      create your own audits. In addition, it allows you to proactively secure your networks against the most critical vulnerabilities by
      incorporating the most up-to-date vulnerability databases. Since vulnerability audits are added continually, this database is updated
      at the beginning of each session.
      Using the Network Security Scanner, you can:

             l   Scan in parallel using the scanner queuing system to perform 30 unique audits of one machine.
             l   Perform the majority of scans without administrative rights. This allows you to quickly and easily secure your globally
                 distributed networks.
             l   Create custom audit scans to enforce your internal security policies, such as deployments and machine configurations.

      The scanner uses Access or any ODBC data store for storage and a management and aggregation server to control remote
      scanners. In addition, multi-user authentication, summary and executive reporting capabilities, and a comprehensive tracking system
      are available.

      Architectural Overview
      The scanner's primary components are:

             l   Retina Engine Windows Service: retinaengine.exe provides the scanner and is comprised of:
                        o   Scanner: Performs the discovery and auditing. It reads and writes data to the Queue Manager and writes data to the
                            Named Pipe. Externally it reads from and writes to the RTD (Scan Results Database) files and writes the Scanner
                            log.
                        o   Queue Manager: Controls the scanning order. It communicates through queue files with the Scanner and reads data
                            from and writes data to the RPC Interface. In addition, it retrieves jobs from the Scheduler.
                        o   Scheduler: Tracks and queues scheduled jobs. It reads data from and writes data to the RPC Interface, writes data to
                            the Named Pipe, and calls the Product Updater directly at scheduled times.
                        o   Remote Procedure Call (RPC) Interface: Provides the main control and communication from the service to the other
                            executables and data stores. It is the main control and communication interface from the service to other executables,
                            and data stores. The RPC Interface receives data and control information internally from the Queue Manager and
                            Scheduler and externally from the RPC Client. In addition, it writes and forwards data instructions to the Queue
                            Manager, Scheduler, and Named Pipe.
                        o   Named Pipe: Provides the primary data interface for external functions. It receives response data from the engine and
                            forwards data to the RTD, RPC Client and User Interface or command line.
             l   User Interface: The retina.exe provides the local access to the functions of the engine. The UI manages Discovery and Audit
                 scans, as well as scheduling and options by communicating with the engine using the RPC Client. It reads data from and
                 writes data to the RTD and writes to the UI and Message logs.
             l   RPC Client: Receives and forwards data from the UI or other applications to the RPC Interface. In addition, the RetRPC_
                 Client.exe is the return conduit for data to the UI.
             l   Application Bus: Provides the data channel for information and control sequences to and from the engine. It reads and
                 forwards data from the RTD to the Events Client.

SALES: www.beyondtrust.com/contact               SUPPORT: www.beyondtrust.com/support                 DOCUMENTATION: www.beyondtrust.com/docs                                                                    5
©2003-2019 BeyondTrust Corporation. All Rights Reserved. BEYONDTRUST, its logo, and JUMP are trademarks of BeyondTrust Corporation. Other trademarks are the property of their respective owners.     TC: 3/28/2019
NETWORK SECURITY SCANNER
                                                                                                                                                                                                    USER GUIDE

             l   Events Client: Forwards data to the Events Server, if the scanner is integrated with the centralized console.
             l   Product Updater: Communicates with the BeyondTrust servers to ensure the application and audit data files are current.

      Scan Process
      During the scanning process, you enter the job information using the User Interface (UI). The interface writes the job information to a
      job file and a scan request. The scan request is passed to the scanner or Engine Service.

                   Note: The following details on how a scan works is provided for information only. Do not change the database tables.

      The scanner receives the job file and begins the audit process. An audit scan consists of:

             l   Targeting: Builds a scan list from the address group and Discovery options. The scanner ascertains if the target is a device as
                 well as the applications or services on the device.
             l   Port Scanning: Determines the open, closed or filtered ports on each device.
             l   Detecting Operating System: Performs registry checks, NetBIOS, ICMP fingerprinting or TCP fingerprinting to determine the
                 target's operating system.
             l   Auditing: Runs an audit of each port with the specified protocols. This is to access the vulnerabilities associated with the
                 service on that port.

      Initially, the scanner retrieves the list of IP addresses to be scanned and builds and writes its target list to the eeye_ groups table. The
      job list contains the job start and stop information. The scanner then starts running the scan.
      As targets are scanned, the host completed entries are removed from the queue file. If the host is powered down for any reason, this
      ensures that a scan will complete.
      At the end of the scan, the scanner writes Completed to the eeye_groups table in the scan results database (RTD). If the user aborts
      the job, the scanner writes Aborted to that table.

SALES: www.beyondtrust.com/contact               SUPPORT: www.beyondtrust.com/support                 DOCUMENTATION: www.beyondtrust.com/docs                                                                    6
©2003-2019 BeyondTrust Corporation. All Rights Reserved. BEYONDTRUST, its logo, and JUMP are trademarks of BeyondTrust Corporation. Other trademarks are the property of their respective owners.     TC: 3/28/2019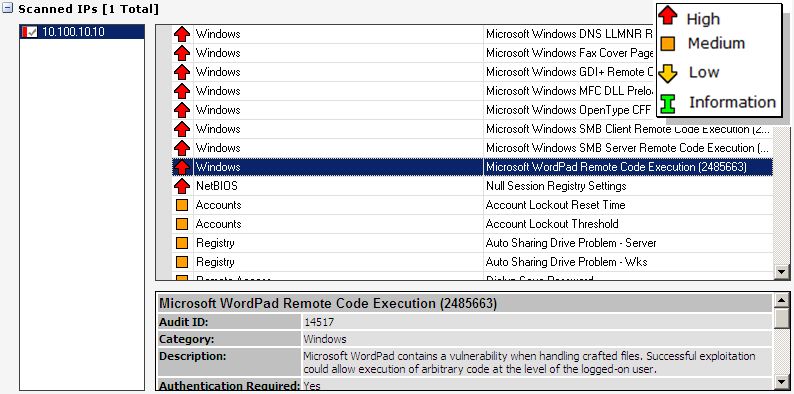
NETWORK SECURITY SCANNER
                                                                                                                                                                                                    USER GUIDE

      Get Started
      You can perform a quick scan by accepting the defaults. This allows the scanner to locate responsive nodes, then launch pre-defined
      scans against the targets. The result is a list of vulnerabilities and remediation which can be viewed online or exported and saved.

                   Note: You must have administrator rights to run scans on target assets.

      Quick Scan
      Using the templates, you can quickly scan based on an individual IP address or sequential range of IP addresses. You can then
      generate a remediation report on the Remediate pane and generate and view the data online or offline using the Reports pane.
      You can create a scan template, then use that template later rather than recreating the settings each time you want to run a scan. Go
      through the Scan Job Wizard on the Tools menu to create a template.

                   For more information on the options available, please see "Run Audit Scans" on page 22.

            1. On the scanner's home page, verify the Quick Scan toolbar is
               displayed. If not, select View > Quick Scan.
            2. Enter an IP address or sequential range of IP addresses in the
               Address box.

            3. Select a template from the Scan Template list:
                        l   Complete Scan: Scans the IP address for every vulnerability audit in the Vulnerabilities database.
                        l   FBI-SANS Top 20: Scans for the SANS list of vulnerabilities that require immediate remediation.
            4. Click Start. The progress displays in the Scan Jobs area of the
               Audit tab. A summary of the vulnerabilities based on the scanned
               IPs is displayed in the Scanned IPs section.

                   Note: Results are only displayed when assets are detected during the scan.

SALES: www.beyondtrust.com/contact               SUPPORT: www.beyondtrust.com/support                 DOCUMENTATION: www.beyondtrust.com/docs                                                                    7
©2003-2019 BeyondTrust Corporation. All Rights Reserved. BEYONDTRUST, its logo, and JUMP are trademarks of BeyondTrust Corporation. Other trademarks are the property of their respective owners.     TC: 3/28/2019
NETWORK SECURITY SCANNER
USER GUIDE
General Provides information on address, report date, ping response, time to live, trace route, and last logged on user.
Hardware Lists disk drive, memory, network card, processor, video, and manufacturer information.
Lists the severity from critical to information and categorized as registry, Windows, IP services, web servers,
Audits
remote access, anti-virus and miscellaneous.
Lists the machine by domain name, credentials, operating system, remote date, remote MAC, NetBIOS info,
Machine remote time, role, event auditing, number of open, closed, and filtered TCP and UDP ports. For a virtual
machine, lists the virtual machine vendor, name, current snapshot, and UUID.
Ports Describes the TCP and UDP ports.
Lists all the processes running on the target system and can include the following details: product name, file
Processes version, file description, file location, command line, memory usage, process ID, parent process, parent process
ID, DLLs loaded, mutex, MD5/SHA1 hash, company name, verified signer, and user name.
Lists the network services for the IP address. Common network services include: authentication servers,
Services
directory services, email and printing.
Shares Lists all locations on a network that allow multiple users to have a centralized space.
Software Lists all software installed on the target system.
Users Lists all the users found on the target system.
User Groups Lists all the groups found on the target system.
5. To view the results in a report, select the Report tab.
6. Select the job name, then click Generate. The report is displayed. You can also view the report in Microsoft Word and a web
browser.
SALES: www.beyondtrust.com/contact SUPPORT: www.beyondtrust.com/support DOCUMENTATION: www.beyondtrust.com/docs 8
©2003-2019 BeyondTrust Corporation. All Rights Reserved. BEYONDTRUST, its logo, and JUMP are trademarks of BeyondTrust Corporation. Other trademarks are the property of their respective owners. TC: 3/28/2019NETWORK SECURITY SCANNER
USER GUIDE
Manage Credentials
When you run a scan, you can select a stored credential. Using credentials with administrative rights for a scan provides more
complete scan results.
In the Network Security Scanner, you can perform the following:
l Create a stored credential
l Create a credential group
l Add credentials to the group
Create a Stored Credential
You can create a stored credential and select the credential when running the scan. You can also add the credential to a credential
group.
You can create the following credential types:
l SSH
l Windows
l MySQL
l Microsoft SQL Server
l Oracle
l SNMP
A credential type is only used against scan targets that match the credential criteria.
Use the following procedure to create any type of stored credential, including Windows, MySQL, or SQL Server credentials.
1. Select Tools > Credential Management.
2. Select a credential type from the list.
3. On the Credentials Management dialog, enter the user account
information: Username, Password, Description. The Default
Credential box is available only for type Any.
4. If you are creating Microsoft SQL Server credentials, select the
authentication type.
5. Click Add. Continue to add credentials as needed.
SALES: www.beyondtrust.com/contact SUPPORT: www.beyondtrust.com/support DOCUMENTATION: www.beyondtrust.com/docs 9
©2003-2019 BeyondTrust Corporation. All Rights Reserved. BEYONDTRUST, its logo, and JUMP are trademarks of BeyondTrust Corporation. Other trademarks are the property of their respective owners. TC: 3/28/2019NETWORK SECURITY SCANNER
USER GUIDE
6. After you add stored credentials, you can select a credential
when configuring a scan.
7. Click Close.
8. Default credentials are always used in a scan and are not displayed in the list.
Create an SSH Credential
You can create Public Key Encryption credentials to connect to SSH-configured targets. You can select a credential that contains a
public/private key pair used for SSH connections.
Note: DSA and RSA key formats are supported.
Optionally, when configuring SSH, you can use sudo. Using sudo, you can access scan targets that are not configured to allow root
accounts to log on remotely. You can log on as a normal user and sudo to a more privileged account. Additionally, you can use sudo
to elevate the same account to get more permissions.
If you are using BeyondInsight for UNIX/Linux, you can elevate privileges using pbrun.
1. Select Tools > Credential Management.
2. From the Type list, select SSH.
3. Provide a description and user name.
4. Select an authentication type from the list: Plain Text or Public Key.
l Password: Enter a password.
l Public Key: Enter the private key filename and passphrase. Click Browse to navigate to the file. A public key is
generated based on the contents of the private key.
5. To elevate credentials, select one of the following:
Note: Using elevated credentials is optional.
l Sudo: The optional sudo user name should be blank in most cases. When blank, commands run with the effective
privileges of the root account. If an optional user name is entered, sudo runs in the security context of that user.
l pbrun: Enter the pbrun username.
l Enable: Enter the credentials for Cisco devices. If you are auditing Cisco devices, you can elevate the credentials to
privileged for more thorough scans.
6. Click Add.
SALES: www.beyondtrust.com/contact SUPPORT: www.beyondtrust.com/support DOCUMENTATION: www.beyondtrust.com/docs 10
©2003-2019 BeyondTrust Corporation. All Rights Reserved. BEYONDTRUST, its logo, and JUMP are trademarks of BeyondTrust Corporation. Other trademarks are the property of their respective owners. TC: 3/28/2019NETWORK SECURITY SCANNER
USER GUIDE
Create Oracle Credentials
When scanning Oracle databases, you can create Oracle credentials. The tsanames.ora file is updated automatically after you
create an Oracle credential.
1. Select Tools > Credential Management.
2. From the Type list, select Oracle.
3. Provide a username, description, and password.
4. Select an access level from the list: Standard, SYSDBA, or SYSOPER.
5. Select additional connection options:
l Connect To: Select from: Database SID, Named Service.
l Protocol: Select a protocol: TCP, TCPS, NMP.
l Host: Enter the hostname where the Oracle database resides. You can scan more than one Oracle target using the
one credential. Add entries using IPv4 addresses, IP address ranges, CIDR notation, and named hosts.
l Database SID: Enter the database SID.
l Port Number: Enter a port number. The default Oracle port number is 1521.
6. Review your settings.
7. Click Save.
Create SNMP Credentials
When scanning devices that are managed using an SNMP community, you can add your community strings here.
1. Select Tools > Credential Management.
2. From the Type list, select SNMP.
3. Enter a description and the community string.
4. Click Add.
Create a Credential Group
Before you can create a Credential Group, you must first create stored credentials.
Note: Credential Groups cannot be used for XCCDF scans.
1. Select Tools > Credential Groups.
2. Click New.
3. Enter a group name and click OK. If there is more than one group name in the list, ensure the correct group is selected.
SALES: www.beyondtrust.com/contact SUPPORT: www.beyondtrust.com/support DOCUMENTATION: www.beyondtrust.com/docs 11
©2003-2019 BeyondTrust Corporation. All Rights Reserved. BEYONDTRUST, its logo, and JUMP are trademarks of BeyondTrust Corporation. Other trademarks are the property of their respective owners. TC: 3/28/2019NETWORK SECURITY SCANNER
USER GUIDE
4. Select the information you want to add for stored credentials to
the group.
5. Click Close. After you add a Credential Group, you can select the
group when configuring a scan.
SALES: www.beyondtrust.com/contact SUPPORT: www.beyondtrust.com/support DOCUMENTATION: www.beyondtrust.com/docs 12
©2003-2019 BeyondTrust Corporation. All Rights Reserved. BEYONDTRUST, its logo, and JUMP are trademarks of BeyondTrust Corporation. Other trademarks are the property of their respective owners. TC: 3/28/2019NETWORK SECURITY SCANNER
USER GUIDE
Configure Address Groups in the Network Security Scanner
To ensure repeatable scans, you can optionally use Address Groups to store a list of targets by IP address, IP range, CIDR notation,
or named host. Address Groups can be created, modified, and deleted in the Address Group Modification dialog.
To access the Address Group Modification dialog, select Tools > Address Groups from the main toolbar.
Target Formats
You can enter targets using the following target type available:
l IPv4 Address: A single IPv4 address (192.168.1.1).
l IPv6 Address: A single IPv6 address (fd30:0000:0000:0001:ff4e:003e:0009:000e).
l IPv4 Range: A range of IPv4 addresses (192.168.1.1-192.168.1.100).
l IPv6 Range: A range of IPv6 addresses (fd30:0000:0000:0001:ff4e:003e:0009:000e-
fd30:0000:0000:0001:ff4e:003e:0009:1000).
l IPv4 CIDR Notation: An IPv4 CIDR block (192.168.1.1/24). The maximum CIDR block size for discovery scans is /8.
l IPv6 CIDR Notation: An IPv6 CIDR block (fd30:0000:0000:0001:ff4e:003e:0009:000e/120). The maximum CIDR
block size for discovery scans is /104.
l Named Host: A DNS or NetBIOS hos name (MyServer).
Separate entries using a comma like 192.168.1.1, 192.168.1.5, 192.168.1.20-25, 192.168.2.1/24.
To omit an entry, prefix using an exclamation point. For example, to scan 192.168.1.1 to 192.168.1.100 while excluding 192.168.1.50,
enter 192.168.1.1-192.168.1.100, !192.168.1.50.
Feedback is provided as targets are entered, including the total number
of IP addresses requested and notification of invalid entries. In the
example, note the invalid 192.168.1.400 entry.
Create Address Groups
Create an Address Group when you want to logically store a list of targets for later use. For example, you might create an Address
Group called DMZ Servers or one called Office Subnet and include the appropriate targets in each.
1. On the Address Group Modification dialog, click New.
2. Enter the name for the Address Group, then click OK. The Address Group Modification dialog displays the new Address
Group.
SALES: www.beyondtrust.com/contact SUPPORT: www.beyondtrust.com/support DOCUMENTATION: www.beyondtrust.com/docs 13
©2003-2019 BeyondTrust Corporation. All Rights Reserved. BEYONDTRUST, its logo, and JUMP are trademarks of BeyondTrust Corporation. Other trademarks are the property of their respective owners. TC: 3/28/2019NETWORK SECURITY SCANNER
USER GUIDE
3. Click Add. The target types are added to the Address Group.
4. To save the Address Group, click Close.
Modify Address Groups
Modify new or existing Address Groups to add or remove targets.
1. On the Address Group Modification dialog, select the Address Group you want to modify from the Address Group list.
2. In the box, enter an IP address, IP range, CIDR notation, or named host. Multiple entries can be separated by a comma.
For more information, please see "Target Formats" on page 13.
3. Optionally, if you want to prevent these targets from being scanned, select the Omit this entry box. The scanner skips these
addresses. Target omissions take precedence over target inclusions.
4. Click Add. The targets are added to the Address Group.
Remove a Target
To remove a target entry from an Address Group, follow the steps below:
1. On the Address Group Modification window, select the Address Group you want to modify from the Address Group list.
2. Select the target entry you want to remove, and click Delete.
Add a Credential
To optionally include a credential with an Address Group, follow the steps below:
1. On the Address Group Modification dialog, select the Address Group you want to modify from the Address Group list.
SALES: www.beyondtrust.com/contact SUPPORT: www.beyondtrust.com/support DOCUMENTATION: www.beyondtrust.com/docs 14
©2003-2019 BeyondTrust Corporation. All Rights Reserved. BEYONDTRUST, its logo, and JUMP are trademarks of BeyondTrust Corporation. Other trademarks are the property of their respective owners. TC: 3/28/2019NETWORK SECURITY SCANNER
USER GUIDE
2. Select a stored credential from the dialog.
Delete Address Groups
Delete Address Groups that are no longer needed.
1. On the Address Group Modification dialog, select the address group you wish to delete from the Address Group list.
2. Click the Delete button located to the right of the Address Group list.
3. You are prompted to confirm that you want to delete the Address Group. Click OK. The Address Group Modification dialog
refreshes and removes the Address Group.
Import Addresses
Import lists of IP addresses from a text file to quickly populate an Address Group.
The text file can have either a single target per line or a comma-delimited list of targets per line.
For more information and a list of supported entries, please see "Run Database Application Scans" on page 52.
1. On the Address Group Modification dialog, select the Address Group from the Address Group list.
2. Click Import.
3. Select a text file that contains a list of targets.
4. Click Open. The file will be parsed and any errors displayed. Valid targets will be added to your Address Group.
Use the Always Address Group
You can create an Address Group and name it Always. The Network Security Scanneris designed to recognize this Address Group
name and includes the group in every scan regardless if the group is selected in the scan job.
You can populate the Always Address Group with IP addresses that you want to scan and those that you want to ignore. The Always
Address Group is recommended for IP addresses that you never want to include in a scan
SALES: www.beyondtrust.com/contact SUPPORT: www.beyondtrust.com/support DOCUMENTATION: www.beyondtrust.com/docs 15
©2003-2019 BeyondTrust Corporation. All Rights Reserved. BEYONDTRUST, its logo, and JUMP are trademarks of BeyondTrust Corporation. Other trademarks are the property of their respective owners. TC: 3/28/2019NETWORK SECURITY SCANNER
USER GUIDE
Note: When creating the Address Group, select the Omit box to ignore IP addresses.
SALES: www.beyondtrust.com/contact SUPPORT: www.beyondtrust.com/support DOCUMENTATION: www.beyondtrust.com/docs 16
©2003-2019 BeyondTrust Corporation. All Rights Reserved. BEYONDTRUST, its logo, and JUMP are trademarks of BeyondTrust Corporation. Other trademarks are the property of their respective owners. TC: 3/28/2019NETWORK SECURITY SCANNER
USER GUIDE
Manage Ports in the BeyondTrust Network Security Scanner
While there are pre-configured port groups available for scanning, you can create port groups that are specific to your scanning
requirements. You can create and change port and port group details.
Create a Port Group
1. From the Tools menu, select Port Groups.
2. Click New.
3. Enter a name for the group.
4. Select Single Port or Port Range and set the port numbers.
5. Select from the following options:
l Protocol: Select the port protocol: Both, TCP, or UDP.
l Omit this entry: Excludes ports from a scan. Even if an excluded port is included during a dependency check, the
ports are excluded. The check box is selected by default.
l Perform Protocol Detection: Excludes the port from protocol detection and scanning.
l Perform Audits: When selected, run the audit on the port if the port is found during the port scan. The check box is
selected by default.
6. Click Add.
7. Click Close.The Port Group is added to the list of Port Groups that
can be selected for scanning.
SALES: www.beyondtrust.com/contact SUPPORT: www.beyondtrust.com/support DOCUMENTATION: www.beyondtrust.com/docs 17
©2003-2019 BeyondTrust Corporation. All Rights Reserved. BEYONDTRUST, its logo, and JUMP are trademarks of BeyondTrust Corporation. Other trademarks are the property of their respective owners. TC: 3/28/2019NETWORK SECURITY SCANNER
USER GUIDE
Review Port Number
To review a list of port numbers and associated processes, select Tools
> Port Descriptions. You can add a port, change a port description, or
delete ports to conform to your network.
SALES: www.beyondtrust.com/contact SUPPORT: www.beyondtrust.com/support DOCUMENTATION: www.beyondtrust.com/docs 18
©2003-2019 BeyondTrust Corporation. All Rights Reserved. BEYONDTRUST, its logo, and JUMP are trademarks of BeyondTrust Corporation. Other trademarks are the property of their respective owners. TC: 3/28/2019NETWORK SECURITY SCANNER
USER GUIDE
Run Discovery Scans with BeyondTrust Network Security
Scanner
The Discovery scan allows you to locate network devices, such as workstations, routers, laptops and printers, and determine if a
single or multiple IP addresses are active. In addition, the scan results can provide data on an outside source attempting to exploit
your network.
You can periodically repeat the discovery scans to verify the status of devices and programs and the delta between the current and
previous scan.
Note: Administrator rights are required to run scans.
On the NSS home page, select the Discover tab.
Configure a Discovery Scan
1. On the Discover pane, select the target type in the Target Type list box.
2. Click Options, then select the type of information to scan:
l ICMP Discovery: Determines the Internet Control Message Protocol.
l TCP Discovery on Ports: Determines the Transmission Control Protocol message packets. You can enter multiple
ports by using comma separators. The default port list includes: 21, 22, 23, 25, 80, 110, 139, 443, 445, 554, 1433,
3389
l UDP Discovery: Determines the User Datagram Protocol.
l Perform OS Detection: Determines the operating system of the target.
l Get Reverse DNS: Scans for reverse Domain Name System (rDNS) and retrieves the domain name for the target's IP
address.
l Get NetBIOS Name: Scans for a Network Basic Input/Output System.
l Get MAC Address: Scans for the Media Access Control address or unique hardware number.
Run a Discovery Scan
1. On the Discover pane, click Discover. The status bar displays the scan progress.
2. To change the sort order, drag a column header to the top of the
results.
3. To interrupt the scan and display the current results, click Pause. The results display in the Results area.
4. To generate a report, select Report or Export from the list, then click Generate. Select Export to generate XML format; select
Report to generate HTML format.
SALES: www.beyondtrust.com/contact SUPPORT: www.beyondtrust.com/support DOCUMENTATION: www.beyondtrust.com/docs 19
©2003-2019 BeyondTrust Corporation. All Rights Reserved. BEYONDTRUST, its logo, and JUMP are trademarks of BeyondTrust Corporation. Other trademarks are the property of their respective owners. TC: 3/28/2019NETWORK SECURITY SCANNER
USER GUIDE
5. To stop the scan, click Abort.
6. To clear the results, click Clear Discovered Items.
Schedule a Discovery Scan
You can schedule Discovery scans. The scans are scheduled by Frequency, Time and Run Date.
1. Click the Discover tab, and click Schedule. The Scan Job Scheduler window displays.
2. Enter a name. For Discover scan jobs, the default job name is Discovery Scan. This cannot be changed.
3. Select the start time and date.
4. Select the frequency:
l Once: Schedules jobs to run one time. From the Start list, select the time and date.
l Daily: Schedules jobs for weekdays only, every x number of days or by the start date. From the Start list, select the
time and date, then select Every Day, Weekdays or Every x days and specify the number of days.
l Weekly: Schedules jobs every x number of weeks or by the start date. From the Start list, select the time and date,
then select the number of weeks and the day of the week.
l Monthly: Schedules jobs every nth weekday of the month or by the start date. From the Start list, select the time and
date. Select either the day of the month by day number or the day of the week and the week, then select the months.
For example, you can schedule a job for the 26th day of August and September or the Second Thursday in April and
June.
Tip: The scan duration is calculated from the scheduled start time, not the time the job begins. If a job is delayed because
the computer was rebooting, other jobs are running or the service was stopped, the job will still complete based on
whether the job started within the time duration. If the delays exceed the specified time duration, the job will not run.
5. To limit the schedule to a specific time duration, check the Abort the scan if it runs longer than box. Enter the number of
minutes the job can run after the scheduled start time.
6. Click OK.
Add Audits to Address Groups
After a discovery scan runs, you can add discovered IP addresses to an Address Group.
1. After the discovery scan runs, select one or more IP addresses in the Results pane.
2. Right-click the IP addresses, and select Add to Address Group.
3. On the Add to Address Group dialog box, select one of the following:
l Append to Existing Address Group: Select an address group from the list.
l Create New Address Group: Enter an address group name to create a group.
For more information, please see "Configure Address Groups in the Network Security Scanner" on page 13.
SALES: www.beyondtrust.com/contact SUPPORT: www.beyondtrust.com/support DOCUMENTATION: www.beyondtrust.com/docs 20
©2003-2019 BeyondTrust Corporation. All Rights Reserved. BEYONDTRUST, its logo, and JUMP are trademarks of BeyondTrust Corporation. Other trademarks are the property of their respective owners. TC: 3/28/2019NETWORK SECURITY SCANNER
USER GUIDE
Clear Discovery Scan Data
You can clear the discovery scan data from the database.
1. From the Results page, right-click on a discovered item, and select Clear Discovered Items.
2. To clear all discovered assets from the list, click Yes.
SALES: www.beyondtrust.com/contact SUPPORT: www.beyondtrust.com/support DOCUMENTATION: www.beyondtrust.com/docs 21
©2003-2019 BeyondTrust Corporation. All Rights Reserved. BEYONDTRUST, its logo, and JUMP are trademarks of BeyondTrust Corporation. Other trademarks are the property of their respective owners. TC: 3/28/2019NETWORK SECURITY SCANNER
USER GUIDE
Run Audit Scans
The scanner can scan any device with an IP address if the route between the scanner and the IP address can be established. Scans
can be internal within a DMZ or from outside inward. You can scan VMWare ThinApp images.
Configure Audit Scans
You can define your scan parameters, then create a group to ensure scanning the same targets at a later date. You can schedule
audit scans to track the vulnerability assessments.
You can create an Address Group called Always that is included in all scans. For more information, please see
"Configure Address Groups in the Network Security Scanner" on page 13.
You can run a scan without administrative rights on each target asset; however, administrative rights ensure more complete scan
results.
Select Targets and Output Types
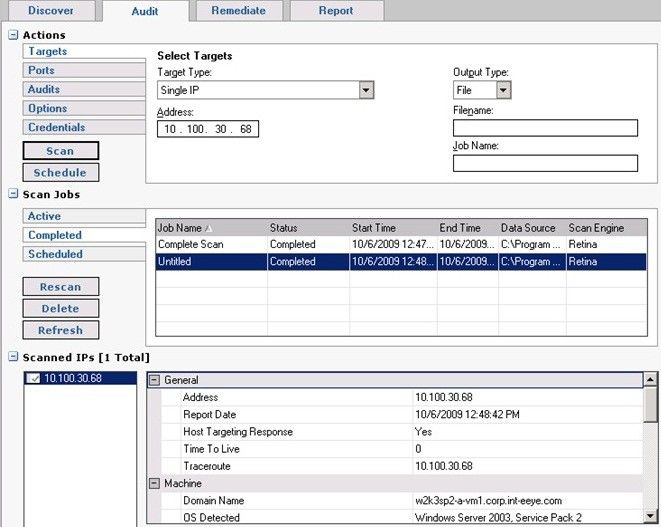
1. On the Network Security Scanner home page, select the Audit tab. The Audit page displays Actions, Scan Jobs and
Scanned IPs.
2. In the Actions area, click Targets. The Target pane displays.
3. From the Target Type list, select the target type:
4. From the Output Type list, select one of the following:
l File: To store scan results in a file.
l DSN: To store results to a system database. To restore results in a specific DSN, create the DSN using ODBC Data
Source Administrator in Windows Administrative Tools.
l If no file or DSN is defined, the scanner stores multiple results in a single file.
5. Enter a filename and job name.
Select Ports
There are pre-configured Port Groups available. You can add or remove ports from a Port Group. You can create a Port Group and
add ports.
For more information, please see " Manage Ports in the BeyondTrust Network Security Scanner" on page 17.
Select a Port Group from the Ports pane. You can select more than one
Port Group.
SALES: www.beyondtrust.com/contact SUPPORT: www.beyondtrust.com/support DOCUMENTATION: www.beyondtrust.com/docs 22
©2003-2019 BeyondTrust Corporation. All Rights Reserved. BEYONDTRUST, its logo, and JUMP are trademarks of BeyondTrust Corporation. Other trademarks are the property of their respective owners. TC: 3/28/2019NETWORK SECURITY SCANNER
USER GUIDE
Select Audits
When you select Audit Group scan settings, you can:
l Select one or more Audit Groups to include in the scan
l Change the audits in an Audit Group as you configure the scan settings.
For more information, please see "Customize Audits" on page 43.
To select the audits for the scan, follow the steps below:
1. Select the Audit tab, then select Audits.
2. Scroll through the list and select audit groups.
3. To change the Audit Groups, click Modify. The Audit Group
Modification window displays.
4. To create an Audit Group, click New, then type the group name
and click OK. The Audit Group name displays.
5. To add audits to the group:
a. Select the Automatically enable new audits in this group
check box to automatically add all audits received when
you update your database with the latest audits.
b. Select an Audit Group then select the checkboxes for the
audits that you want to add to the group.
c. Right-click an audit and select Enable All; all audits in the
Audit Group are selected.
d. Shift+select audits to select more than one audit. Right-
click and select Enable Selected.
6. To change an existing Audit Group, select or clear audit checkboxes.
7. To save changes, click Close.
To restore the default settings for an Audit Group, click Reset. Click Yes on the confirmation dialog box. The default audits for the
currently selected Audit Group are reset.
Select Audit Options
1. Select the Audit tab.
2. Select Options.
3. Select scan options from the following list:
OPTIONS DESCRIPTION
Perform OS Detection Determines the operating system of the target.
Get Reverse DNS Scans for reverse Domain Name System (rDNS) and retrieves the domain name
for the target's IP address.
Get NetBIOS Name Determines the Network Basic Input/Output System.
SALES: www.beyondtrust.com/contact SUPPORT: www.beyondtrust.com/support DOCUMENTATION: www.beyondtrust.com/docs 23
©2003-2019 BeyondTrust Corporation. All Rights Reserved. BEYONDTRUST, its logo, and JUMP are trademarks of BeyondTrust Corporation. Other trademarks are the property of their respective owners. TC: 3/28/2019NETWORK SECURITY SCANNER
USER GUIDE
Get MAC Address Retrieves the Media Access Control address or unique hardware number. In
addition, the scanner can use the MAC address to detect if a target is running in a
virtualized environment.
Perform Traceroute Determines the paths that packets travel to the target.
Enumerate [parameter] Using NetBIOS Uses the NetBIOS protocol to determine and list audits specified in the Audit
Group. The parameters include registry, users, shares, files, hotfixes, named
pipes, machine information, audit policy, per-user registry settings, groups,
processes, user and group privileges, and hardware.
Enumerate Users Find and enumerate users on the target assets.
Enumerate Shares Using NetBIOS, finds and enumerates shared folders and resources on the target
asset.
Enumerate Groups Lists groups on the target asset, including SID, group scope, and group type
information.
Enumerate Processes Lists the processes running on the target asset.
Enumerate Services Lists the services running on the target asset.
Enumerate Hardware Lists the hardware on the remote host using WMI.
Enumerate Software Using NetBIOS, determine the software installed on the target asset.
Enumerate Certificates Lists the certificates installed on the target asset.
Enumerate Databases Lists database instances, table and user information on a target. Includes SQL
Server, Oracle, and MySQL databases.
Note: The data is sent to BeyondInsight management console only.
Enumerate Scheduled Tasks Displays information about the scheduled tasks on that particular asset, including
task name, task to run, last time the task ran, schedule type, etc. Applies to
Windows assets only. BeyondInsight is required for this option.
Perform IP Protocol Scanning Lists open and filtered IP protocols.
Enumerate Ports via Local Scan Service Installs the local Network Security Scanner agent and enumerates local ports
using netstat. OFF by default. The Perform Local Scanning check box from the
Advanced Options must also be selected.
Enable Remote Registry Service Starts (and then stops) the remote registry on a target. Requires the local scan
service (agent). OFF by default. The Perform Local Scanning check box from the
Advanced Options must also be selected.
Enable WMI Service Starts (and then stops) the WMI service. Requires the local scan service.OFF by
default. The Perform Local Scanning check box from the Advanced Options
must also be selected.
Enumerate File Contents via Local Scan Detects personally identifiable information on remote Windows targets.
Service Information includes financial information and personal information.
Randomize Port List Shuffles the port list so that ports are scanned in random order instead of
sequentially.
SALES: www.beyondtrust.com/contact SUPPORT: www.beyondtrust.com/support DOCUMENTATION: www.beyondtrust.com/docs 24
©2003-2019 BeyondTrust Corporation. All Rights Reserved. BEYONDTRUST, its logo, and JUMP are trademarks of BeyondTrust Corporation. Other trademarks are the property of their respective owners. TC: 3/28/2019NETWORK SECURITY SCANNER
USER GUIDE
Scan Docker Images Scan Docker images discovered on the target. The Perform Local Scanning check
box must also be selected.
For more information, please see "Run a Docker Instances Scan" on
page 53.
Perform Database Application Scanning Scans remote database instances
4. Select the Enumerate a maximum of check box and enter the maximum number of users to be audited. The maximum
number is per target and applies to each of the user types that exists for that target. For example, a UNIX/Linux target running
Samba could have UNIX/Linux users, domain users, and Samba users. If you set the number to 50, then a maximum of 50
UNIX/Linix users, 50 domain users, and 50 Samba users could be returned for that target in the scan results.
5. To display the Advanced Options, check the Show Advanced Options box.
Note: There are performance issues when running a connect scan, force scan and UDP scan simultaneously. The
combination of the three instructs the scanner to negotiate a full connection to each port on each device. On a Class B
network, you could be waiting for 65,535 devices to time-out on a minimum of 65,535 connections each.
6. Optionally, select the following advanced scan types:
OPTIONS DESCRIPTION
Enable Connect Scan Mode Run if other methods, such as a slow dial-up, are unreliable. The operating system
negotiates a full connection to each device. Because multiple port scanning
methods are not used, the Network Security Scanner cannot determine a number
of items, such as operating system.
Enable Force Scan Run if the targeted devices are not going to answer SYN or ICMP scanning.
Forces the Network Security Scannerto run protocol discovery on each port of
each device to determine the protocol. This should only be used in a highly locked
down network where the standard port scanning methods will be filtered or
blocked. Force Scan should not be used in IP ranges.
Note: Using Force Scan assumes the selected target is live. Each
selected target counts against your license count.
Extended UDP Scan Runs a complete scan on all User Datagram Protocols without timing out. Forces
the scanner to expect an answer. The IP will eventually timeout. An extended UDP
scan can take longer when the Windows target has Windows Firewall turned on.
Turn off Windows Firewall for the duration of the scan.
Disable Tarpit Detection Stops tarpit detection. A TCP tarpit program intentionally reduces the size of data
packets to slow communication transmissions. This can cause incorrect scan
results. To scan systems running tarpits, set the tarpit to allow unimpeded
connections from the scanner.
Randomize Target List Shuffles IP addresses so that targets are scanned in random order instead of
sequentially by IP address.
Perform Local Scanning Uses the local scan agent to assist with the scan. This check box must be selected
when selecting the Enumerate Ports via Local Scan Service, Enable Remote
Registry Service, and Enable WMI Services checkboxes.
SALES: www.beyondtrust.com/contact SUPPORT: www.beyondtrust.com/support DOCUMENTATION: www.beyondtrust.com/docs 25
©2003-2019 BeyondTrust Corporation. All Rights Reserved. BEYONDTRUST, its logo, and JUMP are trademarks of BeyondTrust Corporation. Other trademarks are the property of their respective owners. TC: 3/28/2019NETWORK SECURITY SCANNER
USER GUIDE
Disable OS Backport Detection Runs all remote audits on all targets including operating systems where there
might be backported banners. By default, the scanner skips some remote audits
when a backported banner is detected to avoid a false positive on that target.
Enable Smart Credentials When there is more than one credential selected for a scan, the scanner
determines the best credential to use for each target. For example, a target asset
might have SQL Server installed. For that particular target you would want the SQL
Server credential used. In this case, using Smart Credentials ensures the SQL
Server credential is used (if set in the scan settings).
For more information, please see Setting Credentials. Enable Smart
Credentials is turned on by default.
Enable Cleartext Authentication Sends credentials over cleartext protocols like FTP and HTTP.
Note: This option is disabled by default. It is not recommended that you
send credentials over cleartext protocols.
Get Detailed Audit Status Provides information about all audit attempts for a target.
Set Credentials
Credentials are used to secure access to the target assets, such as networks, workstations, servers, and printers. You can run a scan
without administrative rights on each target asset; however, administrative rights ensure more complete scan results.
Note: To run a fully credentialed scan of a UNIX device, you must enable SSH access using the root or admin username.
To run a fully credentialed scan of a Windows device, NetBIOS access is required. NetBIOS is enabled by default.
1. Select the Audit tab, then select Credentials.
2. Select the credentials to use for this scan:
l Null Session: Requires no credentials.
l Stored: Provides a selection list of stored credentials. To create a stored credential, click Add.
For more information, please see "Manage Credentials" on page 9.
l Single-use: Allows a single session for one user based on username and password.
l Credential Group: Select a group from the list.
For information about Credential Groups, please see "Manage Credentials" on page 9.
SALES: www.beyondtrust.com/contact SUPPORT: www.beyondtrust.com/support DOCUMENTATION: www.beyondtrust.com/docs 26
©2003-2019 BeyondTrust Corporation. All Rights Reserved. BEYONDTRUST, its logo, and JUMP are trademarks of BeyondTrust Corporation. Other trademarks are the property of their respective owners. TC: 3/28/2019NETWORK SECURITY SCANNER
USER GUIDE
Run Scans
You can scan the target immediately or schedule the scan for a later
date. The Scan Jobs section displays active, completed, and scheduled
scans. You can rescan, delete, and refresh the list of scans.
Scan Immediately
To scan the targets immediately, follow these steps:
1. Select the Audit tab.
2. Click Scan.
3. You are prompted to enter a scan name and credentials. Enter
the scan name or credentials (both are optional). The audit
begins. You can view the scan progress details in the Status bar,
including: IP address scanned, type of scan, and update
messages.
4. After the scan runs, select a vulnerability in the Scanned
IP section to view more details such as description and
fix information. Use the legend as a quick aid to interpret
vulnerability severity level.
You can fix the vulnerabilities using the remediation process. For more information, please see "Remediate Vulnerabilities
Using BeyondTrust Network Security Scanner" on page 31.
Schedule Scans
You can schedule scans. Scans are scheduled by frequency, start time and run date.
1. Select the Audit tab, then click Schedule. The Scan Job Scheduler window displays.
2. Enter a job name.
3. Select the start time and date.
Tip: The scan duration is calculated from the scheduled start time, not the time the job actually begins. If a job is delayed
because the computer was rebooting, other jobs are running or the service was stopped, the job will still complete based
on whether the job started within the time duration. If the delays exceed the specified time duration, the job will not run.
SALES: www.beyondtrust.com/contact SUPPORT: www.beyondtrust.com/support DOCUMENTATION: www.beyondtrust.com/docs 27
©2003-2019 BeyondTrust Corporation. All Rights Reserved. BEYONDTRUST, its logo, and JUMP are trademarks of BeyondTrust Corporation. Other trademarks are the property of their respective owners. TC: 3/28/2019NETWORK SECURITY SCANNER
USER GUIDE
4. Select the frequency:
l Once: Schedules jobs to run one time. From the Start list, select the time and date.
l Daily: Schedules jobs for weekdays only, every x number of days or by the start date. From the Start list, select the
time and date, then select Every Day, Weekdays or Every x days and specify the number of days.
l Weekly: Schedules jobs every x number of weeks or by the start date. From the Start list, select the time and date,
then select the number of weeks and the day of the week.
l Monthly: Schedules jobs every nth weekday of the month or by the start date. From the Start list, select the time and
date. Select either the day of the month by day number or the day of the week and the week, then select the months.
For example, you can schedule a job for the 26th day of August and September or the Second Thursday in April and
June.
5. Click OK. The scan runs as scheduled.
6. To limit the scan to a specific length of time, select the Abort the scan if it runs longer than check box. Enter the number of
minutes the job can run after the scheduled start time.
7. Select the Enable job specific scan restrictions check box to set a scan restriction.
8. If there is a scan restriction set globally, the time frame is indicated on the Scan Restrictions dialog box. Click the Override
global scan restrictions check box to clear the global settings.
9. Click the squares to set the restricted time frame, and then click
OK.
10. If a scan is running when the scan restriction time starts, you can
abort or pause the running scan. Select Aborted or Paused
11. Click OK.
Scan File Contents on Windows Targets
You can run scans on Windows remote targets to detect personally identifiable information, including:
Financial
l Actuality Report
l Credit card numbers, including the following card providers: AMEX cards, Diners Club, Discover Card, JCB, MasterCard,
Maestro, Visa
l Credit card tracks. The audit includes all track types (1, 2, 3)
l Financial Report (English)
l IBAN Numbers (46 countries)
Note: The actual credit card numbers are not reported in the scan information; only information is detected. For example,
the scan might detect a file that contains an American Express credit card number; the scan output indicates the file name
and the credit card type, but not the credit card number.
Personal
SALES: www.beyondtrust.com/contact SUPPORT: www.beyondtrust.com/support DOCUMENTATION: www.beyondtrust.com/docs 28
©2003-2019 BeyondTrust Corporation. All Rights Reserved. BEYONDTRUST, its logo, and JUMP are trademarks of BeyondTrust Corporation. Other trademarks are the property of their respective owners. TC: 3/28/2019NETWORK SECURITY SCANNER
USER GUIDE
The following personal information can be detected: DNA sequence, email address, driver license (51 states/territories), phone
number, social security number, ZIP code (USA), ZIP code+4 (USA).
File types
l Text Files (TXT)
l Log Files (LOG)
l XML Files (XML)
l Comma Separated Values (CSV)
l Microsoft Word 1997-2003 (DOC)
l Microsoft Word 2007+ (DOCX)
l Microsoft Excel 1997-2003 (XLS)
l Microsoft Excel 2007+ (XLSX)
l Microsoft PowerPoint 1997-2003 (PPT)
l Microsoft PowerPoint 2007+ (PPTX)
l Adobe Portable Document Format 1.2 – 1.7 (PDF)
l Rich Text Format (RTF)
l OpenOffice OpenDocument Text (ODT – as OpenXML)
l OpenOffice OpenDocument Spreadsheets (ODS – as OpenXML)
l OpenOffice OpenDocument Presentation (ODP – as OpenXML)
To configure the file contents scan, follow the steps below:
1. Configure the scan settings as usual.
2. Select the Options tab, and then select the Enumerate File
Contents via Local Scan Service check box.
3. Set credentials.
4. Click Scan.
Export Scan Results to CyberScope
You can export scan results and SCAP scans to CyberScope format.
After a scan runs, right-click the scan, and select Export to CyberScope.
Delete Scan Jobs
1. Select the Audit tab, and then click the Completed tab.
2. Right-click a job, and then select Delete.
3. Press Shift + select jobs to select more than one job in the list.
4. Click Yes.
SALES: www.beyondtrust.com/contact SUPPORT: www.beyondtrust.com/support DOCUMENTATION: www.beyondtrust.com/docs 29
©2003-2019 BeyondTrust Corporation. All Rights Reserved. BEYONDTRUST, its logo, and JUMP are trademarks of BeyondTrust Corporation. Other trademarks are the property of their respective owners. TC: 3/28/2019NETWORK SECURITY SCANNER
USER GUIDE
Abort Large Scans
You can cleanly restart the Network Security Scanner during large connect and force scans. However, aborting large scans requires
additional time to clear out of the target.
For example, an audit scan on a Class C network using a force scan and connect scan typically requires 20 minutes. However,
depending on the situation, it could require 60 minutes. If the scan requires additional time, the user times out and aborts the job after
approximately an hour.
In a connect scan with multiple ports using the OS stack, the abort requires additional time. The actual scanning stops quickly, but the
multiple connections require an extended period to time out, and the queue also requires deleting.
If you restart or stop the service, this only stops the scanning until the Retina Engine service restarts. The abort does not clear the
queue entries. As the scanner accesses the queue and restarts scanning for the devices still listed, the job immediately starts again.
To preclude this, the best solution is abort the scan job and wait for the abort process to complete. If the job is causing another
problem on the network, then aborting the job and unplugging the network is the next best solution. However, without the network
connection, the abort could take even longer.
1. Click Abort.
2. Stop the scanner service (net stop retinaengine).
3. If the scan will be continued in the future, rename or move queue.xml. If not, delete it.
4. Open the associated .RTD file, locate the Job Name in the eeye_groups, and set the status to Aborted or Completed. This
allows the retention of data. If not, delete the RTD file.
5. Restart the engine.
6. Delete the following files to place the scanner in a clean state for troubleshooting:
l Retina 5\queue*.
l Retina 5\targetlog.*
l Retina 5\schedule.xml
l Retina 5\jobs*.*
l Retina 5\scans\*.rtd
l Retina 5\scans\*.ldb
l Retina 5\scans\scanrequests\*.xml
l Retina 5\scans\jobs\*.xml
l Retina 5\temp\*.*
l Retina 5\logs\*.*
SALES: www.beyondtrust.com/contact SUPPORT: www.beyondtrust.com/support DOCUMENTATION: www.beyondtrust.com/docs 30
©2003-2019 BeyondTrust Corporation. All Rights Reserved. BEYONDTRUST, its logo, and JUMP are trademarks of BeyondTrust Corporation. Other trademarks are the property of their respective owners. TC: 3/28/2019NETWORK SECURITY SCANNER
USER GUIDE
Remediate Vulnerabilities Using BeyondTrust Network
Security Scanner
You can access the jobs scanned in the Audit tab and generate a Remediation Report that lists the vulnerability information. The
report also recommends methods to resolve the vulnerability as well as noting the risk level, severity code, PCI severity level.
Generate Remediation Reports
1. Click Remediate, and select the Job Name from the Scan Jobs area. The Remediate pane displays the Include in Report
section. The data to include in the Remediation report changes based on the filter.
2. Select filtering options:
l Group Report By list: Vulnerability, Machine, CVE
l Sort Machines By list: IP Address, Name
l Sort Vulnerabilities By list: Risk, Name
3. Select the specific vulnerabilities or machines.
4. Select the Options tab. The Options pane displays the section
headings and creation details.
5. In the Include box, select the headings to include in the report:
l Page Breaks: Displays the information into standard 8-1/2 x 11” pages.
l Job Metrics: Provides a summary of the scan.
l Confidentiality Page: Adds the following text to the cover page:
The following report contains company confidential information. Do not distribute, email, fax, or transfer via any electronic
mechanism unless it has been approved by the recipient company's security policy. All copies and backups of this document
should be saved on protected storage at all times. Do not share any of the information contained within this report with anyone
unless they are authorized to view the information. Violating any of the previous instructions is grounds for termination.
l Expand URLs: Provides links and website address in the Related Links section.
l Notes Area: Provides blank space for adding notes.
l Detailed Audit Status: Displays the detailed audit status.
6. In the Creation Details section, select the Include Creation Details Page check box to include a created by page. In the
Report Created By and Report Create For box, enter the names or other text information.
7. In the Include by Risk section, select the type of vulnerabilities to include:
l Information: Details host information that does not necessarily represent a security threat, but can be useful to the
administrator to assess the security.
l Low: Defines risks associated with specific or unlikely circumstances.
l Medium: Describes serious security threats that would allow a trusted but non-privileged user to gain access to
sensitive information.
l High: Indicates vulnerabilities that severely impact the overall safety and usability of the network.
SALES: www.beyondtrust.com/contact SUPPORT: www.beyondtrust.com/support DOCUMENTATION: www.beyondtrust.com/docs 31
©2003-2019 BeyondTrust Corporation. All Rights Reserved. BEYONDTRUST, its logo, and JUMP are trademarks of BeyondTrust Corporation. Other trademarks are the property of their respective owners. TC: 3/28/2019You can also read