Purchase Card History Lookup System In Argos
←
→
Page content transcription
If your browser does not render page correctly, please read the page content below
Purchase Card History Lookup System In Argos
                          General Instructions to Access the Information
The following is a document that you can use for step by step instructions on how to look up P-card
information in the new Argos P-card History tables. This document consists of 4 parts:

         Accessing the Lookup System in Argos pg 1-3
         OLAP Cube-Perfect for Drilling Down to Detail pg 4-7
         Data Dictionary pg 8
         Miscellaneous Navigation in the Cube pg 9

Beginning with the March 2011 transactions, purchase card transactions that have been fed into Banner
are also kept in a history file to enable the ISU community to have access to the information. This history
file can be accessed using the P-Card History Lookup system in Argos. The lookup system is designed to
enable ISU entities to answer the following kinds of questions regarding Purchase Card use:

For Cardholders:
    - “How much did I spend at a given merchant, during a given month?”
    - “How much have I spent for any given merchant?”
    - “What index codes have I used when reconciling transactions for a given merchant?”
    - “Why was the expense account code changed on my transactions before it was charged to my
        index?”

For UBOs and Account Directors:
    - “Which cardholder in my area uses the P-Card the most?”
    - “How much have cardholders in my area spent at a given merchant?” , and “What did they
       spend it on?”
    - “Which index codes did a specific cardholder in my area use?”

For anyone with Fund/Org security on a specific fund:
    - “How much has a particular index code been used in P-Card transactions?”
    -   “Who is generating those transactions, and for which merchants?”

All of the above questions, plus many more, can be answered using the P-Card history lookup system.
This document shows the features of the lookup system and describes how to access it.

Note: The history lookup system is a static copy of the data as it was loaded into Banner. Journal entries
subsequent to the initial load are not reflected in the history file, because journal entries do not modify
the static historical data. To see how subsequent journal entries have affected your indexes, please use
the query tools available in Self Service Banner.

Accessing the Argos Lookup system
To access the P-Card history lookup system, log into Argos:

d:\my documents\diana\p-card instructions\general instructions purchase card history lookup system .docx   1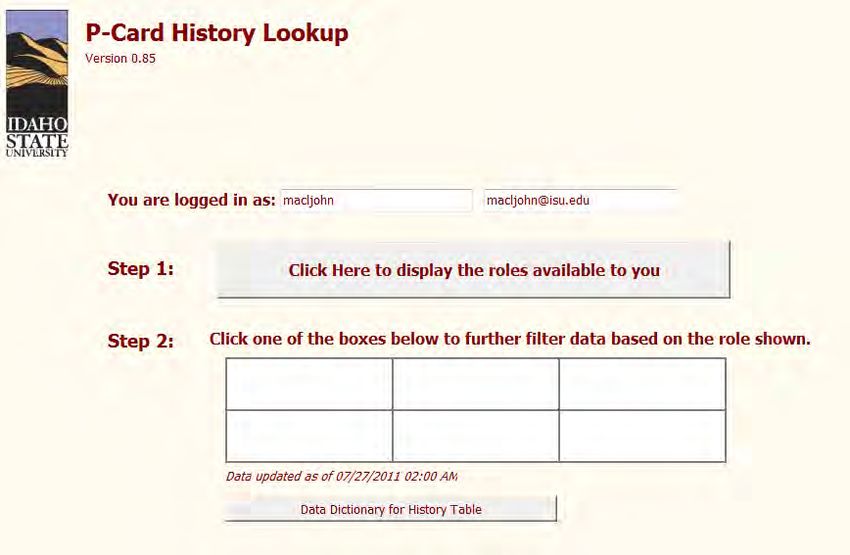
-    From Bengalweb, go to the Employees Tab and look for a channel named ‘Reports @ ISU
         (Argos)’, like this:

    -    Click on ‘View a report’ to display the Argos main menu. (If you do not have access to Argos, you
         may fill out the Banner/Argos Request form in the same channel). If prompted, enter your logon
         id and password. After a few seconds, you’ll see the login messages and the report explorer,
         which looks similar to this:

    -    Click on the + sign next to ‘Production_Reporting’ to expand that portion of the list, then click on
         the + sign next to ‘Finance Campus wide reports’:

         To display the following menu:

d:\my documents\diana\p-card instructions\general instructions purchase card history lookup system .docx    2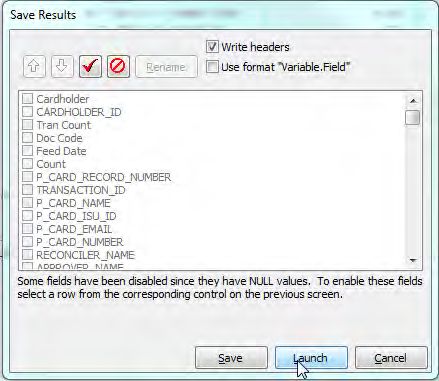
-    Click on ‘P-Card History Lookup Quickview’ to display the quick view main menu. On the right-
         hand side of the screen, click on the ‘Quickview’ button to run the datablock as a quickview, like
         this:

When you do that, the main menu will display, as shown below.

Main Menu

The main menu displays your login and email information.

When you click the ‘Click Here…’ button, the grid at the bottom of the menu will populate showing the
P-Card system roles that have been assigned to you. The possible roles are:

    -    Cardholder:                   Anyone who has been assigned a Purchase Card
    -    Acct_Director:                Individuals listed as account directors for P-Card usage
    -    Fund_Org:                     Anyone who has fund/org security access in Banner
    -    UBO:                          Individuals who are University Business Officers
    -    Master_Fund_Org:              Individuals in Finance and Admin who have Master Fund and/or

d:\my documents\diana\p-card instructions\general instructions purchase card history lookup system .docx   3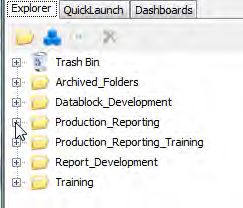
Master Org permissions in Banner.
- Purchasing: Personnel in Purchasing Services
- CCER Reconcilors You will have to have one of the other roles to use the reporting tool
- CCER Approvers You will have to have one of the other roles to use the reporting tool
Each role can query the history file in ways specific to their purpose. However, the query methods are
not mutually exclusive. Frequently, people will have multiple roles; for example, an Account Director
normally also has Fund/Org security access as well, or a UBO could also be a Cardholder. Where these
roles overlap, the person in those roles can choose either role to use to query the system, depending on
need.
Please see the separately attached documents for the query screens available to
each role.
OLAP Cube – Perfect for Drilling Down to Details
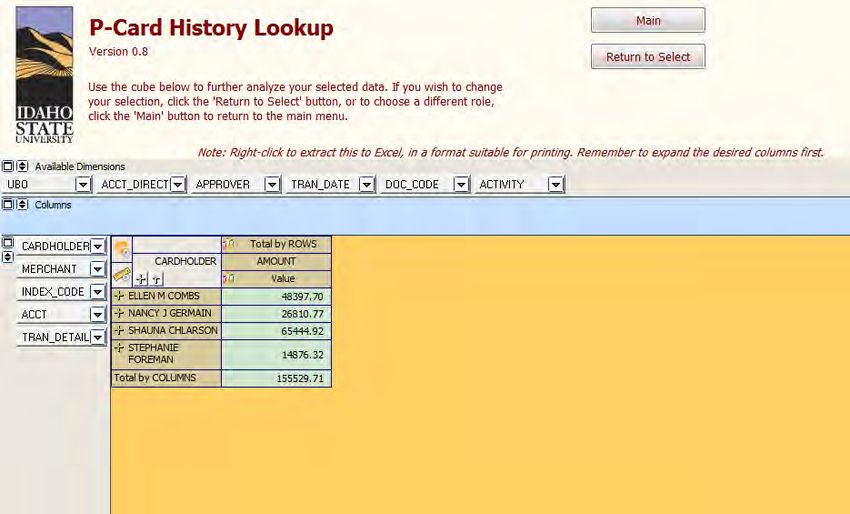
When you click ‘View in Cube’ on any query screen, a cube screen similar to the one below will display.
(Note: OLAP stands for ‘On Line Analytical Processing’, and is a way to work with summarized data in
order to analyze it in a flexible and ad-hoc manner.)
The cube initially displays in summarized mode. All details are collapsed and subtotals for the items are
combined into unique groups and a grand total at the bottom. The sample below shows subtotals only
for the cardholders selected, plus a grand total. Next to each cardholder is a plus sign, which allows you
to expand that category.
d:\my documents\diana\p-card instructions\general instructions purchase card history lookup system .docx 4As you click on the + signs in the columns, the cube expands to show the detail at that level. Compare
the image above to this:
They are the same data, but in the bottom, the + next to the cardholder has been expanded, as well as
the + next to ‘Amazon.com’, and the AEGR03 Index code. As you can see, all of the detail for a given
transaction, including the Index code and Banner Acct code are displayed. Note that in the ‘Tran_Detail’
column, the P-Card transaction description that the reconciler entered in CCER is displayed.
Additionally, the transaction amounts are shown, and appropriate subtotals at each level. The number
that prefixes the description (in the example above, 130795) is a unique, ISU-assigned record number
that uniquely identifies the transaction. If you need the Controller’s office’s help in troubleshooting a
specific transaction, having that number available may assist them in ensuring that you are both talking
about the same transaction.
In the sample above, the sort order is: Cardholder, then Merchant, then Index Code, then Acct code,
then Tran Detail. If you are not concerned about what the Cardholder did, but want to know totals by
Merchant, you can drag the Merchant box to the top, and the list will re-sort.
Before:
After:
This shows how the data has re-sorted itself:
d:\my documents\diana\p-card instructions\general instructions purchase card history lookup system .docx 5Note how the subtotals are now by merchant, where before, they were by cardholder. If you want to see P-Card expenses by Index code, just drag it to the top of the list: Again, the data re-sorts itself and the subtotals are now by Index code: Finally, if you want to see P-Card transactions by Acct code, drag it to the top: d:\my documents\diana\p-card instructions\general instructions purchase card history lookup system .docx 6
And the data re-sorts and re-summarizes itself by Account Code, as shown below:

Across the top of each cube are additional dimensions that you can use to further categorize the data:

To include one of the available dimensions in your cube, simply click and drag it down to the left-hand
column where the other dimensions are located. The example below shows the Approver dimension
being added to the list, because I wanted to see who approved the transactions:

 Now, when the columns are expanded, you can see that the Approver name appears next to the
cardholder name:

d:\my documents\diana\p-card instructions\general instructions purchase card history lookup system .docx   7
Data Dictionary (A definition of what the information in the columns means)
If you choose to download the contents of a transaction viewport to Excel, the file will contain column
headers for the data items. On the Main Menu is a button that allows you to display the data dictionary
for the history file:

When you click it, the data dictionary screen will appear, similar to this:

You can use this screen to learn what the columns mean, or you can right-click it, save it to Excel, and
print it for later use as needed.

d:\my documents\diana\p-card instructions\general instructions purchase card history lookup system .docx   8
Miscellaneous Navigation in the Cube
To return to the Query page, click the ‘Return to Select’ button. Click ‘Main’ to return to the main menu.

To re-sort any list box on a specific column, click that column’s header. Click the header again to reverse
the sort.

To download the contents of any list box to Excel, right-click on it, and choose ‘Save Results’:

This displays the following screen:

Click ‘Save’ to save the results in a .csv file, or ‘Launch’ to save the file, then launch Microsoft Excel with
that file. The file format is .csv (comma-separated value), which is also compatible with spreadsheet
programs other than Excel.

d:\my documents\diana\p-card instructions\general instructions purchase card history lookup system .docx          9
You can also read