RULEBOOK DISCLAIMER: This is a BETA. Some rules may change - Sheol Board Game
←
→
Page content transcription
If your browser does not render page correctly, please read the page content below
RULEBOOK

               DISCLAIMER: This is a BETA. Some rules may change

Introduction
Welcome to the universe of Sheol, a post-apocalyptic sci-fi game where the Earth has been shrouded in an
eternal night. Sheol is a cooperative game, playable solo or up to 4 people, with an emphasis on exploration
and combat. It is organized in campaigns in turn subdivided into missions. In each mission, players will have
to coordinate their efforts tactically to complete the objectives and defend the central game area (the
citadel) from the enemy invasion.

In this rulebook you will find all the information to learn how to play and the advanced rules that you will
need for the missions.

The story of Sheol in a nutshell
NOTE: you can find the full story of Sheol at the beginning of the mission manual.

The shadows arrived on the moon. From that day on, a mass of shadows (called Sheol) similar to a black
tide began to form until it shrouded the moon completely and the moon "cried" the shadows down to
Earth. Although technologically advanced, people had no means to stop the shadows, which slowly filled
the Earth and exterminated almost all of mankind. The planet was fully enveloped in layer of clouds so dark
that sunlight could not filter through and the survivors took refuge on the Isle of Light, also called the
Citadel, the last outpost of mankind. In fact, Lux, a type of light radiation capable of destroying shadows,
was discovered too late. Enclosed between the immense walls that surround the many square kilometers in
which the intricate levels of the citadel arise, humans have slowly forgotten the external world shrouded in
darkness and exhausted themselves in a series of internal political, cultural and economic struggles. In fact,
over the decades, the citadel has become a collection of decadent people, mixing nanotechnology with
superstition, millenary beliefs with cyber-empowerments, chaos and the emergence of new castes. Only
the Scouts, explorers of the unknown and raiders of the outside world, have not forgotten that the world
belongs to mankind and that mankind shall reclaim it one day. In this game, you are one of them.

Game goal
The scope of the game is to complete the main mission objectives and not allow the citadel to be
conquered by shadows.

                                                      1
How to play and set up the game
Playing Sheol means experiencing the missions and the story of the scout protagonists. Each mission
represents a game session of about 1-2 hours and is framed in a set of successive missions. To fully
experience the story and the gameplay dynamics, it is recommended to play the missions in sequence, even
if it is possible to play them in any order.

To start, you must first of all arrange the game board, the event cards, the shop and the tokens as shown in
the figure.

1- Main Board
2- Citadel Board
3- Shadow Board
4- Base shadows area
5- Heralds area
6- Boss area
7-Character area
8- Events library
9- Missions library
10- Missions manual
11- Tokens
12- Upgrade area
13- Shop area

At this point, you must choose a mission. The first mission acts as tutorial to show Sheol's dynamics little by
little. To start a mission, take the mission manual and read the mission introduction. It will tell you how to
prepare the elements on the board, the mission cards, the level of the citadel districts, the enemies
involved, the category of items in the shop, the number of cards to have in the character decks, the amount
of initial Umbra and the starting position of the characters.

                                                      2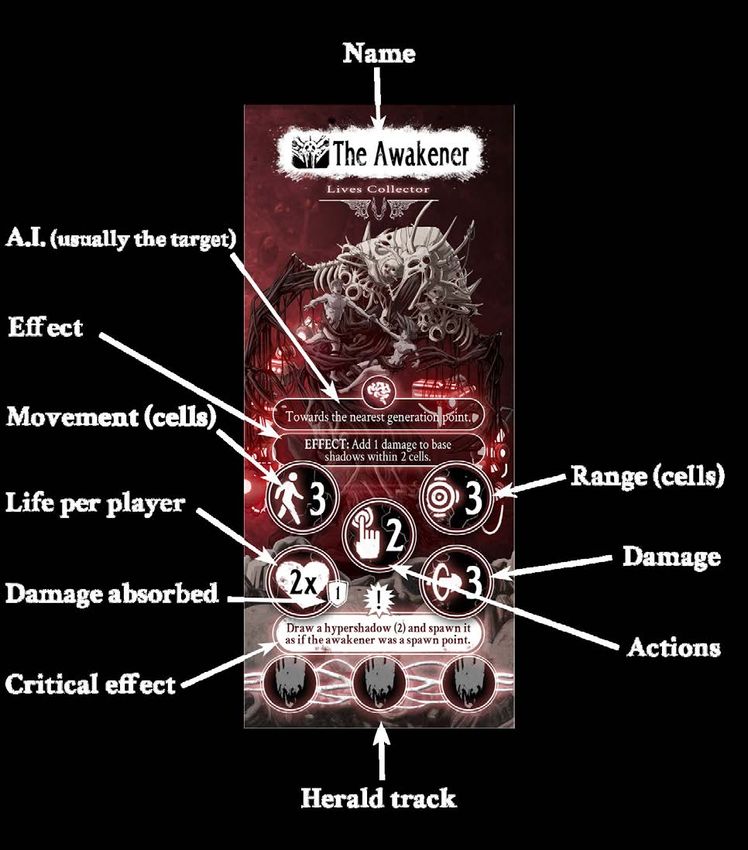
The following sections list how to arrange the different elements on the game board and their meaning.

The main board

All character actions take place on the main board which is split into 20 x 20 cells. The board has 2 axis wide
2 cells called Alpha and Omega.

At the center of the board, stands the miniature of the citadel plateau representing the typical starting
point for the characters. In all the other sectors, instead, the lands or other elements must be placed
according to the diagram provided at the beginning of each mission.

Sheol is a game that allows multiple combinations of elements, making each mission considerably different.

                                       The lands

                                       If you have already chosen the mission to play (we strongly advise
                                       you to start from the first one), you will have to set up a series of
                                       lands on the board according to the diagram shown in the mission
                                       manual.

                                       The lands are of three types in increasing order of danger: the
                                       chronicles lands (marked by a ^), the forgotten lands (marked by ^^)
                                       and the shadow lands (red).

                                                      3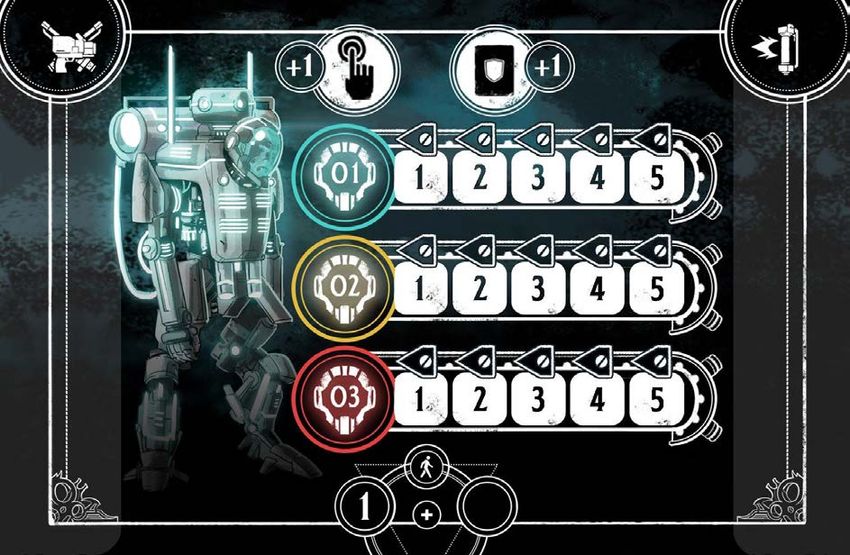
The lands are considered to be 2 x 2 cells, and when a character or an enemy moves into one of those cells
it means it entered the land.

Secondary missions and events decks

The lands are linked to two decks, Secondary missions and Events. These decks of cards must be set next to
the board. When a character discovers a land (that is, entering the land and revealing it), the player needs
to search first in the Secondary mission deck for the card linked to the discovered land and put it into play.
If there’s no Secondary mission card (because it was dealt with in a previous mission), then the player
needs to search in the Event deck for the card linked to the land and put into play. If there is no Secondary
mission card or Event card, there’s no further effect. Please take note that there is a limit to the number of
secondary missions and events that could enter in play during a mission.

Paths, singularities and other markers

On the main board you will place different types of markers. The most common ones are the singularities,
representing the generation areas of unrevealed shadows, a.k.a. blips.

Next to the main board, you will also have to set the pouches containing the blips (for the generation of
shadows), the lightstream paths (for construction actions), the shadow markers (for revelations), a stack of
Umbra markers and wasteland markers. If the mission briefing or mission cards specify the need for
additional markers (for example mission tokens) you can take them directly from the box.

                                                      4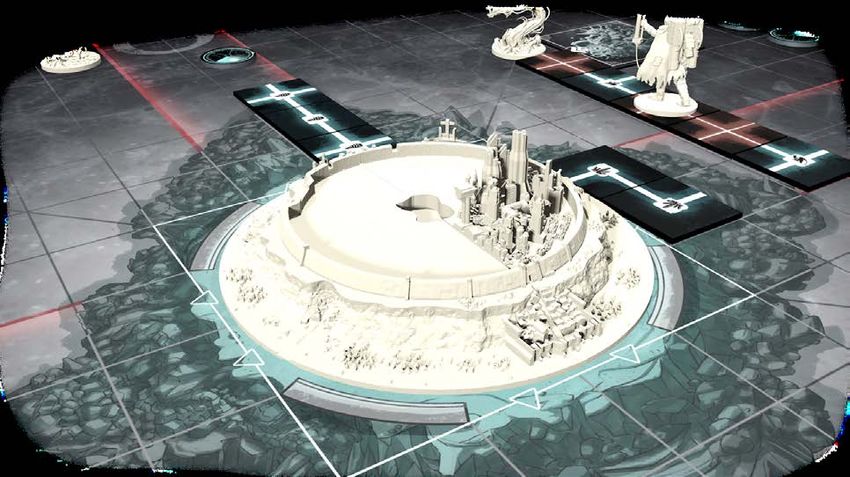
The shop

                                                                          Place the deck of shop cards next to
                                                                          the main board. Each card represents
                                                                          a useful item available to the
                                                                          characters and ready to be purchased
                                                                          for the price specified in Umbra
                                                                          currency. The shop cards are
                                                                          subdivided into categories and levels.
                                                                          At the start of each mission, you will
                                                                          know which categories of items are
                                                                          available in the shop and the card
                                                                          levels to use.

                                                                          Citadel board

                                                                        The Citadel board houses the
                                                                        districts, development points,
factions, and prosperity points. The prosperity marker specifies the life points of the citadel. If these fall to
zero, it’s game over. Place the marker on the numbered prosperity indicator on the side of the board. The
prosperity value of the citadel is permanent during the entire campaign. Points are lost when shadows
attack and could be regained during the development phase.

                                                        5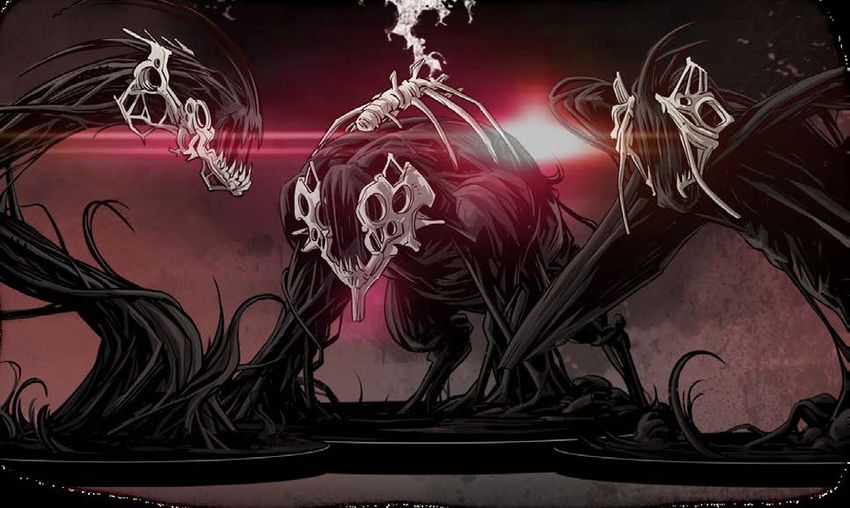
Districts

                                               Before the first 2 missions, it is not necessary to place any
                                               district. As the campaign continues, however, you will have
                                               to build districts during the development phase to ensure the
                                               survival of the citadel. You can place these cards on the
                                               citadel board.

Shadow board

The shadow board houses the blip values, the threat deck and a threat indicator. At the beginning of each
phase of the shadows, the indicator rises by one point. If it reaches specified mission-to-mission levels, a
threat card is revealed and its effect activated.

                                                      6
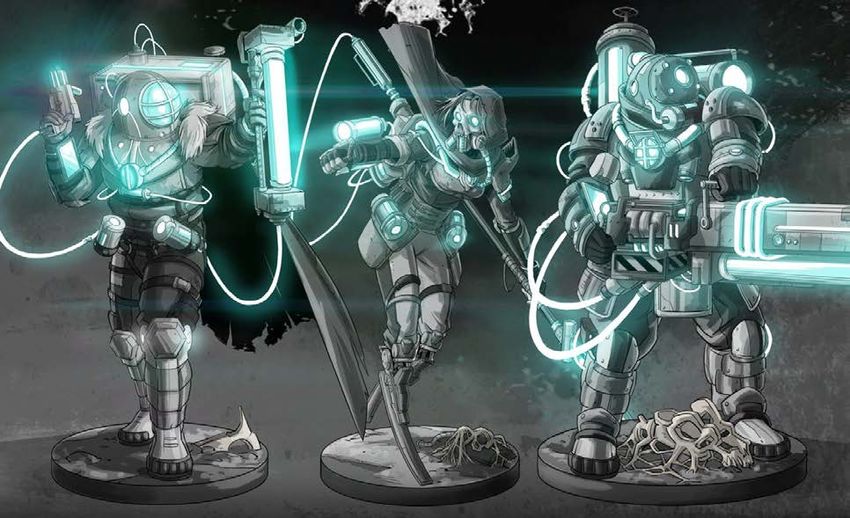
Miniatures

Sheol has many miniatures to use to fully immerse yourself in the gaming experience. Each miniature
represents a character, an enemy, or one of the districts that make up the citadel. When you start a
mission, place next to the main board the miniatures of the base shadows, the miniatures of the districts
and those of the advanced enemies called for in the mission. The players’ miniatures, on the other hand,
must be placed each one on the respective character board. When a miniature is on the character board,
it’s considered to be in the Citadel.

Dice

Sheol has several dice that are used during the game. In particular: 1 gravity die (alpha and omega faces), 3
sheol dice (with singularity symbols), 1 shadow attack die, and 2 player attack dice (white). Place them next
to the board, ready for use.

                                                      7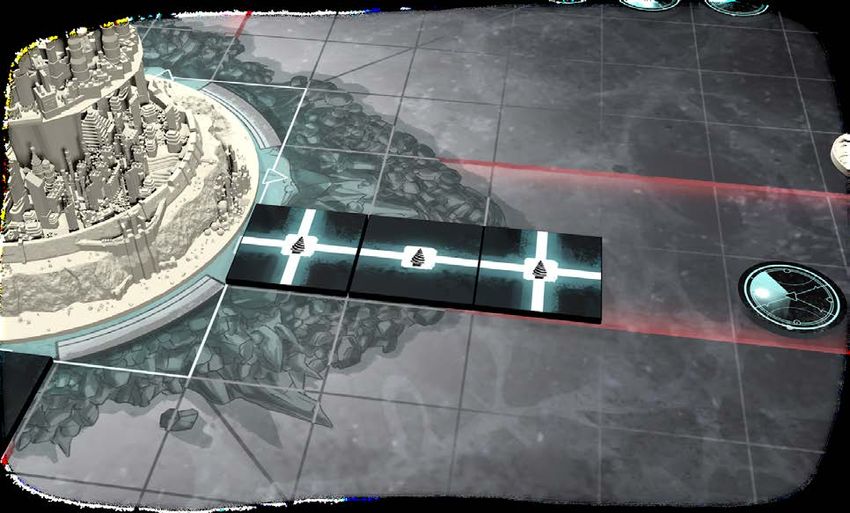
Characters
There is no adventure without notable protagonists. In Sheol there are 6 characters available and at the
beginning of each mission the 4 participating players must choose which one they wish to be. All characters
have unique characteristics, weapons and actions that differentiate them from each other. Furthermore,
each character has 2 archetypes among attack, defense, movement, brightness, care, engineering and
technomancy. The archetypes are fundamental for the choice of new lightshield cards and for the events
and mission challenges (see section "events”).

The following sections list the playable characters that you will find in Sheol and their main features.

Note: If you play solo, see the "play solo" section.

Pioneer (Marco Reed)

Pioneer is the key character of Sheol and also the born leader of the team. A veteran scout, he specializes in
building the lightstream and is a balanced character.

Lux vials supplied: 2.

Lightshield included: 3.

Archetypes: attack and brightness.

Maenad (Iris Light)

Maenad is a fast and sharp character. Master of movement, it is the ideal character for quick sorties in the
land of night and for striking at the hearts of enemies.

Lux vials supplied: 2.

                                                       8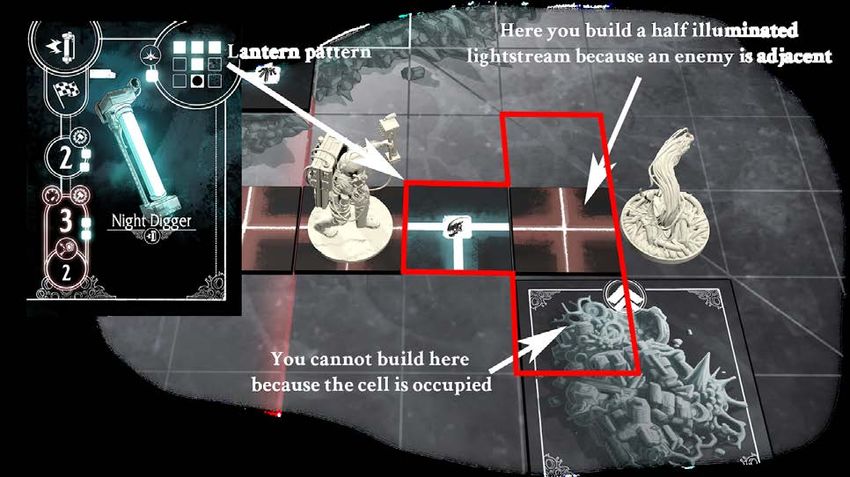
Lightshield included: 4.
Archetypes: melee and movement.
Cyclops (Bud Washington)
Cyclops is a heavy-duty character, perfect for those who want to make their way through the shadows with
cannon shots. His high defense is ideal for missions on the front line and to protect peers in case of need.
Lux vials supplied: 2.
Lightshield included: 4.
Archetypes: attack and defense.
Breathless (Aurora Clark)
Breathless is a sniper and favors ranged attacks. Thanks to her mimicry skills, she can get confused in the
territory and kill enemies without them noticing.
Lux vials supplied: 2.
Lightshield included: 3.
Archetypes: mimicry and attack.
Character boards
Once you have chosen your character, place the corresponding character board in front of you. The default
values for the actions of attack, construction, detection and movement are specified on the side. Moreover,
the upper portion of the board shows the number of lux and lightshield vials available to the character, as
well as, next to the name, the archetypes. At the beginning of each mission, you will have to choose a
9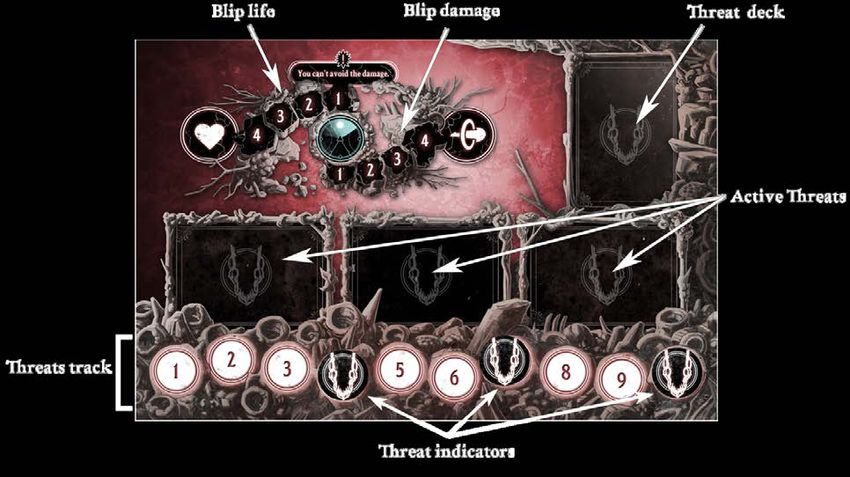
weapon and a lantern to assign to the character for that specific mission (see section "equipment").
Equipment values will override default action values.
Character lightshield cards
Each character has a deck of cards, called the lightshield deck containing a series of unique actions. Take
the character deck corresponding to each character used, shuffle it and place it face down next to the
character board.
The character cards will be essential to turn the game's fortunes in your favor and to guarantee you
discounts in lux on game actions.
During the sequence of missions, the deck can be expanded adding new cards that will grow the
character’s abilities and lead to his or her progress.
For more detailed information on lightshields, see the section "using the lightshield".
Lux vials
The lux vials specify the amount of lux available to the character. Place the vial card next to the character
board and place a plastic cube in the last cell on the right side of the vial to show that the vial is full and
contains 8 lux. Then place a numbered die face up in the left space with the number of vials available to the
character. Each character begins with the number of vials shown on the character board and the number of
vials held can never exceed this number; however, it is possible to recover lux as a result of cards or events.
If the lux earnings exceed the maximum number, the extra ones will be discarded.
During the game, when a lux vial reaches zero, if it is not the last vial, scale down the vial die by 1 and
reposition the lux counter to the maximum. If the loss of lux exceeds the amount of lux remaining in the
vial, the cost will have to be paid in full, thus scale down the remaining amount from the new vial.
Equipment
Now that you have chosen a mission and prepared the elements on the board as specified in the mission
briefing, there is only one step left to start the game: the choice of equipment. At the start of each mission,
players must choose the weapon and lantern to carry with them. Each character initially has a rack with a
weapon and a lantern. Continuing with the missions, this rack can be expanded. The choice of weapon and
lantern is important to define the style of game you wish to play with a specific character.
10Now, choose a weapon and a lantern and place them next to the character board. The values specified on
these cards replace the default ones on the board.
If you have some accessories, you can also equip them on the bottom of the character board.
11Starting the game
Each Sheol game session is subdivided into phases, and those phases are split into sub-phases and turns.
There are two phases: the Shadow Phase and the Players Phase. The phases keep alternating with each
other unless special conditions specify otherwise. The mission starts with a Shadow phase. Furthermore,
the mission briefing specifies how lands and singularities are configured on the main board, and which
objective cards must be revealed at the beginning.
Mission goal and objective cards
The objective cards tell the story of Sheol during the mission and
establish the sequence of goals to achieve. Each mission, after the
briefing, begins by arranging the initial objective cards next to the
board. Resolving these cards will make the players reveal new cards
until they reach the goal of the mission. Objective cards can include
branches, challenges, and secondary quests that players can follow
to get bonuses.
Mission Setup
● Choose your mission from the mission booklet
● Arrange the board at the center of the table
● Read the mission setup in order to know where to place setup elements (pay attentions to the
coordinates!)
● Shuffle the Lands based on their category and setup them at random on the map, based on the
mission briefing, unless stated otherwise.
● Put Singularities on the map based on the number of players
● Put Threat tokens on the same track based on the Mission briefing
● Put Enemies cards beside the Threat track, based on the enemies present in the Mission briefing
● Place the Citadel board and put the Prosperity token based on the current Prosperity of the Citadel
● Place the shop deck at the side of the Citadel board and reveal the top 6 cards
● Read the mission briefing and reveal the first mission cards
● Every player chooses a character, takes their corresponding deck and board and place them in front
of them; put a lux token and lux vials based on the character
● Equip characters with equipments from the shared supply, remembering to pay attention to
archetypes
● Start with the Phase indicated on the Mission briefing
12Players Phase
The Players Phase takes place when the characters are
called to action and must fight to chase off the shadows
and achieve their goals.
The Player Phase is split into 4 sub-phases:
• Start of phase
• Lightshield refill
• Action
• End of phase
Sub-phase: Start of turn
It is the players’ turn. The effects triggered by the
keyword "start of players’ turn" take place at this point
along with other global effects specified in the mission
(for example, loss of citadel prosperity).
Sub-phase: Lightshield refill
In this sub-phase, players draw lightshield cards from
their own stack to refill their hand with the maximum
number of cards allowed to them. If they did not use any lightshield they will not draw any lightshields. If
the lightshield stack is exhausted, players can reshuffle their discarded cards to create a new stack. This
costs 3 lux.
Sub-phase: Action
This sub-phase represents a core phase in Sheol. In this sub-phase, the characters take their individual turns
and perform their actions. The players must decide who is going first, taking their entire turn with their
character. This order of play is not fixed, and players can always change it during the Players Phase (based,
for example, on new revealed informations).
In a turn, each character can move using their movement points allowance and has 3 actions available
among the following: construction, revelation, attack, repair, purchase, extraction and mission. All actions,
can be performed two or more times in a turn (for example, two attacks and one construction) as long as
the character has enough actions to spend. The actions are explained in the section "The players’ action
sub-phase in detail".
Most of the actions have a cost in lux, specified in the equipment cards or on the character board, which
can be discounted using the lightshield cards (see paragraph: use of lightshield).
I you don’t want to do any action, or do less than 3 actions, you can Pass the turn.
Sub-phase: end of turn
13When all players have completed their actions and ended their personal turns, the player phase ends. The
effects triggered by the keyword "end of players’ turn" take place at this point along with other global
end-of-phase effects specified in the mission.
The players’ action sub-phase in detail
Let's see in detail the actions that the characters can perform.
Movement
Character movement means moving the character's miniature by a number of cells equal to the character's
movement value plus any modifiers. Movement is not an action, and movement points can be spent freely
between other actions.
The movement value is specified in the bottom portion of the character board. The first value is the free
movement points allowance that a character can use to move without paying lux. If a character wants to
move more than the free allowance, then they can spend lux and “buy” other movement points following
this procedure:
The first time IN A TURN that you buy movement points, spend the number of lux displayed on the
second value. The second time IN A TURN, spend double that value. The third time IN A TURN, spend
triple the value, and so on.
For example, if your character has a 4 + 3 (2lux)
movement allowance, it means:
● That the first 4 movement points in a turn
are free
● To buy 3 more movement points in the
same turn, you need to spend 2 lux
● To buy another 3 more movement points
in the same turn, you need to spend 4 lux
● And so on...
The movement in Sheol always follows three rules:
● it occurs only according to a 4-connected
diagram, this mean that movement is allowed only
in the four cells orthogonally adjacent; thus, never
diagonally;
● it occurs only on cells in which the
lightstream has been built (unless the character is
in a state of corruption), or on the lands. Characters cannot move on dark empty spaces.
● it occurs only if the cell is free, meaning not already occupied by a shadow or another character. A
character can be passed by paying an additional movement point, as long as the movement value is
sufficient to reach at least the next cell.
The lands have the same function as 4 squares on the map.
Lightshield cards, modifiers and shop cards can increase movement.
14Pay attention that Corruption changes movement rules for that character, because a corrupted character
could also move in the cells without the lightstream (See paragraph “corruption” for more info).
Obstacles could change the movements of players and shadows (see paragraph “obstacles” for more info).
Construction
To move around the lands of Sheol, players must use roads or paths, called lightstream. The lightstream can
be built by carrying out a construction action. Any character can perform such action. The construction cost
in lux and the number of paths built in a single action is specified in the lantern card associated to the
character board.
To construct, the player draws the first tile randomly and places it on the map in one of the squares of the
pattern of the character’s lantern. It doesn’t - right now - need to connect it to other tiles through
lightstream. Repeat if you need to draw other tiles (always randomly), based on the construction value of
the lantern. At the end of the construction action, every path freshly built that is not connected to the
citadel is flipped to the “red” side.
The image shows a few examples of constructions allowed or not allowed.
15The paths have two different sides: the blue side is called "illuminated", the red side "partially illuminated".
Paths should always be placed with the illuminated face up, unless the construction is adjacent to a
shadow, a herald, a boss or a blip. In this case the construction is partially illuminated because the
characters are in a hurry, as the threat of shadows is near.
Each path has a symbol. By aligning three identical symbols, a triplet is performed (see section triplets).
An overload construction value is also indicated on the lantern. A player may decide to build the number of
paths specified by the overload construction value, but to do this he/she risks to damage the lantern.
When you perform an overload building you have to throw the shadow die, if you obtain every result
except the blank or the critical hit, add 1 overload token on the weapon. If you obtain critical hit add 2
overload tokens, if you obtain blank do not add tokens. If the number of overload tokens exceed the
resistance of the item, that is broken (See the “Equipment damage” section).
A character in a dark or corrupt space cannot build (see "destruction of the lightstream" and "corruption").
A character could build under drones or other mission tokens.
The cost in lux to perform a construction action can be discounted using lightshields (see section "using the
lightshield").
Revelation
The shadows of Sheol are by their own nature elusive beings. When a shadow is generated by a singularity
(spawn point), it is called a blip and it is in a state of non-detection. Blips have their own statistics (attack
and resistance) and are more difficult to hit than a revealed shadow.
To reveal a shadow, the characters must perform a revelation action. The cost of this action and its pattern
are shown on the lantern card that goes with the character board. The revelation almost always has a price
in lux, also marked on the lantern card.
16When a character decides to reveal a shadow, they pay the lux cost and target cells on the map based on
the pattern of the lantern. Starting with the blip closer to the character (if there are more than one, players
choose), they flip the blip, revealing the shadow underneath. Replace the blip with the corresponding
miniature or leave the flipped blip if you don’t have the miniature, then do the “revelation action” of the
shadow currently revealed. After that, repeat with every blip targeted, from the closest to the farthest.
Revealed shadows have different characteristics,
they strike less accurately and are easier to hit
than unrevealed shadows. A revelation is an action
that always succeeds and often it is convenient to
reveal the shadows before proceeding with the
attack; however, when a shadow is revealed
adjacent to a character, it could strike or do
something nasty.
When you kill a revealed shadow, you are
rewarded with an umbra.
An overload revelation value is also indicated on
some lanterns. A player may decide to reveal using the overload pattern instead the normal pattern, but to
do this he/she risks to damage the lantern. When you perform an overload revelation you have to throw
the shadow die, if you obtain every result except the blank or the critical hit, add 1 overload token on the
weapon. If you obtain critical hit add 2 overload tokens, if you obtain blank do not add tokens. If the
number of overload tokens exceed the resistance of the item, that is broken (See the “Equipment damage”
section).
The cost in lux to perform a revelation action can be discounted using lightshields (see section " using the
lightshield").
17Attack
The characters have a wide range of weapons and techniques at their disposal to kill the shadows. The
attack action is the main method to destroy the shadows and it always costs lux. The attack range, the
damage caused by the attack and the damage caused by a overload attack are shown on the weapon card
next to the character board.
To attack the shadow, the player must pay the attack cost in lux, declare which is the shadow within the
pattern of their weapon want to attack, and then roll the attack die. The die has six faces which respectively
indicate:
Therefore, success is ensured 2 times out of 6 if the shadow is not revealed and 6 times out of 6 if the
shadow is revealed. Modifiers change the damage inflicted on the enemies. Critical hit allows players to do
a special action based on their character. Half revelation is not applied to base shadows, but is applied to
herald and bosses that could be in 3 conditions: not revealed, half revealed, revealed.
18Attacking a shadow, however, does not always mean killing it. In order for a shadow to be killed, and thus
be eliminated from the game, the damage inflicted must be equal or greater than the resistance of the
shadow. If you can’t do the entire damage in one attack, the damage carries on until the end of your turn,
when the damaged shadow is “healed”.
Killing a revealed shadow always gives a reward of 1 Umbra.
In case of heralds or bosses, they get damage that is permanent, so players don’t need to kill them within
one turn. They are, however, extremely resilient and capable of striking back.
A overload attack is a move to destroy the most powerful shadows. However, whenever a overload attack
is performed, the weapon risks to get damaged. When you perform an overload attack you have to throw
the shadow die, if you obtain every result except the blank or the critical hit, add 1 overload token on the
weapon. If you obtain critical hit add 2 overload tokens, if you obtain blank do not add tokens. If the
number of overload tokens is equal to the item resistance, that is broken (See the “Equipment damage”
section).
The cost of the attack in lux can be discounted using the lightshields (see section "using the lightshield").
Repair
A weapon or lantern damaged by the
use of overload actions or effects can
be repaired and returned to its original
state through the repair action. Every
time a character performs a repair
action, they pay a cost in Umbra listed
on the damaged equipment and then
flip it to the repaired side.
Some characters, Wrench for example,
can help other characters repair their
items. There are also some items that
allow carrying out specific actions only
when the items are damaged.
For other informations about how a
weapon or a lanter is damaged, see the
section “Equipment damage”.
A repair action is free (apart from the
action spent) and does not cost lux, but
Umbra.
Purchase
During missions, it may happen that support
items are needed to allow the characters to
perform particular actions. These items can
19be found in the shop and can be purchased without paying actions but by paying the corresponding Umbra
cost, as long as the character is properly connected to the citadel via the lightstream (either with dim paths
or illuminated paths). When an item is purchased, the player places it next to the character board. You can
play it at any time during your turn with a free action or by paying the cost in actions specified on the item.
Players can send newly purchased items to other characters, but only while they are purchasing the item in
the shop.
Item use
Using purchased items is often free, but it may happen that an item cost is specified on the item card. In
this case, to use the item it is necessary to pay one or more actions.
Extraction
When a character is on a land, he can
perform an extraction action. The player
pays one lux and put an Extractor of
his/her character in a free spot of the
Land. At the beginning of a turn, if the
land is connected to the citadel, the
character receives one, two or three
(depends on the type of Land) Umbra.
There could be only a max of 3 Extractors
on a land, and only one per character.
The characters receive umbra even if it’s
not on the land.
Mission (action)
The mission action represents the time that the characters must spend to do their part in a particular task
specified by the story (for example, collecting information). The mission action can be performed only when
and at the points indicated by the mission cards.
Free actions
There are actions that can be carried out by characters that do not fit into those listed above and that do
not have a cost in terms of actions. These actions are the use of a lightshield ability (if an action cost is not
specified on the card), use of some of the items, discover a land, complete a mission objective (if no mission
action is required), or complete an event during a discovery.
Use of accessories in particular are generally free actions.
20Shadow phase
Sheol starts with a shadow phase. It is at this stage that enemies are generated, move, attack and generally
make it difficult for players to survive. Like the player phase, the shadow phase is split into sub-phases. In
particular:
● Start of phase
● Incoming Threats
● Outer Lord phase
● Heralds phase
● Shadows phase
● Generation of new shadows
● End of phase
Sub-phase: Start of phase
It is the beginning of the shadow phase. The effects triggered by the keyword "beginning of the shadows’
turn" take place at this point along with other global effects specified in the mission (e.g.: generation of a
special shadow in a specific area, boss effects and so on).
Sub-phase: Incoming Threats
Advance the threat token one space on the Threat track. If it reaches a point that was marked by the
Mission Briefing, you need to draw a card from the Threat deck and apply its effects. Some effects apply
only for one turn, some for the rest of the mission.
Sub-phase: Outer Lord phase
The Outer Lord, if present, acts.
21Sub-phase: Heralds phase
During the heralds phase, these enemies make their moves according to the AI specified on their card. In
general they move towards a target using the following rules:
● Spend first action to move towards the target
● There are characters within range? If yes, spend actions attacking them
● If no, spend another action to move towards the target, and check again for attacks.
● Continue until all actions spent
Sub-phase: Shadows phase
After the heralds, the base shadows act. The movement of the base shadows, which can create actual
shadow tides, represents one of Sheol's main game dynamics. It is managed by the roll of a die, called a
gravity die, which determines the axis along which the base shadows will move.
The roll on the gravity die indicates which direction shadows should follow during movement (apart
shadows “locked” on corridors); a plus symbol on the gravity die means that shadows will move twice this
turn.
As seen in the section "main board" , this is subdivided into corner sectors and axis areas (Alpha and
Omega). Let’s review the movement phase:
22• First the player has to roll the gravity die and notice the resulting axis.
• Starting from a corner and going clockwise, move every shadow towards that axis, starting from the
shadows closer to the citadel and moving outwards.
• If the gravity die result is an axis with a +, shadows have to move again toward that axis.
• If a shadow is in a “lock zone”, it will move only towards the citadel from now on, ignoring the
gravity die direction.
• If a shadow encounters another shadow (that has already moved) or an Umbra obstacle, it moves
jumping over the obstacle(s) to the nearest free cell in the direction of the movement.
• If a shadow encounters a “hard obstacle” (grey obstacle, see paragraph obstacles), it foregoes its
movement. That’s the same even when jumping over obstacles and there is a hard obstacle in the
path: the movement is canceled.
• Characters are like “hard obstacles”.
Particular cases of shadow movements
If a shadow enters a land, it occupies it and will no longer move during the movement phase. If it enters a
discovered land, the shadow is automatically revealed, not triggering any revealed actions.
If a shadow during a movement tries to enter a cell in which there is a lightstream without the path in the
shadow direction, it damages the path and the shadows bounces back to the starting cell. On the other
hand, if the shadow tries to enter a cell in which there is a lightstream with a path in its direction, the
shadow damage the lightstream and goes over it. Damaging a path means that if the lightstream was
completely illuminated (blue), it is flipped to the red side, instead, if the path is partially illuminated (red) it
is destroyed, and the shadow occupies the cell where the lightstream was located. Basically, the paths can
be used to hinder the movements of the shadows, but their light is dimmed every time the shadows try to
overcome them. Advanced cards like the districts could increase the power of the lightstreams.
A herald or an Outer Lord that moves over a lightstream destroys it without hindering its movements.
23If a shadow during its movement enters the citadel, it automatically inflicts its damage to the citadel, which
loses an equal number of prosperity points. In this case, the shadow is destroyed and removed from the
game.
Shadow phase: attack
After all the movement, every shadow near a character (near means even by an angle to the character)
attacks the character with most lux. Roll a shadow die for every attack and the character gets damage if hit.
In particular, the shadow die has the following faces:
On a critical hit, the shadow makes is critical/special according to its type.
Sub-phase: generation
During each shadow phase, new shadows come into play. These are generated by points called
singularities. The singularities are of two types: Aeon (triangle) and Oorth (circle). The corresponding
symbols also appear on the Sheol die used for shadow generation and for challenge events (see section
"events”). In particular, the die has the following faces:
Up to 3 Sheol dice can be rolled to determine the generation, based on mission directives. This also
establishes how many shadows should be generated each turn and how many heralds can enter the field.
For example, the mission establishes 2 shadows to be generated and two dice to roll: if during the die roll
the result is an Aeon and an Oorth, 2 shadows will be generated from each Aeon and Oorth singularity in
the field. Instead, if two Aeons are obtained, 4 shadows will be generated from each Aeon singularity.
Everytime you roll a Herald symbol, you should “charge” them (see following “Generation of heralds”
paragraph) until they are ready to be spawned on the map. When there are no more Heralds to be
spawned (because they are already on the map), treat every Herald result on the die as a Aeon or Oorth for
generation.
Generation of basic shadows
The shadows generated are always unrevealed (blips) and must be placed in the cells surrounding the
singularities. Each singularity is surrounded by eight cells. Generation always occurs in these cells unless
they are all occupied. For example, if you must generate two shadows per singularity, you have to draw the
24blips from the pool and for each singularity place them first in the cell in the corner closest to the citadel.
Then, place the second blip in the cell adjacent to the first one closest to the axis obtained with the gravity
die.
The idea is to make the blips always move towards the citadel and along the obtained axis. In fact, if instead
of generating two shadows you must generate 3, you will have to place the last blip on the row of the two
previous ones, always considering the axis obtained by the gravity die. In the case of four shadows, you
must fill the second line starting from the cell closest to the citadel, and so on.
If a singularity has all eight squares occupied, this turn does not generate other shadows.
If a shadow has to be generated on an illuminated road, the road is flipped and there is no generation. If
the road is partially illuminated, the road is destroyed, and generation takes place.
Generation of heralds
Generation of heralds always takes place at the edges of the board. At the beginning of the mission, the
heralds that appear in the mission are placed in random order with their card as an “Herald track”. At the
beginning of the mission place the herald charge token outside on the first cell on the first herald card.
Every time you obtain an herald throwing the Sheol die, you have to advance the token by on cell. The first
herald will spawn when the charge token goes “outside” the card. The herald will spawn near the
singularity (spawn point) more distant from the characters.
Sub-phase: End of phase
It is the end of the shadow phase. The effects triggered by the keyword "end of the shadows’ turn" take
place at this point along with other global effects specified in the mission. Once the shadow phase is over,
the player phase starts again.
25The shadows
Shadows are the characters’ enemies. They move in darkness and plot to destroy what remains of
humanity. In Sheol there are: blips (unrevealed shadows), 3 types of base shadows, 4 heralds and 3 Outer
Lords. The basic shadows and blips are present in every Sheol mission, the heralds start to appear from the
third mission (the first mission of the first campaign), while the Outer Lords are the protagonists of some
missions of each campaign, which focuses on each of them.
If a shadow reaches the island of light, it is incinerated by the light-ring that surrounds the plateau, but the
citadel suffers a loss of prosperity points equal to the attack value of the shadow. For this reason, it is good
to keep the shadows away from the zone close to the Citadel and destroy them before they can reach it.
The following sections describe the shadows in detail along with their effects on the game.
Base shadow: blip
These are the locations where the black mass of Sheol is particularly concentrated. Blips
host solid shadows (lurker, devourer and moth) that crawl into the lands of the night.
Blips, although not represented by a miniature, are shadows that have not been
revealed, yet. The blips originate from the singularities and can create shadows
agglomerates on the game board.
Attack and Resistance stats are indicated on the mission directive currently played.
Critical Hit: Damage dealt cannot be reduced using lightshields.
Base shadow: Lurker
26Millions of tiny strands of darkness unite in a creature driven solely by the instinct to kill. An ambush
specialist, a Lurker can sneak silently behind a scout on a mission and eliminate him without his companions
noticing anything.
A revealed blip can become a Lurker. This resembles a large snake and has a bone-coral formation on the
head that reminds of an astral species of horned viper. When a Lurker hits a character with a critical hit, it is
capable of emitting a corrosive substance that ruins the character's weapon or lantern.
Resistance: 1
Attack: 3
Revealed action: it moves toward the character by one cell. Then, if it’s within range of that character, does
1 damage to the character.
Critical hit: 1 damage is done to the lantern of the character hit (see paragraph “Equipment damage”).
Base shadow: Devourer
Scouts do not need to use lux lamps to understand when a devourer is approaching. The ground shaking is
usually a clear sign it is time for them to run before the Devourer’s fury overwhelms them.
The devourer is a heavy shadow that looks like a cross between a huge bull and a bear. Less lethal than the
Lurker, it is more resistant and has the ability to calcify becoming an insurmountable obstacle when it
strikes with a critical hit.
Resistance: 3
Attack: 1
Revealed action: it spawn a coralbone obstacle under it.
Critical hit: 1 damage is done to the weapon of the character hit (see paragraph “Equipment damage”).
Base shadow: Moth
A desperate cry, frenzied lights that tear through the darkness, and a body suddenly disappearing upward
into the night. This is what happens when the moth glides overhead and silently attacks from the sky. Few
are those who manage to free themselves from its grip without being crushed.
The Moth, as the name says, reminds of a large moth that approaches attracted by the light of the scouts.
It has no mercy. The moth is a flying shadow and when it attacks with a critical hit, it passes over the
attacking character heading towards the citadel.
Resistance: 2
Attack: 2
Revealed action: it moves away from the character by 1 cell.
Critical hit: the affected character gets one Incapacitated status card.
27Heralds
The heralds are Sheol's elite enemies and during their movement phase they do not follow the gravitational
axes towards which the basic shadows are drawn. A herald has always a target, such as a character, and will
follow him until it has killed him. Each herald has unique and lethal characteristics. There may be more
heralds on the field at the same time during the same mission.
Each herald has two phases: one when it is sane and another one when it went berserk. Heralds enter the
field sane and their statistics can be read on the related herald card.
28A Herald goes berserk whenever it reaches the damage threshold indicated on their stat card. Remove all
damage markers on the Herald card and flip it to indicate its new status.
Whenever a berserk Herald reaches its damage threshold, it has been destroyed, rewarding its killer with 5
Umbra.
The number of actions available, the resistance of the herald, the damage, the range, the movement, the
special effect and the target (AI behavior) are specified on the herald cards, for each phase.
Heralds have more than a revealed/hidden status: they have a reveal rating, going from full to hidden.
When you reveal for the first time a Herald, put a “Full
Revealed” token on its card. Whenever it’s attacked
successfully, flip that token to the “Half revealed” side. Again, if
it’s attacked successfully again, remove the token to indicate
that now it’s hidden.
It’s crucial to keep the Herald revealed at all times.
Herald: The Hunter
The hunter is a ruthless shadow, fast and with great range. It will be relentless against the characters who
will try to destroy it.
Herald: The Awakener
The awakener is able to influence shadow generation points on the board and is hungry for the light of the
characters. Stand ready to face the dead.
Herald: The Whisperer
The Whisperer can influence entire game areas and lure characters outside the lightpath.. A tactical
approach is highly recommended.
Herald: The Marauder
The Marauder can easily surpass scout lines to destroy the lightpath near the Citadel and isolate the
characters.
29The Outer Lords (boss fights)
The Outer Lords are Sheol's most fearsome enemies. There are some missions focused on one of them.
Each Outer Lord has at his disposal many action cards and reaction cards that determine its behavior.
At the start of a battle mission against an Outer Lord, place
the relevant Outer Lord board next to the mainboard. Then
place the Action deck and the reaction deck near the Outer
Lord Board. At the beginning of the shadow phase, reveal
the first action card. On this card are indicated: the
resistance of the Outer Lord for that turn, the attack of the
Outer Lord, any special actions or moves.
Inflicting damage to an Outer Lord means overcoming the
life points of the Outer Lord. When this is done, discard the
active Action card and heal the Outer Lord in full. Basically,
to defeat an Outer Lord it is necessary to make it discard all
the Action cards that represent not only his moves, but its
life bars as well. Destroying an Outer Lord is usually the
main goal of the mission.
30If at the end of the players' turn the Outer Lord card has not been discarded, it ends up at the bottom of
the Outer Lord stack and the next one is drawn.
Outer Lords have some reaction cards that are used during the player phase.
After revealing the next action card, shuffle the reaction deck and draw a facedown card, putting it below
the active action card. Then, shuffle and draw a facedown reaction token, reveal it and place it onto the
facedown reaction card.
That reaction is going to be triggered between player’s turns: the number indicates that the reaction will be
triggered after that many player’s turns.
Example: there are 4 players in play and in the Shadow phase it’s been draw a reaction card with a “2”
token. At the end of the 2nd player’s turn, the reaction is revealed and activated, following its effects.
Reactions vary based on the Illuminated state of the boss, so pay attention of that when triggering the
effects.
Outer Lord: Tzion, the crying mountain
A megalithic being who cries rivers of black tears.
Outer Lord: Tisha B'Av, the walking cataclysm
31A colossus that marches across the lands of the night destroying everything in its path.
Outer Lord: Olam haBa, the wandering child
A floating creature that appears as big as the moon.
32Surviving in the land of the night
At this point, you should have a pretty good overview of the Sheol's world and its main rules. In the
following sections we will focus on the mechanics that are ancillary to the main action during a game
session and how they can influence and enrich the gaming experience.
Triplets
The road tiles that make up the lightstream have symbols in the middle. When placing or turning a road, a
linear path is formed (not diagonally) and 3 identical symbols are obtained, a triplet is formed. The triplet
rewards the one who created it with 3 Umbra, simulating that by exploring the lands of the night the
character found useful resources for the citadel. However, once the triplet is created, the lightstream will
wear out and the roads will be flipped again. If a road is illuminated (blue side), it becomes partially
illuminated (red); if it is already red, it is destroyed.
If the flipped roads were to form a triplet again either on their own or with other roads, the player earns an
additional 3 Umbra, but the roads will be destroyed.
Forming triplets is a good way to gain Umbra currency, but it compromises the lightstream and makes it
weaker to the shadows.
Destruction of the lightstream
During Sheol's missions, the lightstream may be destroyed for several reasons: creation of triplets,
progression of shadows or use of abilities such as demolition. If a character is on a lightstream that is
destroyed (not following the advance of a shadow, since the shadow action would turn into an attack), he
remains on the dark. If a character ends his turn in the dark, they lose 2 lux. They cannot do a construction
action while in the dark.
33Disabling singularities
Singularities are the origin of Sheol's swarms of shadows and represent the character’s thorn in the side.
However, they can be deactivated using a particular item in the shop. When a singularity is deactivated, its
token is flipped, and the singularity does not generate more shadows during the generation phase.
In a game, however, it is not possible to deactivate more than the number of the singularities specified by
the mission. When a singularity above the maximum limit allowed is deactivated, the first that was
deactivated is reactivated (it must be flipped again) and can resume to generate shadows. For this reason,
the singularities to be deactivated must be carefully chosen.
Discoveries and events
Events are some of Sheol's most entertaining moments. When a character first enters a land that is face
down, he/she flips it and makes a discovery. A discovery is a free action.
● First, look in the Optional Mission deck for the card linked to the land and put into play.
● If there is already another Optional Mission in play or there is no linked Optional Mission card in the
deck, proceed to the next step
● Look in the Event deck for the card linked to the land and resolve it.
● If you have already resolved 2 events during this mission or there is no Event card linked to the
deck, do not do anything.
The event card must always be drawn by a player other than the one who triggered the event. This player
will read the card and present to the player who triggered the event a choice among those available on the
event card, without revealing the consequences.
Many events consist in dealing with a challenge (see section "challenges") and may have negative
consequences on the character and in some cases on the entire team.
34Once the effect of the choice has been dealt with, the event must be put aside, because it will never be
used again.
Challenges
In several missions and numerous events, players are asked to overcome a challenge. A challenge consists
in obtaining the required symbols by rolling 3 Sheol dice. Furthermore, each challenge shows the
archetypes. A die can be rolled again for each archetype involved in the challenge. For example, if it is
required to destroy a boulder and the challenge is to roll 2 Oorth with attack and defense archetypes, the
player must roll three dice and if one of his archetypes is an attack or a defense, he may roll again one die
for each one of the archetypes.
The challenges have always consequences that lead to success or failure to be read on the respective event
or mission card. It is not possible to repeat a challenge.
Using the lightshields
Correct use of lightshields is one of the keys to succeeding in completing mission objectives in Sheol. Each
player starts the missions with 13 lightshield cards. Each lightshield, except for special, has 3 basic uses:
- The primary effect
- The discount or secondary effect
- Reduce damage when suffering an attack.
Lightshield cards can be used at any time in a turn, except for the support ones, which must be used during
another player's turn. Playing a lightshield card does not cost lux, umbra or actions unless specified on the
card.
Typically, the lightshield effects can be subdivided into 5 types:
● Free actions, playable during a turn, which result in an instant effect. Some of the character-specific
lightshields, such as "demolition", belong to this group.
● Modifiers of existing actions that must be played while performing a specific action. E.g.: sight
adjustment.
● Discounts on actions that must be played while an action is being taken.
● Special effects that have an action cost and allow the character to make unique moves.
35● Playing supports that must be played on a companion's turn and help him to perform certain
actions.
When to use and how much is the cost of each lightshield is information always specified on the respective
cards.
New lightshields can be added to the deck as the various missions progress (see section "Development
phase").
If the lightshields end and during the recharge phase a player cannot draw further cards, he can shuffle the
discard pile to form a new pile at the cost of 2 lux. These actions represent how much rest the character
needs before being able to restore his reserve of useful actions.
Items use
Using your Umbra reserves to buy items can make the difference between victory and defeat. Items can
help characters inflict that extra damage they need to defeat a herald, or restore lost lux, or increase
movement.
The items are subdivided into categories. Each category could be upgraded during the Development phase
Equipment damage
Equipment like weapons, lanterns and accessories could be damaged during
the game. Damage is counted with overload tokens. Items could be damaged
mainly in 3 ways: by enemies if specified in their critical hit, by land events or
scripted mission events, or by using the overload option of the item (see attack
“paragraph”).
When the number of overload tokens is equal to the item resistance (the number located in the overload
section), it is broken and the card flips. Then you can repair the item using a repairing action (see paragraph
“repair action”).
Citadel Districts
The citadel districts represent the influence of the citadel on the game board and allow passive and active
effects to be applied to entire play areas. Districts are unlocked through the Development Phase.
Passive effects are always working, while active effects are triggered by the players. Pay attention that most
of the active effects can be used only one time per mission, but they could be refreshed by some triggering
actions, and be used again during the mission.
The time factor
The time factor is a key variable during Sheol's games. Procrastinating the completion of objectives in most
cases leads to being overwhelmed by shadows. In fact, the more the players take turns to carry out their
actions and to achieve the objectives, the more the main board becomes crowded with shadows.
Sheol does not have a definite playing time in which the game is considered finished, but as turns go on, the
situation will become increasingly unsustainable for the characters and lethal for the citadel.
36Combining the compromising effects of weapons, shop items, action cards and citadel districts is key in
acting synergistically, avoiding threats and achieving goals in the shortest time possible.
Corruption
In the world of Sheol corruption occurs when the characters suffer too much influence from the shadows,
which begin to have physical and psychological effects on them. In terms of gameplay, a character goes into
a state of corruption when his lux points fall below 0 in his last vial. The player should then flip the vial to
the red side board and put the counter on 5 lux. A corrupted character, therefore, has a 5 more lux points
to spend before dying, but also gains advantages and modifiers that make him stronger. In particular:
● the player board is flipped to represent the character's corruption. Some of the basic indicators can
change.
● corrupted characters can use the disruptive attack of weapons without paying their cost.
● corrupted characters can use the disruptive construction of the lantern without paying their cost.
● Corrupted characters can move into any unoccupied space on the board, so they are no longer tied
to illuminated paths. However, if a character ends his turn in a shadow zone, they lose 2 lux.
During the corruption state, you can regain lux to a max of 5, but you can’t exit the corruption.
Obstacles
Sheol obstacles are tiles that can prevent or encourage movement for players and shadows. There are 3
types of obstacles: obstacles for players (red), obstacles for shadows (blue), obstacles for everyone (grey).
Players can go over blue obstacles, but shadows can’t. Shadows can go over red obstacles, but players
37can’t. Neither can go over grey obstacles. Obstacles cannot be destroyed, except for special effects defined
by mission cards.
38Development Phase
In Sheol, after completing a mission, your scout group
returns to the citadel and the development phase
begins. This phase is played in group and players must
make decisions together to improve the equipment of
their characters, take care of them, improve the shop
and the districts of the citadel.
Development points and faction points earned during
the mission are used to do this.
To play this phase, first close the game board and place
the citadel board in the center of the table. Then take
the district pack and the upgrade pack depending on
the level of the mission you have just accomplished and
place them next to the board. In sheol there are 3
upgrade levels, 1 per floor of the citadel, which
correspond to as many decks of favors and districts.
The first level is unlocked automatically, while to access
the next levels 2 conditions must be met:
● The mission just completed must belong to the
level to be unlocked (e.g. to unlock level 2 you must have arrived at least in mission 5 of the main
campaign)
● All quarters of the citadel of the previous level must be built. That means 4 lvl. 1 districts to unlock
the second level and 3 lvl. 2 districts for the third.
39After defining the upgrade decks, also place the shop cards and all the favors/equipments already unlocked
by your characters on the table. At this point, as explained in the diagram on the left side of the citadel
bridge, you have several options for improvement, in particular:
● Build new districts. The cost is 2 development points for a first level district, 3 for the second level,
4 for the third. To build a district you must choose a card from the districts deck and determine
which “face” to build. In fact, each card shows 2 thematically related districts, one with a passive
ability that lasts for the entire game, another with an active charge ability that can be spent at any
time during the game. The choice of whether to build the active or passive district is exclusive.
Furthermore, once a district has been built, it will remain on the citadel board for the entire
campaign and can no longer be changed.
● Purchase favors. To buy favors, or new actions and equipment, take the favors deck, mix it and
place it in front of you face down. Then spend one faction point of your choice and start revealing
one card at a time starting from the top one, until you have revealed 2 cards of the chosen faction.
Once done, put them aside. Then repeat the procedure for any other faction points you want to
spend during the development phase. If the deck runs out, reshuffle and start again from the
beginning. Finally, place all the cards set aside on the game board. These cards entered the market
and can be purchased using 1 development point for 1 card (here too the cost rises to 2 or 3 per
card if the deck is of a higher level). All the cards purchased in this way become permanent party
property for the entire campaign, and can be assigned to the characters during the missions if they
comply with the archetype indicated above. All faction points left at the end of this phase are
discarded, while revealed cards not purchased return to the favor deck.
● Treating players. During the game players can be injured and have negative status cards in their
lightshield decks. By spending 1 development point, up to 2 status cards can be removed from a
single player's deck.
● Take care of the citadel. The citadel suffers permanent damage during missions. These damages
can be cured at this stage. The first damage can be healed for free, while the subsequent damage
can be healed at the cost of 1 development point for each damage.
● Improve shop items. Each object in the shop has a corresponding higher level object. By spending 1
development point, it is possible to choose 2 objects from the shop and replace them with the
relative higher level objects.
● Convert development points to faction points. It is possible to obtain 1 faction point by paying 2
development points.
Factions and alignment
The inhabitants of the citadel and of the outer outposts belong to factions that influence their political and
social life. The characters too, during the missions, will accumulate faction points that establish their
propensity, or their "alignment" towards a particular faction.
Faction points correspond to counters accumulated through missions and events.
Accumulating points in factions is essential for three reasons:
● Factions affect what equipments and techniques could be discovered during the Development
phase
● The alignment that favors a particular faction can influence missions and game events.
● The alignment determines the end of Sheol's campaigns and history.
40You can also read