SAFE-T-TILE TECHNICAL MANUAL - Installaon Maintenance Manufactured in the U.S.A. by: AMARCO Products
←
→
Page content transcription
If your browser does not render page correctly, please read the page content below
SAFE-T-TILE TECHNICAL MANUAL
     Installa on· Maintenance
            Manufactured in the U.S.A. by:

                 Revised on 28 Feb 2022
             Supersedes all previous versions.
       Check www.amarcoproducts.com for updates.

                www.amarcoproducts.com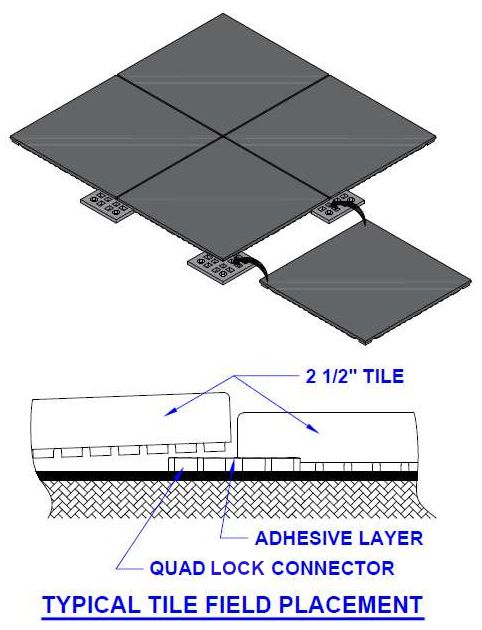
SAFE-T-TILE - TECHNICAL MANUAL

               Table of Contents
Base Prepara on
General Informa on                   3
Tool/ Material Required              4
Site Work                            4
Base Op ons                          4

Installa on
Site layout                          6
General Informa on                   6
Fully Adhered Installa on            6
Quad Lock Installa on                7
Poly Foam Pad Installa on            8
Cu ng & Accessories                  9

Maintenance
Indoor Maintenance                   10
Outdoor Maintenance                  11

            www.amarcoproducts.com                                2
SAFE-T-TILE - TECHNICAL MANUAL
Base Prepara on
I. GENERAL INFORMATION
Safe-T-Tile playground safety surface les and accessories by Amarco Products can be installed on
concrete, asphalt, wood or compacted gravel base surfaces, except for limita ons noted herein.
NOTE: Dimensional tolerance is +/- 1/8" for thickness and +/- 1/8" for width. It may be necessary to
hand select some les to make sure the course lines remain straight during the installa on. Color
tone and shading may vary to the extent that some hand selec on is required to maintain
uniformity throughout the site.
NOTE: Slight variance in shade and color chip dispersion is normal. It is the installer’s responsibility to
inspect all products to ensure the correct style, thickness, and color. Any moderate to severe
discrepancies should be reported immediately before beginning installa on. No labor claim will
be honored on material installed with visual defects.
Interior Exterior
Surface 24" x 24" x 2-1/2" 24" x 24" x 2-1/2"
Quad Lock1 Full Glue1,2 Quad Lock1,4 Full Glue1,2
Concrete Surface Approved Approved Approved Approved
Asphalt Surface Approved Approved Approved Approved
Plywood Approved Approved Approved No
Compacted Gravel3 Approved No Approved No
Wood or Tile Approved No Approved No
Resilient Flooring Approved No Approved No
Rubber Roofing4 N/A N/A Approved No
Please note:
1. Tile must always be glued to top of Quad Lock
2. “Full Glue” requires full spread adhesive using Safe-T-Tile Adhesive with 1/8” square notch trowel. Bond
test is recommended; installer responsible to determine suitability.
3. Compacted Gravel sub-base may experience movement and subsidence; sub-base out-of-flatness,
movement, subsidence, etc. are warranty exclusions.
4. Only adhere le to Quad Lock connector; do not glue Quad Locks or Tiles to the roof.
www.amarcoproducts.com 3SAFE-T-TILE - TECHNICAL MANUAL
II. TOOLS/MATERIALS REQUIRED
1. Two tape measures - one 25’, one 50’ 13. Framing square
2. Safety glasses 14. Trash bags
3. Chalk line 15. Silver or gold color paint pencils
4. 1-1/2” flexible pu y knife 16. Push broom or high velocity blower
5. Saber saw 17. Standard size caulk gun
6. Coveralls 18. Mineral spirits
7. Blades for saber saw (7-10 teeth per inch) 19. 4” slot blade screwdriver
8. Kneepads 20. Installa on instruc ons
9. Solvent safe rubber gloves, long cuff style 21. Silicone Spray Lubricant
10. Dustpan 22. String line
11. U lity knife with heavy-duty blades 23. Notched trowels (1/8” square notch)
12. Rags 24. Cu ng table (shipping pallet)
III. SITE WORK
A. Site Eleva on
1. On grade installa on - The finished installed height of the Safe-T-Tile surface will be equal to or slightly
higher than the perimeter grade but not more than 1" higher unless approved by the project
engineer.
2. Above grade installa on - The installa on of Safe-T-Tile over exis ng decks or slabs is referred to as an
“above grade installa on” and will usually require the use of reducers around the perimeters of the
area to transi on smoothly back to the floor eleva on, unless the site terminates at a wall or other
ver cal surface.
B. Site Slope / Drainage
1. When preparing a new hard base, a minimum slope equal to 1" per 8 feet of run shall be applied to
the finished surface with slope toward the down-grade side of the site, as appropriate.
2. Provide for drainage system to eliminate standing water.
IV. BASE OPTIONS
A. Hard Base Construc on
1. Concrete Base
a. Minimum compressive strength of 3000 psi, cured for a minimum of 28 days.
b. Provide base flat to the equivalent of 3/16˝ (4.8 mm) in 10´ (3.0 m). A light broom finish is best if
fully adhering the les.
c. If outside, provide a minimum slope equal to 1” per 8 feet of run toward the drain or down-grade
side of the site or as specified.
2. Paved Asphalt Base
a. Coarse aggregate mixtures will provide a stable base. The aggregate size best suited for the
adhered system is 3/8" to ½". Do not use asphalt mixtures that contain a high percentage of fines,
as they are not stable in hot weather and may become so enough to allow the les to slide in
high use areas.
b. The soil subgrade must be compacted with a minimum of two passes of a 10-ton vibratory roller
with no so or moving areas upon comple on. The crushed stone base must also be compacted
with a minimum of two passes of a 10-ton vibratory roller. The binder and wear courses of the
asphalt must both meet 95% of the theore cal maximum density of the JMF (Job Mix Formula).
www.amarcoproducts.com 4SAFE-T-TILE - TECHNICAL MANUAL
Analysis of Asphalt Wear Course
Total Passing Sieve Percent by Weight
½” 100
⅜” 80-100
#4 45-90
#8 30-65
#50 5-25
#200 2-8
Asphalt Cement 6-8
c. New asphalt surfaces should cure for 28 days before adhering Safe-T-Tiles.
B. Compacted Loose Base Construc on
1. In outdoor areas or areas with no walls or confines, a perimeter footer will need to be constructed to
contain the compacted base and stone dust.
2. Excavate approx. 9 inches of soil below the required finished le level. Prepare approx. 6 inches of
compacted, crushed stone followed by one inch of stone dust on top. Allow for a 1” in 10 LF slope for
moisture movement to drainage pit as applicable. Some bases may require a perforated drainpipe to
remove moisture build-up.
3. By adding addi onal stone and compac ng to the top of the concrete footer, the Safe-T-Tile can be
laid over the top of the footer concealing it, if so desired.
4. The crushed stone must be compacted to 95% standard proctor compac on and should be a
homogeneous mix suitable for and available in your geographic area. One example mix might be:
Total Passing Sieve Percent by Weight
⅜” 100
#4 85-100
#100 10-30
5. Cover the en re stone dust area with geo-tex le fabric, including the top of the footer if the
Safe-T-Tile extends over the footer. Overlap successive geo-tex le sec ons a minimum of 4". The
geo-tex le should be permanently adhered to the top of the en re footer on all sides.
NOTE: Compacted Gravel sub-base may experience movement and subsidence. Subbase out-of-flatness,
movement, subsidence, etc. are warranty exclusions.
www.amarcoproducts.com 5SAFE-T-TILE - TECHNICAL MANUAL
Installa on
I. SITE LAYOUT
A. Sweep area clear of all dust and loose debris.
B. Determine a star ng point for the first course of le to best suit the site area. Because most walls /
borders are not straight or corners square, le installa on generally starts in the middle of the area.
Measure the width and length of the space, divide the room into 4 equal quadrants and snap chalk lines
that are perpendicular (90 degrees) to each other.
C. Adjust the star ng point to balance the les in the space and not end up with small cuts of le against the
perimeter. Begin installa on where the two (adjusted) perpendicular chalk lines meet.
NOTE: Trimmed / par al les may require addi onal underneath support; this will need to be site
engineered.
II. GENERAL INFORMATION
NOTE: For roo op and specialty applica ons, we recommend the use of Quad Locks; the les are
adhered to the Quad Lock connector and not to the roof.
III. FULLY ADHERED INSTALLATION
A. NOTE: Fully adhered installa on method is NOT permi ed over Poly Foam or rubber roofing
B. If fully adhering les on an interior installa on, moisture must be measured using the RH Rela ve
Humidity test method per the ASTM F2170 test standard. Moisture content should not exceed the
allowable limit of the selected Safe-T-Tile Adhesive.
a. Safe-T-Tile Adhesive – RH limit of 85% – normally selected
If RH levels exceed the selected Safe-T-Tile Adhesive’s RH limit, stop and correct the situa on. If outside,
simply use Safe-T-Tile Adhesive
C. In the event that a moisture mi ga on system is required, it must conform to the ASTM F3010 Standard
Prac ce for Two-Component Resin Based Membrane Forming Moisture Mi ga on Systems for use Under
Resilient Floor Coverings.
D. Perform pH tests on all interior concrete floors. If greater than the allowable limit of the selected
Safe-T-Tile Adhesive, neutralize prior to installa on.
E. The les, accessories, and substrates must be dry before, during, and 24 hours a er the applica on of
adhesive. Higher temperatures and humidity levels will cause the adhesive to set faster and colder
temperatures and low humidity will slow down the curing process. The installer should monitor on site
condi ons and adjust open mes accordingly.
F. Using a 1/8” square-notched trowel, apply the Safe-T-Tile Adhesive slightly wider than the le being
placed. Coverage rates for the Safe-T-Tile Adhesive using a 1/8" square-notched trowel are approx. 60 sq/
gal on concrete and approx. 50 sq/ gal on asphalt.
G. Place le into the fresh adhesive bed following pre-established lines. If applicable, place ramps into the
fresh adhesive in a similar manner.
H. Allow 24 hours for adhesive to cure before opening the area for use.
www.amarcoproducts.com 6SAFE-T-TILE - TECHNICAL MANUAL
IV. QUAD LOCK INSTALLATION
A. NOTE: Quad Locks are required over Poly Foam
B. Follow the Site Layout instruc ons.
C. Once chalk lines are established, place the first le at the intersec on of two chalk lines, aligning adjacent
edges of the le with the chalk lines.
D. Apply a con nuous 3/8" diameter bead of Safe-T-Tile Adhesive along the center axis of all Quad Lock
connectors. Insert le into Quad Lock WHILE ADHESIVE IS STILL WET. Adhesive open / working me is
dependent upon environmental condi ons.
E. Fit the first le with four prepared Quad Lock connectors by li ing each le corner slightly, sliding the
connectors under each corner and engaging the four corner legs of each le with the respec ve apertures
in the Quad Lock. Con nue to sequen ally lay the le and to set the Quad Lock connectors along one
chalk line un l the first course of le is complete.
NOTE: Cut Quad Lock connectors in half to secure le at the perimeter edge of surface area.
F. Complete the other three quadrants of the roof deck in a similar fashion.
G. Depending on manpower availability, one or more quadrants can be worked on simultaneously using the
above method.
H. Allow 24 hours for adhesive to cure before opening the area for use.
I. One 10.1-ounce tube of Safe-T-Tile Adhesive is required for approx. 10 of the 8" x 8" Quad Locks.
V. POLY FOAM PAD INSTALLATION (UNDER SAFE-T-TILE AND QUAD LOCK)
CAUTION! Please note:
1. Quad Locks must be used when installing over Poly Foam
2. The top of the Safe-T-Tile Poly Foam Pad is covered with fabric.
3. Plan ahead! Posi on the Poly Foam (cut if necessary) so the edges of the Safe-T-Tile do not line up
with an edge of a Poly Foam pad sec on.
4. The Poly Foam Pads are only to be used with both the 2-1/2" Safe-T-Tile and Quad Locks
www.amarcoproducts.com 7SAFE-T-TILE - TECHNICAL MANUAL
A. Sweep area clear of all dust and loose debris.
B. Determine star ng point for the first course of the 39-1/16" x 90-9/16" x 2-1/4” thick Safe-T-Tile Poly
Foam Pad. For irregular configura ons, the best star ng point is o en in the center to ensure a
symmetrical finish for les that require trimming along the perimeter. Some installa ons are best started
in the corner or along the edge that represents the length or width dimension of the site.
C. Once the layout is determined, apply Safe-T-Tile Adhesive with a 1/8" square notched trowel to a 6" x 6"
area at each of the 4 bo om corners of every 39-1/16" x 90-9/16" Safe-T-Tile Poly Foam Pad and adhere
to concrete. Extra adhesive may be necessary over rough substrate surfaces. Place the Safe-T-Tile Poly
Foam pads ghtly against each other. Rough substrates or windy condi ons may require weighing down
the Poly Foam pads un l the adhesive develops a firm set.
NOTE: The top of the Safe-T-Tile Poly Foam Pad is covered with fabric.
D. The most accurate cuts are made using a heavy-duty high carbon steel linoleum knife and a straight edge.
A saber saw u lizing a 7-10 TPI wood cu ng blade also does an acceptable job, especially for free-form
cuts. Blade must be long enough to penetrate the 2-1/4" pad.
E. When installing pad around equipment posts, a minimum 6" perimeter area of adhesive should be
u lized. Standard hole saws work well for making cutouts, but a lead in cut is required to place the pad in
place around the posts.
F. To install le and Quad Lock over the Safe-T-Tile Poly Foam Pad, begin by following the Site Layout
Installa on Instruc ons to prepare the site for the installa on of 2-1/2" Safe-T-Tile.
G. Follow the Quad Lock Installa on Instruc ons to prepare the site to install le and Quad Lock connectors.
VI. CUTTING TILES & ACCESSORIES
A. Avoid leaving a cut edge of a le exposed to eyesight. To ensure a finished appearance, any le that has
its factory molded edge removed or cut for any reason should be posi oned against a transi on ramp,
masonry, or mber edging unless the edge is to be placed against a wall or other ver cal member. Use
either a silicone sealant or a permanently elas c urethane sealant/adhesive for filling gaps, if any,
between cut edges and walls.
B. Use a heavy-duty u lity knife and a straight edge for a clean, neat surface cut followed by a saber saw
using a 7-10 TPI wood cu ng blade to finish cu ng. Silicone spray lubricant can make cu ng easier.
Consider using a band saw on larger jobs.
C. It may be necessary to cut les to fit around the play equipment suppor ng posts. Make the cutout
approximately 1/4" larger in all dimensions than the support to prevent binding of the le around the
support. Voids between the equipment supports and le cuts should be filled in with silicone urethane
sealant or adhesive.
D. Lay out le cuts out by referencing dimensions from the edges of les already in posi on, and then
transfer these dimensions to the le to be cut.
E. A lead-in cut is made from the le edge to the por on to be cut and is usually the shortest distance from
the cutout area to a le edge or one that is less no ceable.
F. Reducers should be miter cut for the correct fit at the corner
www.amarcoproducts.com 8SAFE-T-TILE - TECHNICAL MANUAL
Maintenance
I. INDOOR MAINTENANCE
1. Ini al Cleaning
a. Remove all surface soil, debris, sand, and grit by sweeping, dust mopping, or vacuuming with a high
CFM vacuum.
b. Scrub floor with Safe-T-Tile Cleaner (10 oz. /gal. of water), using buffer or auto scrubber with a so
nylon brush or pad per table above. Avoid flooding the floor.
c. Pick up the solu on with a wet vacuum. Rinse with clean water, picking up the rinse water with a wet
vacuum and allowing it to dry thoroughly (6-8 hours).
2. Daily/Regular Cleaning
a. Remove surface soil, debris, sand, and grit by sweeping, dust mopping, or vacuuming. b. Hose or
power wash with Safe-T-Tile Cleaner diluted (2-4 oz. /gal. of water)
3. Heavy Soil
a. Remove surface soil, debris, sand, and grit by sweeping, dust mopping, or vacuuming.
b. Scrub floor with Safe-T-Tile Cleaner using a low speed scrubber or auto scrubber with pad per table
above.
c. Pick up solu on with a wet vacuum, rinse with clean water, and allow to dry thoroughly (6-8 hours).
4. Restora ve Maintenance
a. Remove surface soil, debris, sand, and grit by sweeping, dust mopping, or vacuuming.
b. Heavily scrub floor with Safe-T-Tile Strip diluted per table. This cleaning may be performed with an
auto scrubber or low speed scrubber with pad per table above.
c. Vacuum soiled solu on with a wet/dry vacuum.
d. Pick up the solu on with a wet vacuum. Rinse with clean water and allow the floor to dry thoroughly
(6- 8 hours).
Indoor Cleaning Diluted
Mixture Equipment
Maintenance Product Coverage
Vacuum. Scrub with so Nylon
Brush or 3M 4100 White or 4200
10 oz./gallon 2,000 sq.
Ini al Cleaning Safe-T-Tile Cleaner Beige Pad on low speed
water ./gallon
scrubber. Vacuum up water.
Rinse and Dry
Vacuum. Scrub with so Nylon
Brush or 3M 4100 White or 4200
2-4 oz./gallon 6,000 sq.
Maintenance Cleaning Safe-T-Tile Cleaner Beige Pad on low speed
water ./gallon
scrubber. Vacuum up water.
Rinse and dry
Vacuum. Scrub with 3M 5300
10 oz./gallon 2,000 sq.
Safe-T-Tile Cleaner Blue pad, Brown 7100 or Black
water ./gallon
Heavy Soil and 7200 pad on low speed
Restora ve Cleaning scrubber. Do NOT use High
16 oz./gallon 1000 sq.
Safe-T-Tile Strip Produc vity Pad. Vacuum up
water ./gallon
water. Rinse and dry.
www.amarcoproducts.com 9SAFE-T-TILE - TECHNICAL MANUAL
II. OUTDOOR MAINTENANCE
Outdoor Diluted
Cleaning Product Mixture Equipment
Maintenance Coverage
Vacuum or leaf blower, hose or
10 oz./gallon 2,000 sq. .
Ini al Cleaning Safe-T-Tile Cleaner power wash, or scrub with so
water /gallon
Nylon Brush or 4200 Beige Pad.
2-4 oz./gallon 4,000 – 6,000 Blow, vacuum or sweep loose
Maintenance Cleaning Safe-T-Tile Cleaner
water sq. . /gallon debris and power wash or hose.
Vacuum or leaf blower, hose or
2-4 oz./gallon 4,000 – 6,000 power wash, or scrub with so
Periodic Cleaning Safe-T-Tile Cleaner
water sq. . /gallon Nylon Brush or 4200 Beige Pad.
Vacuum or squeegee dry.
10 oz./gallon 2,000 sq. .
Safe-T-Tile Cleaner Power wash or scrub using
water /gallon
Heavy Soil and 3M Brown 7100 or Black 7200 pad
Restora ve Cleaning on low speed scrubber.
16 oz./gallon 1,000 sq. .
Safe-T-Tile Strip Do NOT use High Produc vity Pad.
water /gallon
Power Scrubber ● Low speed (175-300 rpm) 17" rotary floor scrubber with brush / pad a achment
Auto Scrubber ● Unit with clear rinse feature and wet vacuum with wand pickup nozzle
Cold Water Pressure ● Extensions for trigger gun and quick disconnect fi ngs
Washer
CAUTION: Use all applicable PPE when using power washers. Use power washer
least 18" from le surface with the appropriate pressure and recommended 40° wash
nozzle. Power washers can cause significant and permanent damage. Hire a
professional if unsure regarding power washing safety or use.
www.amarcoproducts.com 10You can also read