Seashore
The Incomplete Guide
←
→
Page content transcription
If your browser does not render page correctly, please read the page content below
Seashore The Incomplete Guide
Contents

Contents.......................................................................................................................... 1

Introducing Seashore....................................................................................................... 4

   Product Summary........................................................................................................ 4

   Technical Requirements .............................................................................................. 4

   Development Notice.................................................................................................... 4

   Seashore’s Philosophy................................................................................................. 4

   Seashore and the GIMP............................................................................................... 4

   How do I contribute?................................................................................................... 5

The Concepts .................................................................................................................. 6

   Bitmaps....................................................................................................................... 6

   Colours ....................................................................................................................... 7

   Layers ......................................................................................................................... 7

   Channels ................................................................................................................... 10

   Selections.................................................................................................................. 12

The Tools...................................................................................................................... 14

   The Toolbox.............................................................................................................. 14

   Colour Selection........................................................................................................ 15

   Texture Selection ...................................................................................................... 15

   Brush Selection ......................................................................................................... 16

   The Rectangular Select Tool                   .................................................................................. 17

   The Elliptical Select Tool                ...................................................................................... 18

   The Lasso Tool ...................................................................................................... 19

   The Polygon Lasso Tool                  ........................................................................................ 20

                                                                 1
The Colour Selection Tool ..................................................................................... 21

   The Pencil          ............................................................................................................. 22

   The Paintbrush            ...................................................................................................... 23

   The Colour Sampling Tool                    .................................................................................... 24

   The Text Tool ........................................................................................................ 25

   The Eraser          ............................................................................................................. 26

   The Paint Bucket             ................................................................................................... 27

   The Gradient Tool              ................................................................................................. 28

   The Crop Tool            ....................................................................................................... 29

   The Clone Tool             ..................................................................................................... 30

   The Smudge Tool               .................................................................................................. 32

   The Effects Tool            .................................................................................................... 32

   The Zoom Tool              ..................................................................................................... 33

   The Position Tool             .................................................................................................. 34

The Operations.............................................................................................................. 36

   Adjusting Boundaries ................................................................................................ 36

   Scaling ...................................................................................................................... 37

   Changing Resolution ................................................................................................. 38

   Selection Effects ....................................................................................................... 39

Miscellanea................................................................................................................... 41

   Adding Textures........................................................................................................ 41

   Adding Brushes......................................................................................................... 41

   Advanced Selections ................................................................................................. 42

   ColorSync ................................................................................................................. 44

   The Information Panel............................................................................................... 45

                                                                 2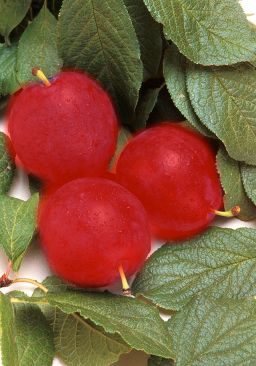
SVG, JPEG 2000 and EXIF Support ......................................................................... 46

   GIMP Compatibility.................................................................................................. 47

   A Final Word ............................................................................................................ 48

Credits .......................................................................................................................... 49

License.......................................................................................................................... 51

                                                                 3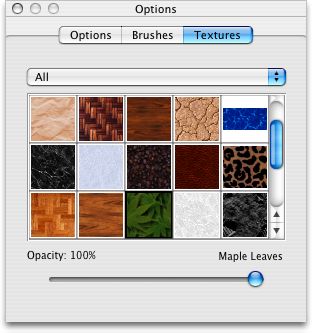
Introducing Seashore

Product Summary
Seashore is an open source image editor for Cocoa. It features gradients, textures and
anti-aliasing for both text and brush strokes. It supports multiple layers, alpha channel
editing and Core Image effects. It uses the same native file format as the GIMP.

Technical Requirements
Seashore requires Mac OS 10.3 or later. Seashore is a universal binary that works
natively with Intel and PowerPC-based Macs. Seashore is able to take advantage of Mac
OS 10.4’s Core Image framework to provide access to a wide range of effects. (Note:
Core Image effects are not available for G3 users).

Development Notice
Seashore is still under development and may contain bugs. Please make sure to only work
on copies of images, as there is the potential for corruption. Also please report any bugs
you find using the “Report a Bug” menu item.

Seashoreʼs Philosophy
Seashore highlights the qualities I value in software: it’s sleek, well-documented and
open source. It also integrates tightly with the Mac operating system and is thoroughly
object-oriented. It aims to serve the basic image editing needs of most computer users,
not to provide a replacement for Adobe Photoshop.

Seashore and the GIMP
Seashore is not the GIMP (GNU Image Manipulation Program), because I didn’t want a
Mac version of the GIMP. Rather Seashore marches to the beat of its own drum, but it
does use the GIMP to help make it the program it is. Parts of the GIMP are present in
everything from the code that drives the brush and gradient tools to the brush shapes and
textures themselves.

                                             4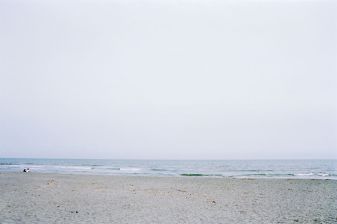
I owe a great debt of gratitude to the authors of the GIMP, as without the GIMP,
Seashore would not be the program it is today.

See also: Miscellanea – GIMP Compatibility, The GIMP – http://www.gimp.org/

How do I contribute?
There are two things you can do to help Seashore. The first is to contribute bug reports
and the second is to develop new features.

To help with either of these visit our web site for more information:

http://seashore.sourceforge.net/

If you enjoy Seashore, make sure to tell your friends. Open source software can only
succeed by exposure to as many people as possible.

If you are contributing to Seashore’s source code, please make sure to read the source
code read-me.

                                             5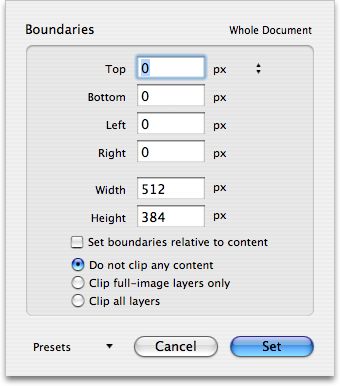
The Concepts

Bitmaps
A computer’s screen is made up of thousands of little squares of colour called pixels. By
specifying the colour of these pixels one can display pictures on the screen. A list of pixel
colours that results in a picture is called a bitmap. Seashore is a bitmap editor.

Bitmaps are rectangular in shape and have a height and a width. They also have a
resolution that specifies the number of pixels that should appear in a square inch of the
device they are being displayed on. This is useful because devices such as printers and
scanners fit different numbers of pixels per square inch depending on their quality.

Seashore asks for all three of these values when it presents the new image dialog seen in
Figure 1. You can specify the width and height of a new image in pixels, inches or
millimetres using the pop-down menu to the right of the units. You can also select from a
range of pre-determined image sizes by using the templates pop-down menu in the lower-
left of the dialog. There are also four resolutions to select from and other resolutions can
be set after the document is created. 72 dpi is generally the preferred resolution for most
purposes with higher resolutions useful for better results when printing or applying
various visual effects. The dialog also asks for the colour mode to be used by the image.
This is covered in the next section.

                             Figure 1 – The new image dialog

                                             6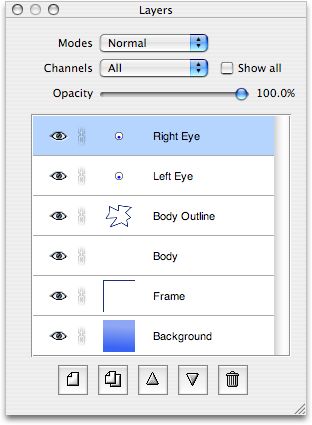
See also: The Operations – Changing Resolution

You can stop a new image being created when you start Seashore by using the
Preferences dialog accessible through the “Seashore” menu.

Seashore uses an image’s resolution to determine its size at 100% zoom. If the image has
a value higher than 72 dpi, each display pixel will represent multiple image pixels. The
reverse is true for resolutions lower than 72 dpi. Using the pop-down menu in the
Preferences dialog, you can tell Seashore to ignore the image resolution when displaying
images. You can also adjust the resolution of a single image using the “Image” menu.

Colours
Seashore works with two colour modes. They are full colour and greyscale. They
correspond to the colour modes of 24-bit RGB colour and 8-bit greyscale colour
respectively. When Seashore encounters a file that is not in one of these colour modes it
converts the file to the nearest appropriate colour mode for loading. This results in the
loss of information for images with a higher bit-rate but a warning will appear to tell you
this.

Images can be converted between the colour modes using the “Mode” sub-menu of the
“Image” menu. This is important in case you load a greyscale image that you then wish to
add colour to.

Because images are often drawn onto other images, images can also have an alpha
channel that specifies what parts of the image are transparent. Unless the transparent
background checkbox is checked, Seashore creates all new images with an opaque
background. When saving, Seashore will automatically include or exclude the alpha
channel of an image based upon its utility.

See also: The Concepts – Channels, Miscellanea – Colours and ColorSync

Layers
Consider the picture of Zipf presented as Figure 2. Zipf was made using Seashore and
consists of several parts – specifically the background, the frame, his body outline, his
body, his left eye and his right eye. Each of these parts was placed in a separate layer.
Layers are like little images (or slides) piled one on top of another to form a grand image.
The layers panel manages these layers and the panel for Zipf is presented as Figure 3.

                                             7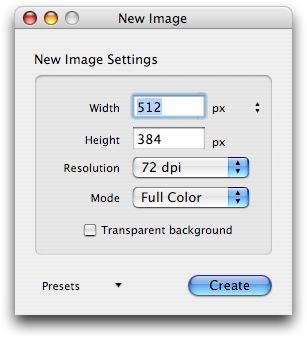
Figure 2 – A picture of Zipf

                   Figure 3 – The Layers and Channels panel for Zipf

The advantage of placing each part of Zipf in a separate layer is simple – each part can be
manipulated without affecting the others. For example, suppose you wanted to change the
colour of the background. To do this you would simply select the background layer by
clicking on its thumbnail and fill the background with the new colour. This action along
with any other drawing action only affects the selected layer – in this case the
background.

                          Figure 4 – The various layer buttons

                                            8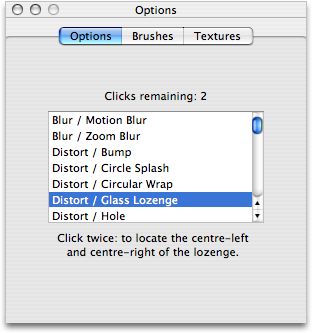
Apart from drawing, layers can be manipulated in a range of ways some of which involve
using the layer buttons pictured in Figure 4. Table 1 details these actions.

Action                         Method

Select a layer                 Click on the layer’s thumbnail

Add a new layer                Press the new button

Delete a layer                 Press the delete button

Change the order of a layer    Select the layer and press the up or down buttons (or use
in the image                   the “Layer” menu)

Duplicate a layer              Select the layer and press the duplicate button

Change a layer’s visibility    Click on the eye next to the layer’s thumbnail

Change a layer’s opacity       Use the opacity slider

Change a layer’s               Use the mode pop-up menu
compositing mode

Rename a layer                 Click on the layer’s title

Move a layer                   Use the position tool or click on the layer’s title

                           Table 1 – Layer actions and methods

Changing a layer’s compositing mode changes the way that layer blends with other
layers. Using this in combination with the layer’s opacity you can subtly change an
image’s colours. An example of this is presented near the end of this manual in “A Final
Word”. The layer modes are probably best discovered by experimenting with them. It is
important to note a layer using a compositing mode other than normal will only affect the
non-transparent pixels of the image. As a result, layer modes only make sense if you have
at least one normally composited layer in the image.

                                             9
All layers in Seashore have their own boundaries. You can reveal a layer’s boundaries
using the “Show Layer Boundaries” menu item in the “View” menu and you can adjust a
layer’s boundaries using the “Layer Boundaries...” menu item in the “Layer” menu.
After you have finished working on a layer you might want to shrink the layer so that
there is as little empty space as possible. This reduces the memory requirements of the
layer resulting in faster layer operations. To do this, simply select the “Condense to
Content” menu item from the “Auto-trim” sub-menu of the “Layer” menu. If you want to
edit the layer again simply select the “Expand to Document” menu item from the same
sub-menu.
Reducing a layer’s size also helps with aligning the layers. You can centre a layer in the
main image using the “Centre Horizontal” and “Centre Vertically” menu items of the
“Alignment” sub-menu of the “Layer” menu. You can also align the left, right, top or
bottom of two or more linked layers using the same menu. To link layers simply press the
chain icon that appears next to the their thumbnails in the layers and channels panel. All
layers with an undimmed chain icon are considered linked. Remember to always include
the active layer when you link layers together – this will be the layer that all other layers
are aligned with.
You can also merge linked layers together by selecting “Merge Linked Layers” from the
“Layer” menu. Merging layers is a destructive process, so you can’t separate layers once
you have merged them. However it is useful for keeping the number of layers in your
document to a minimum (this helps Seashore to run faster). If you want to merge all
layers into one you can also use the “Flatten Image…” menu item in the “Image” menu.
Finally, you can copy layers to other documents by holding the mouse down on the active
layer’s thumbnail and dragging the layer to that document’s window. This transfer
preserves layer’s properties such as its title, opacity, offset and visibility. You can also
drag a layer’s thumbnail to the trash to delete that layer or to another applications to copy
that layer. Remember that to drag a layer’s thumbnail it must already be the active layer.
See also: The Operations – Adjusting Boundaries, The Tools – The Position Tool
Channels
Each layer in Seashore has either two or four channels. In the case of a greyscale image
these are the grey and alpha channels and in the case of a colour image these are the red,
green, blue and alpha channels.
10The alpha channel determines a layer’s transparency. Where the alpha channel is white
the layer is opaque and where the alpha channel is black the layer is transparent. The
other channels are known as the primary channels and determine the layer’s colour.
Seashore typically works on all channels at once. For example, dragging the paintbrush
across a layer adjusts both the layer’s primary and alpha channel together. Seashore also
allows you to edit the primary or alpha channels individually using the “Channels” pop-
down menu in the layers panel. Figure 5 shows why editing the primary and alpha
channels individually is useful.
Figure 5 – The primary and alpha channels of a layer and the end result
Although all layers have an alpha channel, the alpha channel of some layers are disabled.
This means that the alpha channel cannot be selected and using the eraser will not create
a hole in the layer but rather just fill it with the background colour. You can enable or
disable a layer’s alpha channel using the “Enable Alpha Channel” menu item of the
11“Layer” menu but in order to disable a layer’s alpha channel the layer must be fully
opaque. The background layers of most new images have their alpha channel disabled but
all freshly-created layers have their alpha channel enabled. This set-up makes it easy to
create images with semi-transparent layers set upon solid backgrounds – the preference of
most graphics artists. If you do not wish to have a background layer you can delete it as
soon as you have created another layer to take its place. You can also create images with
transparent backgrounds by checking the “Transparent background” checkbox in the
“New Image” dialog.
Selections
Selections are a means of highlighting part of an image for manipulation. Selections can
be made using the selection tools but can also be made using various operations in the
“Edit” menu. Selections can be cancelled by using the “Select None” menu item in the
“Edit” menu.
Selections can be either anchored or floating.
Anchored selections constrain the part of the layer that can be impacted upon by drawing
operations. They are also useful for determining what part of the layer should be used for
copying operations. Seashore permits pixels to be partially selected – a case that is
encountered when using the selection tool with an elliptical shape or the lasso tool. Users
must be careful when using partially selected pixels, as they are an imperfect concept. For
example, repeatedly filling an elliptical selection with multiple colours will cause a
multicolour fringe to appear around the shape.
Floating selections can be derived from anchored selections by using the “Float
Selection” menu item in the “Selection” menu. This causes the selection to be floated and
its residue cleared. Unlike anchored selections, floating selections can be moved about
the canvas using the position tool and while the selection is floated the selection tools are
disabled. Floating selections can be anchored using “Anchor Selection” in the “Selection”
menu or by clicking outside the selection with the position tool. Floating selections can
be moved between layers using the up and down buttons in the layers panel. Floating
selections are also the way pasted (or duplicated) material is added to the document. If
part of a floating selection is outside the boundaries of a layer when it is anchored that
part of the selection will be lost.
To further understand selections you might consider reading the sections listed below
particularly the one on “Advanced Selections”.
12See Also: The Tools – Selection Tool, The Tools – Colour Selection Tool, The
Operations – Selection Effects, Miscellanea – Advanced Selections
Seashore uses shading to identify a selection. Grey shading is used by default but this is
problematic for images that are predominately black. To cycle through other shading
colours press the apostrophe key in combination with the command key or use the
“Rotate Selection Shading” menu item in the “Selection” menu.
If you are using one of the selection tools, you can float an anchored selection by option-
clicking on it. This is equivalent to right-clicking on the selection when using a two-
buttoned mouse.
13The Tools
The Toolbox
The tools of an image editor are the basic weaponry of the graphics artist. In Seashore,
they can be accessed through the toolbox shown in Figure 1. The toolbox serves two
purposes:
i) It allows the user to select the colours to be used when drawing.
ii) It allows the user to select the active tool from a matrix of sixteen tools.
This chapter introduces each of the eighteen tools available in Seashore as well as colour,
brush and texture selection. You can select a tool using the mouse or its shortcut key.
Some tools use the same shortcut key and in this case the shortcut key toggles between
the two tools.
Figure 1 – The toolbox
You can reveal a tool’s options by double-clicking on its button in the toolbox.
14Colour Selection
Seashore’s tools use at most two colours for drawing, a foreground colour and a
background colour. These two colours are presented inside two boxes in Seashore’s
toolbox with the foreground colour’s box overlapping the background colour’s box. In
Figure 1, black is the foreground colour and white is the background colour.
Clicking on either colour’s box causes Apple’s colour picker to appear, which can be
used to change the colour. In Seashore, the opacity of a colour is an intrinsic part of the
colour. This means every drawing tool (including the gradient tool) can support
transparency. To change a colour’s opacity, simply adjust the opacity slider at the bottom
of Apple’s colour picker.
Texture Selection
A number of tools also support textures including the pencil, the paintbrush and the paint
bucket. If you are using a tool with texture support, you can select the texture to be used
by clicking on the “Textures” tab of the options panel (pictured as Figure 2). You can
also specify the opacity of the texture in this tab. To reveal the options panel simply use
the “Show Options” menu item of the “View” menu or double-click on the active toolbox
button.
Figure 2 – The options panel’s “Textures” tab
15When a texture is selected for a tool that supports textures, the foreground colour’s box
will be filled with that texture. You can change back to solid colours by clicking on the
foreground colour’s box and changing to the appropriate colour in Apple’s colour picker.
See also: Miscellanea – Adding Textures
Brush Selection
A number of tools also rely upon a brush shape to work including the paintbrush, the
eraser and the smudge tool. You can select the active brush shape by clicking on the
“Brushes” tab of the options panel (pictured as Figure 3). You can also specify the
spacing between each plot of the active brush by using the slider at the bottom of the tab.
The spacing is important as if it is too large, some brushes will not blend properly.
Alternatively if it is too small, some brush strokes will appear very dense. The spacing
only affects the paintbrush, clone and eraser tools, not the smudge tool.
Figure 3 – The options panel’s “Brushes” tab
All brushes have default spacing and reselecting or changing brushes will revert to that
default spacing. This spacing can be edited using Brushed.
See also: Miscellanea – Adding Brushes
16The Rectangular Select Tool
Shortcut key: M
Description
The rectangular select tool allows the user to select part of a layer for copying, selective
drawing, floating or cropping. As suggested by the name, the rectangular select tool
selects a rectangle or rounded rectangle. To select part of a layer for copying or selective
drawing simply drag the cursor across that area. Unlike previous versions of Seashore,
clicking on a selection that has already exists will now move that selection but not its
contents. To prevent this and instead make a new selection, simply hold down the control
key while clicking.
To float a selection, press Command-F or option-click with the tool. Both these actions
will automatically take you to the position tool (and upon anchoring return you to the
selection tool).
Modifier Keys
Option – Floats the current selection so it can be moved.
Shift – Ensures the selection has a 1:1 aspect ratio.
Control – Forces a new selection (as opposed to moving the existing selection).
Control-Shift – Adds to the current selection.
Option-Shift – Subtracts from the current selection.
Delete – Removes the current selection. This causes it to be transparent if the alpha
channel is enabled or replaced by the background colour if the alpha channel is disabled.
Options
Corner radius – When checked, specifies the radius of the circles used for the edges of
the rounded-rectangle.
Aspect ratio – When checked, constrains the selection to the specified aspect ratio or size.
Two standard ratios are provided (1:1 and 4:3) and a custom ratio or size can be specified
using the “Custom...” menu item from the adjacent pop-up menu. The size can be
specified in pixels, inches or millimetres using the pop-up menu in the panel that
specifies the custom size.
17See also: The Concepts – Selections
If you have a two-button mouse, you can also right-click to float and move a selection. In
fact, right-clicking is functionally equivalent to option-clicking for all tools in Seashore.
The Elliptical Select Tool
Shortcut key: M
Description
The elliptical select tool is functionally similar to the rectangular select tool except where
as the rectangular select tool selects a rectangle the elliptical select tool selects an ellipse.
To select part of a layer for copying or selective drawing simply drag the cursor across
that area. Unlike previous versions of Seashore, clicking on a selection that already exists
will now move that selection but not its contents. To prevent this and instead make a new
selection, simply hold down the control key while clicking.
To float a selection, press Command-F or option-click with the tool. Both these actions
will automatically take you to the position tool (and upon anchoring return you to the
selection tool).
Modifier Keys
Option – Floats the current selection so it can be moved.
Shift – Ensures the selection has a 1:1 aspect ratio.
Control – Forces a new selection (as opposed to moving the existing selection).
Control-Shift – Adds to the current selection.
Option-Shift – Subtracts from the current selection.
Delete – Removes the current selection. This causes it to be transparent if the alpha
channel is enabled or replaced by the background colour if the alpha channel is disabled.
Options
Aspect ratio – When checked, constrains the selection to the specified aspect ratio or size.
Two standard ratios are provided (1:1 and 4:3) and a custom ratio or size can be specified
using the “Custom...” menu item from the adjacent pop-up menu. The size can be
18specified in pixels, inches or millimetres using the pop-up menu in the panel that
specifies the custom size.
See also: The Concepts – Selections
The Lasso Tool
Shortcut key: L
Description
The lasso tool allows you to select an arbitrary shape. To do so, simply click-and-hold at
the point where you want the shape to begin, trace out the shape with the mouse button
still down and release once complete. The point of release will be connected back to the
initial point to form the arbitrary shape. As with the rectangular selection tool, the
selection can be floated and moved by clicking on the selection with the option key held
down. In this version of Seashore, the lasso tool’s selection is always anti-aliased. While
useful for quick and rough selections, for information on how to make more exact
arbitrary selections consult the "Advanced Selections” section of this guide.
Modifier Keys
Option – Floats the current selection so it can be moved.
Control – Forces a new selection (as opposed to moving the existing selection).
Control-Shift – Adds to the current selection.
Option-Shift – Subtracts from the current selection.
Delete – Removes the current selection. This causes it to be transparent if the alpha
channel is enabled or replaced by the background colour if the alpha channel is disabled.
Options
None.
See also: The Concepts – Selections, Miscellanea – Advanced Selections
19The Polygon Lasso Tool
Shortcut key: L
Description
The polygon lasso tool allows you to select a polygon with an arbitrary number of
vertices (or corners). To do this, click at the point where you want the shape to begin.
Then click at the points where you want each vertex of the polygon to appear and, finally,
double click to close the shape. Alternatively you can click near the initial point to close
the shape. As with the selection tool, the selection can be floated and moved by clicking
on the selection with the option key held down. In this version of Seashore, the lasso
tool’s selection is always anti-aliased. While useful for quick and rough selections, for
information on how to make more exact arbitrary selections consult the "Advanced
Selections” section of this guide.
Modifier Keys
Option – Floats the current selection so it can be moved.
Control – Forces a new selection (as opposed to moving the existing selection).
Control-Shift – Adds to the current selection.
Option-Shift – Subtracts from the current selection.
Delete – Removes the current selection. This causes it to be transparent if the alpha
channel is enabled or replaced by the background colour if the alpha channel is disabled.
Options
None.
See also: The Concepts – Selections, Miscellanea – Advanced Selections
20The Colour Selection Tool
Shortcut key: W
Description
The colour selection tool selects all pixels on a single layer that surround a given pixel
and are within a given tolerance range. This allows the user to select all nearby pixels of
similar colour. To use the tool simply click on the desired base pixel.
Technically speaking, a pixel is selected if each channel is within the given tolerance
range of the base pixel and the pixel is vertically or horizontally adjacent to a selected
pixel. If the base pixel has a fully transparent alpha channel only the alpha channels are
compared.
Modifier Keys
Option – Floats the current selection so it can be moved.
Control – Forces a new selection (as opposed to moving the existing selection).
Control-Shift – Adds to the current selection.
Option-Shift – Subtracts from the current selection.
Delete – Removes the current selection. This causes it to be transparent if the alpha
channel is enabled or replaced by the background colour if the alpha channel is disabled.
Options
Tolerance – The colour selection tool requires a tolerance range to operate. The tolerance
range determines the range of pixels that are acceptable for selection. Low values indicate
only pixels that closely match the base pixel’s colour are acceptable where as higher
values allow more flexibility. Taken to the extremes, a value of 0 indicates only pixels of
identical colour are acceptable where as a value of 255 indicates all pixels are acceptable.
See also: The Concepts – Selections
21The Pencil
Shortcut key: B
Description
The pencil allows you to draw blocks on the current layer. The blocks can range in size
from 1 to 21 pixels. The pencil deliberately does not use anti-aliasing as it is intended for
users who wish to edit a handful of pixels in a very precise manner. The pencil is also
useful for drawing borders as it can draw in a straight line if the control and shift keys are
held down.
To draw a single square using the pencil simply point-and-click at the centre point of
where the square is to be placed. To draw multiple squares click-and-drag. To draw lines,
hold down the shift key, click at the start of the line and then click at the end of the line
(do not drag the cursor between the two points).
Modifier Keys
Option – Act as an eraser.
Shift – Draw a line between the points clicked on while the shift key is held down. These
lines may be of any angle.
Shift-Control – Draw lines that are either strictly horizontal, strictly vertical or at an angle
of 45° to the horizontal or vertical.
Options
Pencil size – The number of pixels wide the pencil’s drawing square should be.
See also: The Tools – Colour Selection, The Tools – Texture Selection, The Tools – The
Eraser
22The Paintbrush
Shortcut key: B
Description
The paintbrush allows you to draw various brush strokes on the current layer. By default
Seashore comes with a range of brush shapes and, using Brushed, users can add their
own. The paintbrush uses anti-aliasing so as to create smooth flowing brush strokes.
To draw a single brush stroke simply click-and-drag the cursor across the layer. To draw
lines, hold down the shift key, click at the start of the line and then click at the end of the
line (do not drag the cursor between the two points)..
The appearance of the brush stroke can be fine-tuned by adjusting the brush’s spacing
under “Brushes” tab of the options panel. This is especially helpful in improving the look
of fading brush strokes.
Modifier Keys
Option – Act as an eraser.
Shift – Draw a line between the points clicked on while the shift key is held down. These
lines may be of any angle.
Shift-Control – Draw lines that are either strictly horizontal, strictly vertical or at an angle
of 45° to the horizontal or vertical.
Options
Fade-out – When checked the brush stroke will fade after a certain length proportional to
the fade-out slider value. The fade-out may appear smoother with a low spacing value.
Pressure sensitive – When checked the paintbrush is sensitive to the pressure reading of
tablets. The opacity of each brush plot is then varied based upon this value.
There are three transformations that can be applied to the pressure readings. These are the
quadratic, linear and square-root transformations – corresponding to the lighter, normal
and darker modes.
23Brush scaling – When checked the brush stroke decreases in size as it fades. This fading
may be caused either by a set fade-out value or by pressure sensitive tablet readings. For
aesthetic reasons the brush only scales to at most seventy percent of its original size.
See also: The Tools – Colour Selection, The Tools – Texture Selection, The Tools –
Brush Selection, The Tools – The Eraser, Miscellanea – Adding Brushes
If your computer is not fast enough, brush strokes can appear jagged. By unchecking the
“Faster drawing (mouse coalescing)” checkbox in the preferences panel (which can be
accessed through the “Preferences...” menu item of the “Seashore” menu), this jagged
appearance can be prevented but as a result drawing may trail your cursor.
The Colour Sampling Tool
Shortcut key: I
Description
The colour sampling tool allows you to set the foreground (or background) colour to that
of a pixel or a group of pixels on the canvas. To achieve this simply click on the position
of the pixel or pixel group that you want to use for the foreground colour.
You can set whether the colour is grabbed from just the current layer or from all visible
layers using the tool’s options. The sampled colour includes the alpha channel, which
means that if the block you are sampling is slightly transparent the foreground colour will
be slightly transparent too. If either the primary or alpha channel is selected, then the tool
takes the colour from that channel only. When the tool’s options specify a sample size
greater than one, the average component values of each of the pixels in the block is used
to find the colour.
Modifier Keys
Option – Sets the background colour as opposed to the foreground colour.
Options
Sample size – This option specifies the number of pixels wide that the square used by the
tool should be.
24Use sample from all layers – If checked, the sample is taken from all layers on the
canvas. If unchecked, the sample is taken from just the active layer (and where
appropriate the active channel).
See also: The Tools – Colour Selection, Miscellanea – The Information Panel
You can use the point information panel to preview the colour chosen by the colour
selection tool. To reveal the point information panel simply select “Show Point
Information” from the “View” menu.
The Text Tool
Shortcut key: T
Description
The text tool allows you to place one or more lines of text anywhere on the current layer.
To place the text, simply click where you want the baseline and left-most character of the
text to go. Then in the following dialog type the text you want written and press the
“Add” button. As you type a live preview of the text will appear in the document.
The text will be rendered using the current foreground colour or texture. By clicking the
“Fonts…” button in the options panel, you can select any of Mac OS X’s fonts to be used
for the text. Seashore uses Apple’s font picker for font selection and does not support
Mac OS 10.3’s additional shadowing and underlining options.
Once placed the text becomes part of the bitmap and cannot be altered. As such it is often
best to place text in a separate layer so it can be erased using the eraser without affecting
other parts of the image.
In this version of Seashore, it is possible to adjust the position of text after the initial
click. You can do this by pressing the “Move...” button in the dialog that follows. Doing
this will present a second dialog with instructions on how to move the text. If you press
“Done” in this dialog, the text will be committed and the dialog will disappear. If you
press “Cancel”, you will be returned to the text-typing dialog where you can make final
adjustments.
While the text-moving dialog is active, you can use the arrow keys to move the text
slowly and combine them with the option key to speed up the process. You can also use
the ‘h’ and ‘v’ keys to centre the text horizontally and vertically in the layer.
25Modifier Keys
None.
Options
Text alignment – Specifies whether the text should be aligned to the left, centre or right.
This is only relevant for multi-line text. Whatever choice, text will always appear to the
left of where you initially click (see above for how to move it from that point).
Outline – When checked, draws outlined text using the specified thickness. If you first
draw the text without the outline and then align the outline over that text you can have
text of one colour with another colour outline.
Font – Specifies the font to be used by the text. All text will be rendered in this font.
Allow high quality fringe – When checked, specifies whether a fringe based on the pixels
behind the present layer should be allowed. The results look better if the pixels behind the
layer remain the same but worse if they are later changed. A more detailed explanation
follows.
By default, Mac OS X renders text to screen using colours other than the base colour
when it is aware of the background. For example, black text on a white background will
contain some red pixels (this is known as sub-pixel rendering). However black text on a
transparent background will be all black because the text may then be put on a blue
background in which case the red pixels will look out of place. Checking this option
means that, rather than just considering the layer, the renderer will consider the whole
image when rendering text. The result is text that looks better if the pixels behind the
layer remain the same but worse if they are later changed.
The Eraser
Shortcut key: E
Description
The eraser allows you to erase pixels from the current layer. In the case of a layer with its
alpha channel disabled, this means setting pixels to the background colour. In the case of
a layer with its alpha channel enabled, this means making the pixels transparent. The
eraser uses the same brush shapes as the paintbrush and is functionally similar to the
26paintbrush when the option key is held down. The eraser is also anti-aliased and has an
opacity setting.
To draw a single brush stroke simply click-and-drag the cursor across the layer. To draw
lines, hold down the shift key, click at the start of the line and then click at the end of the
line (do not drag the cursor between the two points).
Modifier Keys
Shift – Draw a line between the points clicked on while the shift key is held down. These
lines may be of any angle.
Shift-Control – Draw lines that are either strictly horizontal, strictly vertical or at an angle
of 45° to the horizontal or vertical.
Options
Opacity – This option specifies the strength of the eraser. At 100%, full strength parts of
the brush shape will totally erase a pixel. However at 50%, full strength parts of the brush
shape will only partially erase a pixel. In this way the eraser can be used to achieve
fading.
Mimic paintbrush fading – When checked the eraser adopts the same fading options as
the paintbrush tool. This includes the pressure sensitive, fade-out and brush scaling
options. If this option is not checked the eraser does not fade and is insensitive to
pressure readings.
See also: The Tools – Colour Selection, The Tools – The Paintbrush
The alpha channel of a layer can be enabled or disabled through the “Layer” menu, but
the alpha channel can only be disabled if the layer is fully opaque.
The Paint Bucket
Shortcut key: G
Description
The paint bucket allows you to flood an area of similar colour with a single colour or
texture. To determine what area of the layer to flood the paint bucket relies on a tolerance
range that works the same way as the colour selection tool. To use the paint bucket,
27simply point-and-click on the pixel from which you want to start flooding. If you hold
down the option key you will flood all selected space. In combination with the selection
tool this allows for smooth ellipses or rounded rectangles. The active selection affects
what pixels the paint bucket floods but not the way the tool calculates what pixels to
flood. When the paint bucket is used on the primary or alpha channels it ignores the other
channels.
Modifier Keys
Option – Flood all selected space ignoring the tolerance range. This causes the entire
layer to be flooded if there is no active selection.
Shift – Preview the flood, which means that the flood is shown when the mouse button is
pressed but not committed when the mouse button is released. This allows users to fine
tune the tolerance settings.
Options
Tolerance – The tolerance range determines the range of pixels that are acceptable for
flooding. Low values indicate only pixels that closely match the base pixel’s colour are
acceptable where as higher values allow more flexibility. Taken to the extremes, a value
of 0 indicates only pixels of identical colour are acceptable where as a value of 255
indicates all pixels are acceptable.
See also: The Tools – Colour Selection, The Tools – Texture Selection, The Tools – The
Colour Selection Tool
The Gradient Tool
Shortcut key: G
Description
The gradient tool allows you to create a gradual shift from the foreground colour to the
background colour. The area affected by the tool is constrained to the selected area of the
active layer or the whole layer if no area is selected. There are eight styles of gradient and
three repeating patterns. The gradient tool is also aware of transparent or semi-transparent
colours allowing for a wide range of effects.
28To apply the gradient, simply click at the point where you wish the gradient to begin and
drag to the point where you wish the gradient to end. It is important to stress that the
length over which you drag the cursor affects the gradient’s direction and appearance.
Modifier Keys
Control – Draw lines that are either strictly horizontal, strictly vertical or at an angle of
45° to the horizontal or vertical.
Options
Gradient style – The gradient style determines the shape of the gradient. There are eight
gradient styles to select, six of which are illustrated in Figure 4.
Figure 4 – The linear, bilinear, radial, square, conical (symmetric) and
spiral (clockwise) gradient styles
Repeating pattern – The repeating pattern determines how the gradient repeats at the end
of its style. Repeating patterns only affect the first four gradient styles (specifically linear,
bilinear, radial and square). Figure 5 illustrates all three repeating patterns with the linear
gradient style.
Figure 5 – The none, sawtooth wave and triangular wave repeating
patterns
See also: The Tools – Colour Selection
The Crop Tool
Description
The crop tool allows you to adjust the boundaries of an image so that they match a
particular rectangle. This rectangle is formed by a click-and-drag operation similar to
what you would use to select items in the Finder. Once you have a rectangle you can drag
29it around the canvas like a selection. Once you have selected the desired rectangle, press
the “Crop” button (from the tool’s options box) to finalize the change.
Unlike other tools, the crop tool is not affected by a layer’s boundaries or the active
selection so these are not shown when the crop tool is selected. The crop tool only affects
the image’s margins not those of the layers therefore once cropped you can reposition
layers using the position tool to perfect your image.
Modifier Keys
Shift – Ensures the crop rectangle has a 1:1 aspect ratio.
Control – Forces a new crop rectangle (as opposed to moving the existing rectangle).
Options
Crop - Pressing this button completes the crop.
Aspect ratio – When checked, constrains the crop rectangle to the specified aspect ratio
or size. Two standard ratios are provided (1:1 and 4:3) and a custom ratio or size can be
specified using the “Custom...” menu item from the adjacent pop-up menu. The size can
be specified in pixels, inches or millimetres using the pop-up menu in the panel that
specifies the custom size.
You can view the width and height of a crop using the point information panel read the
“Miscellanea - The Information Panel” section for further details.
See also: The Operations - Adjusting Boundaries, Miscellanea - The Information Panel
The Clone Tool
Shortcut key: S
Description
The clone tool allows you to duplicate any part of the canvas in another place. To do this
you first need to set a source point. You can do this by option-clicking on the part of the
canvas you wish to duplicate. A cross should then temporarily appear. If you then click-
and-drag the mouse around another part of the canvas the source will be duplicated there.
Note the duplication process is reset as soon as the mouse is released.
30Consider Figure 6, the centre and far right images were both produced using the clone
tool. The path the clone tool followed to achieve this effect is illustrated in Figure 7. Each
cross indicates a position where there was a mouse click and each line indicates a drag.
Note that the first click, indicated by the red cross, must have been a option-click to set
the source point. Also note that the brush settings have a notable impact on the result.
Figure 6 – Clone tool effects with source (far left), simple stroke using
the partial circle brush (centre) and complex stroke using the window brush (far right)
Figure 7 – Clone tool strokes with source placement (far left), simple stroke using
the partial circle brush (centre) and complex stroke using the window brush (far right)
The clone tool works between layers (i.e. you can set one layer as the source and then
move to another layer to duplicate). Through the tool’s options, you can also use the
whole canvas as opposed to a single layer as the source. Among other uses the clone tool
can prove helpful in touching up photographs (e.g. you can clone pieces of sky or ocean
to colour out small specks of dust).
Modifier Keys
Option – Specifies the source point for the tool. You must set a source point before you
can use the tool.
Options
Source – Presents the point and layer of the document that is the source. The clone tool
cannot be used while the source is “unset.”
31Use sample from all layers – When checked, this indicates that the contents of the whole
canvas should be used as the source. When unchecked, this indicates only the contents of
the layer where the source was set should be used.
See also: The Tools – Brush Selection
The Smudge Tool
Shortcut key: O
Description
The smudge tool allows you to smudge part of the current layer using the current brush
shape. To smudge part of the layer, simply click the point where you want the smudge to
begin and drag to the point where you want the smudge to end.
Modifier Keys
None.
Options
Rate – The rate of smudging affects the amount of smudging that takes place. Higher rate
smudges are more pronounced than lower rate smudges.
See also: The Tools – Brush Selection
The Effects Tool
Shortcut key: O
Description
The effects tool allows you to apply various visual effects to the layer. These effects
differ from the effects discussed in “The Operations – Selection Effects” section in that
they require specifying one or more points on the layer to work; hence the need for the
effects tool.
To use the effects tool, select an effect from the list in the options panel and follow the
instructions that appear beneath the list. As you click, the clicks remaining should decline
32until you reach zero. At this point, the effect may be applied instantaneously or require
you to adjust some additional parameters in a sheet before application.
For details on each of the effects see the “Seashore Effects Guide” available through the
“Help” menu.
Figure 8 – The effects option panel
Modifier Keys
None.
Options
None.
See also: The Operations – Selection Effects; Seashore Effects Guide
The Zoom Tool
Shortcut key: Z
Description
The zoom tool allows you to zoom-in on any part of the canvas. To do this, simply click
on the part of the canvas you wish to zoom-in on. You can also zoom-out by holding
down the option key while you click.
33Modifier Keys
Option – Decrease zoom level instead of increasing it.
Options
Zoom – This presents the current zoom level for the canvas.
The Position Tool
Shortcut key: V
Description
The position tool allows you to adjust the position of a layer on the canvas. To do so,
simply click anywhere on the canvas and drag in the direction you wish to move the
layer. If the layer is linked with other layers, all layers that are linked will be moved
together. Layers can be linked by enabling the chain icon of multiple layers in the layers
panel of Seashore.
The position tool can also be used to move floating selections and is selected
automatically when a selection is floated. Depending upon the position tool’s options,
clicking outside the may anchor the floating selection.
The position tool also allows you to scale layers and floating selections. To do this,
simply hold down the shift key and drag horizontally across the canvas in order to resize
the content. A guiding box should appear to help you scale the content correctly.
Finally, the position tool allows you to rotate floating selections. To do this, simply hold
down the control key and drag horizontally across the canvas in order to rotate the
content. A guiding box with an indent at the top should appear to help you rotate the
content correctly. It is important to emphasise that you can only rotate floating selections.
Modifier Keys
Shift – Scale the layer or floating selection as opposed to moving it.
Control – Rotate the floating selection as opposed to moving it.
Options
Do not anchor floating selections – Prevents floating selections from being anchored
when you click outside of them. This can make it easier to move small floating
34selections. The floating selection can still be anchored using the “Anchor Selection”
menu item in the “Selection” menu or the Command-F shortcut.
See also: The Concepts – Layers
You can also nudge layers and floating selections using the arrow keys on the keyboard.
You can reveal a layer’s boundaries using the “Show Layer Boundaries” menu item in
the “View” menu.
35The Operations
Adjusting Boundaries
Often the quickest way to adjust the boundaries of an image is with the crop tool (see the
last chapter). However there are a number of reasons you may want to adjust the
boundaries using the boundaries sheet pictured in Figure 1 – these include better control
of the final size, the ability to expand the boundaries and the ability to adjust the
boundaries with respect to the image’s actual content.
The sheet can be accessed through either the “Image” or “Layer” menu using the “Image
Boundaries…” or “Layer Boundaries…” menu item. The choice of menu affects whether
the sheet adjusts the image’s boundaries or the active layer’s boundaries. A label in the
top-left of the sheet reflects this after the menu item choice has been made. Remember in
Seashore the image and layer boundaries are independent of one another.
Figure 1 – The image boundaries sheet
With no checkbox checked, the boundaries sheet allows the user to specify the number of
pixels the image or layer is to be expanded by. You can specify this value in inches or
millimetres by selecting the correct unit from the pop-down menu to the right of the first
text box. Negative values can be used to shrink the image or layer. You can also expand
to a predetermined size using the presets pop-down menu.
36With the “Set boundaries relative to content” checkbox checked, the boundary
measurements become relative to what Seashore detects as the image’s or layer’s content.
Content is detected by taking the top-left pixel’s colour and seeing how many complete
rows or columns also have that colour. In the case of pixels with alpha channel values of
zero the primary channels are not compared.
Typically adjusting an image’s boundaries does not affect the layer’s boundaries but this
can be inconvenient when dealing with layers that you expect to cover the entire image.
To resolve this situation you can also condense the boundaries of layers that span the
entire image by selecting the “Clip full-image layers only” radio box. And you can
condense the boundaries of any layers that extend beyond the image’s new boundaries by
selecting the “Clip all layers” radio box.
Last but not least, you can now also adjust the width and height of an image directly.
When you adjust the width or height, Seashore will automatically so the adjustments
contribute evenly to either the left/right margins or the top/bottom margins.
See also: The Concepts – Layers, The Tools – The Crop Tool
Scaling
Scaling is done through the scaling sheet pictured in Figure 2. The sheet can be accessed
through either the “Image” or “Layer” menu using the “Scale Image…” or “Scale
Layer…” menu item. The choice of menu affects whether the sheet scales the image or
the active layer.
The “Keep proportions” checkbox ensures that scaling occurs in an even manner – that is
the proportions of the image or layer are preserved after scaling. You can specify the
scaled width and height either as a percentage or a number of pixels. The text boxes in
the dialog are often linked meaning changing the text of one may affect the text of others.
You can also specify an interpolation style for scaling – none, linear or cubic. The latter
interpolation styles generally produce better-looking results. Like the boundaries sheet,
you can change the units you specify the scale in using the pop-down menu to the right of
the third text box. Alternatively, you can specify a predetermined size using the presets
pop-down menu.
37You can also read