A NEW ERA OF CINEMATIC LIGHTING - USER MANUAL V2.0
←
→
Page content transcription
If your browser does not render page correctly, please read the page content below

A   NEW   ERA   OF   CINEMATIC       LIGHTING

            USER     MANUAL   V2.0
STORAGE & SAFETY

General                                                       to rain, liquids or moisture may increase the risk of
                                                              electric shock or fire
• We recommend that you read these instructions
                                                              • Any damage to Titan’s™ components, power supply
carefully before attempting to use Titan™ for the
                                                              or product housing must be remedied by an approved
first time. The information below will assist with safe
                                                              Rotolight service centre or agent
handling and operation
                                                              • Do not mount, operate, store or transport Titan™
• If selling or transferring the product, please ensure
                                                              near any heat source or heating device, or in an
that these instructions are available for future users
                                                              environment with an ambient temperature greater
• Titan™ is designed for professional use. Always ensure
                                                              than 65 degrees C (149 degrees F)
that the product is operated by qualified, experienced
                                                              • Never allow Titan™ to be operated if damage to
personnel
                                                              cables, power supply or product housing is evident
• Only use original Rotolight Titan™ accessories and
                                                              • Never open the Titan™ product housing or power
spare parts
                                                              supply or operate the product with the housing open
• Always be responsible and observe local recycling
                                                              to the elements
regulations when disposing of packaging
                                                              • Never restrict airflow around Titan™ and ensure that
• Please comply with all reasonable and local safety
                                                              fans and ventilation grilles are free from obstruction at
requirements
                                                              all times. Rotolight use the latest 'super quiet' fans for
• Please ensure that all warnings and safety instructions
                                                              exceptional performance
are observed at all times.
                                                              • Never use cables to move, adjust, hold or suspend the

Product usage                                                 light or power supply
                                                              • Only use original Rotolight Titan™ cables and power
Rotolight Titan™ is designed to provide illumination
                                                              supplies as the usage of third-party options may
of people and subjects in a dry environment. Please
                                                              invalidate the warranty
follow all safety information. Inappropriate use,
                                                              • Titan™ is only suitable for operation in an
disassembling or tampering with the unit may lead to
                                                              environment with an ambient air temperature of
increased risk of short circuiting, electric shock or fire.
                                                              -20 degrees C to +45 degrees C (-4 degrees F to 113
Tampering with, attempting to modify the product in
                                                              degrees F) with less than 85% relative humidity (RH)
any way or usage other than described above is not
                                                              and no condensation. In extreme cold we strongly
recommended and will invalidate the warranty.
                                                              recommend the use of the Rotolight rain cover and

Responsible disposal                                          that the light should always be left on even 1 or 2
                                                              percent to avoid condensation or moisture.
Please be aware of local regulations for the safe and
responsible disposal of electronic equipment that is
no longer functional or economic to repair. Disposal of
                                                              Storage conditions
                                                              Please ensure that Titan™ is securely stored in a
electronic equipment with domestic waste should be
                                                              dry environment, avoiding excessive humidity that
avoided. Details for the safe and responsible disposal of
                                                              could cause condensation or moisture in extremes of
electronic equipment is available from your local waste
                                                              temperature.
disposal facility or local authority.

Safety advice                                                 Note:
                                                              Product information and technical specifications may
• Always check that mains and connector cables are
                                                              be subject to change without notice.
securely connected prior to using Titan™
• Always clean Titan™ with a clean, dry cloth and avoid
                                                              Always consult Rotolight if Titan™ has been dropped,
the use of abrasive materials
                                                              suffered impact damage, the power supply or cable
• Always use a grounded mains electrical outlet rated
                                                              has been damaged, the unit has been exposed to rain,
for 100-240V AC, 50/60Hz
                                                              liquid or moisture and does not appear to be operating
• Always use Titan™ in a dry environment. Never
                                                              correctly.
submerge in liquid or place on a wet surface. Exposure

                              Rotolight Titan™ is equipped with high intensity RGBWW LED
                              emitters. Never stare directly into the active light source.
                                                                                                                           3
CONTENTS

                                    SFX Menu				18
Storage and Safety			          3
                                    Flash Interface			24
Titan X1 Quick Start Guide     6
                                    DMX Interface			30
Titan X2 Quick Start Guide     7
                                    Using ROTO-wDMX			33
Introduction 				8
                                    Remote Device Management         34
How to Update Your Titan		     10
                                    Titan DMX Protocols		            36
Mounting Your Titan		          11
                                    How to Connect to Luminair       40
Using Titan on Battery Power   12
                                    Titan Technical Specifications   42
The Home Master Menu		         13
                                    Titan Competitor Comparisons     45
What is SmartSoft™		           14
                                    Titan Accessories			48
Titan System Menu			           15
                                    Warranty information		           53
5
Titan X1 - Quick Start Guide

                                            4        5          7        8         9

             1                                                                                                1

             3

             2
                                                                                                              10
             6

                                                                                                              11

             1                                                                                                1

                                                16                           14    20

    1. Yoke Mounting Points (M8)                                     11. K-Mount (shown with a Swan Neck Mount)
    2. DMX Menu                                                      12. Power Switch ON | OFF | ON
    3. SFX Menu                                                      13. DC Cable
    4. HOME Menu                                                     14. Built-in Foot
    5. SYS Menu                                                      15. DMX Ports
    6. FLASH Menu                                                    16. Port Plate
    7. Wi-Fi Aerial                                                  17. Mini Jack Flash Port
    8. Touchscreen Display                                           18. USB Port
    9. Navigation Buttons                                            19. Factory Programing Port
    10. Rotary Knobs                                                 20. Handle

                                  17

                            19         18                 15                        13          12
                        Factory    USB          DMX      DMX         DMX             DC         Power
                  Programming      Port         Port     Port         Port        Input         Switch
                           Port                                     (RJ45)          24V         (ON/OFF/ON)
6
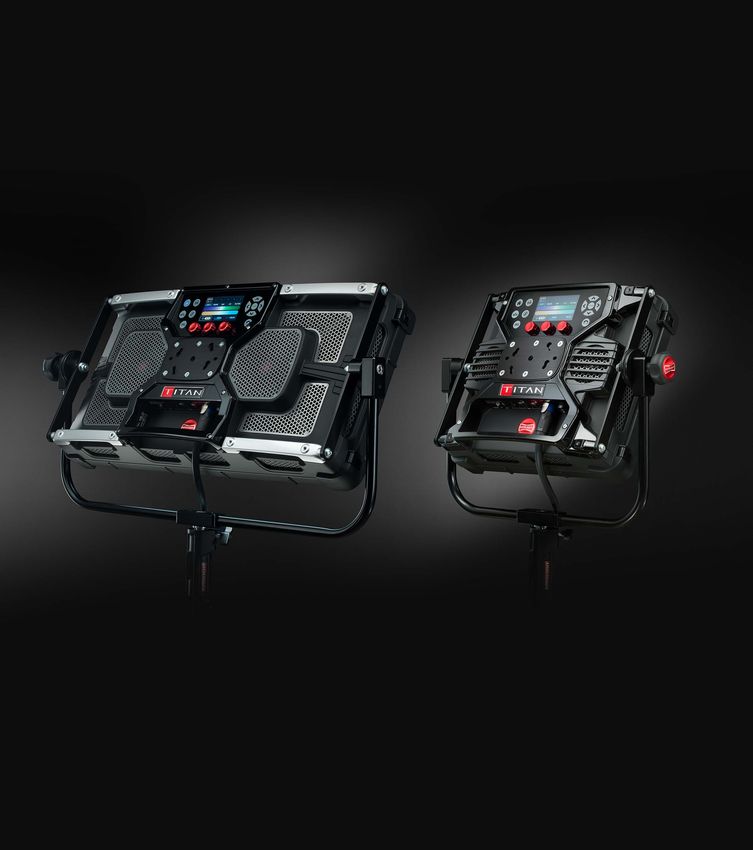
Titan X2 - Quick Start Guide

     1                        2           3       4    5   6           7      8       9

                                                                                                                         10

                                                                                                                         11

20

                              19           18   17         16                         12

                                                           15                         13

                                                                                      14

1. Yoke Mounting Points (M8)                                                11. K-Mount (shown with a Swan Neck Mount)
2. DMX Menu                                                                 12. Power Switch ON | OFF | ON
3. SFX Menu                                                                 13. DC Cable
4. HOME Menu                                                                14. Built-in Foot
5. SYS Menu                                                                 15. DMX Ports
6. FLASH Menu                                                               16. Port Plate
7. Wi-Fi Aerial                                                             17. Mini Jack Flash Port
8. Touchscreen Display                                                      18. USB Port
9. Navigation Buttons                                                       19. Factory Programing Port
10. Rotary Knobs                                                            20. Handle

                                   Flash

                        19           18                          15                       13           12
                    Factory         USB         DMX             DMX         DMX          DC            Power
              Programming           Port        Port            Port         Port     Input            Switch
                       Port                                                (RJ45)       24V            (ON/OFF/ON)
                                                                                                                              7
INTRODUCTION
    Thank you for purchasing Rotolight Titan™, the most powerful range of LED lighting fixtures ever made. We
    at Rotolight are committed to bringing the finest and most inspirational lighting tools to image makers.
    Rotolight Titan™ fixtures includes industry-first technologies such as SmartSoft™ electronically adjustable
    diffusion, High Speed Sync Flash (HSS), and other revolutionary technologies developed by Rotolight such as
    CineSFX™. We hope you enjoy using your Rotolight Titan™ as much as we enjoyed creating it!

                                Please register your product at www.rotolight.com/register
    Please ensure that your firmware is up to date and download future updates at www.rotolight.com/titan-updates

    Titan™ Graphic User Interface Overview
    Titan™ is the first light to have an interactive touchscreen interface. We have combined this with navigation
    controls and dual function rotary knobs with switches. There are also five master menu buttons (Home/ System/
    CineSFX/Flash/DMX).

    HOME comprises all of the colour editing functions, i.e.; CCT (where you set the Titan™ system white balance),
    RGBW (where you can create or edit a colour and add the CCT ‘whites’ to de-saturate it), HSI (Hue, Saturation,
    Intensity), XY (where you can enter the coordinates of your desired colour), and finally the Filter page, which
    includes over 2400 electronic versions (at 3200K and D6500) of virtually all of the colour lighting gels and sampled
    light source matching.

8
SYS (System) contains all of the customisable key system settings and read only information including
temperature settings, colourspace, brightness mode etc. You can also perform system updates via the USB port
within this menu.

SFX (Cinematic Special Effects, ‘CineSFX™’) contains over 20 fully customisable special lighting effects, developed
by Rotolight and visual effects veteran, Stefan Lange. You can edit a lighting gel or create a custom colour in one of
the Home menus, and combine it with an edited effect in SFX to create your own customised lighting FX.

FLASH allows you to use Titan™ as a High Speed Sync photographic flash unit, utilising the built in library of
lighting gels or custom created RGBW colours . Titan™ has a built-in Skyport 2.4Ghz HSS receiver capable of
syncing at up to 1/8000th of a second, with colour tuneable RGBWW flash and modelling light, capable of running
at any repeated frame rate, with zero recycle time. There is also an Exposure Effects (X-FX) section for customisable
multi–exposure effects, where you can control delay, repetitions and gaps between flash events for creative
photography.

DMX allows you to set the base DMX channel, the channel mode (i.e. number of channels used to control Titan™
over DMX) and control Titan™ via the built-in Lumenradio TimoTwo wDMX chip, Rotolight wDMX, or wired DMX
port from a lighting control desk. You can set the system parameters via RDM (Remote Device management) (this
feature will be introduced in Q1 2021).

Each of these five master menus has ten dedicated radio preset buttons (in two switchable banks of five), where
you can store your edited settings (50 presets in all). You just tap the preset button to recall, hold the button to
store, and double tap to open a dialogue page where you can name the preset and save or load it to/from the USB
stick (feature to be introduced in Q1 2021). The Titan™ graphic user interface is designed to be intuitive to use, yet
totally comprehensive in the functionality on offer. Navigate, touch, rotate and refine your Titan™ controls, with the
assurance of having a back button to correct any mistakes.

TOUCH TO SELECT
In firmware V2.0 onwards, there are now four ways to adjust the controls on Titan:-

1. Control knobs – you can rotate these to adjust the selected parameter
2. Press, Hold and Turn – if a knob parameter has a grey triangle behind it , this indicates there is a second function
to this rotary control if you ‘press, hold and turn’.
3. Touchscreen, many controls are directly editable by using sliders on the touchscreen
4. New ‘Touch to Select’ allows you to select a parameter on the touchscreen and adjust it using the knob below. If
you want to revert to the original parameter, simply click the knob to unlatch the ‘Touch to Select’, or touch a new
parameter to control.

We hope you will find this simplifies your workflow with Titan.

Future features
Important: any feature displayed as a greyed out (i.e. not active) GUI menu item or icon will be available in future
updates. All future updates will be announced to our customer base.

                                                                                                                          9
HOW TO UPDATE TITAN™
                                      VIA USB PEN DRIVE

                                                              FAT32

                   STEP 1                                    STEP 2                                    STEP 3
            Choose a USB stick                  Format the USB Stick to FAT32            Copy and paste the update file to
     (preferably San Disk or reputable        format and have no other files on                    the USB Stick
     brand), (not compatible with USB                       the stick
     3.0, needs to be USB 2.0 or earlier)

                 update.bin

                   STEP 4                                    STEP 5                                    STEP 6
     Once on the stick, rename the file        Connect your Titan to power, but           Insert the USB stick to the unit
               to 'update.bin'                 make sure the unit is turned off

                                                                                                     50%

                      X                                                                        Updating: Don’t turn off

                   STEP 7                                    STEP 8                                    STEP 9
     Hold down both the left and right          Keep the knobs held down for               The light will start a firmware
       knobs and, keeping the knobs            around 15 seconds until you see           update process, let it complete.
       held down, turn on the power.          the Flash icon specifically light up,      Do not turn the power off whilst
                                               (you will see other icons light up                this is underway.
                                               first), and once Flash icon lights
                                               up, you can release the buttons          Once complete reboot your light

           Troubleshooting: If you have any problems, try a different USB Stick, and ensure the file is named correctly.

10
HOW TO ATTACH THE YOKE MOUNT
STEP 1 STEP 2 STEP 3
Align the yoke with the mounting Secure using bolts and included The Yoke can then be mounted
points on the side of the Titan Allen key. onto a lighting stand. We
recommend using a C-Stand with
sandbags.
Recommended stand: The Titan X1 is compatible with RL-LIGHTSTAND as well as c-stands, whilst the Titan X2 requires a Junior
to Baby adapter (RL-CSTAND-J2B) if mounting onto a c-stand 16mm Baby spigot. We recommend using a sandbag to provide
additional support.
The Titan X1 can either be mounted onto a 16mm Baby Spigot, or , by removing the tensioner , The 16mm TVMP socket becomes a
28mm Junior stud. Titan X2 is equipped with a 28mm Junior stud. Rotolight also sell a 28mm Junior socket to 16mm Baby stud
adapter, available from our accessories page.
HOW TO ATTACH THE SWAN NECK
STEP 1 STEP 2 STEP 3
Align the pins on the swan neck Rotate the swan neck clockwise To remove, firstly get a good hold
with the matching holes on the rear until it clicks into place. Use the of the Lighting fixture, then pull the
plate of the Titan. tension knob to adjust angle and quick release knob….etc. The Fixture
position as required, taking care to will become loose rather quickly, so
support the weight of the unit when take care not to drop it.
making any adjustments.
11HOW TO ATTACH THE BATTERY ADAPTOR
STEP 1 STEP 2 STEP 3
Mount the battery adapter to Slide the batteries into the Connect the adapter to the Titan
the Titan clamp by aligning the mounting positions on each side of using the DC cable.
hexagonal pin on the adapter with the adapter
the corresponding hole on the
clamp.
USING TITAN ON BATTERY POWER
To use the Titan on battery power, use the Rotolight 2-way or 4-way adapters; we do not recommend third-
party adapters. Please note that these adapters support 14.8V batteries, DO NOT use 24V batteries as it may
cause the adapter and Titan to sustain damage. A full range of recommended batteries including 95Wh,
155Wh and 310Wh batteries are available from rotolight.com (see page 48)
12THE HOME MASTER MENU
When you select the touch button labelled ‘HOME’, it will take you to the page where you can select one of five
colour editing submenus below:
1. CCT - when this submenu is selected you can set the white balance. Using the left knob, you can change the
brightness. Using the centre knob or the CCT touchscreen slider you can adjust the colour temperature, from
3,000 to 10,000 kelvin. Please notice that there is a grey triangle behind the CCT window, this indicates that there
is a second function to this knob if you press and turn. This second function controls the green / magenta balance
(also available as a touch slider function on screen). Finally the right hand knob controls the SmartSoft™ electronic
diffusion. You can store or recall your custom CCT settings using any of the HOME menu radio preset buttons (hold
the preset button to store, tap to recall).
2. RGBW – when this submenu is selected you can create a custom colour, or edit a filter, or source match sample.
Use the left knob to set the amount of red, use the centre knob to set the amount of green, and the right knob to
set the amount of blue. All three knobs have grey triangles behind indicating that there are second functions to
all three knobs. If you press and turn the left knob you can adjust the overall brightness of the Titan™, if you press
and turn the centre knob you adjust the amount of whites (from the CCT page) that you are adding to the custom
colour – this will have the effect of desaturating the RGB colour. Finally press and turn the right knob to control the
SmartSoft™ electronic diffusion. You can store the RGBW custom colour settings to any of the HOME menu radio
preset buttons by holding the preset button.
NB – You can edit a filter or source match setting in RGBW and store the customised result in a preset button.
3. HSI - (Hue, Saturation, Intensity) when this submenu is selected you can create a custom colour using the left
knob (Hue), or swipe on the touchscreen slider colour display. The colours are represented as degrees from 0-360,
and you mix from red (0 degrees) to green (120 degrees) through to blue (at 240 degrees) back to red (at 360/0
degrees). In this mode you are only ever mixing two of the RGB colours. The centre knob adjusts Saturation (i.e.
adding white to pastelise the selected colour). The right knob adjusts overall fixture intensity (brightness). Finally
press and turn the right knob to adjust SmartSoft™. You can store the HSI custom colour settings to any of the
HOME menu radio preset buttons by holding the preset button. There is a preview display of the selected colour
below the HSI colour bar.
4. XY – when this submenu is selected you can create a custom colour by swiping the marker to a custom colour
on screen (the CIE ‘sharksfin’ curve of visible colours is shown), and the selected colour is also shown on the
preview window in the screen. You can use the left knob to enter an ‘X’ colour co-ordinate, or the centre knob to
enter a ‘Y’ colour co-ordinate. The right knob allows you to adjust the fixture intensity and pressing, holding and
turning the right knob adjusts the SmartSoft™ electronic diffusion. You can store the XY custom colour settings
13to any of the HOME menu radio preset buttons by holding the preset button. NB - You can select a colourspace
on the Titan™ by clicking the centre knob. Choose ‘Full Gamut’ for photography or cinematography, choose REC:
2020 for Ultra HD 4K, or REC:709 for HD 2K. This will impose a bounding triangle in the XY display that will prevent
you from inadvertently selecting a colour that the camera cannot record or playback, or that the broadcaster
cannot broadcast. A text display to the right of the CIE graphic indicates which colourspace is currently active.
5. FILTER – when this submenu is selected you can browse through a library that contains electronic simulations
of virtually all of the 1,400+ colour gel filters from the likes of Lee, Rosco, Apollo and GamColour®. The filters are
available at 3200K or D6500 versions giving nearly 2500 varieties. In addition, there is a second library of sampled
lighting source matches. The colour filters are arranged in colour groups, which you select on screen by touching
the colour group, or rotate the left knob (‘colour’). To browse through the gels rotate the centre knob (‘number’)
and this will scroll through all of the available filter gels in that selected colour group (there can be 300-400 in
some of the groups). To change the ‘illuminant’ colour base of the filter, click the left knob, you will see the text
information in the preview screen change from ‘3200K’ to ‘D6500’ and the filter colour displayed will change
correspondingly. The right knob controls fixture intensity (brightness), and if you press and turn the right knob
you can control the SmartSoft™ electronic diffusion. On the right hand side of the colour group bar there is a
black segment marked ‘S’ for source matching. This contains a library of 50+ sampled light sources (e.g. Tungsten,
Candle, HMI, Fluorescent , Sodium Vapour, etc). You can scroll through these sampled sources using the centre
knob (number). You can edit ANY filter or source match by switching to the RGBW submenu and using the
controls to tweak your selected filter or source. You can immediately jump to the SFX or FLASH menu and use your
custom colour in a special effect or in RGBW flash. You can store your edited filter or source in any of the HOME
menu preset buttons by holding the button.
There is a preview window below the colour group bar which displays the selected colour filter, and which gives
you a text display of the filter number, and the filter name. If the filter number begins with letter ‘L’ it is a sample
of a Lee™ filter, if it begins with ‘R’ it is Rosco™, ‘A’ for Apollo™, or ‘G’ for GamColour®. If you tap the filter preview
window, a pop up window will appear with a description of the selected filter, tap ‘done’ to return to the filter
screen.
SmartSoft™ Electronically Variable Diffusion
SmartSoft™ is a radically new technology developed by Rotolight. It allows the user to electronically adjust the
diffusion, focus and spread on Titan™ lighting fixtures. It provides two stops of programmable diffusion, and
can be operated from the local controls on the light or remotely via DMX or wireless DMX. If the user intends to
operate the light for long periods at high temperatures then the performance of the SmartSoft™ diffusion may be
impaired. Ideally best performance is achieved when the temperature of the fixture is kept below 45 degrees C.
14‘SYS’ (TITAN™ SYSTEM MENU)
Pressing the dedicated ‘SYS’ menu touchscreen button opens the system settings menu in Titan™.
SETTINGS Submenu
The first submenu item, SETTINGS is a scrollable list of settings. These include the following:
1. Thermal Management: there are three options available:
STEALTH – in this mode the fans are mostly off when minimal noise is required. We strongly recommend leaving
the Titan in auto mode wherever possible.
AUTO – in this mode the fans react to the measured operating temperatures of the LED boards, the graphic user
interface PCB and the driver PCB. This mode uses Advanced Intelligent algorithms to manage the fans whilst
maintaining the quietest possible operation.
MAX – use this mode if shooting in high ambient temperatures, or operating the light continuously with a high
output.
NB: when Titan™ is controlled by DMX the fan speed is controlled directly over DMX. If Titan™ is unintentionally
disconnected from DMX then it will revert to AUTO Fan control.
2. Fine Dimming Mode: options off/medium/finest.
Fine dimming mode enables Titan™ to mix RGBW colours and dim them smoothly right down to 0%. It is not
recommended for high frame rate shooting.
3. Colour Space: options Full Gamut / REC:709 / REC:2020.
Selectable colourspace allows you to control the colour output of Titan™ so when using XY colour editing, it is
not possible to accidentally set a colour that cannot be captured/recorded/broadcast in a particular codec. So
for photography or cinematography we recommend you use Full Gamut. For 2K HD (i.e. 1080P) use the ‘REC:709’
colourspace. For 4K Ultra HD (i.e. 2160P) use the ‘REC:2020’ colourspace.
4. Camera LUT (Look Up Table): options Alexa / Sony Venice / Panasonic Varicam / Red Dragon / Canon C300.
This feature allows you to select a LUT profile for the Titan™ which matches a specific camera sensor. In this mode
the Titan™ will tailor its colour profile to enhance the light spectrum, optimising the images being captured in
your camera LOG mode. (This feature will be introduced in future updates. )
155. Display: options Auto Off / Buttons Only / Always On.
The default mode for the display option is Always On.
a. If you select Auto Off, then the display will only illuminate when you touch a control knob, the touchscreen, or a
menu icon on the GUI, it will turn off again after five seconds of inactivity.
b. If you select Buttons Only the colour touchscreen will automatically turn off after five seconds of inactivity, but
the backlit menu and navigation buttons will remain illuminated.
c. If you select Always On, then the display remains illuminated at the default level.
6. Rotate Display: options Off / On
This allows you to rotate the display through 180 degrees. Very useful if the light is upside down on a truss.
7. Power Source: options AC adapter / DC battery
If you select ‘AC adapter’, Titan™ will operate fully without restriction in all modes. If you select ‘DC Battery’, the
potential output of Titan™ (X2) will be restricted, running at 60% of normal output. Titan™ X1 will operate at 100%
on both AC adapter and DC Battery.
8. Frequency: Frame rate options 24 / 25 / 29.97 / 30 / 50 / 60 / 100 / 120 / 240 / 300). This allows you to specify
specific frame rates for the SmartSoft™ diffusion. When SmartSoft™ is set to 100% there is no need to specify the
frame rate.
9. Dimming Curve: options Linear / Exponential
Select your desired dimming curve.
10. Brightness Mode: options MAX LUX / CONSTANT LUX
In MAX LUX mode the power output will vary dependent on the CCT kelvin setting, giving more output when both
channels are at full output (at approx. 4200K). In CONSTANT LUX mode, the output will remain constant regardless
of the colour temperature setting.
11. Language:
English (UK) The following languages will be available in future updates: German, French, Spanish.
12. Factory Reset: options Apply / Cancel
This feature will restore the adjustable parameters back to the factory defaults. There is also a second option ‘
Erase User Presets’. so please save your data before using this feature. NB: Very useful for rental houses.
ABOUT submenu
The second submenu item is a scrollable list of ‘about’ information. This includes the following:
1. Serial number: this feature will display the serial numbers for the LED1 PCB / LED2 PCB / Driver PCB and GUI PCB
together with the Titan™ assembly serial number.
2. Firmware version: this feature will display the driver PCB firmware version.
USB submenu
The third submenu item is a scrollable list of USB settings. This includes the following:
Please note that 5V DC power is available at the USB port, so it can be used as a power source for optional
interfaces, i.e. SACN, ArtNet etc. THIS 5V DC IS POTENTIALLY DANGEROUS TO SOME USB DEVICES, SO PLEASE
USE THIS FEATURE WITH CARE.
1. USB: UPDATE FIRMWARE system. Download the latest firmware from Rotolight/titan-updates. Rename the file to
‘update.bin’, then copy it to a 16GB (or 32GB) USB2 memory stick that is formatted in ‘FAT32’ mode.
2. Insert the USB memory stick into the USB socket on Titan’s port plate.
3. Go to SYS / USB and switch 'Firmware Update' on.
4. Reboot Titan (it will take roughly 2 minutes to complete the update)
5. When the update has finished, it is good practice to do a Factory Reset,
NB: you do not have to erase your User Memory Presets.
16INFO submenu
1. Temperature: Titan™ reads the temperature of LED1 and LED2 PCBs, and also the driver PCB. It also reads the
RPM of the Fans. This is read-only data. Please note that Titan™ X1 does not have a ‘Right LED’ board, but will
continue to display the RPM of the right hand Fan. RE: Fan RPM: the current fan RPM is displayed here. This will be
based on the operating temperature of Titan™, and the selected ‘thermal management’ mode (see SYS/settings).
2. Volts: Titan™ accurately measures the incoming voltage and this is displayed here. Titan™ also calculates the
average voltage during the last three flash events, so you can see if your power supply is coping well with the extra
power required for flash. Finally the right hand knob controls fixture brightness on this page, and you can adjust
this and see what effect this has on the power source voltage. Please note that we recommend that you only use
Rotolight power adapters or battery adapters. The incoming voltage must not exceed 24-25volts DC or damage
may occur to Titan™
FDIM (True Aperture Dimming™) submenu
The fifth submenu item, is a special function called FDIM (i.e. F-Stop Dimming/True Aperture Dimming™). This
feature is an exposure calculator. It shows the brightness setting as an accurately calculated aperture (f-stop) for
your subject at a given distance, using your camera ISO and shutter. It also provides a nice way to accurately adjust
your key light to match your camera settings, rather than the other way round, which can be very useful.
Select the menu item ‘FDIM’ . Rotating the left knob adjusts the ‘Exposure’ duration setting (set this to match your
camera). The centre knob adjust the ISO setting (set this to match your camera). If you press and turn the centre
knob, you can input the distance of the Titan™ from you subject.. Finally, if you rotate the right knob, it will adjust
the brightness of the Titan™, whilst displaying the correct Aperture (f-stop) setting for your camera.
Please note the ‘True Aperture Dimming™’ algorithm calculates the f-stop based on the Titan™’s brightness
setting, your camera’s ISO and shutter speed, the distance to the subject and compensates for the skin contrast of
the subject.
You can also decide to work in reverse, i.e. you creatively choose an Exposure duration, ISO, AND aperture (i.e. f3.0),
so now you can match your light to your camera exposure settings, this way all the photos from your shoot will
have the same grain structure, depth of field, etc. This is a novel and very useful way of working creatively, and can
also save a lot of time, whilst delivering consistent results from a shoot.
SYS User Presets
The user presets in the SYS menu are numbered from 11 through to 20. You can store your custom system settings
by holding one of the preset buttons, you can recall a system preset by tapping one of the preset buttons, and if a
preset is highlighted you can delete it by pressing the ‘BACK’ button. On future updates you will be able to ‘load/
save’ presets and banks to/from the USB stick, by double tapping the preset or bank button (feature due 2021)
17‘SFX’ (Cinematic Special Effects)
In collaboration with Stefan Lange, DOP and VFX veteran, we have created an arsenal of cinematic special FX
(CineSFX™). These production tools are designed to complement your feature, music video or short film.
Before you start: you can create a custom colour or recall a filter in the home menu, and bring that colour across
to the SFX menu to use with a customised effect. The combination of your custom colour and the tweaked SFX
preset can be stored into the user programmable SFX radio preset buttons.
Pressing the dedicated ‘SFX’ touchscreen button activates the CineSFX™ menu in Titan™.
All SFX can be triggered via DMX or wireless DMX. You can also trigger the SFX using a Skyport wireless trigger or
an electrical trigger attached to the trigger port.
WARNING - HEALTH HAZARD – USE STROBE WITH CAUTION:
CineSFX™ mode uses strobe lighting effects that carry a minor risk of causing photosensitive seizures/epilepsy.
Manufacturer accepts no liability or responsibility for misuse of this product. You should take all precautions to pre-
warn and ensure the safety of those who may come into contact with the product. If you or any of your relatives
have a history of seizures or epilepsy, consult a doctor before using. If you feel unwell from using these effects,
immediately discontinue use and consult a doctor. If strobe lighting is to be used in a production, warnings should
be posted at the front of house or entrance doors to the set/theatre as well as in a video or program, if distributed.
Example: “WARNING: strobe lights are used during this programme”.
This product is not suitable for use by children of any age and is designed for professional use only.
Rotolight have a policy of continuous product improvement and so some of the CineSFX™ may operate in a
slightly different way than is described here, or may be forthcoming on a future firmware update,
check www.rotolight.com for details or ask your local dealer.
Touch the SFX menu button to enter ‘CineSFX™’. The available effects are listed in a carousel. You can swipe
through the SFX to get to the desired effect. You can stop/start the selected effect by touching the 'TRIGGER'
on the touchscreen. Rotating the ‘MENU’ knob also cycles through the available CineSFX™: ‘FADE’ - ‘STROBE’
- ‘LIGHTNING’ - ‘THROB’ - ‘CYCLE’- ‘FIRE’ - ‘POLICE’- ‘TV’ - ‘SHOT’ - ‘NEON’ - ‘FILM‘ - ‘WELD’ - ‘PAPARAZZI’ - ‘CHASE’ -
‘DEMO’
Please note that the ‘CHASE’ effect will only be available if the Master Titan ‘IN/OUT’ is set to ‘LOCAL IN’ and
OUTPUT is set to WIRELESS.
18The three control knobs are usually assigned to MENU, SPEED and BRIGHTNESS. There are some secondary
functions assigned to the knobs which are accessible if you press and turn the knobs, these are assigned to
specific parameters for each effect and are indicated by grey triangles behind the main parameter displays.
Most of the effects will also have the trigger function , assigned to the Centre knob (click the centre knob to trigger
start/stop the selected effect), or tap the TRIGGER on the touchscreen.
‘FADE’ (Designer Fade™)
Fade is a programmable fade that you can trigger to produce in-camera practical fade effects. Create a colour, set
your max brightness and diffusion in HOME, then go to SFX/FADE. You can trigger the fade by clicking the centre
knob, or touching the ‘TRIGGER’ on the touchscreen. Rotate the middle knob to set the fade duration, Rotate the
right knob to adjust the brightness. Best Fade results are obtained when ‘SYS/SETTINGS/Fine Dimming Mode’ is
set to ‘FINEST’.
‘LIGHTNING’
The Lightning effect simulates real lightning, it is a random effect but you can control the speed at which the
lightning bursts re-occur, ideally you would set the brightness (BRI) to 100% and the colour (COL) temperature
to 7000k or create a cool white with added blue. Click the centre knob to trigger (start/stop) the Lightning
effect. Rotate the centre knob to adjust the duration between the bursts of lightning (it will display XX which is
an indication of the effect frequency). The lightning range is from 1 up to 50 . Click the centre knob to arm the
effect and fade to black, TRIGGER will be highlighted - re-click the centre knob to trigger the effect, you can also
trigger the effect from an external trigger source via the PC port or Skyport wireless trigger. Press, hold and rotate
the right knob to adjust the pulse duration or rolling shutter compensation. Rotate the right knob to adjust the
maximum brightness level. You can create a custom colour in the Home menu, and then select SFX/lighting
to combine your custom colour with your edited effect. Finally you can store your custom colour and effect
combined into one of the SFX preset buttons.
NB - the duration of the lightning flashes is 20ms which is the recommended duration for cinematography,
although this value is adjustable so you can compensate for rolling shutter artifacts. The lightning strikes come in
bursts of between two and eight random length pulses.
19‘STROBE’ The Strobe effect produces a regular flashing light. Create a colour in the HOME menu then go to SFX/STROBE. . Click the centre knob to trigger (start/stop) the strobe effect, or touch the ‘TRIGGER’ activator onscreen (or use a wireless trigger or a connection to the trigger port). Rotate the centre knob to adjust the strobe speed (it will display X.X Hz, where = ‘X.X’ = number of strobe cycles per second) the strobe range is from 0.3 Hz up to 7 Hz. NB - the last used strobe parameters are stored in non-volatile memory. Rotate the right knob to adjust Brightness. Press and turn the right knob to adjust WIDTH (duty cycle/pulse duration), this is also known as ‘rolling shutter compensation’, where you can trim out the artifacts associated with rolling shutters ‘THROB’ (NB: now integrated into CHASE effect) Throb is a regular smoothly pulsing light effect. It has been integrated into the ‘CHASE’ effect. So if you want to get a controlled throbbing light (or coloured light), create the colour in HOME, and go to SFX/CHASE to integrate your custom colour with the throbbing light effect. ‘CYCLE’ (RGB colour cycle) Colour Cycle is a regular smoothly pulsing light which fades smoothly between the Red, Green and Blue LEDs. Rotate the centre knob to adjust the effect SPEED (it will display XX which is an indication of the effect frequency). The cycle SPEED range is from 1 up to 50. Rotate the right knob to adjust brightness. ‘FIRE’ Fire is a complex emulation of a burning fire and it can be tuned to your requirements. Some VFX artists like to use multiple lights with slightly different settings/gels to achieve a fire with dancing 3D shadows. Choose an appropriate colour or Gel from HOME/FILTER or HOME/RGBW and then go to SFX/FIRE Rotate the centre knob to adjust the FLAME flicker frequency (it will display XX which is an indication of the effect frequency – around 15 is nice for a ‘camp fire’). Press and turn the centre knob to adjust the Fire effect residual GLOW depth threshold (about 25% is nice for a ‘camp fire’). (It will display XX % which is an indication of the effect depth). Rotate the right knob to adjust brightness. You can save the combination of your custom colour and customised effect in any of the SFX preset buttons ( hold to save, tap to recall) 20
‘POLICE’
This effect is an emulation of an emergency services light. Click the centre knob (or touch the TRIGGER
touchscreen) to activate the Police effect. Rotate the centre knob to adjust the police beacon speed. (It will display
XX, which will give you an indication of the effect speed). Press, hold and turn the left knob to select the colour
(red, blue, red/blue, blue /red) Press, hold and turn the right knob to select Flash type (i.e. 2-pulse, 3-pulse, 4-pulse,
5-pulse, 6-pulse) Rotate the right knob to adjust brightness.

‘TELEVISION’
This effect is an emulation of a TV flicker – it works best by setting the colour temperature to 6000K or choosing an
‘LHT 061 at 3200K Mist Blue’ filter from the HOME/FILTER menu.

Click the centre knob or touch the TRIGGER on the touchscreen to activate the TV effect, or pause & fade to black.
You can also trigger this effect from a trigger connected to the flash sync port or via the Skyport or DMX.

Rotate the centre knob to set the SPEED of the TV effect speed (it will display XX, which will give you an indication
of the effect speed).

Press and rotate the right knob to adjust brightness.

‘GUNSHOT’ (Muzzle Flash)
This effect simulates the light produced when a gun is fired (commonly known as muzzle flash). Select the
GUNSHOT effect from the SFX carousel. Trigger the effect by clicking the centre knob, or tapping the TRIGGER
touchscreen, or trigger the effect externally via the trigger port or via the Skyport or DMX. Control the SHAPE of
the gunshot by rotating the centre knob. Rotate the right knob to adjust brightness. Select a base colour for the
GUNSHOT effect from the HOME menu, then go to SFX/GUNSHOT.

‘NEON’ (Broken Neon Light)
This effect is used to simulate a faulty neon or fluorescent fixture. Trigger the effect by clicking the centre knob,
or tapping the TRIGGER touchscreen, or trigger the effect externally via the trigger port or via the Skyport or
DMX. Rotate the centre knob to control the flicker SPEED of this effect. Rotate the right knob to adjust brightness.

You can create a custom colour for this effect in the HOME menu and combine that with the ‘NEON’ SFX. The
customized preset can be stored in the SFX User Presets.

                                                                                                                             21
‘FILM’ (Old Cinema Projector) The Film effect is designed to simulate the flickering light coming from a celluloid film projector in a movie theatre. Create a base colour for this effect in the HOME menu then go to SFX/FILM to combine the customized colour with your edited effect. You can start / stop (or pause/fade to black) the effect by clicking the centre knob, or touching the 'TRIGGER' on the touchscreen or using an external trigger from the sync/trigger port, DMX or wDMX. Rotating the centre knob changes the flicker SPEED. Ideally set the flicker SPEED quite slow so that a camera running at 24 or 25 frames per second can easily record it. Rotate the right knob to adjust brightness of the effect. Store your customized effect in one of the SFX User Presets (hold to store / tap to recall). ‘SPARK WELD’ (Arc Welding Light) This effect simulates the light from an electric arc welding torch. Select the SPARK WELD effect on the SFX carousel. Clicking the centre knob or tapping the touchscreen TRIGGER starts/stops the effect (or pause – fade to black), or you can also start/stop the effect via the external trigger port or via the Skyport or DMX. Rotating the centre knob varies the SPEED of the effect. A key characteristic of the arc welding process is the electric blue arc flame interspersed with vivid orange sparks, and this effect emulates this beautifully. ‘PAPARAZZI’ (Press Photography Flash Mob) This effect simulates a flash mob of Paparazzi photographers. Select a suitable base colour from HOME menu (usually a CCT at 5600K) and set your diffusion and core brightness here. Go to SFX and enter the effect by selecting the PAPARAZZI symbol on the SFX carousel. Tap the touchscreen 'TRIGGER' or click the centre knob, or tap the PAPARAZZI symbol on the carousel, or trigger the effect externally via the flash/trigger port or via the Skyport or DMX. Rotate the centre knob to control the speed of the effect. Rotate the right knob to change brightness. ‘CHASE’ (Moving or Throbbing Light Emulator) This effect allows Titan™ to wirelessly control a line of up to 12 Rotolight Titans to simulate passing streetlights. This effect requires some settings in the DMX menu as follows:- Master Titan™ should be set to DMX/IN-OUT (Input – Local Control) (Output Sync-SFX) and Network ‘ROTOLIGHT’, in DMX/OVERVIEW set the Master to Roto wDMX Channel 1. Any connected slaves should be set to DMX/IN-OUT (Input wDMX-In) and Network ‘ROTOLIGHT’. The Slaves should be set in DMX/OVERVIEW/Roto-wDMX Channel to base addresses in clusters of 16 (i.e. channels 1, 17, 33, 49, 65, 81, 97, 113, 129, 145, 161, 177, 193). However, If you are using CHASE to generate a THROB effect, (or any other SFX effect) and you want an unlimited number of lights to do the same thing, then the Master & Slave lights should all be set to the same Roto-wDMX channel DMX address. 22
The controls for Chase are as follows:

Rotate centre knob to control the Chase ‘SHAPE’

Rotate right knob to control Brightness

Press, hold and turn the left knob to control the Chase ‘SPEED’

Press, hold and turn the centre knob to control the Chase ‘light FLOOR’ (i.e. the amount of residual light across all
the lights in the Chase)

Press, hold and turn the right knob to control the Chase ‘GAPs’ between each of the lights in the Chase.

DEMO (Auto Demo Mode)
This is a useful way to demo the light in a retail store. Select DEMO by tapping the symbol on the SFX carousel.
Right click or tap the symbol again to start/stop (toggle) the DEMO.

                                                                                                                        23
FLASH INTERFACE Titan™ flash with modelling light Overview Titan™ is the first professional lighting fixture that provides an RGBWW High Speed Sync flash (HSS) at up to 1/8000th second, with no recycle time. You can flash in any colour temperature (3000-10,000 Kelvin), whilst enjoying up to 200% more power (1 stop), than in regular continuous mode, and considerably preserving battery power. Titan™ also gives you a fully adjustable modelling light so in a dark environment you can achieve optimal focus, adjust the selected colour temperature of the flash/modelling light to match any ambient light in the image, whilst previewing and optimizing the shadows in your image. Rotolight HSS Providing more than 200% of the normal maximum continuous output (in MAX+ mode), Rotolight HSS flash also provides incredible colour accuracy (CRI 98, TLCI 99) with the ability to electronically tailor the diffusion, spread, brightness, duration and colour temperature to your needs. The advantage of the Titan™ is that the modelling light allows you to better compose your shot; letting you obtain focus and preview how the light will fall in the final image. You can also shoot in high fps mode to ensure you never miss a shot (at any frame rate* and with no recycle time). High Speed Sync, (HSS), allows flash to be synchronised at a shutter value beyond your camera’s normal X-Sync speed (X-Sync is the speed at which your camera can synchronise the flash and the shutter, typically around 1/250th second). In so doing it allows you to freeze action, or enables shooting wide open (with a ‘faster’ aperture) for lovely bokeh in bright sunlight conditions, which requires your flash to be able to sychronize to higher HSS shutter speeds to avoid over exposure. Please note, with certain cameras at the highest fps settings the camera switches from mechanical to electronic shutter, and in so doing disables the hot shoe and flash synchronization. Flash can only be synchronized with mechanical shutter so please consult your camera manual. Additionally, many cameras disable flash synchronisation when in silent shutter mode, so ensure this mode is switched off. USING THE FLASH MODE Please note : The Titan will use the previously selected colour temperature (CCT), RGB/HSI/XY colour, or filter that was selected prior to entering flash mode. Therefore for regular operation, before entering the flash menu select your desired Colour temperature from the ‘CCT’ tab on the HOME menu from 3000-10,000 Kelvin (with 5600K being ‘daylight’ and 3200k being ‘tungsten’ ie sunset). Then, tap the ‘FLASH’ menu button on the touchscreen panel to enter ‘FLASH’ mode. (NB - Titan is not a TTL flash, it is a manual flash with adjustable flash power, modelling light, colour temperature, diffusion and duration settings.) Set your camera into manual flash mode, for exposure guide, take a test shot and either adjust flash power, or distance to the subject to achieve optimal exposure. Alternatively you can use the FDIM mode (SYS menu) to calculate exposure for continuous mode, noting that your exposure will be + 1 stop for flash power. 24
Rotate the left knob to set the desired modelling light level in order to preview focus, shadows and highlights on
your subject (in %, 0-100%) and compose your photograph.

NB: Titan™ is intentionally less bright whilst in modelling light mode than regular continuous light mode, in order
to make the light more comfortable for the subject and prolong battery life.

Press, hold and rotate the left knob to set the desired ‘colour temperature’ for your flash (in kelvin, range
3000K-10000K). Or, touch the colour temperature box, then adjust with the left knob. NOTE : If you are shooting
using an RGBW colour or filter, then this control is ignored (it only works if you are using a CCT colour)

Rotate the centre knob to set the flash output power,
‘MAX+’ (>200% of maximum continuous output plus RGB), (RECOMMENDED)
‘MAX’ (=100% of maximum continuous output)
‘1/2’ (=50%),
‘1/4’ (=25%),
‘X8’ (modelling light level x 8)
‘X4’ (modelling light level x 4).

Using the X4 or X8 output allows you to use the modelling light on your Titan™ to compose and balance the lights
in a multi-light setup, and when they flash they will keep this relationship but be four or eight times brighter.
Press, hold and rotate (or touch and adjust) the right knob to set the desired SmartSoft™ diffuser setting.
Rotate the right knob to set the desired duration for the flash, in shutter intervals, i.e. 1/50s, 1/60s, 1/80s, 1/100s…up
to 1/2500s (‘1/2K5’).

Recommended flash settings for simple one-light Titan™ flash operation:
Set flash power to MAX +
For HSS set flash duration to 1/50th (any faster shutter speed i.e. 1/100th will be automatically captured) this
ensures that the image will be lit for the entire duration of the flash/shutter event.
Set colour temp (kelvin) to midpoint (approx. 4200K – for maximum output), or carefully match the colour
temperature to the ambient light colour in the background of your image.

NB- We strongly recommend to leave the duration set to 1/50th and in HSS mode Titan™ will automatically adjust
the duration for you if it detects overlapping flash events.

                                                                                                                             25
To shoot with a colour filter or custom RGBWW colour Titan can flash in any colour temperature (3000-10,000 Kelvin), whilst enjoying up to 200% more power (1 stop), than in regular continuous mode*, and considerably preserving battery power. Alternatively, Titan can flash in any of the 16.7Million RGB colours, or 2500 filters, for optimized battery life. To shoot in an RGB colour, simply choose the desired filter or create a custom colour in the RGBW / HSI / XY / FILTER menus found on the HOME page. Once you have chosen the desired colour, then go to the FLASH page, and your custom colour will be automatically transferred. *Please note : The additional flash power boost is provided when the Titan flash is in“CCT” mode in traditional ‘white light flash’ ie 3000-10,000 Kelvin. In RGB or filter mode, the flash will be at the same maximum ouput as in regular continuous mode, but will considerably increase battery life by dramatically reducing power consumption. Rotolight/Elinchrom HSS transmitter - Recommended To shoot in High Speed Sync, you will need an HSS wireless transmitter. Titan™ features an in-built Elinchrom Skyport 2.4Ghz wireless HSS receiver, capable of High Speed Sync flash (HSS, 1/8000th. For best results, use the Rotolight HSS Transmitter (RL-HSS-TX) by Elinchrom available now for Sony, Canon, Nikon, Olympus, Panasonic and Fujifilm cameras, available from from www.rotolight.com and Rotolight retailers globally. Capable of controlling up to ten Rotolights, in four groups, the Rotolight HSS transmitter also provides wireless control of Titan brightness and colour temperature in both flash and continuous modes (Rotolight HSS transmitter only), and can trigger CineSFX™, X-FX (Exposure FX) and Designer Fade™. Shooting in High Speed Sync Titan™ will happily work with any camera and any trigger/receiver with a PC sync input, however to shoot in High Speed Sync a) your camera must itself be capable of HSS (many are not), and b) you must use a HSS capable transmitter and receiver (most are not natively HSS compatible unless explicitly stated). NB – When triggered, Titan™ will flash once for the duration set shutter interval when syncing in HSS, ensuring that the complete frame is illuminated, without banding or gradation. If Titan™ detects a flash re-trigger event that overlaps the next flash event during a set interval, it will automatically adjust the duration of the flash to a shorter interval, to avoid damage occurring to the LEDs. 26
‘TrigSync’ and custom flash duration and triggering
Rotolight have developed a special duration and control mode, aimed at the cinematographic industry. It
enables Flash mode to support high frame rate, super Slo-Mo production, called ‘TrigSync’. If TrigSync is selected
in the Duration control (rotate duration to the far left and TrigSync will be displayed after the 1/2500th value, then
both Triggering and Duration are controlled from an analogue electronic input signal via the minijack sync port.
It can be triggered at virtually any frame rate, and duration is also controlled by the length of each trigger signal,
and can be as short as 20uS (20 millionths of a second).

NB: when TrigSync is selected in ‘Duration’ wireless trigger signals from the Elinchrom HSS receiver are ignored.

Wired Flash Sync using your camera’s PC Sync port
To trigger the flash from the PC Sync port on your camera (wired operation), connect a PC sync cable from your
camera’s PC sync port to the 3.5mm mini jack on the Titan™ port plate. If your camera does not have a PC sync
port, then you can purchase the optional ‘Rotolight Accessory Shoe to PC’ adapter and the PC flash sync cable,
which converts your accessory shoe into a PC socket NB - PC sync is limited to your camera’s internal sync speed
(X-Sync) (usually 1/60th up to 1/250th). IT IS NOT HIGH SPEED SYNC.

Recommended triggers
To avoid the need for additional cables or receivers the following transmitters work natively with the inbuilt
Elinchom skyport receiver :
Rotolight HSS Transmitter (Canon, Nikon, Sony, Olympus/Panasonic, Fuji)
Elinchrom Transmitter PRO (supports HSS) (Canon, Nikon, Sony, Olympus/Panasonic, Fuji)
Elinchrom HS Transmitter Plus (not HSS) (Canon, Nikon, Sony, Olympus/Panasonic, Fuji

Third-party triggers
Alternatively, you can connect third party flash receivers or transceivers which have a PC sync or 3.5mm flash
output, with a PC sync/3.5mm cable to the 3.5mm mini jack flash trigger input jack located on the port plate of
Titan™. Connect the transmitter to your camera accessory shoe (such as Godox X1T/R, Phottix, Sony, Pocket Wizard,
etc) and follow the instructions supplied with your transmitter. Recommended third party transmitters include:

Godox X1T (use with the Godox X1R receiver)
Pixel King Pro-Sony, Canon, Nikon
Flashpoint R2
Phottix ODIN II (HSS) – Canon, Nikon, Sony
PocketWizard (HSS): FlexTT5, and FlexTT6 support High Speed Sync (HSS) for Canon and FP Sync for Nikon.
Cactus VI II (HSS): Fuji, Canon, Nikon, Pentax, Olympus, Panasonic

Please note: most transmitters require a setting enabled to output a flash sync signal via the PC sync port, please
ensure this setting is enabled on your transmitter/receiver

                                                                                                                         27
Setting up a Rotolight Elinchrom HSS Transmitter The below setup instructions are based on the HSS transmitter firmware 1.3 and Titan™ firmware V2.0. To check the firmware version on your HSS transmitter, this is shown on the screen briefly whilst the device turns on. To check the Titan™ firmware version, go to the about information in the SYS menu. If your HSS transmitter has a version earlier than 1.3, please visit the Elinchrom website to update manually, which should only take a few minutes. If you need an update to your Titan™ firmware, please visit www.rotolight/titan-updates First, turn on your Titan™ then after a few seconds, turn on your Rotolight or Elinchrom HSS Transmitter. If you are operating from the correct firmware, the transmitter should automatically find the Titan™ and display this on Screen (if it does not you can press setup ‘Scan’ on the transmitter to force it to search for compatible devices). (Note : It may detect it as ‘Apollo’ or ‘Titan X1’ / Titan X2) We automatically set the units to default to channel 1, frequency 1 out of the box. Ensure that Skyport receiver mode is set to ‘SPED’ on the Titan™. This ensures that Skyport is active and is in HSS mode. Similarly ensure the Skyport transmitter is in the same “Speed” mode by pressing setup> ELSP mode> Speed. Then, on Titan™ Flash menu check that both FREQ and GRP are both set to 1, or whatever the desired channel and group is that you wish to use. The frequency setting (channel 1-20) should be set to the same on both your Titan™ and the HSS transmitter. Press the setup button on the right-hand side of the HSS transmitter. Scroll using the rotary wheel to ‘Frequency’, and ensure it is on the desired frequency – we recommend defaulting to channel 1, however if you happen to encounter interference from other signals, try changing to a lesser used frequency, such as channel 20. To then adjust the frequency, press the button in the centre of the rotary wheel and scroll to change the number. Press the centre button to confirm, which also navigates you back to the main setup menu. For users wishing to operate both Elinchrom and Rotolight units simultaneously using the HSS transmitter, scroll using the rotary wheel to ‘ELSP mode’, use the centre button to enter the mode and scroll to adjust to ‘Normal’. Press the button in the centre of the rotary wheel centre to confirm. The screen will change to a green background colour to confirm you are in Normal mode. Ensure you also change this setting on your Titan™ in the FLASH menu. You may then need to turn off your transmitter and turn back on again for it to re-register the units on the display. If you are only operating Rotolight units via the HSS transmitter, we recommend using Speed mode, which will turn the background colour red. Flash User Presets : There are ten user programmable radio button user presets available to store and recall your favourite customised Flash settings (presets 31-40). Press and hold to store a setup, tap the button to recall the preset. Tap the bank button to access presets 36-40. 28
‘X-FX’ (Exposure Effects)
Titan™ X2 includes an Exposure Effects (X-FX) feature set, delivering multi-flash intra-frame imaging for
photography that allows users to capture multiple stroboscopic frames of movement within one exposure, or
programmable delayed flash events. It is easy to use and can provide some really fun ways of creating unusual
multi-exposure images to capture the spirit of movement in still photography.

As a rule , it is a good practice to use a dark background, and to track the camera slightly through the image
capture, to avoid burned out hotspots within the image. X-FX works using the Flash settings you have created
in the FLASH submenu.       If you exit the X-FX submenu, then the X-FX parameters, (DLAY / REPS / GAPS) will be
switched off.   The X-FX and FLASH settings can be stored in the Flash menu User Presets (hold to store, tap to
recall).

A typical X-FX setup would comprise 2 or more Titan Lights, using one as a “big finish/keylight” which would fire
once at the end of the captured motion sequence, usually with a DLAY set. The other light would be at a lower
power output setting, with a very short duration (so the motion doesn’t blur), and with no DLAY, multiple REPS,
with short GAPS set between the REPS. e.g. The second light triggers first, with 5 REPS, and GAPS of 0.1seconds,
at half power (maybe as a coloured RGBW Flash?), that will take a total of exactly 0.5 seconds, so your main “big
finish/keylight” should have 0.5seconds DLAY and fire once, to conclude the shot. Your camera exposure duration
should be at least 0.6 seconds. The sequence of flashes between the two lights will be synchronised to start from
the same flash trigger event (could be a wireless or wired flash trigger)

‘DLAY’ (Delay before the ‘Repetitions or Gaps’)
Rotate the left knob to set your desired ‘DLAY’ 0.00s (in seconds). This will introduce a delay that follows the flash
trigger, and before the Titan™ flash fires, after the shutter release or trigger is received. The REPS (with their set
GAPS) follow the DLAY.

‘REPS’ (Repetitions)
Rotate the centre knob to set the required REPS (flash repetitions). (maximum 20).

‘GAPS’ (The Gaps between the Repetitions)
Press the right knob to set the desired duration of the ‘GAPS’ (between the REPS),displayed in fractions of a second
(i.e. 0.10s – 1/10th of a second) between the repeated flashes (‘REPS’).

When you have set any desired DLAY, REPS or GAPS you can test X-FX by tapping the ‘TEST’ switch on screen, or
clicking the centre knob.

NB - X-FX are only active whilst you remain in the X-FX menu.

                              Photography by Dylan Coulter, Images for Professional Reference only, all rights reserved.

                                                                                                                           29
You can also read