PROWLER 930 ROBOTIC INGROUND POOL CLEANER ROBOT NETTOYEUR POUR PISCINE ENTERRÉE LIMPIADOR ROBÓTICO DE PISCINA ENTERRADA - Pentair Pool Europe
←
→
Page content transcription
If your browser does not render page correctly, please read the page content below
English
                                                                        2

PROWLER™ 930
ROBOTIC INGROUND POOL CLEANER

                                                                      Français
ROBOT NETTOYEUR POUR PISCINE ENTERRÉE
LIMPIADOR ROBÓTICO DE PISCINA ENTERRADA
                                                                        11

                                                                      Español
                                                                       25

                              INSTALLATION AND USER’S GUIDE
                                       GUIDE D’INSTALLATION
                                        GUIA DE INSTALACION

IMPORTANT SAFETY INSTRUCTIONS
READ AND FOLLOW ALL INSTRUCTIONS / SAVE THESE INSTRUCTIONS

CONSIGNES DE SÉCURITÉ IMPORTANTES
LIRE ET SUIVRE TOUTES LES INSTRUCTIONS / CONSERVER CES INSTRUCTIONS

INSTRUCCIONES IMPORTANTES DE SEGURIDAD
LEA Y SIGA TODAS LAS INSTRUCCIONES / GUARDA ESTAS INSTRUCCIONES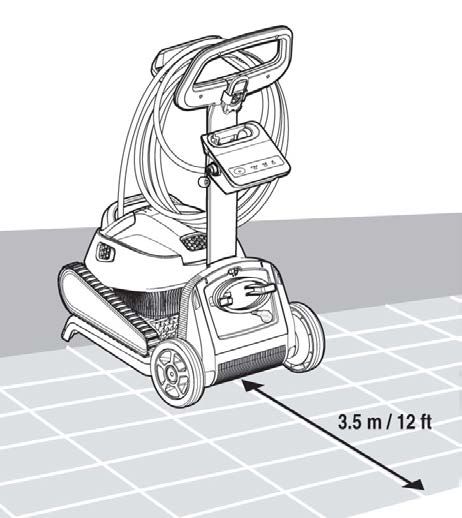
i

                                                                  PROWLER™ 930
English

          Pentair thanks you for placing your trust in the company and purchasing Prowler™ 930, the robotic inground pool cleaner.
          Please carefully read this user manual to fully benet from all of the functions of Prowler™ 930. Store it carefully so that it can be consulted at any time.

          Declaration of conformity

          Directives – Harmonised standards
          Pentair International Sarl - Avenue de Sévelin 20 - 1004 Lausanne - Suisse
          We declare, under our own responsibility, that the product meets the directives

          SAFETY                EN 60335-2-41:2003 + A1:2004 +A2:2010/IEC 60335-2-41:2012
                                EN 60335-1:2010/EN60335-1:2012
                                IEC 62233:2005/EN 62233:2008

          ETSI                  EN 300328 V1.8.1 (2012)
                                EN 301489-1 V139.2 (2011)

          EMC                   EN 55014-1:2006+A2:2011
                                EN 55014-2:1997+A1:2001+A2:2008
                                EN 61000-3-2:2006+A1:2009+A2:2009
                                EN 61000-3-3:2013

              PROWLER 930:                                                          Parts:
              PROWLER-930 EU                                                        Cleaner: P/N 99996211-PNT                Power supply: P/N 99956033-ASSY

              Other regulatory documents                                            Authorised person for technical documentation
              2014/35/EU (Low Voltage Directive)                                    Pentair International S.a.r.l
              2014/30/EU (Electro Magnetic Compatibility Directive)                 Avenue de Sévelin 20
              2014/53/EU (Radio Equipment Directive)                                1004 Lausanne - Switzerland
              2011/65/EU (RoHS)

                                                                                                                                Lausanne, 2020 03 31

                                                                                                                                Jacques, Van Bouwel
                                                                                                                                Engineering Mgr

              Product specifications: POWER SUPPLY
              Power supply input: 220-240 VAC ~, 50-60 Hz         Power supply output: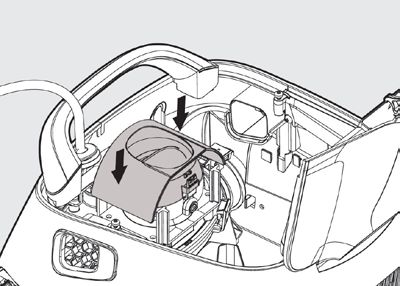
ii

                             CUSTOMER SERVICE / TECHNICAL SUPPORT

                                                                                                                                                                                                                  English
If you have questions about ordering Pentair Aquatic Systems, (“Pentair”) replacement parts, and pool products,
please use the following contact information:
       Customer Service                                                                                                                                           Technical Support

        +39 050716166 / +39 050716169                                                                                                                             e-mail: techsupport.poolemea@pentair.com
        orders.pooleu@pentair.com                                                                                                                                 Hotline: +33 184280940
        poolemea@pentair.com
        www.pentairpooleurope.com

  TABLE OF CONTENTS

Declaration of conformity..................................................................................................... i

Customer service / Technical support ..............................................................ii

Important Warning and Safety Instructions ............................... iii & iv
Preparation of the Pool and Cleaner.................................................................... 2
   Overview............................................................................................................................................ 2
   Packaged Components................................................................................................ 2
   Cleaner Features................................................................................................................... 2
   Initial Setup........................................................................................................................ 2 & 3
   Caddy Assembly........................................................................................................... 4 & 5
Operation.................................................................................................................................................... 6
  Control Panel Overview................................................................................................ 6
  Weekly Timer.............................................................................................................................. 6
  Setting the Weekly Timer.......................................................................................... 6
  Cleaning Speed (Quick Clean Feature)..................................................... 6
  Bluetooth® Operation........................................................................................................7
  Downloading the Mobile App..................................................................................7
  Pairing your Smartphone to the Cleaner...............................................7
  Operating the Cleaner with Manual Drive.............................................7

Maintenance........................................................................................................................................... 8
   LED Indicator Lights......................................................................................................... 8
   Removing the Cleaner from the Pool........................................................ 8
   Cleaning the Filter Baskets..................................................................................... 9
   Periodic Filter Screen Cleaning......................................................................10
   Cleaning the Impeller....................................................................................... 11 & 12
   Storing the Cleaner..........................................................................................................12
Troubleshooting ............................................................................................................................ 13

                                                                                                      PROWLER™ 930 Robotic Inground Pool Cleaner Installation and User’s Guide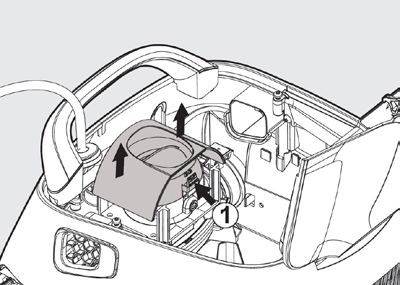
iii

                IMPORTANT WARNING AND SAFETY INSTRUCTIONS
English

                    Important Notice:
          Attention Installer: This guide contains important information                            When lifting the robotic pool cleaner, take
          about the installation, operation and safe use of this product.                           care to prevent back injury.
          This information should be given to the owner and/or operator
          of this equipment after installation of the pool cleaner.            General Installation Information
          Attention User: This manual contains important information           This equipment generates, uses and can radiate radio
          that will help you in operating and maintaining this pool cleaner.   frequency energy and, if installed and used in accordance
          Please retain it for future reference. Consult Pentair with any      with the instructions, guarantees that interference will not
          questions regarding this equipment.                                  occur in a particular installation. If this equipment does cause
                                                                               harmful interference to radio or television reception, which can
                              Before installing this product, read and fol-
                                                                               be determined by turning the equipment off and on, the user
                              low all warning notices and instructions
          which are included. Failure to follow safety warnings and in-        is encouraged to try to correct interference by one or more
          structions can result in severe injury, death, or property dam-      following measures:
          age.                                                                    • Reorient or relocate the receiving antenna.
                                                                                  • Increase the separation between the equipment and the
          Consumer Information and Safety:
                                                                                    receiver.
          The pool cleaners are designed and manufactured to provide
          many years of safe and reliable service when installed, operated        • Connect the equipment into an outlet on a circuit different
          and maintained according to the information in this manual.               from that to which the receiver is connected.
          Throughout the manual, safety warnings and cautions are                 • Consult the dealer or an experienced radio/TV technician
          identified by the “ ” symbol. Be sure to read and comply with             for help.
          all of the warnings and cautions.                                    Changes or modifications to this equipment not expressly
                                                                               approved by the party responsible for compliance (Pentair)
                               RISK OF ELECTRICAL SHOCK OR
                               ELECTROCUTION. Connect only to a                could void the user’s authority to operate this equipment.
                               grounding type receptacle protected by a        Pre-Installation Check List:
                               earth leakage circuit breaker 30mA.             Before installing your cleaner, review and understand all
                               Contact a qualified electrician if you cannot
                                                                               warnings and safety information in this guide. Failure to follow
                               verify that the receptacle is protected by a
                               earth leakage circuit breaker 30mA.             these instructions or improper installation of the cleaner can
                                                                               result in damage to the pool finish or the vinyl liner, Pentair
                              HAZARDOUS SUCTION. Do not                        disclaims any liability for repairs or replacement to any of these
                              play with cleaner or apply to                    structures or components of the customer’s pool.
          body. Can trap and tear hair or body parts.
                                                                               Before installing the cleaner in a vinyl liner pool:
                              Do not operate the robotic pool cleaner
                                                                               Check liner closely for signs of deterioration or damage from
                              when there are people swimming in the
          pool. Communication cable can trip or entangle swimmers              age, chemicals, pool wall damage, etc. If any damage is found,
          which could result in drowning.                                      have a qualified pool professional make all the necessary
                                                                               repairs. Also, if there are stones, roots, etc., under the liner,
                               When inspecting or servicing the robotic        remove them before installing the cleaner.
                               pool cleaner, disconnect the main power
          supply.                                                              Before installing the cleaner in a gunite pool or a pool that is
                                                                               partially or completely tiled:
                              Keep the robotic pool cleaner out of reach
                              of persons with reduced physical, sensory        Repair loose tiles and tighten any loose light rings.
          or mental capabilities, or lack of experience and knowledge,         Before installing the cleaner, clean your filter system:
          without proper supervision and understanding of the                  Make sure you have cleaned the filter, including backwashing,
          instructions.
                                                                               rinsing, and emptying all baskets. A clean system is necessary
                               Use only a power cable produced by the          for proper cleaner operation and coverage.
                               original cleaner manufacturer at all times.
                                                                               Before installing the cleaner, understand cleaner coverage:
                                To reduce the risk of electrical shock, do     The cleaner is designed to rid your pool of debris in approximately
                                not use an extension cord to connect unit      4-6 hours. Less time could be needed, depending on the pool
          to electrical supply; provide a properly located outlet.             size. The cleaner was not designed to automatically clean
                               Only a trained operator should operate          steps or swimouts or to work under a solar cover. It was also
                               the robotic pool cleaner.                       not designed to do initial cleanup for a new pool or when opening
                                                                               your pool for the season.
                               To avoid hand injury, operator should keep
                               hands away from all moving parts and
                               suction inlets.
                               Position the caddy and power supply at
                               least 3.5 m (12 feet) from the edge of the
                               pool during operation.
                               Do not bury cord. Locate cord to minimize
                               abuse from lawn mowers, hedge trimmers
                               and other equipment.

          PROWLER™ 930 Robotic Inground Pool Cleaner Installation and User’s Guide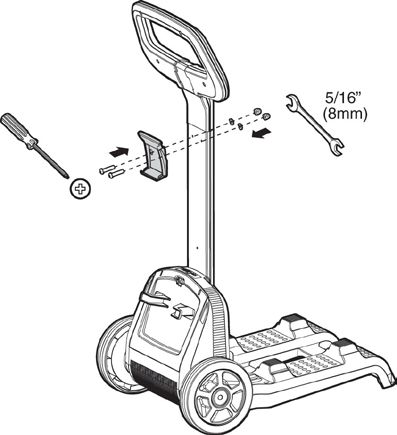
iv

    IMPORTANT WARNING AND SAFETY INSTRUCTIONS

                                                                                                                                           English
AFTER installing the cleaner, make sure the cleaner is                                        DO NOT ALLOW CHILDREN TO USE THE
operating correctly:                                                                          CLEANER :
The cleaner may need some minor adjustments to make sure
                                                                      MAINTENANCE AND STORAGE
it is operating properly so there is no damage to the pool
finish. Certain vinyl liner patterns are particularly susceptible     - Make sure that no water is left in the Pool Cleaner
to surface wear, pattern removal, ink rubbing off of, or              - Thoroughly clean the filter and let it dry outside of the filter
serious scratches to the pattern caused by objects coming                canister
into contact with the vinyl surface, including automatic pool         - Roll up the cable so that it has no kinks
cleaners. Pentair is not responsible for any pattern removal,
abrasions or markings on vinyl liners.                                - Store the Pool Cleaner in a protected area out of direct sun /
                                                                         rain / frost, at a temperature of between
Disclaimer of Liability                                               - 5°-45°C / 41°-113°F
About your Pool and Cleaner:
                                                                      - DO NOT LUBRICATE
There are a multitude of factors that contribute to the life
of your pool. These robotic pool cleaners are very passive
products that will have no impact on pool life.
Please be aware that over time, deterioration, discoloration
and brittleness of any pool finish can be caused separately
by, or in combination with, age, an imbalance in pool water
chemistry, improper installation and other factors. Robotic
pool cleaners will not remove or cause wear on “good” pool
plaster. In fact, the opposite is true–pool plaster will eventually
cause wear on the cleaner.
The same situation holds true for vinyl-lined in-ground
swimming pools, because vinyl liners are also affected by
the environment and factors such as pool water chemistry,
sunlight and the pool’s surroundings. Therefore over time, vinyl
can become brittle and weak. In addition, vinyl-lined pools are
affected by the workmanship, composition and installation
of the liner and the workmanship and quality of construction
of the supporting walls and pool base. These are all factors
which can contribute to liner failure. The existence of any of
these type of conditions in your pool is not caused by the use
or operation of the cleaner. The manufacturer disclaims any
liability for repairs or replacement to any of these structures
or components of the customer’s pool.
The pool owner must assume all responsibility for the condition
and maintenance of the pool’s surface, water and deck.

SAFETY
- Connect only to a grounding type receptacle protected by a
  earth leakage circuit breaker 30mA
- Keep the power supply out of standing water
- Position the power supply at least 3.5m (12 feet) away from
  the edge of the pool
- Do not enter the pool while the Pool Cleaner is working
- Unplug the power supply before servicing

                                 SAVE THESE INSTRUCTIONS

                                              PROWLER™ 930 Robotic Inground Pool Cleaner Installation and User’s Guide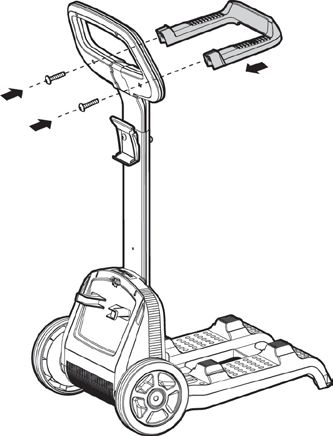
2
PREPARATION OF THE POOL AND CLEANER
English
Overview
Prowler™ 930 robotic pool cleaner is designed to scrub, vacuum, and filter (including the waterline) your inground
pool. Before operating this product, be sure to read and follow all warning and safety instructions on pages iii-iv.
Packaged Components: Cleaner and 18 m. Cleaner Caddy
communication cable
• Cleaner and 18 m. communication cable
• Power supply
• Cleaner Caddy (Prowler 930 only)
Cleaner Features:
• Weekly Timer
• Wall and Waterline Scrubbing Power Supply
• Top Loading Basket Filtration
• Quick Clean
• Bluetooth® Wireless Technology Connectivity
• “Prowler™ 930” Mobile App for Smartphones
Initial Setup
Before using the cleaner for the first time, complete the following steps:
STEP 1: STEP 2:
Power Supply or Caddy Placement
Unroll Communication Cable
The Prowler 930 cleaner comes with a cleaner caddy
Unroll the cable and stretch it out completely so that is
that will need to be assembled before continuing fur-
has no kinks. See Figure 2.
ther into this section. See page 4 for Caddy Assembly
instructions.
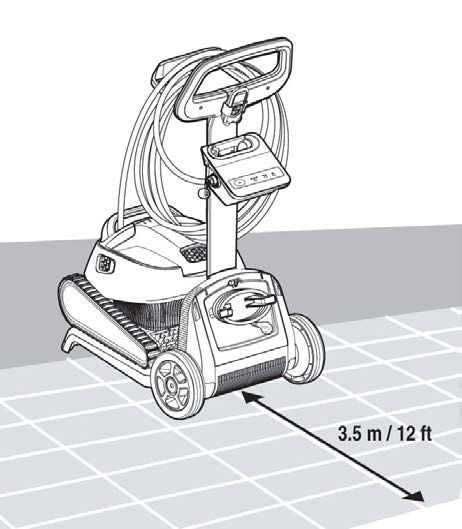
Position the caddy or power supply at least 3.5 m (12 feet)
from the edge of the pool. See Figure 1.
Figure 2
Figure 1
PROWLER™ 930 Robotic Inground Pool Cleaner Installation and User’s Guide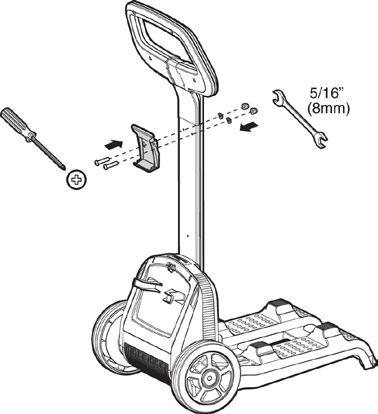
3

             PREPARATION OF THE POOL AND CLEANER

                                                                                                                              English
STEP 3:                                                          STEP 5:
Connect Power Supply to Cleaner                                  Placing the Cleaner in the Pool
Connect the communication cable to the power supply.
                                                                                   Do not switch the pool cleaner to “ON”
Ensure the connector notch is lined up with the                                    if it is not fully immersed in water.
corresponding groove in the socket on the power supply.           Operating the cleaner out of water will immediately
Turn the cable connector clockwise to lock the cable              cause severe damage and will result in loss of warranty.
into the power supply connection. See Figure 3.                   Do not leave the cleaner in the pool all the time. Always
                                                                  remember to turn the power supply “OFF” and unplug
                                                                  it from the power outlet before removing the cleaner
                                                                  from the pool.

                                                                 1.   Be sure the power supply is positioned at least 3.5 m
                                                                      from the pool.
                                                                 2. Lower the cleaner into the pool by the handle. see
                                                                    Figure 5.
                                                                    Note: Never lower the cleaner into the pool by the
                                                                    communication cable. This puts an unnecessary
                                                                    strain on the cable and could result in damage to
                                                                    the cleaner.
                                                                 3.   Gently tilt the cleaner from side to side or turn
                                                                      upside down to release trapped air. See Figure 6.

Figure 3 STEP 4:
Connect Power Supply to Power Source
Connect the power supply to the electrical source/outlet.
See Figure 4.

                  RISK OF ELECTRICAL SHOCK OR
                  ELECTROCUTION: Connect only to a                        Figura 5                     Figura 6
 grounding type receptacle protected by a earth leakage
 circuit breaker 30mA. Contact a qualified electrician if
 you cannot verify that the receptacle is protected by a
 earth leakage circuit breaker 30mA.
                     To reduce the risk of electrical shock,
                     do not use extension cord to connect
 unit to electrical supply; provide a properly located outlet.

                          Figure 4

                                          PROWLER™ 930 Robotic Inground Pool Cleaner Installation and User’s Guide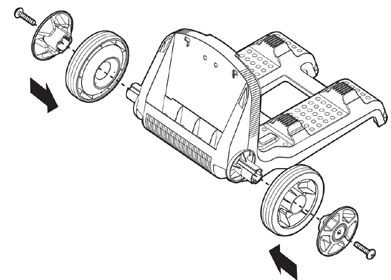
4

                      PREPARATION OF THE POOL AND CLEANER
English

          Caddy Assembly
          The following section contains instructions for assembling the Prowler™ 930 cleaner caddy:

          STEP 1:                                                       STEP 3:
          Removing the Communication Cable Holder                       Installing the Handle Support
          1. While holding the caddy chassis in place, pull the top     1. Slide the handle support into it’s groove on the caddy
             of the communication cable holder straight out until           chassis and push it firmly down into it’s seat in the
             it snaps loose. See Figure 7.                                  chassis. See Figure 9 .
          2. Place the attachment to the side. It will be reinstalled       N o te : T h e h a n d l e
             in Step 4.                                                     support seats tightly
                                                                            into the chassis and
                                                                            substantial force may
                                                                            be needed. Ensure the
                                                                            support is seated all the
                                                                            way into the chassis,
                                                                            otherwise the securing
                                                                            screws will not line up
                                                                            correctly.
                                                                                                                         Figure 9
                                                                        2.   Using two of the shorter Phillips-head screws
                                                                             provided with the caddy, secure the caddy chassis
                                                                             to the handle support. See Figure 10
                                   Figure 7

          STEP 2:
          Installing the Caddy Wheels
          1. Using two of the shorter Phillips-head screws
              provided with the caddy, secure both caddy wheels
              to the caddy chassis. See Figure 8.

                                                                                                  Figure 10

                                                                        STEP 4:
                                                                        Reinstall the Communication Cable Holder
                                                                        1. Slide the bottom of communication cable holder into
                                                                            it’s seat on the front of the caddy chassis.
                                                                        2. While holding the caddy chassis in place, push the top
                                                                            of the attachment in until it clicks into place Figure 11.

                                   Figure 8

                                                                                                  Figure 11

          PROWLER™ 930 Robotic Inground Pool Cleaner Installation and User’s Guide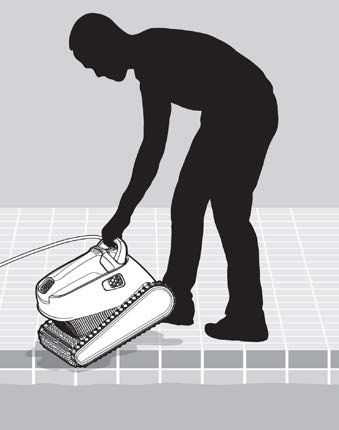
5

            PREPARATION OF THE POOL AND CLEANER

                                                                                                                        English
STEP 5:                                                    STEP 7:
Install the Caddy Handle                                   Install the Power Cable Holder
1. Insert the caddy handle into the handle support.        1. Using the final two shorter Phillips-head screws
    See Figure 12 .                                            provided with the caddy, secure the power cable
                                                               holder to the caddy handle. See Figure 14 .
2. Push the handle into it’s support as far as possible.

                        Figure 12

STEP 6:
Install the Power Supply Clip
3. Using the two longer Phillips-head screws, two
    washers and two 8 mm (5/16”) nuts provided with the
    caddy, install the power supply hook to the caddy’s
    handle support. See Figure 13.

                                                                                   Figure 14

                                                           STEP 8:
                                                           Attach the Power Supply to the Caddy
                                                           1. Hook the power supply’s handle over the top lip of the
                                                               power supply clip. See Figure 15 (A).

                                                           2.   Tilt the power supply toward the handle support until
                                                                the power supply snaps into place on the bottom lip
                                                                of the power supply clip. See Figure 15 (B).

                        Figure 13

                                                                                    Figure 15

                                      PROWLER™ 930 Robotic Inground Pool Cleaner Installation and User’s Guide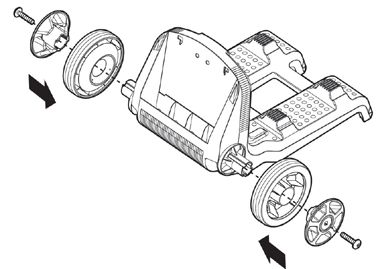
6

                                                         OPERATION
English

          Control Panel Overview
                                                                      3 Schedule         2 Cleaning
                                   Bluetooth® Wireless Technology        LEDs           Speed LEDs
                                        Connection Indicator

                                             ON/OFF                 Weekly Schedule    Cleaning Speed
                                             Button                     Button             Button

          Weekly Timer
          The power supply has a timer control that allows you to set an automatic cleaning schedule each week. Be sure
          the cleaner is fully immersed in water before turning on the power.

          Setting the Weekly Timer
          When the power supply is switched on, you may choose a        Cleaning Speed (Quick Clean Feature)
          pool cleaning schedule for the coming week by pressing
          the Weekly Timer button.                                      The Prowler™ 930 Pool Cleaner can be set to clean your
                                                                        pool at either its standard cleaning speed or at a higher
          Note: The cleaner will always begin to work upon set-up.      cleaning speed referred to as Quick Clean.
                    Schedule LEDS:                                      1.   The cleaner’s default speed is symbolized by the
          LED 1 -   The cleaner will automatically work every                    icon on the power supply. When the cleaner is
                    day for a full cycle = 7 times per week. Press           performing a default cleaning cycle the LED under
                    the Weekly Timer button once to select this              this icon will illuminate.
                    interval.                                           2. Quick Clean is symbolized by the           icon on the
          LED 2 - The cleaner will automatically work every other           power supply. When the cleaner is performing a
                  day for a full cycle = 3 times per week. Press            Quick Clean cleaning cycle the LED under this icon
                  the Weekly Timer button twice to select this              will illuminate.
                  interval.                                                 To begin a Quick Clean cycle, press the Cleaning
                                                                            Speed button once. The cleaner will immediately
          LED 3 - The cleaner will automatically work every 3               enter Quick Clean mode and will clean the pool for
                  days = 2 times a week. Press the Weekly Timer             one hour.
                  button three times to select this interval.
                                                                        Note: While in Quick Clean mode the cleaner will only
                                                                        clean the pool floor. The cleaner will NOT climb and clean
          Pressing the Weekly Timer button four consecutive             pool walls.
          times will reset the cleaner’s schedule. If you do not
          press any of the buttons within the first 5 seconds after     Note: Once Quick Clean is selected, the cleaner will
          the power has been switched on, the cleaner will default      continue to clean in Quick Clean mode each time the
          to running one cycle only.                                    cleaner is activated. To return to the default cleaning
                                                                        cycle the Cleaning Speed button must be pressed while
          While the cleaner is working in weekly timer mode, the        the cleaner is active.
          appropriate Weekly Timer LED will blink constantly
          between cycles. At the end of the week the power supply
          automatically shuts off.

          PROWLER™ 930 Robotic Inground Pool Cleaner Installation and User’s Guide
7
OPERATION
English
Bluetooth® Operation 3. After successfully connecting your smartphone
to the desired cleaner, the Welcome screen will
The Prowler™ 930 Inground Pool Cleaners contain a display.
Bluetooth® Wireless Technology receiver that allows
the cleaner to communicate with most smartphones. You’ll have three options on this screen:
The following guide provides instructions on how to pair • Start Cleaning: This button will activate the cleaner
the cleaner with a compatible smartphone, as well as and begin the automatic cleaning cycle that is set
how to use the Manual Drive function. at the power supply.
• Manual Drive: This button
Downloading the Mobile App will send you to the Manual
The Mobile App can be found in Drive screen. For more
your smartphone app store by detailed information on the
searching the keyword “Prowler Manual Drive function,
930” or “Kreepy Krauly”. continue to Operating the
Cleaner with Manual Drive.
• Links and Info: This
button will direct to a list
Pairing your Smartphone to the Cleaner of helpful links related to
To successfully pair your smartphone to the cleaner, your cleaner. A link to the
the smartphone must be broadcasting a Bluetooth cleaner’s Installation and
connection signal. Ensure Bluetooth capability is User’s Guide can be found
enabled before attempting to pair with the cleaner. here.
1. The first time the Mobile Operating the Cleaner with Manual
App is opened on a mobile
device, the app will begin to
Drive
search for a cleaner to pair First, tap the Start Cleaning button on the Welcome
with. screen. The Manual Drive button will not be accessible
until a cleaning cycle is in process.
The smartphone must
be within 1 m (3 ft.) of the After selecting the Manual Drive function on the
cleaner’s power supply to Welcome screen, the Manual Drive screen will display.
successfully pair with the Manual Drive allows you to manually drive your cleaner
cleaner. around the pool. This allows for easy and quick spot
cleaning of the pool floor.
There are two options for
manually controlling your
2. Once a cleaner(s) is recognized by your smartphone cleaner:
the Select Robot screen will display. Cleaners will
display by serial number. Select the cleaner you wish 1. Joystick Mode: This is the
to connect to. default Manual Drive mode.
The cleaner direction and
speed is controlled by your
thumb as you guide the
“joystick”.
2. Tilt Mode: Enter Tilt Mode
by swiping the Tilt Mode
toggle at the bottom of the
Manual Drive screen to ON.
The cleaner direction and
speed will now be
controlled by the direction
and angle you tilt your
smartphone.
PROWLER™ 930 Robotic Inground Pool Cleaner Installation and User’s Guide8
MAINTENANCE
English
Make sure the cleaner’s power supply is turned “OFF” and is disconnected from the electrical
source/outlet before servicing the cleaner. Moving parts may injure hands or fingers if cleaner
inadvertently powers on during servicing.
LED Indicator Lights
The Prowler™ 930 Robotic Pool Cleaner includes an
LED indicator just above the scrubber on the front side
of the cleaner. See Figure 16. During normal operation
powered by the power supply the LED indicator will blink
blue.
Removing the Cleaner from the Pool
The cleaner will shut off automatically at the end of a Figure 16
cleaning cycle. Follow the STEPs below to remove the
cleaner from the pool.
Ensure the power supply is turned “OFF”
and disconnected from the electrical
source/outlet before removing the cleaner from the
pool. Operating the cleaner out of water will immediately
cause severe damage and will result in loss of warranty.
Do not leave the cleaner in the pool all the time.
1. Disconnect the power supply cable from the
electrical outlet and disconnect the cleaner
communication cable from the power supply.
2. Using the communication cable, slowly and gently
pull the cleaner to the waterline at the edge of the
Figure 17
pool until you can reach the handle. DO NOT lift the
cleaner out of the water by the cable.
3. Using the handle, lift the cleaner out of the pool.
See Figure 17.
Note: Never lift the cleaner out of the pool by the
communication cable. This puts an unnecessary
strain on the cable and could result in damage to
the cleaner.
4. Place the cleaner on the edge of the pool and allow
excess water to drain from the cleaner body and
basket. See Figure 18.
5. Disconnect the communication cable from the
power supply.
6. Store the cleaner in a covered area with the
communication cable coiled.
Figure 18
PROWLER™ 930 Robotic Inground Pool Cleaner Installation and User’s Guide9
MAINTENANCE
English
Cleaning the Filter Baskets
Note: It is highly recommended that you clean the filter basket after each cleaning cycle. Too much debris in the
filter will restrict the suction power of the Prowler™ 930 Robotic Pool Cleaner and reduce its effectiveness.
To clean the filter basket, follow the instructions given below:
STEP 1: STEP 3:
Open the Filter Cover Remove and Rinse the Inner Filter Basket
When the filter cover is opened the filter basket handle Remove the inner filter basket
will pop up independently. See Figure 19 and 20. from the outer filter basket
see Figure 22.
Dump any loose debris from the
inner basket and thoroughly
rinse out any remaining debris
with a garden hose.
Figure 22
Figure 19 STEP 4:
Empty the Filter Basket
Open the latch at the bottom
of the filter basket. This will
release the bottom lid of the
basket and dump much of the
collected debris. See Figure 23.
Figure 23
STEP 5:
Figure 20
Clean the Outer Filter Basket
Thoroughly clean the filter basket with a garden hose.
STEP 2: See Figure 24.
Lift the basket out of the cleaner body
Figure 24
Figure 21
PROWLER™ 930 Robotic Inground Pool Cleaner Installation and User’s Guide10
MAINTENANCE
English
Periodic Filter Screen Cleaning
Note: It is recommended that you clean the filter screens at least once a month. Too much debris in the filter
screens will restrict the suction power of the Prowler™ 930 Robotic Pool Cleaner and reduce its effectiveness.
To dismantle and clean the four filter screens, follow the instructions given below.
STEP 1: STEP 3:
Empty the Inner and Outer Filter Baskets. Clean the Filter Screens
Follow steps 1-5 on the previous page. The inner and Thoroughly clean the filter screen with a garden hose.
outer filter baskets should be emptied and rinsed clean See Figure 27.
before removing the outer basket’s filter screens.
STEP 2:
Remove the Filter Screen
Using your thumbs, firmly press inwards on the top of
Panel 1 to remove the filter screen from its frame.
See Figure 25.
Each filter screen is stamped with a number. see Figure 26.
Remove the filter screens in numerical order:
Screen 1 > 2 > 3 > 4.
Figure 27
STEP 4:
Reassemble the Filter Screens
Replace the filter screens by seating the bottom of the
screen into its frame, then pushing firmly outwards on
the top of the screen until a click is heard.
Each filter screen is stamped with a number. See Figure
28. Replace the filter screens in numerical order:
Screen 4 > 3 > 2 > 1.
Figure 25
Figure 28
Figure 26
PROWLER™ 930 Robotic Inground Pool Cleaner Installation and User’s Guide11
MAINTENANCE
English
Cleaning the Impeller
Always disconnect power to the cleaner before servicing, disassembly, or reassembly. Failure to
do so could result in death or serious injury to servicemen, pool users or others due to electrical
shock. Read all servicing instructions before servicing the cleaner.
Every so often debris may become trapped in the Prowler™ 930 Robotic Pool Cleaner’s impeller.
To clean out debris trapped in the impeller opening, follow the instructions below:
STEP 1:
Open the Filter Cover and Remove the Basket STEP 3:
See Figure 29 and 30. Unmount and Remove the Impeller Cover
Press the tabs on both sides of the impeller cover (Item
#1 in Figure 32) to unlock the cover from the impeller
assembly. While pressing both tabs, pull the cover away
from the cleaner.
Place the impeller cover to the side.
Figure 29 Figure 30
STEP 2:
Unmount and Remove the Intermediate Cover and
Manifold Assembly
1. Using a No. 2 Phillips-head screwdriver, remove
the two screws that hold the intermediate cover
and manifold assembly in place. These screws can Figure 32
be found in the inside corners of the intermediate
cover. See Figure 31. STEP 4:
2. Place the two screws to the side. Clean Debris from the Impeller
3. Gently pull the intermediate cover (Item #2 in Figure By hand, remove any debris that has become trapped
31) away from the cleaner and place it to the side. around the impeller. See Figure 33.
4. Gently pull the manifold assembly (Item #3 in Figure
31) away from the cleaner and place it to the side.
Figure 33
Figure 31
PROWLER™ 930 Robotic Inground Pool Cleaner Installation and User’s Guide12
MAINTENANCE
English
STEP 5:
Remount the Impeller Cover
STEP 6
Gently push the impeller cover back onto the impeller Remount the Intermediate Cover and Manifold Assembly
assembly. See Figure 34.
Reseat the intermediate cover and manifold assembly
The tabs on the motor unit will lock the cover into place. and reinstall the two screws that hold the cover and
manifold assembly in place. See Figure 35.
Figure 34
Figure 35
Storing the Cleaner
Any time the cleaner will not be in use for an extended period of time, for example during the winter, follow the
storage recommendations below:
• Be sure to disconnect the power supply after use.
• Store the power supply, cable, and cleaner with
the caddy if included with the cleaner.
• Store the cleaner in a protected area out of direct
sun, rain and frost, at a temperature between
5°-45°C (41°-113°F).
• Drain all water from the pool cleaner.
• Thoroughly clean the filter basket and filter
screens and store the cleaner with them installed.
PROWLER™ 930 Robotic Inground Pool Cleaner Installation and User’s Guide13
TROUBLESHOOTING
English
Problem Possible Cause Corrective Action
Cable twisting or cable Obstruction in pool Remove obstruction in pool.
coils up
Gets stuck on main drain cover Turn off filter and install main drain cover ring.
Straighten cable and lay in sun periodically.
Excess cable in the pool Remove excess cable from pool.
Cleaner is moving in Dirt stuck in moving parts Remove dirt from moving parts.
circles
Tracks worn due to extended use Contact your dealer. Replace tracks.
Power supply positioned incorrectly Place power supply in a position so that the
cleaner can reach all walls.
Algae in pool Correct pool and water conditions.
Cleaner does not Power supply positioned incorrectly Place power supply in a position so that the
reach all areas of the cleaner can reach all walls.
pool
Cleaner does not climb walls Check reasons for not climbing walls below.
Algae on pool walls and floor Brush pool walls and floor.
Pool filter and pump is on Turn off pool filter and pump and run another
cleaning cycle.
Cleaner does not Cleaner is too heavy Clean and wash cartridge.
climb walls
Algae on walls Brush walls.
Water temperature too low and/or too Ideal water temperature between 6-35°C
high (43-95°F).
Brushes are worn Replace brushes - contact your dealer.
Debris caught around impeller Clean impeller (see page 8).
Cleaner is too light from trapped air Turn cleaner upside down under water to
remove trapped air.
Unsuitable pH level Check pH level - should be between 7.4 - 7.8;
minimum level of 7.2.
Motor not working Impeller blocked Clean impeller (see page 8).
Drive system blocked Clean tracks and wheels.
Electrical problem - motor unit, Consult with your dealer or service center.
communication cable, or power supply
Cleaner will not sink Air caught in trapped in cleaner Turn cleaner upside down under water to
remove trapped air. Wash the cartridge.
Remove calcium deposits or other chemical
sediments.
Open inlet flap in the bottom lid to remove dirt
and/or trapped air.
Power supply or power Not plugged in properly or main Reconnect and check main power supply.
supply switch light is socket is damaged
not working
PROWLER™ 930 Robotic Inground Pool Cleaner Installation and User’s Guide14
Français
Manuel d’installation et d’utilisation du nettoyeur robotisé pour piscine enterrée PROWLER™ 930PROWLER™ 930
ROBOT NETTOYEUR POUR PISCINE ENTERRÉE
Français
GUIDE D’INSTALLATION
CONSIGNES DE SÉCURITÉ IMPORTANTES
LIRE ET SUIVRE TOUTES LES INSTRUCTIONS / CONSERVER CES INSTRUCTIONSxvi
PROWLER™ 930
Pentair vous remercie d’avoir fait confiance à l’entreprise et d’avoir acheté un robot nettoyeur PROWLER™ 930 pour piscine.
Veuillez lire attentivement ce manuel d’utilisation pour profiter pleinement de toutes les fonctions de Prowler™ 930.
Conservez-le soigneusement afin de pouvoir le consulter à tout moment.
Déclaration de conformité
Directives – Normes harmonisées
Pentair International Sarl - Avenue de Sévelin 20 - 1004 Lausanne - Suisse
Nous déclarons, sous notre propre responsabilité, que le produit est conforme aux directives.
Français
SÉCURITÉ EN 60335-2-41:2003 + A1:2004 +A2:2010/IEC 60335-2-41:2012
EN 60335-1:2010/EN60335-1:2012
IEC 62233:2005/EN 62233:2008
ETSI EN 300328 V1.8.1 (2012)
EN 301489-1 V139.2 (2011)
EMC EN 55014-1:2006+A2:2011
EN 55014-2:1997+A1:2001+A2:2008
EN 61000-3-2:2006+A1:2009+A2:2009
EN 61000-3-3:2013
PROWLER 930: Parts:
PROWLER-930 EU Cleaner: P/N 99996211-PNT Power supply: P/N 99956033-ASSY
Autres documents normatifs Personne en charge de la documentation technique
2014/35/EU (Low Voltage Directive) Pentair International S.a.r.l
2014/30/EU (Electro Magnetic Compatibility Directive) Avenue de Sévelin 18
2014/53/EU (Radio Equipment Directive) 1004 Lausanne - Switzerland
2011/65/EU (RoHS)
Lausanne, 2020 03 31
Jacques, Van Bouwel
Engineering Mgr
Spécification produit : ALIMENTATION ÉLECTRIQUE
Power supply input : 220-240 VAC ~, 50-60 Hz Power supply output:xvii
SERVICE À LA CLIENTÈLE / SOUTIEN TECHNIQUE
Pour toute question concernant la commande de pièces de rechange et les produits pour piscine Pentair, veuillez
utiliser les coordonnées suivantes :
Service à la clientèle Soutien technique
+39 050716166 / +39 050716169 e-mail: techsupport.poolemea@pentair.com
orders.pooleu@pentair.com Hotline: +33 184280940
poolemea@pentair.com
www.pentairpooleurope.com
Français
TABLE OF CONTENTS
Déclaration de conformité.............................................................................................xvi
Service à la clientèle /Soutien technique .............................................. xvii
Avertissements & Consignes de sécurité............................. xviii & xix
Préparation de la piscine et du nettoyeur................................................. 20
Aperçu.............................................................................................................................................. 20
Composants du nettoyeur.................................................................................... 20
Caractéristiques du nettoyeur....................................................................... 20
Configuration initiale..................................................................................... 20 & 21
Assemblage du chariot.............................................................................. 22 & 23
Utilisation............................................................................................................................................... 24
Aperçu du panneau de commande.......................................................... 24
Vitesse de nettoyage................................................................................................... 24
Utilisation Bluetooth®..................................................................................................25
Télécharger l’application mobile...................................................................25
Jumeler votre téléphone avec le nettoyeur..................................25
Utilisation du nettoyeur avec commande manuelle..........25
Indicateur à LED..................................................................................................................26
Retirer le nettoyeur de la piscine.................................................................26
Nettoyer les paniers filtres................................................................................... 27
Nettoyage périodique des tamis du filtre.........................................28
Nettoyage de la turbine............................................................................. 29 & 30
Ranger le nettoyeur....................................................................................................... 30
Dépannage ............................................................................................................................................ 31
Manuel d’installation et d’utilisation du nettoyeur robotisé pour piscine enterrée PROWLER™ 930xviii
AVERTISSEMENTS ET CONSIGNES DE SÉCURITÉ IMPORTANTS
Remarque importante :
À l’installateur : Ce guide contient des renseignements Pour réduire le risque de choc électrique,
importants sur l’installation, le fonctionnement et l’utilisation n’utilisez pas de rallonge lorsque vous
sécuritaires de ce produit. Ces renseignements doivent être branchez l’unité à l’alimentation électrique; installez une prise
remis au propriétaire ou à l’utilisateur de cet équipement après de courant à un endroit approprié.
l’installation du nettoyeur de piscine.
Seul un opérateur formé doit utiliser le
À l’utilisateur : Ce manuel contient des renseignements robot nettoyeur de piscine.
importants qui vous aideront à bien utiliser et entretenir
ce nettoyeur de piscine. Veuillez le conserver pour vous y Pour éviter des blessures aux mains,
Français
référer ultérieurement. Consultez Pentair pour toute question l’opérateur doit tenir ses mains éloignées
concernant cet équipement. du mécanisme de la courroie d’entraînement.
Avant d’installer ce produit, lisez et suivez Placez le bloc d’alimentation à 3.5 m (12
tous les avertissements et instructions pieds) au moins du bord de la piscine
ci-inclus. Le non-respect des avertissements et consignes de lorsque vous utilisez l’appareil.
sécurité peut entraîner des blessures graves, le décès ou des N’enterrez pas le câble - placez le câble de
dommages à la propriété. façon à réduire au minimum les dommages
Sécurité et renseignements à l’intention du consommateur pouvant être causés par des tondeuses à gazon, des taille-haies
Les nettoyeurs de piscine sont conçus et fabriqués pour assurer et d’autres appareils.
des années de fonctionnement fiable et en toute sécurité Lorsque vous soulevez le robot nettoyeur
lorsqu’ils sont installés, utilisés et entretenus conformément de piscine, prenez garde de ne pas vous
aux informations de ce manuel. Dans tout le manuel, les blesser le dos.
avertissements et consignes de sécurité sont mis en évidence
par le symbole “ ”Assurez-vous de lire et de respecter tous les Renseignements généraux relatifs à
avertissements et consignes. l’installation.
RISQUE DE CHOC ÉLECTRIQUE OU Ces limites sont conçues pour fournir une protection raisonnable
D’ÉLECTROCUTION. Branchez uniquement contre les interférences nuisibles dans une installation
à une prise de type mise à la terre protégée résidentielle. Cet équipement génère, utilise et peut émettre
par un disjoncteur différentiel de fuite à la des fréquences radio, et garantit qu’aucune interférence
terre (DDFT). Faites appel à un électricien ne se produira s’il est installé et utilisé conformément aux
qualifié si vous ne pouvez pas vous assurer
instructions. Si cet équipement produit des interférences
que la prise avec mise à la terre est
protégée par un DDFT 30mA. nuisibles à la réception radiophonique et télévisée – ce qui peut
être déterminé en allumant et éteignant l’équipement – il est
SUCCION DANGEREUSE. Ne recommandé à l’utilisateur d’essayer de corriger l’interférence
vous amusez pas avec le au moyen de l’une ou plusieurs des mesures suivantes :
nettoyeur ou le tuyau et ne l’appliquez pas sur le
• Réorientez ou déplacez l’antenne réceptrice.
corps. Il risque de happer et d’arracher des cheveux
ou des parties du corps. Le tuyau peut faire trébucher • Augmentez la distance entre l’équipement et le récepteur.
des nageurs ou s’emmêler autour d’eux, ce qui • Branchez l’équipement à une prise de courant sur un circuit
pourrait provoquer des noyades. différent de celui auquel le récepteur est branché.
Ne faites pas fonctionner le robot nettoyeur • Consultez le détaillant ou un technicien radio/TV
lorsque des personnes nagent dans la expérimenté pour obtenir de l’aide.
piscine. Le tuyau peut faire trébucher des nageurs ou s’emmêler
autour d’eux, ce qui pourrait provoquer des noyades. Des changements ou modifications de cet équipement non
expressément approuvés par la partie responsable de la
Débranchez l’alimentation principale quand conformité (Pentair) pourraient faire perdre à l’utilisateur
vous procédez à un examen du robot l’autorisation d’utiliser cet équipement.
nettoyeur de la piscine.
Liste de vérification pour la préinstallation
Gardez le robot nettoyeur de piscine hors
de portée des enfants. Avant d’installer votre nettoyeur, passez en revue tous les
avertissements et renseignements relatifs à la sécurité figurant
Gardez le robot nettoyeur de piscine hors
dans ce guide et assurez-vous de bien les comprendre. Le non
de la portée des personnes à capacités
physiques, sensorielles ou mentales réduites, et ne laissez pas respect de ces instructions ou une installation inadéquate du
des personnes n’ayant pas d’expérience et de connaissances nettoyeur pourrait causer des dommages à la finition de la
l’utiliser sans supervision et compréhension adéquates des piscine ou au revêtement en vinyle. Pentair Aquatic Systems
instructions. décline toute responsabilité à l’égard des réparations ou
remplacements de ces structures ou composants de la piscine
Seul un câble d’alimentation d’origine doit
du client.
être utilisé en tout temps. Afin d’éviter les
risques. Le faire remplacer par un technicien qualifié, spécialisé
dans les robots nettoyeurs de piscine, au besoin.
Manuel d’installation et d’utilisation du nettoyeur robotisé pour piscine enterrée PROWLER™ 930xix
AVERTISSEMENTS ET CONSIGNES DE SÉCURITÉ IMPORTANTS
Avant d’installer le nettoyeur dans une piscine avec revê- APRÈS l’installation du nettoyeur, assurez-vous que le net-
tement en vinyle : Vérifiez le revêtement de près pour dé- toyeur fonctionne correctement : Le nettoyeur peut néces-
tecter d’éventuels signes de détérioration ou de dommages siter quelques réglages mineurs pour assurer son fonction-
attribuables à l’âge, aux produits chimiques, à des dommages nement optimal et éviter des dommages à la finition de la
aux parois de la piscine, etc. Si vous détectez des dommages, piscine. Certains modèles de revêtement en vinyle sont par-
demandez à un spécialiste des piscines qualifié de procéder ticulièrement sensibles à l’usure de la surface, à l’effacement
à toutes les réparations nécessaires. En outre, si des pierres, des motifs, au frottage de l’encre ou aux graves éraflures sur
des racines, etc. se trouvent sous le revêtement, enlevez-les les motifs causées par des objets entrant en contact avec la
avant d’installer le nettoyeur. surface en vinyle, y compris les nettoyeurs de piscine auto-
matiques. Pentair Aquatic Systems n’est pas responsable de
Avant d’installer le nettoyeur dans une piscine en gunite
l’effacement de motifs, des abrasions ou des marques sur les
ou une piscine partiellement ou complètement carrelée :
Français
revêtements en vinyle.
Réparez les carreaux décollés et resserrez tous les anneaux
de luminaires mal fixés. Exonération de responsabilité à propos de votre piscine et
du nettoyeur : Une multitude de facteurs contribuent à la vie
Avant d’installer le nettoyeur, nettoyez votre système de de votre piscine. Les robots nettoyeurs de piscine sont des
filtre : Veillez à bien laver le filtre, ainsi qu’à effectuer un lavage produits très passifs qui n’auront pas d’incidence sur la vie de
à contre-courant, un rinçage et un vidage de tous les paniers. votre piscine.
Le système doit être propre pour que le nettoyeur fonctionne
Sachez qu’avec le temps, la détérioration, la décoloration et
correctement et qu’il atteigne toutes les zones de la piscine. la fragilisation de n’importe quelle finition de piscine peuvent
Avant d’installer le nettoyeur, comprenez le champ d’applica- être causées séparément par, ou en combinaison avec, l’âge,
tion du nettoyeur : Le nettoyeur est conçu pour débarrasser un déséquilibre chimique de l’eau de la piscine, une installation
votre piscine des débris en quatre à six heures environ. Il peut inadéquate et d’autres facteurs. Les robots nettoyeurs de
mettre moins de temps, en fonction de la taille de la piscine. Le piscine ne vont pas décoller ou user un « bon » revêtement
nettoyeur n’a pas été conçu pour nettoyer automatiquement de piscine. En fait, c’est l’inverse : c’est plutôt le revêtement de
des escaliers, des sorties de piscine, ou pour travailler sous piscine qui finira par provoquer l’usure du nettoyeur.
une toile solaire. Il n’a pas été conçu non plus pour effectuer La situation est la même pour les piscines enterrées dotées
le nettoyage initial d’une nouvelle piscine ou pour l’ouverture d’un revêtement en vinyle, car les revêtements en vinyle sont
de votre piscine en début de saison. également abimés par l’environnement et des facteurs tels que
la chimie de l’eau de la piscine, la lumière du soleil et les abords
Avant d’installer le nettoyeur, comprenez le champ d’applica- de la piscine. C’est pourquoi avec le temps le vinyle peut devenir
tion du nettoyeur : Le nettoyeur est conçu pour débarrasser friable et cassant. De plus, les piscines avec revêtement
votre piscine des débris en quatre à six heures environ. Il peut en vinyle sont conditionnées par la qualité de l’exécution, la
mettre moins de temps, en fonction de la taille de la piscine. Le composition et l’installation du revêtement et la qualité de
nettoyeur n’a pas été conçu pour nettoyer automatiquement l’exécution et de la construction des murs de soutènement et
des escaliers, des sorties de piscine, ou pour travailler sous du fond de la piscine. Tous ces facteurs peuvent contribuer
une toile solaire. Il n’a pas été conçu non plus pour effectuer à la défaillance du revêtement. L’existence de ces types de
le nettoyage initial d’une nouvelle piscine ou pour l’ouverture problèmes dans votre piscine n’est pas attribuable à l’utilisation
de votre piscine en début de saison. ou au fonctionnement du nettoyeur. Le fabricant décline toute
responsabilité à l’égard des réparations ou du remplacement
de ces structures ou composants de la piscine du client. Le
propriétaire de la piscine doit assumer l’entière responsabilité
à l’égard de l’état et de l’entretien de la surface de la piscine,
de l’eau et du bord de la piscine.
CONSERVEZ CES INSTRUCTIONS
Manuel d’installation et d’utilisation du nettoyeur robotisé pour piscine enterrée PROWLER™ 93020
PRÉPARATION DE LA PISCINE ET DU NETTOYEUR
Aperçu
Les robots nettoyeurs de piscine Prowler™ 930 et sont conçus pour nettoyer les parois et le fond, aspirer les
matières en suspension et filtrer l’eau de votre piscine enterrée. Avant d’utiliser ce produit, lisez et suivez les mises
en garde et consignes de sécurité des pages iii-iv. Nettoyeur et câble de
communication de 18,3 m Chariot du nettoyeur
Composants du nettoyeur : (60 pieds)
• Nettoyeur avec câble de communication de 18,3 m
(60 pieds)
• Bloc d’alimentation
Français
• Chariot du nettoyeur
Caractéristiques du nettoyeur : Bloc d’alimentation
• Minuterie hebdomadaire
• Nettoyage du fond, des parois et de la ligne d’eau
• Chargement du panier filtrant par le haut
• Démarrage différé
• Nettoyage rapide
• Connexion à la technologie sans fil Bluetooth®
• Application «Prowler 930» pour téléphones
intelligents
Configuration initiale
Avant d’utiliser le nettoyeur pour la première fois, suivez la procédure ci-dessous :
ÉTAPE 1 : ÉTAPE 2 :
Mise en place du bloc d’alimentation ou du chariot
Déroulez le câble de communication
Le nettoyeur Prowler 930 est livré avec un chariot
Déroulez le câble de communication et étendez-le
qui doit être assemblé avant de procéder aux étapes
complètement de façon à ce qu’il n’y ait pas de pliures.
suivantes. Consultez les instructions d’assemblage du
Voir Illustration 2.
chariot à la page 22.
Placez le chariot ou le bloc d’alimentation à au moins
3,5 m (12 pieds) du bord de la piscine. Voir Illustration 1.
Illustration 2
Illustration 1
Manuel d’installation et d’utilisation du nettoyeur robotisé pour piscine enterrée PROWLER™ 93021
PRÉPARATION DE LA PISCINE ET DU NETTOYEUR
ÉTAPE 3 : ÉTAPE 5:
Branchez l’alimentation électrique au nettoyeur Mise en place du nettoyeur dans la piscine
Branchez le câble de communication au bloc
TOUJOURS s’assurer que le nettoyeur
d’alimentation. Assurez-vous que l’encoche du connecteur
est complètement immergé dans l’eau
est bien alignée avec la rainure correspondante dans avant de le mettre en marche. L’utilisation du nettoyeur
la prise du bloc d’alimentation. Tournez le connecteur hors de l’eau causera immédiatement de graves
du câble dans le sens des aiguilles d’une montre pour dommages et entraînera une perte de garantie. Ne
brancher le câble au bloc d’alimentation. Voir Illustration 3. laissez pas le nettoyer dans la piscine en permanence.
N’oubliez pas de toujours éteindre l’alimentation
électrique et de la débrancher de la prise de courant
Français
avant de retirer le nettoyeur de la piscine.
1. Assurez-vous que le bloc d’alimentation est placé à au
moins 3 m (10 pieds) du bord de la piscine.
2. Descendez le robot nettoyeur Prowler™ 930 dans la
piscine en le tenant par la poignée. Voir Illustration 5.
Remarque : Ne descendez jamais le nettoyeur dans la
piscine en le tenant par le câble de communication.
Vous feriez subir au câble une tension inutile qui
risquerait d’endommager le nettoyeur.
3. Inclinez doucement le nettoyeur de gauche à droite
ou retournez-le pour libérer l’air emprisonné. Voir
Illustration 6.
Figure 3
ÉTAPE4:
Branchez le bloc d’alimentation à la source
d’alimentation
Branchez le bloc d’alimentation à la source/prise
électrique. Voir Illustration 4.
RISQUE DE CHOC ÉLECTRIQUE OU
D’ÉLECTROCUTION: Branchez-vous
uniquement sur une prise reliée à la terre protégée par Illustration 5 Illustration 6
un disjoncteur différentiel de fuite à la terre (DDFT).
Contactez un électricien qualifié si vous ne pouvez pas
vérifier que la prise est protégée par un DDFT 30mA.
Pour réduire le risque de choc électrique,
n’utilisez pas de rallonge pour brancher
l’appareil à l’alimentation électrique ; prévoyez une prise
de courant correctement située.
Illustration 4
Manuel d’installation et d’utilisation du nettoyeur robotisé pour piscine enterrée PROWLER™ 930You can also read