Singapore University of Social Sciences Canvas Student Guide For Part Time Students - Amazon S3
←
→
Page content transcription
If your browser does not render page correctly, please read the page content below
Singapore University of Social Sciences
Canvas Student Guide
For Part Time Students
Coverpage
| Contents | i

Contents
  Coverpage ........................................................................................................................................ ii

  Chapter 1: Getting Started With Canvas .............................................................. 5
           What is Canvas? .................................................................................................................................................. 6
           Canvas Technical Requirements .......................................................................................................................... 6
           Additional Software ............................................................................................................................................. 6
           Accessing Canvas ................................................................................................................................................ 7
           Password Reset .................................................................................................................................................... 8
           Canvas Environment ............................................................................................................................................ 9
           Logout ................................................................................................................................................................ 10

  Chapter 2: Customize Canvas ............................................................................... 11
           Profile ................................................................................................................................................................ 12
                   Access Profile ........................................................................................................................................ 12
                   Update Profile Picture ........................................................................................................................... 13
           Contact Settings ................................................................................................................................................. 17
                   Email Addresses .................................................................................................................................... 17
                   Other Contacts ....................................................................................................................................... 18
           Change Notification Preferences ....................................................................................................................... 19
                   Types Of Notification ............................................................................................................................ 20

  Chapter 3: Communication ................................................................................... 21
           Access Inbox ..................................................................................................................................................... 22
                 Inbox Interface....................................................................................................................................... 22
                 Compose a Message .............................................................................................................................. 23

  Chapter 4: Course Site Navigation ....................................................................... 25
           View Courses ..................................................................................................................................................... 26

  Chapter 5: Key Features Available In The Course ............................................. 27
           Part Time Course Site ........................................................................................................................................ 28
                  L- Group ................................................................................................................................................. 28
                  T- Group ................................................................................................................................................. 29
                  Difference Between L and T Groups ..................................................................................................... 30
           Fully Online Course Site ................................................................................................................................... 31
                  TV- Group .............................................................................................................................................. 31
           Accessing etextboo k via iBookstore ............................................................................................................. 33

  Chapter 6: Assignments ......................................................................................... 43
           Turnitin Submission .......................................................................................................................................... 44
                  Important Information For Turnitin Submission ................................................................................... 44
                  How Do I Submit Turnitin Assignment? ............................................................................................... 46
                  Digital Receipt ....................................................................................................................................... 52
           View Marked Assignments ............................................................................................................................... 55
           Quiz Submission ................................................................................................................................................ 56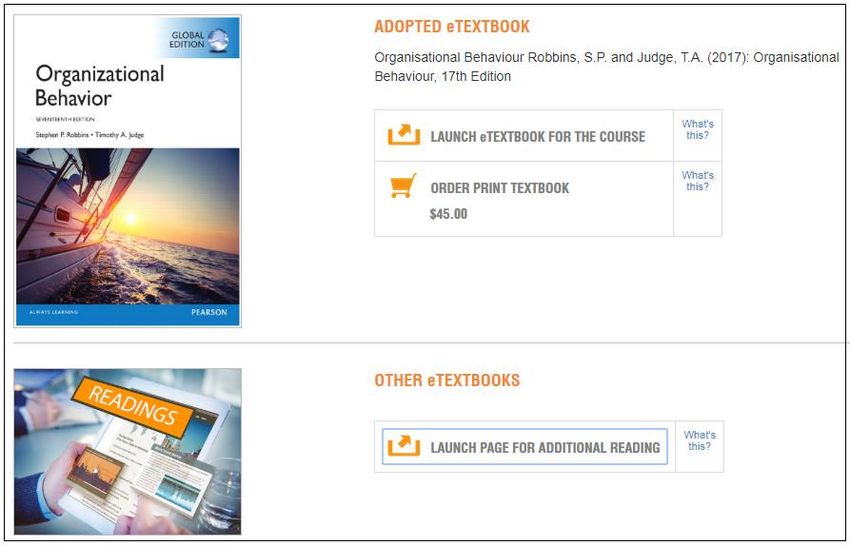
| Contents | ii

                  How Do I Submit A Quiz Assignment? ................................................................................................ 56

Chapter 7: Grades .................................................................................................. 62
       Access Course Site ............................................................................................................................................ 63
       View Grades ...................................................................................................................................................... 64
       SUSS Gradebook……………………………………………………………………………………………….65
              View Mark Deduction .......................................................................................................................... 65
              OCAS Calculator .................................................................................................................................. 65

Chapter 8: Getting Help ......................................................................................... 66
       Learning Services Support (LS Support) ........................................................................................................... 67
       Student Support ................................................................................................................................................. 67
       MyMail Support ................................................................................................................................................ 68
       Campus Wireless Network Support ................................................................................................................... 68

Appendix A: Turnitin Similarity Check (Plagiarism Report) ............................ 69
       Originality Reports ............................................................................................................................................ 70
       Interpreting the Similarity Index ........................................................................................................................ 70
               Similarity Index Examples .................................................................................................................... 71
       Access Turnitin Originality Report .................................................................................................................... 71
               Feedback Studio .................................................................................................................................... 71
               Match Overview .................................................................................................................................... 72
               Match Overview .................................................................................................................................... 75
               Repository Sources ................................................................................................................................ 77

Appendix B: Discussions ........................................................................................ 78
       Access Course Site ............................................................................................................................................. 79
       Access Discussions ............................................................................................................................................ 79

Appendix C: How Do I Access Groups? ............................................................... 80
       Access Groups ................................................................................................................................................... 81

Appendix D: How to Show Markup (Comments) in Microsoft Word? ..............82
       View Markup (Comments) in Microsoft Word ............................................................................................................83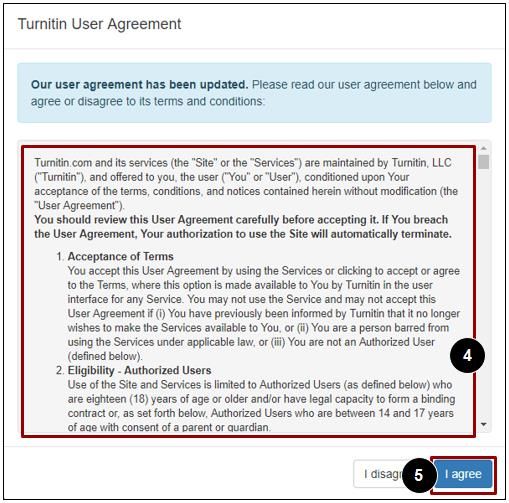
| Getting Started With Canvas | 5

Chapter

1
Getting Started With Canvas
Topics:                  The Singapore University of Social Sciences (SUSS) has adopted Canvas as
                         its Learning Management System. Canvas is developed by Instructure, an
•   What is Canvas?      educational technology company based in Salt Lake City, USA.
•   Canvas Technical
    Requirements
•   Accessing Canvas
•   Canvas Environment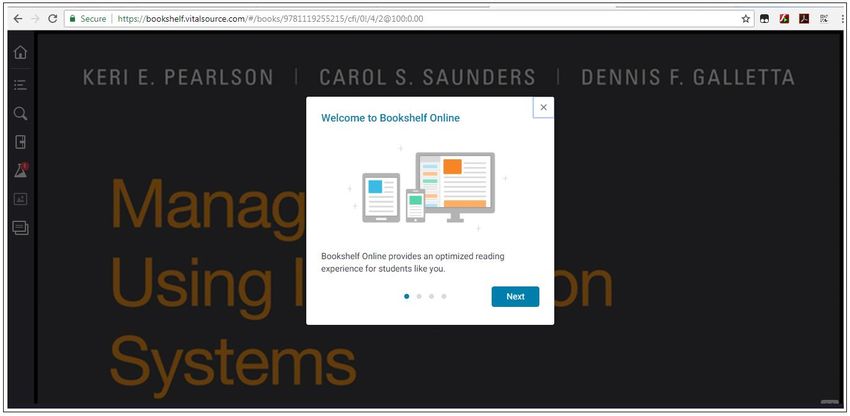
| Getting Started With Canvas | 6

What is Canvas?
    SUSS students use Canvas to:
    •     access course related materials and announcements
    •     participate in online discussions
    •     participate in online quizzes
    •     submit written assignments
    •     download marked assignments
    •     retrieve assignment and quiz grades

Canvas Technical Requirements
    Do ensure that your personal computer is installed with

    Operating Systems
    •     Windows 10,
    •     or Mac OS X

    Computer Specifications
    •     Desktop or laptop with at least 4GB RAM and sound card
    •     Built-in Broadband Wired or Wireless Card
    •     Built-in Speakers & Mic with Webcam

Additional Software
                     a. Microsoft Office Package                            b. Adobe Digital Editions

                     Microsoft Word
                                                              Adobe Digital Editions Software to
                                                              read iStudyGuide.
                                                              Downloadable via: http://www.adobe.com/solutions/
                      Microsoft Excel                         ebook/digital-editions/download.html

                      Microsoft PowerPoint
                      To have at least Microsoft Office
                      2007 or above.

                       c. VitalSource Bookshelf                                   d. PDF Reader

        VitalSource Bookshelf Software to                                 Acrobat Reader
        read eTextbook.
                                                              Downloadable via: http://get.adobe.com/reader/
        Downloadable via: http://tinyurl.com/
        vitalsourcedownload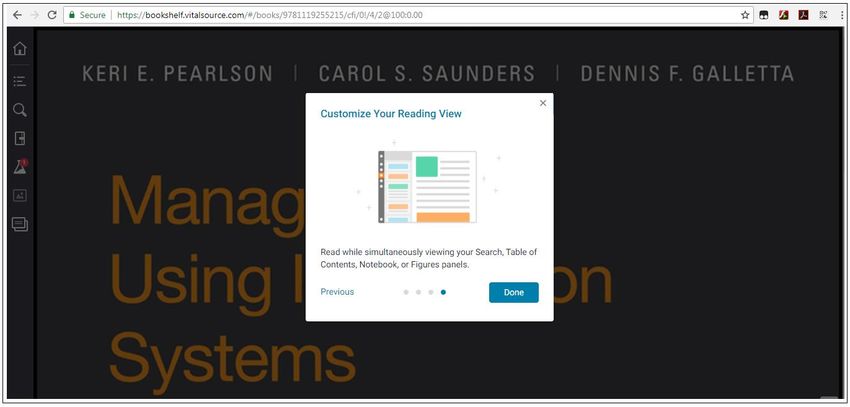
| Getting Started With Canvas | 7

                            e. Java                                              f. TeamViewer

                                                             Software to provide remote support of computers.

    Downloadable via: http://www.java.com/getjava/           Downloadable via: http://tinyurl.com/teamviewinstall
    index.jsp

Accessing Canvas
   1. Navigate to https://canvas.suss.edu.sg via the Google Chrome browser.
   2. Key in your “User ID” and “Password” and click "Log In".

   Your userid is your MyMail email address without the email domain. For example, if your MyMail email address is
   tanteongkeng001@suss.edu.sg, your username would be tanteongkeng001.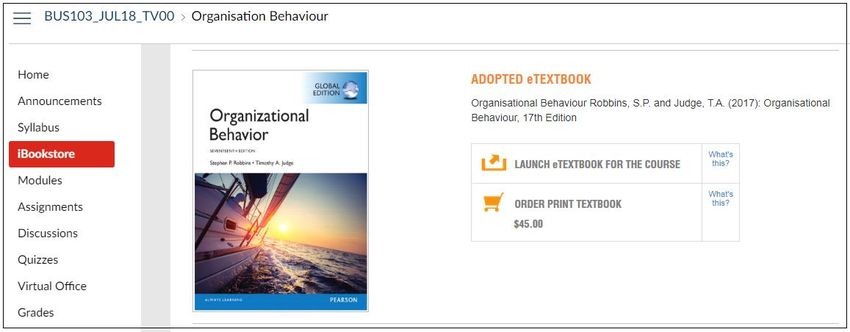
| Getting Started With Canvas | 8

Password Reset
   Click on “MyMail Support” and follow the instructions to send an email to reset your password.
| Getting Started With Canvas | 9

Canvas Environment
          Note: You can return to your Dashboard at any time by clicking on the Singapore University of Social
          Sciences logo.
   1. The “Global Navigation” provides you with quick access to frequently used Canvas features such as your
      enrolled courses, the Dashboard, Groups, Calendar, Inbox, Account and Help.

   2. The Dashboard is the first screen that you will see when you log in to Canvas. The "Card View" in the Dashboard
      displays your "Bookmarked" courses as Course Cards. Each Course Card may contain up to 4 icons to represent:
      •
               Announcements
      •
               Assignments
      •
               Discussions
      •
               Files

   3. The “Dashboard Sidebar” shows various action items in your courses. It can contain up to three sections.
      •   The “To Do” section shows assignments or events that require your attention.
      •   The “Coming Up” section shows assignments due and events coming in the next seven days. If you are
          enrolled in a course as a student, the “Recent Feedback” section shows assignments with feedback from your
          instructor.

   4. The “Recent Activity” view in Dashboard loads a stream of recent notifications of your courses. You can toggle
      the Dashboard to either see a "Card View" or a “Recent Activity” stream.

                                                                                                                  3

                                                                                         4

                                                               2
           1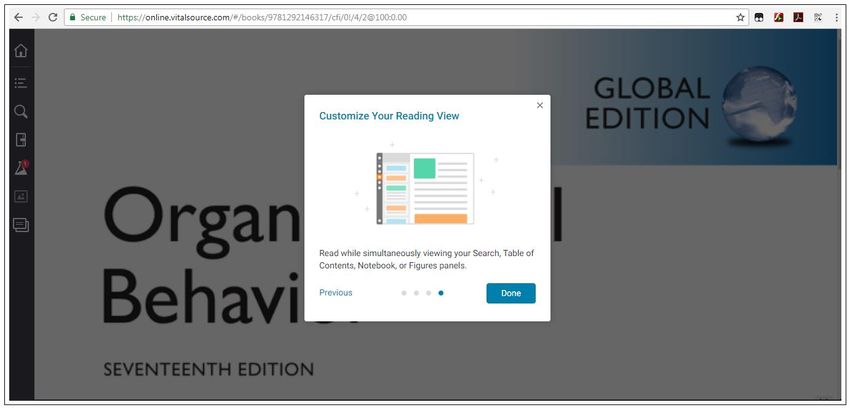
| Getting Started With Canvas | 10

Logout
   To logout from Canvas
   1. Click on "Account".
   2. Click on "Logout".
| Customize Canvas | 11

Chapter

2
Customize Canvas
Topics:                   You can personalise your Canvas account by updating your Profile and User
                          Settings.
•   Profile
•   Contact Settings
•   Change Notification
    Preferences
| Customize Canvas | 12
Profile
You can update your Profile Picture in Canvas by either
1. uploading a picture from your computer; or
2. taking a new picture from your webcam.
Access Profile
1. Click on "Account".
2. Click on "Settings".| Customize Canvas | 13
Update Profile Picture
1. Click on the "Profile Picture" icon. A dialog box will open.
Upload a Picture
1. Click on “Upload a Picture”.
2. Click on “Choose a picture”.| Customize Canvas | 14 3. Select the file from your computer. Next, click on “Open”. 4. Drag the selection box to crop or resize your picture. 5. Click on “Save" to upload your profile picture.
| Customize Canvas | 15

6. The picture will be updated as your profile picture in Canvas.

Take a Picture
1. Click on “Take a Picture”.
2. Click on “Take Picture”.
| Customize Canvas | 16

3. Click on “Retry” to take another picture.
4. When you are satisfied with your picture, click on “Save”.

5. Again the picture will be updated as your Profile Picture in Canvas.
| Customize Canvas | 17

Contact Settings
   Before you set your notification preferences, you will need to set the ways you want to be notified first.
   1. Click on "Account".
   2. Click on "Settings".

Email Addresses
   1. Your account would have already been updated with your SUSS (MyMail) email address. You can add an
      additional email address by clicking on “Add Email Address”.
              Note: The default email address of your Account is denoted by the star icon. The SUSS (MyMail) email
              address must be maintained as your default email at all times. Do not set your personal email address to
              default as this may affect your access to other Canvas related application.

   2. Type in the email address that you want to add in the text field.
   3. Click on “Register Email”.
| Customize Canvas | 18
4. A confirmation link will be sent to your personal email. Click on the link in that email to successfully register your
personal email address.
5. Click on "Ok, Thanks".
6. As part of the Personal Data Protection Act (PDPA), please take note that by entering your personal email address
(substitute with mobile number) into Canvas, you agree to be contacted via Canvas.
Other Contacts
1. Click on “+ Contact Method".
2. Type in the mobile number that you want to add in the text field.
3. Click on “Register SMS”.| Customize Canvas | 19
4. A confirmation SMS will be sent to your personal mobile number. Enter the confirmation code to finish
registering.
5. Click on "Confirm".
6. As part of the Personal Data Protection Act (PDPA), please take note that by you, entering your private email
address (substitute with mobile number) into Canvas, you are agreeing to be contacted via Canvas.
Change Notification Preferences
You can modify the notification preferences to manage the frequency and mode in which you receive notifications
from Canvas.
1. Click on "Account".
2. Click on "Notifications".| Customize Canvas | 20
3. Your notifications preference page will display all of the contact methods you have created across the top of the
page. You will need to specify how you want to be notified for each contact method. The notifications are divided
into six categories:
a. Course Activities
b. Discussions
c. Conversations
d. Scheduling Groups
e. Alerts
4. To change a notification for a contact method, mouse over to the notification type you want to change and select
one of the four options below. For example, “Due Date”.
Types of Notification
Click on “Check Mark” icon to be notified immediately of any change
1
for the activity
Click on “Clock” icon to be notified daily of any change for the
activity. A summary email per day. Daily Summary notifications may
2.
vary among users, but typically are scheduled to be delivered around
6pm in the user's set time zone.
Click on “Calendar” icon to be notified weekly of any change for the
activity. A summary email per week. Weekly Summary notifications
3.
vary among users. The date and time of your weekly notifications are
posted at the bottom of the notifications page.
Click on the “Remove” icon to remove the notification preference so
4.
you won't be notified of any change for the activity.
Important Note:
We do not recommend updating the default notifications. If you do edit them, it is your responsibility to follow up on
important matters about your course(s) on your own.
If you did not receive the notification emails in your MyMail Inbox despite setting your notification preferences in
Canvas correctly, please check your junk folder and right-click on the email and marking it as not junk. You will then
receive the notification emails in your inbox subsequently.| Customize Canvas | 21
| Communication | 21

Chapter

3
Communication
Topics:            You can communicate with your instructors and peers using the conversation
                   tool called "Inbox". Inbox functions as a messaging tool that allows you to
•   Access Inbox   send messages to individuals or a custom group of people in a Course.
| Communication | 22
Access Inbox
Note: The Canvas Inbox is not your MyMail Inbox. These are two separate systems. You can only receive messages in
Canvas Inbox from someone who is enrolled to the same course site as you.
1. Click on “Inbox”. In your Inbox, you will see a list of conversations on the left.
Inbox Interface
1. Click on the menu “All Courses” to view messages by course or group.
2. Click on the menu “Inbox” to filter your messages by types.
3. The toolbar on the page contains options to manage the messages.
1. Compose a new message
2. Reply to a message
3. Reply all to a message
4. Archive a message
5. Delete a message
6. More options – Mark as unread, Forward and Star a message| Communication | 23
4. You can search for specific messages.
5. The left section display message in your inbox.
• The Inbox is organized with the latest message at the top.
• Click on the“ ” icon to mark a conversation as read or unread at the left of the message.
• To bookmark a conversation, mouse over the conversation and click on the “ ” icon on the left of
the message.
Compose a Message
1. Click on the “Compose" icon to compose a new message.| Communication | 24 Send Message 1. Select a course to locate the recipient's name. 2. You can type the recipient's name in the "To" field, or you can use the "Dropdown List" to select the recipient within the course. 3. Type a subject in the "Subject" field. 4. Type a message in the "Message" field. 5. Click on the attachment or media file icon if you want to include an attachment. 6. Click on “Send” to send your email.
| Course Site Navigation | 25

Chapter

4
Course Site Navigation
Topics:             The course that you have been offered in a particular semester will appear as
                    course sites in Canvas. Each course site is designed with navigational menus
•   View Courses    and features to meet the teaching and assessment requirements of the course.
| Course Site Navigation | 26
View Courses
Note: Courses are always listed alphabetically; you cannot reorder the courses to your preference.
1. Click on the “Courses” menu to view the list of courses that you have been enrolled to.
2. Click on the “All Courses” menu to locate any missing courses that you have been offered for the semester.
3. Courses that appear with a highlighted star icon in the “All Courses” page will be populated in the “Courses”
menu for quick access. We recommend that you 'bookmark' all your active courses by clicking on the star icon.| Key Features Available In The Course | 27 Chapter 5 Key Features Available In The Course Topics: • Part Time Course Site • Fully Online Course Site
| Key Features Available In The Course | 28

Part Time Course Site
   You will be enrolled to two course sites for each course that you have been offered: the L-group and T-group.

L-Group
   The L-group facilitates the distribution of resources and information that are relevant to all students enrolled into the
   course.
   In Canvas, the L-group's navigational menu is organised as below.

    Users
    Functions/Content
    Home                       Home is the first page of a course site. The page shows recent activities in the course site.
    Announcements              Announcements are generally meant to notify all students of a course on important
                               information. Announcements are posted by the instructors or by the faculty staff. They
                               can pertain to information on assignment deadlines, course content, instructions etc.
    People                     People shows a list of people enrolled to the course. You can locate your instructor and
                               classmates here.
    Syllabus                   Syllabus shows a table view of the course schedule. Assignment deadlines and event
                               dates are displayed here.
    iBookstore                 Contains the iStudyGuide (an interactive study guide in the EPUB format) and eTextbook
                               (an electronic textbook for selected courses).
    Modules                    Modules display and organise the course materials of the course.
    Quizzes                    Online quizzes relevant to your course are set up here.
    Grades                     View assignment grades.
    OCAS Calculator            Shows the OCAS of your present course.
    Classroom Recordings       Contains recorded lectures.
    Past Year Exam Papers      View SUSS’s repository of past year exam papers.
| Key Features Available In The Course | 29
T-Group
The T-group is a classroom sized group that divides the students who are enrolled to a course into multiple smaller
groups. Each T-group will have its own course instructor to facilitate the course and to grade the students'
assignments.
In Canvas, the T-group's navigational menu is organised as below.
Users
All students and instructors enrolled in the course
Functions/Content
Home Home is the first page that students will see when they click into a course. By default, the
page shows recent activities happening within the course.
Announcements Announcements shows a list of messages that your instructors wanted to alert you about.
It could be important information on a pending assignment or updates to the course
content.
People People shows a list of people enrolled to the course itself. You can locate your instructor
and classmates here as well.
Syllabus Syllabus shows a table-oriented view of the course schedule. Assignments created in
Canvas will be automatically populated in here. Instructors can add in events manually as
well.
Assignments Assignments include online submissions such as TMA, GBA, ECA, PowerPoint and
video assignments.
Grades View assignment grades.
OCAS Calculator Shows the OCAS of your present course.
Past Year Exam Papers View SUSS’s repository of past year exam papers.
Virtual Class Contains scheduled virtual class sessions (if any) from the Schools.
Marked Assignments Allows downloading of marked TMA files.
Discussions Discussion allows both instructors and students to start and contribute to as many
discussion topics as desired. It serves as a forum for topical and current events.| Key Features Available In The Course | 30
Difference between L and T groups
Here is the summary of difference between L and T groups.| Key Features Available In The Course | 31
Fully Online Course Site
You will be enrolled to a TV-group course site a TV-group course site for each course that you have been offered. For example,
BUS103_JUL18_TV00: Organizational Behavior.
TV-Group
The TV-group is a classroom size group. The number of students in each TV-group is a fraction of all the students
who are enrolled to the same course. Each TV-group has its own course instructor to facilitate the course and to grade
the students’ assignments.
In Canvas, the TV-group course navigational menu is organised as below.
Students and instructors are enrolled in the course
Functions/Content
Home Home is the first page that students will see when they click into a course. By default, the
page shows recent activities happening within the course.
Announcements Announcements shows a list of messages that your instructors wanted to alert you about.
It could be important information on a pending assignment or updates to the course
content.
Syllabus Syllabus shows a table-oriented view of the course schedule. Assignments created in
Canvas will be automatically populated in here. Instructors can add in events manually
as well.
iBookstore Contains the iStudyGuide (an interactive study guide in the EPUB format).
Modules Modules display and organize the course materials of the course.
Assignments Assignments include online quizzes (QUIZ01, QUIZ02, etc), discussion boards (DB) and
group-based assignment (GBA).
Discussions Discussion allows both instructors and students to start and contribute to as many
discussion topics as desired. It serve as a forum for topical and current events.
Quizzes Online quizzes relevant to your course are set up here.
Virtual Office Contains scheduled virtual class sessions (if any) from the Schools.
Grades View assignment grades.
SUSS Gradebook Allows downloading of marked GBA files.
Chat Allows students to interact with their instructor and classmate in real-time.
People People shows a list of people enrolled to the course itself. You can locate your instructor
and classmates here as well.
Past Year Exam Papers View SUSS’s repository of past year exam papers.
OCAS Calculator Shows the OCAS of your present course.| Key Features Available In The Course | 32 Here is the summary of the TV-group.
| Key Features Available In The Course | 33
Accessing etextbook via iBookstore
The iBookstore is integrated to Canvas and enables students to access the study guide and etextbook of the course on
multiple devices such as your personal computer and mobile devices. Students may download and keep their
recommended eTextbooks for a period of eight years.
Note: Your eTextbook access is through iBookstore on the course navigation menu.
1. Redeem the eTextbook (once) from iBookstore in Canvas.
2. If necessary, reset your password via https://bookshelf.vitalsource.com/#/user/forgot. Resetting your
password allows you to choose your own preferred password.
3. Click on the iBookstore eTextbook link to view the online textbook.
1. Click on "Courses".
2. For Part Time Course, click on your desired L-group course site. For Fully Online Course, click on your desired
TV-group course site.
2
1
3. On the left menu, click on “iBookstore”.
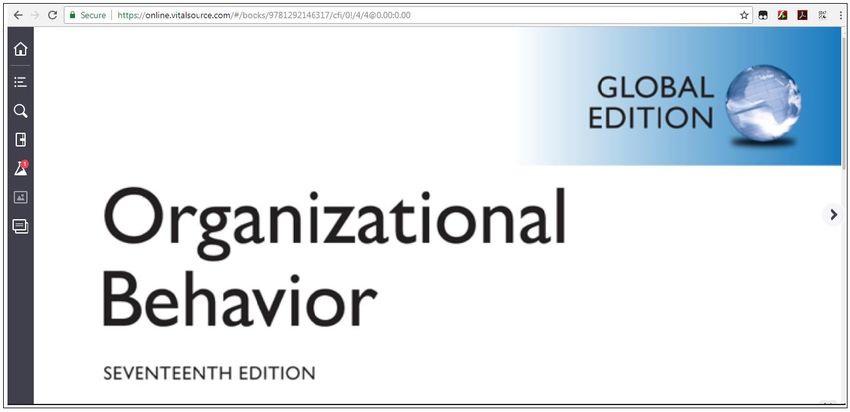
4. Click on the “LAUNCH eTEXTBOOK FOR THE COURSE” link to launch the VitalSource Bookshelf
Online site in a new window.
3 4| Key Features Available In The Course | 34
5. Enter your SUSS email, click on “Continue” and follow the on-screen instructions until you reach the Terms
and Privacy Page.
5
6. Click on "I agree to the Terms of Use and Privacy Policy." checkbox after reading the Terms and Privacy.
7. Click on "Accept".
6
7| Key Features Available In The Course | 35
8. A Welcome to Bookshelf Online Window appears. Click on "Next" to proceed and repeat for the next few
pages.
8
9. Click on “Done”.
9| Key Features Available In The Course | 36
10. The eTextbook of the course will load successfully.
Access Your Additional Reading Materials
There are also additional reading materials that you can access for your own reading interest. These materials may
not be related to your course. Additional Readings contains a wide collection of reference books, ranging from
management skills to counselling and even media related topics. Students may download and keep these
complimentary online resources for a period of one year.
1. Click on "LAUNCH PAGE FOR ADDITIONAL READING” under "iBookstore".
1| Key Features Available In The Course | 37
2. Click on "Select to activate" under the textbook that you would like to read.
2
3. Your selected textbook will appear at the top of the page. Click on "Launch" to open the book.
3| Key Features Available In The Course | 38
4. Enter your SUSS email, click on "Continue" and follow the on-screen instructions until you reach the Terms and
Privacy Page.
4
5. Click on "I agree to the Terms of Use and Privacy Policy." checkbox after reading the Terms and Privacy.
6. Click on "Accept".
5
6| Key Features Available In The Course | 39
7. A Welcome to Bookshelf Online Window appears. Click on "Next" to proceed and repeat for the next few pages.
7
8. Click on "Done".
8| Key Features Available In The Course | 40 9. The selected Additional Reading Material (eTextbook) will load successfully.
| Key Features Available In The Course | 41

VitalSource Bookshelf Online Interface
 Note: For more information about VitalSource Bookshelf Online, please refer to https://
 support.vitalsource.com/hc/categories/200136253-Bookshelf-Online.

          1

          2

          3

          4

          5                                                                                         15

          6

          7
                    9                                                         10      11       12        13   14

          8

1.      Library                      6.      Figures                    11.        Zoom Options
2.      Table of Contents            7.      Flashcards                 12.        Fast Highlight
3.      Search                       8.      Settings                   13.        Citation
4.      Notebook                     9.      Add Bookmark               14.        Copy URL
5.      Labs                         10.     Print Pages                15.        Next Page
| Key Features Available In The Course | 42
| Key Features Available In The Course | 43
| Assignments | 44

Chapter

6
Assignments
Topics:                       Part-Time Students submit their completed Tutor-Marked Assignment (TMA), Group-
                              Based Assignment (GBA) and End-of-Course Assessment (ECA; includes multiple
•   Turnitin Submission       components such as report, video and slides) through Canvas.
•   View Marked Assignments   Online Students submit their completed Group-Based Assignment (GBA) through
                              Canvas.
•   Quiz Submission
                              ALL students attempt their course quizzes electronically using the Quiz feature of
                              Canvas.
| Assignments | 45
Turnitin Submission
In this document, you will find important information on how to submit your assignment using Turnitin
through Canvas.
Generally all written assignments are checked for plagiarism and collusion using the Turnitin system to
promote academic integrity. This is also to ensure the authenticity of your assignment and that you have
acknowledged the work and ideas used from various sources. The Turnitin system is integrated in Canvas and
you are granted seamless access to Turnitin once enrolled to a course on Canvas.
This document is divided into the following parts:
1. Important Information for Turnitin Submission
2. How Do I Submit Turnitin Assignment?
3. Digital Receipt
Important Information for Turnitin Submission
1. What does the abbreviations TMA, GBA and ECA stand for?
TMA: Tutor-Marked Assignment
GBA: Group-Based Assignment
ECA: End-of-Course Assignment
2. Where can I download my Group-Based Assignment (GBA) question booklet?
For Online students, you can download the GBA question booklet from Modules > Unit 1 > Download
Group-Based Assignment (GBA)”. Online students are not required to submit both TMAs and ECAs.
For Part Time students, you can download the assignment question booklets from “Modules” via the
L-group course site.
3. How many documents am I able to submit through a Turnitin submission link?
Only one single document can be submitted through the Turnitin system at one time.
4. What document format is accepted for Turnitin submission?
Turnitin accept file types such as Corel WordPerfect®, HTML, Adobe PostScript®, Plain text (TXT)
Rich Text Format (RTF), Portable Document Format (PDF), Microsoft PowerPoint (PPT, PPTX, and
PPS) and Hangul (HWP). However, we recommend that you upload a Microsoft Word Document
(.docx), with document containing at least 20 words of text.| Assignments | 46
5. What is the file size limit for my Turnitin submission?
Each document should not exceed 40 MB. To reduce file size, you can compress images in your
document. Refer to this link for steps to reduce the file size.
6. How should I name my submission file?
Name your file as per your name displayed in Canvas and append it with an underscore followed by the
assignment name. For example, “CarreySimEngKeat_GBA01.docx”
7. Where do I submit my assignment?
For Online students, submit your assignments in Assignments > Group-Based Assignment > GBA.
For Part-Time students, submit your “Assignments” via the T-group course site. You will then be
directed to the submission page.
8. What do I need to take note for PDPA?
In accordance to the Personal Data Protection Act (PDPA), please DO NOT include personal particulars
such as NRIC, home address and mobile number in your assignment document.
9. What must I do after submitting my file?
You must verify that your assignment is submitted successfully in Canvas by obtaining a digital receipt
of your submission.
10. What is the ‘grace period’ and ‘Mark Deduction Schemes’ for each assignment submission?
Refer to the Student Handbook for more information.
11. How do I submit a Group-Based Assignment (GBA)?
Each and every students will be assigned to a group. Usually, the group leader will submit the
assignment on behalf of the group. For Part-Time students, the same method is used to submit a GBA
and a TMA.| Assignments | 47
12. How do I view and interpret the Turnitin Originality Report?
The Originality Report provides a summary of matching or similar areas of text found in a submitted
paper.
Note: Papers that are submitted on the 4th attempt (or 3rd resubmission) may generate a new Originality
Report only after a full 24 hours. This delay is automatic and allows the 3rd resubmission to generate
the Originality Report correctly without matching to the previous draft.
The Originality Report icon shows a percentage figure and a corresponding colour indication. The colour
indication depends on the range of the percentage figure, which is determined by the amount of matching
found. The percentage figure is the Similarity Index, which runs from 0% to 100%. A higher Similarity
Index implies that a larger amount of content in your submitted paper is found to be similar to some
available online resources. The paper shown in the Originality Report is fully formatted and contains any
images and graphs included in the original document.
How Do I Submit Turnitin Assignment?
In this section, you will see step-by-step guide of how to submit a Group-Based Assignment in Microsoft
Word format (.docx) using Turnitin.
Access Course Site
1. Click on “Courses”.
2. For Part Time Course, click on your desired T-group course site. For Fully Online Course, click on
your desired TV-group course site.
2
1| Assignments | 48
3. You can find your assignment under “Assignments” of the course navigational menu.
3| Assignments | 49 Submit Turnitin Assignment 1. Click on “Assignments”. 2. Scroll down to the name of the assignment. For example, Group-Based Assignment. 3. Click on GBA.
| Assignments | 50

4. You will be directed to the Turnitin submission page. Read the terms and agreement carefully regarding Turnitin User
   Agreement. This page will only be displayed when accessing Turnitin for the first time.

5. Click on ”I agree“ to continue.

6. Click on “Upload Submission” to upload your file.

Note: Name your document file strictly to this format - FullName_GBA01. For example,
      PremaSubroyan_GBA01 (omit D/O, S/O), TanMeiMeiSally_GBA01. For GBA assignment, the
      document file should contain only the full name of the student submitting the assignment.
| Assignments | 51 7. Click on “Choose File” to attach the assignment file from your computer. 8. Locate your GBA Word document from your computer and click on “Open”. 9. The name of your chosen file will be populated in the “Submission Title” field. Remove the file extension from the submission title.
| Assignments | 52

10. Click on “Upload and Review”.

11. Turnitin will then process the assignment file to check for any inherent problems.
| Assignments | 53

12. You will be able to Review your assignment.

13. Click on Submit to Turnitin.

14. Upon successful submission, you will see three icons that allows you to Resubmit Paper [14], Download Paper
    [15] and Download Digital Receipt [16].

Digital Receipt
1. Click on the Digital Receipt icon to download the digital receipt of your submission.

                            1

2. The digital receipt will then be downloaded into your computer.

Note: If you don’t see the Turnitin view above, please refer to the steps below.
| Assignments | 54
3. Click on your document name under Paper Title.
4. A pop-up window with your assignment will appear. Click on the Download icon.
5. Click on Digital Receipt. A copy of the digital receipt will then be downloaded into your computer.
Download
icon| Assignments | 55 Below is a sample of the downloaded digital receipt.
| Assignments | 56

View Marked Assignments
    The marked assignment files will be returned to students through Canvas.

Access Course Site
    1. Click on “Courses”.
    2. For Part Time Course, click on your desired T-group course site. For Fully Online Course, click on your desired TV-group
       course site.

                                                           2

                         1

    Marked Assignments Page
    1. Click on “SUSS Gradebook”.
    2. Click on the File Download icon to download the marked assignment that has been returned.

                                                                                                               2

                           1

Quiz Submission
| Assignments | 57
Quizzes are administered in Canvas and the attained quiz grades are computed electronically.
How Do I Submit A Quiz Assignment?
In this illustration, we demonstrate how you can complete an Online Quiz.
Access Course Site
1. Click on “Courses”.
2. For Part Time Course, click on your desired L-group course site. For Fully Online Course, click on your desired TV-group
course site.
2
1
Submit Quiz Assignment
1. Click on “Quizzes”.
2. Click on the available quiz. For example, “QUIZ01”.
2
1
3. Read the instructions carefully before you begin the quiz.
4. Click on “Take the Quiz” to proceed.| Assignments | 58
3
4
5. Answer the quiz questions.
6. The point value of each question will be shown on the top right corner.
Note: The quiz may require students to complete one question at a time or may display all the
questions in a single page.
6
5
7. At any point during the quiz, you can view a summary of your quiz. Questions you've answered can be| Assignments | 59
identified by a checkmark icon, while unanswered questions can identified by a question mark icon.
8. You'll also see a timer showing your progress on the quiz. For untimed quizzes, the timer shows the elapsed
time. If you are taking a timed quiz, the timer shows the running time and counts down until the time expires.
7
8
9. Your quiz answers are automatically saved while you are attempting the quiz.
10. Click on "Submit Quiz" to submit your quiz.
9 10| Assignments | 60 Verify Muted Quiz Submission Quizzes are 'muted' at times to disallow students from viewing their attained grade for a quiz attempt. In such cases the details of your quiz submission will be displayed in the sidebar under the header 'Submission Details'. Quiz with Only 1 Attempt Quiz with Multiple Attempt
| Assignments | 61

Quiz with Limited Attempt
| Assignments | 62

Unmuted Quiz with Multiple Attempts
| Grades | 62

Chapter

7
Grades
Topics:                   The Grades page of the course site displays grades of your respective course
                          assignments.
•   Access Course Site
•   View Grades
•   View Mark Deduction
•   OCAS Calculator
| Grades | 63
Access Course Site
1. Click on “Courses”.
2. For Part Time Course, click on your desired T-group course site. For Fully Online Course, click on your desired TV-group
course site.
2
1
3. Click on “Grades”.
3| Assignments | 64
View Grades
Note: Grades are sorted chronologically by assignment due date, followed by assignments with no due dates.
1. You can view the name of the assignment, the assignment due date, the score you attained, and the total point
value of the assignment.
2. Click on the course drop-down menu to view grades in your other enrolled courses.
3. Click on “Print” to print out the grades for your reference.
3
2
1| Grades | 65
SUSS Gradebook
View Mark Deduction
1. Click on "SUSS Gradebook".
2. The amount of marks deducted for the assignment, if any, is reflected in the Mark Deduction column.
OCAS Calculator
3. The OCAS Calculator displays the Unmoderated Score, Maximum Score and Weight of each and every OCAS
components in your course. Your total OCAS (Unmoderated) will also be displayed. The OCAS components are
the quizzes and assignments.
1
2
3| Grades | 66
Chapter
8
Getting Help
Topics: Contact information for administrative and technical enquiries.
• Learning Services Support (LS
Support)
• Student Support
• MyMail Support
• Campus Wireless Network
Support| Getting Help | 67
Learning Services Support (LS Support)
Offers technical assistance on Canvas such as submission of assignments.
Note: Closed on public holidays and SUSS shutdown days.
• Hotline:
6248-9111 (Option 1 followed by Option 2)
• Operating Hours:
8.30am to 7.30pm (Monday to Friday)
9.00am to 1.00pm (Saturday)
• Email:
lssupport@suss.edu.sg (Please use MyMail for email correspondences)
Student Support
Handles enquiries about administrative matters and obtain useful information related to academic/administrative
student records, government subsidy and course fees matters etc.
Note: Closed on public holidays and SUSS shutdown days.
• Hotline:
6248-9111 (Option 1 followed by Option 1)
• Operating Hours:
8.30am to 7.30pm (Monday to Friday)
9.00am to 1.00pm (Saturday)
• Office:
Block C, Level 1, C.03/C.04, 463 Clementi Road, Singapore 599494
• Email:
Note: Please use MyMail for email correspondences
students@suss.edu.sg (Part Time Student)
ucstudents@suss.edu.sg (Full Time Student)| Getting Help | 68
MyMail Support
Offers assistance on MyMail and Student Portal login issues (Including password issues).
• Email:
mymailsupport@suss.edu.sg
Please include the following particulars in your email for verification when resetting password.
1. Full Name
2. PI Number
3. NRIC
4. Date of Birth
Campus Wireless Network Support
Supports enquiries on campus wireless (Excluding password issues).
Note: Closed on public holidays and SIM/SIMPL shutdown days.
• Hotline:
6248-9393 (Option 4)
• Operating Hours:
8.30 am to 5.30pm (Monday to Friday)
9.00am to 1.00pm (Saturday)| Turnitin Similarity Check (Plagiarism Report) | 69
Appendix
A
Turnitin Similarity Check (Plagiarism Report)
Topics: The Similarity Check provides a summary of matching or similar areas of text
found in a submitted paper.
• Originality Reports
Papers submitted to Turnitin may be compared against billions of internet
• Interpreting the Similarity Index
documents, archived internet data that is no longer available on the live web,
• Access Turnitin Originality a local repository of previously submitted papers, and subscription repository
Report of periodicals, journals, and publications.
The comparison document is called an Originality Report. This document
details the matching or similar text between a submission made on Turnitin
and the documents the submission was compared against.| Turnitin Similarity Check (Plagiarism Report) | 70
Originality Reports
The Originality Report provides a summary of matching or similar areas of text found in a submitted paper.
Note: Papers that are submitted on the 4th attempt (or 3rd resubmission) may generate a new Originality
Report only after a full 24 hours. The delay is automatic and allows the 3rd resubmission to generate the
Originality Report correctly without matching to the previous draft.
The Originality Report icon shows a percentage figure and a corresponding color indication. The colour indication
depends on the range of the percentage figure, which is determined by the amount of matching found. The percentage
figure is the Similarity Index, which runs from 0% to 100%. A higher Similarity Index implies that a larger amount of
content in your submitted paper is found to be similar to some available online resources.
The paper shown in the Originality Report is fully formatted and contains any images and graphs included in the
original document.
Interpreting the Similarity Index
Turnitin does not check for plagiarism in a piece of work. Instead, it will check your work against their database,
and if there are instances where your writing is similar to, or matches against, one of their sources, Turnitin will flag
this for your instructor to review. Their database includes billions of web pages: both current and archived content
from the internet, a repository of works students have submitted to Turnitin in the past, and a collection of documents,
which comprises thousands of periodicals, journals, and publications.
It is perfectly natural for an assignment to match against some of their database. If you have used quotes and have
referenced correctly, there will be instances where Turnitin will find a match. The Similarity Score Index (SSI) simply
makes your instructor aware of any problem areas in your paper; they will then use this as a tool as part of a larger
process, in order to determine if the match is or is not acceptable.| Turnitin Similarity Check (Plagiarism Report) | 71
Similarity Index Examples
As an example, you may have submitted a paper to Turnitin in the past. If you have included your name in that
submission, it is entirely possible that, if your instructor has opted not to exclude small matches, this will be
highlighted in your Originality Report.
Another example may concern a student copying and pasting a chunk of text into their paper, due to a lack of
knowledge on the topic they are covering. Their Similarity Index might be 10%.
However, this might be compared to another student who has a firm basis of knowledge for the paper and knows
enough to gather information from several sources to quote and reference correctly. Their Similarity Index might be
12%.
Both students will be shown to have matches against Turnitin database. However, one of these students copied
directly from a website, whereas the other provided properly sourced quotes.
Turnitin empowers your instructor by giving them the tools to differentiate between matches. It also empowers you,
as a student, by knowing that your work will be seen through the correct lens. For more information about citing the
sources you have used, please refer to SD103 Academic Integrity.
Access Turnitin Originality Report
Note:
1. Turnitin will take an hour to generate the Originality Report, for the first 3 submissions of an assignment.
2. Turnitin will take up to 24 hours to generate the Originality Report for the fourth submission (or third re-
submission) of the same assignment.
3. Originality Report generation time may vary based on the extreme levels of usage that may occur during
certain periods of the academic year or due to very large submissions.
1. To get details on Turnitin Originality Report, click on the “Paper Title” or "Similarity Index". For example,
“LSAStudent01_TMA01”.
Feedback Studio
Note: For more information about Turnitin, please refer to http://turnitin.com/en_us/resources/blog.
1. Click on “Info” button to view information about this paper. The paper information contains:
a. Submission ID
b. Submission Date
c. Submission Count
d. Word Count
2. Navigate to left or right to zoom in or out of the paper.| Turnitin Similarity Check (Plagiarism Report) | 72
3. The two viewing modes for an Originality Report are:
a. Match Overview (show highest matches together): A list of all areas of the paper which have similarity to
information in the Turnitin repository. Matches are color coded and listed from highest to lowest percentage
of matching word area to the submission. Only the top or best matches are shown, all underlying
matches are visible in the Match Breakdown and All Sources modes.
b. All Sources: Allows a user to view matches between the paper and a specific selected source in the Turnitin
repositories. Contains a full list of all matches found rather than the best matches per area of similarity. This
listing is exhaustive but will show all matches found, including any that are obscured in the Match Overview
by virtue of being in the same or similar areas as other, better matches
4. Click on “Download” button to download:
a. Current View
b. Digital Receipt
c. Originally Submitted File
Match Overview
The Match Overview gives you a breakdown of all the matches that have been found in the paper and allows you to
clearly view the similarity score index. Matches are ordered by highest instance of similarity down to the lowest. Each
match has a color and a number attached to it. These color tags will help you to find the match on the paper itself.
1. To view the Match Overview, click on the red number on the product toolbar.| Turnitin Similarity Check (Plagiarism Report) | 73 2. The Match Overview will be displayed within the Match Overview side panel. 3. Having clicked the Match Overview icon, this will also highlight any matches within the paper itself. Each match can be color coded to help you identify them easily. 4. By clicking on one of the sources from the Match Overview side panel, you can discover how many matches have been found for each source. Click the navigation arrows to jump from one match to the next; this will move you through the paper itself. 5. Should you wish to see a match breakdown for each source, click the arrow to the right of the source.
| Turnitin Similarity Check (Plagiarism Report) | 74

6. You can now see a large list of all the sources concerning this particular match. Click any of these matches to be
   directed to it on your paper.

Viewing Source Details
1. If you would like to see more information regarding the text that has matched to a source, click on the source
   number from within the paper

2. A pop-up box will appear; this will show you further details relating to the source that your writing has been
   matched with.
| Turnitin Similarity Check (Plagiarism Report) | 75

   3. Should you wish to view the source in more depth, click on the "Full Source View" icon in the top right-hand
      corner of the pop-up.

   4. The right-hand side panel will change to Full Source Text, which you can scroll through to read in detail.

   5. Click the "X" icon in the top right-hand corner of the side panel to return to the Match Overview.

Match Overview
   The Match Overview gives you a breakdown of all the matches that have been found in the paper and allows you to
   clearly view the similarity score index. Matches are ordered by highest instance of similarity down to the lowest. Each
   match has a color and a number attached to it. These color tags will help you to find the match on the paper itself.

   1. To view the Match Overview, click on the red number on the product toolbar.
| Turnitin Similarity Check (Plagiarism Report) | 76 2. The Match Overview will be displayed within the Match Overview side panel. 3. Having clicked the Match Overview icon, this will also highlight any matches within the paper itself. Each match can be color coded to help you identify them easily. 4. By clicking on one of the sources from the Match Overview side panel, you can discover how many matches have been found for each source. Click the navigation arrows to jump from one match to the next; this will move you through the paper itself. 5. Should you wish to see a match breakdown for each source, click the arrow to the right of the source.
| Turnitin Similarity Check (Plagiarism Report) | 77

   6. You can now see a large list of all the sources concerning this particular match. Click any of these matches to be
      directed to it on your paper.

Repository Sources
   Turnitin utilizes multiple types of repository in the generation of the Originality Reports.
   There are currently four types of repository:
   1. Internet Repository - billions of active and archived web pages from the internet. Internet sources indicate a date
      of download on the Turnitin Originality Report if the match is not found on the most recent download of content
      from this site.
   2. Periodicals - a repository of frequently updated content from professional journals, periodicals, and publications.
   3. Student Paper Repository - a repository of papers previously submitted by Turnitin users.
   4. Institution Paper Repository - a collection of papers submitted to the institution’s repository.
| Discussions | 78
Appendix
B
Discussions
Topics: Canvas provides an integrated system for class discussions, allowing both
• Access Discussions instructors and students to start and contribute to as many discussion topics as
desired.| Discussions | 79
Access Course Site
1. Click on “Courses”.
2. For Part Time Course, click on your desired T-group course site. For Fully Online Course, click on your desired
TV-group course site.
2
1
Access Discussions
Note: For more information about discussions, please refer to https://guides.instructure.com/m/4212/c/35110.
1. Click on “Discussions”.
1| How Do I Access Groups? | 80
Appendix
C
How Do I Access Groups?
Topics: Groups are like a smaller version of your course and are used as a
collaborative tool where students can work together on group projects and
• Access Groups assignments.| How Do I Access Groups? | 81
Access Groups
1. Click on “Groups”.
2. The groups you are currently enrolled in will appear here. Click on a group name to access the group site. For
example, "Group 1".
3. To view all your groups, click on "All Groups".
2
3
1| How to Show Markup (Comments) in Microsoft Word? | 82
Appendix
D
How to Show Markup (Comments) in Microsoft Word?
Topics: Markup is used by marker to provide feedback on submitted assignment.
• View Markup (Comments) in
Microsoft Word| How to Show Markup (Comments) in Microsoft Word? | 83
View Markup (Comments) in Microsoft Word
1. Locate and open your marked assignment, for example, "931726620-LSAStudent01_GBA01.docx".
1
2. Click on "Review".
3. Ensure "All Markup" is selected.
3
2
4. Comments will be displayed on the screen.You can also read