SMA Pilot Balustrade Level I - Balustrade Installation - Education Committee Class - The Stairbuilders and Manufacturers ...
←
→
Page content transcription
If your browser does not render page correctly, please read the page content below
SMA Pilot Balustrade Level I
Balustrade Installation - Education Committee Class
 ©2018 Stairbuilders and Manufacturers Association
         Presented by: Quarter Turn Dave
   Photos, Illustrations & Materials Provided by:
                     WM Coffman
                        LJ Smith
                     Fits Industries
                  Staircon – Elecosoft
                     Loudoun Stair
                    Ideal Stair Parts
                    Crown Heritage           Hi Folks,
                  North Atlantic Corp.
                                             This is a greatly reduced
                       StairWorx             representation of the Power
                                             Point used in the three day
                                             class.

                                             Quarter Turn Dave

                    By: Quarter Turn Dave
Balustrade - Post to Post
Balustrade Level I Pilot Class teaches geometry, layout, some machining
and attachment of component pieces for installation of a Post to Post
Balustrade used around the Country. This will include guards for both
closed and open string and balcony's. This class will instruct the new
installer how to achieve the goals of a strong pleasing functional
balustrade system.

The class will instruct the new installer how to achieve the goals of a
strong pleasing functional balustrade system focusing on why the basics
work as we teach each section building the system. Everything in this class
is tried proven and used by masters of the past from timber framing to
todays construction.

We start with IRC Code applications in layout determining the location of
the newel, baluster and balustrade height from paperwork of materials
selected to build a balustrade. We delve into centering which poses
conditions set by Company standards, and job conditions covering newel
mounting via surface , notching or a combinations of both to various parts
of the stairway and floor systems. Next is mounting handrails to newels
and walls with different fasteners and finally baluster attachment, with a
mix of mounting styles, fasteners and procedures. Component connections
must be strong showing no joinery cracks and be able to withstand code
testing. The following pages are excerpts from the Power Point lead class.

Quarter Turn Dave

 ©2018 Stairbuilders and
 Manufacturers Association                     By: Quarter Turn Dave
•        Newels -Style & Quantity                                 •     Add up the pieces count, see paperwork & drawing
                                                                      •     Verify newel count, style
    •        Balusters -Style & Quantity
                                                                      •     Verify Rail height, it effects the Baluster lengths
    •        Rail -Style & Quantity                                   Three Baluster installs:
    •        Cap & Shoe -Style & Quantity                             •     *For 34” rail IRC Baluster length - 34”, 36”, 39”
                                                                      •     For 36” Rail IRC Baluster Length - 36”, 39”, 42”
    •        Landing Tread -Style & Quantity
                                                                      •     For 38” Rail IRC Baluster Length - 39”, 42”, 45”
    •        Fascia -Style & Quantity                                 •     *Balusters needed; 2- First Step 2/36”, 2/39”
    •        Fasteners -Style & Quantity                              •     *Balance of Balusters on Treads; 8/34”, 8/36”, 8/39”
                                                                      Two Baluster installs:
    •        Review Drawing                                           •     *For 34” rail IRC Baluster length - 34”, 39”
    •        Job Conditions                                           •     For 36” Rail IRC Baluster Length - 36”, 42”
    •        Contact                                                  •     For 38” Rail IRC Baluster Length - 39”, 45”
                                                                      •     *Balusters needed; 1- First Step - 2/39”
    •        Location                                                 •     *Balance of Balusters on Treads; 8/34”, 8/39”
    •        Tools                                                    •     Note if grouping balusters over equal centers is used
                                                                      •     Newel block size needed; 2½-5”, 1-10”, 1-13”
                                                                      •     *16’ of Balcony Balusters; 45/36”
                                                                      •     Baluster heights may vary from style to style
                                                                      •     Newel Drop, Landing Tread, Fascia & Trim
                                                                      •     Fasteners for; Newel, Rail, Baluster, Fascia, Trim

                                                                      Newels Types by location in the example are: A-4040 is a starting newel, B-4046 is a intermediate landing newel, C-4045 is a
                                                                      landing newel, D -4042 landing newel and E -4042 is a half newel. The basic difference while in the same style is the length of
                                                                      each plinth and square block and where it fits in the system. The starting newel A, could be the same as newel D & E having a 5”
                                                                      top block and short plinth block with E ripped forming a half newel. Landing newel B is different with the top block between 12”-
                                                                      13½” to receive the two different height rake rails. It’s plinth block is longer allowing it to reach the lower stair stringer for notch
                                                                      lapping. Landing newel C top block is 10” with a similar long plinth to reach the bottom of the stringer for notch lapping.

Verify, verify, verify:
•       May be required to log the truck, mileage, fuel, condition
•       Understand the materials and job matched to paperwork
•       Have the exact material as indicated on the paperwork. If
        something looks odd ask now, clarity is a good friend
•       Note if extras are indicated on paperwork, if not ask for extras
•       Does the job need different tools, bits, fasteners, adhesives
•       Remember you are the last person to interact with the Customer.
        You will be the one they remember. Be professional, be curious,
        be mindful of surroundings and CLEAN your mess.                                            Starting Newel is used at the bottom or beginning of a stairway. This newel can be changed
•       Turn in extra materials with customer signed paperwork                                     from style and size and manufactured as a ornate custom. The drawings above show two
                                                                                                   styles of starting newel with different starting tread applications.

    ©2018 Stairbuilders and
    Manufacturers Association                                                        By: Quarter Turn Dave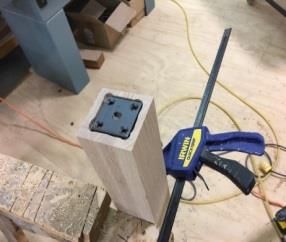
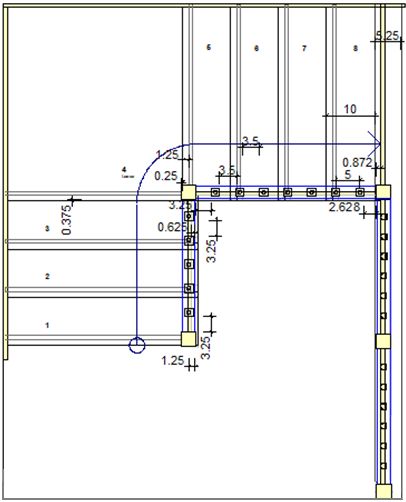
The backbone of any balustrade installation Also remember to adjust for the baluster spacing sphere rule. Fig. 5 & 5a shows
is the placement of components. Each the newels in a desirable location for this layout. The balcony newel location Fig.
employer or installation will have different 5 is placed in the similar location allowing the baluster plinths to align on the
required placement for the centerline of the fascia or apron face. This is the first and easiest way to layout an intermediate
balustrade. For this class we will cover the landing newel on a dextral or sinistral landing. Also be mindful of the wall
basic standard slightly modified around the termination. Be sure to check the newel to wall measurement for code on 36”
country. This is the finest detail work wide. VI R311.7.1
required, workmanship is not an option.
First locate the centerline, your employer
may have default locations, ASK! In this
exercise we are using half the baluster plinth
width to determine the centerline of the
balustrade and the baluster plinth flush with
the stringer or bracket and riser for an open
stair. If it has a quarter space landing as
shown in Fig. 4, both stairs will create a
common center line point for the dextral
quarter space landing newel…
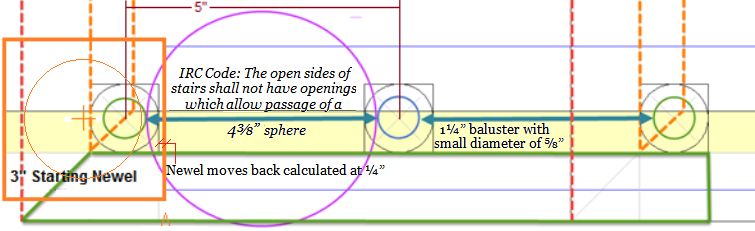
With rake guards using two 1¼” pin top, square block or iron baluster on a 10” If the sphere rule is not checked and allotted for the stair balustrade will be out
run another calculation is required. The 4⅜” sphere rule for calculating the of code right here at the newel. By moving the baluster and balustrade center
distance between a two balusters and/or a newel at the smallest turn cut area. line and newel as necessary at the intermediate and landing newel location will
The small turn cut in a newel is deeper than the ½” turn cut on a 1¼” baluster bring the sphere rule back into code. For the starting newel just move the
or iron… measure the small diameter with calibers on the newel and baluster, newel back a little. This will become second nature to you as you progress. At
subtract half from the plinth dimension of each, you will see a newel small turn no point are rake baluster spaces allowed to be greater to allow the 4⅜”sphere
cut is deeper than a baluster small turn cut. Baluster centers, newel location or to pass between balusters or baluster and newel or the 4” sphere on a balcony
both must be adjusted. The 4⅜” sphere must not pass on a rake, 4” on the balustrade. If need be lay the parts on flat on the floor to verify your math.
balcony. R312.1.3 VI 2012
Drawing to the left indicates baluster plinth side is flush with stringer
and riser. It also shows the starting newel needs to be placed further
back for the 4⅜” sphere rule. Manufacturers use different top pin
diameters from ½” - ⅝” - ¾” small diameters… diameter shown here is
a ⅝” pin top and will not pass code, a ¾” will. Note the orange square
and circle indicates the newel. Did it misses the placement as well.
©2018 Stairbuilders and
Manufacturers Association By: Quarter Turn Dave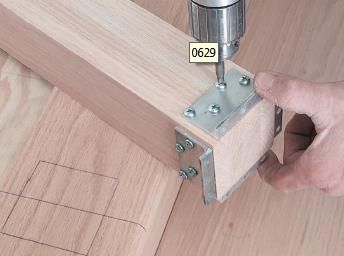
Now that the basic layout is complete with baluster and newel locations and the
                                                                                                   handrail heights, the balusters and newel lengths can be determined. If done
                                                                                                   correctly the back of the baluster and newel plinth is not same distance?

                                                                                                   If there is a intermediate landing newel or landing newel start here. Arriving at the
                                                                                                   newel height is simple with the pitch block and ruler. Clamp the rake rail on the stair
                                                                                                   and mark the vertical line on the handrail with the pitch block at the starting newel
                                                                                                   plinth location. This is the exact angle of the handrail ready to cut if the tread is
                                                                                                   level…baluster length, measure the raise length from under the handrail to the tread
                                                                                                   at each baluster center line, plus the raise length and add 1” for the baluster pin
                                                                                                   insertion length or ¼” for square top in plowed handrail, baluster lengths set.

 With the tread to newel height marked and cut on the newel the rest of the measurements can be made for the notch location and depth of cut №1 & 3. Very keen measurements
 need to be made along with the best joinery possible. Using a bevel square check the miter on the stringer and riser for…check for cupping of the riser and stringer. Continue with
 the tread length cut #2 as determined from the layout for the height of the newel, cut stop at both vertical lines #1 & #3. With the starting newel cut, finished and checked for
 plumb in place. The anchor holes would like to be in the tread and riser. Your employer will have additional process here with regards to locations, glues or adhesives and
 fasteners. Lightly fasten this newel for now.

                                                               Here the vertical cuts #2 and #3 consist of two #3’s and two #2’s as the blade will not make a full cut. Make all
                                                               vertical cuts, then the horizontals. The lower portion of the notch will just fall off leaving the top upper flight notch
                                                               to chisel. Can a surface mount work in this position if it was used on the starting newel?

                                                                                                           The landing newel layout is the last done in the balustrade and last cut.
                                                                                                           The procedure starts like the starting newel … until the layout cut lines.
                                                                                                           The balcony handrail height is calculated the same but at 36” balcony raise
                                                                                                           height; rake at 34⅛” balcony at 36⅛”. This sets the newel height on the
                                                                                                           landing to calculate the horizontal cuts. Just measure down from the top
                                                                                                           block and accurately marking the plinth.; you now have balcony baluster
                                                                                                           length. Check the wall termination point.

                                  Intermediate

Starting installing at the termination point. Apply the half newel or rosette through a rail bolt into solid blocking. If instructed to set blocking try to remove just enough sheet rock
to allow the half newel or rosette to cover the hole on the backer framing at the handrail location. Using a longer hanger bolt …

   ©2018 Stairbuilders and
   Manufacturers Association                                                  By: Quarter Turn Dave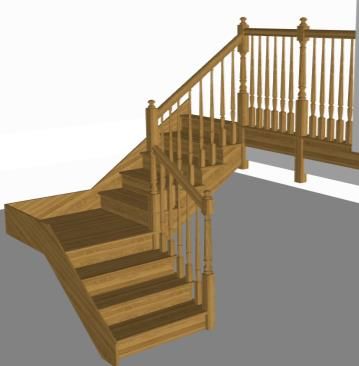
Using brad point drills, drill a ¼” hole in a scrap of handrail. Measure ¹⁵⁄₁₆”
up from the bottom and centered in the end to make a templet. Use a scrap
cutoff cut earlier for the rake rail. Using dowels or finish nails drill one or
two nail or ⅜” holes about ¾” down from the top of the handrail in the
widest part and about 1¼” apart, centered. Mark one side of the cut off…
Square top balusters mainly use plow hand rail, cap and optional shoe rail. Layout and
prepare the newels as indicated earlier. Cap should be installed prior to the newels on curb
walls. Shoe rail would directly install on the buttress stringer… With the cut shoe rail and
handrail done in the prior lessons …is used to determine the height of the balusters. You may
use a pitch block or measure method however, lay the handrail on the cap or shoe rail to
transfer the baluster marks…two styles of attachment is used to secure the baluster plinths,
screws from below or toe nail with medium T-nail or small trim screw on the baluster plinth
into the shoe rail where the fillet covers. For elevated shoe rail on open stairs please use
screws from under the shoe rail. VI R312.1.3 -46
Upon completion follow guidelines noted below and/or company procedures as
specified.
• Confirm everything meets code requirements.
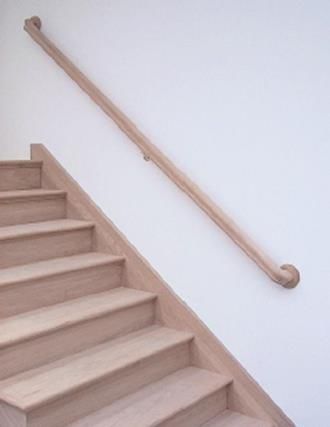
Wall rail codes require the ends to be retuned to the wall instead • Double check to insure all surfaces are sanded clean, all joints are secure,
of using lambs tong or vertical volutes. Quarter turns are usually tight & clean.
used for this termination combined with a rosette attached to the • Clean-up job site: vacuum/sweep/dust, remove trash & prepare for next
end of the handrail into a stud. It is recommended to cut a pocket step.
in the sheetrock at a stud…solid piece of wood flush with the – Attach cover protection such as paper or cardboard if provided if
sheetrock and cover with the rosette. All three parts anchor to site is not ready for occupation.
each other to the stud. Handrail brackets support the wall rail – Prepare for owner/occupant access.
through the middle of the field. Remember the code height and • Clean/ pack tools & remove from jobsite.
use wall rail brackets at 4’ spacing minimums; check with your • Inventory supplies & materials; create list, if necessary, to adjust invoice
employer. accordingly.
VI R311.7.1 Photo 3; VI R311.7.8.1; VI R311.7.8.2 Drawing 28, Photo • Materials; address any leftovers, store or return/restock any usable
29-31 leftovers or save for finish samples.
• Notify Owner or job lead that staircase is complete, answer any questions
• Request signature for job approval/completion.
• Take Pictures - be sure to capture all angles and details.
• Confirm monies collected match the invoice if required.
©2018 Stairbuilders and
Manufacturers Association By: Quarter Turn Dave • Follow up with ‘Thank You’ and ask for future references.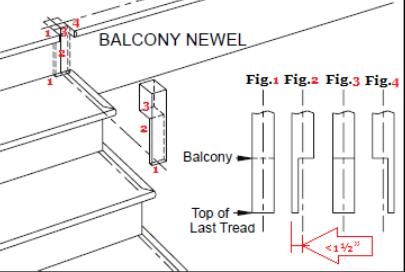
You can also read