Soul Food Recipes - Learned On A North Carolina Tobacco Farm by
←
→
Page content transcription
If your browser does not render page correctly, please read the page content below
Here are a few soul food recipes for your enjoyment. They are from the cookbook
Soul Food Recipes – Learned On A North Carolina Tobacco Farm by
Willie Crawford.

Give them a try and share them with your friends. Since this is an electronic cookbook it
can be passed on. You simply email copies to your friends. If you have a website you
can also allow others to download it from there. This cookbook is copyright 2002 by
Willie Crawford

To find more great recipes check out the cookbook by Clicking Here.

                                  Recipes Featured
Recipe
Collard Greens
Pinto Beans With Ham hocks
Chitterlings And Hog Maws
Southern Fried Chicken
Deep Fried Turkey
Fried Green Tomatoes
Liver Pudding
Fried Catfish
Beer Battered Halibut
Oven Barbecued Baby Back Ribs
Salmon Croquettes
Macaroni and Cheese
Coleslaw
Potato Salad
Grits (Several Variations)
Buttermilk Biscuits
Hush Puppies
Sweet Potato Pie
Pound Cake
Vanilla Wafer Cake
Awesome Collard Greens Collard greens are a very nutritious and inexpensive treat. When I was growing up, my grandmother would buy about 50 cents worth of collard seeds and this would grow enough collard greens to feed us for the entire year. That 50 cents worth of seeds would produce hundreds of collard plants in our North Carolina backyard garden. Ingredients: 2 - 3 medium smoked ham hocks or 2 pounds smoked pork neck bones 5 pounds of collards or several large bunches (If you can't get them fresh, frozen will do. 2 teaspoon of salt My favorite way to cook collard greens is very simple. I take 2 or 3 smoked ham hocks and put them in a large (6 quart) pot of water. Bring the water to a rolling boil and let it boil for about 1 1/2 hours. Add more water as it boils down. The idea is to boil the ham hocks until they begin to fall apart. You should always cook pork very thoroughly and use proper food handling techniques. You want the ham hocks to be falling apart before you add the collard greens. Take the collard greens and separate the leaves (if fresh). Now rinse each leaf individually under cold running water. After you rinse the collard greens thoroughly, stack several leaves on top of each other. Roll these leaves together. Then slice the leaves into thin strips using a cutting board and large knife. Rolling them together speeds up the process as you are slicking through several leaves at once. Next, add your collard greens to the pot. Since this is a lot of collards, you will need to add them until the pot is full. Then allow them to wilt as they cook - then add more. Add you salt, cover and cook for thirty minutes on medium heat. Stir every few minutes to distribute the smoked meat taste evenly. Taste to confirm they are the tenderness you prefer. Serve with your favorite meat dish such as chitterlings. Eat the ham hocks or neck bones right along with the collards. If you used frozen collards, simply pour them - frozen - right from the package to the pot. If you use smoked neck bones, they usually don't take as long to cook as ham hocks. People in my neck of the woods usually sprinkle lots of hot sauce on their collards. I like them that way. Give it a try. Since this is a large pot full, just save the extras in the refrigerator. They should keep for a long time and actually get better as the juices settle in. From Soulfood Recipes Learned On A North Carolina Tobacco Farm, Please Click Here.
Pinto Beans and Ham Hocks
Ingredients:

3 smoked ham hocks
2 lbs. dried pinto beans
1/2 teaspoon garlic powder
1/2 teaspoon crushed red pepper
1/4 teaspoon ground black pepper
1/2 teaspoon salt
2 teaspoon hot sauce
1/2 medium chopped onion

Directions:

Boil ham hocks on high heat for 45 minutes. Add all seasonings except hot sauce and
onion. Continue boiling for 20 minutes. Add pinto beans, hot sauce, and onion. Boil on
medium heat until beans are done to taste.
Note: To speed up cooking of beans and reduce the gas beans produce, soak beans in cold
water overnight or for three hours during the day.
Serve with rice and a meat side dish. You can also use the ham hocks as your meat side
dish. However, ham hocks are a high-fat food with not that much meat (mostly skin).

From Soulfood Recipes Learned On A North Carolina Tobacco Farm
Please Click Here.
Chitterlings and Hog Maws

Ingredients:

5 pounds hog maws (pig stomach)
10 pounds chitterlings (pig intestines)
5 quarts water
1 tablespoon salt
1 tablespoon pepper
1 teaspoon red pepper (flakes)
2 medium peeled whole onions (white or yellow)
1 tablespoon Lawry's Seasoned Salt
1/2 tsp sage
2 medium white potatoes

Preparation:

1. Thoroughly was hog maws. Trim off excess fat. Cut into small pieces.
(I make mine about 2 inch pieces).
2. Place maws in LARGE pot of water along with salt, pepper, onion, sage.
3. Boil (covered) over medium high heat for 1 hour.
4. Thoroughly clean chitterlings. Scrap off excess fat. Wash chitterlings
inside and out. It helps if you turn them.
5. Cut into 1-2 inch pieces and add chitterlings to hog maws after 1 hour.
6. Add more water as necessary and continue boiling (covered) for 1 hour.
7. Add Lawry's seasoned salt, turn heat down to medium, and continue
cooking until fork tender. After fork tender, remove lid and allow liquid
to evaporate (cook down). The flavor is better if you have less liquid.
8. Discard onions what's left or onions and potatoes.

Serve with rice, hush puppies, coleslaw, iced tea.
Store leftovers in the refrigerator. The flavor gets even better as they sit
around for a day or two. They've never lasted very long in my house though.

** Note: Since they do have a "distinct" odor, some people prefer cooking them
outside. I use the gas burner from my turkey deep fryer for this purpose. The
recipe is the same. You can read a good book while sitting in your back yard
cooking up a mess of chitlins.

From Soulfood Recipes Learned On A North Carolina Tobacco Farm
SIMPLE SOUTHERN FRIED CHICKEN

Ingredients:

1 frying chicken, skin removed if you
want lower fat. I leave the skin on.
3 teaspoons Lawry's Seasoned Salt
2 garlic cloves, finely chopped
1 cup all purpose flour
1 cup vegetable oil

1. Season chicken with all seasonings.
2. Roll chicken in flour until covered. Shake off
excess flour. Sprinkle additional seasoning.
3. Simply fry chicken in frying pan until golden
brown. I like it crispy so I cook it a little longer
than most and turn the heat back up at the
very end.

Start out with the oil very hot and then
reduce it later. This seals in the moisture and
flavor, then cooks it.

From Soulfood Recipes Learned On A North Carolina Tobacco Farm
Deep Fried Turkey

My method of choice for fixing turkey is currently deep frying them. They are much
tastier than roasted turkeys and leftovers are never a problem.

First of all, you need a cooker. I have a King Kooker.
This is a gas burner that you set up outside, attached
to a propane tank, and with a tall pot set on top of the
burner. My pot is nearly 2 feet tall. My cooker was
made by Metal Fusion, Inc, 712 St. George Ave.,
Jefferson, LA 70121 (Phone 504-736-0201) but my local
Sam's Club carried it.

Anyway, you need the cooker, a pot, a frying rack, and
a lifting hook.

To prepare the turkey you inject it with some seasonings.
I sometimes use the one created by King Kooker. I prefer
the Hot and Spicy with Garlic and Butter injectable
marinade. You need a syringe to inject this seasoning.
As you might imagine, King Kooker also makes this. You
pump 1 ounce of the marinade per pound of turkey into
the cleaned and dried turkey. You can also make your
own marinade. I have tried several different mixture
recipes. There are many different commercial mixtures
prepared for this purpose though.

You need enough peanut oil to cover the turkey when
lowered into the pot. To determine how much oil that
would be you can lower your turkey into a pot and
add water until it covers the bird. Remove the turkey
and measure the amount of oil you need. I buy my oil
from Sam's Club for $21 for 5 gallons. It was a lot
more expensive (locally) in the supermarket. The oil is
expensive but can be used to fry many turkeys. I do
several at a time (sharing with friends). Strain the oil and
put it back into the jug once it cooled completely and the
oil can be reused over and over. It keeps well if stored in
a cool place.

The brand of peanut oil that I used was called Lou
Ana. The container also contained a recipe for fried
turkey.

Prepare your turkey by thawing it completely, wash it,
and pat it dry. Examine the turkey and remove any
pin feathers that the plant may have missed. Pump
the marinade into the turkey at 1 ounce per pound
of turkey. Light you cooker and heat the oil to
325 degrees Fahrenheit. You need a deep fryer
thermometer to accurately determine this but many of
my friends just fire up the cooker and let it heat
up. If you overheat the oil it will begin to smoke.
You should also rub some of your marinade on the
outside of the turkey. Allow the marinate to soak
in 3 or 4 hours before cooking.

The turkey lifting hook is a special gadget designed
for lowering your turkey into the oil. Use cooking mitts
and lower it slowly. Splashing the hot oil onto your gas
burner is likely to cause a real mess!

You heat the oil to around 325 degrees, then When you lower
your turkey into the oil, the temperature will drop since the
turkey is cooler. You want to maintain a temperature of 280 - 300
degrees and cook the turkey for 3 1/2 to 4 minutes per pound.
I shoot for 280 degrees and 4 minutes per pound.

When time is up, pull the turkey out using the lifting
hooks and mitts. Put it on a dish with a few paper
towels to drain and cools.

After it cools it ready to slice and eat! Serve with the
same dishes you'd eat any turkey with... just don't expect
as many leftovers.

From Soulfood Recipes Learned On A North Carolina Tobacco Farm
Fried Green Tomatoes

Tomatoes were and still are a very easy plant to grow. All you need is soil with the right
ph balance, a little sun, and regular watering to harvest a great tomato crop just about
anywhere. I have lived in many states from North Carolina, to Florida, to Hawaii, to
Alaska (while flying military transport aircraft). I grew tomatoes in each of these
locations with ease. While tomatoes grow fast, it's hard to wait for them to ripen. Now
you've got a great way to eat mature but not ripened tomatoes. Do let some vine ripen
though. A juicy fully vine-ripened tomato eaten fresh off the vine is a treat in itself.

Ingredients

4 large green tomatoes
2 cups corn meal (white)
1 tablespoon salt
1/2 teaspoon black pepper
1/2 cup Wesson oil

Preparation:

1. Clean tomatoes
2. Slice tomatoes in slices about the thickness of
a cooked hamburger patty
3. Heat oil in frying pan over medium heat.
4. Sprinkle salt and pepper on both sides of tomato slices. I spread them on a
clean plate to do this.
5. Coat each side of tomato slices with cornmeal. I simply sprinkled the
corn meal over the tomatoes on the plate, turned them over, and sprinkled
the other side.
6. Gently shake off the loose meal and then place tomato slices in hot oil.
7. Cook over medium heat until brown on one side, turn over and brown
the other side.
8. Place on a paper towel to drain.
9. Serve hot.

I enjoy them with grits.

From Soulfood Recipes Learned On A North Carolina Tobacco Farm
Please Click Here.
Liver Pudding
When I was growing up two of my favorite foods
were "smoked pork sausage," and liver pudding.
Liver pudding was fried in a skillet and served
with grits. Here is my Liver Pudding recipe.

1 pound pork liver
1 pound boneless pork chops
1/2 tsp salt
1/2 tsp pepper
1/4 tsp red crushed red pepper
A pinch of sage

Clean the liver and trim away the excess
fat, membrane and veins. Cook the liver and
pork chops over medium heat, in separate pots,
until they are thoroughly done and a fork easily
inserts in them. Cook them separate to avoid
overcooking either. Save the stock from the
pork chop.

Cut the liver and pork chop into small cubes
and then run them thorough a meat grinder
together. In a pinch you can use a food processor
but you want to grind the meat, not liquefy it. You
want it finely ground but not creamy.

Stir in your salt, two types of pepper, and sage.
Taste it and see if you want more seasoning.
But many of us need to watch our salt so
don't over do it. Use some of the liquid from
your pork chops to moisten your mixture so that
it sticks together nicely.

Now you have two choices. If you have casings,
you can run the pudding back through your
meat grinder, stuffing it into the casing as you
do. This is how we used to do it, and how also
how the pudding we bought from the local grocery
store was prepared. If you do not have casings
available locally, you can pack it tightly
into a lightly oiled Pyrex (glass) loaf pan.

Cover with plastic wrap and refrigerate for
a day. I know it's tough but you want the
flavors to blend and the texture to set in.
After a day you it should be set enough where
you can put it in a plastic container if you
want. It will keep for several days in the
fridge.

When ready to eat your liver pudding,
I like to slice off a few pieces and fry it
in a lightly oiled skillet until it is medium
browned. By medium browned I mean it has a
slight crust from cooking. Great with grits or
on a sandwich.

From Soulfood Recipes Learned On A North Carolina Tobacco Farm
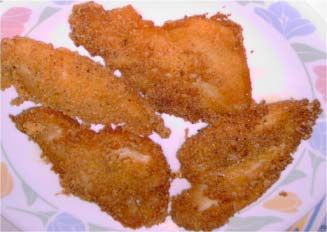
Mouthwatering Fried Catfish

Ingredients:

Enough catfish fillets for 3 or 4 medium
pieces per person.
1 cup Yellow Corn Meal (This should be enough
to coat the catfish fillets)
2 teaspoons Lawry's Seasoned Salt
Crisco or your favorite vegetable cooking oil.
(Enough to cover the catfish).

(I use a deep fryer although a frying pan will
work just as well)

The secret to fried catfish is cooking
it at just the right temperature to
seal in the moisture and flavor. When
you first drop it into the grease you
want to seal it and then cook it.

You can use fresh catfish fillets, or
you can use the farm-raised variety
available in the supermarket freezer section.

Rinse the fillets thoroughly and then
pat dry with a paper towel. If using fresh
catfish, skin the catfish and then wash
thoroughly. Pat dry with a paper towel.

Roll the fresh, catfish fillets in
a mixture of corn meal and Lawry's
Seasoned Salt. If you cannot find
Lawry's Seasoned Salt, then your favorite
seasoned salt will have to do. It's
just that Lawry's Seasoned Salt is a
southern favorite. A quick way to coat
the fish in the corn meal and season
mixture is to place it in a plastic bag
and just shake it.
Drop into deep fryer at 325 degrees.
Fry until it turns golden brown, about
5 minutes. Dump onto paper towel and
allow to drain.

Serve with collard greens, macaroni
and cheese, coleslaw and hush puppies.

Makes me hungry just thinking about it.

From Soulfood Recipes Learned On A North Carolina Tobacco Farm
Beer Battered Halibut

Perhaps my all-time favorite fish is halibut, and beer battered is my favorite way of
cooking it although it's hard to ruin halibut. Fresh halibut should be available in your
supermarket's seafood section when in season. It can get expensive. I get mine from
friends who live in the northwest and overnight mail it to me :-)

Ingredients:
3 pounds halibut
1 1/2 cups all purpose flour
1 teaspoon seasoned salt
1 teaspoon pepper
1 teaspoon paprika
1 12 oz can of been (any kind)
Cooking oil. You can cook it in a frying pan or a deep fryer. That determines how much
cooking oil you use. I use vegetable oil.

Preparation:
1. Cut halibut into chunks about 1 1/2 inches square works nicely.
2. Combine all the dry ingredients in a bowl. Mix to blend.
3. Stir in beer to form a loose batter.
4. Drop the halibut chunks into the batter.
5. Heat your oil to medium high. I put my deep fryer on 375.
6. Fish out battered halibut chunks and drop them into the hot oil. Don't put too many at
a time. When they are a golden brown on all sides take them out and place on a paper
towel to drain.
Goes great with just about anything including collard greens, corn bread, and cole slaw.
Also tastes great just eaten alone.

From Soulfood Recipes Learned On A North Carolina Tobacco Farm
Please Click Here.
Oven Barbecued Pork Baby Back Ribs
Ingredients:

5-6 pounds pork back ribs
1/2 teaspoon accent (monosodium glutamate)
2 T packed brown sugar
1/4 teaspoon liquid smoke
2 C fresh orange juice
1/4 teaspoon minced garlic
2 T fresh lemon juice
1/4 teaspoon black pepper
1 tablespoon cornstarch
 Preparation:
1. Combine all ingredients except ribs in medium saucepan. Stir over medium heat
until mixture thickens.

2. Place sections of ribs in roasting pan. Brush liberally with sauce. Cover
with foil.
3. Bake in 350 degrees oven for 1 hour.
4. Baste and cook for another 1/2 hour. Uncover during final 15 minutes
of cooking to brown ribs slightly.
5. Brush on additional sauce or dip ribs in sauce at serving time.

From Soulfood Recipes Learned On A North Carolina Tobacco Farm
Salmon Croquettes
Canned salmon was one of the cheaper fish that we
could get while growing up in interior North Carolina,
unless you caught your own fish. My grandmother often
bought canned pink salmon or canned mackerel. With
the mackerel she often stirred them into some
fried onion, simmer the mixture, and we ate it over
rice. With the salmon, she formed patties, fried
them and we called them salmon croquettes. Here is the recipe
I use for that:

Ingredients:
1 12 oz can pink salmon
2 Whole eggs
1/4 cup chopped onion
1/4 cup all purpose flour
2 tablespoons yellow corn meal
1/2 teaspoon salt (depending upon the
brand and how much salt is in it you
can leave this out if you want.
1/2 teaspoon ground black pepper

You basically pour all of the ingredients into
a large bowl and mix them. A large spoon or a
potato masher worked fine. I add the flour last
because I sometimes adjust the amount to control the
consistency. Mold the dough-like mix that you
end up with into patties (like thick homemade
hamburgers).

Coat a frying pan with a little cooking oil. Crisco
works just fine. Preheat the oiled pan over medium
heat. Slip the patties into the pan, fitting as
many as you can but leaving room to turn them. Cook
until medium brown on one side, then turn over and
do the same to the other side.

I enjoyed eating these hot fresh out of the pan
along with rice, maybe some corn or butterbeans,
and sweetened iced tea.

After leaving home, the Air Force sent me to Alaska
where I learned to catch my own salmon. There I
discovered that there are many species of salmon (red,
pink, king, silver, chum, etc). Each has a different
taste based mainly upon how firm the meat is and
how much fat is in the meat. I learned to prepare
salmon a lot of other ways but croquettes is still
one of my favorite.

From Soulfood Recipes Learned On A North Carolina Tobacco Farm
Macaroni and Cheese
Ingredients:

5 cups cooked macaroni
(approx 4 cups uncooked)
5 tbsp butter
2 eggs
1/2 tsp salt
1/2 tsp pepper
3 cups milk
2 cups shredded mozzarella cheese
4 cups shredded cheddar cheese

Cook the macaroni until done as usual.
Do not overcook it. Drain macaroni in
strainer.

Place macaroni, butter, salt, pepper,
milk, mozzarella cheese, and 3 cups of
cheddar cheese in casserole dish. Mix
eggs in a bowl first and then stir into
mixture.

Cover everything with aluminum foil and
cook for 45 minutes at 350 degrees.

Uncover and add extra cup of cheddar
cheese across the top. Bake uncovered
for another 15 minutes.

From Soulfood Recipes Learned On A North Carolina Tobacco Farm,
Please Click Here.
Creamy and Healthy Coleslaw
Here is my favorite recipe for coleslaw.

An excellent way to add raw cabbage to your diet
and therefore add more fiber. See this stuff is
good for you!

Ingredients:

2 pound cabbage
2 large carrots
1 medium red pepper
1 medium green pepper
1/3 teaspoon celery seeds
3/4 cups apple cider vinegar
1 teaspoon salt
1/2 cup sugar

Warm the sugar and vinegar until sugar dissolves. Stir gently.

Shred the cabbage and carrots using a grater.

Allow the sugar and vinegar mixture to cool. Then pour
this mixture over the cabbage and carrot mixture.

Chop the peppers into small pieces. I slice them as thinly
as I can. Then, I chop these slices. The peppers are for flavor,
but they are also for color. The same is true for the carrots.

Mix the chopped peppers, the salt, and celery seeds into the
cabbage mixture. Pour the whole thing into a bowl, cover, and
allow to settle. I put mine in the refrigerator overnight to
allow the flavors to blend. This is very important with many
dishes. The longer you allow it to just sit, the more the
flavors mix.

Enjoy.

willie

From Soulfood Recipes Learned On A North Carolina Tobacco Farm
Homemade Potato Salad
Here is my favorite recipe for potato salad. I vary
this recipe from time to time based upon my mood and
encourage you to do the same.

Ingredients:

4 large baking potatoes.
1/4 white or yellow onion (optional)
2 large eggs
1/2 tsp salt
1/3 cup mayonnaise
4 oz sweet relish
paprika

Boil the potatoes until they are done but not overcooked
I use the test here where I stick the fork in and it
meets a little resistance but not too much. How long
you boil them depends upon how big they are. You do want
the potatoes done though since no further cooking is
involve. If you overcook them, they don't really hurt
the recipe since the extra potato just mixes in with
the creamy portion of the mixture.

Boil the eggs over medium high heat until hard boiled.

Allow the potatoes and eggs to cool. You can run cold water
over them in a strainer to speed up the process.

Peel the potatoes and then slice into chunks. If you aim
for 1 inch by 1 inch chuck you will do well.

Peel and slice the egg into 1/2 inch pieces.

Chop the onion into very small pieces. I made this optional
because you WILL be able to smell the onion on your breath.

Stir all ingredients gently except for the paprika.

After all ingredients are well mixed, pour into a bowl.
Add the paprika across the top. Store in the refrigerator
until ready to serve.

From Soulfood Recipes Learned On A North Carolina Tobacco Farm
Grits
Grits are a staple of the southern breakfast.
Keep those hash browns away from me :-)

First of all, grits are nothing more than
coarsely ground dried corn. If you grind it
finely, it is corn meal. Grind it coarsely
and it's grits.

Anyway, there's not too much to cooking
grits. You just pour it in a pot of
boiling water according to the instructions
on the bag or container. You cook it over
medium to low heat stirring as it cooks. If
you don't stir it occasionally it lumps up
and may even stick.

There are a lot of things you can do to enhance
the flavor.

- My grandmother used to stir in raw eggs
as her grits cooked. It gave it a unique
flavor.

- We also used to add fatback to our grits.
Fatback is salted pork with the skin attached.
It is mostly fat so when you fry it your get
a lot of salty grease and a crispy piece of
skin. We used to sprinkle cooked fatback
over our grits to add a little flavor. We
also used to pour a little of the grease onto
the grits to add a little flavor.

- Others just add a pat of butter and sprinkle
a little salt and pepper on their grits.

There is no wrong way to fix grits. It's just
a filler to go along with your bacon and eggs.
Grits sort of takes on the flavor of whatever
you eat it with. If you eat it by itself, it
just tastes a little "gritty."
Tuna Grits
Follow instructions on package for cooking grits.
While grits are cooking open a can of tuna (packed in oil)
and lightly brown in a frying pan. Sprinkle salt and pepper
to taste over tuna while it is browning.

As grits are almost done, stir browned tuna into grits.

Serve hot!

                                  Fried Grits and Egg
Ingredients:

Cold Grits
Butter or Margarine
Egg
Salt
Pepper

You'll invariable have left over grits. Save the left over grits
to fry for a delectable treat.

Allow the left over grits to cool and then place in the
refrigerator. When ready to eat fried grits, take pot out of
refrigerator and turn cold grits out onto cutting board.

Place eggs in a small bowl along with salt and pepper.
Lightly beat eggs.

Place several pats of butter/margarine in frying pan and
melt over medium heat.

Slice grits into 1/4 thick slices.
Dredge grits through egg mixture and place into frying pan.
Allow egg to brown, turn and brown other side.
Remove fried grits to serving platter, add more margarine
and fry remained of egg.

Enjoy breakfast.
Grits With Egg
Ingredients:
Raw grits
2-3 eggs
Shredded cheese (optional)
Salt and black pepper to taste
Preparation:
1. Break eggs into bowl, add salt and pepper, and lightly beat.
2. Cook grits according to package instructions or my instructions
for basic grits.
3. While grits are cooking stir in the eggs. They will blend right
in with the grits and give it a very nice flavor.
4. If you like cheese, stir cheese in after stirring in eggs.
Grits With Fish
Raw grits
Dash of salt
Dash of black pepper
Any type of leftover fried fish (bones removed).
Preparation:
1. Cook grits according to package instructions or my instructions
for basic grits.
2. Warm boneless fish separately. Microwave is ok.
3. Place serving of cooked grits on plate.
4. Add serving of warmed fish in the middle of grits.
Enjoy. The fish and grits flavors blend nicely.
From Soulfood Recipes Learned On A North Carolina Tobacco FarmGrandma's (Handmade) Homemade Buttermilk Biscuits I used to really enjoy hot fresh homemade buttermilk biscuits. Split one open and spread some fresh butter (actually, we always used margarine), or slip in a fresh sausage patty. There's nothing better! After I learned to make them I also enjoyed just getting my hand dirty as I kneaded the dough. Kids have fun in the strangest way. Anyway, here is how my grandma used to make them. I don't think the store-bought, canned biscuits will ever even begin to compare. Ingredients: 3 cups all purpose flour 3 teaspoons baking powder 3/4 cups buttermilk 1 teaspoon salt 3/4 teaspoon baking soda 3/4 cup Crisco shortening Sift the flour to make sure there are no lumps. Add in the baking powder, salt, and baking soda. Add the Crisco slowly, working it into the dry ingredients. You can use a large spatula or spoon, but I preferred using my hands. Next add the buttermilk, working it into the mixture too. After everything is thoroughly mixed, plop it down on a floured counter top or cutting board. Turn you oven to 450 to allow it to preheat. While it's heating up knead your dough until it is about the consistency of clay that kids play with in grade school. You can make it a little dryer if need be by sprinkling more flour on your counter or cutting board. As you knead your dough it will pick up more of the flour. After you have it the right consistency you can shape your biscuits by hand or using a cookie cutter. I preferred pinching off a chunk, rolling it into a ball, and then patting it a little flat. It takes a little practice to get you biscuits all about the same size. If you want them more perfect,
you can roll out your dough using a rolling pin and
then cut them with a round cookie cutter. That
would look neater when you have company over.

Anyway, place you biscuits on a cookie sheet that
is either lightly greased or lightly sprinkled with
flour. If you use the flour option, be sure not to
put too much.

Bake these biscuits for roughly 18 minutes on the
middle rack in your oven (depends upon how hot
your oven is and how far this rack is from the
top). If the rack is too low you can move the
biscuits to the top rack the last minute of so
to get them browned just the way you want. Leave
them on the middle rack and they should turn out
lightly browned.

Pop them out of the over and eat them while still
piping hot. That's the only way to get the butter
to melt just right.

Enjoy!

From Soulfood Recipes Learned On A North Carolina Tobacco Farm
Piping Hot Hush Puppies

                   These have cheese and bacon pieces added in too.

We ate a lot of corn meal based foods when I was
growing up because corn meal was cheap. In fact,
we could even take grain to the local mill and
have it ground into flour, meal, livestock feed,
etc. Cornbread or biscuits were almost always
served at any meal I attended at many houses in
the neighborhood. They were usually pretty good
too, although I preferred the lighter tasting
hush puppies. Eaten fresh out of the fryer, they
practically melted in your mouth. Here is my
recipe:

Ingredients:
2 cups yellow corn meal
1 cup plain flour (flour is what gave it the
lighter taste and you can experiment with the
amount you use if you want)
2 eggs
1 cup buttermilk (you can also use plain milk in
a pinch, but nothing compares to buttermilk)
3/4 teaspoon seasoned salt. I use Lawry’s but just
about any brand will work as you are just looking
for something to spice things up a little
1/2 teaspoon ground pepper blend (again, the idea
is to spice things up a little).
1 teaspoon baking powder
2/3 teaspoon baking soda
1/8 cup bacon grease. This is another big key to the flavor. In a pinch you can use other types of cooking oil, but bacon is my favorite. You also need some type of cooking oil to deep fry these in. I usually use Crisco oil although peanut oil and some of the lower fat oils work well too. Mix all of the dry ingredients in a bowl. Add your eggs, oil, and buttermilk. Stir it all up until the flavors are thoroughly blended. Turn your cooker on medium-high heat. When it's hot you can drop your hush puppies in using a tablespoon. Allow them to brown on all sides. They should begin floating when done, but if they don't, don't overcook them. Serve as a side dish with just about any meal. I loved eating them with fried catfish or fresh chopped or pulled pork barbecue. Most of the local restaurants added them as a standard feature when you bought plate meals. After getting to Alaska, I visited a restaurant that also added yellow corn to their hush puppies and a touch of sugar. If you want to give this a try, precook the corn, but don't overcook it. Use 3/4 cups in the recipe above. On top of that add 2 tablespoons of white sugar. The recipe at the restaurant in Alaska was so popular that customers often ordered side orders to take home. I always though that it tasted pretty good. You can also store this mixture in the refrigerator for a day or so if you are only cooking for a smaller group. Before cooking let it reach near room temperature. From Soulfood Recipes Learned On A North Carolina Tobacco Farm, Please Click Here.
Delicious Sweet Potato Pie
Sweet potatoes were another staple I
grew up with. They were fairly inexpensive
and were great baked or put in a pie. Baked
potatoes were just eaten with a little butter.

Ingredients:

4 large potatoes
2 cups sugar
1 stick butter
1 pinch cinnamon
1 pinch nutmeg
1 store-bought pie 9" deep dish pie crust
or your can just line a pan with vanilla wafers
instead
1/2 cup milk
2 eggs (slightly beaten)

Boil the potatoes until tender. When you stick a
fork in them it should go in easy but you don't
want them to fall apart.

Let the potatoes cool and then peel them.

Put the potatoes in a large mixing bowl and
mash them thoroughly with a potato masher.
Melt the butter and pour it and the other
ingredients in the bowl of potatoes. Stir
until well mixed.

Whether you used a ready-made pie crust or
just cookies, pour the potatoes mixture
into the crust.

Put into an oven preheated to 375 degrees.
Cook for about 35-40 minutes or until a toothpick
inserted in the center comes out dry.

If you want you can make a meringue topping by
blending confectionary sugar with egg whites.
After the pie is almost done, spread the
meringue thinly across the top. Continue baking
until the meringue turns light brown. If you
are going to use a meringue topping, you can add the extra
egg yokes to the pie or save them for breakfast.

Enjoy.

From Soulfood Recipes Learned On A North Carolina Tobacco Farm,
Please Click Here.
Awesome Pound Cake
My Aunt Ruth used to make the best pound cake
in the whole world. It was so rich and creamy.
She explained to me that it was called a pound
cake because it used a pound of butter and a
pound of sugar. This was what made it so rich.
Here's my recipe - hers was very similar.

Ingredients:

3 cups cake flour
6 large eggs
1 pound butter
1 pound sugar (2 1/4 cups)
2 teaspoons of pure vanilla extract
1/2 teaspoon salt
1/2 cup buttermilk

Sift the flour into a large mixing bowl. Stir in
the sugar. I use a large spoon for this. Next I add
the butter. My grandmother would melt the butter
in a pan over slow heat to make it blend easier.
You can do this or just let the butter soften at
room temperature. Add the eggs, whole. At this
point I break out my mixer and begin mixing on
slow. I slowly add my buttermilk, and then the
vanilla extract. After it is thoroughly stirred,
I turn the mixer up to medium for a few minutes,
and then finally on high. If the mixture is a little
thick I add just a touch more buttermilk. If you don't
mix things thoroughly you will have lumps that will
form air bubbles in your mixture and leave holes
in your finished cake. It was always a matter of pride
not to have these air pocket holes in our cakes so we
always made sure we got all of the lumps. In the
pre-electric-mixer day that involved a lot of whipping
the cake by hand. We usually didn't have a hand cranked
mixer that worked well, so this involved a large mixing
spoon to whip it. Some old timers even counted the number
of times they whipped the mixture - sort of made it
fun and you didn't notice your arm tiring.

Preheat the over to 325 degrees.

Take your standard tube cake pan and oil it with
butter. Then lightly flour the oiled pan. Shake
the excess flour from the pan.

Pour the mix in, bake the cake for about 1 hour
and twenty minutes. Keep looking at how your cake
is doing through the oven door but avoid opening
the door too much while it is cooking as I have
seen this, or jarring a cake, cause it to collapse.
When you think it is done, do the toothpick test.
Stick a wooden toothpick into one of the thickest
parts of the cake. If it's dry when you pull it our,
the cake is done.

Allow the cake to cool 15 or 20 minutes in the pan.
Then gently remove it, and stick it on your favorite
decorative cake plate.

From Soulfood Recipes Learned On A North Carolina Tobacco Farm
Vanilla Wafer Cake
               Here's a cake that's incredibly easy, and unbelievably delicious!

Ingredients:

1 cup margarine
2 cups sugar
6 eggs
1 box vanilla wafers (12 oz. box)
1/3 cup milk
1 cup chopped pecans
1 cup coconut

Preparation:

Heat milk until warm, pour over wafers.
Cream margarine and sugar. Add eggs one at a time. Add wafers & milk to the mixture.
Fold in nuts and coconut. Pour into bundt ban

Heat oven 300 degrees
Bake 1 1/2 hours, or until done.

From Soulfood Recipes Learned On A North Carolina Tobacco Farm,
Please Click Here.
If you enjoyed this cookbook we hope that you will pass copies on to others who would enjoy sharing the recipes and the traditions. You can simply email copies to your friends along with a little note. They will thank you and we thank you too :-) Here are some of the nice things folks have had to say about the book and our recipes: "Thank you Willie for the wonderful cookbook, you have done a fabulous job on it and thank you for signing it. I have been in New York for a while now at the culinary institute in Hyde Park. So I haven't been active on your recipe exchange. I am looking forward to using some of these recipes at the restaurant also... Warmest regards, Stephen Block " Author: Recipes from a German Grandma http://www.kitchenproject.com/german "Willie, I fixed your pulled pork barbecue yesterday! It tastes just like the stuff I remember when I traveled through Virginia and North Carolina years ago. Thanks for bringing back great memories :0) T. Mack - Antioc, CA" Hi Willie,
Just letting you know that I received your cookbook
in the mail today. WELL WORTH THE WAIT!!!! I will
definitely be passing the word out about it, as I've
already have been doing. A close friend of mine, in
Delray Beach, FL has also ordered a cookbook from you.
Can't wait to jump into the recipes!

"Hi Willie;
Just wanted to write and let you know we are enjoying the cookbook
very much. We tried the macaroni and cheese last night and boy was it
good. So far my wife's favorite has been the fried green tomatoes.

I can't wait to try the baby back ribs...grin.

Thanks again for some great eating!

Gary Knuckles"
Creator, Internet Information Manager Software

http://wetrack.it/budgetware/af.cgi?2

Take care,
Ray Testa
Mesquite, Texas
http://www.pagesintime.com/

Willie,
Your recipes have been a big help. This year I am looking forward to opening a soul
food restaurant here in Shreveport, LA. For some time I have done a lot of research on
what would sell and what wouldn't. So.... I would try your recipes when we would sell
plate lunches.

Not once have any of my customers not returned for more. Repeat customers have
proven that your recipes are one of a kind.
Thanks,
Deondre'

Willie,

Shirley and I fixed your coconut pie for dinner. It was DELICIOUS. This will become a
regular around our house. So much for the diet!

Bob,
Sharlimar, Florida"

Dear Willie:

I just received your cookbook. It arrived at my
office AS I WAS TALKING to a friend about cooking!
I opened the package immediately; and the result was
that my friend will be ordering a couple of these
for her son and herself.

For me............. my comment to you is "FABULOUS"!
Reading through the book is very much like revisiting
my grandmother's kitchen! She has been gone now for
44 years; but she's alive again....... TODAY
............ thanks to your cookbook.

Thank you! Thank you, again!
Sincerely,
Viv Norton

"Willie,
I was really surprised to see you published your pork barbecue recipe right in your
cookbook. So many people won't share their with anybody. I cooked half a pig
overnight, following your instructions exactly. It turned out perfect! I can see myself
making a little extra money selling bbq meals from my house.

Thanks again man.
Byron - Bend, Oregon"

THANK YOU, THANK YOU, THANK YOU!
My Mother was not the greatest cook. Dinner usually came from a box or can...
I wanted to learn how to cook authentic soul food for my family and happened
across your website while doing a little web "research."
The information and recipes I've obtained from your website and e-mail
service have GREATLY improved the taste and presentation of my families meals.
Now, my family can't wait to see what I'm going to cook next!
Thanks to you and your subscribers for helping me to become a much better
cook.
J Pierce

Hi, Willie:

It's here and what a beautiful book!! I am so excited
and I thank you sooo much (this is MY Christmas gift to
me, smile). Much love, happiness and success to you
and your family.

Elvee O'kelley

"Willie,

I tried your greens (collards) last night and
they're exquisite!

Tracy Stivers"

"Mr. Crawford,

I fixed your pinto beans and ham hocks for my family
last night. My family loved them. The kids even
had some of the leftovers for breakfast. Keep
up the great work.

Vivian W."

"Willie,

Your baby back ribs were the hit of our family
reunion. YOU DA MAN!

Bobby Jones - Mullins, S.C."
"Willie,
I have recently visited with my Grandmother
who is 88 yrs. old, and we plan to use many of the recipes from this site for
Thanksgiving, and Christmas. Thank you so much

                      Glenda Washington

PS We are 5 generations so my mother, grandmother, my daughters, and my
granddaughter, will really be cooking good old down home Soul Food during the
Holidays."

 I was unable to give my friend Lucille her cookbook that I received from
you until yesterday, She was thrilled. She is a good cook and worked for
the Detention Center for years before retiring. (She is a black lady and I
am white) She could not put the book down. It recalled fond memories of
 her mothers cooking. She is going to give me a recipe for catfish that
her mother made and I will send it to you for your book. She is a beautiful
person whom I love very much and is my very best friend.
 Thank you for your site Shirley Spearin

Hello again,

I 'borrowed' your recipe for Sweet Potato Pie and made it for Christmas
dinner for our family. It was a big hit, and we will make it a regular
around here.

Thanks for sharing,
Cyndie Townsend

Willie
I loved your pound cake recipe!! I am from Canada and I was wondering if I add
cream cheese would I omit the buttermilk?

Thank you for you help
Liz
You can also read