Tailored Trim | Stair Treads - Installation - NET
←
→
Page content transcription
If your browser does not render page correctly, please read the page content below
Tailored Trim | Stair Treads
Installation
For Use With Stair Treads Only

160 South Industrial Blvd.
Calhoun, GA. 30701
AladdinCommercial.com

Technical Services Department
508 East Morris St.
Dalton, GA 30721
800.833.6954
product_tech@mohawkind.com

                                 © 2021 AladdinCommercial.com | 888.387.9881   2160_2020_May/2021   Page 1 / 7
This document has been created to provide installation instructions for Aladdin Commercial Stair Treads that requires
a specific adhesive and installation techniques. Please read the entire document prior to initiating installation and
follow exact instructions. Failure to follow the published installation steps will void all product warranties.
All instructions and recommendations are based on the most recent information available and should be followed
for an ideal installation. For questions about product installation contact Aladdin Commercial Technical Services
at product_tech@mohawkind.com or 800-833-6954 Monday-Friday, 8am – 5pm EST; or visit our website at
AladdinCommercial.com to ensure you have the most up to date version of our installation instructions.
MATERIAL RECEIVING AND HANDLING
Upon receipt of material, immediately remove any pallet wrapping materials and verify that the correct product and
color was received and that the carton is free from damage. Be careful not to drop any cartons as this may damage
the flooring. No labor claims will be honored on materials installed with visible defects. Any discrepancies should be
reported immediately to the Aladdin Commercial Technical Services before beginning installation.
Store boxes of treads flat and squarely on top of one another no more than 3 boxes high. Select a storage location
that is in the center of the installation area and away from vents, direct sunlight, etc. Check the carton label to verify
that all materials are from the same run/lot number.
TOOLS
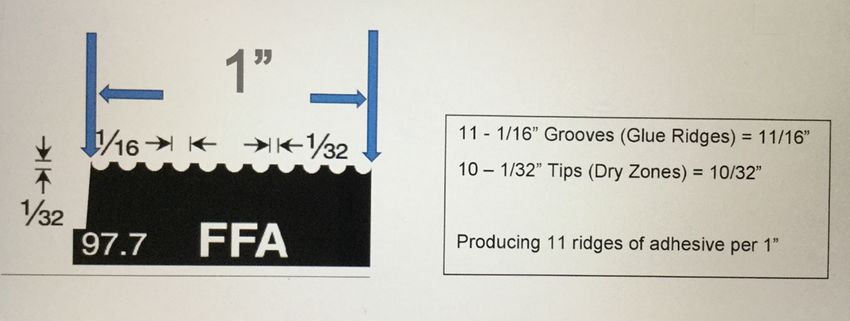
• Trowel: 1/16” (width) x 1/32” (depth) x 1/32”
(spacing) U-Notch with an approximate
spread rate of 220-260 sq. ft. /gallon.
• J-type Hand Roller
• In Situ RH Moisture Probes • Compass
• pH Testing Kit • Framing Square
• Infrared Thermometer • Utility Knife
• Pencil • Tape Measure
REQUIRED ADHESIVES
Mohawk M99 Adhesive – Primary adhesive (Stair Treads/Landing Tiles)
Mohawk M99 is a solvent free, water-based acrylic adhesive suggested for use in occupied buildings, as it is low
in odor, and contains “zero” (calculated) VOC’s. M99 is designed with extended open time which allows product to
be installed up to 4 hours after drying. Product should be allowed to dry to touch to prevent slippage. Non-porous
substrates require adhesive to be dry to touch with little or no transfer to the finger. Do not install flooring into wet
adhesive on a non-porous substrate.
For technical data on adhesive, visit http://www.mohawkgroup.com/sitefiles/resources/Adhesive_TDS_M99.pdf
Mohawk M95.0 - Alternate Landing Tile Adhesive
M95.0 must be used with landing tiles in Stairwell areas that are not climate controlled and exposed to direct
sunlight.
© 2021 AladdinCommercial.com | 888.387.9881 2160_2020_May/2021 Page 2 / 7Premium high strength wet set adhesive used over porous substrates. Mohawk M95.0 is a solvent free, water-based
acrylic adhesive suggested for use in occupied buildings, as it is low in odor, and contains “zero” (calculated) VOC’s.
Adhesive must be allowed to flash off but only spread what can be installed in 15-20 mins.
Mohawk AD-888 Adhesive
Mohawk’s AD-888 adhesive is a two-part solvent-free epoxy caulking compound. It prevents cracking and flexing of
rubber treads by bonding uniformly to the under-step. It is excellent for the complete restoration of existing concrete,
wooden or metal steps and can be used for repairing cracks, holes, depressions and worn or broken edges.
Directions:
1. Cut a 3/8” inside diameter opening in the mixing nozzle
2. Remove cap and attach the mixing nozzle to the cartridge using the retaining nut
3. Depress the trigger on the gun until the compound reaches the end of the nozzle
4. Discard the first 6” of compound. Do not remove internal mixer in nozzle
5. Squeeze a sufficient amount inside the nosing of the tread so that when it is pressed firmly in place, the
compound molds it to the shape of the step edge. Warning: Care must be taken not to displace the compound
– the epoxy is intended to fill the void and molding to the stair edge may create a void in the epoxy, which will
greatly reduce its effectiveness
6. After installing the tread, thoroughly roll it with a hand roller, especially in the nosing area being careful not to
apply too much pressure which could result in displacement of the epoxy. All of the tread nosing must touch
the step edge to provide adequate support.
7. Coverage is approx. 30 LF per unit using a 3/8” diameter bead
8. To save a partial cartridge or compound for future use, leave the mixing nozzle on the cartridge during storage.
To use, simply replace the old nozzle with a new one
9. AD-888 curing time is 2 hours
JOB SITE CONDITIONS
Flooring material and adhesive must be acclimated to the installation area for a minimum of 48 hours prior to
installation. If the area is not within the industry-recommended temperature and relative humidity requirements, the
product should NOT be installed until those requirements have been met.
• It is recommended that stair treads installation shall not begin until all other trades are completed.
• Areas to receive flooring shall be clean, fully enclosed, with the permanent HVAC set at a uniform temperature
range of 65° F to 85° F and maintained following the installation.
• Humidity should be below 65%.
• Areas to receive flooring should be adequately lighted during all phases of the installation process.
APPROVED SUBSTRATES AND TESTING REQUIREMENTS
All substrates to receive moisture sensitive floor covering must be tested for moisture.
Do not install flooring if moisture test results exceed recommended limits. Stop the job and advise customer that
installation cannot be initiated without the proper treatment for moisture conditions.
© 2021 AladdinCommercial.com | 888.387.9881 2160_2020_May/2021 Page 3 / 7All substrates to receive resilient flooring shall be dry, clean, smooth, and structurally sound. They shall be free of
dust, solvent, paint, wax, oil, grease, residual adhesive, adhesive removers, curing, sealing, hardening, or parting
compounds, alkaline salts, excessive carbonation or laitance, mold, mildew, and other foreign materials that might
prevent adhesive bond.
Never use liquid adhesive remover or solvent cleaners for removing old adhesive residue or other substances on the
substrate; their use could cause failure.
ASBESTOS WARNING
DO NOT MECHANICALLY CHIP OR PULVERIZE EXISTING RESILIENT FLOORING, BACKING, LINING FELT, ASPHALTIC
“CUTBACK” ADHESIVES OR OTHER ADHESIVES. Previously installed resilient floor covering products and the
asphaltic or cutback adhesives used to install them may contain either asbestos fibers and/or crystalline silica.
Avoid creating dust. Inhalation of asbestos or crystalline dust is a cancer and respiratory tract hazard. Smoking by
individuals exposed to asbestos fibers greatly increases the risk of serious bodily harm.
Unless positively certain that the previously installed product is a non-asbestos containing material, you must
presume it contains asbestos. Regulations may require that the material be tested to determine asbestos content and
may govern the removal and disposal of material. See current edition of the Resilient Floor Covering Institute (RFCI)
publication “Recommended Work Practices for Removal of Resilient Floor Coverings” for detailed information and
instructions on removing all resilient covering structures.
Old Adhesive Residue
If the adhesive residue is asphalt-based (cut-back) or any other type of adhesive is present, it must be mechanically
removed completely.
Note: Never use solvents or citrus adhesive removers to remove old adhesive residue. Solvent residue left in and on
the subfloor, will affect the bond between the new adhesive and the new floor covering.
Moisture Testing
Tests must be performed per the latest edition of ASTM F 2170 - IRH (Internal Relative Humidity Test). Three tests
should be conducted for areas up to 1000 SF; and one additional test is required for each additional 1000 SF. Results
must be below 99% RH.
• pH reading must not exceed 12.
• Damp mop the surface with clear water to lower alkalinity.
Note: It may not be the floor covering installer’s responsibility to conduct the tests. It is, however, the floor covering
installer’s responsibility to make sure these tests have been conducted and that the results are acceptable prior to
installing the floor covering. When moisture tests are conducted, it indicates the conditions only at the time of the
test.
Use of cement-based patching and/or self-leveling compounds which contain Portland or high alumina cement and
meet or exceed the compressive strength of 3000 psi are acceptable.
Subfloor Preparation
Concrete Steps:
• Concrete must be clean, dry, full cured and free of alkali or acids, curing compounds, paint, urethane, oil or
solvents. Newly poured concrete steps must be cured for at least 6 weeks prior to tread installation.
© 2021 AladdinCommercial.com | 888.387.9881 2160_2020_May/2021 Page 4 / 7• Fill cracks and level low or rough areas with a cement-based patching and/or self-leveling compounds which
contain Portland or high alumina cement and meet or exceed the compressive strength of 3000 psi are
acceptable. Mohawk AD-888 Nosing Caulking can be used for repairing worn or cracked steps.
Wooden Steps:
• Wooden steps must be properly nailed, clean and free of polish and wax. Replace or repair old or worn steps.
• Fill all surface cracks and holes with Portland or high alumina cement.
Terrazzo, ceramic, natural/agglomerated marble or granite-type steps:
• These types of steps have a glazed and polished finish.
• Most often they are treated with sealers and wax as well, which can build up. Remove glaze, polished finish,
sealers and wax by sanding or bead blasting.
• Ensure the surface is free of dirt, dust, debris or any other substance that may prevent bonding. Use a primer
and then apply a Portland or high alumina cement self-leveling compound with at least a 1/8” thickness.
• Allow to cure for 24 hours before installing product
Metal steps:
• The surface must be level, clean, dry and free of any coatings or foreign materials.
• Sand the metal (aluminum, steel, brass, copper and bronze) to ensure a good adhesive bond.
• The surface must be level, clean, dry and free of any coatings or foreign materials.
• Sand the metal (aluminum, steel, brass, copper and bronze) to ensure a good adhesive bond.
Do not use chemical adhesive removers as these will void Aladdin Commercial warranty. Do not use an oil-based
sweeping compound to clean the surface because this will interfere with the bond. For detailed instructions please
refer to the Floor Preparation document found on our website at www.mohawkgroup.com
PRODUCT INSTALLATION & PROTECTION
General Instructions
• Must use Mohawk M99 Adhesive and AD-888 nose caulking and follow the directions on the adhesive label.
• Ensure that moisture tests have been conducted and that the results do not exceed 85%.
• The permanent HVAC system is operational and set to a minimum of 65° F for a minimum of 72 hours prior to,
during and after installation. After the installation, the maximum temperature should not exceed 85° F.
• Adhesive working and open times vary based on job conditions, substrate, temperature, and humidity.
• Ensure that all recommendations for subfloor and jobsite conditions are met prior to beginning the installation.
• Once the installation is started, site conditions are accepted.
• M95.0 is for landing tiles that are exposed to direct sunlight or stairwells that are non-climatized.
Regular Stair Tread Installation
Step 1: Dry fit all treads. First scribe treads to fit steps in both the depth and from side to side. Second, slightly
bevel the rear edge for a better fit. Continue until all treads are cut.
© 2021 AladdinCommercial.com | 888.387.9881 2160_2020_May/2021 Page 5 / 7Step 2: Carefully clean step substrate and the back of the tread for any dust particles and then apply M99
adhesive with a 1/16”x1/32”x1/32” U-notched trowel. It is required that all treads have a minimum bead of 3/8”
of AD-888 nose caulking applied along the inside of the tread nosing angle section. The entire gap must be filled.
Note: We recommend abrading the back of the tread if the treads are being applied to a non-porous surface,
such as metal steps.
Step 3: Press treads firmly into place. Press nosing into stair so the epoxy caulking molds to the shape of
the tread nose and stair. Use a hand roller to roll entire tread and nose being careful not to displace the nose
caulking.
One-piece Tread and Riser Installation
Step 1: Dry fit all treads. First scribe treads to fit steps. Second, place riser into position to fit tread nose on
above step: do not overlap the top portion of the riser with the tread nose.
Step 2: Carefully clean step substrate and the back of the tread for any dust particles and then apply M99
adhesive with a 1/16”x1/32”x1/32” U-notched trowel. It is required that all treads have a minimum bead of 3/8” of
AD-888 nose caulking applied along the inside of the tread nosing angle section. The entire gap must be filled. A
minimum bead of 3/8” AD-888 nose caulking should also be used where the tread and riser intersect.
Step 3: Press tread and riser firmly into place. Press nosing into stair so the epoxy caulking molds to the shape of
the tread nose and stair. Use a hand roller to roll entire tread, riser and nose being careful not to displace the nose
caulking.
Stringer Installation- Vertical wall section next to the stair tread
Step 1: Make a template in cardboard or an appropriate material.
Step 2: Measure the height and depth of each step and transfer the measurements to the template.
Step 3: Rough cut the template and fit the template to the stairs and trim the template where necessary to obtain
a snug fit to the staircase.
Step 4: Cut stringer material utilizing template. Dry-fit stringer material to staircase and make any necessary
adjustments before permanent installation. Make a pencil mark on the top of the string to use as a glue line for
next step.
Step 5: Apply M99 with a 1/16”x1/32”x1/32” trowel or M45 cartridge to the wall surface and follow instructions
for set up times of adhesive.
Step 6: Position and install the stringer followed by hand rolling to ensure that the adhesive transferred.
Step 7: Clean up any excessive adhesive before the stair treads are installed.
Riser Only Installation
Step1: Dry fit the riser and scribe the sides and top of the riser.
Step 2: Position riser and make any necessary adjustments.
Step 3: Apply M99 with a 1/16”x1/32”x1/32” trowel to staircase riser and follow instructions for set up times of
adhesive.
Step 4: Position and install the stringer followed by hand rolling to ensure that the adhesive transferred.
Step 5: Clean up any excessive adhesive before the stair treads are installed
© 2021 AladdinCommercial.com | 888.387.9881 2160_2020_May/2021 Page 6 / 7Landing Tiles
M95.0 must be used with landing tiles in Stairwell areas that are not climate controlled and exposed to direct
sunlight.
Follow product directions for open time and working time.
Step 1: Apply M99 with a 1/16”x1/32”x1/32” trowel and follow instructions for set up times of adhesive.
Step 2: Start at the nosing installing full tiles from the step to the back of the landing.
Step 3: Fill any remaining areas by cutting tiles snuggly in place.
Step 4: Roll all landing tiles with hand roller
AFTER INSTALLATION
• Immediately remove any excess adhesive from the surface of the flooring using a clean white cloth dampened
with water. You may also use rubbing alcohol or denatured alcohol to remove tacky or dried adhesive. Dried
adhesive may be removed with a clean white cloth dampened with mineral spirits.
• No traffic for 24 hours. Light traffic/foot traffic for 24 to 72 hours. Moderate to heavy traffic after 72 hours.
Additional time may be necessary if the installation is over a non-porous substrate.
Aladdin Commercial Stair Treads are recommended for a variety of commercial applications, including educational,
institutional, healthcare, retail, office and hospitality environments and may be installed over most properly prepared
substrates, making it suitable for installation on all grade levels where moisture conditions allow. Aladdin Commercial
continuously makes technological advancements that improve product performance or installation techniques and
methods.
© 2021 AladdinCommercial.com | 888.387.9881 2160_2020_May/2021 Page 7 / 7You can also read