15 Fun Science Experiments using everyday household items!
←
→
Page content transcription
If your browser does not render page correctly, please read the page content below
15 Fun Science Experiments using
          everyday household items!

*Please note: All science experiments included require adult supervision at all
times. Please follow the directions carefully and use extreme caution when allowing
your child to participate. Keep the materials used for the experiments out of the
reach of children.

                                                      ©www.icanteachmychild.com
Marshmallow Slingshots


Ages 4+ with Adult Supervision at all times

Materials You Need:
  • Large Marshmallows
  • Plastic Ring from Prescription Bottle or
     the bottom ring on a milk bottle
  • Several Rubber Bands
  • Chair

Directions:

       1. Place the plastic ring in the center and then make a chain of rubber
          bands on both sides. To make the chain, overlap two rubber bands
          (or the ring and the rubber band) to look like a Venn diagram and
          then pull the bottom rubber band through the top one and over itself.
          Continue the process until you have a chain equal to the length of the
          distance between two legs of your chair.
       2. Turn your chair upside down and secure the chain in between the
          two legs of the chair.
       3. Put your marshmallow on the ring. Hold the marshmallow as you
          pull back. Release and watch the mallow go flying!

The Science Behind It:

Every action has an equal and opposite reaction. When you use force to
pull back on the marshmallow, it flies forward once you release it. This is
also a great activity for transformation of energy.

*For step-by-step directions with pictures:
http://www.icanteachmychild.com/2012/05/marshmallow-slingshots/

Adapted from: http://kitchenpantryscientist.com/?p=1774

                                                    © www.icanteachmychild.com
Elephant Toothpaste


Ages 6+ with Adult Supervision at all times

Materials You Need:
  • Large pan
  • 1 16 oz. empty soda bottle
  • 2 tablespoons warm water
  • 1 teaspoon yeast
  • Funnel
  • ½ cup hydrogen peroxide
  • 4-5 drops of food coloring
  • squirt of dish soap

Directions:

   1. Place your empty 2-liter bottle in the center of your pan.
   2. In a separate bowl, mix 2 tablespoons warm water with 1 teaspoon of
      yeast. Gently stir together and let sit for a few minutes.
   3. Use your funnel to place ½ cup of hydrogen peroxide, 4-5 drops of
      food coloring, and a squirt of dish soap in the 16-ounce soda/water
      bottle.
   4. Pour the yeast mixture into the bottle using your funnel and watch
      what happens!

The Science Behind It

Hydrogen peroxide naturally breaks down into water and oxygen. The
yeast (which is a catalase, an enzyme in all living things) speeds up this
process. The dish soap creates bubbles, which overflow out of the bottle!

*For step-by-step directions with pictures:
http://www.icanteachmychild.com/2012/05/elephant-toothpaste/

Adapted from:
http://preschoolpowolpackets.blogspot.com/2012/01/science-experiment-
elephant-toothpaste.html


                                                 © www.icanteachmychild.com
                       Fizzy Balloons


Ages 5+ with Adult Supervision at all times

Materials You Need:
  • Empty water bottle or 16 oz. Soda Bottle
  • Funnel
  • Balloon
  • ½ cup white vinegar
  • 1 tablespoon baking soda

Directions
   1. Use a funnel to pour ½ cup white vinegar
      into your bottle.
   2. Rinse the funnel and dry it off.
   3. Hold the mouth of the balloon open and use the funnel to carefully
      place 1 tablespoon of baking soda into the balloon. Shake the balloon
      gently so the baking soda falls into the balloon.
   4. Stretch the open end of the balloon over the neck of the bottle and
      make sure it is secured tightly. Let the rest of the balloon hang over
      the side (while you hold the bottle upright) so that no baking soda
      falls into the bottle just yet.
   5. Hold onto the neck of the bottle (where the end of the balloon is) and
      carefully lift the heavier end of the balloon until you are holding it
      completely upright. All of the baking soda should fall into the bottle.
      Watch what happens to the balloon!

The Science Behind It:
When the baking soda and vinegar mix, it creates a chemical reaction. We
know this because we see bubbles. This chemical reaction gives off a gas
which inflates the balloon.

*For step-by-step instructions with pictures:
http://www.icanteachmychild.com/2012/05/fizzy-balloons/

Adapted from: http://kitchenpantryscientist.com/?p=129


                                                © www.icanteachmychild.com
Fireworks in a Jar


Ages 3+ with Adult Supervision at all times

Materials You Need:
  • Clear Jar (glass or plastic)
  • Oil
  • Water
  • Several drops of food coloring
  • Plastic Fork

Directions:

       1. Fill your jar ¾ full with warm water.
       2. In a separate bowl, mix a few tablespoons of oil and several drops of
          different colors of food coloring.
       3. Use your fork to gently mix the oil and food coloring together.
       4. Gently pour the oil mixture into the jar.
       5. Watch what happens—the food coloring will slowly sink out of the oil
          and into the water. When this happens, it will expand and begin to
          mix with the other colors.

The Science Behind It:

Food coloring dissolves in water but not in oil. Because the oil is less dense
than the water, it will float at the top. The colored droplets will begin to
sink because of their density.

*For step-by-step instructions with pictures:
http://www.icanteachmychild.com/2012/05/fireworks-in-a-jar/

Adapted from: http://action-pack.com/2012/02/action-pack-issue-9-mad-
scientist-issue/


                                                  © www.icanteachmychild.com

          Can you blow up a balloon in a bottle?


Ages 4+ with Adult Supervision at all times

Materials You Need:
  • Balloon
  • 1 plastic bottle (2-liter work best)
  • Thumbtack
  • Nail

Directions:

       1. Put your balloon into the top of your bottle
          and stretch the neck over the bottle opening.
       2. Try to blow the balloon up while it is still in the bottle. What happens?
       3. Remove the balloon from the bottle. Take your thumbtack and poke a
          hole in the bottom of your bottle. Make it larger using your nail.
       4. Again, place the balloon in the top of the bottle and stretch the neck
          over the bottle opening.
       5. Try blowing it up again. What happens this time?

The Science Behind It:

In order for a balloon to blow up, you must force air inside it. However, when
you try to blow the balloon up inside an “empty” bottle, you can’t because the
bottle is actually already filled with air! Once you poke a hole in the bottle,
some of the air can escape as you blow more air into the balloon!

*For step-by-step instruction with pictures:
http://www.icanteachmychild.com/2012/05/can-you-blow-up-a-balloon-in-
a-bottle/

Adapted from:
http://sciencesquad.questacon.edu.au/activities/balloon_bottle.html

                                                      © www.icanteachmychild.com
Tie Dye Milk


Ages 3+ with Adult Supervision at all times

Materials You Need:
  • Shallow plate or bowl
  • Milk
  • ½ cup of water
  • Various colors of food coloring
  • Dishwashing Soap
  • Q-tips

Directions:
   1. In the shallow bowl/plate, pour enough milk to cover the bottom of
      the dish.
   2. In a separate bowl, mix ½ cup of water with about a teaspoon of dish
      soap.
   3. Squirt a few drops of different colors of food coloring onto the milk.
   4. Dip a Q-Tip into the soap & water mixture. Gently touch the dipped
      Q-tip onto the milk (do NOT stir). The food coloring will swirl
      around, making a tie-dye pattern.

The Science Behind It:

The surface tension of the milk is strong enough to hold the food coloring in
place. Once you touch it with the soap-water mixture, it breaks the surface
tension and allows the colors to float around freely (sort of like a balloon
that has been popped allowing the air to escape).

*For step-by-step instructions with pictures:
http://www.icanteachmychild.com/2011/06/mixing-colors/

Adapted from: http://kitchenpantryscientist.com/?p=1496

                                                © www.icanteachmychild.com
Mentos Geysers


*Children of all ages can watch from a safe distance of several feet, but
only an adult should conduct the experiment.

Materials You Need:
  • 2 Liter Bottle of Diet Soda (dark-colored Soda
     works best)
  • 1 Package of Mentos
  • 1 piece of construction paper

Directions:

   1. Take a piece of construction paper and roll it
      into a tube small enough to fit in the mouth of
      the 2-liter.
   2. Unwrap the Mentos from their packaging and put inside the
      construction-paper tube.
   3. Go outside into an open area and ask an adult to place the tube
      inside the open bottle of Diet Soda (with his/her face away from the
      opening of the bottle) and run back as quickly as possible. Watch the
      geyser form!

The Science Behind It:
Even scientists are stumped by this phenomenon. But many speculate
that when you drop the Mentos into the soda, you break the surface
tension. Soda is bottled with carbon dioxide (which makes it fizz). When
you drop the Mentos into the bottle, tiny bubbles form around each of the
tiny indentations on the Mentos. And because the Mentos are heavy, they
sink to the bottom. When all of this gas is released, it pushes all of the soda
up at an incredible force!

*For step-by-step instructions with pictures:
http://www.icanteachmychild.com/2012/05/mentos-geysers/

Adapted from:
http://www.stevespanglerscience.com/experiment/original-mentos-diet-
coke-geyser and http://kitchenpantryscientist.com/?p=1124

                                                   © www.icanteachmychild.com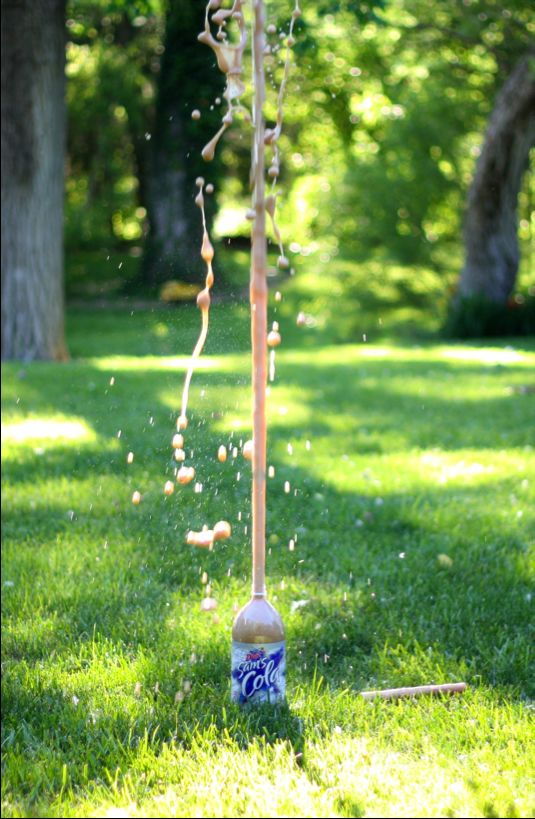
Make Your Own Lava Lamp


Ages 6+ with Adult Supervision at all times

Materials You Need:
  • Clear plastic bottle
  • Oil
  • Water
  • Funnel
  • Food Coloring
  • 1 Alka-Seltzer Tablet (*Do not let your
     child handle this medication)

Directions:
   1. Fill your plastic bottle half full with oil.
   2. Fill the remaining half with water.
   3. Add 10 drops of the food coloring (use only 1 color).
   4. Have an adult break the Alka-Seltzer tablet into fourths and place ¼
      of the tablet into the bottle. *Do not let a child handle the Alka-
      Seltzer tablet as it is medication.

The Science Behind It
Both the water and the food coloring sink to the bottom of the bottle while
the oil floats at the top because water is heavier than oil. The food coloring
dissolves in the water but not in the oil. When you drop the piece of Alka-
Seltzer into the bottle, it reacts with the water and creates carbon dioxide
gas bubbles. Because the food coloring has already dissolved into the
water, the bubbles are “colored” and float to the top! Once they ‘pop’, the
colored bubbles sink back to the bottom of the bottle.

*For step-by-step instructions with pictures:
http://www.icanteachmychild.com/2012/05/make-your-own-lava-lamp/

Adapted from: http://myreciperoom.blogspot.com/2010/03/home-made-
lava-lamp.html and
http://www.momto2poshlildivas.com/2012/01/easy-homemade-faux-lava-
lamps-for-kids.html and
http://www.stevespanglerscience.com/experiment/bubbling-lava-lamp

                                                  © www.icanteachmychild.com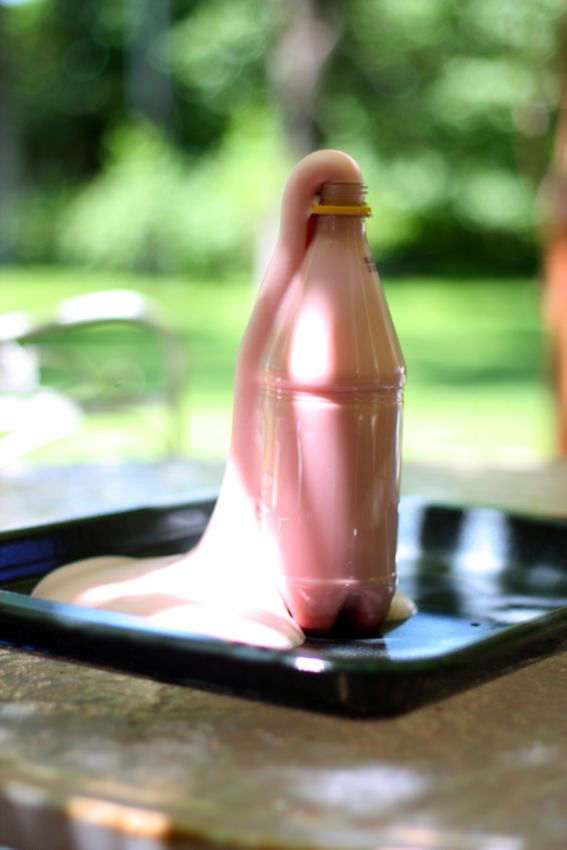
            Oobleck: Liquid or Solid?


Ages 3+ with Adult Supervision at all times

Materials You Need:
  • 1 cup of cornstarch
  • ½ cup of water
  • Food coloring (optional)

Directions:
   1. Mix the cornstarch and water in a large
      bowl. It should be the consistency of syrup.
   2. Place your fingers in the mixture…when you
      move your hands quickly, it becomes like a solid. When you keep the
      mixture still or move it very slowly, it acts like a liquid!
   3. Continue playing with it, rolling it into balls and letting it slide
      between your fingers!

Optional Literature Link:

Read Bartholomew’s Oobleck by Dr. Seuss

The Science Behind It:

Cornstarch is made up of long chains of atoms. When you move them
slowly past one another, they flow like a liquid because they can slide
easily past each other. When you squeeze, roll, or agitate them, the “atom
chains” will get entangled and form a solid! Substances like oobleck are
referred to as “non-Newtonian fluids” because they do not have the normal
properties of either solids or liquids.

*For step-by-step instructions with pictures:
http://www.icanteachmychild.com/2012/05/oobleck-liquid-or-solid/

Adapted from: http://kitchenpantryscientist.com/?p=5 and
http://littleshop.physics.colostate.edu/Try%20At%20Home/goorecipeone.h
tm

                                                 © www.icanteachmychild.com
                         The Bouncy Egg


Ages 3+ with Adult Supervision at all times

Materials You Need:
  • Glass Jar with Lid
  • 1 egg (uncooked)
  • Vinegar

Directions:

       1. Carefully place the raw egg into the glass jar.
       2. Add enough vinegar to cover the egg (watch for bubbles).
       3. Let sit for one full day.
       4. Use a spoon to carefully remove the egg from the jar. Dump the
          vinegar out and put the egg back into the jar, adding enough “fresh”
          vinegar to cover the egg again.
       5. Let it sit for another 2 days. You should be able to see through the
          egg since the vinegar has dissolved the shell.
       6. Remove the egg from the vinegar and gently wash it off with water.
          Feel how squishy it is. Carefully bounce the egg on the table!

The Science Behind It:

The shell of an egg is made of calcium carbonate. When you place the egg
into the vinegar, you see bubbles, which is the chemical reaction of the acid
in the vinegar reacting with the calcium carbonate to produce carbon
dioxide. You’ll also notice that the egg gets larger as it sits in the vinegar.
That is because some of the vinegar is absorbed in the egg through its semi-
permeable membrane!

*For step-by-step instructions with pictures:
http://www.icanteachmychild.com/2012/05/the-bouncy-egg/

Adapted from:
http://www.thechocolatemuffintree.com/2012/03/transparent-and-
bouncy-egg-experiment.html and
http://www.stevespanglerscience.com/experiment/naked-egg-experiment


                                                  © www.icanteachmychild.com
              Make Your Own Compass


Ages 6+ with Adult Supervision at all
times

Materials You Need:
  • Small bowl
  • Needle or straight pin
  • Permanent Marker
  • Bar magnet
  • Small piece of waxed paper (or foam) cut into a 1” diameter circle
  • Water

Directions:
   1. Hold the needle pointed up and mark the tip with the permanent marker.
   2. Take the “North” side of your bar magnet and place it perpendicular to
       your needle. Starting at the top of the needle, slide the side of the bar
       magnet along the length of the needle. Do not slide back and forth, but
       rather slide from one end to the other. Stop and start back at the end you
       began with. Repeat several times. Turn the needle upside down and use
       the opposite end of the magnet and repeat the same process until the
       needle is magnetized.
   3. Pour water into your bowl until it is about ¾ filled.
   4. Have an adult help you thread the needle through the waxed paper/foam
       circle. This will cause the needle to float on top of the water
   5. Place the needle on top of the water. Watch as the tip of the needle spins to
       point northward!

The Science Behind It:
When you rub the needle with your magnet, a little bit of magnetic material will
end up being left behind on the needle. This creates a magnet! In order for the
needle to act as a compass, it needs to be placed in an environment with less
friction, which in this case is the water. But first it needs to be able to float, which
is why we use the waxed paper/foam. Once the needle and waxed paper/foam are
placed on the water, the opposite poles of the needle are attracted to the Earth’s
magnetic field!

*For step-by-step instructions with pictures:
http://www.icanteachmychild.com/2012/05/make-your-own-compass/

Adapted from: http://kidsactivitiesblog.com/how-to-make-a-compass/ and
http://www.stevespanglerscience.com/content/experiment/homemade-compass

                                                          © www.icanteachmychild.com
Ice Cream in a Bag
Ages 4+ with Adult Supervision at all times
Materials You Need:
• 2 sandwich-sized baggies
• 2 gallon-sized baggies
• ½ cup Half-&-half (or milk)
• 1 tablespoon sugar
• ½ teaspoon vanilla extract
• Crushed ice (or snow)
• Rock salt
• Winter Gloves
Directions:
1. Fill one of the gallon-sized baggies half-full of ice.
2. Add 6 tablespoons of rock salt to the bag. Put your winter gloves on and
shake the ice/salt mixture for about 5 minutes.
3. Mix the half-&-half, sugar, and vanilla extract together in one of your
sandwich-sized baggies. Get as much air out of the bag as possible and seal
and then put that bag into another sandwich-sized baggie to double-bag it.
4. Place those bags into the gallon-sized baggie with the ice and salt and
squeeze as much air out as possible before sealing. Then put those bags
into another gallon-sized bag. J
5. Put your winter gloves back on and start shaking, tossing, and rolling the
bag for approximately 15-20 minutes.
6. Remove the bags and rinse the half-and-half bag with cold water to remove
any salt from the bag prior to opening. Open the bag and enjoy your ice
cream!
The Science Behind It:
The salt causes the ice to melt but it also lowers the temperature at which it melts
(which is why we use it on the roads in the winter). Instead of melting at 32
degree Fahrenheit (0 degrees Celsius), the rock salt causes the ice to melt at a
temperature much lower, depending on how much salt you add. The more rock
salt you use, the lower the temperature the ice will melt at. This creates an
environment that the ice cream mixture can freeze below the normal 32 degrees.
*For step-by-step instructions with pictures:
http://www.icanteachmychild.com/2012/05/ice-cream-in-a-bag/
Adapted from:
http://www.stevespanglerscience.com/experiment/homemade-ice-cream-sick-
science
© www.icanteachmychild.comBalloon Terrarium
Ages 4+ with Adult Supervision at all times
Materials You Need:
• Clear Balloon
• ½ cup Potting Soil
• 3-4 radish seeds (or other fast-growing
plants)
• Funnel
• ¼ cup water
Directions:
1. Blow up the balloon and then let all the air out of it. This will make it
easier to add the potting soil.
2. Attach the neck of the balloon to the small end of the funnel.
Carefully add ½ cup of potting soil in the balloon.
3. Add ¼ cup of water into the balloon using the funnel.
4. Carefully drop 3 to 4 radish seeds through the funnel and into the
balloon.
5. Hold the balloon by the neck and carefully blow it up. Once it is
blown up, secure the end by tying it.
6. Store neck-up in a sunny location and watch to see if your seeds
begin to sprout!
The Science Behind It:
Plants need 3 things to grow: air, sunlight, and water. Once they have
sprouted, the plants release oxygen. In a closed terrarium, the moisture
cannot escape or dry out, so the plant will always have water. A terrarium
creates an environment in which the cycle can be repeated (as long as the
balloon holds up, that is).
For step-by-step instructions with pictures:
http://www.icanteachmychild.com/2010/09/balloon-terrarium/
© www.icanteachmychild.com
                   Build a Hovercraft


Ages 4+ with Adult Supervision at all times

Materials You Need:
  • Old CD or DVD you are no longer using
  • Balloon
  • The cap off of a Sports Drink (with a
     push/pull opening)
  • Hot glue gun or super glue (*adult use
     only)

Directions:
   1. Use the hot glue gun or super glue to glue
      the cap of the sport’s drink onto the center of the CD. Make sure you
      create an airtight seal.
   2. Push the cap in the closed position.
   3. Blow up the balloon and twist it so that no air escapes.
   4. With the balloon twisted shut, stretch the neck of the balloon over
      the top of the sport’s drink cap.
   5. Slowly release the twist on the balloon, carefully pull the sports
      drink cap into the "open" position, and gently flick the CD on a flat
      surface. Watch what happens!

The Science Behind It:

As the balloon slowly deflates, the air it releases creates a cushion of air
between the CD and the surface. This cushion reduces the friction between
the CD and the surface, allowing it to move more freely as though it is
floating.

*For step-by-step instructions with pictures:
http://www.icanteachmychild.com/2012/06/build-a-hovercraft/

Adapted from: http://www.allfortheboys.com/home/2011/8/4/science-
fun.html and http://www.stevespanglerscience.com/experiment/cd-
hovercraft-sick-science

                                                  © www.icanteachmychild.com
Make Your Own Solar Oven
Ages 3+ with Adult Supervision at all times
Materials You Need:
• Pizza Box
• Aluminum Foil
• Box Cutter
• Permanent marker
• Ruler
• Elmer’s Glue
• Plastic Cling Wrap
• Black construction paper
• Tape
Directions:
1. Use a permanent marker and a ruler to cut a
square in the center of the pizza box lid that is one inch from the outside of
the pizza box on all sides.
2. Cut the front of the square and the two sides with a box cutter, but leave
the back uncut to create a flap.
3. Bend back the square flap on your lid and cover the inside of the flap with
aluminum foil using glue to secure. Cut off the excess or fold and tape.
4. Open the lid of the pizza box and cut a square of plastic cling wrap that is 1
inch larger than the perimeter of the flap. Pull tightly and tape on all sides.
Close the lid.
5. Put another air-tight piece of plastic wrap on the outside of the box lid,
underneath the flap so that both sides of the flap opening are covered in
plastic wrap.
6. Line the inside of the pizza box with aluminum foil. Glue it down and then
fold over the sides and tape.
7. Add some black paper to the inside bottom of the pizza box.
8. When ready to use your oven “preheat” it by placing it outside in direct
sunlight for about 15 minutes.
9. Add your contents (s’mores work great) and close the pizza box. Adjust
the angle of the flap to best harness the sun’s rays. If necessary, use a
straw or a ruler to hold the flap up. Check every 20 minutes until heated
to your satisfaction!
*For step-by-step instructions with pictures:
http://www.icanteachmychild.com/2012/06/make-your-own-solar-oven/
Adapted from: http://www.youtube.com/watch?v=xbwliZJiHe8
© www.icanteachmychild.comYou can also read