Telenor MDM v.5.40.0x Google Firebase Configuration - Telenor Mobile Device Management - Document information Version-history
←
→
Page content transcription
If your browser does not render page correctly, please read the page content below
Telenor MDM v.5.40.0x
Google Firebase Configuration
Telenor Mobile Device Management

Document information
Date:          10.05.19
Version:       5.40.0x EN

Version-history
 Version   Date        Comments     Edited by
 1.0       10.05.19    New format   Tony Dargis
Disclaimer:

The information in this document is provided “as is,” with no warranties whatsoever, including any war-
ranty of merchantability, fitness for any particular purpose, or any warranty otherwise arising out of
any proposal, specification, or sample. This document is provided for informational purposes only. The
screen-shots and instructions contained within this document may differ depending on which version of
the MDM server you are using.

iPhone, iPad, iTunes, Apple School Manager, Apple Store R , iBooks Store R , iCloud R are Trademarks
of Apple Inc. Android, Google and Google Play are trademarks of Google Inc. Samsung and Samsung
KNOX are trademarks or registered trademarks. Windows, Windows Phone, Windows server are all
trademarks of Microsoft Inc. of Samsung Electronics Co., Ltd. in the United States and other countries.
Specifications and designs are subject to change without notice. All other trademarks are the property
of their respective owners.

References in this document to any specific service provider, manufacturer, company, product, service,
setting, or software do not constitute an endorsement or recommendation by SEVEN PRINCIPLES.

SEVEN PRINCIPLES cannot be held liable for any damages, including without limitation any direct, in-
direct, incidental, special, or consequential damages, expenses, costs, profits, lost savings or earnings,
lost or corrupted data, or other liability arising out of or related in any way to information, guidance, or
suggestions provided in this document.

Proprietary Notice: All rights reserved. No part of the document may be reproduced or transmitted in
any form or by any means, electronic or mechanical, for any purpose, without the written permission of
SEVEN PRINCIPLES, Erna-Scheffler-Straße 1a, 51103 Köln.

The information in this document is subject to change without notice.
COPYRIGHT SEVEN PRINCIPLES 2019

                                                     i
Contents
           List of Figures                                                                                                                                               ii

           List of Tables                                                                                                                                                ii

1          About This Guide                                                                                                                                             1
1.1        Icon description . . . . . . . . . . . . . . .       .   .   .   .   .   .   .   .   .   .   .   .   .   .   .   .   .   .   .   .   .   .   .   .   .   .   1
1.2        Supported browsers . . . . . . . . . . . . .         .   .   .   .   .   .   .   .   .   .   .   .   .   .   .   .   .   .   .   .   .   .   .   .   .   .   1
1.3        Navigating the Web GUI . . . . . . . . . . .         .   .   .   .   .   .   .   .   .   .   .   .   .   .   .   .   .   .   .   .   .   .   .   .   .   .   2
1.4        Navigation layout . . . . . . . . . . . . . . .      .   .   .   .   .   .   .   .   .   .   .   .   .   .   .   .   .   .   .   .   .   .   .   .   .   .   3
1.5        Basic navigation . . . . . . . . . . . . . . .       .   .   .   .   .   .   .   .   .   .   .   .   .   .   .   .   .   .   .   .   .   .   .   .   .   .   4
1.6        Command navigation . . . . . . . . . . . .           .   .   .   .   .   .   .   .   .   .   .   .   .   .   .   .   .   .   .   .   .   .   .   .   .   .   4
1.7        Hyperlink navigation . . . . . . . . . . . . .       .   .   .   .   .   .   .   .   .   .   .   .   .   .   .   .   .   .   .   .   .   .   .   .   .   .   4
1.8        Menu Items . . . . . . . . . . . . . . . . . .       .   .   .   .   .   .   .   .   .   .   .   .   .   .   .   .   .   .   .   .   .   .   .   .   .   .   4
1.9        Description of warning flags . . . . . . . . .       .   .   .   .   .   .   .   .   .   .   .   .   .   .   .   .   .   .   .   .   .   .   .   .   .   .   5
1.10       Password policy . . . . . . . . . . . . . . .        .   .   .   .   .   .   .   .   .   .   .   .   .   .   .   .   .   .   .   .   .   .   .   .   .   .   5
1.11       Display Tooltip . . . . . . . . . . . . . . . .      .   .   .   .   .   .   .   .   .   .   .   .   .   .   .   .   .   .   .   .   .   .   .   .   .   .   5
1.12       Greyed (read-only) items . . . . . . . . . .         .   .   .   .   .   .   .   .   .   .   .   .   .   .   .   .   .   .   .   .   .   .   .   .   .   .   6
1.13       Shortcut to Administrators password . . . .          .   .   .   .   .   .   .   .   .   .   .   .   .   .   .   .   .   .   .   .   .   .   .   .   .   .   6
1.14       MDM Client password policy management                .   .   .   .   .   .   .   .   .   .   .   .   .   .   .   .   .   .   .   .   .   .   .   .   .   .   7
1.15       Coloured status indicators . . . . . . . . .         .   .   .   .   .   .   .   .   .   .   .   .   .   .   .   .   .   .   .   .   .   .   .   .   .   .   7
1.16       Information omissions . . . . . . . . . . . .        .   .   .   .   .   .   .   .   .   .   .   .   .   .   .   .   .   .   .   .   .   .   .   .   .   .   8
1.17       General error messages . . . . . . . . . . .         .   .   .   .   .   .   .   .   .   .   .   .   .   .   .   .   .   .   .   .   .   .   .   .   .   .   8
1.18       Expiration notifications . . . . . . . . . . . .     .   .   .   .   .   .   .   .   .   .   .   .   .   .   .   .   .   .   .   .   .   .   .   .   .   .   8

2          Firebase Cloud Messaging                                                                                                                                      9
2.1        Prerequisites . . . . . . . . . . . . . . . . . . . .            .   .   .   .   .   .   .   .   .   .   .   .   .   .   .   .   .   .   .   .   .   .   .    9
2.2        Login to the Firebase console . . . . . . . . . .                .   .   .   .   .   .   .   .   .   .   .   .   .   .   .   .   .   .   .   .   .   .   .    9
2.3        Create a new project . . . . . . . . . . . . . . . .             .   .   .   .   .   .   .   .   .   .   .   .   .   .   .   .   .   .   .   .   .   .   .   10
2.4        Name the project and select the Country/region                   .   .   .   .   .   .   .   .   .   .   .   .   .   .   .   .   .   .   .   .   .   .   .   10
2.5        Inspect the project settings . . . . . . . . . . . .             .   .   .   .   .   .   .   .   .   .   .   .   .   .   .   .   .   .   .   .   .   .   .   11
2.6        Retrieve the FCM token . . . . . . . . . . . . . .               .   .   .   .   .   .   .   .   .   .   .   .   .   .   .   .   .   .   .   .   .   .   .   12
2.7        Apply the FCM token to the 7P MDM server . . .                   .   .   .   .   .   .   .   .   .   .   .   .   .   .   .   .   .   .   .   .   .   .   .   12
2.8        Verification . . . . . . . . . . . . . . . . . . . . .           .   .   .   .   .   .   .   .   .   .   .   .   .   .   .   .   .   .   .   .   .   .   .   13

List of Figures
      1    Navigating the MDM server . . . . . . . .        .   .   .   .   .   .   .   .   .   .   .   .   .   .   .   .   .   .   .   .   .   .   .   .   .   .   . 2
      2    MDM server Global navigation overview .          .   .   .   .   .   .   .   .   .   .   .   .   .   .   .   .   .   .   .   .   .   .   .   .   .   .   . 3
      3    Hyperlink navigation . . . . . . . . . . . .     .   .   .   .   .   .   .   .   .   .   .   .   .   .   .   .   .   .   .   .   .   .   .   .   .   .   . 4
      4    Password definition - user account policy        .   .   .   .   .   .   .   .   .   .   .   .   .   .   .   .   .   .   .   .   .   .   .   .   .   .   . 5
      5    Tooltip - field “call out on” mouse hover . .    .   .   .   .   .   .   .   .   .   .   .   .   .   .   .   .   .   .   .   .   .   .   .   .   .   .   . 5
      6    Read only items . . . . . . . . . . . . . .      .   .   .   .   .   .   .   .   .   .   .   .   .   .   .   .   .   .   .   .   .   .   .   .   .   .   . 6
      7    Administrator password update shortcut .         .   .   .   .   .   .   .   .   .   .   .   .   .   .   .   .   .   .   .   .   .   .   .   .   .   .   . 6
      8    Admin credentials . . . . . . . . . . . . .      .   .   .   .   .   .   .   .   .   .   .   .   .   .   .   .   .   .   .   .   .   .   .   .   .   .   . 7
      9    Coloured status indicators . . . . . . . . .     .   .   .   .   .   .   .   .   .   .   .   .   .   .   .   .   .   .   .   .   .   .   .   .   .   .   . 7
      10   Error message format . . . . . . . . . . .       .   .   .   .   .   .   .   .   .   .   .   .   .   .   .   .   .   .   .   .   .   .   .   .   .   .   . 8
      11   Expiration notification pop up . . . . . . .     .   .   .   .   .   .   .   .   .   .   .   .   .   .   .   .   .   .   .   .   .   .   .   .   .   .   . 8
      12   Google Firebase welcome screen . . . .           .   .   .   .   .   .   .   .   .   .   .   .   .   .   .   .   .   .   .   .   .   .   .   .   .   .   . 9
      13   Firebase project configuration settings . .      .   .   .   .   .   .   .   .   .   .   .   .   .   .   .   .   .   .   .   .   .   .   .   .   .   .   . 11
      14   Send push notification to device . . . . . .     .   .   .   .   .   .   .   .   .   .   .   .   .   .   .   .   .   .   .   .   .   .   .   .   .   .   . 13

List of Tables
      1    Text convention . . . . . . . . . . . . . . . . . . . . . . . . . . . . . . . . . . . . . . . . . .                                                           1
      2    Current icons . . . . . . . . . . . . . . . . . . . . . . . . . . . . . . . . . . . . . . . . . . .                                                           1
      3    Optional modules . . . . . . . . . . . . . . . . . . . . . . . . . . . . . . . . . . . . . . . . .                                                            3

                                                           ii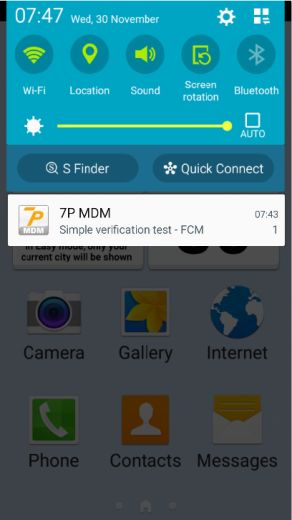
4   Coloured status indicators . . . . . . . . . . . . . . . . . . . . . . . . . . . . . . . . . . . .   7

                                                 iii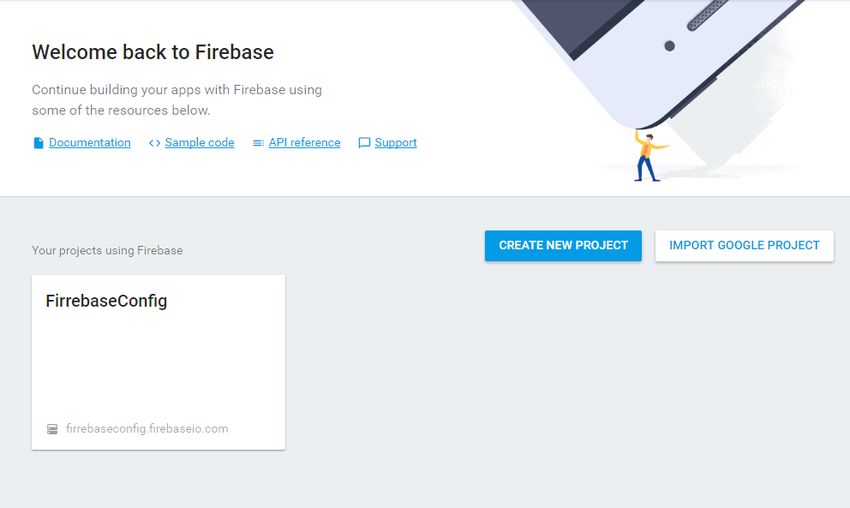
1     About This Guide
The following conventions are typically adhered to in the construction of this document.

      Convention               Description
      Key names                Keys that are pressed simultaneously are linked by a plus sign (+):
                               e.g. Press Ctrl + Alt + Del
      The word “enter”         Enter indicates you type something and then press the Return or Enter key.
      Bold                     Used to distinguish certain words from others within the text
      Italics                  Used to distinguish certain words from others within the text

                                                 Table 1: Text convention

1.1     Icon description
The following icons are used throughout the MDM server to illustrate which functionality is applicable to
manufacturing specific technology.

              Icon                                                     Icon

                      General Android device                                   Apple iOS9

                      Android Enterprise Managed device                        Apple iOS9 Supervised

                      Android Enterprise Managed profile                       Apple iOS10

                      Samsung KNOX Standard                                    Apple iOS10 Supervised

                      Samsung Knox Workspace                                   Apple iOS11

                      Huawei                                                   Apple iOS11 Supervised

                      Android HTC                                              Apple iOS12

                      Android HTC Pro                                          Apple iOS12 Supervised

                      Android HTC Pro2                                         Apple macOS

                      General Apple iOS device                                 Windows 10
                      General iOS device, (DEP Supervised mode de-
                                                                               Windows 10 Mobile
                      vices)

                      General iOS8 device

                      General iOS8 device ( DEP Supervised mode)

                                                  Table 2: Current icons

1.2     Supported browsers
The MDM server supports the current versions of Firefox, Microsoft Internet Explorer, and Google
Chrome.

Version 5.40.0x EN                                                                                 Update 1.00 10.05.19
Document status                                                                                     Author:TonyDargis
[public] [released]                                                                                          Page 1/13
1.3 Navigating the Web GUI
The information and features in the 7P MDM server are presented in a number of browser pages. This
section describes the design structure used.
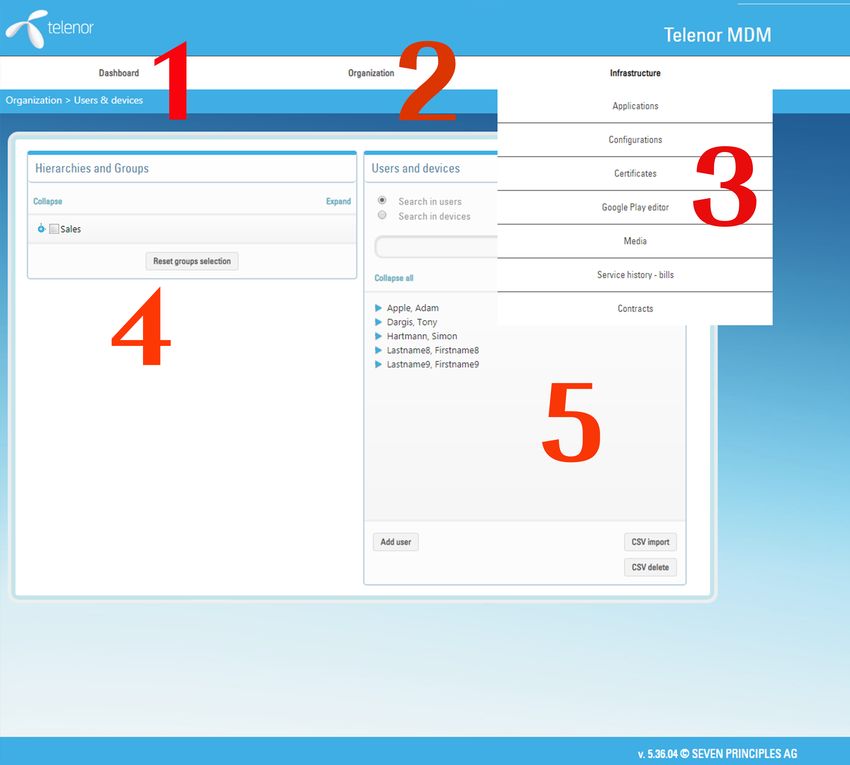
Figure 1: Navigating the MDM server
1. Breadcrumb
The breadcrumb indicates the current menu and submenu item. The above image indicates that the
active page is Organization>Infrastructure.
2 Main menu headings (horizontal)
Navigation is achieved by clicking one of the 6 main menu items. Once clicked, each main menu item
sub menu will be revealed.
3 Sub menu headings (vertical column)
When the main menu heading is selected, all available submenu headings are revealed. Opening any
of the sub menu headings will open a new page. Contained within that page are typically several panels
of configurable elements.
4. Page menu
The page menu is displayed in the middle of the screen. The page menu can typically be made up of
several panels, all with increasing functional layers available when selected.
5. Dynamic filter bar
Dynamic filter bars are cylindrical in shape and accept text as input. As each letter is typed, a dynamic
search of the relevant MDM server table is completed, with the results being displayed.
As more text is inserted, the displayed results will decrease until the either the required information is
located, for example, “Name” or “No data available in table” will be shown.
Version 5.40.0x EN Update 1.00 10.05.19
Document status Author:TonyDargis
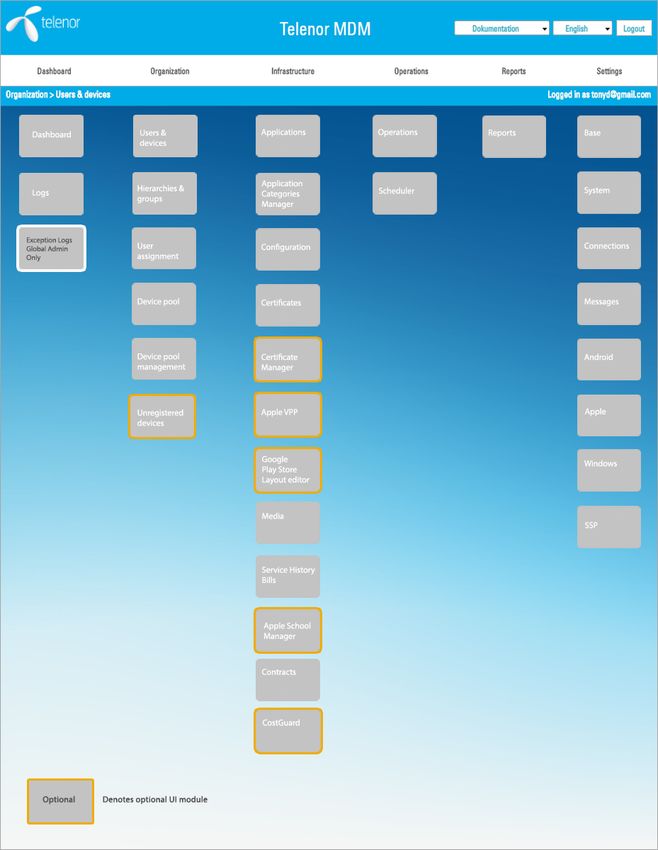
[public] [released] Page 2/131.4 Navigation layout
The MDM server navigation is achieved by selecting a main “header” menu subject (pictured in gold)
of the Dashboard, Organization, Infrastructure, Operations, Reports and System settings. Each header
menu item will open the associated drop down sub menu items in a vertical orientation.
Selecting the sub menu items, for example, Dashboard will open the Dashboard web page.
Figure 2: MDM server Global navigation overview
Menu item Enable/Disable
Unregistered devices Enabled by selecting the check box located at
Settings>System>General Options>Unregistered devices
Costguard Enabled by selecting the check box located at
Settings>System>General Options>Costguard
Google Play Store Layout Enabled by creating a Google EMM environment at
editor Settings>android>Google EMM
Apple VPP Enabled by either adding a valid VPP token to the Global or Tenant settings at
Settings>Apple>Volume Purchase Program>
Apple School Manager Enabled by inserting valid SFTP credentials in Settings>Apple>Apple School Manager
Certificate Manager Enabled by either adding a valid SSCEP binaries path configuration at
Settings>Connection>SCEP Certificate Settings>SSCEP
Table 3: Optional modules
Version 5.40.0x EN Update 1.00 10.05.19
Document status Author:TonyDargis
[public] [released] Page 3/131.5 Basic navigation
Navigation through the various header menu, sub menus, and panels is short formed in this document
in the following way:
Navigate to System settings>Settings>Base>Tenants will instruct the administrator how to locate
the “Tenants” configuration panel within the MDM server.
1.6 Command navigation
Command navigation consists of a command tagged onto the navigational direction:
Select the Organization>Hierarchies & groups>Add a new hierarchy will instruct the administrator
how to locate the “Add a new hierarchy” command within the MDM server.
1.7 Hyperlink navigation
Hyperlinks are used to allow detailed examination of information. For example, if an Operation (named
SIM change test) has been deployed to the device, a status message would be included in the device
history.
Figure 3: Hyperlink navigation
Selecting the “SIM change test” hyperlink will open the Operation>SIM change test allowing closer
examination. Selecting the browsers “back” button will return the administrator to the device history log.
When hyperlinks are available, selecting the hyperlink will either:
n Navigate the administrator to the origin of the link, for example, a configuration statement
n To further functionality, for example, as with the displaying of GPS records
Utilising the back facility of the browser may return the administrator to the original page. It is always
advisable, due to the dynamic nature of the updating data, for the administrator to restart their query
with the vertical menu buttons.
1.8 Menu Items
The greater than sign >, separates segments of command navigation.
For example, Operations>Operations>Is roaming>Drop-down selection (Yes / No) indicates that
you first choose “Operations” from the main tabs, then “Operations” from the left-hand menu options,
followed by the selection of an operation name, then the condition to be applied.
Version 5.40.0x EN Update 1.00 10.05.19
Document status Author:TonyDargis
[public] [released] Page 4/131.9 Description of warning flags
This document may contain warnings and safety recommendations of the following meaning:
Attention: May have undesired consequences
Caution: Operational functionality may be impeded
General information
1.10 Password policy
All passwords must comply with the password management fields of the user account policy. You will
be advised of the password policy requirements when information is entered into any password field.
Figure 4: Password definition - user account policy
The user account password policy will be originally defined by the MDM administrator. See User account
policies for more details.
1.11 Display Tooltip
An information pop up will be revealed, when certain condensed information fields are hovered over
with the mouse, which will allow the administrator to copy and paste the full information field into, for
example, a Notepad document.
Figure 5: Tooltip - field “call out on” mouse hover
Version 5.40.0x EN Update 1.00 10.05.19
Document status Author:TonyDargis
[public] [released] Page 5/131.12 Greyed (read-only) items
Two discrete colours are used to designate write enabled (editable) and read-only (non-editable) com-
mands and information throughout the entire MDM server.
Figure 6: Read only items
n Read only configuration elements are usually configured (and protected) by the Super Adminis-
trators security credentials.
n Read-only information can also include information retrieved from a mobile device and is read-only
by default.
n Read-only information can also include absolute values, information, and totals; the information
retrieved and displayed in a report for example.
Any Configuration template, Application, or parameter that has the [Global] suffix is only
editable by a Super Administrator. Any Configuration template, Admin role or parameter will
have the originating/creating tenancy name clearly displayed as a suffix in the Global tenant’s
view. e.g. Access Point [Documentation]
1.13 Shortcut to Administrators password
A shortcut (hyperlink) now exists that allows an administrator to edit (update) their password by select-
ing the name specified in “Logged in as”.
Figure 7: Administrator password update shortcut
Once successfully logged in, an administrator can select the “logged in as” name. The hyperlink, once
selected, opens the Settings>Base>Admin>Admin name in edit mode so that the administrators
password may be updated.
Version 5.40.0x EN Update 1.00 10.05.19
Document status Author:TonyDargis
[public] [released] Page 6/13Figure 8: Admin credentials
Once the password has been updated, select OK.
1.14 MDM Client password policy management
Once a device has been successfully enrolled into the MDM server, the device will maintain the pass-
word policy that has been determined by the MDM server administrator.
If the MDM server device password policy is changed then, the new password policy will be enforced
when the user next logs into the device. At such a time, the user will be invited to change their password
which must comply with the new password policy of the MDM server. (See User account policies)
1.15 Coloured status indicators
Coloured status indicators are designed to assist the administrator by highlighting (through colour) se-
lective performance indicators, whether a status or metric is either within or outside the desired range.
Figure 9: Coloured status indicators
At present, three colour indicators exist on the MDM server:
Colour code Description
green Indicates “All OK” values are within desired parameters
or range. No action required
yellow Indicates “Attention” the values are not within desired pa-
rameters or range. Action: Investigate
red Indicates “Alert” the values are not as desired and there
may be a security loophole. Action: investigate
Table 4: Coloured status indicators
Version 5.40.0x EN Update 1.00 10.05.19
Document status Author:TonyDargis
[public] [released] Page 7/13Revision details have been omitted from all the documentation lists as the most current ver-
sion will be available from your 7P representative or service provider
1.16 Information omissions
The MDM server can only display information that is provided by the mobile devices.
1.17 General error messages
Error messages in general are designed to inform the administrator why a specific function fails to exe-
cute; if there is a data conflict, type mismatch, or desired parameter is already in use.
Figure 10: Error message format
1.18 Expiration notifications
The expiration notification pop up will only be presented to Global administrators or Tenant administra-
tors when logging in to the UI. The pop up is designed to alert the administrator if and when an essential
license, certificate or token is due to expire.
Global administrator view:
The Global administrator will be alerted of all expiring licenses, certificates and tokens of all tenants
contained within the MDM server.
Figure 11: Expiration notification pop up
Tenant administrator view:
The Tenant administrator will also receive a similar information pop up of expiring licenses, certificates
and tokens but the information will be restricted to the tenancies that the Tenant administrator has
permission to access.
Whether Global or Tenant administrator, the expiration information is always accessible to
view via the MDM dashboard. Navigate to Dashboard>Expirations
Error messages where possible contain exact information. In the case of the above data conflict, the
MDM server displays the reason for the error and supplies further information, notably User, Tenant and
device name.
Version 5.40.0x EN Update 1.00 10.05.19
Document status Author:TonyDargis
[public] [released] Page 8/132 Firebase Cloud Messaging
Firebase Cloud Messaging (FCM) formerly known as Google Cloud Messaging (GCM), is a cross-
platform solution for messages and notifications for Android, iOS, and web applications.
Firebase Cloud Messaging token will replace the Google Cloud Messaging token within the MDM server
which is currently used to Push messages to Android devices.
Configuration of a FCM token consists of the following steps
n Login to the Firebase console
n Create a new project
n Name the project and select the Country/region
n Inspect the project settings
n Retrieve the FCM token
n Apply the FCM token to the 7P MDM server
2.1 Prerequisites
User:
A valid Google account, enabling access to the Google Firebase console, located at : https://firebase.google.com/console
MDM server:
Port 443 from the MDM server OPEN to *.google.com
2.2 Login to the Firebase console
Navigate to https://firebase.google.com/console and login with your Google account details
Figure 12: Google Firebase welcome screen
Google’s Firebase console will list any previously created projects.
Version 5.40.0x EN Update 1.00 10.05.19
Document status Author:TonyDargis
[public] [released] Page 9/132.3 Create a new project Select the blue ,,Create new project“ button 2.4 Name the project and select the Country/region Insert a memorable friendly name for the project and select the Country/Region from the Country/Region drop down selector. Once completed, select “Create Project” Version 5.40.0x EN Update 1.00 10.05.19 Document status Author:TonyDargis [public] [released] Page 10/13
2.5     Inspect the project settings
Select the Gear icon, adjacent to the project name, then select ,,Project settings.

The following screen will be opened, allowing further access to the project configuration settings.

                           Figure 13: Firebase project configuration settings

Version 5.40.0x EN                                                                       Update 1.00 10.05.19
Document status                                                                           Author:TonyDargis
[public] [released]                                                                               Page 11/13
2.6 Retrieve the FCM token Select the “Cloud Messaging” tab. Copy both the Firebase Cloud Messaging token and Sender ID 2.7 Apply the FCM token to the 7P MDM server Navigate to Setting>Android>Android Push Notification Select Edit, then enter the Sender ID and the Firebase Cloud Messaging Token ( in the Authentication token field) Version 5.40.0x EN Update 1.00 10.05.19 Document status Author:TonyDargis [public] [released] Page 12/13
2.8     Verification
Select a registered and active Android device in the MDM server.

Navigate to Organization>Users & devices>Device>Action>Send push notification

Complete the Push notification message by inserting a subject, and message text, then select ,,send“.

                                 Figure 14: Send push notification to device

The push notification will be displayed on the device in the notification bar.

                      User selects   “Con-   MDM server may now       User selects   “Con-
                      tinue”                 assign the book to de-   tinue”
                                             vice

The user may examine the details of the push notification by dragging down and “tapping” the push
notification message.

Version 5.40.0x EN                                                                           Update 1.00 10.05.19
Document status                                                                               Author:TonyDargis
[public] [released]                                                                                   Page 13/13
You can also read