The EastWest PLAY System - Users' Manual
←
→
Page content transcription
If your browser does not render page correctly, please read the page content below
The EastWest PLAY System
        Users’ Manual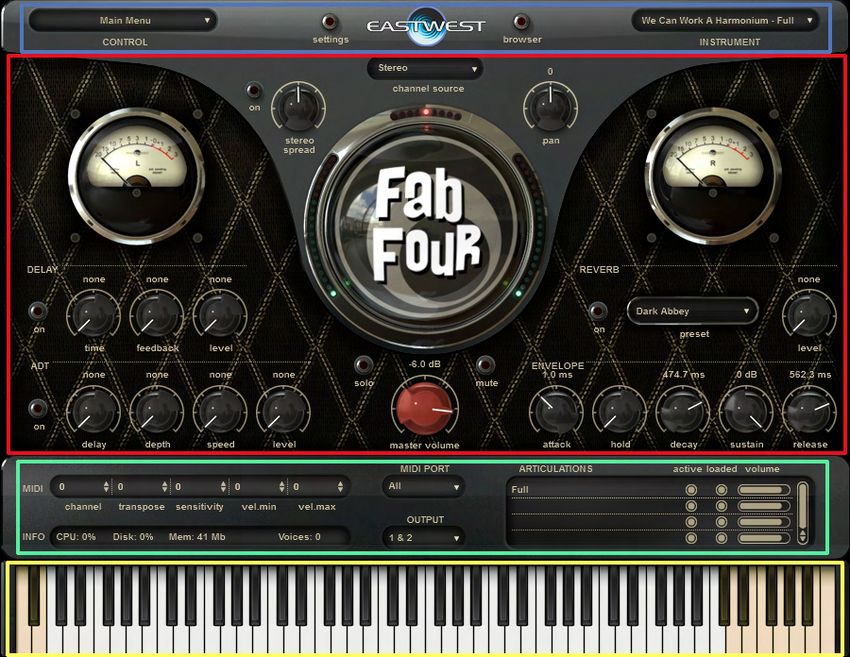
T h e E ast W est P L AY S ystem

The information in this document is subject to change without notice and does not rep-
resent a commitment on the part of East West Sounds, Inc. The software and sounds
described in this document are subject to License Agreements and may not be copied
to other media. No part of this publication may be copied, reproduced or otherwise
transmitted or recorded, for any purpose, without prior written permission by East West
Sounds, Inc. All product and company names are ™ or ® trademarks of their respective
owners.

© East West Sounds, Inc., 2007. All rights reserved.

East West Sounds, Inc.
6000 Sunset Blvd.
Hollywood, CA 90028
USA

1-323-957-6969 voice

1-323-957-6966 fax

For questions about licensing of products: licensing@eastwestsounds.com

For more general information about products: info@eastwestsounds.com

http://support.soundsonline.com

Version of October 2008

		                                                                                   ii
T h e E ast W est P L AY S ystem

                            Credits

                           Producer
                          Doug Rogers

                     Software Development
Klaus Voltmer, Patrick Stinson, Stefan Kersten, Klaus Lebkücher,
Toine Diepstraten, Stefan Podell, Ezra Buchla, Nicholas Cardinal,
Jonathan Kranz, David Kendall, Günter Hirscher, Olivier Frappier,
     Doug Rogers, Nick Phoenix, Rhys Moody, Stefan Leiste

                            Manual
                          John Philpit

		                                                                  iii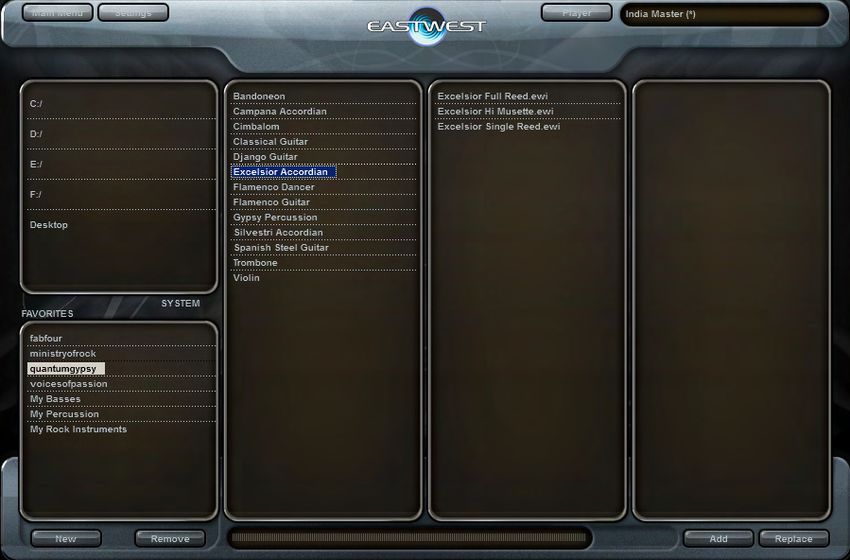
T h e E ast W est P L AY S ystem
1. Welcome
2 About EastWest
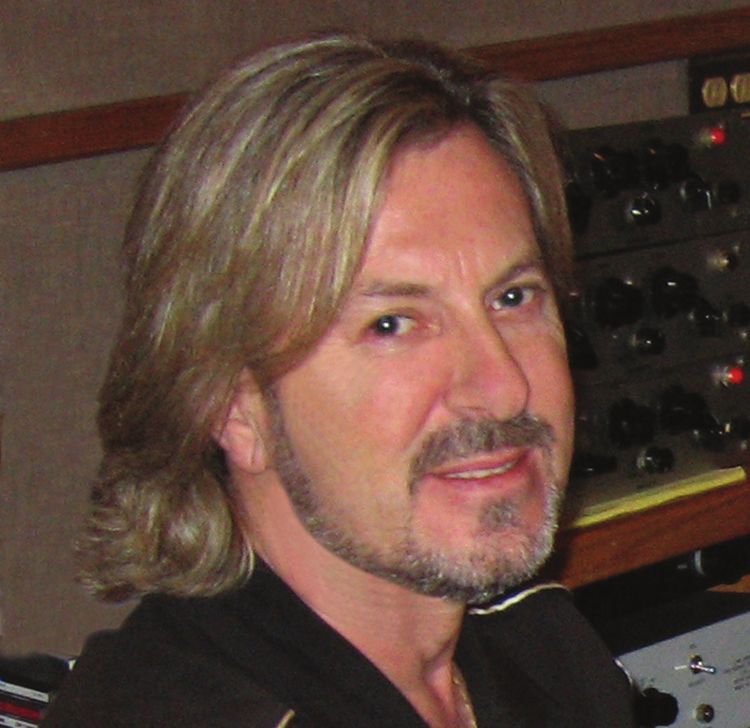
3 Producer: Doug Rogers
5 EastWest Studios
8 How to Use This and the Other Manuals
9 Online Documentation and Other Resources
Click on this text to open the
Master Navigation Document
1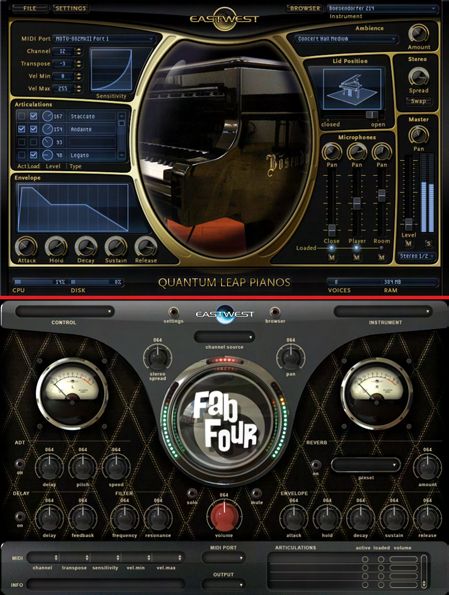
T h e E ast W est P L AY S ystem
Welcome
About EastWest
EastWest (www.soundsonline.com) has been dedicated to perpetual innovation and un-
compromising quality, setting the industry standard as the most critically acclaimed
producer of Sample CDs and Virtual (software) Instruments.
Founder and producer Doug Rogers has over 30 years experience in the audio industry
and is the recipient of many recording industry awards including “Recording Engineer of
the Year.” In 2005, “The Art of Digital Music” named him one of “56 Visionary Artists &
Insiders” in the book of the same name. In 1988, he founded EastWest, the most criti-
cally acclaimed sound developer in the world, and recipient of over 50 industry awards,
more than any other sound developer. His uncompromising approach to quality, and in-
novative ideas have enabled EastWest to lead the sound-ware business for 20 years.
In 1997 Rogers partnered with producer/composer Nick Phoenix and set up Quantum
Leap, a wholly owned division of EastWest, to produce high-quality, no-compromise sam-
ple libraries and virtual instruments. Quantum Leap virtual instruments are mostly pro-
duced by Nick Phoenix. Some of the larger productions, such as Symphonic Orchestra,
Symphonic Choirs and Quantum Leap Pianos are co-produced by Doug Rogers and Nick
Phoenix. As a composer, Phoenix began scoring film trailers and television commercials
in 1994. To date, he has either scored or licensed music for the ad campaigns of over
1000 major motion pictures including Tomb Raider 2, Terminator 3, Lord of the Rings
Return of the King, Harry Potter 2, Star Wars Episode 2, Spiderman 3, Pirates of the
Caribbean 3, Blood Diamond, Night at the Museum, and The Da Vinci Code. Quantum
Leap has now firmly established itself as one of the world’s top producers of high-end
sample libraries and virtual instruments.
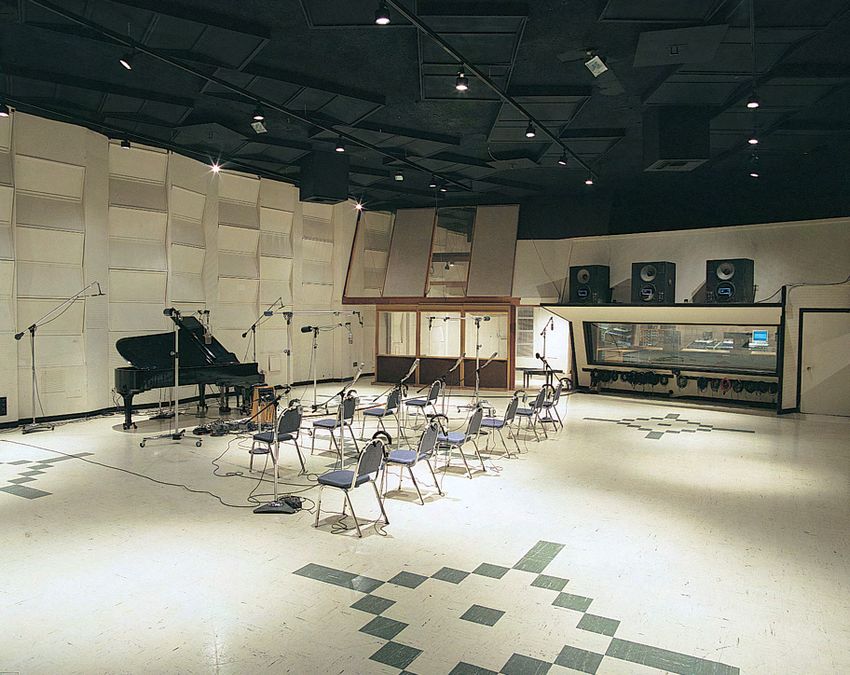
In 2006, EastWest purchased the legendary Cello Studios (formerly United Western Re-
corders) on Sunset Boulevard in Hollywood, re-naming it EastWest Studios. The 21,000
sq. ft. facility, since remodelled by master designer Philippe Starck, houses five record-
ing studios and is the world headquarters for EastWest.
Chapter 1: Welcome 2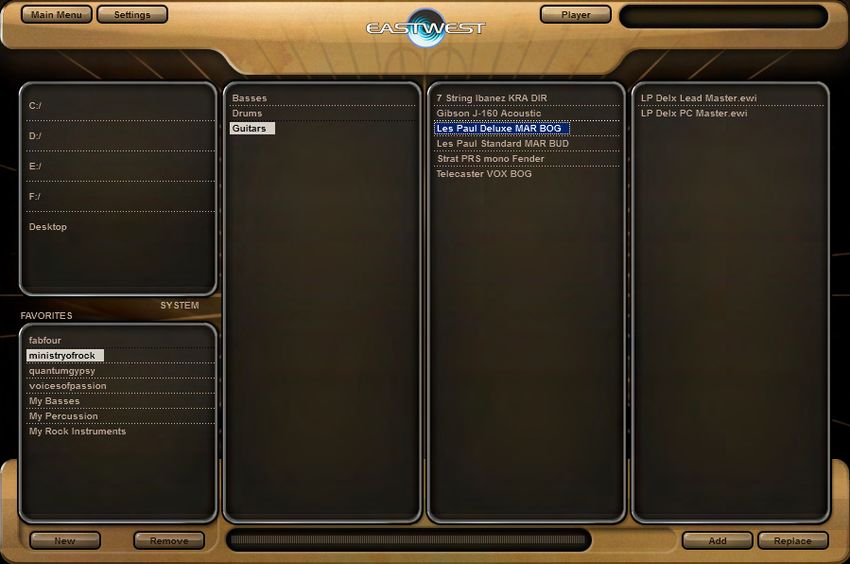
T h e E ast W est P L AY S ystem
Producer: Doug Rogers
     Doug Rogers has over 30 years experience in the audio industry and is the recipient of
     many recording industry awards including “Recording Engineer of the Year.” In 2005,
    “The Art of Digital Music” named him one of “56 Visionary Artists & Insiders” in the book
     of the same name. In 1988, he founded EastWest, the most critically acclaimed sound
     developer in the world, and recipient of over 50 industry awards, more than any other
     sound developer. His uncompromising approach to quality, and innovative ideas have
     enabled EastWest to lead the sound-ware business for 20 years.

    In the late eighties, he released the very first commercial drum sample CD, and followed
    it with the multiple-award-winning “Bob Clearmountain Drums” sample collection. In
    the years that followed he practically reinvented the sound-ware industry. EastWest in-
    troduced loop sample libraries to the market in the early nineties, followed closely by
    the first midi driven loops (Dance/Industrial). He released the first sample library to
    include multiple dynamics, followed by the first sample library to stream from hard disk,
    an innovation that led to the detailed collections available today. His recent productions
    are Symphonic Orchestra (awarded a Keyboard Magazine “Key Buy Award,” EQ Maga-
    zine “Exceptional Quality Award,” Computer Music Magazine “Performance Award,” and
    G.A.N.G. [Game Audio Network Guild] “Best Sound Library Award”); and Symphonic
    Choirs (awarded Electronic Musician “2006 Editor’s Choice Award,” G.A.N.G. “Best
    Sound Library Award,” and Keyboard Magazine “Key Buy Award”).

    He persuaded audio legend Prof. Keith O. Johnson to record EWQLSO and EWQLSC,
    and came up with the revolutionary idea of recording all instruments and voices with 3
    simultaneous stereo mic setups so users can control the tone of the performances and

Chapter 1: Welcome                                                                         3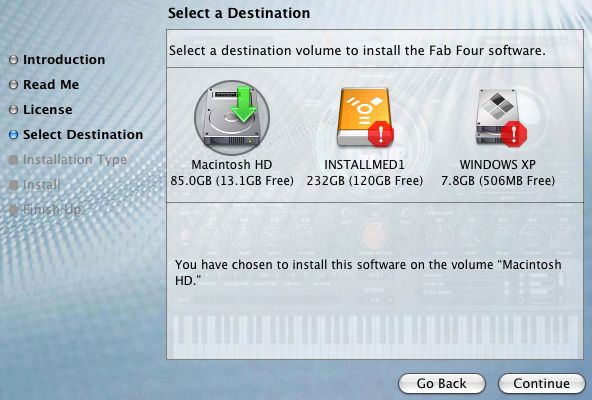
T h e E ast W est P L AY S ystem
   the acoustics of the concert hall, as well as create surround sound mixes. His latest
   productions include Quantum Leap Pianos, another 3 mic setup, and the most detailed
   virtual piano collection ever produced; and Fab Four, inspired by the sounds of the Beat-
   les, featuring the same kind of vintage instruments and original EMI/Abbey Road record-
   ing equipment as the Beatles used to create their music. He persuaded audio legend
   Ken Scott, who was involved in the recording of five Beatles albums and an engineer for
  “Magical Mystery Tour” and “The Beatles” (also known as the White Album) to work with
   him on Fab Four. He also acquired one of Hollywood’s most famous recording studio
   complexes in 2006, formerly United Western (now EastWest Studios), recipient of more
   engineering awards and RIAA certified Gold and Platinum recordings than any other
   studios worldwide. He persuaded top international design superstar Philippe Starck to
   redesign the non-technical areas of the studios.

   Over the last decade he has partnered with producer/composer Nick Phoenix and set up
   the Quantum Leap imprint, a subsidiary of EastWest, to produce high-quality, no com-
   promise sample libraries and virtual instruments. EastWest/Quantum Leap virtual instru-
   ments are considered the best available and are in daily use by the who’s who of the
   industry. His latest technical achievement was unveiled at the 2007 NAMM convention
  - the world’s first 64-bit audio engine named PLAY, which powers EastWest/Quantum
   Leap’s latest suite of virtual (software) instruments.

Chapter 1: Welcome                                                                       4
T h e E ast W est P L AY S ystem
EastWest Studios
     EastWest Studios (formerly United Western Recorders) is the world’s premiere studio.
     Here is a quote from page 33 of the book Temples of Sound: “United Western Recorders
     has been the scene of more hit records—from the 1950’s to right now—than any other
     studio. No other studio has won more technical excellence awards, and no other studio
     has garnered as many Best Engineered Grammys as this complex of studios on Sunset
     Boulevard.” One thing everyone agrees on: The acoustics and the vibe in the recording
     rooms of 6000 Sunset Boulevard are unmatched.

     EastWest Studios has hosted the who’s who of music for over 45 years. In the begin-
     ning, artists like Bing Crosby, Frank Sinatra, Dean Martin, Sammy Davis, Nat King Cole,
     Johnny Mercer and Ray Charles were recording the hits of the day. Ray Charles’ classic,
    “I Can’t Stop Loving You” was recorded here as well as Sinatra’s, “Strangers In The Night”
     and “That’s Life,” and the legendary Beach Boys “Pet Sounds” album, which was the in-
     spiration for The Beatles’ “Sgt. Peppers” album, was recorded here also. The Mamas and
     Papas “California Dreamin,” “Monday Monday,” and Scott McKenzie’s “San Francisco”
     were recorded here. Elvis Presley recorded his 1968 Christmas special in Studio 1. Fa-
     mous themes for film and television were recorded here including the “M*A*S*H” theme,

Chapter 1: Welcome                                                                         5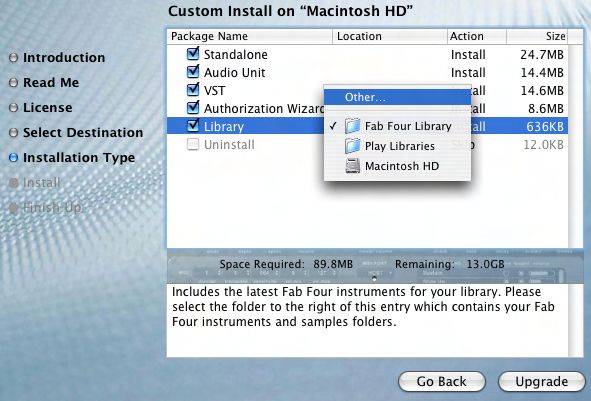
T h e E ast W est P L AY S ystem
  “Mission Impossible” theme, “Hawaii Five-O” theme, “Beverly Hillbillies” theme, “God-
   father” theme, plus much of the “Monkees” and “Partridge Family” television series.

  It would be impossible to name all the musical royalty who have worked at EastWest
  Studios, but here are some of them (in alphabetical order) Christina Aguilera, Herb
  Albert, America, Paul Anka, Fiona Apple, Audioslave, Franky Avalon, Barenaked Ladies,
  Better Than Ezra, Blondie, Buffalo Springfield, Burt Bacharach, Beach Boys, Blink 182,
  Glen Campbell, Canned Heat, Vickie Carr, Carpenters, Johnny Cash, David Cassidy, Ray
  Charles, Chicago, Petula Clarke, Ry Cooder, Elvis Costello, Count Basie & Orchestra, Eric
  Clapton, Nat King Cole, Natalie Cole, Ornette Coleman, Duane Eddy, Jan & Dean, John
  Coltrane, Petula Clark, Joe Cocker, Sam Cooke, Bing Crosby, Bobby Darin, Sammy Davis,
  Jr., Jackie DeShannon, Duke Ellington, Neil Diamond, Fifth Dimension, Bob Dylan, Ellla
  Fitzgerald, Benny Goodman Big Band, Grateful Dead, Grass Roots, Green Day, Guess
  Who, Lani Hall, Herbie Hancock, Don Ho, Whitney Houston, Howlin’ Wolf, Janis Ian,
  Ike & Tina Turner, Incubus, Isley Brothers, Michael Jackson, Elton John, Stan Keaton,
  Carole King, Kris Kristofferson, Franky Laine, K.D. Lang, Avril Laverne, Michel LeGrand,
  Peggy Lee, Little Feat, Trini Lopez, Madonna, Mamas & the Papas, Dean Martin, Johnny
  Mathis, Meatloaf, Sergio Mendez & Brazil 66, Metallica, Johnny Mercer, Paul McCartney,
  Barry Manilow, Scott McKenzie, Natalie Merchant, Bette Midler, Monkees, Alanis Mor-
  rissette, Motley Crue, Muse, Rick Nelson, Willie Nelson, Wayne Newton, Harry Nilsson,
  Nitty Gritty Dirt Band, Ozzy Osborne, Partridge Family, Paul Revere and the Raiders,
  Tom Petty and the Heartbreakers, Pointer Sisters, Iggy Pop, Elvis Presley, Lisa Marie
  Presley, Billy Preston, Rage Against the Machine, Red Hot Chilli Peppers, Kenny Rog-
  ers, Rolling Stones, Ronnie & the Ronettes, Bonnie Raitt, Helen Reddy, R.E.M., Nelson
  Riddle, Righteous Brothers, Johnny Rivers, Ronnie & the Ronnettes, Dianna Ross, San-
  tana, Jimmy Smith, Sonny & Cher, Phil Spector, Tom Scott, Carly Simon, Frank Sinatra,
  Nancy Sinatra, Bruce Springsteen, Steppenwolf, Rod Stewart, Mathew Sweet, Stone
  Temple Pilots, Barbra Streisand, System of a Down, Temptations, The Animals, The As-
  sociation, The Four Tops, The GoGos, The Kingston Trio, The O’Jays, The Vines, The Who,
  Mel Torme, U2, Richie Valens, Stevie Wonder, Tool, Turtles, Sarah Vaughn, Jimmy Webb,
  Weezer, Andy Williams, Nancy Wilson, Young Rascals, Frank Zappa.

  EastWest History
  What’s now called EastWest Studios was founded by Bill Putnam in 1961. Considered
  to be the “Father of modern recording,” he is acknowledged to be the first person to
  use artificial reverberation for commercial recording. He also developed the first multi-
  band equalizers and, with his company Universal Audio, was responsible for the devel-
  opment of classic equipment like the Urei 1176LN and Urei Time Align Monitors. He
  was involved in the early development of stereophonic recording and founded studios in
  Chicago, Hollywood, and San Francisco. He was responsible for a number of innovations
  including: the first use of tape echo and echo chambers, the first vocal booth, the first
  multiple voice recording, the first use of 8-track recording, half-speed disc mastering.

  In 1957, he started United Recording Corp. in a building at 6050 Sunset and started
  new construction on new studios. Stereo was taking off and Putnam was determined
  to incorporate as many technological innovations into the new complex as possible. In

Chapter 1: Welcome                                                                      6
T h e E ast W est P L AY S ystem
  1961, Western Recorders (now EastWest Studios) at 6000 Sunset was acquired, re-
  modeled, and incorporated into the complex with the facilities being known as United
  Western Recorders. After Bill Putnam passed away in 1989, the studio was acquired by
  Allen Sides and renamed Oceanway recording. In 1999 Rick Adams acquired the studios
  and renamed it Cello, and in January 2006 it was acquired by Doug Rogers of EastWest
  Sounds, the #1 sounds producer in the world, with over 50 international awards.

  Looking for a designer to take on the task of refurbishing the exterior and non-technical
  interior areas, while preserving the historic studios, Rogers contacted renowned designer
  Philippe Starck, whose trend-setting work is known the world over for its sheer brilliance
  and beauty. Starck jumped at the opportunity and headed to Hollywood. He insisted on
  restoring all historic elements inside and out, adding new designs to the interior and cre-
  ating a new exterior look that incorporated elements of the current one. Rogers strongly
  supported this. Plans are also afoot by Rogers to add historic names and records to the
  sidewalk on Sunset Boulevard, giving the illustrious studio its own walk-of-fame. Another
  highlight of the restoration has included Rogers’ purchase of other analog studio equip-
  ment to be used for recording the classic way and not just digital (including two EMI
  mixing boards that the Beatles used to record their hits). His plans for reactivating the
  studios are a model for historic and cultural preservation as well as providing EastWest
  with the finest recording environment in the world. In addition to EastWest’s own use of
  the facilities, the five studio complex will be open to a limited number of outside clients
  after the Starck restoration.

Chapter 1: Welcome                                                                        7
T h e E ast W est P L AY S ystem
How to Use This and the Other Manuals
     All documentation for the EastWest PLAY Advanced Sample System and its libraries is
     provided as a collection of Adobe Acrobat files, also called PDFs. They can be viewed on
     the computer screen or printed to paper.

     One advantage of reading this material on a computer screen is the availability of hy-
     perlinks within the document. These links provide the ability to jump directly to a refer-
     enced page elsewhere in the same or a companion document with the click of the mouse.
     When the mouse cursor moves over such a link, it changes appearance. Such hyperlinks
     are available in the list of sections in each chapter title page, as well as for certain indi-
     vidual words and phrases within the chapters.

     By opening the Bookmarks pane along the left edge of the Adobe Acrobat Reader, the
     user can jump directly to a topic from the section names, or to a specific page by clicking
     on one of the page thumbnails (small images of each page). Note that some older ver-
     sions of Acrobat Reader might not support all these features. The latest Acrobat Reader
     can be downloaded and installed at no cost from the Adobe web site. (As an example of
     a hyperlink, click on the last word of the previous sentence to be taken directly to the
     Adobe site.)

     When reading this and other manuals on the computer screen, you can zoom in to see
     more detail in the images or zoom out to see more of the page at once. If an included
     picture of the user interface, or a diagram, seems fuzzy or illegible, then zoom in using
     one of several means provided in the Acrobat Reader software.

     A Note on the Included Images
     Every library that’s part of the EastWest PLAY System has a somewhat different look
     onscreen from the others. The backgrounds vary; the controls are in different places;
     controls present in one library do not exist in some of the others. As a consequence, the
     picture of the user interface (UI) in this manual may not be exactly the same as what you
     see on your screen. The images here were captured from the various libraries available
     when this manual was written.

     For images from a specific library, read the manuals for the individual libraries, as de-
     scribed in the next section.

     Manuals for the Specific Libraries
     Each library in the collection of EastWest and Quantum Leap instruments has its own
     manual. These are separate PDF documents that are copied to your computer’s hard
     drive when each library is installed. Look in the following directories to find the docu-
     mentation files.
     • On a Windows PC: \Program Files\EastWest\Documentation
     • On a Macintosh: \Applications\EastWest\Documentation

Chapter 1: Welcome                                                                              8
T h e E ast W est P L AY S ystem
Library-specific information, such as
• the controls in the user interface
• the modifiable parameters for the articulations
• the list of available articulations, and their intended uses
• and so on
is described in the library PDFs. A description of how to use the PLAY system, the PLAY
software, and any information common to all libraries (for example, how to install them)
is contained in this manual.
The Master Navigation Document
Because the EastWest PLAY System is a collection of components, each with its own
User’s Manual, a Master Navigation Document (MND) is provided to allow users to jump
quickly between these PDFs when being read on the computer screen. This MND is a
one-page file with hyperlinks to the PLAY System documentation and to all the library
manuals. Hyperlinks to this Master Navigation Document are found in the lower-right
corner of the title page of each chapter in each document. From there, you can open any
other document in the collection.
For example, if you’re reading something in the documentation for the Quantum Leap
Pianos library, and need to open the manual for the PLAY System as well, go to any
chapter title page and click on the link that says, “Master Navigation Document.” It will
open in a new window on the computer screen. In that document, click on the icon for
the PLAY System and its manual will open in the same window (hiding the MND). You
now have both the Pianos library manual and the PLAY System manual open in separate
windows so you can refer to them both.
Online Documentation and Other Resources
For the most up to date information, visit the support pages at EastWest’s web site.
There you can find:
• information made available after these manuals were written
• FAQ pages that may already list answers to questions you have
• suggestions from EastWest and other users of the EastWest PLAY System
• news about upcoming releases
The address is:
http://support.soundsonline.com
You can also visit the EastWest online forums. There you can read comments and ques-
tions from others who use EastWest products and post your own. The many forum par-
ticipants are a good source of helpful information about both the technical and musical
aspects of this software.
The address of the forums is:
http://www.soundsonline-forums.com
Chapter 1: Welcome 9T h e E ast W est P L AY S ystem Current PLAY Libraries As EastWest and Quantum Leap add new libraries to the PLAY System, they all work with the same PLAY Advanced Sample Engine you’re running right now. To see a list of all the currently available virtual instruments and/or to purchase them online, click on one of the following links to an online page. For the United States: http://www.soundsonline.com/PLAY-c-54.html For Europe: http://www.soundsonline-europe.com/PLAY-c-54.html Chapter 1: Welcome 10
T h e E ast W est P L AY S ystem

     2. The EastWest PLAY System, An Overview

12   The Architecture
12   The PLAY Advanced Sampling Engine
13   The PLAY System Libraries

                                         Click on this text to open the
                                         Master Navigation Document
		                                                                 11
T h e E ast W est P L AY S ystem
The EastWest PLAY System, an Overview
The Architecture
The EastWest PLAY System is a collection of components that work together to create mu-
sic in an electronic environment. The heart of the system is the PLAY Advanced Sample
Engine, a software sample player designed to work with any of the libraries created es-
pecially for it. The PLAY Sample Engine can run on a Macintosh computer or a Windows
PC, and on both 32-bit and 64-bit platforms.
The PLAY Advanced Sample Engine can generate no sound unless it is loaded with
samples from one or more of the PLAY System Libraries. The engine takes samples—short
recordings of live instruments—from one or more libraries plus MIDI data and molds
them into a musical expression: a single note, an entire piece, or anything in between.
When you buy the license for an EastWest
or Quantum Leap library, the license for
the PLAY Sample Engine is included. As
you install more libraries on the same
computer, they can all use the same
PLAY Sample Engine.
The PLAY Engine
The PLAY Advanced Sample Engine is an
EastWest software program that knows
how to open and play samples in the as-
sociated libraries. It contains the best
sounding and most powerful effects en-
gine available, built from the ground up
for superior quality.
One of the primary initial design points
for the engine was playability. Instead
of forcing the user to focus on techni-
cal issues, the PLAY System provides the
musician intuitive control of each instru-
ment.
The look of the PLAY Engine on the screen depends on what library is currently selected.
The images on this page show two examples (with a red line between them) of how the
PLAY Engine changes when displaying instruments from different libraries. The two li-
Chapter
2: The EastWest PLAY System: An Overview 12T h e E ast W est P L AY S ystem
braries in these examples are the Quantum Leap Pianos and Fab Four. Some aspects of
the user interface, such as the selection controls at the top and the keyboard at the bot-
tom (not shown here), remain relatively constant through all libraries. The controls in the
central section are library-specific and can have very different layouts to accommodate
the varying needs of each library.
The PLAY Engine can be run in either of two modes, as needed:
• In Standalone Mode the PLAY Engine runs as its own program. MIDI and audio connec-
tions are usually made directly with the sound card’s driver.
• In Plug-in Mode the Play Engine runs as part of a host program, usually a sequencer.
The host handles all MIDI and audio connections.
When in Plug-in mode only, it is possible to open more than one instance of the PLAY
Engine at a time. One consideration in deciding how many instances to open simultane-
ously is the question of how many instruments you want to be able to be able to manipu-
late at once through its library’s user interface. (There are other considerations, as well,
some of which may be determined by your choice of host and/or working environment.)
Only one instance of the standalone PLAY Engine can be running at a time. It’s possible
to open as many instruments within that instance as your computer’s resources allow.
The number of unique MIDI channels for playing instruments within a standalone PLAY
Engine is limited by the number of MIDI ports defined; for example, if 10 MIDI ports are
available then 160 instruments can create 160 unique channels. (That’s 10 ports times
16 MIDI channels per port.)
The EastWest PLAY Advanced Sample Engine uses 64-bit processing to take full advan-
tage of the benefits of the new breed of 64-bit processors and operating systems that
are starting to become available. That means accessibility to significantly larger amounts
of RAM and, therefore, the ability to load many times the number of instruments. (The
EastWest software also supports 32-bit processing for full backwards compatibility with
older computers and OS’s.)
For documentation on a specific library and its instruments, go to the separate docu-
mentation for each library. Or open the PLAY System’s Master Navigation Document,
described on page 9.
The PLAY System Libraries
In simplest terms, each library can be thought of as comprising:
• a user interface (UI), the display on the screen and its visible controls
• its instruments
• its samples
(A more in-depth description is provided in the library-specific manuals.)
Chapter
2: The EastWest PLAY System: An Overview 13T h e E ast W est P L AY S ystem
All libraries use the same PLAY Advanced Sample Engine to load and play their instru-
ments. That approach has two consequences worth mentioning here:
• The fist time you install one of these libraries, the PLAY Engine is installed. On subse-
quent installations on the same computer, the setup program installs the new library
and then determines whether the already installed PLAY Engine requires an update.
• In any given instance of the PLAY Engine, you can load instruments from any library
installed and authorized on that computer. For example, let’s say you open an instance
of PLAY and load a Fab Four guitar. You can then load a drum from the Stormdrum 2
library in the same instance. When loading instruments, you can think of all instru-
ments in all the PLAY System libraries you have licensed as a single collection.
Libraries and Instruments in the Browser View
The Browser view is your access to all instruments within all installed libraries. See
Chapter 8 for a more complete description and instructions on how to find specific in-
struments.
Chapter
2: The EastWest PLAY System: An Overview 14T h e E ast W est P L AY S ystem
3. Hardware and Software Requirements
16 System Requirements
17 Supported Audio Drivers
Click on this text to open the
Master Navigation Document
15T h e E ast W est P L AY S ystem
Hardware and Software Requirements
You can run the EastWest PLAY System on any Windows or Apple Macintosh system that
complies with the specifications listed below. Each retail package includes all the files
necessary to function on either the Windows or Macintosh platform. The requirements
listed in this chapter provide a minimum standard required to operate and hardware
recommendations for optimal functioning. Using a more powerful computer system than
the recommendations—a faster processor, more memory (RAM), a hard drive with more
space and/or faster rotation, and so on—is encouraged for larger projects. See the sug-
gestions for improving performance in the online FAQ (Frequently Asked Questions) page
at http://support.soundsonline.com.
System Requirements
The table on the next page lists the computer hardware required to install the PLAY Ad-
vanced Sample Engine and to run a small project. These are guidelines only; the amount
of concurrent processing (including the sequencer, audio and effects processors, other
plug-ins, and so on) can affect the power of the computer resources needed to accom-
plish any specific task.
System Requirements
Computer Type Operating System Hardware
Windows PC • XP SP2 or • P4 2.5 GHz or faster processor
(Required) • VISTA • 1 GB of RAM
• DVD drive
• sound card
• iLok key
• enough free hard drive space for the libraries*
• Internet connection required for one‑time
product activation
continued
Chapter
3: Hardware and Software Requirements 16T h e E ast W est P L AY S ystem
System Requirements
Computer Type Operating System Hardware
Windows PC • Core duo or better processor
(Recommendations) • 2 GB of RAM
• sound card with ASIO drivers
Macintosh • OS 10.4 or higher • G4 1 GHz or faster processor
(Required) • 1 GB of RAM
• DVD drive
• iLok security key (not included)
• enough free hard drive space for the libraries*
• Internet connection required for one‑time
product activation
Macintosh • Core Duo or better processor
(Recommendations) • 2 GB of RAM
* See the library-specific manuals to learn how much free hard disk space is required for
each library. If installing more than one library, the hard drive must have enough free
space to accommodate the sum of all the individual libraries.
The retail copy of the library does not include an iLok security key in the box. If you do
not already own one from another software product, you can buy one at your EastWest
dealer or online at:
www.soundsonline.com/ilok
See the section starting on page 26 for more information on the iLok security key.
Supported Audio Drivers
The PLAY System requires an audio driver to connect to the sound card in the host com-
puter. A variety of different sound cards are available on the Windows and Mac platforms,
each with its own driver. These drivers are normally installed with the sound card, or
they can be acquired separately. Contact the manufacturer of your sound card for more
information.
The table on the next page specifies which audio drivers the PLAY Engine can work with
on each platform. Note that when the PLAY Advanced Sample Player is running as a
plug-in, it uses whichever audio driver is selected in the host’s setup parameters. In this
case, the type of audio driver does not matter as long as your host is compatible with that
driver. For this information, please read your host’s manual.
Chapter
3: Hardware and Software Requirements 17T h e E ast W est P L AY S ystem
Audio Drivers
Computer Type Supported Drivers
Windows ASIO, DirectSound, VST
Mac Audio Units, Core Audio, VST
Note: The information and specifications in this manual are subject to change without
notice.
Chapter
3: Hardware and Software Requirements 18T h e E ast W est P L AY S ystem
4. Installation and Authorization
20 Installation, an Overview
20 Preparing to Install a PLAY System Library
21 Installation Instructions on a Windows Computer
24 Installation Instructions on a Macintosh Computer
26 Authorization, an Overview
26 The iLok Security Key
27 Authorization Instructions
Click on this text to open the
Master Navigation Document
19T h e E ast W est P L AY S ystem
Installation and Authorization
Whether you are installing your first PLAY System library on this computer, or whether
another library is already installed, the process is the same. An Installation Wizard takes
you step-by-step though the process of copying files and setting up parameters in the
operating system. Then an Authorization Wizard authenticates your unique license au-
thorization code online. This chapter and the next walk you through all the steps with the
goal of setting up a system that’s ready to use.
Installation, an Overview
This manual refers to the process of installing a PLAY System library, which includes not
only the instruments and samples but also the EastWest PLAY Advanced Sample Engine.
Each time you install a new library, the Wizard checks the versions and will upgrade the
PLAY Engine if appropriate, but will not downgrade the Engine software just because
what’s in the new installation happens to have an older version.
Although you may be eager to install and use your new PLAY System library, it’s impor-
tant to take a few minutes to plan for what resources the PLAY System requires. The
next section guides you through the questions that need answering before you start the
installation.
Preparing to Install a PLAY System Library
You first need to make sure you have enough free space on the hard drive where you in-
tend to install this library. Sample libraries can have large requirements to hold the many
samples and other files. Look in the library-specific manual on the DVD. It will be in the
same directory as the Acrobat file (PDF) you are currently reading.
Find the section called Hardware Requirements to determine how many gigabytes (GBs)
of free hard disk you need. If you are planning to install more than one PLAY System
library, look in all such manuals and get a total value. If you do not have enough free
space, consider another drive, if available. If you need to buy a new drive, it is very
important with sample libraries that the access and data-transmissions rates are fast;
internal drives are often better than external drives in this regard, but not always. You
may need to do some research, either online or at your computer store.
Installing Larger Libraries
The larger libraries (for example, Quantum Leap Pianos and EWQL Symphonic Orchestra,
Platinum Edition) allow you to install the DVDs in multiple sessions, not all at once. If
you want to break up the installation in that way, read details on how to do that at the
end of the separate Windows and Mac installation instructions before starting.
Chapter
4: Installation and Authorization 20T h e E ast W est P L AY S ystem
Installation Instructions on a Windows Computer
Running the Installer
Before you start to install your first library, make sure the iLok security key is not plugged
into your computer. You will insert it into a USB port at a later time. (You can read more
about the iLok key on page 26.)
Use the Windows Explorer in Windows, or Finder on a Macintosh, to open the drive where
you inserted the DVD. (You may have already done that if you found this manual on the
DVD.) There’s a file in the root directory that includes the text “installer” in its name.
Run this file, which steps you through the process. It asks a few questions and then cop-
ies the needed files to the appropriate folders on the computer’s hard drive.
What follows are the screens the installer presents. If you need to go back to change an
earlier answer, you can always click on the Back button. Or click on Cancel to stop the
installation process without installing the library. Nothing is installed until you click the
Next button on the page where it says it’s ready to install the application.
Welcome and License Screens. A first
screen recommends that you close
all other programs and it presents
legal information about copyrights
for the product. Click on the Next
button to move to a screen that
asks you to accept the license
agreement. You cannot install un-
less you accept. Neither of these
screens is shown here.
Installation Type Screen. You are giv-
en a choice of how much of the
product you want to install. Select
“Typical” unless you plan to install
a large library in multiple sessions,
in which case first read the sec-
tion about Large Libraries starting
on page 23 below. Click the Next
button.
Library Folder Screen. You are asked
where the instrument files and
sample files should be stored.
Select the drive and folder you
picked when planning the installa-
tion (above). If the folder listed in
the screen is not correct, click on
Chapter
4: Installation and Authorization 21T h e E ast W est P L AY S ystem
the Browse button to change to a different one. When the correct drive and folder are
listed, click on Next.
VST Folder Screen. It is standard for
VST plug-ins to be stored in a sin-
gle location in the file system. Use
this screen to specify the location.
If you have other VST instruments,
you can use the Browse button
to change to that path. Or, if you
choose, you can accept the default
value. When the displayed path is
what you want, click on the Next
button.
Ready To Install Screen. At this point
all questions have been answered.
Click on the Next button and all
the indicated files will be copied
to the file system.
You will see several other screen
appear briefly and disappear on
their own. This is normal; it indi-
cates the progress being made.
Success Screen. If all went as it
should, you are notified of a suc-
cessful installation. If an error oc-
curs, see whether you can resolve
the problem. Or contact technical
support at EastWest for assistance.
Click the Finish button to end the
installation program.
Once the PLAY System is installed,
the several disk’s worth of samples
Chapter
4: Installation and Authorization 22T h e E ast W est P L AY S ystem
need to be copied to the hard drive. When asked, replace each DVD with the next until
all samples have been copied.
One more step is required to compete the installation. It’s
necessary to reboot the computer before you can run the
PLAY System successfully. Selecting “reboot now” and click-
ing OK initiates the reboot process. If you have work open
in another program, make sure you save everything before
clicking on OK.
Note that if you are installing more than one library at this
time, you can wait until all libraries have been installed before performing the reboot,
but you will not be able to run any library successfully until it gets done.
Installing Large Libraries on a Windows Computer
If you want to install only a part of a large library (such as only the Yahama piano from
Quantum Leap Pianos), follow these steps:
• When initially installing the vir-
tual instrument, choose “Cus-
tom” when asked the type of
installation to do. Then select
all the software components
you plan to install (for example,
Standalone, RTAS, VST, and
the Authorization Wizard) and
as many of the libraries as you
want to install during this ses-
sion. The image at the right
shows all the software compo-
nents, and only one of the four
pianos, the Yamaha, selected.
• When you’re ready to install another part of the library, restart the installation pro-
gram, and when asked for the type of installation to perform, select “Modify.” When
you see the “Select Features” screen, like the one above, the Windows installer re-
quires that you select the same software components and drivers as before (or else
those component will be removed from your computer). For the library, select only
the part of the library you want to add to your hard drive. Do not re-select the part of
the library already installed. For example, if you wanted to install only the Bechstein
this time, remove the red X from the Bechstein part of the library and choose the red
X next to the Yamaha.
Chapter
4: Installation and Authorization 23T h e E ast W est P L AY S ystem
The Platinum and Platinum Plus editions of
EastWest Quantum Leap Symphonic Orchestra
also provide an alternative approach to instal-
lation. The first DVD includes a folder named
“Library Installers.” As seen in the image at the
left, this folder contains installers for each of
the four orchestral families (strings, woodwinds,
brass, and percussion). And if you have bought a license for Platinum Plus, you can
install the “Plus” content separately as well (though always after installing the primary
libraries).
Installation Instructions on a Macintosh Computer
Introduction, ReadMe and License Screens. These first three screens let you know if there’s
anything that makes it impossible to install the software and present important notes as
well as the license agreement. Click on Continue and agree to the license until you arrive
at the Destination Screen. These first screens are not shown here.
Destination Screen. Select the
volume on which you want to
install the PLAY Engine soft-
ware. Only the root volume will
be available. The software may
only be installed on the running
system drive.
Note that you are choosing
where to install the PLAY En-
gine; where to install the many
Gigabytes of the library sam-
ples will be selected on a later
screen.
Installation Type Screen. This image is on the next page. On this screen you can select what
parts of the package you want to install. To the right of the Library selection is a folder.
If you do not change the folder, the library will be installed in:
your root hard drive/Play Libraries/[LibName]Library
where “[LibName]” is the name of the library you are currently installing.
To change this, click on the folder in the Location column and select “Other….” It is
recommended that you create a folder called “[LibName] Library” at the location you
want to install into; however, this is not required.
Chapter
4: Installation and Authorization 24T h e E ast W est P L AY S ystem
Note that if you uncheck all boxes, the Uninstall checkbox will become checked. This
will uninstall everything except the samples. And if you explicitly check the Uninstall
checkbox, the other options will become disabled.
Depending on whether
any components are
installed already, the
Action column might
read Install or Upgrade.
The same holds true for
the button at the lower
right: it might say In-
stall or Upgrade. If you
have a newer version of
any component on your
system, the checkbox
is unchecked and dis-
abled and the action
reads Skip. Under most
circumstances, the des-
tination folder for the library is the only thing that needs your attention.
After you choose to continue, Mac OS X asks for your password. Please make sure to
have it ready.
Once the installer starts to copy files, you will be asked to insert consecutive DVDs into
the drive until all content has been copied.
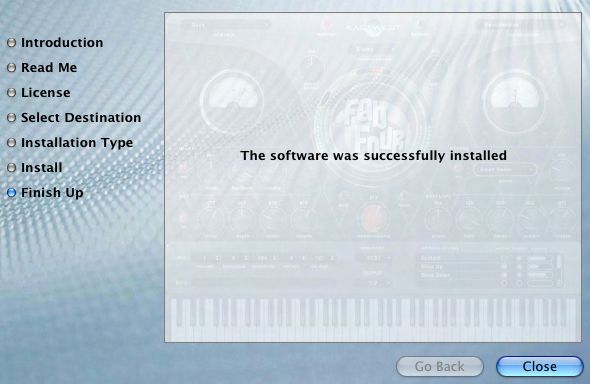
Success Screen. If all went as
it should, you are notified of a
successful installation. If an er-
ror occurs, see whether you can
resolve the problem. Or contact
technical support at EastWest
for assistance. Click the Finish
button to end the installation
program.
Chapter
4: Installation and Authorization 25T h e E ast W est P L AY S ystem
Installing Large Libraries on a Mac Computer
If you want to install only a part of a large library (such as only The Steinway D piano
from Quantum Leap Pianos), follow these steps:
• When initially installing the virtual instrument, select all the software components (for
example, Standalone, Audio Units, VST, and the Authorization Wizard) and as many of
the libraries as you want to install during this session. See the screen titled “Custom
Install” above; it is on that screen that the multiple parts of the library will appear.
• If, at a later time, you want to install any other part(s) of the library, reopen the same
installer. When you get to the page “Custom Install,” select only the part of the li-
brary that you want to install in this session. You do not have to reinstall any software
components.
Authorization, an Overview
When you buy a license to an EastWest PLAY System library, it includes an authorization
code. This is a unique string of characters that identifies the license. You need to convey
this to an online database that can verify no one else has used this code. If it passes
verification, you are granted the license which is placed in a physical security key (see
below).
When you run the Authorization Wizard, it asks you to log in. If you have already created
a Username and Password at www.soundsonline.com, you can use it. Otherwise, create
a new account using the link in the Authorization Wizard. See below for instructions
When an instrument from a library is opened in the PLAY Engine, the program verifies
that there’s a security key attached to the computer. Only if there’s a valid license for
that library in the key will the PLAY Engine generate sounds for that instrument.
See instructions starting on page 27 for how to perform the authorization step.
The iLok Security Key
An iLok key is a hardware device made available by PACE Anti-Piracy, Inc., that can hold
licenses for software installations. A PLAY System library will not function unless the
iLok key holding the appropriate license is inserted into a USB port on the computer run-
ning the library. It does not matter which USB port is used: back, front, or on a hub.
If you own two or more PLAY System libraries and intend to run them from the
same computer, all the licenses can reside in the same iLok key. If you use other
software products protected by the iLok system, the licenses for the PLAY Sys-
tem libraries can reside in the same key as the licenses of those other software products,
up to one hundred per physical key. If you plan to run PLAY System libraries concurrently
on separate computers, then you need a separate security key for each computer. If you
need to run the same PLAY System library concurrently on multiple computers, you need
a separate license for each computer.
Chapter
4: Installation and Authorization 26T h e E ast W est P L AY S ystem
If you have installed a single PLAY System library on two separate computers—for ex-
ample, a laptop and a desktop computer—and you intend to use only one at a time, then
you can move the iLok between the two computers. At any given time, the library will be
functional only on the computer with the iLok key attached.
If you are running the PLAY System on a network and a library’s files are on a different
computer than the PLAY Advanced Sample Engine accessing those files, then the iLok
key needs to be in a USB port of the computer where the PLAY Engine is running.
The license for PLAY System libraries can be moved from one physical key to another at
any time, and moved as often as you need to. The moving of licenses between keys, as
well as other maintenance, can be done at a web site maintained by PACE Anti-Piracy,
Inc.: www.ilok.com.
Authorization Instructions
The authorization process requires that an iLok security key be attached to the computer.
Insert the iLok you are planning to use for this library in a USB port. The computer must
be connected to the Internet. (If the computer on which you will be running this library
is not connected to the Internet, see the instructions below.)
Once a library has been successfully installed, an application called
the Authorization Wizard appears in your EastWest programs. When
you start this program, a window opens that looks like the image at
the left. Enter your Username and Password, as described in the au-
thorization overview, above. If you plan to authorize more EastWest
products in the future, you might want the wizard to remember them
so you don’t have to. If so, check the boxes for those options.
In the five boxes labeled Authorization Code, enter the code that you
received with your purchase. (Once you have entered 4 characters
in a box, the cursor moves automatically to the next box, so there’s
no need to use the tab key or mouse to move from box to box.) When
all 5 boxes are filled, the Authorize button becomes active. Click on
it to transmit this data to the online Authorization Server.
Note the links on this page for creating or modifying your account and for retrieving a
lost password. If you do not yet have an account for logging in, create one with this first
link.
A reminder appears asking whether you are sure you want
to authorize the library now, because this process cannot
be undone. Click on Yes to proceed.
Chapter
4: Installation and Authorization 27T h e E ast W est P L AY S ystem
A progress bar appears next. The window briefly describes each
step until the process finishes. If the Username and/or Password
is incorrect, or if the Authorization Code is either invalid or al-
ready used in a prior authorization, you will be notified at this
time.
When the authorization completes successfully, you see
the screen at the right. You are now finished and can au-
thorize other EastWest products if you choose to do so.
Authorizing a Library When Your Music Computer Is Not on the Internet
If the computer on which you will
be running your EastWest libraries
does not have an Internet connec-
tion, you can perform the autho-
rization on another computer as
long as you insert the iLok security
key in a USB port of that Internet-
connected machine. That is, the
license is stored in the iLok and
not the computer, so the iLok has
to be at least temporarily online
and then, once authorized, can be
moved back to the computer where
the PLAY System will be running.
From the same DVDs you used to install the PLAY System library, rerun the install on the
Internet-connected computer, but this time install only the Authorization Wizard. The
procedure is the same as what’s described above, except when you are ready to select
the type of installation. On a Windows PC choose Authorization, as in the image above.
On a Macintosh, uncheck everything except the Authorization Wizard in the image on
page 25.
Continue as if for a full installation, except that not all screens will appear. After com-
pleting the installation of the Authorization Wizard on your Internet-connected computer,
follow the instructions as presented above.
Note: if your music computer and Internet-connected computer are different types (Mac
and PC), that is not a problem. The iLok security key is completely portable between the
two systems.
Chapter
4: Installation and Authorization 28T h e E ast W est P L AY S ystem
Individual iLok Drivers
The drivers for the iLok security key are installed as part of the installation procedures
described above. Therefore, under most conditions you do not have to work directly with
the iLok driver installation programs. The following files in the folder “Pace Driver In-
stallers” are included on DVD # 1 only for the unlikely case that a problem is discovered
with the drivers:
• iLokx32Setup.exe: installs the driver for the security key
• Tpkdx32Setup.exe: installs the driver that the PLAY Engine uses to check for a valid
license
• setup.exe: installs both of the drivers mentioned above
Note that in a 64-bit environment, the “32” in the file names will be “64” instead.
If a problem occurs with your installation, EastWest Technical Support might ask you to
run one of these files.
Chapter
4: Installation and Authorization 29T h e E ast W est P L AY S ystem
5. Getting Started
31 Verifying the Installation
32 The Settings Dialog
37 Playing a First Note
39 Next Steps
Click on this text to open the
Master Navigation Document
30T h e E ast W est P L AY S ystem
Getting Started
Once the setup program finishes and the authorization is complete, you’re probably ea-
ger to use your new software, but there are still a few tasks that need to be performed
to integrate PLAY with your hardware and software environment. This chapter walks you
through the process of customizing your setup.
You will need to do most of these steps only the first time you install one of the PLAY
System Virtual Instruments. For example, if you did a full installation of Quantum Leap
Ministry of Rock and you’re now ready to install EastWest/Quantum Leap Symphonic Or-
chestra, you should only need to do these steps again if the new installation isn’t working
as expected.
You may want to return here if the software ever stops working, which could happen, for
example, when you install new hardware and/or software.
In addition, some of the tabs in the Settings dialog, described later in this chapter, can
be used to fine-tune the performance of PLAY for your specific hardware environment.
Verifying the Installation
Step 1: Open the PLAY Engine
The best way to test whether the PLAY Advanced Sample Engine is correctly installed
is to open the PLAY Engine as a stand-alone program (that is, not as a plug-in in a se-
quencer or other host). To do this, open one of the libraries by choosing it from the list
of installed programs:
• On a Windows PC: Start > Programs > East West > [library name]
• On a Mac: Applications folder, double-click on “East West,” open [library name]
If the Setup routine installed the library’s icon on your desktop—or if you put one there
manually—then you can also open the standalone version by double-clicking on that
icon.
If the library’s window opens, then the software is correctly installed; go to Step 2. If it
does not open and there’s an error message, try to correct the problem specified in the
message. If there’s no error message and no window appears, then verify that all the
steps in the Installation and Authorization chapter were followed. If necessary, rerun the
setup program.
Chapter
5: Getting Started 31T h e E ast W est P L AY S ystem
The Settings Dialog
Step 2: The “Audio” Tab
The next task is to configure the Audio
connections. Click on the Settings but-
ton near the top of the PLAY window.
A dialog similar to the one shown here
opens. There are six tabs at the top. In
this step, the Audio tab should be se-
lected.
If in doubt about which of the options
to select when following the directions
below, check the documentation that
came with your audio card. And remem-
ber that all your digital audio software
should be using the same settings.
From the Audio Device drop-down, se-
lect the audio driver or audio hardware
to which the audio signal should be
sent.
The Sample Rate drop-down lists the
values supported by your sound card. Select the value you will be using in your current
audio project. Note that if you cannot open this drop-down list it means sample rate—
and audio buffer size—need to be set in your audio driver. In the image above, the two
drop-down lists are grayed because they need to be set in the ASIO driver.
Select the same Audio Buffer Size that is specified in your audio driver (ASIO, Direct-
Sound, CoreAudio, etc.).
The Output Channels item on this tab reports the number of audio output channels avail-
able on your sound card. This is static data provided for your information; it cannot be
changed.
The image above shows a button named ASIO Settings. You will only see this button if
you are using an ASIO driver in Microsoft Windows. It is provided as a shortcut so you
can open the driver to set Sample Rate and Audio Buffer Size.
Further down this tab is a group of controls called Test Tone. These controls can be used
to verify that audio being generated by PLAY is correctly routed to your speakers, head-
phones, or any other destination. Use the two sliders to set the frequency and volume,
then click on the long button to start or stop the tone. Make sure to keep the volume in
the midrange at first, especially if the sound is being sent to headphones.
Chapter
5: Getting Started 32T h e E ast W est P L AY S ystem
Note that the settings in the Audio tab apply only when a PLAY System library is running
in standalone mode, that is, not inside a sequencer or other host. When used as a plug-in,
the PLAY System uses the settings selected in its host.
If you make changes here and want to save them before moving on to another tab, click
on the Apply button.
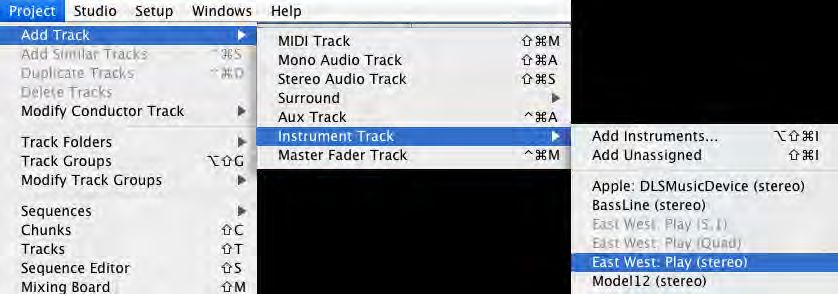
Step 3: The “MIDI” Tab
The MIDI tab allows the user to specify which
MIDI sources can send data to the PLAY En-
gine. The types of devices that will be listed
here include MIDI keyboards, control surfaces,
and sound cards. For each device, turn it to the
On or Off state by clicking in each checkbox. A
check in the box means that PLAY will respond to MIDI data from that source. Each click
toggles the value between On and Off.
All devices turned On here appear in the MIDI Port drop-down list in the main window
for the library. To keep that list short, turn on only the sources that are expected to send
MIDI data: notes and control codes. These values can be changed later if needed.
Step 4: The “Streaming” Tab
Steps 4, 5, and 6 are more advanced.
It’s not necessary to adjust these set-
tings during the initial setup; instead,
you may want to return to this part of
the manual after you have experience
with the product. If this is your first
time installing PLAY, you should read
these three sections quickly to know what’s provided and then move on to Step 7.
Disk Streaming is a technology that provides most of the benefits of having all the
sample data in RAM without requiring the many, many Gigabytes of memory that would
require. Only enough data is maintained in RAM to start playing each required sample
immediately and the rest is streamed from the disk on demand.
Changing the Engine Level control from 0 up to 5 provides six different standardized
settings to control how many buffers are allocated in RAM memory and how large those
buffers are. As shown in the image above, the parameters affected by the Engine Level
are: size of the Engine Memory, the Maximum Voices, and the sizes of the Prime and
Play Buffers.
The Play Buffer holds data being streamed until it’s ready to be used. The Prime Buffer
holds the data loaded into RAM when the instrument is first loaded; it’s used to generate
the initial sound of each note while the rest of the note’s data is being streamed from
disk into the Play Buffer.
Chapter
5: Getting Started 33T h e E ast W est P L AY S ystem
Start out with the default setting of 2 in the Engine Level spin control. This setting will
be right for most users. If you have a larger than typical amount of RAM, you might want
to set it somewhat larger, but only 1 level at a time. Conversely, if your computer is low
on RAM, try lowering this setting. Also, the higher the level the longer it takes to set up
the buffers at startup, so smaller values give you a faster load time.
A setting of 5 is rarely a good choice because that setting can use up RAM very quickly
as you add new instruments. The main reasons to consider increasing the level are:
• you start having problems with pops, clicks, and other noise during playback
• you have a slow hard drive
• you are streaming samples from other computers on a network
• you are using multiple instruments that require lots of voices
In general, use the lowest level that causes no problems.
Note that if you set the Engine Level too high for the available hardware resources, PLAY
is smart enough to attempt to adjust the parameters to more closely correspond to what
your computer can handle.
If your RAM usage in the Info display (page 61) gets very close to 100%, consider reduc-
ing the Engine Level. The best choice depends on many factors, so sometimes trial and
error is the best approach in finding optimal settings.
Advanced: These Streaming parameters are factors tied to the audio buffer size and con-
tent format. This is different from some other engines where the sizes are static values.
Step 5: The “Overload” Tab
This tab provides 2 controls that allow
you to specify how much of your com-
puter’s processing power is available to
the PLAY Engine. This can be turned
On or Off by clicking on the “Enabled”
checkbox. The spin control allows you
to specify the percentage of the computer’s central processor that PLAY can use.
If the CPU Load exceeds the specified percentage, PLAY will lower the load by dropping
those voices that started playing earliest. A CPU overload can cause digital artifacts,
such as audible pops, short drops in the audio output, and other problems, which usually
sound worse than dropping old voices. This protection is most often needed in projects
with lots of instruments playing at once. During playback of your project, keep an eye on
the CPU display in the Player view to see how close the CPU is to reaching the Overload
parameter you set in this dialog.
As a general rule, set the CPU Load Limit control as high as possible without getting the
digital artifacts. Finding the right setting for your environment may be a matter of trial
and error.
Chapter
5: Getting Started 34You can also read