The Kipi Plugins Handbook - Gilles Caulier Gerhard Kulzer
←
→
Page content transcription
If your browser does not render page correctly, please read the page content below
The Kipi Plugins Handbook
        Gilles Caulier
        Gerhard Kulzer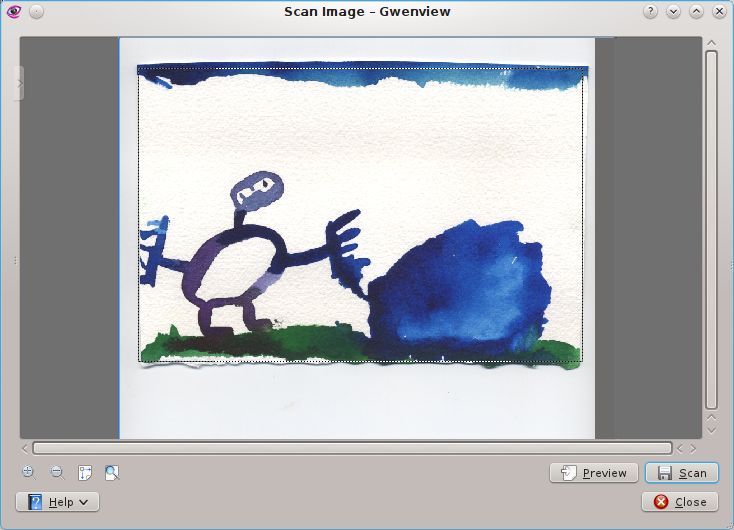
The Kipi Plugins Handbook

           2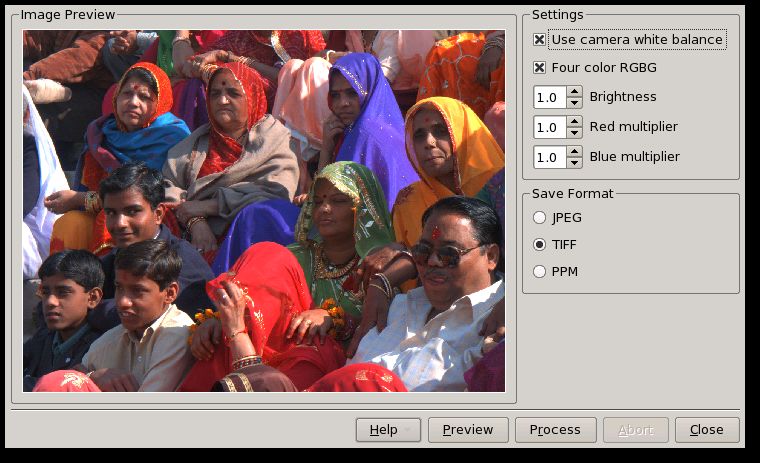
Contents

1   Introduction to Kipi Plugins                                                                                                                                          7

2   Acquire Images                                                                                                                                                        9
    2.1   Scanner Selection . . . . . . . . . . . . . . . . . . . . . . . . . . . . . . . . . . . . . .                                                                   9
    2.2   Main Window . . . . . . . . . . . . . . . . . . . . . . . . . . . . . . . . . . . . . . . .                                                                    10
    2.3   Scanning . . . . . . . . . . . . . . . . . . . . . . . . . . . . . . . . . . . . . . . . . . .                                                                 11
    2.4   Scanning Multiple Selections . . . . . . . . . . . . . . . . . . . . . . . . . . . . . . .                                                                     13
    2.5   Help and Close . . . . . . . . . . . . . . . . . . . . . . . . . . . . . . . . . . . . . . .                                                                   13

3   Color Images                                                                                                                                                         14

4   Convert Images                                                                                                                                                       15

5   Effect Images                                                                                                                                                        16

6   Filter Images                                                                                                                                                        17

7   Flickr Export                                                                                                                                                        18
    7.1   Plugin initialization on first access . . . . . . . . . . . . . . . . . . . . . . . . . . . .                                                                  18
    7.2   Regular Plugin Usage . . . . . . . . . . . . . . . . . . . . . . . . . . . . . . . . . . . .                                                                   19

8   Geolocation Editor                                                                                                                                                   22
    8.1 Geolocation . . . . . . . . . .      .   .   .   .   .   .   .   .   .   .   .   .   .   .   .   .   .   .   .   .   .   .   .   .   .   .   .   .   .   .   .   22
        8.1.1 The correlator . . . . .       .   .   .   .   .   .   .   .   .   .   .   .   .   .   .   .   .   .   .   .   .   .   .   .   .   .   .   .   .   .   .   22
        8.1.2 Edit Coordinates . . .         .   .   .   .   .   .   .   .   .   .   .   .   .   .   .   .   .   .   .   .   .   .   .   .   .   .   .   .   .   .   .   24
        8.1.3 Commandline tagging            .   .   .   .   .   .   .   .   .   .   .   .   .   .   .   .   .   .   .   .   .   .   .   .   .   .   .   .   .   .   .   25

9   Images Gallery                                                                                                                                                       27
    9.1   Collections Selection Dialog . . . . . . . . . . . . . . . . . . . . . . . . . . . . . . . .                                                                   27

10 OpenGL Imageviewer                                                                                                                                                    32

11 JPEG Loss Less                                                                                                                                                        34

12 Metadata Editor                                                                                                                                                       35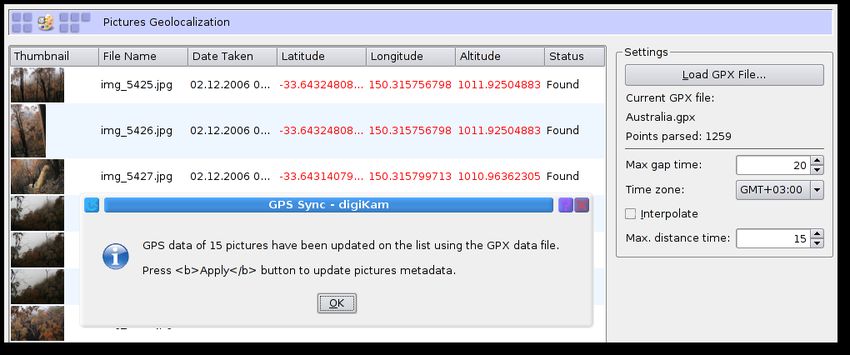
The Kipi Plugins Handbook

13 Print Wizard                                                                                         36

14 Raw Image Converter                                                                                  37
   14.1 Single Conversion Dialog . . . . . . . . . . . . . . . . . . . . . . . . . . . . . . . . .      37
   14.2 Batch Conversion Dialog . . . . . . . . . . . . . . . . . . . . . . . . . . . . . . . . . .     38

15 Recompress Images                                                                                    40

16 Rename Images                                                                                        41

17 Resize Images                                                                                        42

18 Send Images                                                                                          43
   18.1 Using the Module . . . . . . . . . . . . . . . . . . . . . . . . . . . . . . . . . . . . . .    43
         18.1.1 Image Selection . . . . . . . . . . . . . . . . . . . . . . . . . . . . . . . . . . .   43
         18.1.2 Mail Settings . . . . . . . . . . . . . . . . . . . . . . . . . . . . . . . . . . . .   44
         18.1.3 Email Images in Action . . . . . . . . . . . . . . . . . . . . . . . . . . . . . .      44

19 The Advanced Slide Show                                                                              46
   19.1 The Settings Dialog . . . . . . . . . . . . . . . . . . . . . . . . . . . . . . . . . . . . .   46
   19.2 Slide Show in Action . . . . . . . . . . . . . . . . . . . . . . . . . . . . . . . . . . . .    47

20 Credits and License                                                                                  49

21 Index                                                                                                50

                                                    4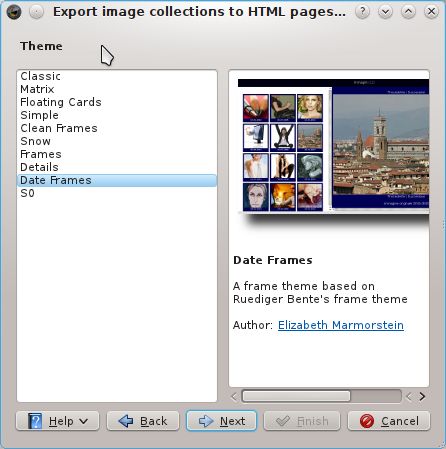
The Kipi Plugins Handbook

List of Figures

 7.1   The First Sign Up Dialog Preview . . . . . . . . . . . . . . . . . . . . . . . . . . . . .    18
 7.2   The Successful Signup Flickr page . . . . . . . . . . . . . . . . . . . . . . . . . . . .     19
 7.3   Current Permissions Dialog preview . . . . . . . . . . . . . . . . . . . . . . . . . . .      19
 7.4   The Main Uploading Dialog Preview . . . . . . . . . . . . . . . . . . . . . . . . . . .       20
 7.5   The Uploading Progress Dialog Preview . . . . . . . . . . . . . . . . . . . . . . . . .       21

 9.1   The Collections Selection Dialog in digiKam . . . . . . . . . . . . . . . . . . . . . .       28
 9.2   The Collections Selection Dialog from other applications . . . . . . . . . . . . . . .        28
 9.3   The Theme Selection Dialog . . . . . . . . . . . . . . . . . . . . . . . . . . . . . . . .    29
 9.4   Parameters for Classic Theme . . . . . . . . . . . . . . . . . . . . . . . . . . . . . . .    30
 9.5   The Image Settings and Thumbnails Dialog . . . . . . . . . . . . . . . . . . . . . . .        30
 9.6   The Output Dialog . . . . . . . . . . . . . . . . . . . . . . . . . . . . . . . . . . . . .   31

 14.1 The RAW Converter Dialog in Single Mode . . . . . . . . . . . . . . . . . . . . . . .          38
 14.2 The Batch RAW Converter Dialog . . . . . . . . . . . . . . . . . . . . . . . . . . . . .       39

 18.1 The Email Images Dialog . . . . . . . . . . . . . . . . . . . . . . . . . . . . . . . . . .    44
 18.2 The E-mail Images Plugin in Action . . . . . . . . . . . . . . . . . . . . . . . . . . .       45

 19.1 The Slideshow Dialog . . . . . . . . . . . . . . . . . . . . . . . . . . . . . . . . . . .     47
 19.2 The Advanced Slideshow Plugin in Action . . . . . . . . . . . . . . . . . . . . . . .          48

                                                 5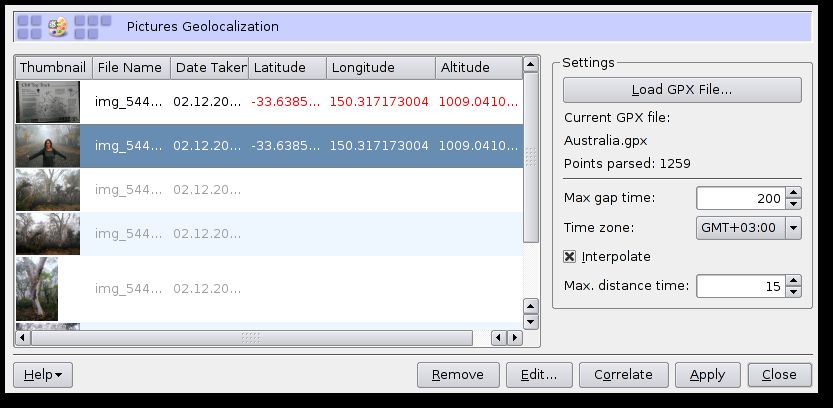
Abstract

This is the handbook for the plugins of Kipi, the KDE Image Plugins Interface.
The Kipi Plugins Handbook

Chapter 1

Introduction to Kipi Plugins

One of the nicest things about KDE photo management programs like digiKam, KPhotoAlbum,
Gwenview and ShowImg is how easily their functionality can be extended, by using plugins.
The Kde Image Plugins Interface (KIPI) project can manipulate image files in almost any way
that users can. Their advantage is that it is much easier to add capabiltiies to the host application
by writing a small plugin rather than by modifying the host application’s core. Many valuable
plugins have C++ source code that only amounts to 100-200 lines or so.
Kipi plugins are additional functions for the KDE Image Managment Host Programs. They can
add extra menus and shortcuts, and extend the host program’s features. You can install as many
or as few as you like, from within host programs.
More information on using and enabling the plugins you want is available in the host program’s
handbook.
The plugins available in this handbook are:

• Acquire Images plugin
• The Calendar plugin is a tool to create calendar from image collections
• Color Images plugin
• Convert Images plugin
• Effect Images plugin
• Filter Images plugin
• The Find Duplicate Images plugin is a tool for find duplicate photograph on your image col-
  lections
• Remote Flickr Export plugin
• The Gallery Export plugin is a tool for export image collections to a remote Gallery server
• Geolocation plugin
• Images Gallery plugin
• OpenGL Imageviewer plugin
• JPEG Loss Less plugin
• Metadata Editor plugin
• Print Wizard plugin

                                                 7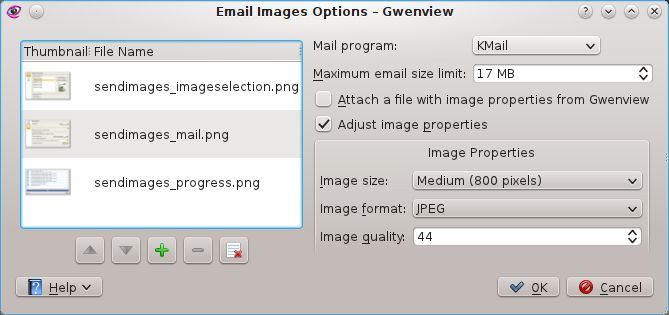
The Kipi Plugins Handbook

• Raw Converter plugin
• Recompress Images plugin
• Rename Images plugin
• Resize Images plugin
• Send Images plugin
• Slide Show plugin
• The Time Adjust plugin is a tool for adjusting image files timestamp

A lot of Kipi plugins currently have no documentation. If you are interested in rectifying that
situation, please contact the Kipi team mailing list at kde-imaging@kde.org.

                                               8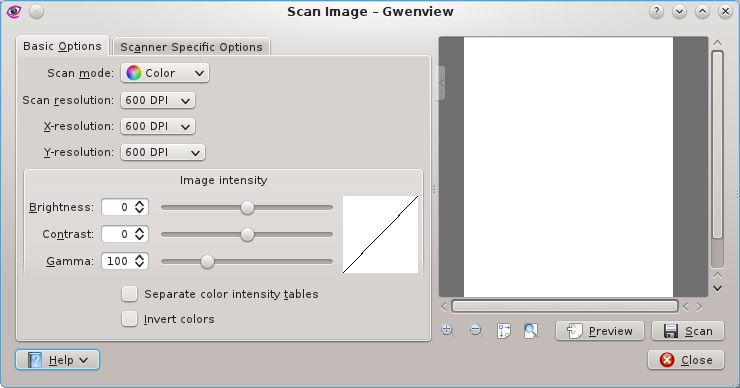
The Kipi Plugins Handbook

Chapter 2

Acquire Images

Kåre Särs
Anne-Marie Mahfouf

      The Kipi acquire images plugin is a tool to scan images using a flat scanner.

This plugin can be used to scan images using a flat scanner. The plugin uses libksane, a KDE
interface for SANE library to control flat scanners.
It can save images in all the formats supported by KDE. For example the following formats:

• png (8 and 16 bits per color)
• jpeg, jpg, jpeg 2000
• bmp

  N OTE
  You can check the status of your scanner support from the SANE project website by entering the
  information on this search page: http://www.sane-project.org/cgi-bin/driver.pl.

2.1     Scanner Selection
If the selected scanner cannot be opened or if no default scanner is provided, a scanner selection
dialog is opened.
The user can choose the scanner to be used and press OK to open the scanner. Pressing Cancel
will cause the plugin to exit.

                                                9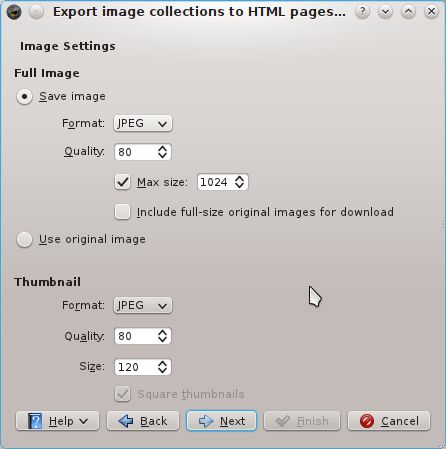
The Kipi Plugins Handbook
In case no devices were found, maybe because the scanner is not plugged in or switched off,
correct that. Then the Reload device list can be used to reload the list of scanners.
N OTE
Not all drivers/backends support this feature. In that case quit the plugin, connect your scanner and
restart the application.
2.2 Main Window
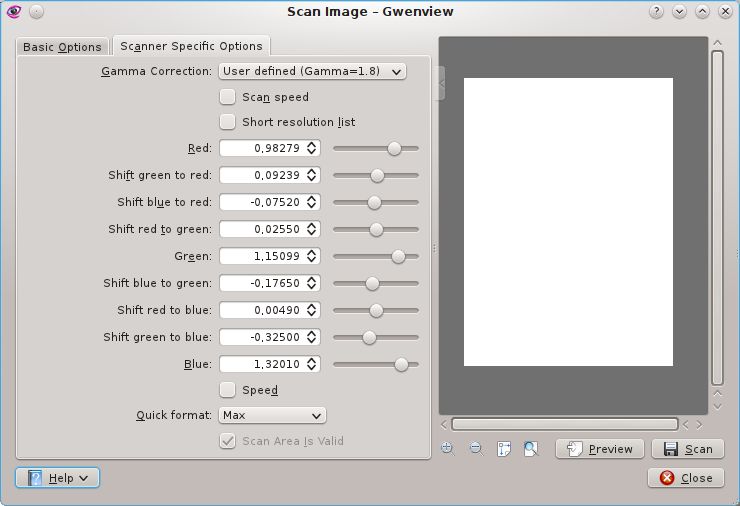
In the main window, the user has two sets of scan options: Basic Options and Scanner Specific
Options. The Basic Options tab contains the most common parameters that the SANE scanner
backends provide, while the Scanner Specific Options tab contains all the options of the backend.
The options listed here depend on SANE support for your driver: libksane (which the plugin
10The Kipi Plugins Handbook
uses) should be able to display most of the types of parameters that SANE provides (analog
gamma tables are not supported at this time).
The scanner specific options contains more detailed options of the backends. The plugin does not
have any special handling for these options.
If you are satisfied with your settings, you can use the little arrow on the top of the options
splitter. When clicked it collapses or expands the options. The collapser can overlap the preview
area, but fades away when the mouse cursor moves out of the collapser.
2.3 Scanning
To scan an image, the user can start with a preview scan and then select the part of the scan area
to do the final scan on. The preview scan is started by pressing the preview button.
When the preview is scanned the area for the final image can be selected.
11The Kipi Plugins Handbook
To better select the image the user can zoom in, out, to the current selection or zoom to fit the
whole preview to the window.
When the image is selected the final image can be acquired by pressing the final scan button.
You will see the progress of the scan.
12The Kipi Plugins Handbook
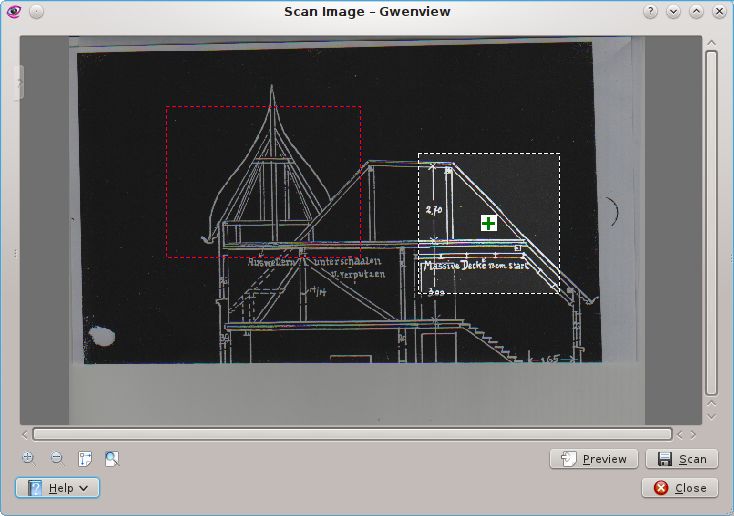
2.4 Scanning Multiple Selections
Sometimes you need only certain parts of an image. Instead of scanning the whole picture and
then using a graphics application (e.g. KolourPaint) to save the different image parts into sepa-
rate files, use the plugins multiple selection feature.
Scan a preview and then use the left mouse button to select the first part of the image in the
preview. Hover the selected area with mouse cursor and click on the green + icon to select the
area. Selected areas are indicated by a red border. Now select the next parts of the image in the
same way.
To remove a single selection hover the area with the mouse cursor and click on the red - icon. With
Clear Selections from the context menu launched with the right mouse button all selections in a
preview can be removed.
If you placed two separate images or photos on you scanner and started a preview the plugin
automatically preselect the different areas.
If you are satisfied with your choice starting the final batch scan of all selections. The selected
parts of the image are scanned and saved separately into different files.
2.5 Help and Close
At the bottom of the main window you find the Help and Close buttons.
The Help button brings up the menu described in the section Help Menu of the KDE Fundamen-
tals. The Close button is used to exit the plugin.
13The Kipi Plugins Handbook
Chapter 3
Color Images
Gilles Caulier
The Kipi Color Images plugin is a tool to change or improve the images’ color render-
ing.
This plugin can be used for batch colors enhancement of images in an Album. It uses the convert
program from the ImageMagick package. A plugin effect preview (partial or full) is available.
Ten color filter types are available:
• Decrease Contrast: reduces the image contrast.
• Depth: changes the color depth of the image.
• Equalize: performs histogram equalization to the image.
• Fuzz: merges colors within a distance are considered equal.
• Gray scales: converts colors images to gray scales image.
• Increase Contrast: enhances the image contrast.
• Monochrome: transforms the image to black and white.
• Negate: replaces every pixel with its complementary color.
• Normalize: transforms image to span the full range of color values.
• Segment: segments an image by analyzing the histograms of the color components.
• Trim: trims an image (fuzz reverse technic).
You can see some samples built with this plugin at this URL.
14The Kipi Plugins Handbook
Chapter 4
Convert Images
Gilles Caulier
The Kipi Convert Images plugin is a tool to convert an image file format to another.
This plugin can be used for batch conversion of images in an Album. It uses the convert program
from the ImageMagick package. The following image file formats are supported:
• JPEG
• PNG
• PPM
• BMP
• TIFF
• TGA
• EPS
15The Kipi Plugins Handbook
Chapter 5
Effect Images
Gilles Caulier
The Kipi Effect Images plugin is a tool for to add a special effect to the images.
This plugin can be used for batch FX transforming images in an Album. It uses the convert pro-
gram from the ImageMagick package. An image effect preview (partial or full) is also available.
Eleven FX filter types have been implemented:
• Adaptive threshold: perform local adaptive thresholding.
• Charcoal: simulate a charcoal drawing.
• Detect edges: detect edges within an image.
• Emboss: returns a grayscale image with a three-dimensional effect.
• Implode: implode image pixels about the center.
• Paint: applies a special effect filter that simulates an oil painting.
• Shade light: shines a distant light on an image to create a three-dimensional effect.
• Solarize: negate all pixels above the threshold level.
• Spread: this is a special effects method that randomly displaces each pixel in a block defined
by the radius parameter.
• Swirl: swirls the pixels about the center of the image.
• Wave: creates a ripple effect in the image by shifting the pixels vertically along a sine wave.
You can see some samples built with this plugin at this URL
16The Kipi Plugins Handbook
Chapter 6
Filter Images
Gilles Caulier
The Kipi Filter Images plugin is a tool for to apply a digital filter to the images.
This plugin can be used for batch filter images in an Album. It uses the convert program from
the ImageMagick package. An image effect preview (partial or full) is available. Nine filter types
have been implemented:
• Add noise: add noise in an image.
• Antialias: remove pixel aliasing.
• Blur: blur the image with a Gaussian operator.
• Despeckle: reduce the speckles within an image.
• Enhance: apply a digital filter to enhance a noisy image.
• Median: apply a median filter to an image.
• Noise reduction: reduce noise in an image.
• Sharpen: sharpen the image with a Gaussian operator.
• Unsharp: sharpen the image with an unsharp mask operator.
You can see some samples building with this plugin at this URL
17The Kipi Plugins Handbook
Chapter 7
Flickr Export
Vardhman Jain
Gilles Caulier
FlickrExport Kipi-plugin allows the user to upload photos to the Flickr web service.
Flickr is an online photo management application. Flickr is a way to get your photos to the
people who matter to you. With Flickr you can show off your favorite photos to the world, blog
the photos you take with a cameraphone, and securely and privately show photos to your friends
and family around the world.
The FlickrExport plugin can be used to upload an image collection from your computer to the
remote flickr server using the Internet.
7.1 Plugin initialization on first access
When accessing the plugin for the first time the user you are taken through the process of obtain-
ing a token which is used for authentication purposes. The following dialog will popup and a
browser window will be launched you will log in to Flickr:
Figure 7.1: The First Sign Up Dialog Preview
18The Kipi Plugins Handbook
After successful signup FlickrUploadr will be allowed to send photos to the flickr website. You
will be presented with the following page on successful signup:
Figure 7.2: The Successful Signup Flickr page
Then, simply close the browser windows and return to the host application dialog. After clicking
Yes, you will see the interface used to upload photos to Flickr, described in the next section.
7.2 Regular Plugin Usage
When the flickrexport plugin is invoked for second time or later you are greeted with the fol-
lowing dialog, which shows the current access permissions the Flickr Export plugin has. The
uploading process requires ‘write’ permissions. The plugin doesn’t allow any other permissions
as of now. You are then asked if they want to proceed with their current permissions.
Figure 7.3: Current Permissions Dialog preview
19The Kipi Plugins Handbook
After clicking Yes, you will see the interface to upload photos to Flickr.
After clicking No, the authentication process is repeated.
The Main upload dialog is shown below:
Figure 7.4: The Main Uploading Dialog Preview
The Add Photos button should be clicked once user has set the other options in the dialog. After
clicking this button an image selector dialog opens up where you can select the photos you want
to upload and click OK, whereupon the image uploading starts.
The Tags field can be filled with a series of words (comma separated) which will be assigned as
tags to the images uploaded.
The Public, Friends, and Family checkboxes can be checked to assign appropriate access permis-
sions to the images you upload. By default the images uploaded are private.
If the Resize photos before uploading option is selected, the photos will be resized before up-
loading. The values will be read from the Maximum dimension combobox.
The Maximum Dimension combobox can be used to adjust the maximum height to which the
photos will be resized before uploading. The width calculation will be done so as to have the
aspect ratio conserved.
20The Kipi Plugins Handbook
Figure 7.5: The Uploading Progress Dialog Preview
You can click Cancel button to abort the uploading of photos.
Finally, you can view the uploaded photos by visting the Flickr website.
21The Kipi Plugins Handbook
Chapter 8
Geolocation Editor
Gerhard Kulzer
The Kipi Geolocation plugin allows for adding and editing GPS coordinates of picture
metadata. The geo-data is stored into the image (EXIF tags) and the location can be
displayed in an external browser map.
The Kipi plugin ‘Geolocation’ provides the tools to localize pictures geographically in the com-
mon spherical coordinate system (used by GPS/Galileo). Altitude, latitude and longitude are
used.
N OTE
The plugin only works for image formats that have EXIF metadata supported by libkexiv2.
8.1 Geolocation
The plugin has two methods to mark the pictures with coordinates:
• Batch correlation of GPS tracking data with a series of images.
• Semi-automatic coordinate attribution to single pictures.
8.1.1 The correlator
In order to correlate your images with geographic data you need to have a GPS tracking infor-
mation available as a XML file in gpx format (gpsbabel and gpsman can download and convert
tracking data from a GPS device for you).
Image → Geolocation → Correlator. This interface can correlate a previously selected number of
pictures with registered GPS tracking information.
22The Kipi Plugins Handbook
Example 8.1 The geo-correlation dialog based on EXIF date/time and tracking data (gpx format)
Select the images you want to correlate in the application main view, then call the menu. The
above dialog will show up. To indicate possible time/location correlation you have to load a
track file with Load GPX File that contains GPS data taken at the same time and location as the
pictures with your camera.
When the file is loaded, an automatic correlation is done showing the attributed coordinates in
red. GPS track data is invariably recorded in GMT time, so you need to match the camera time
with GMT, which can be done with Time Zone. Select the camera time zone here!
The Max. time gap setting specifies the limit within which GPS time and camera time shall be
deemed coincident. The maximum value is 2000 seconds.
T IP
If you have no tracking data for pictures that were taken in the same place you can just manually edit
a gpx file and apply it to those images. The 2000 second time gap will then correlate all pictures taken
within 20 minutes.
The option Interpolate and Difference in min. can be used if there is no match of data. If you
know that in reality there is a location match despite a larger time gap between camera and GPS,
you can set this limit here and click on the Correlate button to interpolate.
23The Kipi Plugins Handbook
Example 8.2 Correlation
240 minutes is the maximum time difference that can be introduced here.
8.1.2 Edit Coordinates
Example 8.3 Semi-automatic attributing of coordinates through map interaction
The coordinates can be set manually with this dialog. This comes in handy if there is a series of
photos taken at the same location. Since the coordinates are memorized from one dialog call to
another, it is as easy as clicking on OK to set the previous data to the current photo.
24The Kipi Plugins Handbook
Otherwise the location can be found and fixed iteratively with the displayed map. Click on the
region of interest, zoom in, adjust location by clicking again, and so on until sufficient accuracy
is achieved. The altitude must always be entered manually. The map can be switched between
map mode, satellite image or mixed mode.
8.1.3 Commandline tagging
Completely outside of the kipi-plugin context, the are ways to GPS tag images. Here is a shell
script that uses exiftool to tag a batch of images.
#!/ bin / sh
# exiftool wrapper script for easy commandline use . It treats regex files ←-
or whole directories .
#
# FMT Output
# "% d deg %d ’ %.2 f "\" 54 deg 59 ’ 22.80"
# "% d deg %.4 f min " 54 deg 59.3800 min
# "%.6 f degrees " 54.989667 degrees
if [ -z $1 ]; then
echo " Usage : exiftool -gps - wrapper lat long [ alt ] file || dir ( use signed ←-
floating coordinates )"
else
if [ -z " $4 " ]; then foo =" $3 "; alt =0
else foo =" $4 "; alt = $3
fi
echo $foo
if [ -e " $foo " ] ; then
latR =$( echo " $1 " | awk ’{ if ( $1 < 0) print "S "; else print "N "} ’)
lonR =$( echo " $2 " | awk ’{ if ( $1 < 0) print "W "; else print "E "} ’)
lat =$( echo " $1 " | awk ’{ val = $1 ; if ( $1 < 0) sub (/ -/ , "" , val ); print ←-
val } ’) # absolute value
lon =$( echo " $2 " | awk ’{ val = $1 ; if ( $1 < 0) sub (/ -/ , "" , val ); print ←-
val } ’) # absolute value
# use the following syntax for easy googlian paste of ll ←-
= -1.23456 ,53.345345
# lonR =$( echo " $2 " | awk ’{ if ( $2 < 0) print "W "; else print "E "} ’)
echo $lat , $latR , $lon , $lonR , $3 , $4 , $foo
function setgpsinfo ()
{
exiftool -c "%.6 f" - GPSMapDatum =" WGS -84" - GPSAltitude = $5 \
- GPSLongitudeRef = $4 - GPSLongitude = $3 - GPSLatitudeRef = $2 - GPSLatitude = ←-
$1 " $6 "
exiftool -GPS : ALL " $6 "
}
if [ -d " $foo " ] ; then
for i in " $foo " ; do # the selection of files treated depend on ←-
the passed regex
echo "i= " $i
setgpsinfo $lat $latR $lon $lonR $alt " $i "
done
else
setgpsinfo $lat $latR $lon $lonR $alt " $foo "
25The Kipi Plugins Handbook
fi
else echo " file or folder is wrong "
fi
fi
26The Kipi Plugins Handbook
Chapter 9
Images Gallery
Gilles Caulier
Gerhard Kulzer
The Kipi images gallery plugin is a tool for exporting a set of Albums or images to a
HTML page.
This powerful plugin can export your Albums into a HTML compliant web image gallery. You
can easily select the Albums to export in an HTML page and set many designs and parameters
for the HTML rendering. UTF-8 encoding is used for the best internationalization.
You can see some samples built with this plugin at this URL
9.1 Collections Selection Dialog
Launching the plugin from within digiKam displays three tabs to change the settings. The My
Albums tab allows you to select all Albums you want to export to HTML. Just check the respec-
tive Albums (they are displayed without hierarchical nesting). On the next two tabs My Tags
and My Searches you can refine your selection using tags or previous search results in digiKam.
27The Kipi Plugins Handbook
Figure 9.1: The Collections Selection Dialog in digiKam
Using this plugin e.g. in Gwenview shows another selection dialog with two choices for the
content of the gallery, either all pictures in the folder or the pictures you selected before starting
this module:
Figure 9.2: The Collections Selection Dialog from other applications
28The Kipi Plugins Handbook
Next step is to select a theme for the gallery from this dialog:
Figure 9.3: The Theme Selection Dialog
Depending on the chosen theme you may have additional options to fine-tune the appearance of
the gallery.
The next screenshot shows the theme parameter setting for the Classic theme:
29The Kipi Plugins Handbook
Figure 9.4: Parameters for Classic Theme
For all selected themes you can adjust the settings for the images and thumbnails in the gallery:
Figure 9.5: The Image Settings and Thumbnails Dialog
In the Full Image section you can either save modified images or Use original image.
30The Kipi Plugins Handbook
For modified images you can select as output format JPEG (smallest filesize, but lossy) and PNG
(lossless and free license) and set specific image compression features. If disk space is of concern
check the target image compression and lower the compression level from the host application
default value.
Checking the Max. size box you can fix the maximum target image size (in pixels) with the
spinbox at the right. Images bigger than this value will be scaled down to it, but smaller images
will not be modified.
N OTE
If JPEG file format is selected for target resizing images, all EXIF information will be preserved from
the original JPEG files.
The Thumbnails section allows to set the Format, Quality and Size for the thumbnails in the
gallery.
Figure 9.6: The Output Dialog
This page defines the settings of where and how to store the gallery with all its associated images.
Select a folder or add a new folder with write access where you want the gallery to be written
to. Two sub-folders with the name of your album folder and the theme name will be created
containing everything.
A progress dialog giving a feedback indicate to user. Press Cancel button during this stage if you
want abort the process.
31The Kipi Plugins Handbook
Chapter 10
OpenGL Imageviewer
Markus Leuthold
The Kipi imageviewer is a very fast and flexible tool for viewing images, based on
OpenGL.
The KIPI imageviewer allows to display a selection of images and to do basic operations, such as
rotation, zooming or panning. The usage of the viewer is only based on keyboard shortcuts and
mouse gestures. It was placed emphasis mainly on speed in displaying as well as fast access to
the functions.
I MAGE A CCESS
Next Image
• Scrollwheel Down
• Down/Right
• Space
• N
• PgDown
Previous Image
• Scrollwheel Up
• Up/Left
• P
• PgUp
Quit
• Esc
D ISPLAY
Toggle fullscreen/normal
On startup, an image is displayed in fullscreen mode by default. It can be changed to
windowed mode if desired.
• F
32The Kipi Plugins Handbook
Toggle scrollwheel action
Turning the scrollwheel either proceeds to the next image or zooms into the image.
• C
Rotation
The rotation is only temporary and not saved to the file.
• R
Reset view
• double click
Original size
Each pixel of the image corresponds to a pixel of the screen.
• O
Z OOMING
• move mouse up/down while pressing the right mouse button
• scrollwheel (if you toggled the scrollwheel action)
• +/-
• Ctrl + scrollwheel
PANNING
• move mouse while pressing the left mouse button
33The Kipi Plugins Handbook
Chapter 11
JPEG Loss Less
Gilles Caulier
The Kipi JPEG lossless plugin is a tool to transform the images without loss in quality
due to compression.
This plugin is available from within the host application. It allows (for the below listed trans-
formations) saving images in JPEG format, which usually loses precision every time you save it
(otherwise there would be no size reduction), without losing any quality nor metadata informa-
tion:
• Do lossless JPEG 90/180/270 Degree Rotation.
• Do lossless JPEG Horizontal or Vertical flip.
• Do lossless JPEG black and white conversion.
• Exif orientation tag based rotation or flip auto-adjustment.
• Do lossless recompression of JPEG images.
As a consequence of the lossless storage the file size will be larger (similar to the lossless PNG
format) since there’s no compression of the color coding information.
34The Kipi Plugins Handbook
Chapter 12
Metadata Editor
Gerhard Kulzer
The Kipi Metadata editor plugin is a tool for adding and editing GPS coordinates of
the photo metadata.
The Kipi plugin ‘Metadata Editor’ currently has no documentation. If you are interested in recti-
fying that situation, please contact the Kipi team mailing list at kde-imaging@kde.org.
Using the metadata plugin’s Import function allows copying data from one image to another.
Select the image you want to copy to in the main application. Then call the import function,
which will open a file browser where you select the source image (the one you want to copy the
metadata from). Click OK and the data will be copied over.
This feature does not work for all image formats. You can import from all formats but not write
to them all. JPEG is supported for writing. Please refer to the exiv2 capabilities to learn which
formats are supported.
35The Kipi Plugins Handbook
Chapter 13
Print Wizard
Gilles Caulier
The Kipi print wizard plugin is a tool for to print images at the same time.
The print wizard allows multiple images to be combined into single sheets of paper in standard
photo sizes for printing. The combined images can also be automatically opened with the image
editor Gimp for enhancement or for direct printing using the Gimp-Print plugin. The combined
images can also be output directly to jpeg files.
36The Kipi Plugins Handbook
Chapter 14
Raw Image Converter
Gilles Caulier
Gerhard Kulzer
The Kipi ‘Raw Image Converter’ plugin is a conversion tool for raw format images.
With this Kipi-plugin you can import/convert your images stored in RAW format to three formats
(JPEG, TIFF, PPM).
There are ome considerations before your convert, and even before you shoot in raw format.
RAW image file formats keep the original information of the exposure supposedly without loss
(when compressed, they use reversible, lossless compressions algorithms). Many photographers
prefer to take their picture in RAW mode because the camera’s built-in conversion program is
often of lesser quality than what you can achieve with digital image processing. The whitebal-
ance of the digital camera is registered but not applied to the image. Some CMOS CCD’s create
four types of color filter data: RGBG, Red, Green, Blue and another Green mask for contrast
enhancement. The plugin can take this into account.
The conversion is actually based on Dave Coffin’s command line tool dcraw (Dave: ‘Don’t expect
dcraw to produce the same images as software provided by the camera vendor. Sometimes dcraw
gives better results!’).
14.1 Single Conversion Dialog
Select the RAW file to convert and open the plugin from the host application. The Raw Image
Converter window in single mode will appear. Click on Preview to show the effect of your settings
taking shape.
Now you can adjust the available check and value boxes to optimize the conversion process. The
first checkbox indicates to use the camera settings for white balance. The essential parameters
like brightness, and red/blue amplifier may be adjusted. If the result is not quite optimal, don’t
worry, it is always possible to fine-tune the image later on.
A Four color RGBG conversion can be selected to use contrast information. (If your camera
works in RGB mode, the RGBG setting has no effect).
If you’re happy with the preview, choose one of three output formats to save the conversion re-
sult. The file name will stay the same, only the extension changes. JPEG uses the lossy algorithm
and produces the smallest output file size.
The tagged image format (TIFF) preserves all information of your image while using lossless
LZW compression.
37The Kipi Plugins Handbook
The Portable PixMap format (PPM) produces the largest output file and contains most data.
T IP
If you intend to work a lot on your images or if it is likely that you have to reuse it later on, then don’t
use JPEG format because it allows a limited number of operations before it deterioates visibly. TIFF
and PPM are better suited to keep the original data.
N OTE
If you choose JPEG as the Save Format then the meta-data included in RAW file will be included in
the JPEG files as Exif information.
When you have finished click the Process button to start the conversion. If you want abort image
conversion, press the Abort button.
Figure 14.1: The RAW Converter Dialog in Single Mode
14.2 Batch Conversion Dialog
The batch mode converter allows you to convert several images in one go. Use this mode when
you’re are sure of the best settings, e.g. try it out in single conversion mode first.
The available setting are mostly identical to the single mode dialog. Here you have the additional
option to overwrite existing files (which you might have created in an earlier try). The preview
option is not available here. A progress bar indicates the conversion status.
38The Kipi Plugins Handbook
Figure 14.2: The Batch RAW Converter Dialog
39The Kipi Plugins Handbook
Chapter 15
Recompress Images
Gilles Caulier
The Kipi recompress images plugin is a tool for recompressing the image files.
This plugin can be used to batch recompress images in an Album. It uses the convert program
from the ImageMagick package. The image file formats supported are:
• JPEG
• PNG
• TIFF
• TGA
40The Kipi Plugins Handbook
Chapter 16
Rename Images
Gilles Caulier
The Kipi Rename Images plugin is a tool for to rename the images files.
This plugin can be used to batch rename image files in an Album. You can set the prefix name to
use, the start index value, and the timestamp.
41The Kipi Plugins Handbook
Chapter 17
Resize Images
Gilles Caulier
The Kipi Resize Images plugin is a tool that resizes or adapts images’ dimensions.
This plugin can be used to batch resize images in an image collection. It uses the convert program
from the ImageMagick package. You can make images larger or smaller. Three resizing types
have been implemented:
• Proportional (1 dim.): standard auto-resizing using one dimension. The width or the height
of the images will be automatically selected depending on the images orientation. The images’
aspect ratio is preserved.
• Proportional (2 dim.): auto-resizing using two dimensions. The images aspect ratio are pre-
served. For example, you can use this for to adapt your images size to your screen size.
• Non proportional: non proportional resizing using two dimensions. The images’ aspect ratio
is not preserved.
• Prepare to print: prepare the image for photographic printing. The user can set the print
resolution and the photographic paper size. The target image will be adapted to the best
dimensions (including the background size, margin size, and background color).
42The Kipi Plugins Handbook
Chapter 18
Send Images
Gilles Caulier
Gerhard Kulzer
The Kipi ‘Send Images’ plugin is a tool for sending images directly by e-mail.
18.1 Using the Module
With this Kipi-plugin you can e-mail the selected images with your favorite e-mail agent. Resiz-
ing images is possible. You can use drag and drop to add more images to the list of images to
send.
18.1.1 Image Selection
When opening the plugin from the host application, the Email Images Options dialog will ap-
pear with your pre-selected images already in the list at the left part of the dialog.
Below the image list there are five buttons. The two left buttons are used to move a selected
image in the list up or down. The middle button opens a file browser to add more files as needed
in the usual file selection manner.
When clicking on the other buttons the selected images will be removed from the list or the list
will be cleared.
T IP
You can drag and drop images between the host application window and the image file list to add new
items to e-mail.
WARNING
Be sure not to overload your own or your addressees e-mail transmission limit; most providers limit the
e-mail size to some megabytes of data. Use several e-mails if you want to send a lot of data.
43The Kipi Plugins Handbook
18.1.2 Mail Settings
The right part of the dialog is used to change the settings of the images to be sent. These settings
will be remembered when you close the plugin until you change them.
Select your favorite e-mail client from the drop-down menu. Default is the current email pro-
gram set in KDE System Settings.
If you select Attach a file with image properties from Application the comments, rating or tags
included with the images will be merged to a text file and attached in the mail.
The next three items allow you to set-up the image properties to be sent. To enable these options
check Adjust image properties. First select an Image size suitable for your Internet connection
speed and the target mailbox size.
The PNG format in the Image file format drop-down menu is not well adapted to reduce photo-
graphic images file size, but is best suited for compressing lossless items like the TIFF file format.
PNG must be used if you use dialup speed Internet and you want to preserve the photo quality.
Otherwise, JPEG is the recommended format.
The Image quality can be chosen with the input box. 75% is the standard compression ratio
for JPEG files. Setting compression to 100% will result in lossless compression at the cost of the
largest file size. The difference in file size between 90% and 100% can be quite dramatic, whereas
the gain in quality is minor. Very good quality is already obtained with 85% compression.
N OTE
If you choose JPEG as the Image file format and the original files were in JPEG format, the original
Exif data included is preserved in e-mailed images.
Figure 18.1: The Email Images Dialog
18.1.3 Email Images in Action
When you have finished selecting your files, click OK to open the composer window of your
favorite e-mail client. You just need to add the addressee and the subject. The selected images
will be already be listed as attachments.
44The Kipi Plugins Handbook
A progress dialog gives you feedback on the progress of your operation. Press the Cancel button
during this stage if you want to abort the process.
When all jobs are completed, this dialog will not close automatically and you can consult the
progress messages if any errors occured during this stage. The mail agent will be started auto-
matically at the end. Press the Close button to close this dialog.
Figure 18.2: The E-mail Images Plugin in Action
45The Kipi Plugins Handbook
Chapter 19
The Advanced Slide Show
Gilles Caulier
Gerhard Kulzer
The Kipi ‘Advanced Slide Show’ plugin creates a configurable full screen slideshow
of your images.
With this Kipi-plugin you create a perfect slide show with just three mouse clicks.
19.1 The Settings Dialog
When opening the plugin from the host application, the Advanced Slide Show window will
appear asking questions as to how you want to stage your slideshow. You can choose between
the selected images or all images in the same album.
The Use OpenGL Slideshow Transitions checkbox enables very smooth image transitions using
the OpenGL display mode. Be sure you have OpenGL enabled on your graphics card, since
otherwise the slideshow will be very slow.
The Print Filename checkbox enables displaying the image filename in the lower left corner.
The Loop checkbox will enable running the whole show in an endless loop (until manually
stopped with Esc).
The Shuffle Image checkbox will enable displaying the images randomly (not using the current
images collection order).
The Delay Between Images may be set in millisecond steps. 1500 milliseconds correspond to 1.5
seconds and is a good default value. The best timing depends also a bit on your computer power
and the transition effect. Try it out before you show it to your friends!
There are more than a dozen Transition Effects available to choose from. The Random selection
will change the transition effect with every image.
46The Kipi Plugins Handbook
Figure 19.1: The Slideshow Dialog
19.2 Slide Show in Action
During the slideshow, you can access a toolbar on the upper left screen corner. Move the mouse
cursor to the top left of the screen to access it.
With this tool bar, you can drive the progress of the slideshow. You can pause or play the
slideshow, go back to the preview image, go to the next image, and stop the slideshow.
In the lower left screen corner you can see the current image file name, the current image ID, and
the total number of images included in the slideshow.
47The Kipi Plugins Handbook
Figure 19.2: The Advanced Slideshow Plugin in Action
48The Kipi Plugins Handbook
Chapter 20
Credits and License
Copyrights for each plugin are listed in the applicable chapter.
All Pictures copyrighted 2004-2007 by Gilles Caulier caulier dot gilles at gmail dot com and Ger-
hard Kulzer gerhard_at_kulzer.net.
This documentation is licensed under the terms of the GNU Free Documentation License.
This program is licensed under the terms of the GNU General Public License.
49The Kipi Plugins Handbook
Chapter 21
Index
C
Comments, 35
E
EXIF, 35
I
IPTC, 35
K
KDE, 9, 14–18, 22, 27, 32, 34–37, 40–43, 46
Kipi, 9, 14–18, 22, 27, 32, 34–37, 40–43, 46
M
Makernote, 35
Metadata, 35
50You can also read