The Oregon Crusaders - Brass Manual 2019
←
→
Page content transcription
If your browser does not render page correctly, please read the page content below

The Oregon Crusaders

      Brass Manual

         2019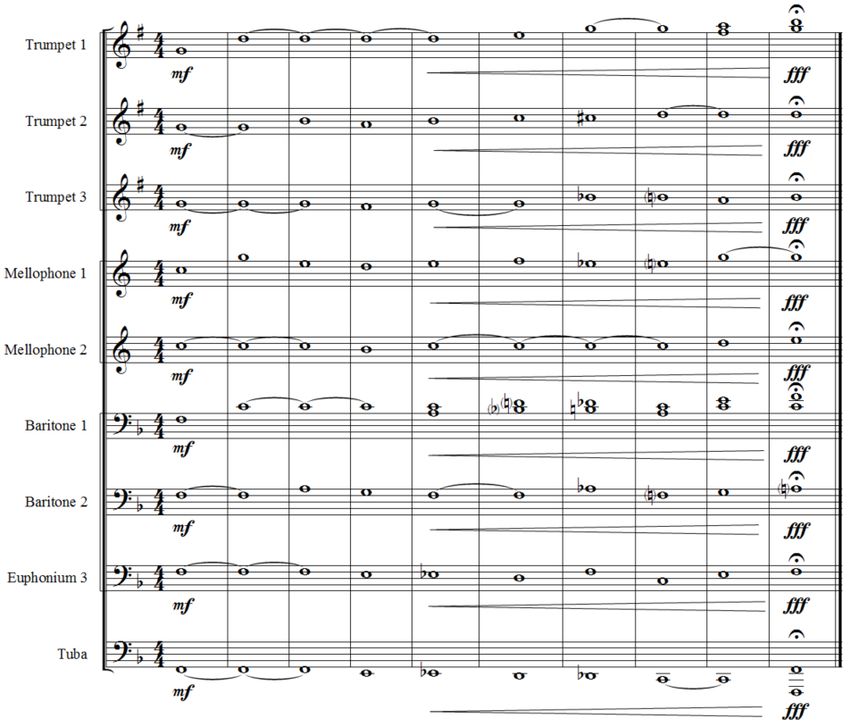
Table of Contents

Contact Information........................................................................................................................................................... 3
Audition Guidelines and Recommendations.................................................................................................................. 4
Brass Video Audition Process .......................................................................................................................................... 6
Camp Checklist ................................................................................................................................................................... 7
Equipment............................................................................................................................................................................ 9
Hornline Etiquette ............................................................................................................................................................ 11
Visual Responsibilities ...................................................................................................................................................... 13
Fundamentals of Musicianship ....................................................................................................................................... 19
Chord Adjustments in Just Intonation .......................................................................................................................... 25
Tuning Tendency Chart ................................................................................................................................................... 26
The Breathing Gym .......................................................................................................................................................... 27
Fundamentals of Breathing ............................................................................................................................................. 35
Singing ................................................................................................................................................................................ 40
Buzzing on the Mouthpiece ............................................................................................................................................ 41
Leadpipe Buzzing and the Maggio System ................................................................................................................... 45
Long Tones ........................................................................................................................................................................ 47
Pitch Bending .................................................................................................................................................................... 51
Flow Studies ....................................................................................................................................................................... 55
Lip Slurs and Flexibility ................................................................................................................................................... 58
Articulation ........................................................................................................................................................................ 67
Double Tonguing .............................................................................................................................................................. 72
Bopping .............................................................................................................................................................................. 75
Chord Progressions .......................................................................................................................................................... 76
Responsibilities Between Camps .................................................................................................................................... 77
Trumpet Audition Excerpt.............................................................................................................................................. 79
Music Performance Audition Form ............................................................................................................................... 81

                                                                                                                                   2
                                                                                                  OREGON CRUSADERS 2019 BRASS MANUAL
Contact Information

          If you have any questions concerning your audition materials, please contact one of the
                           Oregon Crusaders Brass Staff* that are listed below:

 Mike McConnell                     Brass Caption Head                  mcconnell514@gmail.com

 Daniel Galloway                    Educational Coordinator             scvanguard72@gmail.com

 Dr. Aaron Witek                    Brass Pedagogy Consultant           ajwitek@gmail.com

 Ronnie Pruitt                      Brass Instructor                    rmpruitt65@yahoo.com

 Elizabeth Lentz                    Brass Instructor                    elizabeth.lentz@ymail.com

 Cassandra Ellswood                 Brass Instructor                    cassandra.ellswood@gmail.com

 Lorhan Tiger                       Brass Instructor                    lorhantiger@icloud.com

 Dr. Ray Vasquez                    Brass Instructor                    trptjock@aol.com

 Barron Maskew                      Brass Instructor                    barron@maskew.net

*Additional Brass Staff TBD.

                                                                                          3
                                                         OREGON CRUSADERS 2019 BRASS MANUAL
Audition Guidelines and Recommendations

Audition Guidelines
Each prospective member of the 2019 Oregon Crusaders Brass Section should prepare the following for a
successful audition. If you are preparing a video audition, your video MUST include the following:

Prepared Etudes (technical and lyrical)
    •   Prepare the excerpts found in the brass manual.
    •   Play them on the instrument that you are most comfortable with.
    •   You may perform your prepared etude on a French horn, trombone, or concert tuba, but you will be
        required to play a mellophone, baritone, or marching tuba as part of your audition process.

Prepared Exercises
    •   It’s important that you come to your audition prepared to play any exercise from the brass packet.
    •   The exercises to be prepared will vary for each camp, will be announced in advance, and will be
        selected by the brass staff.

Music Evaluation
Your music audition will take place in a classroom where you will be playing for the brass caption head and
possibly an additional member of the brass staff. There will be a warm-up room nearby for you to warm up.

During the audition you will be asked to play your prepared etudes and prepared exercises, be asked a few
questions, and then return to rehearsal. Everyone will know their status with the corps by the time camp
concludes for the weekend.

Visual Evaluation
Your visual aptitude will be evaluated during the weekend by members of the Oregon Crusaders visual staff.
This will likely happen in a group setting during the visual block, but some people may be pulled out
individually to get more specific feedback. We understand that everyone comes from a different visual
background, and that you may not be familiar with the Oregon Crusaders marching technique prior to your
arrival. You will be taught everything that you need to know for your visual audition by the visual staff at
camp.

                                                                                           4
                                                          OREGON CRUSADERS 2019 BRASS MANUAL
Audition Recommendations
Be Prepared
Preparation is the key to success. The success of your performance at the audition will be directly related to
your level of preparation of the audition materials. Find a practice routine that works for you and stick to it.
You may also want to record yourself with some type of electronic device. Take notes. The recorder never
lies! Listening to it critically will allow you to perfect your performance over time. YOU will always be your
best critic! If this habit continues throughout the winter camps, you will be amazed with your growth as a
musician.
Play for as many people as possible. Your band directors, peers, and family are all great people to play for. If
possible, meet with a private lesson teacher on a regular basis prior to your audition. Their suggestions and
criticism can also be incredibly beneficial. Make sure that you get lots of rest before coming to the audition, as
things will be very busy at the camp.
Tips for Dealing with Performance Anxiety and Nervousness
The first thing you must understand is that being nervous is normal. It’s a natural part of the audition
process, and by fighting it, you might make actually it worse. Once you understand that, it becomes easier to
“embrace” your nervousness and channel that energy in a positive way
One of the best things you can do to calm your nerves is to take several slow, deep breaths before entering
the audition room. Let go of your emotions with each breath. If at all possible, “practice” dealing with these
nervous feelings by placing yourself in high-pressure situations. Visualize yourself in the audition room,
perform in front of as many people as possible, and record yourself often. When recording, allow yourself
only one take and examine the quality of the result you produce.
It’s important to “visualize” yourself playing at your very best ability. It’s likely that you may play something
during your audition that will not go quite as well as you would have liked. When nerves are present, mistakes
happen. Professional musicians, however, rarely ever react to these mistakes. Never stop or dwell on these
mistakes, DO NOT apologize for any part of your audition, and NEVER make excuses.
The Audition Room
Before you enter the audition room, keep in mind that you are auditioning at all times during the weekend.
Not only do we want to hear how well you sound individually, but we also want to see your work ethic in the
horn arc. Keep in mind that your audition does not end after one camp! Your preparation, improvement,
attitude, attendance, section ranking, marching ability, and physical condition will be the determining factors
for awarding a spot in the Oregon Crusaders brass section. Before you enter the room, be certain that:
• You have all paperwork, including your personal calendar with you
• Your bell is facing off to one side of the people listening to you
• You always ask questions if you are confused about something that you are asked to play
• You take a slow, deep breath before you play
• You play at your highest ability
5
OREGON CRUSADERS 2019 BRASS MANUALBrass Video Audition Process
2019 OREGON CRUSADERS
Each prospective member of the 2019 Oregon Crusaders Brass Ensemble must prepare the following for a
successful video audition. Your video audition should include:
1. A brief introduction that includes your past experience.
2. The two excerpts, both Lyrical and Technical, from the Brass Manual.
3. The Goldman Articulation Exercise from the Brass Manual (Articulation #2)
4. A chromatic scale in triplets that demonstrates your full range.
5. Any other prepared excerpt that you would like to perform (optional)
Your video audition has no upper limit to the amount of music to be performed, but it should be performed
at your highest ability. Demonstrate your playing proficiency as you would in a live audition.
Once you have made your video, upload the video to YouTube. Make sure that the privacy settings are set to
UNLISTED. For further information on how to change the privacy settings, see the following web address:
https://support.google.com/youtube/answer/157177?hl=en
Once you have successfully uploaded the video and changed the privacy settings to UNLISTED, paste the
web address of the video in an email and send to brass@oregoncrusaders.org, with “OC19 VIDEO
AUDITION” in the subject line.
Please include the following information in the email that accompanies your audition:
• Full Name
• Date of birth
• Street address
• Phone number
• Section for which you are auditioning
• Previous marching experience
In addition, please answer the following questions:
1. Are you involved with any organization that could limit your camp attendance with the Oregon
Crusaders?
2. Are there any personal conflicts that could prevent you from participating in spring training of the
summer tour? (ie: weddings, graduation, etc.)
3. What is the earliest date that you can move in for Spring Training?
4. Have you had any injuries or surgeries in the past 2 years that would limit your physical activity in any
way? (ie: knee problems, back problems, etc.)
Thank you,
The Oregon Crusaders Brass Staff
6
OREGON CRUSADERS 2019 BRASS MANUALCamp Checklist
In addition to clothing, toiletries, and sleeping equipment, each member of the Oregon Crusaders brass
section is expected to bring the following materials to ALL CAMP REHEARSALS and ALL SUMMER
REHEARSALS:
ALL AUDITION FORMS: These forms include the Member Ride Share Request form, Medical forms, the
Concussion Education form, Sports Physical, and School Early Release letter.
REGISTRATION FEE: Registration fees are $150 for all 2-day audition events and callbacks, $100 for 1-
day audition events, and $100 for video auditions.
OREGON CRUSADERS 2019 BRASS PACKET: This can be downloaded as a PDF from the Oregon
Crusaders audition page.
A COPY OF YOUR REQUIRED AUDITION ETUDE: This may be found in the brass packet, but is
also posted online at www.oregoncrusaders.org/audition
YOUR INSTRUMENT AND MOUTHPIECE: See ‘Equipment’ in the Table of Contents for further
details.
TUNER / METRONOME: All members of the Oregon Crusaders brass section must own a
tuner/metronome. We recommend the Korg TM-50 or TM-60. A cellphone app is NOT acceptable during
rehearsals. The Tonal Energy app, however, is an excellent resource for practice and preparation. The Kong
TM-60 metronome can be purchased on Amazon at https://amzn.to/2BAtYU8.
BERP (Buzz Extension and Resistance Piece): BERPS can be purchased at camp for $17.
BREATHING TUBES: PVC Ball Valve style breathing tubes come in various sizes, are used for breathing
gym exercises, and can be purchased at camp for $2. See Equipment for more details.
MUSIC STAND: Please bring your own folding music stand (with your name clearly labeled) to all camp
brass and musical ensemble rehearsals.
THREE-RING BINDER: All members must have a WHITE 1-inch 3-ring binder (with plastic sheet
protectors). The Avery brand “Heavy Duty” binders are highly recommended, as are the “durable” version of
the sheet protectors. Make sure to clearly mark your name and section on the front cover. In the binder,
make sure to include:
• Brass Packet
• All show and supplemental music
• Music handouts
Purchase your Avery “Heavy Duty” binders at Walmart, or through Amazon at https://amzn.to/2RdSrbv.
MECHANICAL PENCIL: It is extremely important to have a pencil on hand at all times (audition camps
and summer tour). Notes should be taken at every rehearsal, especially when rehearsing with the arrangers.
Write EVERYTHING down! The more details you document; the more details you will remember!
7
OREGON CRUSADERS 2019 BRASS MANUALGLOVES (white cotton): Gloves must be worn at all times while holding an Oregon Crusaders owned
instrument. You will go through many pairs of gloves during the course of the season. It is important that
you own several pairs of gloves, they remain in good condition, and are replaced as necessary. Gloves that are
too dirty or have developed holes are NOT acceptable. The gloves that we use at the Oregon Crusaders are
“Wrist Length Cotton Gloves.” These may be purchased from the corps at the cost of $3 per pair, or $5 for
two pairs. Alternatively, gloves be ordered online from the Band Shoppe at https://bit.ly/2CAFSPx.
BLACK TOWEL: The black towel is used to protect your instrument when placed on hard surfaces,
especially when outdoors. Your Oregon Crusaders owned instrument is in one of three places at all times: in
your hand, placed in its stack on the ground, or in its case. The black towel is used to protect your instrument
when it is placed on hard surfaces, especially when rehearsing outdoors. For trumpets, mellophones, and
baritones, and euphoniums, it should be a hand towel. Tubas will need a body towel. The REQUIRED towel
is a Walmart brand “Mainstays” towel.
BASEBALL CAP: Brass section members will need at least 1 hat. Hats are required when rehearsing
outdoors, as they shade your face, eyes, and chops from the damage caused by the sun. Hats are optional
when rehearsing indoors.
TENNIS SHOES / CROSS TRAINERS: You will be moving at all rehearsals. Thus, athletic shoes are
required at all times. Sandals, shower shoes, flip flops, bare feet, etc. are never acceptable.
CLOTHING: You must wear clothing that will allow you to perform athletic movement at camp.
Recommended dress includes sweats, shorts, t-shirts, etc. NO JEANS!! As stated earlier, movement will
occur at all rehearsals.
WATER JUGS: Each brass team member is required to own their own personal water jug beginning at their
first callback camp. The required water jug for the Oregon Crusaders is a RED Coleman 1-Gallon Jug, which
can be purchased on Amazon at https://amzn.to/2R7vLKj.
8
OREGON CRUSADERS 2019 BRASS MANUALEquipment
Instrumentation
The Oregon Crusaders 2019 brass section will consist of 76 contracted members. The instrumentation of its
horn line will include 24 trumpets, 16 mellophones, 16 baritones, 8 euphoniums, and 12 tubas. Each of these
spots are available on any given year, and no one is guaranteed a spot, regardless of their amount of
experience. Each returning member of the brass section must demonstrate a level of development in their
playing that shows continual growth in order to be considered for membership.
The corps has a full line of System Blue instruments, but due to the number of candidates auditioning, there
may not be enough instruments to go around. For this reason, please bring your own marching instrument if
you have access to one. You have the option to audition on any brass instrument of your choice, but staff will
need to hear you on a bell-front marching instrument during rehearsal. Though you may bring your concert
instrument to play for your audition, no French horns or trombones will be allowed in horn arc. Concert
tubas are acceptable if there are not enough marching tubas for each player.
Guidelines for Specific Instruments
Trumpet: Please bring your own instrument to at least the first 2-3 audition camps. The corps’ trumpets will
never be available to check out during the winter months. Corps instruments will, however, be available to
check out after you have attended 3 camps, but ONLY if your financial account is current. Please bring your
own trumpet mouthpiece to each audition camp and to spring training.
Horn/Mellophone: If at all possible, please bring your own mellophone to at least the first 2-3 audition
camps. Corps instruments will be available to check out after you have attended 3 camps, but ONLY if your
financial account is current. You are welcome to perform the prepared part of your audition on a concert
horn provided that you bring your own instrument, but you will also be asked to audition on a mellophone as
part of the audition process. Please bring your own mellophone mouthpiece to all camps and to spring
training.
Baritone/Euphonium: If at all possible, please bring a marching baritone to at least the first 2-3 camps.
Corps instruments will be available to check out after you have attended at least 3 camps, but ONLY if your
financial account is current. You are welcome to audition on your concert euphonium or trombone, but you
must bring your own instrument to camp. You will be asked to perform on a marching instrument during the
audition process. The Oregon Crusaders brass staff reserves the right to determine who will play Baritone or
Euphonium. Please bring your own large bore mouthpiece with you to all camps and to spring training.
Tuba: We understand the challenge of transporting a tuba to camp, however, the corps only owns 12
marching tubas and these instruments may not be available at each audition site. If at all possible, please bring
a marching tuba to at least the first 2-3 camps. Corps instruments will be available to check out after you have
attended at least 3 camps, but ONLY if your financial account is current. You are welcome to audition on a
concert tuba, but you must bring your own instrument. You will, however, be asked to perform on a
marching tuba at some point during the audition process. Please bring your own tuba mouthpiece to all
camps and to spring training.
9
OREGON CRUSADERS 2019 BRASS MANUALMouthpiece Selection
In order to achieve the most cohesive uniformity of sound within the brass section, the Oregon Crusaders
usually require you to purchase a specific mouthpiece to use while playing in the corps. That being said, you
are NOT required to purchase this mouthpiece for the audition. You MUST, however, purchase the specified
mouthpiece if you are contracted as a member of the brass section.
The following mouthpieces have been selected the brass section. Exceptions will only be made if approved by
the brass caption head and your section technicians.
www.karlhammonddesign.com
Trumpet: Hammond 5 ML
Mellophone: Hammond 6 MP
Baritone: Hammond 11 ML Large Bore
Euphonium: Hammond 11 ML Large Bore
Tuba: Hammond 30 XL
Buzz Extension and Resistance Piece (BERP)
All brass section members are required to possess a BERP. The Oregon
Crusaders will have BERPs available for purchase at a discounted price when
you check in at the camp.
Breathing Tube
All brass section members are required to possess a Breathing Tube. The
Oregon Crusaders will have Breathing Tubes available for purchase at a
discounted price when you check in at camp, but you may also purchase your
own breathing tube online at www.pvcpipesupplies.com. We use “PVC
Compact Ball Valve White Socket” breathing tubes of the following sizes:
• 1/2 inch for Trumpet and Mellophone
• 3/4 inch for Baritone and Tuba
10
OREGON CRUSADERS 2019 BRASS MANUALHornline Etiquette
The Four Types of Rehearsals
• Visual Rehearsal
• Brass Rehearsal
• Sub-Sectional Rehearsal
• Full Ensemble Rehearsal
Etiquette for Visual Rehearsal
• Directions from the staff to performers will be relayed from the Box to the Drum Major and Field,
and then reiterated by the Drum Major to the Field
• We use a Check/Adjust Process between reps:
o Posture is maintained and horns stay up throughout (check everything)
o “Check” = look around and take in information
o “Adjust” = Physically move to correct any errors)
• Members should have minimal to NO speaking on the field
• Sections and individuals should raise their left hands while being addressed
• Clean your own house (no junior techs)
• Run to and from water during breaks. Be the first section on the field that is set afterward
• No one sits down on the field unless instructed to do so
• Air and Valve reps should always utilize full air
• Hats should be worn correctly (with the visor over your face) at all times
• The Horn Sergeant will tell you when it’s okay to remove hats for evening rehearsals
• Rehearsal gloves should always be in good condition, and should remain mostly white
• Fanny packs should always contain your dot book and a mechanical pencil
• Each section should store their backpacks in certain area for organization. All straps must face the
same direction
• Each section’s water jugs should be in line, but not touching
• Towels are used on grass and concrete, but not turf
Etiquette for Brass Rehearsal
• Set Up always occurs 5 minutes before the block starts. This includes full brass rehearsal or sectionals
even if there isn’t an arc/circle setting – BE EARLY.)
• Set Up means ready to go for the staff. The goal is to be ready to rehearse before the staff arrives.
• “Ready” includes:
o WHITE gloves on
o BLACK towel over your shoulder
o Water jug in front of you
o Backpack correctly set
o Music in WHITE binder with plastic sheet protectors until deemed not needed.
• If the arc is adjusted during Set Up, do not move your belongings until after the signal to relax
11
OREGON CRUSADERS 2019 BRASS MANUAL• Water breaks should only occur when given permission
• Towels DO NOT get slapped onto the ground
• When being spoken to, acknowledge the staff by raising your left hand
• Water should never be emptied from your instrument while at Carry or Playing Position
• NO talking
Etiquette for Brass Sub-Sectional Rehearsal
• Same etiquette as Full Brass Rehearsal with minor changes
• Raise your hand if you make a musical mistake or mental error
• Go to the Singing/Fingering position if another subsection is working on something else
• “Relax” = do something to better yourself
Etiquette for Full Ensemble Rehearsal
• Same etiquette as Brass Rehearsal and Visual Rehearsal
• The expectation is that you rehearse silently so that the staff does not need to declare a rehearsal
silent
Protocol for Ripples
• While Singing – Instruments go across the chest so you can press the valves down while you sing.
Instruments will go to Trail if the staff instructs you to do so. Tubas should always lower your
instruments down to the ground. Once done, the Tubas should place their right arm across the chest.
The right hand placed upon the left forearm to simulate the valves.
• When a Singing exercise calls for a “Model Group” – The model group should play the starting
pitches before everyone ripples to the singing position.
• While Mouthpiece Buzzing – Go to trail from standby (mouthpieces should be held at the shank
with left hand while the right hand takes the horn to trail)
• Selection requires a horn move – Go to carry.
• Selection does not require a horn move – Go to playing position
• Exercise that requires Clapping rhythms – Put the horn down
• If the staff need to speak, finish Set Up, and then wait for instructions at the Standby position.
• Instruments should be placed on the towel when told to “Bring it In.” Walk with a purpose.
Key Words
All In Air and Valve Time on Own (for practicing, not water breaks)
Air and Valve Singing Down and Back Up (placing horns down or up)
Singing Mouthpiece Buzzing 8 and In (does not include a prep)
Mouthpiece Buzzing Up to Carry Normal Count Off (includes prep)
All In All the way up
12
OREGON CRUSADERS 2019 BRASS MANUALVisual Responsibilities
Posture
Posture is an exceptionally important element of both marching and playing. To be efficient with your
posture, your body should be in a natural and upright position. While playing a brass instrument, it is
important to keep your body weight evenly distributed between both feet. Your upper body weight should be
lifted from the waist so that it does not lean on the lower part of your back. Doing so will train you to think
more critically about the separation of upper and lower body. By lifting your weight off of your hips, you
create more room in your upper body to take in relaxed air. This also helps prevent the demands of marching
and maneuvering from effecting the quality of your sound.
In addition to the hips and back, the position of the shoulders should be back, down, and relaxed in order to
keep tension out of the chest and throat. The angle of your instrument’s bell should be 10 degrees above
parallel at all times. The body should never feel tense, as any improper posture can cause injuries that may
negatively impact the quality of your brass playing.
In regard to holding a brass instrument, your hands and wrists should remain relaxed at all times. Correct
finger technique consists of fingertips that rest upon the top of the valve caps, effectively making a C-shape
with the right hand. This technique will allow you to push the valves straight down and avoid bent valve
stems. The valve casing should be perpendicular to the ground, and the palms of your hands should be away
from the horn in a way that allows you to create a straight line from the knuckle, along the top of the
forearm, to the elbow.
The Hindu Exercise
The “Hindu” is our visual program’s posture exercise. Since everyone has a different body type, and we all
stand differently, the Hindu is an excellent way to create uniform look throughout the corps. By breaking
down one’s individual posture and then re-building it in a way that looks uniform, the Hindu helps increase
one’s body awareness. It does this by creating muscle memory, allowing you to learn the physical sensation of
proper posture.
The Hindu is also important because the improved posture allows you to play better, since your body
becomes more balanced and stable. It also makes you look better. When each point of alignment is realized,
you’ll be able to stand as tall as possible, creating a much better performance experience.
There are 6 points of alignment in the Hindu exercise:
1. Ears
2. Shoulders
3. Ribcage
4. Hips
5. Knees
6. Ankles
The desired Hindu posture aligns these six points vertically in a straight line. When each point of alignment
references the ankle as its base, your Hindu posture becomes realized.
13
OREGON CRUSADERS 2019 BRASS MANUALExercise Breakdown
When we start the Hindu we’ll begin from what we will call the “set position.” At the “set position” your feet
will be slightly outside shoulder width, your middle finger will be on the seam of your pants, and you will
need to find a focal point with your eyes. Your focal point should be in front of your face just above the
horizon. Do not look at the ground or up toward the sky/ceiling. Your eyes are a very important part of your
body language, and you need to focus solely on your focal point. This will communicate focus and
determination.
The Hindu is done in 4 count phrases:
Counts 1-4: Head to Chest - At the end of these 4 counts your chin should touch your chest and you should
feel a stretch at the back of your neck.
Counts 5-8: Shoulders (back, back and up, forward and up, forward and down) - At the end of these 4 counts
you should feel a stretch in your shoulder blades. Your wrists should be crossed over each other. Your chin
should still be touching your chest.
Counts 9-12: Upper Back/Ribcage – During these 4 counts you roll your vertebrae forward from your
shoulders down to the bottom of your ribcage. At this point you should feel a “good hurt” just below your
shoulder blades. Wrists are crossed, chin is to your chest. You are not looking around.
Counts 13-16: Lower Back – During these 4 counts you should relax your lower back. You should be hanging
over your waist. Your chin will lose contact with your chest and your wrists should become uncrossed. Be
relaxed.
Counts 17-20: Relax the Hips – At this point you will be relaxed and hanging. Knees should be bent. Head
and arms should be hanging. Relax your tongue within your mouth. Breathe deeply. With each breath feel
your lower back expand. With each exhalation fall toward the ground and relax more.
Exercise Stack Up
Counts 1-4: Straighten Legs – Your knee point should straighten onto your base point and your hips will align
onto your knee point.
Counts 5-8: Lower back on the hips; knees on the ankle point.
Counts 9-12: Ribcage onto lower back; hips and knees on the ankle point.
Counts 13-16: Roll your shoulders forward and up, back and up, and then back and down. The middle finger
should align with the seam of your pants. Your shoulders will become aligned onto your ribcage.
Counts 17-20: Bring your head back up. This will align your ear above your shoulders. Find your focal point
and stare at it.
Counts 21-24: Bring your feet together, with your heels and toes touching. DO NOT FIDGET! This creates
muscle memory.
Counts 25-28: Rise up onto your platforms and gain maximum height. Ankles together.
14
OREGON CRUSADERS 2019 BRASS MANUALCounts 29-36: Reach toward the sky in 8 counts. On count 4 your arms horizontal. This will lift your rib cage
off of your lower back/trunk area. Arms move up in a half circle, fully extending out through your fingertips.
Counts 37-44: Bring your arms down for 8 counts, leaving the rib cage raised and relaxed. Arms move down
in a half circle, fully extending out through your fingertips.
Counts 45-48: Lower yourself down onto your heels and seek to maintain the same height you had when you
were on your platforms. Seek to stretch your spine towards the ceiling.
Counts 49-52: Raise your horn to playing position.
Mark Time
The Mark Time will be used in all music rehearsals where we do not march drill. The mark time we utilize at
the Oregon Crusaders is a lifted mark time. This means that the full foot leaves the ground between pulses.
There are several reasons for this:
1. When the full foot lands on the beat it provides a tangible connection to pulse for both the individual
performer and ensemble. This is especially true during the preparatory counts for our exercises and
during Air and Valve reps.
2. A lifted mark time quickly makes it apparent to the performer that the upper body MUST be lifted
away from the hips. If excessive lower body movement is allowed to transfer to the upper body,
playing one’s instrument will be much more difficult.
3. We move and play. Confronting this reality with a mark time that closely resembles movement
challenges we face on the field better prepares the individual and ensemble for success when that
demand is presented.
4. It’s an obvious tool for evaluation. The full foot mark time more clearly illustrates to instructors
where individual and section feet are in relation to the pulse. If individuals are allowing their weight
to rest on their hips, it will be evident in a player’s sound, and visually demonstrated by excessive
motion in the upper body.
The Lifted Mark Time Technique
The technique of the lifted mark time is relatively simple:
1. Begin in the standard open first position. The feet should be in a “V” shape with the heels touching
and the toes at 11 and 1 O’clock. The ankles, knees, hips, ribcage, shoulders and ears should all be in
alignment with one another.
2. Lift the left foot off the ground. A slight bend of the knee allows for the foot, leg, and hip to
naturally work together.
3. The left foot descends to the ground, landing with both the heel and ball of the foot on the beat. The
moment it hits, the right foot lifts in the same manner as the left and then descends flat, landing on
the beat.
15
OREGON CRUSADERS 2019 BRASS MANUALGoing a little deeper
• The initiation of the mark time will be one count
• The foot comes up ONE inch. That’s all you need and it’s all we want.
• When the foot lifts and the knee bends to allow for it, you’ll notice that the heel naturally comes up a
split second before the ball of the foot. This is good.
• When the foot lands, the ball and heel should be placed on the ground at the same time.
• The foot hits the ground “on” the beat.
• The foot should be at the top of its travel “off” the beat.
• The motion of the foot should be deliberate, without being forceful.
• You may notice a side-to-side sway with this technique. This is natural, but do not accentuate it.
• Lift your upper body up off the hips to lessen the sway as well as mitigate shock or bound being
transferred from the lower body to the upper body.
• The success of the brass ensemble will be determined by how well you play and move. The sooner
you begin adding movement to your playing, the better off you and your section will become.
The Lifted Mark Time will be addressed throughout the winter. To prepare for your first camp, begin
practicing the exercises in this book with the lifted mark time as soon as possible.
Step-Outs
In the drum corps activity, you will find that almost all timing and technique problems related to music and
drill often occur during the first two counts of a phrase. Step-outs are essentially mini-drill moves to help us
fix these timing issues, as well as another form of combining your music responsibilities with your visual
responsibilities.
Step-outs are easy: Take two steps in ANY direction (left foot, then the right foot) at the beginning of a set or
musical phrase. Over the next two counts, you will return to your original position and continue marking
time. You should vary the direction and step size taken so that you can work on all aspects of your marching
technique while playing. Using a close approximation of your actual step size during horn arc will make your
job on the field that much easier.
Here’s a breakdown of proper step-out technique:
1. Count 1 – Left foot (full step)
2. Count 2 – Right foot (full step, point the toe, lightly “stab” with the platform)
3. Count 3 – Left foot re-plants (in place, in time)
4. Count 4 – Right foot back to the point of origin
5. Count 5 – Left foot back into Right foot (in time – both feet are now together)
6. Count 6 – Continue marking time in place, in time
High Mark Time
The High Mark Time is used to develop several skills that are critical to our music and visual programs. The
purpose of this exercise is to explore its execution in regard to balance, timing, the separation of upper and
lower body, the control of one’s body weight, and to ensure that we move evenly through time and space.
16
OREGON CRUSADERS 2019 BRASS MANUALThe exercise may be done with a variety of count structures to allow for the optimal understanding of its
performance and function, and begins in a closed-first position with the instrument at a carry or playing
position.
The following goals are critical for the High Mark Time’s execution:
• Timing – time must be equal across all beats, and verified using visual checkpoints.
• Posture – the six points of alignment must be maintained as described in the “Hindu” exercise
• Balance – balance must exist between active and passive body parts, demonstrating a skilled control
through the body parts via separation and malleability.
• Evenness – a skilled control of separation and malleability of the body parts through time and space
“Fours”
This variation of the exercise proceeds in groupings of 4 counts. The leg/foot lifts up off of the ground
during the first four counts, and is lowered back down over the next four. Each leg creates an 8-count phrase
with the following checkpoints:
1. Counts 1 + 2: “Up and Off” – The foot lifts off of the ground similar to a roll step. The heel lifts
first, followed by the platform, at which point thus entire foot is leaves the ground on count 2. The
foot should be pointed toward the ground by count 2.
2. Counts 3-4: Vocalize counts 3 and 4. The entire leg travels in an upward motion, with the ankle
traveling alongside the stable leg. The traveling foot remains pointed. Only the knee is broken from
the six points of alignment. A slight variation of these counts includes a sixteenth note “4 e + a”
vocalization of the direction change
3. Counts 5-7: Begin by saying “Down” on count 5. The entire leg now travels in a downward motion,
with the ankle traveling alongside the stable leg. The foot is still pointed, and the knee is remains
broken from the six points of alignment.
4. Counts 8 +: “Touch-Roll” – The platform touches on the ground on count 8 (“Touch”), and the
foot rolls down to the heel on “and”. Roll down to a close-first position with the heels and toes
together unless called to a halt.
Continue to repeat steps 1-4 until called to a halt.
“Ones”
This variation of the exercise is similar to the motion in “Fours,” but now each leg moves in a 1-count
phrase. The checkpoints are as follows:
1. Initiation: The left leg will initiate on count 8 of the 8-beat preparatory count-off. The leg will then
travel in an upward direction to the peak position on the “and” of 8. Make certain that the ankle
moves in alignment with the stable leg, and that the left foot is pointed. The ankle will travel along
the performer’s stable leg, and all but the knee must remain within the 6-points of alignment
described in the Hindu exercise.
17
OREGON CRUSADERS 2019 BRASS MANUAL2. Count 1: The left leg returns to the ground. An emphasis must be placed upon the weight being of
the body being over the platform (“shoelaces”). Although technically a “roll” step to the ground, this
movement occurs too quickly to define its count structure.
3. Count 1 +: The right leg travels to its the peak position. Make certain that the ankle moves in
alignment with the stable leg, and that the right foot is pointed. The ankle will once again travel along
the performer’s stable leg, similar to the left leg.
4. Count 2: The right leg returns onto the ground, similar to the left.
Continue to repeat steps 1-4 until called to a halt.
Health/Fitness
Just a quick word about health and fitness: Spending a summer on the road with the Oregon Crusaders will
be physically demanding. It has been proven that drum corps members perform with physical effort that is
equal to professional athletes, and in order to remain safe, it is imperative that all members are physically fit.
Every successful professional athlete has a very strict off-season fitness plan, and you should think of yourself
in the same way. Please prepare yourself for the endurance, strength and flexibility demands by beginning a
cardiovascular regimen to ensure that you are capable at performing at a high level physically. These types of
exercises may include running, cycling, swimming, and weight lifting. It is recommended that you seek out a
personal trainer to assist you with creating a physical fitness plan. Remember, the stronger you are, the
stronger we will be.
18
OREGON CRUSADERS 2019 BRASS MANUALFundamentals of Musicianship
Modeling and Matching
One of the most important skills that a musician can develop is the ability to match with other players. At the
fundamental level, musicians in an ensemble need to focus on matching their pitch and quality of sound. A
more advanced stage of this concept involves matching dynamics, articulation, style, and musicality. We will
regularly use individual players as models in order to achieve consistency in performance.
Singing, Clapping & Counting
Regardless of your chosen instrument, you are only going to sound as good as the aural model in your mind.
Singing, clapping, and counting allow you to improve upon that model. By isolating musical passages in this
fashion, it is possible to improve the perform quality on our instruments.
Establishing & Maintaining Pulse
At its most fundamental level, music must be in time. It doesn’t matter what sounds are coming out of our
horns if we do not move through time together. It will be our goal to make sure that we not only establish
and maintain tempo as a musical ensemble, but that we will also identify individual and ensemble tendencies
in order to raise awareness in the performers.
Achieving Tempo Consistency
Despite what people may people will tell you, no one has perfect time. It is essential that we use a metronome
at every rehearsal throughout the season, as it will give us the best chance at being successful as an ensemble.
In addition to using a metronome during rehearsal, we will also ask you to prepare assignments at specific
metronome markings that may be tested in rehearsal.
Establishing a Counting System
As a brass ensemble we will be counting almost every rhythm we intend to play during the summer. Doing
this will facilitate rhythmic accuracy and transfer to learning. Although there are several counting systems that
all serve the same purpose, we need to decide upon one and stick with it throughout the season. For this
reason, we have chosen to use the following:
• Quarter notes: 1, 2, 3, 4, etc.
• Eighth notes: 1+, 2+, etc.
• Triplets: 1-trip-let, 2-trip-let, etc.
• Sixteenth notes: 1e+a, 2e+a, etc.
19
OREGON CRUSADERS 2019 BRASS MANUALUnderstanding Basic Rhythmic Tendencies
Human beings are imperfect by design. Certain tendencies are inherent that make performing rhythms
accurately difficult. Other tendencies are developed via bad habits that have either been taught to us or have
crept into our playing. As with just about anything, understanding these tendencies is half of the solution.
Here are some of the most basic ones that plague nearly every musician and ensemble, both amateur and
professional.
White Notes: The tendency is to “lose time” in anything that we play that is slow and simple. We
tend to become unengaged in the music when it is simple; therefore we as musicians tend to lose
time in these situations. The solution is simple: Be aware of this and stay involved in the music at all
times.
Black Notes: The tendency in anything that is difficult in music is to panic. When we panic we tend
to rush. Anything with fast rhythmic figures or even sixteenth notes at a slow tempo have a tendency
to be rushed. Care practice is key. A basic understanding of note groupings will help alleviate this
problem.
Note Groupings: Specific note groupings have specific tendencies that accompany them.
Throughout the season we will be talking about them as they arise, as well as possible solutions when
facing them in performance.
Dynamic Contrast & Volume
In order to communicate effectively with our audience there must be moments of contrast within the show.
The most effective way to do this is with our volume, both loud and soft.
Power and volume are trademarks of any great brass ensemble. The key to playing loud is relaxation. An ugly,
“spread” tone is often the result of too much tension in the airway and forced breathing. You must stay
“open” to maximize the amount of air involved during the inhalation to produce a large and flowing “fff”
exhale. The corners of the mouth must be kept firm to support the large volume of air pouring through the
aperture. Visualize the lips wrapping around the air stream when playing at fuller dynamic levels. Great care
should be taken through the building of volume over a given period of time.
Dynamic Marking Number
We must also focus on playing at the extreme soft dynamics. This is done ppp 1
by applying all of the same techniques we would use during loud volumes.
pp 2
The best ensembles are not only able to play well at loud volumes; they can
p 3
also play at soft dynamic levels with fully-supported sounds. This type of
dynamic contrast makes the show more meaningful, and also maintains the mp 4
interest of the audience. Keep in mind that every note should sound exactly mf 5
the same regardless its volume. mf+ 6
f 7
Since dynamics are typically indicated with variations of the Italian words f+ 8
forte and piano, we have decided to achieve greater consistency in our ff 9
approach through the use a numerical schema to represent dynamics. fff 10
20
OREGON CRUSADERS 2019 BRASS MANUALBalance and Blend
Creating balance and blend within an ensemble begins with individual musicians creating characteristic tone
qualities on their instruments. While it may seem like an obvious prerequisite, producing a characteristic tone
requires the mastery of certain fundamental skills, including a correct embouchure and a clear understanding
of how to breathe efficiently with complete relaxation. Once mastered, individuals can learn to match and
balance with others in their section, across sections, and finally throughout the entire ensemble.
There are several criteria for achieving great balance and blend:
• Proper Air Support
• Focused Embouchure
• Perfect Intonation
• Awareness of the Moving Line
• Balance within your Trio, Section, and the Ensemble
Aside from the fundamental skills mentioned above, one of the most essential criteria for achieving great
balance and blend within an ensemble is perfect intonation. You should constantly ask yourself “Am I in tune
with the ensemble?” First, listen to the intonation in your section, then branch out to other section, and
finally listen to the intonation of the entire ensemble. It’s important to note that if one note in a chord is
played out of tune, then the chord’s balance cannot be properly achieved.
It is also essential to know which sections have the moving line in a given passage, and who has the melody.
This can be achieved by keeping your ears aware of the parts being played around you. Always keep in mind
that you should listen down to the bass voice. If you are supporting a moving line, ask yourself “Am I playing
louder than that line?”
The final criteria for achieving proper balance and blend is a combination of maintaining balance from player
to player, and encouraging each musician in the ensemble to play like a soloist, as every part in the ensemble
is unique in its own way. Knowing when to support a given line, to create balance within that line, or to
project an important line with a fully supported sound is essential to achieving proper balance and blend.
Ask yourself “Am I playing within the other sounds, balancing my sound against it with a rich, supported,
full-bodied tone?”
Balance and Blend require the performers to listen closely with critical ears. For efficiency, we have broken
down this critical listening into the 4 levels required to perform as a balanced brass section:
Level 1 – Self
In this first level of critical listening, the members of the ensemble should focus on the tonal color,
rhythmic accuracy, pitch, intonation, volume, and style that they are producing as individuals. This
self-awareness is important for higher-level playing. Level 1 listening encourages you to ask yourself
“Do I sound good?”
Level 2 – Trios
In this level of critical listening, the members of the ensemble should focus on the sounds that are
produced with respect to the trio that they are a part of. In this level, individuals should concern
21
OREGON CRUSADERS 2019 BRASS MANUALthemselves with the tonal color, rhythmic accuracy, pitch, intonation, volume, and style that they are
producing in relation to the players next to them.
Level 3 – Section
In this level of critical listening, the members of the ensemble should focus on how they fit with
regard to the other members in each respective section. At this level, individuals should concern
themselves with the tonal color, rhythmic accuracy, pitch, intonation, volume, and style that they are
producing in relation to the players on the same instrument.
Level 4 – Ensemble
In this level of critical listening, the members of the ensemble will be listening across the ensemble to
see how they fit into the larger picture. To be more specific, players will need to listen to see if other
sections have the same musical line as they do, and then evaluate how well they are balancing and
blending with those other sections. From time to time, the staff will also describe this process as “ear
mapping.”
Technique
While playing technical passages, it’s recommended that you press the valves down with authority while
keeping a relaxed feel in the wrists and fingers. Make sure not lose control of the valve on its way back up.
The fingers should remain rounded and it is the finger tips that should press the valve straight up and down.
If the valves are pressed at an angle, they may stick, making technical passages unplayable.
Pitch and Intonation
All brass instruments have various inherent intonation deficiencies. As a brass ensemble, we must be aware of
what deficiencies exist, and what we can do to correct them in our playing. We build our system of tuning
through the matching of overtones, which are by definition, never out of tune. Overtones will ring when the
pitches coming out of the horns are in tune. As all of the voices become more in tune with each other, entire
chords can be heard ringing above the brass ensemble.
In addition to working with a tuner every day, it’s possible to improve the tuning of your playing by singing,
mouthpiece buzzing, and various relative pitch exercises that will help you develop your ear for tuning chords
and unison notes. As mentioned in the Equipment chapter, we want you to invest in a Korg TM-60 tuner.
Start practicing with it on a regular basis.
Equal Temperament
Equal temperament is a musical temperament, or a system of tuning, in which the interval between every pair
of adjacent notes has the same ratio. In other words, its perceived distance from one note to its nearest
neighbor is identical. In equal temperament, the interval between notes is found by dividing the octave into
12 equal steps that are a half step apart.
22
OREGON CRUSADERS 2019 BRASS MANUALPythagorean Tuning & Just Intonation
Pythagorean Tuning is a system of musical tuning in which the frequency ratios of all intervals are based on
the ratio 3:2. This ratio, also known as the “pure” or “just” perfect fifth, is chosen because it is one of the
most consonant and easiest intervals to tune with the ear.
Just intonation is not a temperament, since its intonation based on the physics of the overtone series.
Whenever you play a note, a number of notes sound in addition to the fundamental that you produce. For
example, if you play C2, you are also hearing C3 G3 C4 E4 G4 and so on. Just intonation occurs when you
derive all notes of a given major scale using Pythagorean tuning, but preserve the resonance of these intervals
as the harmony changes.
One major distinction between Pythagorean Tuning and Just Intonation is that Just Intonation’s fundamental
is moveable, and may be applied to each interval or chord in a composition.
Lower Valve Combinations
All brass instruments are constructed inherently out of tune. In theory, the second, first, and third valve
should lower the pitch the open tube by one, two, and three semitones, respectively. While the use of single-
valve combinations presents no problem in the function of a brass instrument, a problem does arise when
valves are combined to provide a length of tubing. The combined length of these lower valve combinations is
slightly shorter than the length required for perfect intonation. If all three of the valves were manufactured to
produce correct intonation for these single-valve tones, then the resulting tone produced by using all three
valves in combination would be sharp by more than a quarter-step.
In order to solve this problem, many manufacturers now produce valves that produce a slightly-flatter pitch
when pressed. Even with these adjusted valve lengths, there are still sizable intonation problems in the lowest
three valve combinations. This is precisely why various rings and brackets are fitted to the third valve slide on
brass instruments to permit it to be moved by the player’s hand. It is also why many manufacturers now
produce a fourth valve (similar to playing 1 and 3). In providing an additional low range, this valve
compensates for the most common out-of-tune notes.
The ability for a player to use their air to compensate for faulty notes varies greatly between the high and low
brass instruments. This difficulty arises from the fact that it is more difficult to force a column of air to
vibrate at a frequency other than the one produced as the air column becomes longer. While the trigger may
be a considered a luxury on the trumpet, the proper tuning of the valve slides or the use of a 4th valve on a
low brass instrument is essential.
As a simple rule, the longer the valve combination, the sharper the instrument becomes.
The 5th Partial
Tuning a brass instrument is much more involved than pulling out or pushing in a few slides. The most
common difficulty for many performers stems from their tendency to allow the physical nature of their
instruments to determine their intonation, rather than attempting to correct the intonation themselves. While
most notes simply require a subtle adjustment of the embouchure, air pressure, or placement of the jaw,
others require correction by some mechanic means.
23
OREGON CRUSADERS 2019 BRASS MANUALWhile the second, fourth, and eighth partials (octaves) correspond almost exactly with the equal-tempered
scale, others do not. The third and sixth partials (perfect fifths) are slightly sharp, the fifth partial is noticeably
flat, and the seventh partial is extremely flat to the point where it is rarely used.
Since the fifth partial is an open note, it makes sense that the intonation tendencies associated with it would
also apply to every possible valve combination in the series. In order to overcome the flat nature of these
notes, many players advocate for the use of a lower valve combination on the 6th partial instead.
“It is not whether the instrument is built in tune, but if it can be played in tune.”
Overtone Series – Trumpet & Mellophone 5th Partial – Trumpet & Mellophone
24
OREGON CRUSADERS 2019 BRASS MANUALYou can also read