THE PROCESS OF COMBINING ANIMATION WITH LIVE-ACTION FILMS - Tuomas Anton Tulijoki - Theseus
←
→
Page content transcription
If your browser does not render page correctly, please read the page content below
THE PROCESS OF COMBINING ANIMATION WITH
            LIVE-ACTION FILMS

             Tuomas Anton Tulijoki

                 Bachelor’s thesis
                    May 2018
            Degree Programme in Media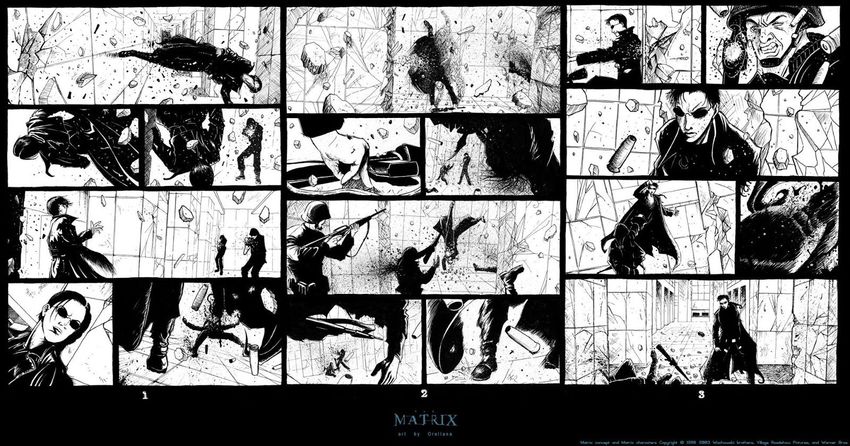
2

ABSTRACT

Tampereen ammattikorkeakoulu
Tampere University of Applied Sciences
Degree Programme in Media

Tulijoki Tuomas
The Process of Combining Animation with Live-action Films

Bachelor’s thesis 42 pages, appendices 1 2018
___________________________________________________

The purpose of this thesis was to examine the process of performing the setup for
animating digital characters on top of filmed footage. During my internship I saw
some issues in the working processes of the company I was working with,
specifically how the company handled animating characters on top of filmed footage.

In order to research this topic, the methods used by modern visual effects artists were
studied, to see how they went about the process of creating visual effects and
animation on top of live-action footage. A single test shot was filmed, and set up for
animation using the information that was gathered. The methods used were
functional, and the entire process of filming, setting up and animating was tested.

However, due to the lack of professional tools and experience with the techniques
used, the end results were only mediocre at best. In the end, the writer of the thesis
could not perfectly animate over the filmed footage in such a way that it could be
accepted in a professional environment, even if a general understanding on how the
process works was reached.
3

1    INTRODUCTION………….………………………………..……………...……....5
2    THE HISTORY OF LIVE-ACTION ANIMATION...………..……...……..……....7
     2.1 First Live-Action Animation Interactions…………………..……...…..….…...7
     2.2 The Rise of Puppet Animation………………………….………............……...7
     2.3 Disney’s Efforts……………………….………….…………..……..…..….…..9
     2.4 The Rise of the Computer-Generated Image…...………….…..………….…..10
3 THE PROCESS OF CREATING CGI FOR LIVE-ACTION.…….……...….....….14
     3.1 The Need for VFX Supervision…………...…..……….……….…..…..……..14
      3.2 Pre-production………...….…....……………….…….…...…………...……..15
         3.2.1 Storyboarding………………...……….....……………………..……...15
         3.2.1 Pre-visualisation…………….....………..………..…...………….…....17
      3.3 Production……………………………….…………...………….……...….…18
         3.3.1 Actor Interactions……….………….……...………………..………....18
         3.3.2 The Camera's Details………..….....….....……...………….………......20
         3.3.3 Tracking Markers.....………….…..……...…...…...………...….……...21
         3.3.4 Information on the Location………………..………………..…...…...22
     3.4 Later Stages of the Process……..…..……………………………………....….23
         3.4.1 Post-visualisation……...……..……………..………..…………..…...23
         3.4.2 Recreating the Set……………..…..….....…..………………….…….24
4 CREATING AN EXAMPLE SHOT…………….……………………….…….…...25
     4.1 Pre-Production……………………………………………………..….…….....25
         4.1.1 The Storyboard…………………………….………...……….…….….25
         4.1.2 Pre-visualisation………………………………………….…………....27
     4.2 Production……………………………………………………...……..…...…..28
        4.2.1 Setting up the Set……………………..……………..……………..…...28
        4.2.2 Camera Report……….………………...…………………….……..….30
     4.3 Post-Production………….…………..………………..………………...…….31
        4.3.1 Motion Tracking………………………………..……………..….…….31
        4.3.2 Recreating the Set………………..………..………..………….…….…33
        4.3.3 Animation and Examination of the Results……….……….….………..35
5 DISCUSSION……………………………………………….……………..………37
    6 REFERENCES…..………………….…………………...…….…..…..…..………39
4

7 APPENDICES…………………………….………………..……………...……...42
 7.1 Appendix 1. Links to the Files……………………………...…………..……..42
5

ABBREVIATIONS AND TERMS

CGI             Computer-generated imagery, visuals created by a computer
VFX             Visual effects
Character rig   A digital character that has been prepared for animation
Live-action     Film-footage taken from the real world
Parent          In 3D-animation, an object that controls an another object
6

Introduction

These days, animated characters are often seen alongside with live-action actors in
various movies and TV-series. With the advent of digital special effects that can
make the impossible possible, the world has seen creatures and characters that could
not possibly exist in the real world brought to life.

When it comes to the animation of the many CGI-characters that one sees on the
screen, the use of motion capture has become more and more popular. This is due to
the fact that it is often cheaper and more efficient to make an actor perform the
movement of the character instead of hiring multiple animators to painstakingly
animate the character to move believably alongside real living actors. However,
getting the equipment necessary for motion capture is not cheap, and many studios
choose to animate characters from scratch to get the job done.

This thesis is intended to examine the process of setting up a CGI-scene that
combines live-action footage and 3D-animation, so that the animator would have an
easy time animating. The idea of this thesis was inspired by my work on the Finnish
movie “Supermarsu”, which combined live-action footage and 3D-animated
characters. The studio that made the movie could not afford motion capture, and thus
did all the animation by using traditional digital animation techniques. However, this
meant that the CGI-characters that were animated still had to be able to interact with
the real world in a believable way. This was achieved by creating a virtual version of
the sets used in the shots, so that the animated characters could still do things like
place their hands on a surface in a way that would seem real.

Due to a lack of manpower in the production of the animation, this meant that the
animator often had to perform the whole set-up of the scene by themselves. This
meant that the animator spent a lot of time not creating any animation, but preparing
the playing field for their own work. I will examine how one could set-up a scene so
that the animator could focus on doing their own job, instead of doing something that
is outside their own field of expertise.
7

2. HISTORY OF ANIMATION IN LIVE-ACTION

2.1. The First Live-Action Animation Interactions

Perhaps the very first films that had animated characters interact with the real world
were the old cartoons of Max Fleischer (Roger Rabbit & Secret of Toontown, 1988).
These cartoons were created by Fleischer using his invention, the Rotoscope. This
machine projected a photograph onto a piece of glass, which an animator could trace
over using paper placed over the glass. The early Fleischer animations used this to take
real world images, and draw animated characters over them, initially filming an actor
moving and then tracing over the motion to copy the actor’s movement onto an
animated character. Fleischer produced a series of cartoons called Out of the Inkwell
from 1918 to 1921, that included animated characters with photographs used as
backgrounds (Pointer 2017, 37-39).

PICTURE 1. A diagram of Fleischer’s rotoscope (Wikimedia Commons 2013)
8

Before the rise of Walt Disney pictures, Disney worked as a cartoonist and pitched the
idea of the Alice Comedies to various potential distributors. This concept was eventually
accepted by Winkler Pictures, and went into production. The basic premise of the series
was that a real actress was filmed on set, and afterwards an animated landscape and
characters would be added in (Markstein, 2005).

PICTURE 2. A screenshot of the Alice Comedies episode Alice’s Wild West Show
(Youtube 2012)

2.2. The Rise of Puppet Animation

One of the most important special effects breakthroughs of the early film industry was
the idea of using puppet animation in conjunction with live-action. This allowed
film-makers to add various kinds of creatures into their films that would have been
incredibly expensive to create as “life-sized”. A man named Willis H. O’Brien, became
a pioneer in his own field in animating movie monsters for early audiences, as he
worked on the film Ghost of Slumber Mountain in 1918, which was the first film to
combine live-action footage and stop-motion animated puppets (1933: King Kong -
How… 2017).
9

Willis would put the art he pioneered to use in the next feature film he worked on: King
Kong. This was perhaps the first time that audiences would see an animated character
actually physically interact with a live-action actor on screen. Most of the interactions
between the actors and the King Kong were done by using layers of film. For example,
in the scene where King Kong holds the live-action actress in his hand, the hand in
which the actress is is actually a lize-sized prop-arm. After the actress was filmed, a
model of King Kong was animated on top of the live-action footage so that it appears
that the actress is in the hand of the model (1933: King Kong - How… 2017).

Willis also became the mentor and inspiration for an aspiring stop-motion animator: Ray
Harryhausen. The former would come to work on numerous SFX-heavy films as a
stop-motion animator, and would spearhead the creation of the animation technique of
Dynamation. This technique was devised to make the special effects animation easier
when Harryhausen worked on the movie Beast from 20,000 Fathoms. Due to budget
limitations, he could not use the more expensive techniques that were invented by
O’Brien, which required expensive matte paintings or environment models to be placed
in front of the camera to create a foreground (Harryhausen & Dalton 2004, 51; Gibbs
2014).

In Dynamation, a camera projects a picture onto a glass panel that stands behind the puppet
animation table. In front of this set-up is another glass panel, in which the area of the film
that will include the foreground would be. That foreground area is then painted black. Then
the model is animated with the background visible. After the animation is complete, the
films on both cameras would be rewound. After that, the glass pane in front of the camera
would be replaced with a panel that was a reverse of the former panel, thus hiding the
background and the animated model behind black paint. Then the entire sequence would be
reshot using the new panel. This technique worked due to the fact that the camera would
only capture the light that was reflected back at it. The black matte would not be filmed,
and one could film things on top of the black spots. The final developed film thus had both
the animated model and the live-action footage together, making Dynamation alike an early
version of the modern green screen (Harryhausen & Dalton 2004, 51).
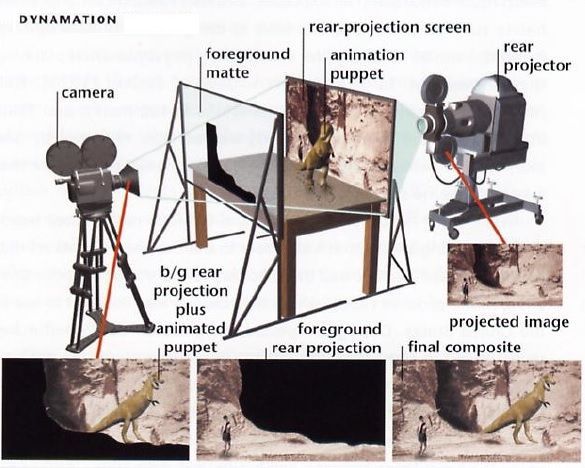
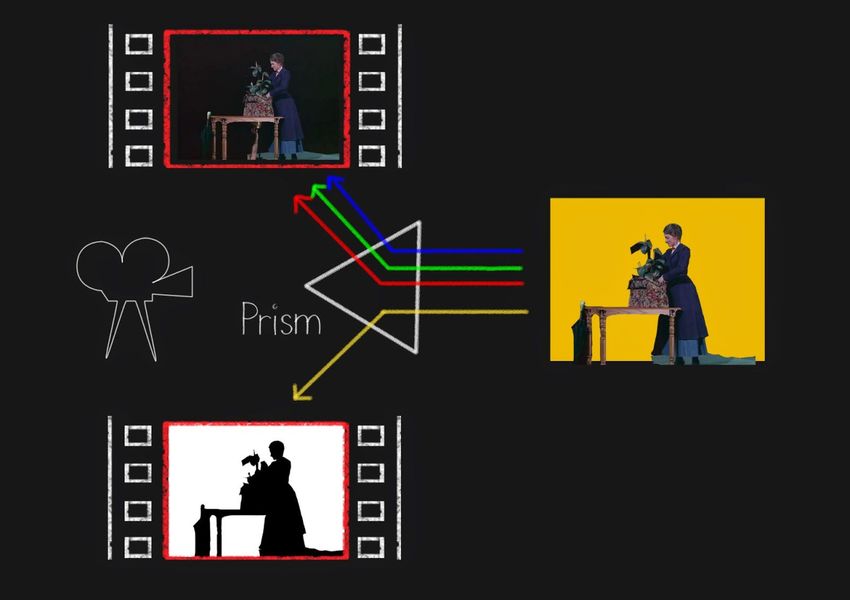
10

PICTURE 3. A diagram showing how Dynamation works (Silver Scenes 2013)

2.3. Disney’s Efforts

In 1964, Disney produced Mary Poppins, which included a sequence in which the
characters go into an animated world. The sequence included animated characters and
backgrounds, with only the actors themselves being live-action footage. The technique
used in the making of Mary Poppins’ animated sequence was called the sodium vapor
process, or the “yellowscreen”. The method had the actors performing in front of a white
screen that was lit by sodium vapor lights, while the actors themselves were lit by normal
lighting. A special camera that would create two films was used in the filming. The other
film was only sensitive to the sodium light of the background, and the other was sensitive
to the normal lighting of the foreground actors. Since the actors stood in front of the
sodium light lit background screen, this would create a black hole in the footage in the
shape of the actors. The animation and the painted backgrounds would be added later
during compositing, and the actor’s silhouettes on the sodium-sensitive film would be used
to block out the parts where the actors would be during the animation and
background-painting process. This meant that when the final film was composited, the
actors would fit in exactly with the animated footage and painted backgrounds. Mary
11

Poppins received numerous Academy Awards, including best Art Direction and Special
Effects (Hollywood’s History of Faking… 2013).

PICTURE 4. A diagram on the sodium vapor process (Hollywood’s History of Faking…
2013)

2.4 The Rise of the Computer Generated Image

The origins of what is now considered to be CGI can be found in the computer named
“Whirlwind I” that was created by the MIT for the use of the US military in 1951. It was
intended to serve as a tool for calculating the trajectories of rockets, and possessed a
display that would draw an image of the calculated trajectory for the user to see (History
of Computer Animation… 2008).

Most of the principles of the computer-generated image were laid down during the 60s.
Mathematicians under the leadership of Ivan Sutherland at MIT created the program
Sketchpad I, which allowed the user to draw lines using the computer. The computer
could also alter the drawn lines, so that they would either become completely horizontal
or vertical. During the same decade, the automotive industry also progressed into
creating their own programs similar to Sketchpad to aid in the design of vehicles
(History of Computer Animation… 2008).
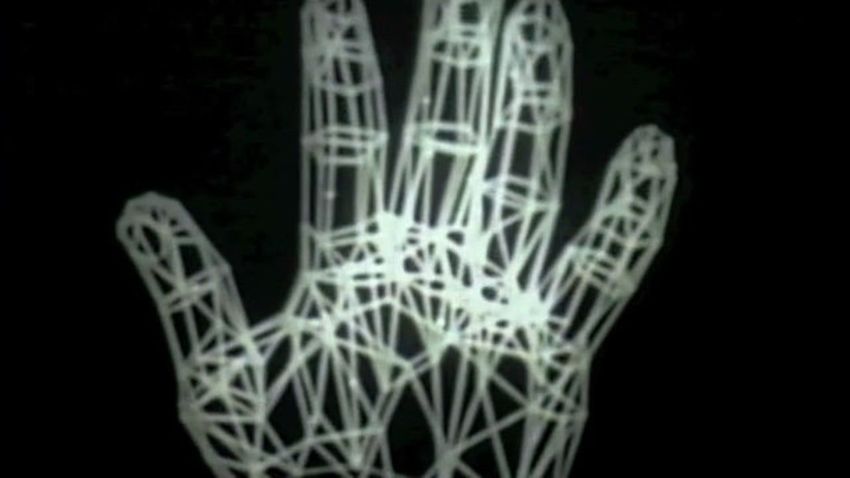
12

PICTURE 5. Sketchpad I’s working process (University Video Communications 1987)

The first use of actual 3D-wireframe animation came to be in 1972 when Ed Catmull,
the future co-founder of Pixar, and his associate Fred Parke created a 3D-wireframe
version of Catmull’s left hand. The hand was then animated to perform some simple
gestures. The pair also created 3D-wireframe versions of a human head and a heart
valve, both of which were animated to perform some simple movements. The pair
created a film of their work, titled “A Computer Animated Hand”. Pieces of the short
were used in the 1976 film Futureworld, and this would be the first time that audiences
would see real 3D-CGI on the big screen. Ed Catmull would go on to found his own
company Computer Graphics Lab. This company would eventually become known as
Pixar (Masson 1999). The university of Utah would later go on to experiment more with
3D-graphics, and create many of the techniques related to 3D rendering, such as
texturing and bump-mapping (History of Computer Animation… 2008).

PICTURE 6. The wireframe hand from “Computer Animated Hand” (Youtube 2011)
13

The 1980s were a time of rapid development for the computer-generated image. The
computers of that era had become increasingly more powerful, and were capable of
handling more sophisticated computer graphics (History of Computer Animation… 2008).
During this time, advertising agencies had grown more interested in computer graphics,
and companies such as “Robert Abel & Associates” began to take 3D-computer graphics
further . In 1982, the animation giant Disney produced Tron, and contracted “Robert Abel
& Associates” to produce the CGI for the film. The movie was a box-office flop, and
Disney decided to go back to traditional 2D-animation (History of Computer Animation…
2008).

In the 1990s, the digital animation started to become an accepted part of the film-industry.
During the early 90s, a company named Alias Systems Corporation created a 3D-animation
software called Alias, also known as PowerAnimator. This software was among the first
animation softwares used in the film-industry. Alias was used to make the CGI in movies
such as Terminator 2: Judgment Day in 1991 and Jurassic Park in 1993. Later that decade,
Alias Systems Corporation and another company named Wavefront merged. The merged
companies combined their efforts together to produce a new 3D-animation software: Maya
(History of Computer Animation… 2008). During this decade, Pixar also made its
animated movie debut in the form of Toy Story in 1995. The company had been struggling
for a long time, but was able to make a breakthrough with it’s first film, as it was both a
box-office hit and received critical acclaim. Toy Story was an important film in the sense
that it was the first fully computer-animated film to be made, and proved to the world that
the technology was worthwhile (Catmull 2014, 6-7).

PICTURE 7. The user-interface of PowerAnimator (Maxforums 2010)
14 3 THE PROCESS OF CREATING CGI FOR LIVE-ACTION This part of the thesis covers the process of making a film that incorporates live-action and digital animation. It focuses on how the special effects crew responsible for the making of the computer animation that will be included in the movie goes through the process of creating digital effects. This includes a great deal of communication with the main staff of the movie, especially the director and the filming crew. During this chapter the terms CGI and VFX will be used interchangeably with animation. This is because the animators that work with live-action movies which incorporate digital animation are a part of the VFX team, as animated characters are visual effects that are added to the movie in post-production. 3.1 The Need for VFX Supervision When it comes to any movie that will include digital characters or effects that will be added in during post-production, the VFX supervisor will be an important part of the filmmaking process. The VFX supervisor helps the leading staff-members of the movie (i.e. director or producer) to understand where digital effects should be used, and what are the needs of the digital effects team. In many ways, the VFX supervisor is the link between the movie’s main staff and the VFX studio that works on the digital effects of the film (Creative Skillset 2018). If there is no VFX supervisor, then the VFX-staff that works on the film cannot clearly communicate their needs to the main staff of the film and vice-versa. This may lead to the digital effects crew having a much harder time adding digital animation and effects during post-production, as they may lack vital information on the scene or the movie’s shots may have been filmed in a way that makes animating digital characters for them difficult. The VFX supervisor has a role to play during every step of the filmmaking process. During pre-production, the supervisor will help the director plan what shots and sequences need digital effects. This way, the supervisor will know the required budget for the digital effects, as well as the assets that are required to make those digital effects happen. During
15

the production, the VFX supervisor will be on the filming set, gathering the information
that the VFX-crew needs to add in the digital effects. During post-production, the VFX
supervisor will lead the VFX-crew and ensure that the director’s vision for the digital
characters and effects is followed.

3.2 Pre-production

Pre-production is the phase in the movie-making process in which most of the design and
the planning for the project occurs. As stated earlier, the VFX supervisor will serve as the
communication channel between the director and the VFX team at this point. The
pre-production phase is also important for visual effects companies as a time for research
and development. Some film projects may contain stunts or shots that require the creation
of new techniques or technologies, and the pre-production is the time during which these
assets are made (The VES Handbook of… 2010, 34). This means that for especially
ambitious films, the pre-production is vital for the visual effects, as having to create new
tools later will bring the film’s production to a halt and add to the film’s budget.

3.2.1 Storyboarding

A storyboard is a image script for a movie. It is often created to get a sense for visual
storytelling, and shot composition. It consists of a series of pictures that represent what the
film’s leading staff would want the movie to look like in the end, and they are often drawn
or rendered by special storyboard artists. Designing shots by taking into account the
CGI-animated character is not all too different from designing the shot normally. However,
the storyboarder’s job is very important in the making of a live-action film that
incorporates animated characters, since the shots have to be planned beforehand. There are
directors of live-action films who prefer to leave storyboarding out on occasion to allow the
actors more creative freedom, but when the final film will include animated characters, it is
necessary to plan out the actions within each shot. This is because the animation team has
to know what assets they must plan and prepare for the post-production. The VFX
16

supervisor can help the director understand the needs of the visual effects staff, and guide
the design of the shots accordingly. If the shots that the animation crew receives prove too
difficult to animate for, it might mean that the filming crew will have to perform additional
shooting. The storyboard will also help the movie’s leading staff-members plan out the
budget better, if they know how much the digital animation will cost overall. The
storyboard saves time and money for everyone in the production (The VES Handbook of…
2010, 38-39).

PICTURE 8. A storyboard used in the making of the movie Matrix (The Art of Matrix
2000)

Above all else, the storyboard allows both the production staff and the post-production staff
to understand how the real and the unreal will interact with each other. The production staff
can film the live-action knowing how the actors should interact with the movie’s digital
assets, and the actors can get into their role more easily when they know what the final shot
should look like. In turn, the visual effects staff will receive footage that is easy to work
with.

However, the more complicated the interactions are between the live-action actors and the
animated characters, the more time they will take to animate (Behind the Ears… 2003).
Using storyboarding, the VFX supervisor can help the director with the budget by guiding
17

them on how complicated a shot should be to fit the movie’s budget. This means that
complicated interactions should be sprinkled in with care, preferably in the most dramatic
and important parts of the movie, so that the audience will get the most out of the
animation.

3.2.2 Pre-visualization

After the storyboard has been made, and has been approved by all parties, the film’s crew
can move on to creating a pre-visualization. This is a “sketch” of the final film, and it is
essentially a moving storyboard. Pre-visualizations are often made using CGI, especially if
the film includes a lot of action. The point of the pre-visualization is to allow the entire film
crew to see what the director wants the final product to feel, look and sound. This way,
everyone can work together better to bring that vision to life (The VES Handbook of…
2010, 57-61).

PICTURE 9. A previs used in the making of the movie Matrix Reloaded (Laurent Lavigne
2009)

Additionally, one of the most important parts of the pre-visualization process is to allow
the film’s key personnel to budget correctly. During this phase, the final scope of the film’s
18

actions will become more clear, and any upcoming problems in terms of excessive special
effects can become clear. This way, these potential problems can be taken care of before
they become a reality. This often means that multiple pre-visualizations need to be created
for the film to be a success. While this iteration will cost money, it will be much cheaper to
pay money beforehand than to encounter unexpected budgeting issues in the middle of
production (The VES Handbook of… 2010, 58).

3.3 Production

Production is the phase of the project in which the raw live-action footage is filmed on a set
or on a filming location. Most of the VFX team has relatively little contact with the project
during this period, but there is some information that they will need from the production
staff to do the VFX work well. To this end, the VFX supervisor and their team will join the
production staff on the location. The supervisor’s team will collect data that the VFX team
needs, and occasionally help the production staff to prepare the filmed footage for the
post-production special effects.

3.3.1 Actor Interactions

Since the actors have to react to entities that do not exist in the real world, they have to put
in extra effort to make themselves believable. While the storyboard, pre-visualization and
the director’s guidance should prove a great help, there are a number of other techniques
that have been used to help actors act with non-existent characters.

In Hollywood, there is a special effects term called the “Monster Stick”. This refers to an
object, usually a long pole, that is used as a reference for characters and creatures that will
be added into the film during the post-production process. The sticks often have marked
regions that represent different areas of the digital character’s body, such as the torso or the
head. This way the actors can direct their gaze into the parts of the digital character that
they are supposed to look at during their performance. The most important part of the
monster stick is usually the head area, as this is used to maintain eye-level with the digital
19

character, and give off the illusion that the actors are actually looking at the eyes of the
animated character (The VES Handbook of… 2010, 163-164).

PICTURE 10. Bob Hoskins practicing with a dummy of Roger Rabbit for the real shot
(Behind the Ears… 2004)

In many productions, the monster stick is used in a reference shoot. A member of the
special effects crew holds the stick at the intended height of the digitally added character,
and the actors play their roles and observe the height of the stick. After this practice has
been done, the actual filming begins (The VES Handbook of… 2010, 163-165). The actors
will have gotten an understanding of the correct height of the digital character, and can act
more convincingly. For example, in the making of the movie Who Framed Roger Rabbit,
Bob Hoskins (who played the role of the the main character, detective Eddie Valiant) was
aided by a dummy in the shape of animated character Roger Rabbit. The crew would shoot
the shot twice. The first time was a practice shot where Hoskins would act with the dummy
as reference. The second shot would be shot without the dummy, and Hoskins would try to
reenact the first shot as best he could without the aide. After this, the filming crew would
compare the two shots and see if the actor had maintained the same eye-level so that it
would seem like that the character was actually looking at the eyes of the imaginary rabbit.
20

If this was the case, the crew would keep the second shot so it could be sent to the
animation crew (Behind the Ears… 2004).

While the monster stick does not directly make an animator’s life easier, as it is mostly
there for the physical actor to use as a tool of reference, it does help an animator act.
Animation and acting can be seen as similar to each other, as both are about acting out a
character in a believable way. If the physical actor is able to give a convincing
performance, then this performance will help the animator act out their part as the animated
character, as they have something that the animated character can react to with emotion.

3.3.2 The Camera’s Details

The camera’s details are important to the animators mostly in order to make sure that the
animated character looks like it is shot with the same camera as the live-action footage.
Most 3D-animation software have virtual cameras with numerous adjustable settings,
making the task of creating the desired virtual camera an easy task so long as the
VFX-artist knows what they need.

Most filming crews have camera assistants, whose job is to create a camera report. This file
contains the important details of the camera that was used to capture the filmed footage on
the set. Karen Goulekas, a VFX supervisor, still suggests that a VFX supervisor should be
present to take extra notes on the camera. She says that this is because the camera assistants
are not professional VFX-artists, and do not always understand the needs of the digital
effects crew. This means that the VFX supervisor, who has likely done work as a
VFX-artist themselves, has a better understanding of what details of the camera will be
necessary for the post-production (The VES Handbook of… 2010, 127-129).

Goulekas also states that the VFX supervisor should always strive to gather as much
information on the camera as possible. This is due to the fact that nobody can say what
information will become necessary down the line of the production, so it is good to have
any and all information within hand’s reach when needed. Some of the basic information
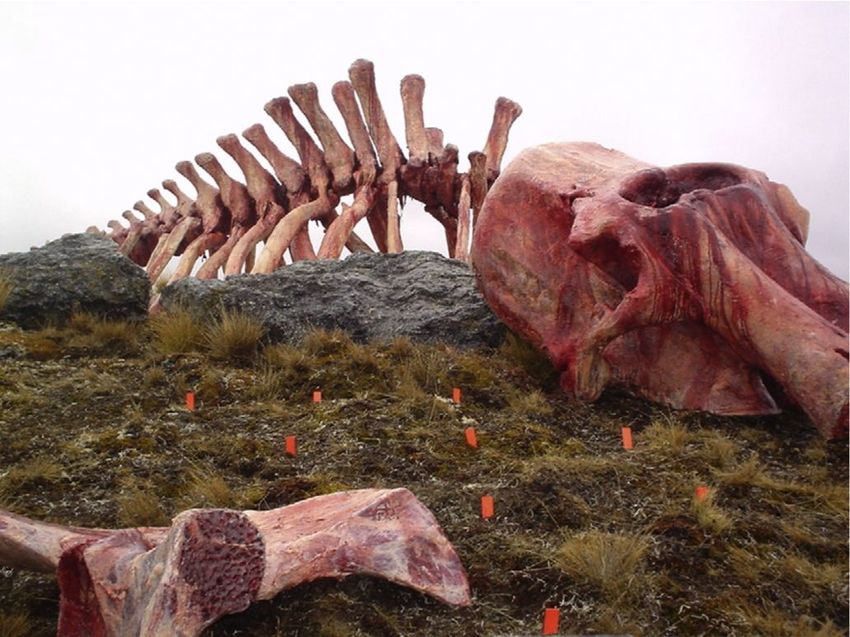
21

needed on the camera include the camera’s lens, the camera’s height and the camera’s tilt.
In case there there is camera equipment in use, such as a dolly track, this equipment should
be noted as well (The VES Handbook of… 2010, 127-129).

3.3.3 Tracking Markers

Motion tracking is the act of using computer software to recreate the movements of a real
camera in a virtual space by analyzing recorded camera footage. This is done by using
various reference points in the footage, and allowing the software to study how these
reference points shift as the footage goes on. The software then uses the information it has
gathered by studying the points to recreate the real camera’s movement for the virtual
space (VES Handbook of Visual... 2010, 131-132).

PICTURE 11. Tracking markers from the movie 10, 000 BC (The VES Handbook of…
2010, 132)

Tracking markers are intentionally placed markers that are easy to track for the software
used to perform the motion tracking. These are often placed in key locations on the set to
enable the VFX crew to track the camera with greater precision, in order to to ensure
higher quality of work. Goulekas suggests that the person responsible for placing the
tracking markers has to perform an important balancing act. The more markers the person
places, the easier it is to perform the motion tracking. However, as the number of tracking
markers increases, the number of elements to be removed from the final shot in
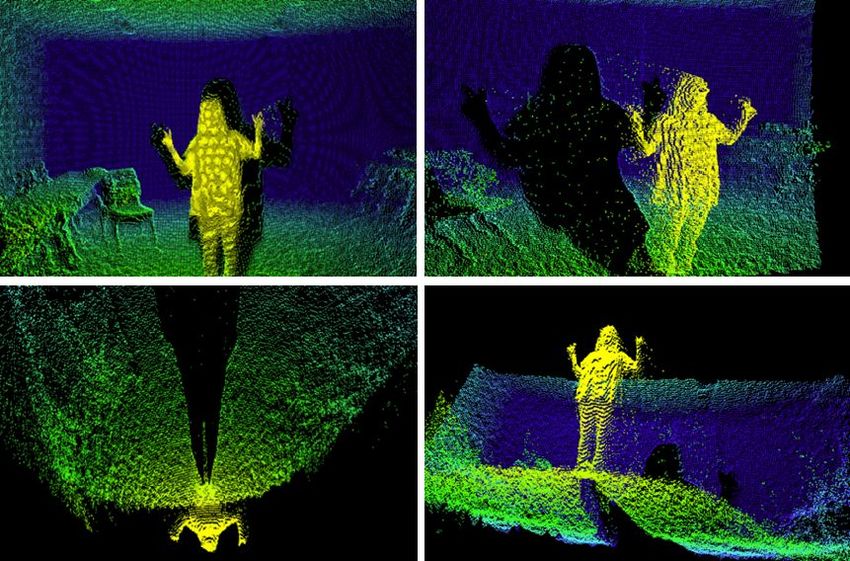
22

post-production also increases. Thus, she says that the placement of each tracking marker
should be weighed carefully (The VES Handbook of… 2010, 131-133).

3.3.4 Information on the Location

In modern productions, there are a number of methods for creating an accurate blueprint of
the filming location for the VFX crew. One of the most popular methods is the Lidar. Lidar
stands for light detection and ranging, and it is a device which can be used to scan and
measure points in real-life 3-dimensional space. Using this a VFX crew can create virtual
copies of sets or filming locations, which eliminates the need for the acquisition of
blueprints on the location itself. Of course, Lidar technology is expensive, and not all
companies can afford to pay the costs for using it. However, there are a number of
companies that rent Lidar-equipment and a VFX studio can pay for their services (The VES
Handbook of… 2010, 140-145).

PICTURE 12. An image of the 3D-clone of the environment created by a Lidar. Note the
“shadow” cast by the person (HL-Data Storage 2017).
23

In case the studio working on the VFX and animation cannot afford a Lidar, there is also
the possibility of photogrammetry. Photogrammetry is the science of measuring distance
from photographs. This is usually done by taking a number of photos of a set or location,
and then importing the photos into a photogrammetry-software. The end result is a
3D-model of the photographs’ contents.The process is not perfect, and the VFX-artists may
have to perform some fixes to the generated models, but this method can be used to get the
general environment into a digital space (Torno 2017).
Overall, it seems that the use of either Lidar or photogrammetry is largely based on
preference, but photogrammetry may become more cheap to use in the future. This is due
to the fact that one only needs a camera and a piece of software to do photogrammetry. The
act of buying a Lidar-tool is likely going to be more expensive for a filming studio than
simply using a camera they already have to take photographs of the set and use a
photogrammetry-software to recreate the set. Photogrammetry is also more available for
students and hobbyists, as most people already have access to cameras at their home. This
means that they would only need the software to learn to use photogrammetry techniques,
which means that many lower budget productions may end up using photogrammetry in the
future as those students and hobbyists start to produce their own films.

3.4 Later Stages of the Process

It is in the final stages in the process of creating CGI for live-action where the VFX-artists,
and the animators, do their work. They add special effects to the footage they have received
from the production staff, and use the information gathered by the VFX Supervisor to make
sure that the CGI-characters seem like they exist in the same space as the actors.

3.4.1 Post-Visualization

Post-visualization is similar to the pre-visualization, as the intention is to give everyone
participating in the post-production process an idea of what is going to happen in the final
film. This will allow the director of the film and the VFX-crew to communicate ideas
24

before moving on to creating the final animation and effects (The VES Handbook of…
2010, 62).

The making of a post-visualization is costly, and may require many attempts to get right.
Some directors may scoff at the idea of a post-visualization, since they already paid money
for the pre-visualization phase of the production. However, spending money on the
post-visualization is good for the production. It is far more expensive to spend a great deal
of time and money animating a CGI-character for a shot, only to realize later down the line
that the shot would have looked better if certain things would have been done differently,
or that there are aspects of the animation that have to be redone (The VES Handbook of…
2010, 62-63).

3.4.2 Measuring Distance in 3D

When attempting to properly recreate a real environment in a virtual world, one has to be
able to measure distance properly so that the real-life scale of an object can be brought into
the 3D-scene. It is best to match the measured distances of the filming location with the
distances of the virtual scene, so that the characters animated in the scene will seem like
they exist in the same location as the actors. Most 3D-animation softwares have various
settings for the measurement of distance, from virtual units to real units of measurement. It
is best to use whatever unit is the most familiar to the animation crew, for both the
instructions on how to recreate the scene and within the 3D-software itself.

In Maya, there are also tools called distance tools. When using the distance tool, the user
places two locator-objects in desired locations within 3D-space, and the software measures
the distance between these locator-objects in whatever units the digital scene has been set
to use. This feature can be used when preparing to recreate a set in 3D, in order to
remember the distance between various objects in the scene before placing them there. This
can be a great aid in making sure that there are no mistakes in the process of creating the
set.
25

4. CREATING THE SCENE

This chapter of the thesis shall go through the process of producing a short shot, and
prepare it so that an animator can easily animate a character onto the footage. Some of the
aspects of filmmaking that have been described earlier cannot be used during this
examination since they are inaccessible to the writer of the thesis, such as a Lidar.
However, the general principles will be put into practice, and their efficiency will be
reported on. In order to create the digital scene, Maya 2017 shall be used. This is due to the
fact that the Maya-animation software is usually seen as an industry standard in animation.
The “Ultimate Tailed” character animation rig created Ugur Ulvi Yetiskin was used as the
animated character in the shot.

4.1. Pre-production

During the pre-production phase of the shot’s creation, the storyboarding and the creation
of a pre-visualization for the animation shall be tested. A simple example has been chosen
for the live-action animation shot. A camera films a chair in an apartment. On the chair is a
CGI-character. The camera moves around to the character on the chair, after which it stops.
Then a hand is presented to the character. The character then jumps onto of the hand’s
palm, and the arm moves out of view. That marks the ending of the shot. The reason this
design has been chosen is because it allows the testing of almost all the techniques that
have been explained earlier to some extent, and that the shot would be achievable with the
current available equipment.

4.1.1 Storyboarding

The storyboard was treated as a plan for the overall composition. The idea was to try to
focus on the CGI-character, and make it so that the character’s actions were clear to the
viewer. A simple angle was chosen, so that the shot would not be unclear in any way. The
character’s pose should be as clear as possible. When the hand comes into the frame, that
26

hand is placed in front of the animated character. This is to avoid excessively complicated
interactions with the hand. If the viewer could not see the area where the character touches
the hand when it jumps onto it. Animating the character so that the contact area was visible
to the viewer would take great effort and perhaps some motion capture reference. By
eliminating this aspect of the shot, time can be cut from the tedious animation adjustment
that the animator would have to do to match the character’s movements with the hand’s
movement. This way, the animator can focus on the performance of the character, and not
where exactly on the palm the character should stand.

PICTURE 13. The storyboard that was used in the making of the shot (Tulijoki 2018)

Storyboarding was used extensively throughout the production of Supermarsu, often to get
a sense on how the VFX-heavy shots would work. For the most part, almost all of the
storyboards were followed according to what was visualised during pre-production.
However, there were a number of flying-shots that were not storyboarded, and instead
filmed by the crew by themselves. In this case, none of these flying shots were overly
complicated, and were quite easy to animate for. However, in terms of storytelling, the
animators had no special instructions on what the animated character should do in each
shot besides flying. While this gives the animator a great deal of creative freedom, it may
also affect the mood of the film if many shots are given to separate animators who might
have their own personal ideas on how the character should fly in each shot. While an
27

Animation Director will likely get these different artistic expressions to match, it would be
easier to have a pre-defined mood for each sequence of shots to make the animation
process more clear.

4.1.2 Pre-visualization

While this part of the process does not directly relate to animation, and how to make it
easier, there are some aspects that were tested using this. The main point of this phase is to
allow me to plan out the general camera-movement better, and to see how the hand should
move to cover the bottom of the animated character when the the character jumps onto the
hand. Since the camera had to be moved by a hand, it was attempted to take the movement
of the hands into account when designing the camera movement. Additionally, this
opportunity was used to create a approximate timing for the shot and its contents. Since the
most complicated piece of animation in the shot is the character getting on the hand, it was
decided to give a great deal of time for this action. While plans have been made for
character actions at this point in the production, it is good to give some room for the
animator in terms of their performance and creativity later down the line.

PICTURE 14. The pre-visualization created for the shot (Tulijoki 2018)

During the making of the Supermarsu-movie, no pre-visualisation was used. This was most
likely due to one of two reasons: budget or shot-simplicity. Perhaps the director saw no
need for a pre-visualisation phase, since the production’s VFX shots had already received
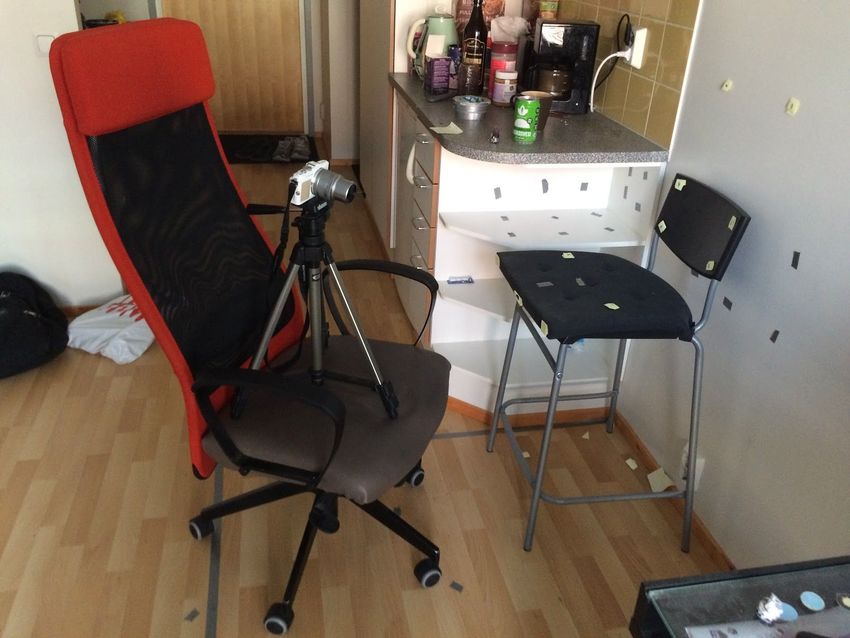
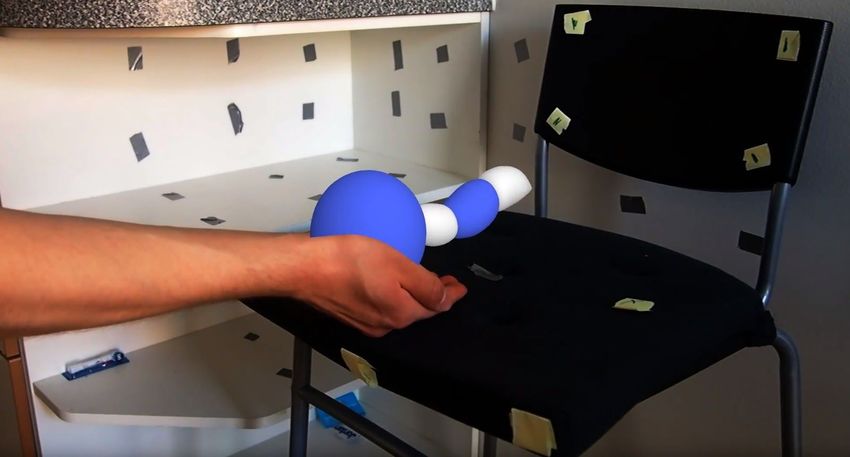
28

storyboards. The director could have seen the pre-visualisation as a waste of resources. The
other reason might be that since most of VFX-heavy shots were quite simple and the
animated characters had little complicated interactions with the environment or actors, the
director thought that there was no good reason to spend time on pre-visualising such simple
scenes.

4.2 Production

In this portion of the creation of the shot the set was created and the live-action footage was
filmed. After pre-visualization was deemed acceptable, a small area of the apartment was
bordered to use as a filming set for the shot, and notes were taken on the camera settings
for the shot itself. Picture 13 shows how the final set and camera set-up looked like when
the filming of the live-action footage started.

4.2.1 Setting up the Set

A corner of my apartment was chosen, which was marked down with tape. This small area
would be the “set” that was going to be recreated digitally. The other parts of the room are
considered to be a background. The camera’s movement was planned so that the camera
would not leave this marked area. However, the most important part of this phase was the
taking of various measurements of the set. This information would later be used to recreate
the set digitally. The only prop used in the filming was the chair on top of which the
animated character would stand. Below is a table (table 1) of the various measurements
taken of the set in order to recreate it later.

TABLE 1. The measurements of the set

 Measured entity                                  Measurements in centimeters

 Filming area                                     126, 5 x 112

 Height of the chair seat                         65 and 40
29

 Chair seat                                   40 x 40

Tracking markers were also placed across the set to allow me to track the camera
movement easier. The markers were placed with the intention of keeping them relatively
far apart from each other to get a large sampling of data. The markers were not placed so
that they could easily be removed via editing later, as this part of the post-production
process does not fall within the scope of this thesis.

PICTURE 15. The set used to film the shot (Tulijoki 2018)

Most of the shots in Supermarsu were shot in outdoors locations. While this certainly saved
a great deal of money, since the filming crew did not have to worry about creating
expensive sets, it also made taking measurements of the environment difficult. No
Lidar-equipment or photogrammetry was used, and only in some cases was there any
measuring work done. Most of the measurements that were received focused on the
distance between the camera and the place where the animated character was supposed to
be. This meant that the animation crew had to sometimes use online map services to
recreate a filming location digitally. It is also worth mentioning that there were no shots in
the movie that used tracking markers on the set.
30

4.2.2 Camera Report

The following data was collected based on the information and suggestions found on
camera reports in the Visual Effects Society Handbook (table 2). Some information has
been left out, namely information related to the time, place and weather, as they would not
affect the work on either the preparation of the digital scene or the animation. Such
information would only become relevant if the production was large, and the staff needed
to find ways to communicate crucial details to each other about lighting conditions. All the
information gathered was not used, as the software used in the digital setup could only
interpret some of the camera report’s details.

TABLE 2. The camera report

 Camera’s detail                  Information                        Used in
                                                                     Post-production

 Camera                           Olympus Pen Lite E-PL5             No

 Lens                             M. Zuiko Digital                   No
                                  14-42 mm 1:3,5-5,6 II R

 Focal length                     14 mm                              Yes

 Aspect ratio                     4:3                                Yes

 Height of camera                 approx. 94 cm                      Yes
 (measured to the middle
 of the lens)

 Distance to subject              approx. 72, 5 cm                   No
 (the animated character’s
 planned spot)

 Shutter speed                    50-60                              No

 F-number                         3, 5                               No
31 FPS (frames per second) 30 Yes ISO 1600 No In the making of the Supermarsu-film, the animation and VFX crew did not receive camera reports for individual shots of scenes. Instead only a general list of what cameras had been used in the filming process was received. This meant that the VFX-crew often had to guess the exact camera for each shot to get the perspective right. This research took time from the actual animation process that was supposed to be done to each of the VFX shots. If one had access to a camera report like this, one could have simply entered the correct information into the animation software. 4.3 Post-Production In this part of my shot’s production, the footage was edited and the digital scene was created in Maya. After setting things up, a short animation of the character jumping onto the filmed hand was created to see if the setup was good to animate with. Various programs were used in order to edit the live-action footage to prepare it for the digital scene. After Effects was used to edit the captured footage by increasing the contrast. This was meant to make the motion tracking easier by giving the tracking software areas of high contrast to analyze. For the motion tracking itself, Autodesk Matchmover 2014 was used. 4.3.1 Motion Tracking After increasing the contrast in my footage, it was imported into Matchmover. However, even with the increased contrast my footage was still of relatively poor quality thanks to a lack of proper lighting. This meant that the tracking had to be fixed many times before it was possible to get an acceptable result. Additionally, it turned out that my tracking markers were too large to be analyzed properly by Matchmover, which would have preferred small points of high contrast as tracking markers. At this point, the necessary
32

information from the camera report was also inserted into Matchmover so it could create
the correct camera. However, the only parts of the camera report that ended up being used
were the focal length and framerate, as Matchmover did not seemingly need any other
information from the report to track the footage properly. In larger productions where there
are a number of different software used in post-production, the camera report’s additional
details may become more relevant depending on what each software needs to do their job.

The actual process itself had me use the software’s Automatic Tracking function to find
points that could be analyzed easily, and then tracking them as they changed places with
the camera’s movements. After the automatic tracking was complete, a number of digital
tracking points were placed by hand in key places in the footage. This was because a
coordinate system for my motion tracking had to be created. This coordinate system is the
3-dimensional space in which the digital camera will exist. Without the system, the
camera’s general movements in relation to the live-action footage may be correct, but the
camera’s place in the 3-dimensional scene will be unknown. The coordinate system will
create this 3D space and will help the software to create the camera’s movements correctly.
The coordinate system is created by using the digital tracking points that have been placed
on the footage. The software is given a source tracking point, the distance between two
virtual tracking points and an another pair of these tracking points for each 3D-axis. The
source is used as the center point of the new coordinate system, and is treated like it was
the ground plane. The distance between two given digital tracking points is used to
determine the distance within the created coordinate system, and thusly the real life
distance between those points should be known to the person responsible for tracking so
that they can achieve good results. After this information has been inserted into the
program, the software must be given two pairs of virtual tracking points. These pairs will
be used to calculate two of the three axes for the coordinate system, with the last axis being
created by the software itself using the former two. With this information, Matchmover can
create the coordinate system, and thus the 3D space in which the digital camera exists.
33 PICTURE 16. The tracking points placed in the shot are marked with green lines (Tulijoki 2018) However, due to my film’s relatively low quality, the best tracking work that could be managed was not a perfect track. The coordinate system that was created had some issues with calculating the 3D-axes, since the tracking points that were given did not align perfectly. This was due to an earlier oversight on my part, as it was not known that the physical tracking markers that were used were too large for Matchmover to analyze well. After performing some fixes within the software’s tracking, it was possible to get a result that was almost completely aligned with the footage. That tracking was used, since that was seen as the best tracking that could be achieved using the available tools. The results here were significantly worse than the tracking work done during the production of Supermarsu. As most of the company’s employees were industry veterans, they knew how to track footage well, even if there were no special tracking markers placed on the set. Although, this likely meant that they had to track numerous mediocre points, rather than a few good ones. 4.3.2 Recreating the Set After the motion tracking had been finished, the tracked camera was imported into Maya. A solution was also devised to fix the somewhat flawed motion tracking. The animated
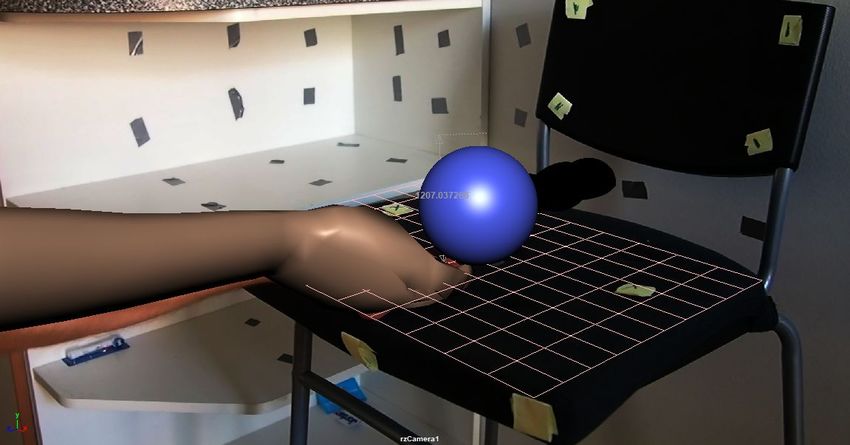
34

character would be parented to an object which would be aligned with the footage by hand.
If the parent-object would start to misalign itself due to tracking mistakes, the object would
be animated so that it would align with the footage. Since the animated character was
parented to the object, it would copy all the object’s movements. This meant that if the
object was animated to align with the footage, so would the character be. This way the
worst of the tracking mistakes were fixed.

After the issue was fixed, the necessary parts of the filming set were recreated. Only the
seat of the chair was modeled, since all action relating to the animated character occured on
the chair’s seat. To model objects outside of that area would have been a waste of resources
in a real production. The reason for modeling the chair’s seat was to use it as a reference
when animating the character later. This way the character’s movements could be animated
more believably, as it was possible to see exactly when the character should hit the ground,
instead of merely guessing it by looking at the footage. The Maya Distance tool was used
to gauge the dimensions of the chair’s seat before modeling it.

A 3D-representation of the hand was also added into the scene. The hand used was picked
from within Maya’s own Content Browser, which is a library of premade models and assets
to be used with Maya. The hand was altered slightly so it would match the filmed hand’s
gestures and form. The main purpose for adding the hand was so it could be used it as a
reference when animating. Not much time was spent making the hand an exact copy of the
filmed hand, as it was only used it as a reference for the position and the size of the filmed
hand. The fine details would not matter in the final shot, as the 3D-hand would be
removed. Some animation was also added to the hand. This animation copied the
movements of the hand in the footage. The animated character was also parented to the
hand, so that when the hand rises up in the footage, the digital hand would lift the character
according to those movements.

For the most part, the set-recreation process that was used during the making of
Supermarsu was applied here. The company only modeled the most necessary parts of the
environment from the live-action shots. This was a good method, since it saved a lot of
time and money from the production, and allowed the company to work faster.
35 PICTURE 17. The scene in Maya with the live-action footage on the background (Tulijoki 2018) 4.3.3 Animation and Examination of the Results The final part of the shot’s creation was to animate the character. A simple animation was created to test out if the setup that had been created was truly functional, and good for animating. After creating the animation, it can be concluded that the setup works in concept but not in execution. During the creation of the animation, the setup worked fine and I did not have to bother with anything else besides animation in the animation process. However, there were flaws in the setup that was created, namely with the motion tracking. The film that was captured for the shot had many flaws that would be a problem later down the line in the production. The poor lighting conditions and tracking markers made it so that everything the captured footage was very difficult to track, even for a professional program like Matchmover. I tried to compensate by increasing the contrast in After Effects, but it did not fix everything. This perhaps illustrates the need for the VFX Supervisor in a production. Their role is to inform the film’s leading staff on how to prepare the footage for VFX. The example shot lacked good preparation, and thus it was hard to set it up for
You can also read