Pro Fusion User Manual - Tobii Pro
←
→
Page content transcription
If your browser does not render page correctly, please read the page content below
Pro Fusion User Manual
Pro Fusion User Manual
Version 2.1
9/2020
All rights reserved.
Copyright © Tobii Pro AB (publ)

The information contained in this document is proprietary to
Tobii Pro AB. Any reproduction in part or whole without prior written
authorization by Tobii Pro AB is prohibited.
Products that are referred to in this document may be either trade-
marks and/or registered trademarks of the respective owners. The
publisher and the author make no claim to these trademarks.
While every precaution has been taken in the preparation of this
document, the publisher and the author assume no responsibility for
errors or omissions, or for damages resulting from the use of
information contained in this document or from the use of programs
and source code that may accompany it. In no event shall the
publisher and the author be liable for any loss of profit or any other
commercial damage caused or alleged to have been caused directly
or indirectly by this document.
Content subject to change without notice.
Please check the Tobii Pro website tobiipro.com for updated
versions of this document.
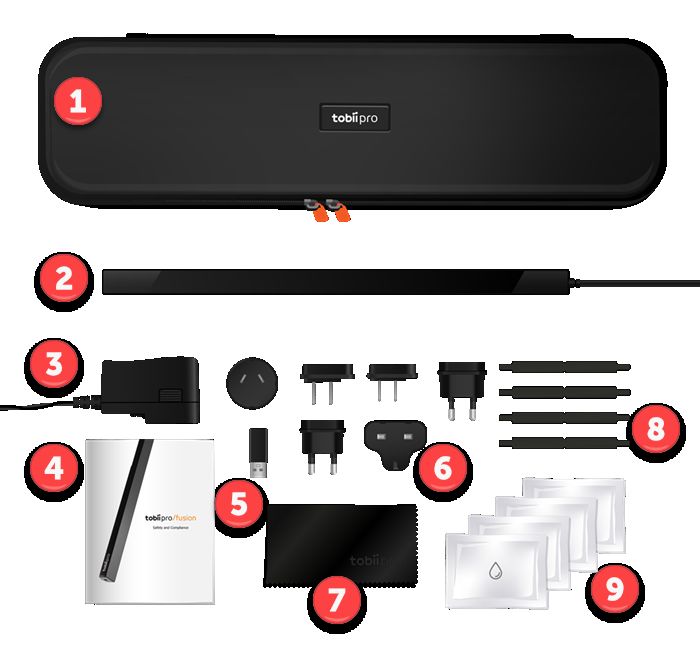
Table of Contents
1 Introduction                                                        5
     1.1 Symbols used in this document                                5
     1.2 Tobii Pro Eye Tracker Manager                                5
2 System Requirements                                                 7
    2.1 Pro Fusion System requirements                                7
    2.2 Additional software options                                   7
3 Safety                                                              8
    3.1 Mounting warning                                              8
    3.2 Emergency warning                                             8
    3.3 Epilepsy warning                                              8
    3.4 Infrared warning                                              8
    3.5 Magnetic field warning                                        9
    3.6 Child safety                                                  9
    3.7 Electricity                                                   9
    3.8 Accessories                                                   9
    3.9 Third party                                                   9
    3.10 Power supply                                                 9
4 Overview of Tobii Pro Fusion                                        10
    4.1 Key features                                                  10
    4.2 How Tobii Pro Fusion works                                    10
    4.3 Product versions                                              10
    4.4 What’s in the Pro Fusion box                                  11
    4.5 USB and power adapter                                         12
    4.6 How to use the USB Type-A to Type-C adapter                   13
    4.7 Attach the adapter plug                                       14
    4.8 Remove the adapter plug from the AC power adapter             14
    4.9 Tobii Pro accessories                                         15
5 Set up your Tobii Pro eye tracker                                   16
    5.1 Download and install Tobii Pro Eye Tracker Manager            16
    5.2 Install Pro Fusion in Tobii Pro Eye Tracker Manager           16
    5.3 Mount the eye tracker on a laptop or monitor                  16
    5.4 Display setup in Tobii Pro Eye Tracker Manager                19
    5.5 Calibration                                                   19
         5.5.1 What calibration does                                  20
    5.6 Detach the eye tracker                                        20
    5.7 Change Pro Fusion’s frequency                                 21
6 Display Setups                                                      22
    6.1 Standard setup                                                22
    6.2 Advanced setup                                                22
         6.2.1 Setup with Tobii Pro Tripod Stand                      22
7 Start Experimenting                                                 24
    7.1 Start eye tracking                                            24
    7.2 Tobii Pro Lab                                                 24
    7.3 Keeping your eye tracker software and display setup updated   24

Pro Fusion User Manual v.2.1                                           3
7.4 Customer Support 25
8 Product Care 26
8.1 Operational environment 26
8.2 Transportation and storage 26
8.3 Cleaning 26
8.4 Disposal of the eye tracker 26
8.5 Limitation of liability 26
9 Technical Specifications 28
9.1 Eye tracking specifications 28
9.2 Pro Fusion eye tracker specifications 29
10 Compliance Information 30
10.1 CE Compliance 30
10.2 VCCI Compliance 30
10.3 General Compliance 30
10.3.1 FCC interference statement 30
10.3.2 Industry Canada statement 30
10.3.3 CE statement 30
10.3.4 Safety compliance 31
10.3.5 EMC compliance 31
Appendix A Support, Learning Center, and Warranty 32
A1 CustomerSupport 32
A1.1 Get help online 32
A2 Learning Center 32
A3 Warranty information 32
Appendix B Limitations and considerations 33
B1 Intended use 33
B2 Light conditions 33
B3 Eyelashes 33
B4 Droopy eyelids 33
Appendix C Glossary 34
Pro Fusion User Manual v.2.1 41 Introduction
Tobii Pro Fusion is a compact, high performance data collection solution that you can take into the
field. Use Pro Fusion when your research takes you to locations and to subjects that would oth-
erwise be hard to bring to the lab. You can collect data in schools, hospitals, libraries, and other loc-
ations where your subjects are easier to recruit.
With sampling frequencies of up to 250 Hz, two eye tracking cameras, and two pupil tracking modes
(bright and dark pupil), Pro Fusion enables you to adapt your data collection setup to different
research populations, scenarios, and data requirements.
Use Pro Fusion for studies on:
l Windows laptop and desktop computers
l PC monitors, 24″ (16:9) or less as optimum size
l Real-world setups such as physical objects and social interactions (using the Tripod Stand)
l Projections, simulators, and larger screens (using the Tripod Stand)
Tobii Pro Fusion is primarily designed for use in indoor office environments with adult participants.
1.1 Symbols used in this document
Three different symbols are used in this document:
The Information symbol means something is important or needs special attention.
The Tip symbol denotes additional information that can make a process or function
easier.
The Warning symbol means there is a possible risk of harm if the warning is ignored.
1.2 Tobii Pro Eye Tracker Manager
Tobii Pro Eye Tracker Manager is a free software available from the Tobii Pro Eye Tracker Manager
webpage.
Pro Eye Tracker Manager helps you manage your Tobii Pro eye tracker. It lets you see which eye
tracker firmware and software versions you are running and also facilitates applicable updates. It
provides:
l Drivers and Firmware installation or updates
l Display setup
l Positioning guide
Pro Fusion User Manual v.2.1 5l User calibration
l Gaze visualization*
References in the manual to Tobii Pro Eye Tracker Manager refer to the latest version
available on Tobii Pro’s website.
*Gaze visualization in Pro Eye Tracker Manager lets you quickly evaluate the quality of
the eye tracking data. The Gaze visualization overlaps data only on the Pro Eye Tracker
Manager screen while Pro Eye Tracker Manager is open.
Pro Fusion User Manual v.2.1 62 System Requirements
2.1 Pro Fusion System requirements
Operating system Windows 10
CPU 1 GHz, 2 cores
RAM 2 GB RAM memory*
*Software for eye tracking research may require higher
RAM
Port USB Type-A or USB Type-C
2.2 Additional software options
Pro Lab Pro Lab is a comprehensive research soft-
tobiipro.com/product-listing/tobii-pro-lab/ ware platform for eye tracking designed to
meet the highest demands on different
research scenarios with exact timing accur-
acy. This software offers an efficient work-
flow, making it easy to design experiments,
record data, analyze and visualize eye track-
ing data, and to sync this data with other bio-
metric data streams.
Pro SDK Pro SDK offers a broad set of tools that
tobiipro.com/product-listing/tobii-pro-sdk/ makes it simple to develop a variety of niche
applications or scripts across multiple plat-
forms, using a wide range of programming
languages. This SDK gives the researcher
access to the full set of relevant gaze data
streams, such as 3D eye coordinates, raw
data, pupil data, etc.
Third-party software This term refers to any application built on Pro
SDK.
Pro Fusion User Manual v.2.1 73 Safety
3.1 Mounting warning
Tobii Pro eye trackers should be mounted according to Tobii Pro´s instructions for
approved mounts.
The mounting bracket is designed for adhesion to a wide variety of surfaces, such as
monitors or laptop screens. It is also designed for clean removability. Failure to follow
the recommended removal instructions can result in damage to both the monitor/laptop
and the mounting bracket. Do not mount the eye tracker on monitors positioned above
the head or face of a user, as it might fall.
3.2 Emergency warning
Tobii Pro eye trackers are designed to be used only for research purposes. Be aware
that due to the low, but possible risk of failure or distraction, the eye tracker should not
be relied upon or used in dangerous or critical situations.
3.3 Epilepsy warning
Some people with photosensitive epilepsy are susceptible to epileptic seizures or loss of
consciousness when exposed to certain flashing lights or light patterns in everyday life.
This may happen even if the person has no medical history of epilepsy or has never had
any epileptic seizures.
A person with photosensitive epilepsy would also be likely to have problems with TV
screens, some arcade games, and flickering fluorescent bulbs. Such people may have a
seizure while watching certain images or patterns on a monitor, or even when exposed
to the light sources of an eye tracker. It is estimated that about 3-5% of people with epi-
lepsy have this type of photosensitive epilepsy. Many people with photosensitive epi-
lepsy experience an “aura” or feel odd sensations before the seizure occurs. If you feel
odd during use, move your eyes away from the eye tracker.
3.4 Infrared warning
When activated, the Tobii Pro eye tracker emits pulsed infrared (IR) light. Certain med-
ical devices are susceptible to disturbance by IR light and/or radiation. Do not use the
eye tracker in the vicinity of these kinds of susceptible medical devices, as their accuracy
or proper functionality could be inhibited. Do not stare into the LED lights at a close dis-
tance (3.5 Magnetic field warning
This Tobii Pro eye tracker contains magnets. Magnetic fields may interfere with the func-
tion of cardiac pacemakers and implantable cardioverter defibrillators. As a general
rule, maintain a minimum distance of 6 inches (15 centimeters) between any item with
magnets and your heart device.
3.6 Child safety
A Tobii Pro eye tracker is an advanced computer system and electronic device. As
such, it is composed of numerous separate, assembled parts. In the hands of a child,
some of these parts have the possibility of being separated from the device, possibly res-
ulting in a choking hazard or other danger to the child.
Young children should not have access to, nor use of the device or its accessories
without parental or guardian supervision.
3.7 Electricity
Do not open the casing of the Tobii Pro eye tracker, this could expose you to potentially
hazardous electrical voltage. The device contains no user-serviceable parts. Non-
compliance will result in loss of warranty! Contact Tobii Pro Support if your eye tracker
is not working properly.
3.8 Accessories
Only use accessories provided by or approved by Tobii Pro AB.
3.9 Third party
Any use of a Tobii Pro eye tracker outside the intended use and together with any third-
party software or hardware that changes the intended use is a risk, and Tobii Pro AB
can not take any responsibility in these situations.
3.10 Power supply
Only use the AC power adapter provided by Tobii Pro to power your Tobii Pro eye
tracker. If the AC power adapter is damaged, it should be replaced only by Tobii Pro Ser-
vice Personnel. If damaged, do not use the AC power adapter until it has been
replaced. Tobii Pro and its agents are not liable for any damages or injuries to a person
or property due to incorrect use of the provided accessories.
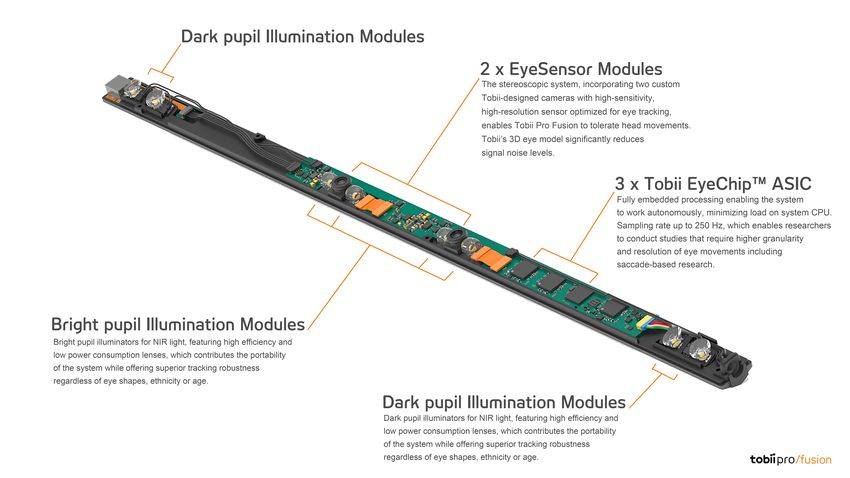
Pro Fusion User Manual v.2.1 94 Overview of Tobii Pro Fusion 4.1 Key features 4.2 How Tobii Pro Fusion works During tracking, eye trackers from Tobii Pro use infrared illuminators to generate reflection patterns on the corneas of the participant’s eyes. These reflection patterns, together with other visual data about the participant, are collected by image sensors. Sophisticated image processing algorithms identify relevant features, including the eyes and the corneal reflection patterns. Tobii Pro Fusion is a dual camera system that automatically chooses when to use dark or bright pupil tracking. Complex mathematics is used to calculate the 3D position of each eyeball along with the gaze point (where the participant is looking). 4.3 Product versions Pro Fusion is available in two product versions: 250 Hz and 120 Hz. The values denote the eye tracker’s maximum sampling frequency, but it can be used at lower settings as well. 250 Hz version: The 250 Hz version can operate at these frequencies: 60, 120 & 250 Hz. Dark pupil tracking is supported in all sample frequencies. Bright pupil tracking mode is supported at 60 and 120 Hz. Pro Fusion User Manual v.2.1 10
120 Hz version:

The 120 Hz version can operate at these frequencies: 60, 120 Hz. The 120 Hz version can be
upgraded to the faster version by contacting your sales representative.
Dark pupil tracking is supported in all sample frequencies. Bright pupil tracking mode is supported at
60 and 120 Hz. For more information, read Technical Specifications.

4.4     What’s in the Pro Fusion box

Pro Fusion User Manual v.2.1                                                                        11
Item                             Additional information
 1                             Travel case                      Stores, protects, and carries Pro
                                                                Fusion and the included
                                                                accessories
 2                             Pro Fusion eye tracker            Used for eye tracking
 3                             AC power adapter                 Provides the additional power
                                                                required when the USB Type-A
                                                                to Type-C adapter is used
 4                             Safety and Compliance            Printed versions of important
                                                                information
 5                             USB Type-A to Type-C adapter     Used when the computer does
                               plug                             not have a USB Type-C port
 6                             6 International plug adapters    Used with the AC power adapter
                                                                to match international outlets
 7                             Cleaning cloth                   For cleaning the surface of the
                                                                eye tracker
 8                             Four mounting plates with non-   Attaches the Pro Fusion eye
                               permanent adhesive               tracker to the screen bezel
 9                             Four cleaning wipes              Removes any dust and grease in
                                                                the area around the screen
                                                                before attaching a mounting
                                                                plate

4.5     USB and power adapter

Pro Fusion User Manual v.2.1                                                                   12
Figure 1. The fixed USB cable is on the right side of Pro Fusion and the power supply port is on the
left side The left side of the Pro Fusion eye tracker has a jack for plugging in the AC power adapter.
The right side of the Pro Fusion eye tracker has a fixed USB cable that plugs into the computer’s
Type-C port or into a Type-A port using the included USB Type-A to Type-C adapter. For more
information, read How to use the USB Type-A to Type-C adapter.
When using the Type-A to Type-C adapter, you should also use the AC power adapter
since Type-A ports can deliver less power. Your computer’s power settings can also
influence the amount of power delivered to peripherals.
4.6 How to use the USB Type-A to Type-C adapter
Pro Fusion is connected to a computer via a standard USB Type-C interface.
The USB Type-C interface enables a better user experience over the older Type-A interface due to
its higher data transfer rate, symmetrical connector which eliminates the “right side up” problem, and
increased power. If your computer doesnot have a USB Type-C connection, you must use the
included USB Type-A to Type-C adapter and the power adapter with your Pro Fusion.
Figure 2. USB Type-A to Type-C adapter
What to do:
1. Plug the USB Type-A to Type-C adapter into the USB end of the cable.
2. Plug the cable with the adapter into the computer.
3. Attach the correct adapter plug for your country to the AC power adapter. For more inform-
ation, read Attach the adapter plug.
4. Plug the AC power adapter into the left-hand side jack on the eye tracker.
5. Plug the AC power adapter and adapter plug into a power outlet.
Pro Fusion User Manual v.2.1 134.7 Attach the adapter plug
Figure 3. International plug adapters
How to use the international adapter plugs:
1. Select the correct plug adapter for your region.
2. Line up the rounded top of the plug adapter with the top of the AC power adapter.
3. Click the adapter plug into the AC power adapter at an angle, starting with the upper part first
and then the lower part.
Figure 4. Snap in the adapter plug, starting at the rounded top
4.8 Remove the adapter plug from the AC power adapter
When storing the AC power adapter in the eye tracker case, you will need to remove the adapter
plug so that it fits in the case. You may also need to exchange one plug adapter for another if you
travel with your eye tracker to another country.
Pro Fusion User Manual v.2.1 14How to remove an adapter plug: 1. Use your thumb to draw the latch underneath the AC power adapter down to release the clip. 2. Remove the adapter plug starting by withdrawing the lower part first and then the upper part. 4.9 Tobii Pro accessories Find out more about Tobii Pro products and accessories on the Tobii Pro website. Pro Fusion User Manual v.2.1 15
5       Set up your Tobii Pro eye tracker
 At the end of this setup, you will have a verified installation that is ready for use.

5.1     Download and install Tobii Pro Eye Tracker Manager
The first step is to get the free software, Pro Eye Tracker Manager on your computer. Setting up
your eye tracker involves installing the necessary drivers and software on your computer. Pro Eye
Tracker Manager makes this easy. For more information, read Tobii Pro Eye Tracker Manager.
             Your eye tracker does not need to be connected to the computer to install Pro Eye
             Tracker Manager.

    1. Before starting, double-check the hardware and system requirements, System Require-
       ments. You should also check the requirements for your analysis software, for example, Tobii
       Pro Lab.
    2. Download Pro Eye Tracker Manager from the Tobii Pro product page.
    3. Open Pro Eye Tracker Manager and follow the prompts to finish installation.

5.2     Install Pro Fusion in Tobii Pro Eye Tracker Manager
Now it’s time to make sure your computer can communicate with your eye tracker. This is necessary
for downloading the proper driver updates.
    1. Open Pro Eye Tracker Manager if it is not already open.
    2. Connect Pro Fusion's USB cable to a Type-C port in your computer. If your computer does
       not have a USB Type-C port, read How to use the USB Type-A to Type-C adapter. Do not
       mount the eye tracker just yet, just plug in the USB so you can make sure everything’s work-
       ing.

             If the included USB Type-A to Type-C adapter is used then the AC power adapter must
             also be used.

    3. If your Pro Fusion is connected to the USB port but doesn’t appear in the list of connected
       eye trackers, click the plus (+) symbol in the upper right corner to install (or reinstall in some
       cases) the required drivers. Sometimes removing the USB and plugging it in again is neces-
       sary.
    4. Select Pro Fusion and click the Install button.
    5. Follow the prompts in Pro Eye Tracker Manager to finish the installation.

5.3     Mount the eye tracker on a laptop or monitor
To ensure quality in eye tracking data, the Pro Fusion hardware package includes several mounting
brackets that can be affixed to a laptop or monitor. You can easily snap the eye tracker on and off the
laptop using the magnetic mounting bracket. The mounting bracket sticks to the frame with a special

Pro Fusion User Manual v.2.1                                                                            16
adhesive that doesn’t damage the underlying surface when the bracket is removed. For more inform-
ation, read Detach the eye tracker.
If the screen bezel is thinner than the height of the eye tracker, affix the mounting
bracket as low as possible on the screen frame, or directly on the screen. Don’t use this
setup if you intend to put stimuli in the lower part of the screen, as they might become
covered by the eye tracker.
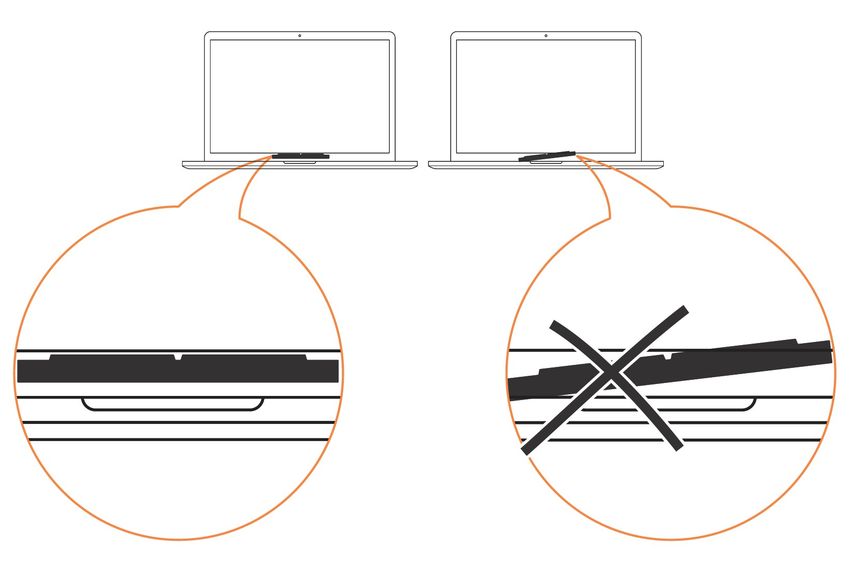
Some laptops are very thin and there is little space between the screen and the key-
board when the laptop is closed. We recommend that you check whether the laptop can
close with the mounting bracket present before you attach it.
What to do:
1. Make sure the eye tracker is attached to the monitor and connected to your computer. Open
Pro Eye Tracker Manager. You should be able to see and expand your eye tracker’s “card” in
Pro Eye Tracker Manager. The serial number of your eye tracker should match the number
displayed.
2. You can leave your eye tracker USB cable connected with the eye tracker to the side (for
example on the table) or you can disconnect it while you attach the mounting bracket.
3. If you plan to attach the eye tracker to a laptop, make sure the laptop can close with the mag-
netic mounting bracket attached. Some laptops have very little space when closed.
You can test whether you can close the laptop with the mounting bracket by placing the
mounting bracket (with the backing paper still attached) on the keyboard side of the
laptop and carefully closing the laptop lid. Watch for any potential interference between
the screen, bracket, and keyboard.
4. Find the center of the screen and clean the bezel with one of the included cleaning wipes.
5. Peel the adhesive tape off the mounting bracket and mount it on the bezel so that your Pro
Fusion is as close to the bottom of the screen as possible without covering the screen. Press
the bracket against the bezel for 30 seconds and wait one hour before attaching the eye
tracker.
Pro Fusion User Manual v.2.1 17Figure 5. Align the eye tracker properly with the mounting bracket. The magnet holds the eye
tracker firmly in place when the slots are lined up correctly.
6. Attach the eye tracker, making sure that it aligns properly with the mounting bracket. The
magnet holds the eye tracker firmly in place when the slots are lined up correctly.
Figure 6. Place the mounting bracket on the bezel so that the Pro Fusion is as close to the bot-
tom of the screen as possible without covering the screen.
Pro Fusion User Manual v.2.1 187. If it is not yet connected, plug in the eye tracker’s USB cable to the correct USB port in your
computer.
The included USB Type-A to Type-C adapter and the eye tracker AC power adapter
must be used if the computer does not have a USB Type-C port. For more information,
read How to use the USB Type-A to Type-C adapter.
8. Move to the next step.
5.4 Display setup in Tobii Pro Eye Tracker Manager
Now the algorithms on the eye tracker need to understand where the eye tracker is in relation to the
screen and map the gaze points accordingly.
1. Open Pro Eye Tracker Manager if it’s not already running, and select your eye tracker.
2. On the Overview tab, locate Display Setup and click the ellipsis icon to the right. On the drop-
down menu, click New.
3. Select Regular setup and click the Next button.
4. If multiple screens are used, select the screen that has the Pro Fusion attached to its bezel.
5. Enter the position of the eye tracker in relation to the screen. Use the radio buttons to select
whether the eye tracker is positioned under or over the screen and enter the measurement in
millimeters.
6. Align the dotted orange lines on the screen with the two outer white marks on the top of your
Pro Fusion.
7. Save your display by naming the setup and clicking the Save button.
8. To confirm that Pro Fusion can detect your eyes, enable the Position Guide at the bottom left
of Pro Eye Tracker Manager. Once activated, you should be able to see two “eyes” in a face
contour.
9. Move to the next step. In the next section, you will test your setup by performing a calibration.
For more information, read Calibration.
You can always return to Pro Eye Tracker Manager and use it when you change com-
puters or screens or want to recalibrate.
5.5 Calibration
When you are done configuring your eye tracker, you should run a calibration to test to see if the eye
tracker is mapping the gaze points correctly to your display.
How to test your eye tracking setup in Pro Eye Tracker Manager:
1. Make sure the eye tracker is attached to the screen bezel and connected to your computer.
Open Pro Eye Tracker Manager. For more information, read Tobii Pro Eye Tracker
Manager.
2. By now you should have also tested your setup as described in Display setup in Tobii Pro Eye
Pro Fusion User Manual v.2.1 19Tracker Manager.
3. Click the Calibrate button in Pro Eye Tracker Manager and follow the on-screen instructions.
4. Evaluate your calibration results. Large systematic errors i.e. a large distance between the
average gaze point and the target gaze point may be indicative of a configuration error. No
calibration feedback data on the targets located on the top of the screen may indicate that
there is a mismatch between the screen size and eye tracker configuration. Click the Recal-
ibrate button to improve an unsuccessful calibration (e.g. recalibrate points with missing
data). Click the Use Calibration button when you are satisfied with the calibration.
You can toggle on and off Gaze Visualization in the upper left corner of the Calibration
Results window (or on the Overview tab). This can be used to confirm the participant’s
calibration results.
5.5.1 What calibration does
The human eye shows a natural individual variation in its shape and geometry. For example, the
exact location of the fovea, the area responsible for the part of the visual field that we perceive in
focus and full color, varies from individual to individual. Tobii Pro Eye Trackers use an individual cal-
ibration procedure to optimize their gaze estimation algorithms (i.e. the 3D eye model) and account
for this variation. The end result of this optimization is a fully customized and more accurate gaze
point calculation. Additionally, some Tobii Pro eye trackers use the calibration procedure to select
the detection mode (e.g. dark or bright pupil tracking) that provides the most accurate data.
You can do basic calibration in Tobii Pro Pro Eye Tracker Manager. There is more functionality,
including calibration validation, in Tobii Pro Lab.
For more information, read the Learning articles calibration and performing a calibration and val-
idation in Pro Lab.
5.6 Detach the eye tracker
To temporarily remove the eye tracker, gently pull it away from the magnetic mounting bracket and
leave the bracket in place.
To permanently remove the mounting bracket, you must remove the non permanent but strong
adhesive that fastens your eye tracker mounting bracket to the screen bezel. Since it is fairly strong,
you may not be able to take it away with only your fingers. If you want to remove it, we recommend
using something very thin such as dental floss or a thin thread, a plastic guitar pick, or a credit card.
Use this to slide between the mounting plate and the computer bezel (or whatever it is attached to).
As you slide it behind the mounting plate, gently bend the mounting plate towards you so that it
detaches.
The mounting bracket adhesive should be removed carefully. If placed over a man-
ufacturer logo on the bezel, removing the mounting bracket could damage the logo.
You can purchase additional mounting brackets. For more information, read Additional Mounting
Brackets on the Tobii Pro website.
Pro Fusion User Manual v.2.1 205.7 Change Pro Fusion’s frequency You can change Pro Fusion’s frequency using Tobii Pro Eye Tracker Manager or your analysis soft- ware, for example, Tobii Pro Lab. In Pro Eye Tracker Manager, use the Frequency drop-down selector on the Overview tab to select an available frequency. Pro Fusion User Manual v.2.1 21
6        Display Setups
6.1      Standard setup
The standard setup for using Tobii Pro Fusion is with a screen of maximum size 24". The eye tracker
is attached below the screen whether it is a laptop screen or separate monitor. For more information,
read Display setup in Tobii Pro Eye Tracker Manager.

6.2      Advanced setup
Advanced setups include using the Tripod Stand or other setups in which the eye tracker is not
attached to the screen bezel.
6.2.1    Setup with Tobii Pro Tripod Stand
Tobii Pro Fusion eye tracker mounts directly on the Tripod Stand. The Tripod Stand is ideal in test
situations in which the subject is sitting at a table in front of a monitor or projected screen larger than
24”. Using the Tripod Stand with Pro Fusion is also useful in scene camera setups when studying
physical objects and social interactions between people. For more information about the Tobii Pro
Tripod Stand, visit the Tobii Pro product page.

Figure 7. Tobii Pro Fusion with the Tripod Stand and external, large-size monitor

 Pro Fusion User Manual v.2.1                                                                             22
Figure 8. Tobii Pro Fusion with the Tripod Stand and projected screen

How to set up Pro Fusion with a large monitor or projector screen:
   1. Select a suitable location and set up the monitor/screen.
   2. Set up the monitor/screen and connect it to the laptop.
   3. Mount the eye tracker on a separate tripod and connect it to the laptop. If the USB Type-A to
      Type-C adapter is needed, use it along with the AC power adapter.
   4. Place the participant 50–80 cm from the eye tracker and use the Position Guide in Pro Eye
      Tracker Manager’s Overview to ensure that the eye tracker can detect the participant’s eyes.
   5. Select “New” in the drop-down Display Setup menu.
   6. Select Advanced setup and click the Next button.
   7. Enter the width and height of your screen in millimeters. The width must be at least 10 mm.
      Click the Next button.
   8. Enter the angle of your screen in degrees. Click the Next button.
   9. Enter the height difference in millimeters between the top of the eye tracker and the bottom of
      your screen. Click the Next button.
  10. Enter the position of the eye tracker in relation to the screen. Use the radio buttons to select
      whether the eye tracker is positioned under or over the screen and enter a measurement in
      millimeters.
  11. Enter the angle of your eye tracker in degrees. Click the Next button.
  12. Save your display by naming the setup and clicking the Save button.

Pro Fusion User Manual v.2.1                                                                             23
7 Start Experimenting
7.1 Start eye tracking
To see where the participant’s focus is, open Pro Eye Tracker Manager and activate Gaze Visu-
alization by toggling the switch on the Overview tab. A hazy blob appears on the screen, indicating
where attention is focused. Use this functionality to verify that your eye tracker is running, that the dis-
play is correctly set up, and that your eye tracker is calibrated.
7.2 Tobii Pro Lab
Tobii Pro Lab provides a comprehensive platform for the recording and analysis of eye gaze data,
which helps in the interpretation of human behavior, consumer responses, and psychology. Com-
bining simple preparation for testing procedures and advanced tools for Visualization and analysis,
eye-tracking data is easily processed for useful comparison, interpretation, and presentation. A
broad range of studies are supported, from usability testing and market research, to psychology and
oculomotor physiological experiments. Pro Lab’s intuitive workflow, along with its advanced analysis
tools, enables large and small studies in a timely and cost-efficient way without the need for extens-
ive training.
In addition to offering powerful analysis tools, Pro Lab is also designed to work with other software
commonly used for recording and analyzing data. This is done by synchronizing with recording soft-
ware using TTL, as well as by enabling data exports in standardized formats, for example for
Microsoft Excel, Matlab, and SPSS.
7.3 Keeping your eye tracker software and display setup updated
Updates
From time to time, Tobii Pro releases updates for an eye tracker’s applicable driver and firmware in
order to improve performance and/or introduce new functionalities. Please check the Tobii Pro web-
site regularly for news and information about updates about your eye tracker. We recommend that
you leave updates and notifications in Tobii Pro Eye Tracker Manager activated. (They are activated
by default and the sliders are colored orange.)
How to activate notifications and updates in Pro Eye Tracker Manager:
1. Click to expand the drop-down list at the top of Pro Eye Tracker Manager.
2. Toggle the switches for notifications. Orange means they are activated.
3. If a software update is available, the available update has a clickable orange link.
4. Select an interface language. The default is English.
Display setup updates
Use Pro Eye Tracker Manager whenever you change computers or display setups.
All references to Tobii Pro Eye Tracker Manager assume that you are using the latest
version of this free software.
Pro Fusion User Manual v.2.1 247.4 Customer Support Help online Visit Customer Support (connect.tobiipro.com) for help with your Tobii Pro device. It contains the latest information about contacting Support, links to our Learning Center, and much more. Product support For questions or problems with your product, contact your Tobii Pro sales representative or author- ized reseller for assistance. They are most familiar with your personal setup and can best help you with tips and product training. Read more about Tobii Pro’s Support options, our in-depth learning articles, and much more in sec- tion Support, Learning Center, and Warranty. Pro Fusion User Manual v.2.1 25
8             Product Care
8.1           Operational environment
The recommended range for temperature and humidity during operations is:
      l       Temperature: 10°C to 35°C (50°F to 95°F)
      l       Humidity: Max 20% to 95% (no condensation on the device)

8.2           Transportation and storage
Use the provided case when traveling with the eye tracker. For shipping and storage, use the ori-
ginal packing.
For transportation and storage, the recommended range for temperature and humidity for the device
is as follows:
      l       Temperature: -40°C to 70°C (-40°F to 158°F)
      l       Humidity: 20% to 95% (no condensation on the device)

                   Tobii Pro eye trackers are not waterproof or water resistant. The eye tracker should not
                   be kept in excessively humid, damp or wet conditions. Do not submerge the eye tracker
                   in water or in any other liquid. Be careful not to spill liquids on the device.

8.3           Cleaning
          l    Before cleaning your Tobii Pro eye tracker, unplug its USB cable and electrical cable if there
               is one.
          l    Use the included cleaning cloth and clean the eye tracker’s front gently.
          l    Avoid getting moisture in openings on the device.
          l    Do not use window cleaners, household cleaners, aerosol sprays, solvents, alcohol, ammo-
               nia, or abrasives.

                   Scratches on the front surface of the eye tracker may impair its performance.

8.4           Disposal of the eye tracker
Do not dispose of your Tobii Pro eye tracker in general household or office garbage receptacles.
Follow your local regulations for the proper disposal of electrical and electronic equipment.

8.5           Limitation of liability
Except where prohibited by law, Tobii Pro AB is not liable for any loss or damage arising from the
use or misuse of a Tobii Pro eye tracker or the mounting plate, whether direct, indirect, special,

Pro Fusion User Manual v.2.1                                                                               26
incidental or consequential, regardless of the legal theory asserted, including warranty, contract, negligence, or strict liability. Pro Fusion User Manual v.2.1 27
9       Technical Specifications
Tobii Pro Fusion’s eye tracking specifications and the eye tracker’s physical specifications are
presented below.

9.1     Eye tracking specifications
    Eye tracking technique*                        Video-based pupil- and corneal reflection eye
                                                   tracking with dark and bright pupil tracking
    Sampling frequency                             60, 120, & 250 Hz or 60 & 120 Hz, depending on
                                                   the hardware version
    Accuracy**                                     0.3° in optimal conditions (down to 0.13°)
    Precision**                                    0.2° RMS in optimal conditions (down to 0.09°)
    Precision filtered**                           0.04° RMS in optimal conditions
    Binocular eye tracking                         Yes
    Total system latency                           3 frames
    Blink recovery time                            1 frame (immediate)
    Gaze recovery time                             250 ms
    Freedom of head movement                       Width × height: 30 cm × 25 cm (11.81" × 9.84") at
                                                   65 cm
    Operating distance                             50–80 cm (19.69”–31.49”)
    Max gaze angle                                 30 degrees
    Max screen size                                24” (16:9 aspect ratio)
    Data sample output***                          Timestamp
                                                   Gaze origin
                                                   Gaze point
                                                   Pupil diameter
                                                   Validity code
    Eye image data stream                          Eye image data stream frequency is approx-
                                                   imately 2 x 4 Hz
    User calibration                               Binocular
    Tracker and client time synchronization        Integrated between the eye tracker time domain
                                                   and the client computer time domain

             *Dark pupil tracking is supported in all sample frequencies. Bright pupil tracking mode is
             supported at 60 and 120 Hz.

             **Tobii Pro uses an extensive test method to measure and report performance and qual-
             ity of data. For more detailed information, please read the full data quality test report
             available on Tobii Pro's Pro Fusion product page.

Pro Fusion User Manual v.2.1                                                                         28
***For the complete list of available data and the supplementary data stream, download
the Pro SDK documentation from Tobii Pro’s Developer website.
9.2 Pro Fusion eye tracker specifications
Dimensions 374 mm L × 18 mm H × 13.7 mm W (14.72“ × 0.70“
× 0.53“)
Weight 168g (5.9 oz.)
Connectors USB Type-C
(USB Type-A to Type-C adapter provided)
Power options Powered directly via USB Type-C
connector or
When the computer has a USB Type-A port
or the computer’s battery power is insufficient
for supporting the eye tracker, the included
AC power adapter can be used
Power port AC power adapter port
Processing 3 x Tobii EyeChip™ ASIC with fully embedded
image and gaze processing
Eye tracking cameras 2 x Tobii EyeSensor™ Modules
Illuminators Dark PupiI Illumination
Modules
Bright Pupil Illumination
Modules
Power consumption Typically 7.5W
Pro Fusion User Manual v.2.1 2910 Compliance Information
10.1 CE Compliance
This Tobii Pro eye tracker is CE-marked, indicating compliance with applicable health
and safety legal requirements set out in the European Union and EEA.
10.2 VCCI Compliance
10.3 General Compliance
10.3.1 FCC interference statement
Pro Fusion has been tested and found to comply with the limits for a Class B digital device, pursuant
to part 15 of the FCC Rules. These limits are designed to provide reasonable protection against
harmful interference in a residential installation. Pro Fusion can radiate radio frequency energy and,
if not installed and used in accordance with the instructions, may cause harmful interference to radio
communications. However, there is no guarantee that interference will not occur in a particular install-
ation. If Pro Fusion does cause harmful interference to radio or television reception, which can be
determined by turning the equipment off and on, the user is encouraged to try to correct the inter-
ference by increasing the separation between Pro Fusion and the receiver. Modifications not
expressly approved by Tobii Pro AB could void the user’s authority to operate the equipment under
FCC rules.
10.3.2 Industry Canada statement
This Class B digital apparatus complies with Canadian ICES-003.
Cet appareil numérique de la classe B est conforme à la norme NMB-003 du Canada.
10.3.3 CE statement
Pro Fusion is CE-marked, certifying compliance with the legal requirements for health, safety and
environmental protection requirements for the European market. Pro Fusion complies with the fol-
lowing directives:
l 2011/65/EU (RoHS 2) - Restriction of Hazardous Substances Directive
l 2014/30/EU (EMC) - Electromagnetic Compatibility Directive
l 2012/19/EU (WEEE) - Waste Electrical and Electronic Equipment Directive
Pro Fusion User Manual v.2.1 3010.3.4 Safety compliance
Pro Fusion complies with the following standards:
l IEC/EN 62471:2008, Photo Biological Safety of Lamps and Lamp Systems
l IEC 60950-1:2005 +A1 +A2, Safety of Information Technology Equipment
l IEC/EN 62368-1, including collateral standard IEC 62368-3 (European Standard)
l CAN/CSA-C22.2 No. 62368-1/UL 62368-1 Edition No. 2, including collateral standard IEC
62368-3 (US and Canadian Standard)
l J60950-1(H22) (Japanese Standard)
l GB 4943.1-2011 (Chinese Standard)
10.3.5 EMC compliance
Pro Fusion complies with the following standards:
l EN 55032:2015, Electromagnetic compatibility of multimedia equipment. Emission require-
ments (European standard
l EN 55035:2017 Electromagnetic compatibility of multimedia equipment - Immunity require-
ments
l FCC part 15 Class B, Regulations under which an intentional, unintentional, or incidental radi-
ator that can be operated without an individual license (American Standard)
l ICES-003 Issue Class B, Interference-Causing Equipment Standard (Canadian Standard)
l CISPR32:2015, Electromagnetic compatibility of multimedia equipment - Emission require-
ments (International standard accepted in AS/NZS and Japan)
l GB17625.1-2012 and GB9254-2008 (Chinese national standard)
l KN32 (CISPR 32), KN35 (CISPR 35) (South Korean Standard)
Pro Fusion User Manual v.2.1 31Appendix A Support, Learning Center, and
Warranty
A1 CustomerSupport
If you need help, please contact Customer Support at Tobii Pro. In order to receive assistance as
quickly as possible, make sure you have access to your Tobii Pro device and, if possible, an Inter-
net connection. You should also be able to supply the serial number of the device, which you will
find on a sticker on the back or bottom of the device.
A1.1 Get help online
Many questions can be answered by visiting Tobii Pro Connect. It contains the latest information
about contacting Support, links to our Learning Center, and much more. Log in or register to see
information about your account and to reach Customer Support at Tobii Pro Connect.
A2 Learning Center
If you are new to eye tracking, or want to extend your knowledge about eye tracking research, sign
up for one of our learning programs and events, or browse through our extensive article library in
our Learning Center.
For further product information and other support resources, please visit tobiipro.com.
A3 Warranty information
Read more about Tobii Pro Care and Tobii Pro’s eye tracker warranty in the Tobii Pro Service
Description.
Pro Fusion User Manual v.2.1 32Appendix B Limitations and considerations
B1 Intended use
Tobii Pro eye trackers are intended to be used in research activities about human beha-
vior including eye movements, in a dry and dust free indoor environment. The product
should only be used as described in this User’s Manual. Please read the User Manual
and other supplied documentation thoroughly before using the product.
B2 Light conditions
Tobii Pro recommends that eye tracking studies be performed in a controlled envir-
onment. Sunlight should be avoided since it contains high levels of infrared light which
will interfere with the eye tracker system. Sunlight affects eye tracking performance
severely and longer exposure can overheat the eye tracker. This eye tracker is not
designed for exposure to (direct) sunlight. Eye tracking generally does not work in
strong direct sunlight.
Shielding the eye tracker adequately from the sun may prevent sunlight from interfering
with eye tracking.
B3 Eyelashes
Long eyelashes can be obstructive when the participant’s eyes are less open, especially
if the participant is wearing mascara. In rare cases, eyelashes may completely block the
view of the participant’s pupils, making eye tracking impossible.
B4 Droopy eyelids
Droopy eyelids or otherwise obstructive eyelids can block the view of the participant’s
pupils. In rare cases, such eyelids may completely block the view of the participant’s
pupils, making eye tracking impossible.
Pro Fusion User Manual v.2.1 33Appendix C Glossary
Accuracy The angular average distance from the actual gaze point to the one meas-
ured by the eye tracker. For more details on how accuracy is calculated,
please read the eye tracker accuracy and precision test report on
tobiipro.com.
Binocular calibration The eye tracker collects data from both eyes the same time and pro-
cesses the data for each eye independently. The calibration is valid when
it succeeds in collecting and processing data from both eyes.
Binocular eye track- Tracks and reports data for both left and right eye.
ing
Blink recovery time When a participant blinks, the eye tracker loses the ability to track eye
(time to tracking gaze because the eye is covered by the eyelid. If the pupil is occluded for
recovery for blinks) only a short period (a few hundred milliseconds), the system will regain
tracking immediately when the pupil becomes visible again, but only if the
subject has maintained approximately the same head position during the
blink. Data during blinks are only lost when the pupil is occluded, i.e. dur-
ing the eye lid movement itself or when the eye is closed.
Bright pupil tracking The process of capturing and processing eye images, with a set of illu-
minators that are placed close to the optical axis of the camera. This
causes the pupil to appear lit up in the image (this is the same phe-
nomenon that causes red eyes in photos). The eye tracking algorithms
identify the pupil by searching for a bright elliptical form in the image.
Dark pupil tracking The process of capturing and processing eye images, with a set of illu-
minators that are located further from the optical axis of the camera. This
causes the pupil to appear darker than the rest of the eye in the image.
The eye tracking algorithms identify the pupil by searching for a dark ellipt-
ical form in the eye image.
Data sample output Type of data provided by the eye tracker
Eye image data The number of eye images per second outputted in the eye image data
stream frequency stream, expressed in Hz units. These images can be used to help to
troubleshoot tracking issues.
Freedom of head Describes the region in space where the participant may move his/her
movement head and still have at least one eye within the eye tracker’s field of view
(trackbox).
Gaze recovery time An eye tracker working in a natural user environment may occasionally
lose track of the subject’s eyes, e.g., when the subject completely turns
away from the tracker. If a period of a few hundred millisecond elapses
during which the eye tracker is unable to detect the eyes near where they
were last detected, the eye tracker will start searching for the eyes within
the entire head movement box. The stated measurement is the typical
time to tracking recovery once the eyes return to the field of view of the
cameras again, i.e. when the subject is within the trackbox limits, with the
Pro Fusion User Manual v.2.1 34eyes open and facing the eye tracker.
Maximum gaze angle The maximum gaze angle for which the eye tracker can perform robust
and accurate tracking on the eyes. The gaze angle is the angle ABC with
A = center of the eye tracker (midpoint between the two eye tracking
sensors), B = eye position (midpoint between the left and the right eye)
and C = stimuli point.
Maximum screen The maximum screen size supported by the standard eye tracker setup
size (i.e. mounting the eye tracker directly on the screen).
Operating distance The minimum and maximum distances between the subject’s eyes and
the surface covering the eye tracker sensors at which eye tracking can be
done while maintaining robust tracking.
Optimal conditions Please download the data quality test report from tobiipro.com.
Precision Describes the spatial angular variation between individual and con-
secutive gaze samples (Root Mean Square), calculated on raw data. For
more details on how precision is calculated, please read the eye tracker
accuracy and precision test report on tobiipro.com.
Sampling frequency The number of data samples per second output for each eye. Expressed
in Hz units, where 1 Hz = 1 sample per second.
Total system latency The duration from the mid-point of the eye image exposure, to when a
sample is available via the API on the client computer. This includes half
of the image exposure time, image read-out and transfer time, pro-
cessing time and time to transfer the data sample to a client computer.
Tracker and client The eye tracker and software client clocks can drift naturally during oper-
time synchronization ation. To compensate for this, the Pro SDK will periodically ask the eye
tracker about its current time stamp, noting the system time stamp when
the request is sent and received. This data is then used to calculate how
the system time corresponds to the device time.
Video-based pupil and At the center of this technique is a hardware setup that consists of one or
corneal reflection eye two video cameras and one or multiple sets of infrared-light illuminators.
tracking The cameras capture images of the eyes and the illuminators produce
reflections on its surface. These images are processed by algorithms that
identify the pupil and the reflections caused by the illuminators. This
information is then combined with different parameters from a 3D model
of the eye and used to map the gaze onto the stimulus.
Pro Fusion User Manual v.2.1 35Pro Fusion User Manual v.2.1 Copyright ©Tobii AB (publ). Not all products and services offered in each local market. Specifications are subject to change without prior notice. All trademarks are the property of their respective owners. Support for Your Tobii Pro Device Get Help Online Visit Tobii Pro Connect for help with your Tobii Pro device. It contains the latest information about contacting Support, links to our Learning Center, and much more. Visit connect.tobiipro.com Contact Your Solution Consultant or Reseller For questions or problems with your product, contact your Tobii Pro sales representative or authorized reseller for assistance. They are most familiar with your personal setup and can best help you with tips and product training. Visit tobiipro.com/contact
You can also read


