TNM061 3D COMPUTER GRAPHICS SCENE GRAPHS AND THREE.JS LAB INSTRUCTIONS 2019 - STEFAN GUSTAVSON FEBRUARY 25, 2019 - LIU
←
→
Page content transcription
If your browser does not render page correctly, please read the page content below
TNM061 3D Computer Graphics
  Scene graphs and Three.js
    Lab instructions 2019
        Stefan Gustavson
        February 25, 2019

                1
1 Three.js and WebGL
During this lab exercise, you will be introduced to the Three.js graphics API. Three.js
is a high-level, scene graph framework for 3D graphics built on top of WebGL. Three.js
programs are written in JavaScript, which isn’t really the ideal choice for a 3-D graphics
program. A 3-D scene may require more data than what a slow, interpreted language
like JavaScript can handle well, and JavaScript is, frankly, an infamously bad language
which encourages writing ugly programs that are poorly documented and hard to main-
tain. Nevertheless, for WebGL there is no alternative to JavaScript, and WebGL is an
interesting, modern and fun platform for interactive 3-D graphics.
Your task is to write a program that displays an animated planetary system with a sun
in the middle, a spinning planet in a circular orbit around the sun, and a spinning moon
in a circular orbit around the planet. The amount of code you will need to write is quite
small, but the amount of thought that needs to be put into it is considerable. The task is
selected to give a reasonably interesting but simple display, and to clarify the concepts of
the Three.js scene graph, hierarchical transformations, animations, meshes and materials
without going into too much detail. If you want to learn more, there are plenty of online
tutorials, many of which are linked from http://threejs.org, the official Web page for
Three.js. That site also contains documentation for all Three.js classes, and you will
probably need to refer to it while you are doing this exercise.
2 Preparation
Contrary to most introductory tutorials on Three.js that start out doing ”flat” scene
graphs with all transformations being performed in the world coordinate space on each
individual object, you will need to have a reasonable grip on scene graphs as a concept
to complete this lab exercise successfully. Therefore, start your preparations by reading
the lecture notes on the subject.
If you encounter any problems during the lab session, you are most welcome to ask
for help, but the intention is for you to solve this on your own, in your own way, so
don’t expect more than general hints and pointers to existing documentation from the
lab assistant. We also reserve the right to refuse to answer questions that are obviously
due to inappropriate preparations, for example not having read the lecture notes at all,
or failing to look at the available documentation. If you encounter any real problems, we
are certainly always open for questions, but the small obstacles on the way to success are
there for you to solve them all by yourself. Have fun, and always remember to do two
things: read and think. It helps a lot.
Having said that, this exercise has not been around for more than a few years, so bug
reports, suggestions for improvement and general comments are much appreciated.
Good luck!
Stefan Gustavson (stefan.gustavson@liu.se)
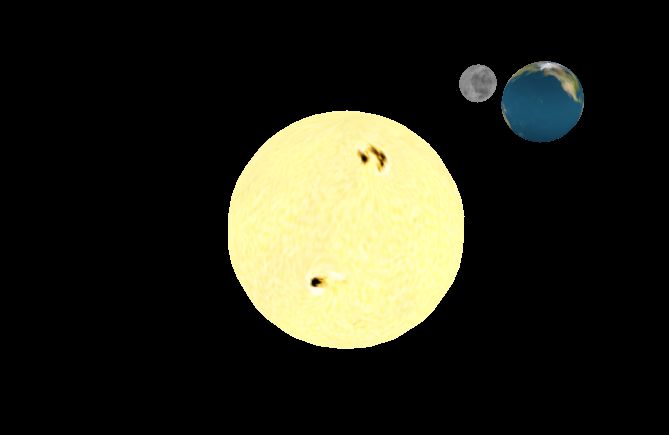
1Figure 1: A simple planetary system.
3 Lab assignments
The final result of this exercise, i.e. what we want you to show in order to pass the
assignment, is an animated view of a planetary system with a textured sun at the origin,
a textured planet rotating around it, and a textured moon rotating around the planet,
resembling the image in Figure 1. In order to make the task more manageable, we suggest
you split it up into the following incremental steps. After you have completed step 9, you
have performed the required part of the exercise. Step 10 is a useful and recommended
extra assignments to explore some of the further possibilities of Three.js. Steps 11 and
12 are more challenging and less rewarding, and instead of doing those you might want
to move on to more general tutorials on Three.js.
1. Download a copy of the HTML document hellouniverse.html. You can find it
on:
http://www.itn.liu.se/ stegu76/TNM061-2017/Lab6/
2. Run the file by opening it in a web browser. Firefox, Chrome, Edge or even Internet
Explorer will do the job.
3. Read the code. The example script gives you all the basic functionality for setting
up a 3D window and animating a simple object in it. It depends only on the file
three.js, which you can find in the same directory. Make sure you thoroughly
understand all of the scene graph stuff in the creation of the object, its transforma-
tions and its appearance, and look at the documentation on http://threejs.org
for each of the utilised methods to see what they do. What is the scene graph for
this simple example? Draw it!
4. Modify the animation to offset the cube from the world-space origin, and rotate
it in an orbit around the origin. As you surely remember, this can be done by a
hierarchical transformation: a static translation along the X axis followed by an
animated rotation around the Y axis. Use separate matrix transformations for the
rotation and the translation (separate Group nodes linked in the correct order).
2Scene root
View rotation
R
Sun spin
R
R Sun
Planet orbit
T
Planet translation Planet spin
R
Planet
R
Moon orbit
T
Moon translation
R Moon
Moon spin
Figure 2: Scene graph for a simple planetary system. Group nodes are circles, Mesh nodes
are triangles. The five shaded Group nodes are animated rotations which should have
their rotation angles updated in each frame. The other Group nodes are static translations
which maintain their values across all frames.
Avoid manipulating both the translation and the rotation in the same matrix, and
do not set the position by explicitly evaluating sin() and cos() functions. (Some
bad online examples do this, hence the warning.)
5. Add a small static rotation around the X axis at the root of the scene graph to view
the orbiting cube from slightly above the rotational plane. This makes the image a
bit more interesting and easier to interpret.
6. Now, make the cube orbit around the origin and rotate around its axis, with differ-
ent speeds. This requires you to use two rotation matrices and update the angles
for both in the render loop. What is the scene graph for your modified program?
Draw it!
7. Create a larger scene graph tree with a number of Group nodes in a hierarchy as
shown in Figure 2. Set all the animated rotations (shaded circles in the figure) to
different speeds. For the time being, use box-shaped objects of different sizes for
the sun, the planet and the moon. Start by doing just the sun and the planet, and
add the moon branch after you have the sun and planet working.
8. Replace the rotating boxes with spheres. There is a predefined SphereGeometry
object in Three.js for you to use. Contrary to the blocky BoxGeometry, you need
to specify the number of steps for the subdivision of a sphere into polygons. The
number of steps is of course very influential on how it looks. Test a few different
values for the second and third parameters of the constructor and find values that
look good but are not unnecessarily high. Feel free to try really high values to crash
test WebGL on the computer you are on. The maximum number of triangles you
can have in a WebGL scene before the display starts to stutter is surprisingly high.
39. Put surface textures on the planet and the moon to make them look more interest-
ing, and to make the spinning animation visible. A simple example of how to put
a texture on a SphereGeometry is provided in the file helloearth.html, available
in the file archive for this exercise.
Texture images of size 512x256 pixels for the Sun, Earth and Moon can be found
in the same archive. The images were derived from public domain images and are
free for use for any purpose.
Note that if you are using Google’s Chrome browser, you need to place both the
HTML file and the texture images on a Web address (e.g. your student web area)
and load the HTML file over HTTP, not from a local file. This is because of a
general security restriction in Chrome. The restrictions in Firefox are not quite
as strong, so Firefox allows loading of textures from local files, provided that the
textures are in the same folder as the HTML file, or in a subfolder.
10. Set values for the rotation speeds to mimic the Sun, Earth, and Moon. Make the
Earth spin once every second and rotate one revolution around the Sun in 365
seconds, make the Sun spin a full turn in 25 seconds, and make the moon rotate
around the Earth in 27.3 seconds while always showing the same side towards the
Earth. Do not try to match the size of the spheres and their relative distances to the
corresponding real values. Place them close together and make them only mildly
different in size, or else you will get a very boring image. If you are interested, real
data for the Sun, Earth and Moon is given in Table 1.
11. (Extra) Place a light source at the position of the sun and make the planet and the
moon receive light from it. To find out how to do this, read the documentation on
lighting at Threejs.org, and/or have a look at some examples. Lights are included
as leafs in the scene graph, like other object nodes.
12. (Extra) Make the system look even more like the Earth and Moon by tilting the
planet’s axis of rotation 23.44 degrees. Make the orientation of the Earth’s axis
of rotation stay fixed relative to the universe, and do not tilt the orbit of the
Moon. (The Moon’s orbit actually tilts 5.15 degrees around a different axis, but
let’s ignore that.) This requires the scene branch of the Earth to be restructured
somewhat, but the entire branch from the scene root to the Moon should still
be kept intact. You will need some additional, carefully designed transformation
groups, with corresponding updates in the rendering loop.
13. (Extra) Transform the camera (attach it to an Object3D that is linked with the
scene graph) so that the view is not from outer space, but from a point slightly
above the Earth’s equator, staying fixed relative to the Earth’s surface and looking
east at the sky. Sit back and watch the Sun rise every morning. If you have turned
on lighting, you can watch days and nights pass on the surface, and even observe
the phases of the Moon. For this kind of view, you will need to reduce the rotation
speeds considerably for all objects, or you will become dizzy. You may also want to
adjust the proportions of your solar system to more closely match the astronomical
data in Table 1.
4Sun Earth Moon
radius 1 392 000 km 6 378 km 1 738 km
rotation time 25.38 days at equator 0.99726 days 27.3 days
orbit radius - 149 600 000 km 384 400 km
orbit time - 365.256 days 27.3 days
axis tilt against orbit - 23.44 degrees 0
orbit tilt against Earth’s orbit - 0 (by definition) 5.15 degrees
Table 1: Astronomical data for the Sun, Earth and Moon
Speaking of the numbers in Table 1: Can you figure out why Earth’s rotation time
is just short of 1 day? And what does it mean that the orbit and rotation times for the
Moon are exactly the same?
Note that the table only describes the most promiment aspects of the planetary move-
ments of the Earth and the Moon. First, the orbits of the Earth and the Moon are not
circular, but slightly elliptical, and the speed of the orbit varies with the current distance
to the centre. Second, the Moon is not perfectly rotationally fixed relative to Earth,
but wobbles slightly back and forth. Third, the axes of orbit and rotation all change
periodically, but extremely slowly.
5You can also read