Training Guide - ORION Mobile Read Reading Meters for a Billing Cycle
←
→
Page content transcription
If your browser does not render page correctly, please read the page content below
ORION® Mobile Read
                                Reading Meters for a Billing Cycle

BEA-TR-03484-EN-01 (May 2021)                                        Training Guide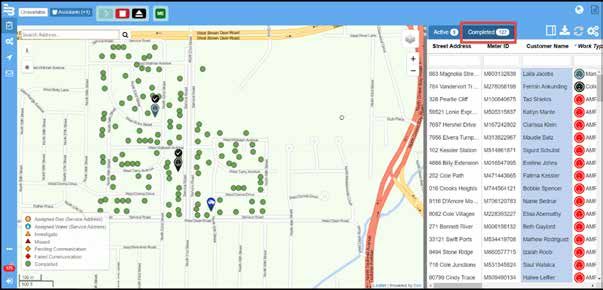
ORION® Mobile Read, Reading Meters for a Billing Cycle

                                                                                                      CONTENTS

About this Training Guide .  .  .  .  .  .  .  .  .  .  .  .  .  .  .  .  .  .  .  .  .  .  .  .  .  .  .  .  .  .  .  .  .  .  .  .  .  .  .  .  .  .  .  .  .  .  .  .  .  .  .  .  .  .  .  .  .  .  .  .  .  .  .  .  . 3
       Typographic Conventions .  .  .  .  .  .  .  .  .  .  .  .  .  .  .  .  .  .  .  .  .  .  .  .  .  .  .  .  .  .  .  .  .  .  .  .  .  .  .  .  .  .  .  .  .  .  .  .  .  .  .  .  .  .  .  .  .  .  .  .  .  . 3
       Technical Support .  .  .  .  .  .  .  .  .  .  .  .  .  .  .  .  .  .  .  .  .  .  .  .  .  .  .  .  .  .  .  .  .  .  .  .  .  .  .  .  .  .  .  .  .  .  .  .  .  .  .  .  .  .  .  .  .  .  .  .  .  .  .  .  .  .  . 3

ORION Mobile Read  .  .  .  .  .  .  .  .  .  .  .  .  .  .  .  .  .  .  .  .  .  .  .  .  .  .  .  .  .  .  .  .  .  .  .  .  .  .  .  .  .  .  .  .  .  .  .  .  .  .  .  .  .  .  .  .  .  .  .  .  .  .  .  .  .  .  .  . 5
       Launching ORION Mobile Read (OMR) .  .  .  .  .  .  .  .  .  .  .  .  .  .  .  .  .  .  .  .  .  .  .  .  .  .  .  .  .  .  .  .  .  .  .  .  .  .  .  .  .  .  .  .  .  .  .  .  .  .  .  .  .  . 6
       Route Reading with ORION Mobile Read .  .  .  .  .  .  .  .  .  .  .  .  .  .  .  .  .  .  .  .  .  .  .  .  .  .  .  .  .  .  .  .  .  .  .  .  .  .  .  .  .  .  .  .  .  .  .  .  .  .  .  . 7
       Active Tab .  .  .  .  .  .  .  .  .  .  .  .  .  .  .  .  .  .  .  .  .  .  .  .  .  .  .  .  .  .  .  .  .  .  .  .  .  .  .  .  .  .  .  .  .  .  .  .  .  .  .  .  .  .  .  .  .  .  .  .  .  .  .  .  .  .  .  .  .  .  .  . 8
       Completed Tab .  .  .  .  .  .  .  .  .  .  .  .  .  .  .  .  .  .  .  .  .  .  .  .  .  .  .  .  .  .  .  .  .  .  .  .  .  .  .  .  .  .  .  .  .  .  .  .  .  .  .  .  .  .  .  .  .  .  .  .  .  .  .  .  .  .  .  .  . 8
       Manual Reads  .  .  .  .  .  .  .  .  .  .  .  .  .  .  .  .  .  .  .  .  .  .  .  .  .  .  .  .  .  .  .  .  .  .  .  .  .  .  .  .  .  .  .  .  .  .  .  .  .  .  .  .  .  .  .  .  .  .  .  .  .  .  .  .  .  .  .  .  . 9
       Reader Codes, Trouble Codes and Notes . .  .  .  .  .  .  .  .  .  .  .  .  .  .  .  .  .  .  .  .  .  .  .  .  .  .  .  .  .  .  .  .  .  .  .  .  .  .  .  .  .  .  .  .  .  .  .  .  .  .  . 10
       Investigate Status .  .  .  .  .  .  .  .  .  .  .  .  .  .  .  .  .  .  .  .  .  .  .  .  .  .  .  .  .  .  .  .  .  .  .  .  .  .  .  .  .  .  .  .  .  .  .  .  .  .  .  .  .  .  .  .  .  .  .  .  .  .  .  .  .  . 11
       Completing a Route Reading Session  .  .  .  .  .  .  .  .  .  .  .  .  .  .  .  .  .  .  .  .  .  .  .  .  .  .  .  .  .  .  .  .  .  .  .  .  .  .  .  .  .  .  .  .  .  .  .  .  .  .  .  .  .  . 12
       Network Connection .  .  .  .  .  .  .  .  .  .  .  .  .  .  .  .  .  .  .  .  .  .  .  .  .  .  .  .  .  .  .  .  .  .  .  .  .  .  .  .  .  .  .  .  .  .  .  .  .  .  .  .  .  .  .  .  .  .  .  .  .  .  .  . 12
       Sign Out .  .  .  .  .  .  .  .  .  .  .  .  .  .  .  .  .  .  .  .  .  .  .  .  .  .  .  .  .  .  .  .  .  .  .  .  .  .  .  .  .  .  .  .  .  .  .  .  .  .  .  .  .  .  .  .  .  .  .  .  .  .  .  .  .  .  .  .  .  .  .  . 12

Display Controls .  .  .  .  .  .  .  .  .  .  .  .  .  .  .  .  .  .  .  .  .  .  .  .  .  .  .  .  .  .  .  .  .  .  .  .  .  .  .  .  .  .  .  .  .  .  .  .  .  .  .  .  .  .  .  .  .  .  .  .  .  .  .  .  .  .  .  .  .  . 13
       Change View  .  .  .  .  .  .  .  .  .  .  .  .  .  .  .  .  .  .  .  .  .  .  .  .  .  .  .  .  .  .  .  .  .  .  .  .  .  .  .  .  .  .  .  .  .  .  .  .  .  .  .  .  .  .  .  .  .  .  .  .  .  .  .  .  .  .  .  .  . 13
       Show/Hide Work Assignment Columns: .  .  .  .  .  .  .  .  .  .  .  .  .  .  .  .  .  .  .  .  .  .  .  .  .  .  .  .  .  .  .  .  .  .  .  .  .  .  .  .  .  .  .  .  .  .  .  .  .  .  .  . 13
       Column Order .  .  .  .  .  .  .  .  .  .  .  .  .  .  .  .  .  .  .  .  .  .  .  .  .  .  .  .  .  .  .  .  .  .  .  .  .  .  .  .  .  .  .  .  .  .  .  .  .  .  .  .  .  .  .  .  .  .  .  .  .  .  .  .  .  .  .  .  . 13
       Searching a Column:  .  .  .  .  .  .  .  .  .  .  .  .  .  .  .  .  .  .  .  .  .  .  .  .  .  .  .  .  .  .  .  .  .  .  .  .  .  .  .  .  .  .  .  .  .  .  .  .  .  .  .  .  .  .  .  .  .  .  .  .  .  .  .  . 13
       Map Layers .  .  .  .  .  .  .  .  .  .  .  .  .  .  .  .  .  .  .  .  .  .  .  .  .  .  .  .  .  .  .  .  .  .  .  .  .  .  .  .  .  .  .  .  .  .  .  .  .  .  .  .  .  .  .  .  .  .  .  .  .  .  .  .  .  .  .  .  .  .  . 14
       Storing Best Read Locations  .  .  .  .  .  .  .  .  .  .  .  .  .  .  .  .  .  .  .  .  .  .  .  .  .  .  .  .  .  .  .  .  .  .  .  .  .  .  .  .  .  .  .  .  .  .  .  .  .  .  .  .  .  .  .  .  .  .  .  . 14

Configuration  .  .  .  .  .  .  .  .  .  .  .  .  .  .  .  .  .  .  .  .  .  .  .  .  .  .  .  .  .  .  .  .  .  .  .  .  .  .  .  .  .  .  .  .  .  .  .  .  .  .  .  .  .  .  .  .  .  .  .  .  .  .  .  .  .  .  .  .  .  .  .  . 15
        Extensions . .  .  .  .  .  .  .  .  .  .  .  .  .  .  .  .  .  .  .  .  .  .  .  .  .  .  .  .  .  .  .  .  .  .  .  .  .  .  .  .  .  .  .  .  .  .  .  .  .  .  .  .  .  .  .  .  .  .  .  .  .  .  .  .  .  .  .  .  .  . 15
        ORION Devices:  .  .  .  .  .  .  .  .  .  .  .  .  .  .  .  .  .  .  .  .  .  .  .  .  .  .  .  .  .  .  .  .  .  .  .  .  .  .  .  .  .  .  .  .  .  .  .  .  .  .  .  .  .  .  .  .  .  .  .  .  .  .  .  .  .  .  .  . 15
        ORION Devices .  .  .  .  .  .  .  .  .  .  .  .  .  .  .  .  .  .  .  .  .  .  .  .  .  .  .  .  .  .  .  .  .  .  .  .  .  .  .  .  .  .  .  .  .  .  .  .  .  .  .  .  .  .  .  .  .  .  .  .  .  .  .  .  .  .  .  . 16
        Base Maps .  .  .  .  .  .  .  .  .  .  .  .  .  .  .  .  .  .  .  .  .  .  .  .  .  .  .  .  .  .  .  .  .  .  .  .  .  .  .  .  .  .  .  .  .  .  .  .  .  .  .  .  .  .  .  .  .  .  .  .  .  .  .  .  .  .  .  .  .  .  . 17
        GPS  .  .  .  .  .  .  .  .  .  .  .  .  .  .  .  .  .  .  .  .  .  .  .  .  .  .  .  .  .  .  .  .  .  .  .  .  .  .  .  .  .  .  .  .  .  .  .  .  .  .  .  .  .  .  .  .  .  .  .  .  .  .  .  .  .  .  .  .  .  .  .  .  .  .  . 17
        Downloads .  .  .  .  .  .  .  .  .  .  .  .  .  .  .  .  .  .  .  .  .  .  .  .  .  .  .  .  .  .  .  .  .  .  .  .  .  .  .  .  .  .  .  .  .  .  .  .  .  .  .  .  .  .  .  .  .  .  .  .  .  .  .  .  .  .  .  .  .  . 18

ORION ME Two-Way Functionality  .  .  .  .  .  .  .  .  .  .  .  .  .  .  .  .  .  .  .  .  .  .  .  .  .  .  .  .  .  .  .  .  .  .  .  .  .  .  .  .  .  .  .  .  .  .  .  .  .  .  .  .  .  .  .  .  .  .  . 19
        Assigned two-way Work Items .  .  .  .  .  .  .  .  .  .  .  .  .  .  .  .  .  .  .  .  .  .  .  .  .  .  .  .  .  .  .  .  .  .  .  .  .  .  .  .  .  .  .  .  .  .  .  .  .  .  .  .  .  .  .  .  .  . 19
        Ad Hoc two-way Work items  .  .  .  .  .  .  .  .  .  .  .  .  .  .  .  .  .  .  .  .  .  .  .  .  .  .  .  .  .  .  .  .  .  .  .  .  .  .  .  .  .  .  .  .  .  .  .  .  .  .  .  .  .  .  .  .  .  .  . 20
        Child Work Order Creation  .  .  .  .  .  .  .  .  .  .  .  .  .  .  .  .  .  .  .  .  .  .  .  .  .  .  .  .  .  .  .  .  .  .  .  .  .  .  .  .  .  .  .  .  .  .  .  .  .  .  .  .  .  .  .  .  .  .  .  .  . 20

Trimble® Ranger 7 Keyboard Functionality .  .  .  .  .  .  .  .  .  .  .  .  .  .  .  .  .  .  .  .  .  .  .  .  .  .  .  .  .  .  .  .  .  .  .  .  .  .  .  .  .  .  .  .  .  .  .  .  .  .  .  .  . 21
        Complete List of all Hot Key Options: .  .  .  .  .  .  .  .  .  .  .  .  .  .  .  .  .  .  .  .  .  .  .  .  .  .  .  .  .  .  .  .  .  .  .  .  .  .  .  .  .  .  .  .  .  .  .  .  .  .  .  .  .  . 21

Page 2                                                                                              BEA-TR-03484-EN-01                                                                                                        May 2021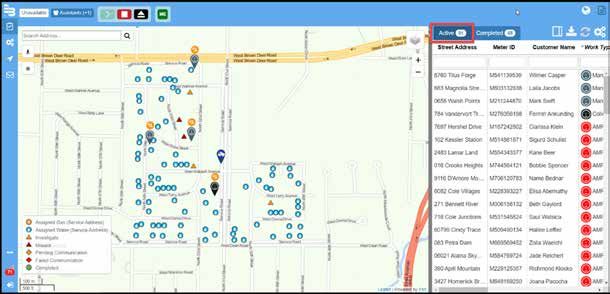
About this Training Guide

ABOUT THIS TRAINING GUIDE
This document is meant to assist and guide the training session. Please refer to helpbeaconama.net for more complete
information, if you have additional questions, or would like additional details about the processes and software.

All of the training materials including the current Training Guides, Quick Reference Guides and How-To videos are available for
download at https://helpbeaconama.net/training

Typographic Conventions
•   Items on the software screens that you need to select or choose by tapping a button, highlighting, checking a box or
    another similar means are in bold text and capitalized in the manual.
        Example: Tap the View Report button.
•   Names of options, boxes, columns and fields are italicized. In most cases, first letters will be capitalized.
        Example: The value displays in the Status Information field.
•   Messages and special markings are shown in quotation marks.
        Example: “Service Stopped” displays in the title bar.

NOTE: Names, addresses and other customer-related information displayed in screen examples were created for
      demonstration purposes in this manual. No actual customer information is included.

Technical Support
If you encounter any problems or have any questions about the mobile billing cycle, please contact Badger Meter Technical
Support by phone, e-mail, or fax.
Phone: 800.616.3837
E-mail: techsupport@badgermeter.com
Fax: 888.371.5982

May 2021                                               BEA-TR-03484-EN-01                                                  Page 3
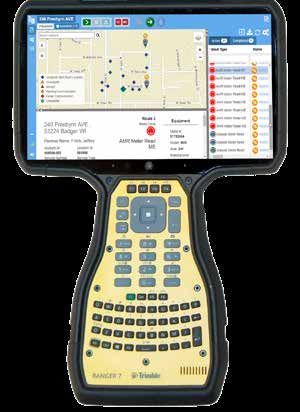
ORION Mobile Read

ORION MOBILE READ

ORION Mobile Read (OMR) is a browser-based application that requires the latest version of Google® Chrome and runs
on a Badger Meter supplied device, or on a customer-supplied Windows® 10 or later tablet or laptop. An ORION mobile
transceiver or mobile receiver kit is required for collection of mobile meter reading data. Secure user logins limit access to
field assignments.

Meter reading field assignments and reading data are automatically synchronized with the cloud based BEACON AMA
software anytime an Internet connection is established, so meter readers do not have to come into the office to receive
assignments or deliver reading data.

Page 4                                                 BEA-TR-03484-EN-01                                                 May 2021
ORION Mobile Read

Launching ORION Mobile Read (OMR)

    1.	 Prior to launching the software, connect and power on the ORION ME mobile transceiver or ORION CE receiver.

           NOTE: If you are using a compatible tablet/laptop, you will want to consistently use the same USB port. You may
                 want to mark this port on your reading device.

    2.	 Open the Google Chrome browser and navigate to HTTPS://OrionMobileRead.BeaconAMA.net

           NOTE: Bookmark this page for quick access. The keyboard shortcut Ctrl-D creates a bookmark.

    3.	 Log in to OMR using your established BEACON AMA user name and password and tap Login.

           NOTE: You must have an active BEACON user name and password that has been designated as a Mobile User by
                 your Utility Admin before you can access OMR.

    4.	 A warning message reminds the driver of the vehicle that they must not touch the tablet/laptop or monitor the
        display while the vehicle is in motion. Acknowledge this notification by tapping the Ok button.

May 2021                                                BEA-TR-03484-EN-01                                              Page 5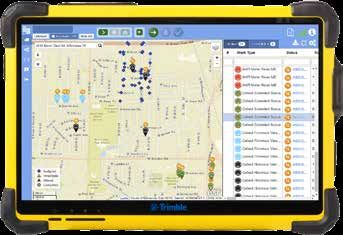
ORION Mobile Read

Route Reading with ORION Mobile Read

    1.	 From the OMR main page, tap the Start icon       to start the data collection process.

    2.	 The warning message will again remind the driver of the vehicle that they must not touch the tablet/laptop or view
        the display while the vehicle is in motion. Acknowledge this notification by tapping the OK button.

         NOTE: On the OMR task bar, mobile transceiver and receiver status indicators will display, if they are configured
               to do so. These indicators are color coded to help the user quickly identify transceiver or receiver
               communication status.

    3.	 If the ORION device Indicator is red, tap on the indicator and tap and Start to begin reading meters.

    4.	 Drive through the route area. Assignment icons and list statuses will change as reads and data are collected.

         NOTE: Audio cues signify completed, missed or investigate items.

Page 6                                               BEA-TR-03484-EN-01                                                 May 2021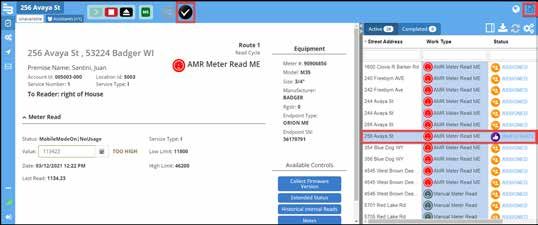
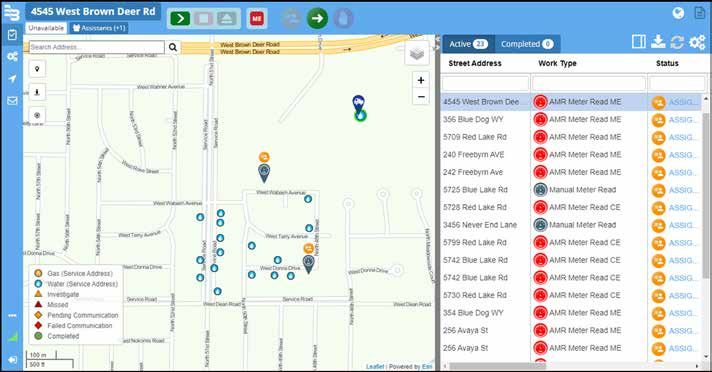
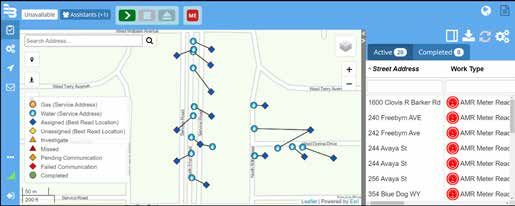
ORION Mobile Read

The work items list is broken down into two tabs. The Active tab includes the Assigned work items, Investigate work items
and the Missed work items. The Completed tab lists the account records where the reading data is collected and the
completed assignment is recorded.

Active Tab

If data collected prompts an Investigate alert, including a Missed reading, the statuses will update on the Active work items
list and map view.

Assignment icons move from the Active tab to the Completed tab when the assignment is completed.

Completed Tab
When the Completed tab is selected, the completed work items list will display along with the completed map icons.

May 2021                                                BEA-TR-03484-EN-01                                                Page 7
ORION Mobile Read

Manual Reads
Manual processing can be started on any work type including AMR meter reads. The manual process must be triggered to
collect any ORION ME two-way items. Please see "ORION ME Two-Way Functionality on page 19" for detailed instructions on the
ORION ME two-way processing.
     1.	 Tap on the account record you wish to manually read in the work list or on the map.
     2.	 Tap the Start icon    to begin the manual read entry process. The account details and manual process opens.

    3.	 Enter the meter read into the Value box by tapping on the number pad icon.
        NOTE: Be sure to enter the billing read value you want to be sent to billing.

    4.	 When you are done with all manual processing and are ready to release the account back to the BEACON software,
        tap the Complete icon.
    5.	 If you are done with the account for now, but wish to access it again before releasing it back to BEACON, tap the
        Suspend icon.
    6.	 If you selected the account in error and want to move it back into the Assigned status for automatic AMR processing,
        tap the Assigned icon.
    7.	 Tap on the garbage icon to delete a manual read if it is still in the Active work list.

NOTE: Once a work item is completed and moved from the Active work list to the Completed work list, no additional
      manual processing of any kind can be done with that work item. A new work item must be created using the Create
      Work Order button.

Page 8                                              BEA-TR-03484-EN-01                                              May 2021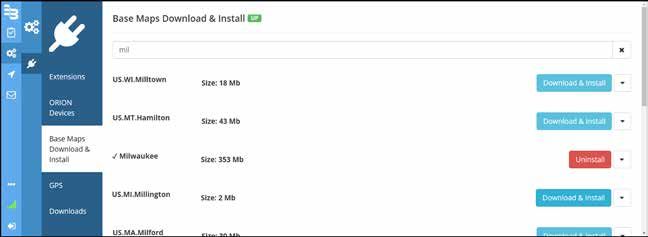
ORION Mobile Read

Reader Codes, Trouble Codes and Notes
Only accounts still on the Active work list can have notes and codes added.

    1.	 Tap on the account record you wish to manually read in the work list or on the map.
    2.	 Tap on the Start icon    to open the account details and begin the manual process.

    3.	 Tap on the Notes button to open the Notes section.

    4.	 Select the desired codes or add the desired text.
        a.	 Only one Trouble code can be attached to an account.
        b.	 Up to three Reader Codes can be attached to an account.
        c.	 Up to 140 Characters are available for a free-form text message.

    5.	 When you are done with all manual processing and are ready to release the account back to the BEACON software,
        tap the Complete icon.
    6.	 If you are done with the account for now, but wish to access it again before releasing it back to BEACON, tap the
        Suspend icon.
    7.	 If you selected the account in error and want to move it back into the Assigned status for automatic AMR processing,
        tap the Assigned icon.
    8.	 Tap on the garbage Icon to delete the notes or codes if it is still in the Active work list.

NOTE: Once a work item is completed and moved from the Active work list to the Completed work list, no additional
      manual processing of any kind can be done with that work item. A new work item must be created using the Create
      Work Order button.

May 2021                                               BEA-TR-03484-EN-01                                              Page 9
ORION Mobile Read

Investigate Status

Field assignments with an Investigate status indicate that a condition has occurred that recommends additional attention.
You can clear an Investigate status on each individual meter as you check the status indicators, or clear them all at once at the
time of completing the route.

    1.	 To clear the Investigate status on a single meter/account:
        a.	 Tap on a specific field assignment in your List view to highlight it and tap on Show Field Assignment Details
             icon.
        b.	 A detailed tab will appear for the account selected. A reader message, code, or manual read may be entered at
             this point.
           c.	 Tap the Complete icon     to change the status to Completed.

          The Field Assignment Details now displays Completed. The account record moves to the Completed tab.

NOTE: Settings in the Field Director software control which alarms and conditions trigger an Investigate status. Only the
      Field Director Admin user can change these settings.

    2.	 Tap on the Show Map icon          to close the Field Assignment Details, and return to map view and continue
        your route.

Page 10                                               BEA-TR-03484-EN-01                                                 May 2021
ORION Mobile Read
Completing a Route Reading Session
When route reading is finished, tap the Stop icon and then the Complete icon.
A warning message displays reminding the reader that tapping Complete affects the status of Investigate and Missed meters,
causing them to automatically transition to Completed status. Tap OK to continue.
NOTE: Only Completed work items sync with the BEACON AMA software upon finding a configured internet connection.
Completed items will remain in list view and they will clear the list at the start of the next calendar day.
Network Connection
When a network connection is not available, the network icon is amber with a count of unsynchronized messages in red.
NOTE: This is not a 1-to-1 ratio and will not match the Field Assignments count.
When a network connection is established, work items will automatically synchronize with the BEACON
AMA software.
Sign Out
To sign out of OMR, tap on the Sign Out icon (bottom icon).
NOTE: Prior to signing out a data connection should be established, and depending on the status of the assignments, you
may either Stop the session or Complete the session prior to signing out.
May 2021 BEA-TR-03484-EN-01 Page 11Display Controls
DISPLAY CONTROLS
Change View
Tapping the Change View icon allows the user to toggle to various view configurations.
Tapping the double arrows collapses and expands the various windows.
Show/Hide Work Assignment Columns
OMR allows the user to show or hide columns of information. Once displayed, column order can be adjusted, column width
can be adjusted, the information in the column can be shown in ascending or descending order and the information in the
columns can be searched.
NOTE: OMR receives information from BEACON through Field Director so information available to the OMR user is
dependent on what has been made available through BEACON and Field Director.
Tap on the three gears icon in the upper left corner to change column options.
To hide the column, remove the checkmark to the left of the column name and tap Save. Changes are saved per user.
Column Order
To adjust the order of the columns on the Active or Completed tabs, tap on the name of the column you wish to move and
drag it to the position desired.
Searching a Column
To search a column for specific information, enter text in the empty box under the column header for the field you wish to
search. List will filter for results as you type. Clear search text to return to the full list.
Page 12 BEA-TR-03484-EN-01 May 2021Display Controls
Map Layers
Tap the Map layers icon in the upper left hand corner of the map display to open the map options.
Online map choices are displayed
The name of the offline map installed is displayed.
Streets adds bold labels on major street names.
Traffic Layer adds color coded traffic indicators on the map.
My Location displays the current location of the meter
reader.
Work Items enables work item icons to be displayed.
• Legend enables the map legend to be displayed.
• Best Read Locations displays the location of the
strongest reading signal.
• Service Addresses enables BEACON Lat/Long icons to be
displayed.
Map Zoom In and Zoom Out is controlled by the plus and minus buttons below the map layers icon.
Follow My Movements when active, moves the map as the route is driven.
Storing Best Read Locations
To save the newest "best read location," complete the following steps when the route is completed.
1. Confirm data connection is active on the reading device (tablet or laptop).
2. Tap Complete button. (Investigate and Missed meters will automatically transition to Completed status.)
3. Log out of OMR.
4. Close the web browser window to exit current browser session.
May 2021 BEA-TR-03484-EN-01 Page 13Configuration
CONFIGURATION
Extensions
Once the OMR software is installed, different Extensions will display a version and status. If the Extension Name Status is
anything other than green and ‘UP’ or amber and ‘Updating,’ please contact Badger Meter Technical Support for assistance.
ORION Devices
Geocoding
OMR software has the ability to geocode a Best Read location during route reading. This feature allows the utility to maintain
the established latitude and longitude where the meter is located while recording an independent best read location latitude
and longitude for meter reading purposes.
This feature can also be a good solution for a utility that does not have the means to establish a latitude and longitude in their
billing software. Geocoding allows the utility to take advantage of mapping features including missed meter notifications.
To activate the Geocoding feature, follow these steps.
1. Navigate to Configurations | ORION Devices.
2. Tap to place a checkmark in the Calculate Best Read Location box.
3. Tap Save.
As the route is read, latitudes and longitudes of the best read locations become a part of the ORION Mobile Read software.
The Best Read map icons will be ready to use and will display during the next reading cycle.
NOTE: These latitude and longitudes do not pass to BEACON, therefore, they do not interfere with established meter asset
latitude and longitudes in the BEACON database.
Page 14 BEA-TR-03484-EN-01 May 2021Configuration
Best Read Location vs. Service Address
The map options allow you to display either the Best Read Location or the Service Address or both icons. The default setting
is to display only the Best Read location. If both are selected, the two icons for the account/meter are connected by a line.
as shown
The service address is based on the latitude and longitude coordinates that are stored in BEACON.
The best read location is based on the latitude and longituse that is stored by the ORION Mobile Read software
during geocoding.
ORION Devices
ORION CE Mobile Receiver and ORION ME Mobile Transceiver
OMR can read ORION CE and ORION ME endpoints.
1. Select the checkbox for the type of reading device you are using.
2. Connect the device to the tablet/laptop and ensure the unit has power and is turned on.
3. Select the appropriate COM Port.
4. Press the Test button. If successful, the Test response will say "Success."
5. Tap Save to preserve the setting. If unsuccessful, check transceiver power, on/off switch, and connection to the
tablet/laptop, or try another Com Port.
May 2021 BEA-TR-03484-EN-01 Page 15Configuration Base Maps If your reading device has a live internet connection while reading, you can use an online "ESRI Street Map." If your reading device does not have a live internet connection, a Base Map for offline reading must be installed. GPS Select the Com Port for the GPS from the available drop-down list. The Com Port for the GPS will vary depending on the device being used. Please consult your IT representative for assistance in identifying the Com Port your device uses. Select Baud Rate for the GPS from the available drop-down list. For a Badger Meter supplied device, the Baud Rate is either 4800 or 9600, depending on the age of the tablet/laptop. Newer units are typically 9600. For other devices please consult your IT representative. Under the Handshake setting for the GPS, select from the available drop-down list. If you are using a Panasonic Toughbook® CF-33 laptop, select XOnXOff. All other devices select None. Many times the GPS has to have an unobstructed view of the sky in order to be set properly. Once communication is seen in the data box and the GPS Status turns green, select Set configuration. NOTE: If multiple question marks “?” appear in the data box, the Com Port or Baud Rate is NOT correct. Page 16 BEA-TR-03484-EN-01 May 2021
Configuration

Downloads
The Downloads page includes software packages required,for the OMR equipment, drivers, and training documentation.

May 2021                                            BEA-TR-03484-EN-01                                          Page 17
ORION ME Two-Way Functionality

ORION ME TWO-WAY FUNCTIONALITY
ORION ME endpoints are capable of two-way communication. This allows the user to pull additional information from the
endpoints via the ORION Mobile Read software on a compatible reading device. Information includes hourly historical data,
extended status messages and firmware version.
NOTE:
    •  In OMR all of the two-way assignments require the meter reader to stop the vehicle, open the work item in the OMR
       software and trigger the actual assignment to complete the process. These assignments will not auto trigger during
       the route reading process.
    •  If the meter reader wants to trigger an ad hoc two-way communication on a Meter Read work item, it must be
       in either the Assigned or Investigate status. Once a work item transitions to Completed it is too late to collect
       additional two-way information without creating a child work order. See "Child Work Order Creation" on page 19 for
       detailed instructions.
    •  If a "Failed Communication" message is received, re-launch the work item and try again.

Assigned Two-Way Work Items
To trigger an existing two-way work item, open the work item to start the manual/two-way process.
     1.	 Tap on the desired work item from the list.
     2.	 Tap the Show Details icon.
     3.	 Tap the Start icon.
     4.	 Tap the blue button for the corresponding two-way work item you wish to trigger. In the example below, the work
         item is Collect Historical Interval Reads.

          The pending communication message displays until the connection is established and the data is captured

    5.	 Tap on Complete and the work item moves to the Completed tab.

Page 18                                             BEA-TR-03484-EN-01                                              May 2021
ORION ME Two-Way Functionality
Ad Hoc Two-Way Work items
To perform an ad hoc work item there must be an existing work item for the desired account in the work item list on the
Active tab. Ad hoc items cannot be pulled on a completed item. A new child work order must be created using the Create
Work Order button. Please see "Child Work Order Creation" on page 19 for detailed instructions.
To request an ad hoc two- way work item open the existing Active work item and start the manual/two-way process.
1. Tap on the desired work item from the list.
2. Tap the Show Details icon.
3. Tap the Start icon.
4. Tap on the desired additional work item.
5. Follow the same steps as listed in the "Assigned Two-Way Work Items" on page 18.
Child Work Order Creation
If a two-way communication is needed on a work item that is already Completed, create a child work order. The new work
order appears in the Active tab and can then be completed using the steps on the previous pages.
1. Tap the Completed tab.
2. Tap the work item you need data for and tap on the Show Details icon.
3. Tap Create Work Order.
4. The new work item is now on your Active list. Process the new two- way request using the steps from "Ad Hoc Two-
Way Work items" on page 19.
May 2021 BEA-TR-03484-EN-01 Page 19Trimble® Ranger 7 handheld Keypad Functionality
TRIMBLE® RANGER 7 HANDHELD KEYPAD FUNCTIONALITY
The Trimble Ranger 7 handheld has a full QWERTY keypad with Hot Key functionality to allow for complete control of the OMR
software without having to use the Touchscreen.
The steps listed below detail the simplest way to read a route with a significant number of manual work items.
1. Tap on the first Manual work item you wish to read in the Active work list.
2. Using the Keypad, press Alt+Q to begin the manual read process on the selected work item.
3. Use the Keypad to enter the reading.
4. Using the Keypad, press Alt+Enter to Complete the manual read process and save the read.
5. The next unread meter will already be selected in the Active work list.
6. Repeat steps 2...5 until all manual work items are completed.
Complete List of all Hot Key Options:
Key Combo Triggered Functionality Required Focus Point
Alt+Q Start the assignment Active Work list
Alt+P Suspend the assignment Work Item Details or Meter Read Value
Alt+Enter Complete the assignment Work Item Details or Meter Read Value
M Activate “Meter Read” control Work Item Details
E Activate “Extended Status” control Work Item Details
H Activate “Historical Interval” control Work Item Details
F Activate “Collect Firmware” control Work Item Details
N Activate “Notes” control Work Item Details
O Move to Comments Notes
T Move to Trouble Codes Notes
R Move to Reader Codes Notes
Ctrl+Alt+D Deactivate Current Control
Alt+H Focus on Main Menu
Alt+V Focus on Map View
Alt+L Focus on Detail View
Alt+A Focus on Active List
Alt+C Focus on Completed List
Page 20 BEA-TR-03484-EN-01 May 2021Trimble® Ranger 7 handheld Keypad Functionality May 2021 BEA-TR-03484-EN-01 Page 21
ORION® Mobile Read Reading Meters for a Billing Cycle

SMART WATER IS B ADGER ME T ER

BEACON and ORION are trademarks of Badger Meter, Inc. Other trademarks appearing in this document are the property of their respective entities. Due to continuous research,
product improvements and enhancements, Badger Meter reserves the right to change product or system specifications without notice, except to the extent an outstanding
contractual obligation exists. © 2021 Badger Meter, Inc. All rights reserved.

www.badgermeter.com
You can also read