TSplus Remote Work
  Documentation
←
→
Page content transcription
If your browser does not render page correctly, please read the page content below

TSplus Remote Work Documentation
TSplus Remote Work - Documentation

General information
  Prerequisites
  Installation
  Activating your license
  Activating your support
  Updating Remote Work
  Using Remote Work

Web Portal
  Customize the Web Portal
  Web Portal Preferences
  HTML5 Client
  Web Server Management

Workstations
  Workstations Management

Security
  HTTPS Certificate
  TSplus Advanced Security

                                                      ©TSplus - www.terminalserviceplus.com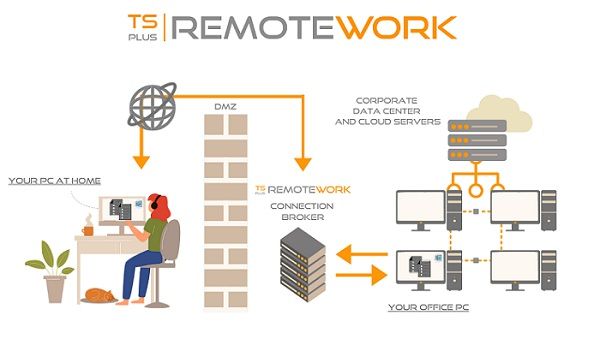
TSplus Remote Work - Documentation

TSplus Remote Work Prerequisites
1) General Information
Important: TSplus RemoteWork is not compatible with TSplus RemoteAccess.
It is not possible to install it on a server with TSplus RemoteAccess already installed.
TSplus Remote Work enables easy remote desktop access from your home office to your workstation at the office.
Your office workstation (the host) can be any PC running a Windows Professional OS from Windows XP Pro to Windows 11 Pro. Please note that
Windows Home, Basic and Family additions are not supported.

The TSplus Remote Work Server is both your Web Portal and Connection Broker. It redirects connection requests to your own office workstation.
The Connection Broker can be installed on any Windows system, server, or workstation. The Connection Broker PC can also be remotely accessed
like any other one.
The Connection Broker is usually installed nearby your ISP’s Router. A NAT (Network Address Translation) rule redirects the HTTP and/or the
HTTPS ports (default value is port 80/443) from the external IP to the LAN IP of your Connection Broker. In this configuration, your Connection
Broker is the only system exposed to Internet.
For the most reliable access to your Remote Work Server, a Static Public IP Address is required. If you do not have a Static Public IP Address, you
may also try alternative Dynamic DNS services like DynDNS.org or NO-IP.org.
Unlike traditional Remote Desktop services, Remote Work does not require the default remote desktop port (3389) to be exposed to the internet. All
traffic is web based, using HTTP/HTTPS. This enables administrators to use SSL certificates for encrypted connections from the outside world.

2) Operating system
Your hardware must use one of the operating systems below:
      Windows Vista Service Pack 2
      Windows 7 Service Pack 1
      Windows 8/8.1
      Windows 10 Pro
      Windows 11 Pro
      Windows Server 2008 SP2/Small Business Server SP2 or 2008 R2 SP1
      Windows Server 2012 or 2012 R2
      Windows Server 2016
      Windows Server 2019
      Windows Server 2022
32 and 64 bits are supported.

                                                                                                          ©TSplus - www.terminalserviceplus.com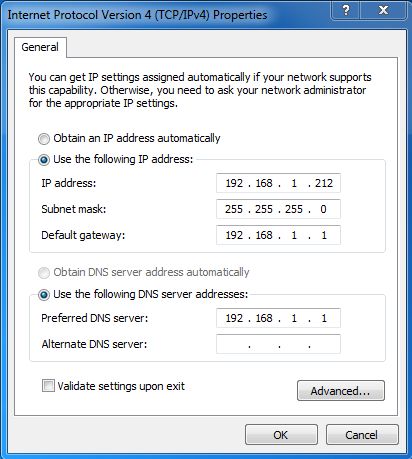
TSplus Remote Work - Documentation
The required framework is .NET version 3.5 for all supported Windows versions.
If you install Remote Work on a Windows 2008 to 2019 make sure the RDS or Terminal Services roles as well as the RDS Terminal Services
licensing role are not installed before installing Remote Work .
If these roles were present, remove them and reboot.
Windows 10 Home edition is not supported.
On Windows Server 2016, 15 sessions maximum are allowed for Remote Desktop access.
Windows Server 2019 Essentials Edition does not support RemoteApp.
3) Network parameters
The TSplus Remote Work Server must have a fixed IP address:
Remote access (from Wide Area Network - WAN)
A DSL connection is recommended as well as a public fixed address. Without a fixed IP address, you should install a dynamic DNS service like
http://DynDNS.org More information about how to set this up can be found here.
The TCP RDP port (by default 3389) must be opened both ways on your firewall.
4) Sessions accessibility
Computers must be able to be accessible during remote connection sessions, it is therefore necessary that these computers are powered on, and also
that the Standby or Hibernation mode are deactivated. The monitor(s) can be turned off.
If a user makes a mistake and turns off his computer remotely, it is not practical to access it again the next day. The solution consists in activating this
GPO : Administrative Templates (Computers) > Start Menu and Taskbar > Remove and prevent access to the Shut Down, Restart, Sleep, and
Hibernate commands.
It is also possible directly via the registry key:
HKEY_LOCAL_MACHINE\Software\Microsoft\Windows\CurrentVersion\Policies\Explorer > HidePowerOptions (DWORD put to 1)
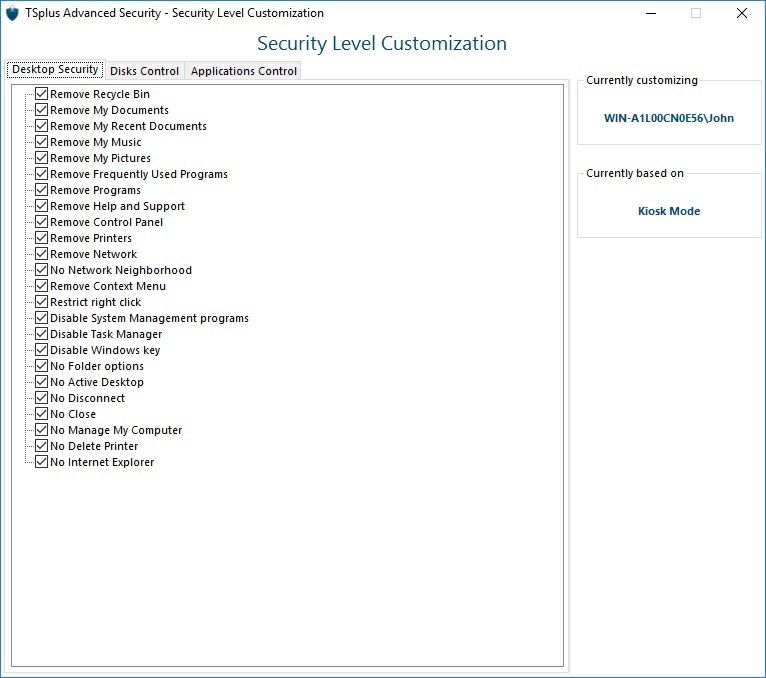
Finally, it is also possible via TSplus Advanced Security, by checking the "No disconnect" box on the Security level Customization tile:
©TSplus - www.terminalserviceplus.comTSplus Remote Work - Documentation
See this documentation for more information.
©TSplus - www.terminalserviceplus.comTSplus Remote Work - Documentation
TSplus Remote Work Installation
Run TSplus Remote Work Setup program and then follow the installation steps.
You can then select two custom options by ticking the corresponding boxes :
Use custom proxy settings.
Only download setup, which does not install TSplus Remote Work.
Click on next.
Click on "I accept the agreement".
Web servers are listening on ports 80 and 443 by default. We recommend you to accept our TSplus Remote Work default installation settings.
According to our experience, most of the production issues are due to Windows security features.
You can still modify these ports if you wish during installation or at any time on the Built-in Web Server Management of the AdminTool. Just make
sure that the defined ports are available and that Java is installed on the server.
The progress bar appears and allows you to follow the progress of the process:
Then the TSplus Remote Work logo appears and a window informs you about the completion of the installation.
To use TSplus Remote Work, you must reboot your system.
The trial period delivers a full product for 15 days and 5 concurrent workstations.
©TSplus - www.terminalserviceplus.comTSplus Remote Work - Documentation
Activating Your License
Locate the Administrator Tool on your desktop :
If you cannot find the admin tool shortcut, it should be located in the desktop folder on the administrator account used to download TSplus
Remote Work. You can also find the TSplus Remote Work folder on this path: 'C:\Program Files (x86)\TSplus-
RemoteWork\UserDesktop\files'.
Double-click on it, then click on the license tab:
Here you can see the status of your TSplus Remote Work license, as well as your Computer ID and Computer Name:
Activating your license
When you order a license, connect to our Licensing Portal and enter your Email Address and your Order Number:
Download the Customer Portal User Guide for more information about how to use it.
Your activation key will be displayed at the top of the dashboard:
You can then go to the License Tile of the AdminTool, click on the "Activate your License" button, enter this activation key and click on “Next” .
You will get a list of all the available licenses/supports assigned to this activation key, i.e. all licenses/supports not activated yet:
Check one or more items and click on the “Next” button. Please note that you can activate several products at the same time by checking several
products/support!
All your products/support are now activated (in this example, both TSplus with support and TSplus Advanced Security have been activated at
once).
Refresh your License Data by clicking on the corresponding button at the bottom of the page, it will synchronize information with our Licensing
Portal:
N.B: You can still download license.lic files on the Licensing Portal for TSplus Legacy Versions. Download the Customer Portal User Guide for
more information about how to use it:
©TSplus - www.terminalserviceplus.comTSplus Remote Work - Documentation
Offline Activation
If the server does not have access to internet when activating, an offline activation process will start.
It will display a quite long URL address. Copy this URL on an internet-connected computer browser and access it in order to retrieve a license
file:
Enter your Activation Key:
Your license is then validated. Download the license file by clicking on the corresponding button:
This license file must then be copied back to the server in order to finish the offline activation process;:
A message will confirm that your license was retrieved succesfully:
You will then have to select the corresponding licenses / support to activate and a message confirming that all your products/support are now
activated.
Rehost
Offline Activation can also be done for rehosting licenses.
When the server does not have Internet access, the 'rehost an existing License' button will present the offline rehost page:
The process is the same as Offline Activation.
©TSplus - www.terminalserviceplus.comTSplus Remote Work - Documentation
Activating your support license file
The support services include our worldwide Ticket/Email support service, Forum access, license rehosting, FAQ and tutorial support.
The Update Services include the delivery of Update codes, the right to install and to use any new release, patch and updates.
The update code is requested once a year to be able to apply the Update Release patch.
It is delivered by our support team on demand.
This update code is now replaced with a support.lic file that you can activate in the licensing tile of the Admin Tool.
We are investing every day to enhance Remote Work and to fix all known issues. So, we recommend all our customers to keep their Remote
Work installation updated. The annual fee is not expensive and is available on our Store Page.
Step One
Locate the Admin Tool on your desktop :
Double-click on it, then click on the license tile.
If you cannot find the admin tool shortcut, it should be located in the desktop folder on the administrator account used to download Remote
Work. You can also find the Remote Work folder on this path: 'C:\Program Files (x86)\Remote Work\UserDesktop\files'.
You can now see your License Status :
Step Two
Connect to the Licensing Portal by entering your Email address and your Order Number:
Download the Customer Portal User Guide for more information about how to use it.
You will get a Support.lic file.
Step Three
Click on the "Activate your license" tile:
Then select "Extend Support period":
Then locate your Support.lic file and open it in order to activate it!
©TSplus - www.terminalserviceplus.comTSplus Remote Work - Documentation
Updating Remote Work
Our development team is working on a daily-basis to ensure the stability and compatibility of TSplus Remote Work with the latest versions of
Microsoft Operating Systems and the latest Updates.
We are proud to provide you with new features and enhancements every week.
This is why it is recommended to keep your server up to date.
By subscribing to our annual Support and Updates Services, you will have access to the latest Updates and bug fixes.
Download the latest version here with the Update Release.
©TSplus - www.terminalserviceplus.comTSplus Remote Work - Documentation
Using TSplus Remote Work
Login
From a PC in your office, open web browser (Firefox, Chrome or Edge for example). Type the address of your Connection Broker and enter the
login:
Done: The logon goes to John’s office workstation.
Session Capture
If John leaves the office with unfinished work and an opens a session on his workstation, TSplus Remote Work will capture his Desktop when he
will start working from home.
Printing
Moreover, John can print documents on his local printer at home. He just has to select the Universal Printer.
The Universal Printer turns each of John’s print into a PDF file. This PDF is saved by his web browser:
John can display, print or save this PDF print file on his home PC.
©TSplus - www.terminalserviceplus.comTSplus Remote Work - Documentation
Customize Remote Work Web Portal
Web Portal Design
With the Web Portal Design tab, you will be able to customize all the display and graphic settings, as well as add your own logo. You have the
choice between a collection of 20 photos, or you can add your own. You can also set any color theme with the background color of your choice
or you can use one of the classic themes.
Some advanced tips:
You don't have to click on a "Choose..." button if you already know a color code: just type it in the input.
Be careful with the real size of the pictures: your page could be quite bad-looking if a picture is too big.
Do not hesitate to use the "Preview" button on the bottom, it's fast and easy!
Saving typed values and Resetting to default ones
When you close this window, all the values you typed and checked are saved.
If you want to reset these values to values by default, click on the "Reset" button on the bottom.
©TSplus - www.terminalserviceplus.comTSplus Remote Work - Documentation
Web Portal Preferences
Using the Web Portal Design and the Web portal Preferences, you will be able to create your own customized HTML Web Access pages - and
there is no need to be a web developer!
This tile allows you to configure the Web Access page:
"Default Values": you can specify a default login, password and domain that will auto-populate the login fields. All of the settings present
here are saved in the index.html file, which can be copied and renamed to your preference.
"Show the Domain Field": when checked, the Domain field is included in the login information request.
"Keyboard": only for advanced administrators who have special keyboard requirements.
"Upload - Download": choose source and destination paths for file uploads and downloads.
Generating the HTML Web Access page
We advise you to try a "Preview" before generating a new HTML Web Access page.
Once you are pleased by the preview, then you can click on the "Publish" button to generate and publish the page to your web server's root folder.
You will be asked for a page name. If you want to overwrite your default page, use "index". In this case, the newly published web page will be
accessible at: http://your-server.com/index.html
©TSplus - www.terminalserviceplus.comTSplus Remote Work - Documentation
HTML5 Client
On this tile, you can edit the parameters for the HTML5 client web display:
Display the menu bar for all devices and computers or for mobile devices only.
Enable or Disable File Transfer.
Allow the Ctrl + Alt + Del shortcut on a specific type of device.
Choose your favorite Top Menu display between transparency and solid.
The number of graphical color bits.
The Connection Timeout.
Show or Hide Warning Messages.
Enable or disable sounds.
Choose your favorite background color.
Add a logo to the background.
Change the logon screen message and animated gif, as well as its display time in milliseconds.
Smartphone and tablets Preferences:
If the administrator uses the software keyboard, when it is hiding an entry field, the application is moved up and the user is still able to see
what he is typing.
The administrator can select a small, a medium or a large size for the mouse pointer or no mouse pointer at all. It makes intuitive for the user
to navigate inside his application.
He can also select the level of transparency for mouse and keyboard.
©TSplus - www.terminalserviceplus.comTSplus Remote Work - Documentation
Server Management
Changing the RDP port number and setting up the firewall
With the AdminTool, you can select a different TCP/IP port number for the RDP service to accept connections on. The default one is 3389. You
can choose any arbitrary port, assuming that it is not already used on your network and that you set the same port number on your firewalls and on
each remote-work user access programs.
Remote Work includes a unique port forwarding and tunneling capability: regardless the RDP port that has been set, the RDP will also be available
on the HTTP and on the HTTPS port number!
If users want to access your remote-work server outside from your network, you must ensure all incoming connections on the port chosen are
forwarded to the remote-work server.
Your Remote Desktop Server must be available, easy-to-access and safe. That’s why Remote Work utilizes a built-in Web Server which helps
you easily manage its status and operations.
A Management Console is available in the Administrator Tool.
This Management Console enables you to view and configure the status of Terminal Service Plus built-in Web Server.
When you install Remote Work, web servers are listening on ports 80 and 443 by default. Make sure that the defined ports are available and that
Java is installed on the server.
Web Server Components Status
The status of the Web Server main components are displayed on the AdminTool Home dashboard.
Ports Considerations (Local Machine and Firewall / Router)
Remote Work only requires either Port 80 or Port 443 to be opened.
Port 3389 can stay closed.
Restart / Stop the Web Server Service
If you see that a service is not running, you may need to restart the Web servers by clicking on the "Restart Web Servers button" which is
represented by an arrow on the right, the Web Servers will be restarted and the service should be running again.
If you click on the "Stop Web Servers" button, placed on the middle, the Web servers will be stopped.
The HTTP and HTTPS server status will now display in red indicating that the HTTP / HTTPS services are stopped:
Manage Web Servers
You can change the ports during installation or at any time by clicking on the Web - Web Server tab. On this tab, you can choose to use a
different HTTP web server, modify the Web Server root path and the HTTP/HTTPS port numbers. Make sure that these ports are available
before changing them: if a conflict occur Remote Work web server will not work. Here is a non-exhaustive list of TCP port that might be used by
an application on your server. Once these modifications done, click on save and the AdminTool will restart.
©TSplus - www.terminalserviceplus.comTSplus Remote Work - Documentation
Manage Workstations
1) Click on Manage Workstations to begin:
2) Click on Add and enter a friendly Workstation name and it’s IP address.
Of course, all of your users’ workstations and the “Connection Broker” must have a fixed IP address:
In the case of Elisabeth, her PC’s IP address is 192.168.1.135:
Repeat this process for the rest of your client PCs:
3) Assign PCs to users:
Let’s take the example of John. Select ‘John Workstation’ and click on ‘Add’ in Users section on the right:
In this example, the Windows login on this PC is “John”. You can use the Active Directory login if PCs are members of a domain:
John’s workstation is now all set and ready to go:
4) Multiple users:
Nicolas and Paul share a PC at work. Paul uses it during the morning shift and Nicolas, during the evening shift. So, for this example, we will assign
two users to Nicolas’ workstation.
5) Workstation setup:
On each of the 5 users’ workstation assigned in the Connection Broker, download and run the client setup program. It is a small program: You can
easily ask each of your users to do it themselves.
The download link is http://192.168.1.120/download
Where 192.168.1.120 is the IP address of your TSplus Remote Work Connection Broker:
You can also download it by clicking on one of the links on the Managing Workstations tile:
Which correspond to these paths:
C:\Program Files (x86)\TSplus-RemoteWork\Clients\www\download\index.html :
©TSplus - www.terminalserviceplus.comTSplus Remote Work - Documentation
And
C:\Program Files (x86)\TSplus-RemoteWork\Clients\www\download\
Once these steps are completed, you are all set and can begin using TSplus Remote Work.
©TSplus - www.terminalserviceplus.comTSplus Remote Work - Documentation
Free and Easy-to-install HTTPS Certificate
Overview
With TSplus Remote Work, in 3 mouse clicks you can get a secured valid certificate, renewed automatically, and configured automatically into
Remote Work built-in web server.
This feature uses Let's Encrypt to provide a free and secure HTTPS certificate for your HTTPS connections.
Prerequisites
Please ensure that your server meet these requirements before using the Free Certificate Manager:
You must use Remote Work built-in web server listening on port 80 for HTTP. This is required by Let's Encrypt domain ownership
validation process.
Your server's domain name must be accessible from the public Internet. This is required as well to validate that you are the real owner
of the domain.
You must run this program on the Gateway server or a Standalone server, not an Application server (except if your Application
Server is accessible from the public Internet and has a public domain name).
It is not possible to get a certificate for an IP address, be it public or private.
It is not possible to get a certificate for an internal domain name (i.e. a domain which only resolves inside your private network).
Free Certificate Manager GUI
To open Remote Work Free Certificate Manager GUI, open Remote Work AdminTool, click on the "Web - HTTPS" tab, then click on
"Generate a free valid HTTPS certificate" as shown in the screenshot below:
The Free Certificate Manager GUI will open and remind you about the prerequisites, as shown in the screenshot below:
Please read carefully and check that your server meet all the requirements, then click on the "Next" button.
Step 1: Enter your Email
As shown in the screenshot below, you only need to enter a valid email address.
This email will not be used to spam you. Actually it will not even be sent to Remote Work or any third party, except the certificate issuer: Let's
Encrypt.
They will only contact you if needed, according to their Terms Of Service.
Enter a valid email, then click on the "Next" button.
Step 2: Accept the Terms Of Service
As shown in the screenshot below, you will be able to open Let's Encrypt Terms Of Service by clicking on the big button.
To accept these Terms Of Service and continue, check the checkbox and click on the "Next" button.
Step 3: Enter the server's Domain Name
As shown in the screenshot below, you only need to enter your server's public domain name.
©TSplus - www.terminalserviceplus.comTSplus Remote Work - Documentation
This is the public Internet accessible Domain Name, something like gateway.your-company.com. You can also enter another domain name or a
subdomain name, separated with a comma. Example: "server1.example.com,www.server1example.com"
As explained in the GUI, do not add a protocol prefix and/or a port suffix, just enter the clean domain name(s).
The certificate will be generated for this domain name, and it will only be valid on a web page hosted at this domain name. If your users connect to
your Web Portal using https://server1.example.com:1234, then you must enter "server1.example.com".
Enjoy your Certificate!
Remote Work Free Certificate Manager will now use all the data to connect with Let's Encrypt, validate that you really own the domain name you
typed, and get the matching valid certificate.
Once the program receives the certificate, it will automatically handle all the required file format conversions and softly reload Remote Work built-
in web server in order to apply the new certificate to every new connection. The web server is not restarted and no connection is stopped.
Certificate Renewal
Let's Encrypt certificates are valid for 90 days.
Remote Work will automatically renew the certificate every 60 days for safety. A check is done at every reboot of the Windows server, and then
every 24 hours.
You can manually renew your certificate by opening the Free Certificate Manager tool. It will display the domain name of the certificate and its
expiration date, as shown in the screenshot below.
To manually renew your certificate, just click on the "Next" button.
The "Reset Domain" button on this window deletes the SSL certificate and reconfigure the Web Server to its original state before using the
Certificate Manager.
Best Practices
If no error occurs, Remote Work will renew the certificate automatically every 60 days. We recommend that you check every 60-70 days that
your certificate has been automatically renewed.
We also recommend that you backup at least every month the following folder and its sub-folders:
C:\Program Files (x86)\TSplus-RemoteWork\UserDesktop\files\.lego
This is an internal folder, containing your Let's Encrypt account private key, as well as the key pair of your certificate.
Troubleshooting
In case of an error, please contact support and email them the following log file:
C:\Program Files (x86)\TSplus-RemoteWork\UserDesktop\files\.lego\logs\cli.log
This log file (and maybe the other log files in the same folder) should help our support team to investigate and to better understand the issue.
If you want to restore a previously used certificate, go to the folder:
C:\Program Files (x86)\TSplus-RemoteWork\Clients\webserver
It will contain every "cert.jks" files used. These are the "key store" files and we never delete them, we only rename them with the date and time of
their disabling.
Error Codes
©TSplus - www.terminalserviceplus.comTSplus Remote Work - Documentation
Error 801: Free Certificate Manager was not able to register your Let's Encrypt account. Check your Internet connection. Check that your
email is not already registered at Let's Encrypt. Try again with another email.
Error 802 & Error 803: Free Certificate Manager could not retrieve Let's Encrypt Terms Of Service URL address. This is a non blocking
error: you can still continue and accept Let's Encrypt Terms Of Service - be sure to read them from your browser first of course.
Error 804: Free Certificate Manager was not able to validate your agreement to Let's Encrypt Terms Of Service with Let's Encrypt servers.
Check you Internet connection. Try again.
Error 805 & Error 806: Free Certificate Manager was not able to validate that you own the domain you entered during certificate creation
(Error 805) or certificate renewal (Error 806). Check again all the prerequisites. Check your Internet connection. Check that your web
server is listening on port 80. Check that you do not use a third-party web server such as IIS or Apache. Check that your domain name is
accessible from the public Internet.
©TSplus - www.terminalserviceplus.comTSplus Remote Work - Documentation
TSplus Advanced Security
TSplus Advanced Security is available as an Add-On on TSplus Remote Work AdminTool:
You can find its full documentation on this page.
Brute-Force Attacks Defense
The Brute-Force attack Defender enables you to protect your public server from hackers, network scanners and brute-force robots that try to
guess your Administrator login and password. Using current logins and password dictionaries, they will automatically try to login to your server
hundreds to thousands times every minute. Learn more about this feature on this page.
On the Web Portal
Brute-force attacks on the Web Portal are blocked when users enter wrong credentials.
After 10 attempts during a period of 10 minutes, the Web Portal will prohibit the user to logon for 20 minutes:
These are the default settings which are customizable on the BruteForce tab of TSplus Advanced Security AdminTool.
You can check all blocked connections and logs on the IP Addresses tile of TSplus Advanced Security Ultimate Protection:
This functionality is visible and active after the first Web Portal connection.
The complete TSplus Advanced Security documentation is available on this page.
©TSplus - www.terminalserviceplus.comTSplus Remote Work - Documentation
Two-Factor Authentication
Two-factor authentication adds an extra layer of security and prevents access to your users' session even if someone knows their
password.
A combination of two different factors is used to achieve a greater level of security:
1) something they know, a password.
2) something they have, a device - such as a smartphone - with an authentication app installed..
You can use one of the following authenticator apps to proceed. These apps are available across a wide range of platforms:
- Authy
- Google Authenticator
- Microsoft Authenticator
Each time a user sign in to its remote session it will need its password and a verification code available from its mobile phone. Once configured, the
authenticator app will display a verification code to allow him or her to log in any time. It works even if its device is offline.
OR you can decide to receive verification codes by SMS. In this case, you will have to create a free account on Twilio.
Two-factor authentication is available with HTML5 and Remoteapp connections on remote-work Web portal only, on remote-work
Mobile Web and Enterprise Editions. This authentication mode does not support login through Remote Desktop client.
In order to provide an even safer solution, RDP connections are denied for 2FA enabled users.
As a prerequisite, remote-work server and Devices must be on time. See the Time Synchronization and Settings sections for more configuration
information.
Activating the Two-factor Authentication Add-On License
The Two-Factor Authentication feature can be found on the Add-On tab of the AdminTool:
To activate your license, copy the serial number you can find at the bottom of the Home tile:
Then, connect to our Licensing Portal and enter your Order Number, your e-mail address, Serial Number and select "Two-Factor Authentication"
on the dropdown list below:
You will get your license.lic file. Then, go to the License tab and cick on the "Activate your license" button:
Enable Two-factor Authentication
Perform the following steps to enable two-factor authentication for your remote-work server or deployment. If your remote-work deployment is
configured to use multiple servers, perform this task on the remote-work server exposed as the single point of entry for users or having the reverse
proxy role.
1) Open the two-factor authentication administration application. The two-factor authentication status and the license status are displayed:
©TSplus - www.terminalserviceplus.comTSplus Remote Work - Documentation
By default, 2FA is disabled.
Enable it:
Add Users and Groups
Once two-factor authentication is enabled, you can configure users for two-factor authentication.
1) From the two-factor authentication administration application, click on the Manage Users tab.
2) Then, click on Add to select users and/or groups of users. The Select Users or Groups box opens.
3) Add as many users and groups as required and then click OK. The users and groups are added to the list and enabled for two-factor
authentication.
Edit Users
On the same tile, you can edit the way users receive verification codes by selecting a user and clicking on the "Edit" button:
The user receives verification codes on the authentication app by default. You can choose that he/she receives it by SMS by selecting the option
and adding the user's phone number on the field below.
Remove Users and Groups
In order to remove users or groups, select the user or the group and then click on Remove. A confirmation message is displayed.
Click Yes. The user or the group is removed from its list and won't connect using two-factor authentication anymore.
Reset Configuration for Users
In the event of the loss of the authenticating device for a user, or if the user needs to display the secret QR code again, you must reset the user
authentication settings.
1) From the two-factor authentication administration application, click on the Manage Users tab.
2) Select one or multiple activated users and then click on Reset. A confirmation message is displayed:
3) Click Yes. The selected users will be presented a new QR code at the next login and will have to scan it in their device's authentication app.
You can also modifiy the user's phone number, so that he can receive a verification code on his new device.
Enroll User for Two-factor Authentication
Once a user has been enabled for using two-factor authentication, an activation message will be displayed at his next successful logon from the
remote-work Web portal.
In order to complete the required steps, you have two choices: either generate codes via an authenticator app, either make the user receive codes
by SMS.
Receive codes with an Authenticator Application
©TSplus - www.terminalserviceplus.comTSplus Remote Work - Documentation
The user must install an authenticator app on a portable device, such as his smartphone.
You can use one of the following authenticator apps to proceed. These apps are available across a wide range of platforms:
- Authy
- Google Authenticator
- Microsoft Authenticator
Please use each app documentation for more details on how to proceed to add your remote-work account.
Configure SMS
In order for the user to receive verification codes by SMS, you must first enable it. Click on the Configure SMS tab:
remote-work leverages Twilio in order to send verification codes by SMS. Twilio is a third-party cloud platform, not affiliated with remote-work.
1) Just create a free account on Twilio by clicking on the button below "Start your free trial with Twilio":
2) On your Twilio account dashboard, you will need to activate your Trial Number:
3) The next step is only necessary for Trial versions. It allows Twilio to verify the actual phone number on which SMS will be sent.
Enter this number under the "Phone Numbers" menu - "Verified Caller IDs" tab :
4) You will then be able to enter your account SID, Authentication Token and Trial Number as the Phone Number on the Configure SMS tab of
remote-work:
Then, click on Save. The following message will be displayed:
You can manage your Twilio subscription on the Manage Twilio subscription section, at the bottom of the Configure SMS tab. Administrate
your account, see the Service Status or reach Twilio Support Center just by clicking on the corresponding buttons.
Login using Two-factor Authentication
Once a user has configured his remote-work account in his authenticator app, he or she will be able to connect using its password and the code
provided by its authenticator app or by SMS.
Time Synchronization
TSplus Remote Work server and Devices must be on time. This means that the time and date of the server must be synchronized with a time
server. Devices must also have time synchronization, regardless of the time zone on which they are configured.
If an authentication request comes from a Device whose date and time are not synchronized, or if the server's date and time are not synchronized,
this request may be rejected.
The validation of information between the Device and the server relates to UTC time.
In the Settings section, the Discrepency parameter is used to manage the period of validity of the code, in intervals of 30 seconds.
©TSplus - www.terminalserviceplus.comTSplus Remote Work - Documentation
Example of validation or valid authentication:
the server is synchronized with a time server, the time zone is UTC + 2, it is 2:30 pm
the Device is synchronized with a time server, the time zone is UTC + 1, it is 1:30 pm
the Discrepency parameter is configured at 60, i.e. a code validity period of 30 minutes
referred to UTC time, the Device time and the server time are identical.
Example of validation or invalid authentication:
the server is synchronized with a time server, the time zone is UTC + 2, it is 2:30 pm
the Device is not synchronized with a time server, the time zone is UTC-1, the time is manually set to 1:30 pm
the Discrepency parameter is configured at 60, i.e. a code validity period of 30 minutes
the server time referred to UTC time is 12:30 am
the time communicated by the Device, referred to UTC time is 2:30 pm
the difference is 120 minutes, the validation code is therefore refused.
Settings
The Settings tab allows you to whitelist users, in order for them to connect using an RDP client, without the need to enter a two-
authentication code.
Click on the "Add" button to add a user and remove a user by selecting it and clicking on the "Remove" button.
The Advanced tab allows you to configure Two-Factor Authentication in-depth settings.
Discrepancy
You can modify the Discrepancy value, which allows you to set the validation time of a verification code.
A discrepancy of 3 means that the same verification code remains valid 90 seconds backward and forward its original 30 seconds validity period.
Default is 480, which means 480 x 30 seconds= 4 hours.
Issuer
A string indicating the name of the two-factor authentication service. The issuer is displayed on the client mobile app and identifies the service
associated with the generated verification code. By default, it is composed of the server's name with remote-work.
Validity After First Session
Period during which a user can open a session without having to revalidate a previous two-factor authentication code. This setting allows users to
open applications from the Web application portal successively. Default is 480 minutes.
Validity Before First Session
Period during which a user can open a session after validating a two-factor authentication code from the Web portal or from the mobile app, in
secondes. Default is 3600 seconds.
Digits
The number of digits to display to the user. Please note that this setting may not be supported by authentication apps. This number must be greater
than or equal to 4 and lower or equal to 12. Default is 6.
©TSplus - www.terminalserviceplus.comTSplus Remote Work - Documentation
SMS Verification Code Message
Message sent to users requesting a verification code if they are configured to receive it via SMS. This message must contain the %CODE%
placeholder which will be replaced by the actual verification code. Default is: Your %ISSUER% verification code is: %CODE%
©TSplus - www.terminalserviceplus.comYou can also read