U.are.U SDK 3.0 Platform Guide for Linux
←
→
Page content transcription
If your browser does not render page correctly, please read the page content below
U.are.U® SDK 3.0
Platform Guide for Linux
Copyright © 2017 Crossmatch. All rights reserved. Specifications are subject to change without prior notice. The Crossmatch logo,
Crossmatch™, Cross Match®, L Scan®, D Scan®, I Scan®, Guardian®, SEEK® and Verifier® are trademarks or registered
trademarks of Cross Match Technologies, Inc. in the United States and other countries. DigitalPersona®, TouchChip®, Eikon®,
U.are.U® and FingerJet™ are trademarks or registered trademarks of DigitalPersona, Inc., which is owned by the parent company
of Cross Match Technologies, Inc. All other brand and product names are trademarks or registered trademarks of their respective
owners.

Published: May 19, 2017 (v3.0)
Contents

INTRODUCTION                                                                                                                                     5
Getting Updated Documentation .................................................................................................................. 5

INSTALLATION                                                                                                                                               6
Installing on the Development System .......................................................................................................... 6
Installing on the Target Machine ................................................................................................................... 7
Uninstalling the SDK...................................................................................................................................... 7

DEVELOPING APPLICATIONS WITH C/C++                                                                                                                                8
Pre-Requisites ............................................................................................................................................... 8
System Requirements ................................................................................................................................... 8
   Kernel ........................................................................................................................................................8
   Development System ................................................................................................................................8
   Target Runtime Hardware (Linux-Based Device) ......................................................................................8
The Sample Applications............................................................................................................................... 9
   Building the Sample Applications .............................................................................................................9
   Running the UareUSample Application ....................................................................................................9
   Running the UareUCaptureOnly Application ..........................................................................................14

DEVELOPING APPLICATIONS WITH JAVA                                                                                                                            18
Pre-Requisites ............................................................................................................................................. 18
System Requirements ................................................................................................................................. 18
   Development System ..............................................................................................................................18
   Target Runtime Hardware (Linux-Based Device) ....................................................................................18
   Installing on the Target Hardware ...........................................................................................................18
The Java Sample Application ...................................................................................................................... 19
   Selecting a Reader ..................................................................................................................................20
   Enrolling a Finger ....................................................................................................................................21
   Identifying a Fingerprint ..........................................................................................................................22
   Verifying a Fingerprint .............................................................................................................................23
   Using the Capture and Streaming Feature .............................................................................................24

DEVELOPING APPLICATIONS WITH JAVAPOS                                                                                                                         25
Pre-Requisites ............................................................................................................................................. 25
System Requirements ................................................................................................................................. 25
   Development System ..............................................................................................................................25
   Target Runtime Hardware (Linux-Based Device) ....................................................................................25
Installation Notes ......................................................................................................................................... 25
   Installing on the Target Hardware ...........................................................................................................25
   Enabling and Disabling the USB Hotplug Device ...................................................................................26
   Registering the U.are.U Device Service ..................................................................................................26
Upgrading from Previous Versions of the JavaPOS API ............................................................................. 26
The JavaPOS Sample Application............................................................................................................... 26

REDISTRIBUTION                                                                                                                                 33
Fingerprint Reader Documentation ............................................................................................................. 33
   Hardware Warnings and Regulatory Information ....................................................................................33

U.are.U SDK - Platform Guide for Linux                                                                                                                           3
U.are.U Fingerprint Reader Use and Maintenance Guides ....................................................................33

U.are.U SDK - Platform Guide for Linux                                                                                       4
Introduction
T HIS CHAPTER PROVIDES AN OVERVIEW OF THE CHAPTERS IN THE U . ARE. U SDK PLATFORM GUIDE FOR L INUX .

This manual describes how to use the U.are.U SDK to develop applications that will run on the Linux platform. The
U.are.U SDK is available for multiple platforms and this document describes issues specific to developing applications
that will run on Linux platforms:
Introduction (this chapter) describes how to get the latest version of this documentation.
Installation provides instructions for installing on your development system and on the target (Linux) machine.
Developing Applications with C/C++ lists system requirements for developing and running applications in C/C++ and
describes the sample application.
Developing Applications with Java lists system requirements for developing and running applications using Java,
provides additional installation instructions and describes the Java sample application.
Developing Applications with JavaPOS provides information on using the JavaPOS-compliant API built on the
U.are.U framework.
Redistribution describes the merge modules that are provided to help you redistribute applications built using the
U.are.U SDK.
For a detailed description of the SDK, consult the U.are.U SDK Developer Guide.

Getting Updated Documentation
If you are viewing this guide from the download package for the U.are.U SDK, you may want to check online at our
website for an updated version of this document at
http://www.crossmatch.com/Support/Reference-Material/SDK-Reference-Material/
On the Developer Reference Material page, select U.are.U SDK for Linux and the version number of the SDK that you
are using.

U.are.U SDK - Platform Guide for Linux                                                                               5
Installation
THIS CHAPTER PROVIDES INSTRUCTIONS ON INSTALLING THE U.ARE.U SDK ON THE DEVELOPMENT AND TARGET SYSTEMS.
Except as noted in the platform/language-specific chapters, the installation process is the same for all Linux
development.
There are two steps to the installation:
1. Installing on the development system
2. Installing on the device (the target hardware)
These steps are described below.
I n s t a l l i n g o n t h e D e ve l o p m e n t S y s t e m
To install the SDK on your development system:
1. Unpack CM-UareU-SDK--.tar.gz into a directory.
2. Go to the directory where you unpacked the files.
3. Run install. You must be root to install the SDK.
If the installation scripts are not executable, you might first need to run
chmod +x install
4. Follow the prompts as they appear.
The installer copies all necessary files to the selected folder (by default, the product folder is /opt/Crossmatch/
urusdk-linux ). The files installed on the developer’s machine are located in the following folders within the main
product folder:
Folder Contents
Include Header files for C/C++ API.
Linux/docs End user license agreement (EULA) plus documentation:
SDK Developer Guide - describes all APIs
Platform Guide for Linux - Linux-specific details
C_API - Doxygen for C/C++ API
Java_API - Javadoc for Java API
Linux/lib Runtime files for:
arm - C/C++ development for ARM processors
armhf - C/C++ development for ARMHF processors
x64 - C/C++ development for x64 processors
x86 - C/C++ development for x86 processors
java - Java and JavaPOS JAR files
U.are.U SDK - Platform Guide for Linux 6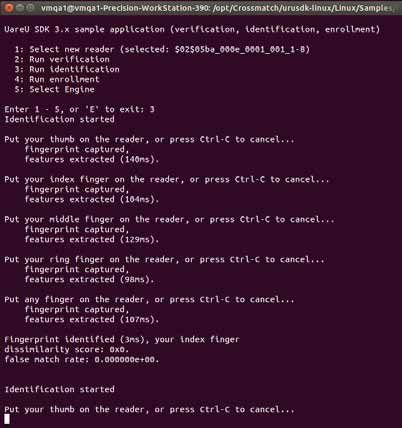
Installation
Folder Contents
Linux/Samples/bin Compiled sample applications:
Bin
java - Java sample
javapos - JavaPOS sample
linux-arm - C/C++ sample for ARM processors
linux-armhf - C/C++ sample for ARMHF processors
linux-x64 - C/C++ sample for x64 processors
linux-x86 - C/C++ sample for x86 processors
Source files for sample applications:
UareUSample - C/C++ sample
UareUCaptureOnly - C/C++ sample that demonstrates
only capture
UareUSampleJava - Java sample
UareUSampleJavaPOS - JavaPOS sample
I n s t a l l i n g o n t h e Ta rg e t M a c h i n e
The installation procedure is identical for all supported readers.
Depending on the functionality you need, you must copy and unpack the tarballs as shown in the table below. The files
will typically be copied to /usr/lib or /usr/local/lib. To run applications, LD_LIBRARY_PATH should point to
the correct location or the dynamic linker cache should be remade to include the location with the library files.
Functionality Required files (depending on reader used)
Capture Crossmatch-fpcapture-..tar.gz
Crossmatch-fpdriver4k-..tar.gz
Crossmatch-fpdriver5k-..tar.gz
Crossmatch-fpdriverEikon-..tar.gz
Feature extraction (FingerJet Engine) Crossmatch-fpengine-..tar.gz
Java wrapper Crossmatch-uru-java-.noarch.tar.gz
Crossmatch-uru-jni-..tar.gz
The folder /opt/Crossmatch/urusdk-linux/redist contains the redistributable files for all supported target
architectures, for the supported readers.
Once the appropriate library packages have been extracted to the target system, copy the following files into /etc/udev/
rules.d on the target platform (these files are found on the host machine in the same directory).
• 99-dp4k.rules
• 99-dp5k.rules
• 99-touchip.rules
Uninstalling the SDK
If you need to uninstall the SDK,
1. Change the directory to /opt/Crossmatch/urusdk-linux.
2. Run uninstall. Note that you must be root to uninstall the SDK.
U.are.U SDK - Platform Guide for Linux 7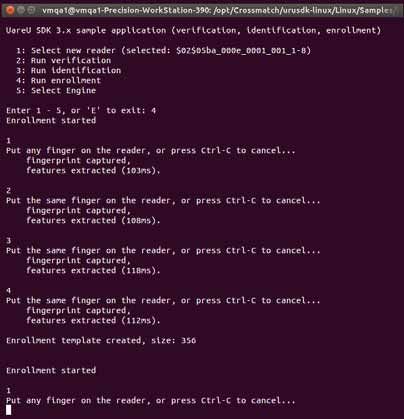
Developing Applications with C/C++
T HIS CHAPTER PROVIDES INFORMATION NECESSARY FOR DEVELOPING L INUX APPLICATIONS IN C/C++ WITH THE
U. ARE .U SDK.

P re - R e q u i s i t e s
This chapter assumes that you have a working knowledge of C/C++ and that you know how to develop for applications
that will run on Linux platforms and devices.

S y s t e m R e q u i re m e n t s

Kernel
The Linux kernel that is supported for target and development systems is 3.xxx or above. The FingerJet Engine is
supported on all versions of the Linux kernel.

Development System
The development system can be any Intel-based Linux system with a 3.xxx or above kernel.
  • Ubuntu 12.04, 14.04 and 16.04
  • Fedora 19-25
  • OpenSUSE 11.3 and Leap 42.1
These utilities, packages, and libraries should already be installed on your system:
  • usbutils
  • binutils (lsmod and lsusb utilities)

Target Runtime Hardware (Linux-Based Device)
The Linux-based device that will run the application must be one of the following hardware platforms:
  • Linux kernel 3.xxx or above
  • Intel x86 architecture with CPU from 600MHz and at least 16Mb of available RAM
  • Intel x64 (x86-64) architecture with CPU from 600MHz and at least 16Mb of available RAM
  • ARMv4T EABI with CPU from 400MHz and at least 16Mb of available RAM
  • ARMv6+VFP2 with CPU from 400MHz and at least 16Mb of available RAM
The file sizes are (in Kb):

  Function                                                      x86     x64      ARM    ARMHF
  Capture runtime (drivers + SDK layer)                         1896    2094     1966   1939
  Fingerprint recognition runtime                               1176    1311     927    848

In addition, the device must also have:
  • a USB port
  • 16 MB free memory
The SDK works on a variety of hardware and is intended to have a small footprint so that it can run even on minimal
hardware. Less capable hardware will work, but response time may not be optimal.

U.are.U SDK - Platform Guide for Linux                                                                                8
Developing Applications with C/C++
The Sample Applications
The U.are.U SDK includes sample applications to demonstrate the features of the SDK. The sample applications are
located in subfolders of the /opt/Crossmatch/urusdk-linux/Linux/Samples folder:
• The Bin subdirectory contains pre-compiled sample applications for ARM, ARMHF, x86 and x64 architectures.
• The UareUCaptureOnly subdirectory contains the sources of the sample application that demonstrates
fingerprint capture. This application does not have any dependencies on the FingerJet engine libraries.
• The UareUSample subdirectory contains the source for the sample application that demonstrates the full
functionality of the SDK: fingerprint capture, feature extraction and verification, identification and enrollment of
fingerprints. This application has dependencies on the capture and FingerJet Engine libraries.
Building the Sample Applications
UareUSample and UareUCaptureOnly are built in the same way. The instructions for UareUCaptureOnly are
provided below.
To manually build the UareUCaptureOnly sample application for the same target architecture as your development
system:
1. Change to the /opt/Crossmatch/urusdk-linux/Linux/Samples/UareUCaptureOnly directory.
2. Run make
To manually build the UareUCaptureOnly sample application for ARM architecture (on a x86 or x64 development
system):
1. Change to the /opt/Crossmatch/urusdk-linux/Linux/Samples/UareUCaptureOnly directory.
2. Run CC= CFLAGS=”L/opt/Crossmatch/lib_arm” make
(Depending on the cross-toolchain, additional parameters may be required in the CFLAGS parameter, for
example, for GCC: CFLAGS=”-march=armv4t -L/opt/Crossmatch/lib_arm”
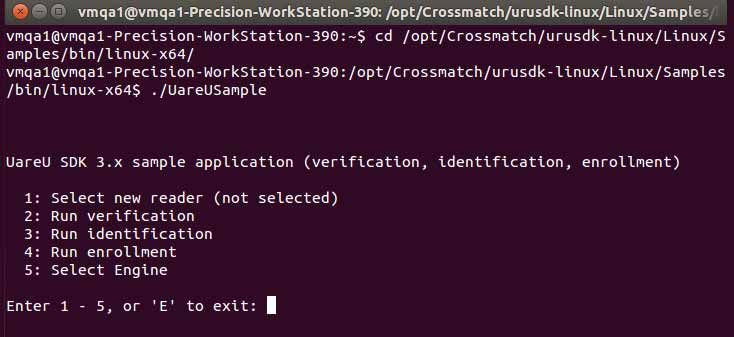
Running the UareUSample Application
The UareUSample application demonstrates the Capture API and the FingerJet Engine API. This sample application is
a console application -- it does not require any graphic libraries or desktop environment. Be sure that
LD_LIBRARY_PATH points to the location of the urusdk-linux libraries. When you launch the application you will
see the main menu, as shown below.
You must begin by selecting a fingerprint reader device to use with the application. After you press 1 and Enter to
select the reader, the application will search for any fingerprint readers and display a list of the readers it finds, as
U.are.U SDK - Platform Guide for Linux 9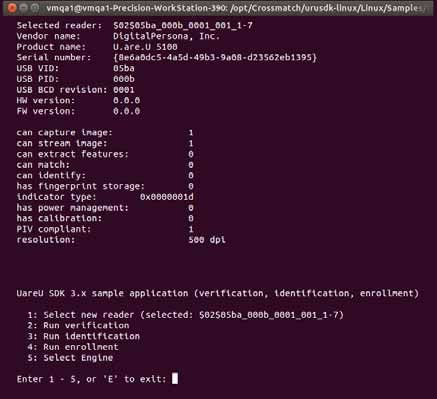
Developing Applications with C/C++

shown below. Choose the desired reader and press Enter to continue.

Once a reader is selected, you will see a screen that shows information about the reader and its capabilities, as shown
below.

To test verification, press 2 and then press Enter.
Follow the prompts on the screen as shown below and touch your finger on the reader. You will see that the program
extracts the fingerprint features. Place your finger on the reader again, and the sample application will extract the
features of the second fingerprint and determine whether the fingerprints match or not.

U.are.U SDK - Platform Guide for Linux                                                                                10
Developing Applications with C/C++

Place your index finger as the first fingerprint and your middle finger as the second fingerprint, and note that they do
not match.
Press the Esc key to return to the main menu.
To test identification, press 3 and then press Enter to start.
Remember that identification matches a single fingerprint against a set of fingerprints. You will be prompted to touch
each of your fingers on the reader in turn, as shown below. When you have entered all of your fingerprints, you will be
prompted to place any finger on the reader. Place one of your fingers on the reader to ensure that the fingerprint
matches. Then place a finger from your other hand on the reader and ensure that it does NOT match.

Press Ctrl C to return to the main menu.
To test enrollment, press 4 and then press Enter to start.

U.are.U SDK - Platform Guide for Linux                                                                                 11
Developing Applications with C/C++

The enrollment test is to successfully enroll a single finger. Follow the prompts on the screen (as shown below) and
place your finger on the reader when prompted to do so. Then when prompted again, place the same finger on the
reader. It typically takes four scans to get a good enrollment. If you place a different finger on the reader during the
enrollment process, or if a scan is of poor quality, that scan will be dropped and the application will request additional
finger scans in order to do a complete enrollment.

Once you have finished testing the enrollment feature of the sample application, press Ctrl C to return to the main
menu.
To test fingerprint engine selection, press 5 and then press Enter to start.
The fingerprint engine test is to successfully select a fingerprint engine and ensure that it is running.

U.are.U SDK - Platform Guide for Linux                                                                                  12
Developing Applications with C/C++

Type the number of the fingerprint engine that you want to select and press Enter.

The program displays a message indicating which DPFR engine is running.
This completes the demonstration of the UareUSample application. Press E to exit from the main menu.

U.are.U SDK - Platform Guide for Linux                                                                 13
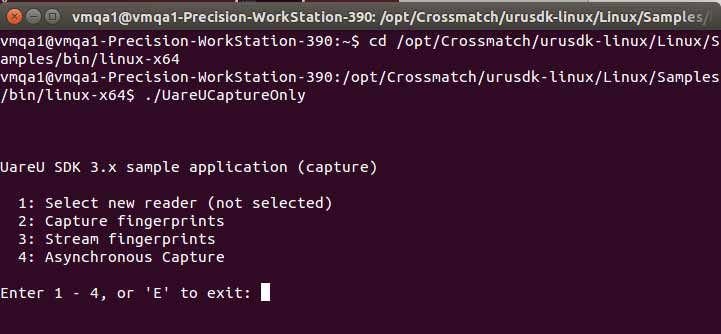
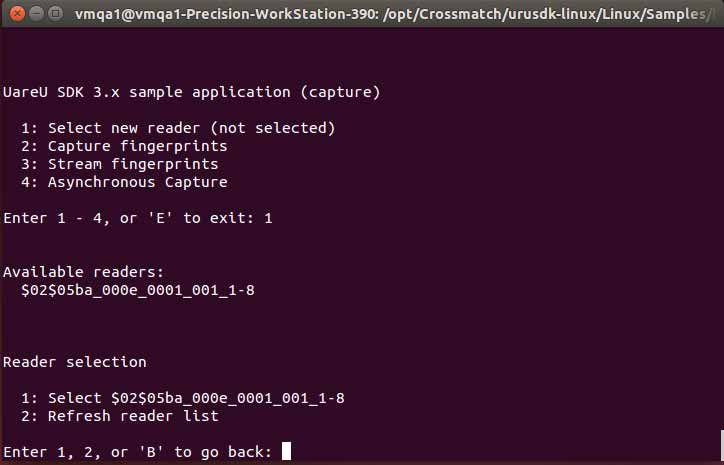
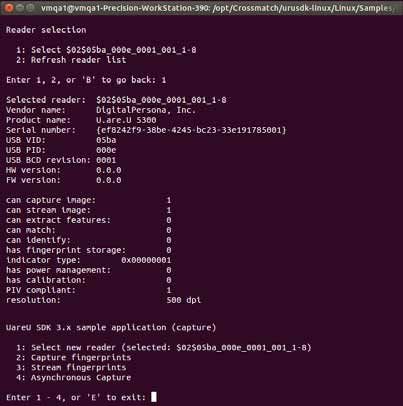
Developing Applications with C/C++

Running the UareUCaptureOnly Application
The UareUCaptureOnly application demonstrates the Capture API alone (no dependencies on the FingerJet Engine
library). The UareUCaptureOnly sample application is a console application -- it does not require any graphic
libraries or desktop environment.
Be sure that LD_LIBRARY_PATH points to the location of the urusdk-linux libraries. When you launch the
application you will see the main menu, as shown below:

You must begin by selecting a fingerprint reader device to use with the application. Press 1 to select the reader. The
application will search for any readers and display a list of any readers it finds, as shown on the next page.

Choose the desired reader and press Enter to continue.

U.are.U SDK - Platform Guide for Linux                                                                                   14
Developing Applications with C/C++

Once a reader is selected, you will see a screen that shows information about the reader and its capabilities, as shown
below.

Select 2 and press Enter to test the capture function of the sample application.
The capture function simply puts the reader into fingerprint capture mode and waits until a fingerprint is detected, as
shown in the picture below.

Once you have finished testing the capture feature of the sample application, press Ctrl C to return to the main menu.

U.are.U SDK - Platform Guide for Linux                                                                                15
Developing Applications with C/C++

To test the streaming feature (not available on all fingerprint readers), select 3 and press Enter to test the streaming
function of the sample application. The streaming function simply puts the reader into fingerprint stream mode and
waits until a fingerprint is detected, as shown in the picture below.

When you place your finger on the reader, images will be captured and their quality score displayed. Press E to exit
streaming mode.

U.are.U SDK - Platform Guide for Linux                                                                                     16
Developing Applications with C/C++

To test the Asynchronous Capture feature, select 4 and press Enter. This function puts the reader into Asynchronous
Capture mode, which waits until a fingerprint is detected and then begins the fingerprint capture process, as shown in
the picture below.

Once a collection of adequate quality images is created, its width and height are displayed and the fingerprint capture
process begins again automatically. Press Ctrl-C to exit the Asynchronous Capture mode.
This completes the demonstration of the UareUCaptureOnly application. Press E to exit from the main menu.

U.are.U SDK - Platform Guide for Linux                                                                               17
Developing Applications with Java
T HIS CHAPTER PROVIDES INFORMATION NECESSARY FOR DEVELOPING L INUX APPLICATIONS IN J AVA WITH THE
U. ARE .U SDK.

P re - R e q u i s i t e s
This chapter assumes that you have a working knowledge of Java and that you know how to develop for Java readers.

S y s t e m R e q u i re m e n t s

Development System
The development system can be any Intel-based Linux system with a 3.xxx or above kernel.
  • Ubuntu 12.04, 14.04 and 16.04
  • Fedora 19-25
  • OpenSUSE 11.3 and Leap 42.-1
These utilities, packages, and libraries should already be installed on your system:
  • usbutils
  • binutils (lsmod and lsusb utilities)

Target Runtime Hardware (Linux-Based Device)
The Java-based device that will run the application must be one of the following hardware platforms:
  • Linux kernel 3.xxx or above
  • Intel x86 architecture with CPU from 600MHz and at least 16Mb of available RAM
  • Intel x64 (x86-64) architecture with CPU from 600MHz and at least 16Mb of available RAM
  • ARMv4T EABI with CPU from 400MHz and at least 16Mb of available RAM
  • ARMv6+VFP2 with CPU from 400MHz and at least 16Mb of available RAM
The file sizes are (in Kb):

  Function                                                      x86     x64      ARM    ARMHF
  Capture runtime (drivers + SDK layer)                         3484    3817     3305   3199

In addition, the machine must also have:
  • a USB port
The SDK works on a variety of hardware and is intended to have a small footprint so that it can run even on minimal
hardware. Less capable hardware will work, but response time may not be optimal.

Installing on the Target Hardware
To install the run-time environment on the target hardware platform:
  1. Install as described in the section, Installing on the Target Machine on page 7.
  2. Copy /opt/Crossmatch/urusdk-linux/Linux/lib/java/dpuareu.jar and /opt/Crossmatch/
     urusdk-linux/Linux/lib//libdpuareu_jni.so* to the location of your choice.
  3. Make sure that dpuareu.jar is in the classpath and libdpuareu_jni.so is accessible by JVM. For example:

U.are.U SDK - Platform Guide for Linux                                                                            18
Developing Applications with Java
java -cp "./UareUSampleJava.jar:/opt/Crossmatch/urusdk-linux/Linux/lib/java/
dpuareu.jar" -Djava.library.path="/opt/Crossmatch/urusdk-linux/Linux/lib/x86"
UareUSampleJava
T h e Java S a m p l e A p p l i c a t i o n
The U.are.U SDK includes a sample application to demonstrate the features of the SDK when using the Java API. The
sample application is located in the Samples folder. The compiled file, UareUSampleJava.exe can be downloaded
to your machine for testing or you can compile it yourself using the source files provided.
The application demonstrates the features of the SDK. When you launch the application, you see the main screen as
shown below.
The sample program demonstrates:
• How to enroll a subject finger
• How to identify a fingerprint
• How to verify a fingerprint
• The built-in control for enrollment
• The built-in control for identification
• How to use the streaming feature to display live fingerprint data on the screen
U.are.U SDK - Platform Guide for Linux 19Developing Applications with Java Selecting a Reader To choose the reader, click on the Select new reader button. You will see a list of available readers and you can choose the desired device, as shown below: To see the reader capabilities, click on the Get reader capabilities button. The capabilities will be displayed, as shown in the image below. Click on the Back button to continue. Click on the Back button from the previous screen to return to the main screen. U.are.U SDK - Platform Guide for Linux 20
Developing Applications with Java

Enrolling a Finger
Click on Run enrollment to begin enrolling a test subject.
You will see a series of prompts to scan fingers for enrollment, as shown below.

After the first finger is successfully scanned, you will be prompted to scan additional fingers until a sufficient number
of high quality scans are complete. The number of fingers requested will vary depending on the image scans - the
enrollment functions will continue to request scans until an acceptable enrollment record has been created.
When enrollment is complete, click Back to return to the main screen.

U.are.U SDK - Platform Guide for Linux                                                                                 21
Developing Applications with Java

Identifying a Fingerprint
To test the identification feature, click on the Run identification button. Recall that identification is a 1-to-many
comparison where the application searches through all of the enrolled fingers to find a match. For this example, we do
not have a stored database, so the sample application first prompts you to place your fingers on the reader so that it can
create a FMD. After a FMD is created, you will be prompted to place any finger on the reader to identify against the
FMD that was just created.
When you click the Run identification button, you will be prompted to place your fingers on the reader. If you place
an enrolled finger on the reader, you will see that a match was found. In the screen image below, we successfully
identified a user.

To exit identification mode, click on the Back button.

U.are.U SDK - Platform Guide for Linux                                                                                  22
Developing Applications with Java

Verifying a Fingerprint
To test the verification feature, click on the Run verification button. Recall that verification is a 1-to-1 comparison
where the application matches against a specified fingerprint. When you click the Run verification button, you will be
prompted to place your finger on the reader. As with the identification example above, in the screen below, we have
successfully verified a user.

To exit identification mode, click on the Back button.

U.are.U SDK - Platform Guide for Linux                                                                               23
Developing Applications with Java

Using the Capture and Streaming Feature
The sample application also demonstrates the streaming feature (on fingerprint readers that support that feature). To
test capturing or streaming, from the main window, click on Run capture or Run streaming button.
This puts the reader into capture/streaming mode and immediately the results are displayed in the window. For
streaming mode, the window then becomes like a live window on the reader as it streams results. Placing a finger on
the reader displays the streamed fingerprint, as shown below.

For streaming, removing the finger shows a blank stream.
To exit capture / streaming mode, click on Back.

U.are.U SDK - Platform Guide for Linux                                                                                  24
Developing Applications with JavaPOS
T HIS CHAPTER PROVIDES INFORMATION NECESSARY FOR DEVELOPING L INUX APPLICATIONS IN J AVA POS WITH THE
U. ARE .U SDK.

P re - R e q u i s i t e s
This chapter assumes that you have a working knowledge of JavaPOS and that you know how to develop for Linux
machines.

S y s t e m R e q u i re m e n t s
This section lists the minimum software and hardware requirements needed to work with the U.are.U SDK.

Development System
The development system can be any Intel-based Linux system with a 3.xxx or above kernel.
  • Ubuntu 12.04, 14.04 and 16.04
  • Fedora 19-25
  • OpenSUSE 11.3 and Leap 42.-1
These utilities, packages, and libraries should already be installed on your system:
  • usbutils
  • binutils (lsmod and lsusb utilities)

Target Runtime Hardware (Linux-Based Device)
The Linux-based device that will run the application must be one of the following hardware platforms:
  • Linux kernel 3.xxx or above
  • Intel x86 architecture with CPU from 600MHz and at least 16Mb of available RAM
  • Intel x64 (x86-64) architecture with CPU from 600MHz and at least 16Mb of available RAM
  • ARMv4T EABI with CPU from 400MHz and at least 16Mb of available RAM
  • ARMv6+VFP2 with CPU from 400MHz and at least 16Mb of available RAM
The file sizes are (in Kb):

  Function                                                      x86     x64      ARM    ARMHF
  Capture runtime (drivers + SDK layer)                         5317    5650     5138   5032

Installation Notes
After installing the Java API on your development system as described in the Installation chapter beginning on page 6,
perform the following additional steps.

Installing on the Target Hardware
To install the run-time environment on the target hardware platform:
  1. Install as described in the Installation chapter beginning on page 6.

U.are.U SDK - Platform Guide for Linux                                                                              25
Developing Applications with JavaPOS
2. Copy /opt/Crossmatch/urusdk-linux/Linux/lib/java/*.jar and /opt/Crossmatch/urusdk-
linux/Linux/lib//libdpuareu_jni.so* to the location of your choice.
3. Make sure that dpuareu.jar is in the classpath and libdpuareu_jni.so is accessible by JVM. For example:
java -cp "./UareUSampleJava.jar:/opt/Crossmatch/urusdk-linux/Linux/lib/java/
dpuareu.jar" -Djava.library.path="/opt/Crossmatch/urusdk-linux/Linux/lib/x86"
UareUSampleJava
Enabling and Disabling the USB Hotplug Device
IMPORTANT:You must be root to enable or disable the USB hotplug device.
To enable or disable the USB hotplug device
Run /urusdk-linux/drivers/hotplug.sh
Registering the U.are.U Device Service
To enable U.are.U support in your JavaPOS environment, you may need to register the U.are.U Device Service.
To register your device
1. Modify the JAVA_POS_CONFIG_PATH variable in the register.sh file to point to the config folder. (This
file is located in the /opt/Crossmatch/urusdk-linux/Linux/lib/java directory.)
2. Run register.sh
To unregister the Device Service
• Run register.sh -u
U p g ra d i n g f ro m P re v i o u s Ve r s i o n s o f t h e Java P O S A P I
To upgrade your existing applications, be sure to do the following steps:
1. Add a reference to /opt/Crossmatch/urusdk-linux/Linux/Lib/Java/dpuareu.jar in your classpath.
This change is often done in a build or run script.
2. Replace the old dpjavapos.jar with the newest one, located in /opt/Crossmatch/urusdk-linux/Linux/
Lib/Java.
3. Before running your application, set the path reference to the JavaPOS Wrapper JNI layer with this command:
Set LD_LIBRARY_PATH = Linux/Lib/x86
OR
Set LD_LIBRARY_PATH = Linux/Lib/x64
T h e Java P O S S a m p l e A p p l i c a t i o n
This section describes the functionality of the sample application, which is located in the /opt/Crossmatch/
urusdk-linux/Linux/Samples directory. For more information about the sample application and the sample code,
particularly button functionality, refer to the readme.txt file located in the same directory.
IMPORTANT: To run the sample application, Java runtime environment (JRE) 1.5 or higher must be installed on your
computer.
U.are.U SDK - Platform Guide for Linux 26Developing Applications with JavaPOS
To start the application
1. Change to the /opt/Crossmatch/urusdk-linux/Linux/Samples/bin/javapos directory.
2. For x86 machines, run
./run_x86.sh
For x64 machines, run
./run_x64.sh
For ARM machines, run
./run_arm.sh
For ARMHF machines, run
./run_armhf.sh
U.are.U SDK - Platform Guide for Linux 27Developing Applications with JavaPOS
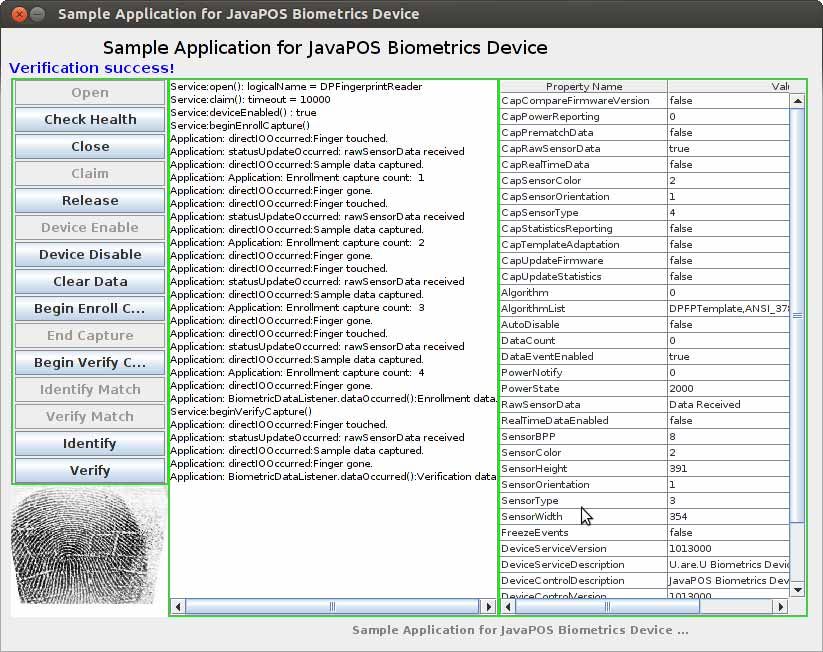
The sample application window appears as shown below.
The U.are.U SDK window is made up of the following distinct areas:
• Buttons area
This area is located at the left of the window and contains buttons that initiate calls to various methods for
interacting with the fingerprint reader and for performing fingerprint enrollment, verification, and identification
operations.
• Messages area
U.are.U SDK - Platform Guide for Linux 28Developing Applications with JavaPOS
This area is located above the Buttons area and displays messages that inform the user of system activity, invite
the user to perform actions such as touching the fingerprint reader, or advise the user of system errors. The
message that appears when you start the application is “Click to open the device...”.
• New Image area
This area is located at the bottom left and displays raw sensor data when a StatusUpdate event is returned
signaling raw data is available.
• Log area
This area is located in the middle of the window and displays a log of system activity, including method calls and
error codes.
• Properties area
This area is located at the right of the window and displays a list of properties, both common and specific (in the
Property name column), and their current values (in the Value column).
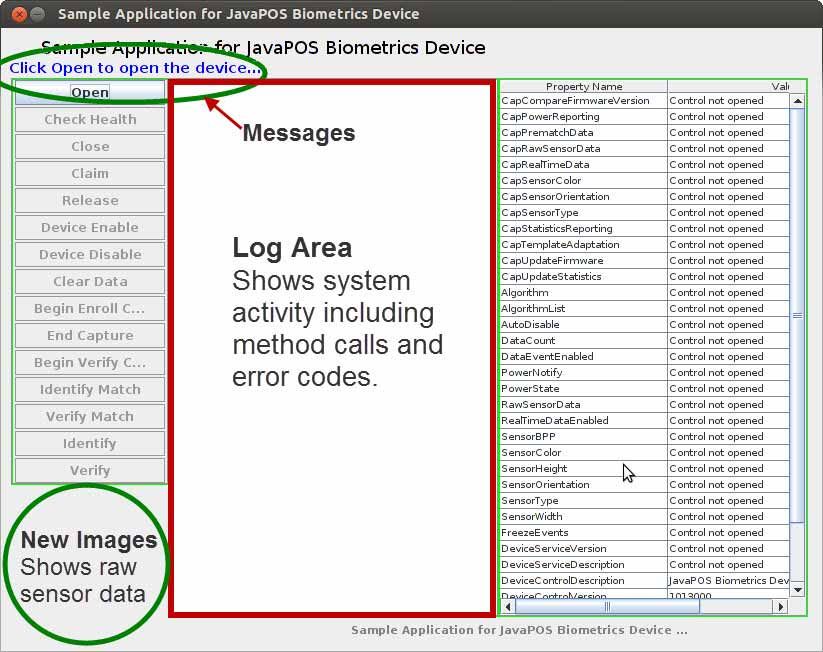
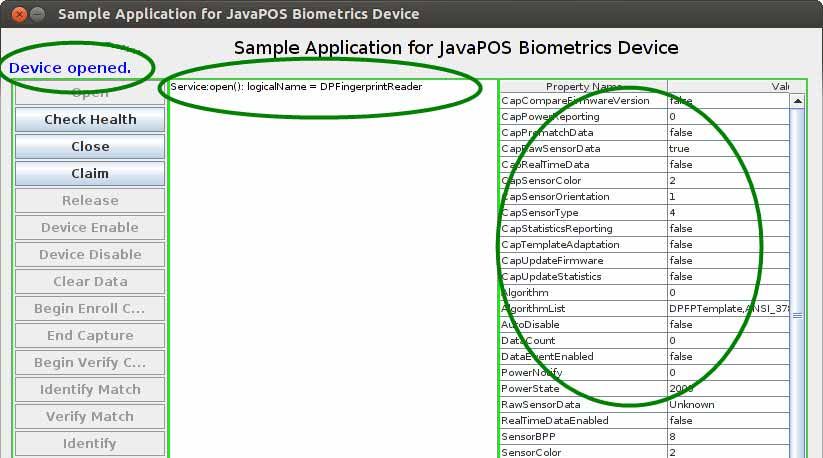
To open the connection with the fingerprint reader
• Click Open.
The open method of the Device Control object is called.
If the call succeeds, the connection with the fingerprint reader is opened and various properties (common and
specific) are set to their default values. These properties and values are displayed in the Properties area, and
“Device opened...” appears in the Messages area, as shown in the screen shot below.
NOTE: As each method is called, any properties that change are displayed in the Properties area.
If the method call fails, a failure message appears in the Messages area and error codes are displayed in the Log
area.
Once the connection with the fingerprint reader has been opened, it must be claimed.
To claim the fingerprint reader
• Click Claim.
U.are.U SDK - Platform Guide for Linux 29Developing Applications with JavaPOS
The claim method of the Device Control is called, the claimed property is set to true, and “Exclusive accessed”
appears in the Messages area.
Once the connection with the fingerprint reader has been claimed, it must be enabled.
To enable the fingerprint reader
• Click Device Enable.
The deviceEnabled property is set to true and “Physical Device Operational” appears in the Messages area.
Enrolling a fingerprint consists of capturing four fingerprint images, converting them into fingerprint pre-enrollment
templates, and then creating an enrollment template from these templates.
To perform fingerprint enrollment
1. Click Begin Enroll Capture.
The beginEnrollCapture method of the Device Control is called and “Touch the sensor four times” appears in
the Messages area.
2. Touch the fingerprint reader four times. Follow the instructions that appear in the Messages area to guide you.
If the method call succeeds, an enrollment template is created and “Total enrollment completed: N” appears in
the Messages area, where N is the number of total enrollments.
If the method call fails, a failure message appears in the box in the Messages area. If an error occurs, appropriate
messages appear in the Messages area, and error codes are displayed in the Log area.
To perform fingerprint verification
1. Click Begin Verify Capture.
The beginVerifyCapture method of the Device Control is called and “Touch the sensor to capture sample data”
appears in the Messages area.
If the method call fails, a failure message appears in the Messages area. If an error occurs, appropriate messages
appear in the Messages area, and error codes are displayed in the Log area.
2. Touch the fingerprint reader.
If the method call succeeds, a verification template is created and “Sample Data Captured” appears in the
Messages area.
If the method call fails, a failure message appears in the Messages area. If an error occurs, appropriate messages
appear in the Messages area, and error codes are displayed in the Log area.
3. Click Verify Match.
The verifyMatch method of the Device Control is called.
If the method call succeeds, a match is performed using the latest enrollment template available and the
verification template that was created in step 2, and “Verification success!” or “Verification failed!” appears in
the Messages area.
If the method call fails, a failure message appears in the Messages area. If an error occurs, appropriate messages
appear the Messages area, and error codes are displayed in the Log area.
To perform fingerprint identification
1. Click Begin Verify Capture.
If the method call fails, a failure message appears in the Messages area. If an error occurs, appropriate messages
appear in the Messages area, and error codes are displayed in the Log area.
U.are.U SDK - Platform Guide for Linux 30Developing Applications with JavaPOS
2. Touch the fingerprint reader.
If the method call succeeds, a verification template is created and “Sample Data Captured” appears in the
Messages area.
If the method call fails, a failure message appears in the Messages area. If an error occurs, appropriate messages
appear in the Messages area, and error codes are displayed in the Log area.
3. Click Identify Match.
The identifyMatch method of the Device Control is called.
If the method call succeeds, a match is performed using all of the enrollment templates available and the
verification template that was created in step 2. A candidate ranking is generated by listing only the indices of the
enrollment templates that match, and “Identification success!” or “Identification Failed!” appears in the
Messages area.
If the method call fails, a failure message appears in the Messages area. If an error occurs, appropriate messages
appear in the Messages area, and error codes are displayed in the Log area.
To perform fingerprint verification using a verification template created on-the-fly
1. Click Verify.
The verify method of the Device Control is called, and “Please touch the sensor for verification” appears in the
Messages area.
2. Touch the fingerprint reader.
If the method call succeeds, a verification template is created on-the-fly. Then a match is performed using the
latest enrollment template available and the verification template, and “Verification success!” or “Verification
failed!” appears in the Messages area.
If the method call fails, a failure message appears in the Messages area. If an error occurs, appropriate messages
appear in the Messages area, and error codes are displayed in the Log area.
To perform fingerprint identification using a verification template created on-the-fly
1. Click Identify.
The identify method of the Device Control is called and “Please touch the sensor for Identification” appears in
the Messages area.
2. Touch the fingerprint reader.
If the method call succeeds, a verification template is created on-the-fly. Then a match is performed using all of
the enrollment templates available and the verification template. A candidate ranking is generated by listing only
the indices of the enrollment templates that match, and “Identification success!” or “Identification Failed!”
appears in the Messages area.
If the method call fails, a failure message appears in the Messages area. If an error occurs, appropriate messages
appear in the Messages area, and error codes are displayed in the Log area.
To clear the enrollment template array set and the verification template
• Click Clear Data.
The clearInput method of the Device Control is called and “Clear data to start enrolling again” appears in the
Messages area.
If the method call succeeds, the enrollment template array set and the verification template are cleared. A new
verification template and a set of enrollment templates can now be created.
If the method call fails, a failure message appears in the Messages area, and error codes are displayed in the Log
area.
U.are.U SDK - Platform Guide for Linux 31Developing Applications with JavaPOS
Here is a demonstration of a sample sequence, showing the log area and messages.
In the screenshot below, the sample application window shows the following sequence of actions:
• Open
• Claim,
• Device enable,
• Begin enroll capture,
• Captured 4 fingers,
• Begin verify capture,
• Captured 1 finger,
• Verify match,
• Returns a success notification (final message at top left)
To close the connection with the fingerprint reader
• Click Close.
The Close method of the Device Control is called.
If the method call succeeds, the connection with the fingerprint reader is closed, all of the controls other than the
Open button are disabled, and the properties are reset, or cleared.
If the method call fails, a failure message appears in the Messages area, and error codes are displayed in the Log
area.
To close the application
Click the Close button at the top right of the window.
U.are.U SDK - Platform Guide for Linux 32Redistribution T HIS CHAPTER PROVIDES DETAILS ABOUT THE FILES INCLUDED IN THE U. ARE .U SDK THAT MUST BE DISTRIBUTED WITH YOUR APPLICATION . You may redistribute the files in the redist folder in the U.are.U SDK software package (typically located at /opt/ Crossmatch/urusdk-linux/redist) to your end users pursuant to the terms of the end user license agreement (EULA), attendant to the software and located in the /opt/Crossmatch/urusdk-linux/Linux/Docs folder in the SDK software package. When you develop a product based on the U.are.U SDK, you need to provide the redistributables to your end users. These files are designed and licensed for use with your application. Per the terms of the EULA, Crossmatch grants you a non-transferable, non-exclusive, worldwide license to redistribute, either directly or via the respective merge modules, the following files contained in the redist folder in the U.are.U SDK software package to your end users and to incorporate these files into derivative works for sale and distribution. Fingerprint Reader Documentation You may redistribute the documentation included in the /redist directory to your end users pursuant to the terms of this section and of the EULA, attendant to the software and located in the /Docs directory. Hardware Warnings and Regulatory Information If you distribute U.are.U fingerprint readers to your end users, you are responsible for advising them of the warnings and regulatory information included in the Warnings and Regulatory Information.pdf file in the redist directory. You may copy and redistribute the language, including the copyright and trademark notices, set forth in the Warnings and Regulatory Information.pdf file. U.are.U Fingerprint Reader Use and Maintenance Guides The U.are.U Fingerprint Reader Use and Maintenance Guides, Reader Maintenance Swipe.pdf and Reader Maintenance Touch.pdf, are located in the /redist directory. You may copy and redistribute them, including the copyright and trademark notices, to those who purchase a U.are.U module or fingerprint reader from you. U.are.U SDK - Platform Guide for Linux 33
You can also read