EQUOBOX TOOLKIT LITE User Guide
←
→
Page content transcription
If your browser does not render page correctly, please read the page content below
SINAPSI S.r.l.

Via delle Querce 11/13

06083 Bastia Umbra (PG) Italy

T.+39 075 8011604 F.+39 075 8014602

www.sinapsitech.it|info@sinapsitech.it

EQUOBOX TOOLKIT LITE
User Guide
Rev 3.5

                                         This user guide applies   to   software
                                         versions from: 2.1.2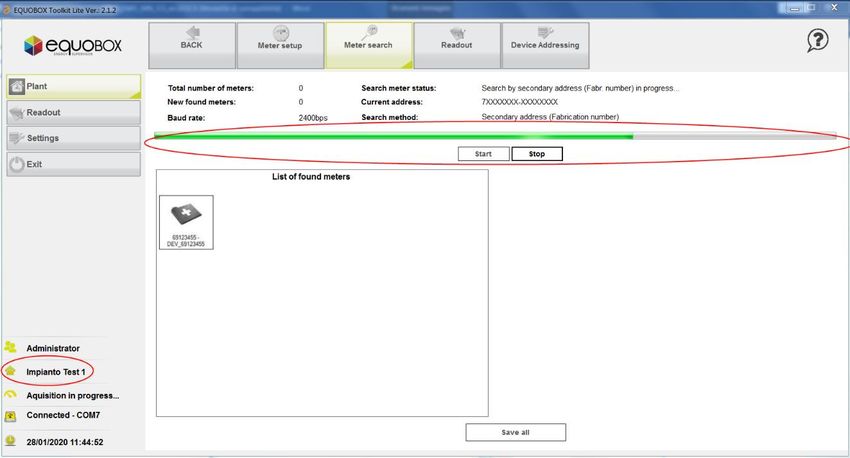
EQUOBOX TOOLKIT LITE – User Manual Rev. 3.5

TABLE OF CONTENTS
1.     SOFTWARE INSTALLATION ............................................................................................................................. 3
     1.1       System requirements ............................................................................................................................. 3
     1.2       Installing the EQUOBOX TOOLKIT software........................................................................................ 3
2.     LOGIN ............................................................................................................................................................... 6
3.     SETTINGS .......................................................................................................................................................... 7
     3.1       SIN.EQSW1............................................................................................................................................... 7
4.     PLANT SECTION ............................................................................................................................................... 8
     4.1       Homepage ............................................................................................................................................... 8
     4.2       Creating a new plant ............................................................................................................................ 10
     4.3       Opening an existing plant ................................................................................................................... 11
     4.4       Delete plant ........................................................................................................................................... 12
     4.5       Close Plant ............................................................................................................................................. 12
5.     MANAGEMENT OF M-BUS DEVICES ON WIRED SYSTEMS ....................................................................... 13
     5.1       SIN.EQLC1 connection ......................................................................................................................... 13
     5.2       Connecting the SIN.EQLC250 .............................................................................................................. 13
     5.3       M-Bus Interface settings and SIN.EQLC1 and SINEQLC250 firmware upgrade ........................... 14
     5.4       Wired section (M-Bus) .......................................................................................................................... 16
     5.5       Meter search ......................................................................................................................................... 16
     5.6       Device addressing ................................................................................................................................ 19
     5.7       Meter Setup ........................................................................................................................................... 21
     5.8       Readout.................................................................................................................................................. 23
6.     READOUT SECTION ....................................................................................................................................... 24
     6.1       Open Readout ....................................................................................................................................... 24
     6.2       Excel Report .......................................................................................................................................... 25
7.     SIN.EQRPT868XT DEVICE MANAGEMENT ON WIRELESS PLANT............................................................. 27
     7.1       Connecting a SIN.EQRPT868XT repeater ........................................................................................... 27
     7.2       Wireless Section (W. M-Bus) ................................................................................................................ 27
     7.3       SIN.EQRPT868XT Repeater Firmware Update .................................................................................. 28
     7.4       Access to the Repeater ........................................................................................................................ 29
     7.5       Change Repeater Login Password ..................................................................................................... 30
     7.6       Setting a Mesh Network Address (on RTU) and on Repeaters ....................................................... 31
     7.7       Uploading a list of available W. M-Bus devices in the plant on repeaters .................................... 33
     7.8       Special cases ......................................................................................................................................... 36

SINAPSI S.r.l. |Via delle Querce 11/13 - 06083 BASTIA UMBRA (PG) – Italy

T.+39 075 8011604 - F.+39 075 8014602|www.sinapsitech.it-info@sinapsitech.it                                                                                                2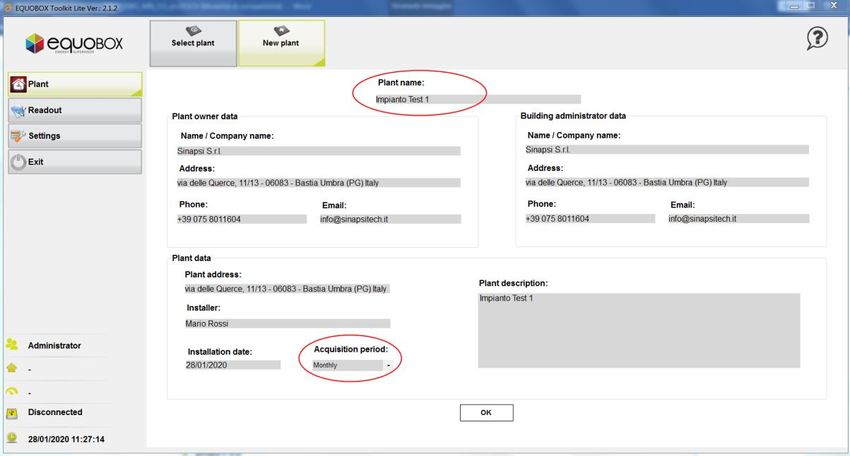
EQUOBOX TOOLKIT LITE – User Manual Rev. 3.5

1. SOFTWARE INSTALLATION
1.1 System requirements
The following minimum system requirements must be met to ensure proper operation of the
EQUOBOX Toolkit:
   • Operating System: Windows XP, Windows Vista, Windows 7, Windows 8, Windows 10
   • HW features: 32 bit or 64 bit processor, 1 USB port 1.1 or upper
   • Minimum support resolution: 1280x768
1.2 Installing the EQUOBOX TOOLKIT software
Follow the procedure to install the management software.

Double-click on the icon                              and follow the next steps

                                                                   Figure 1 - Installation Step 1

                                                                   Figure 2 - Installation Step 2

                                                                   Figure 3 - Installation Step 3

SINAPSI S.r.l. |Via delle Querce 11/13 - 06083 BASTIA UMBRA (PG) – Italy

T.+39 075 8011604 - F.+39 075 8014602|www.sinapsitech.it-info@sinapsitech.it                                                                 3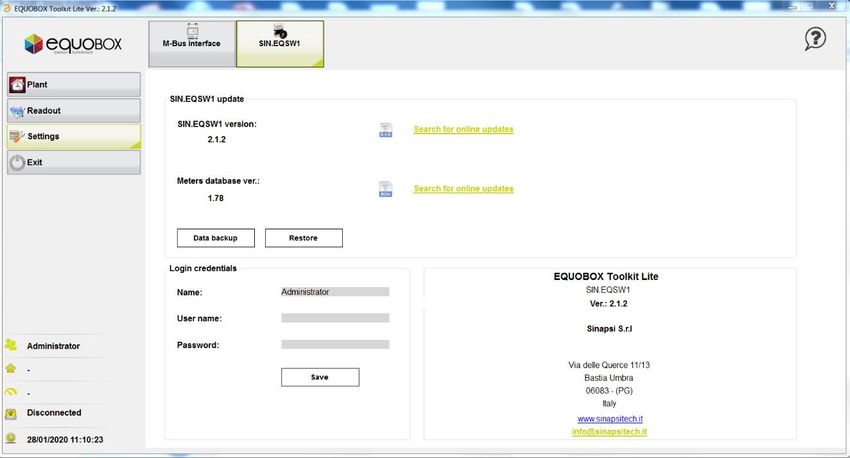
EQUOBOX TOOLKIT LITE – User Manual Rev. 3.5

                                                                   Figure 4 - Installation Step 4

                                                                   Figure 5 - Installation Step 5

                                                                   Figure 6 - Installation Step 6

                                                                   Figure 7 - Installation Step 7

SINAPSI S.r.l. |Via delle Querce 11/13 - 06083 BASTIA UMBRA (PG) – Italy

T.+39 075 8011604 - F.+39 075 8014602|www.sinapsitech.it-info@sinapsitech.it                                                                 4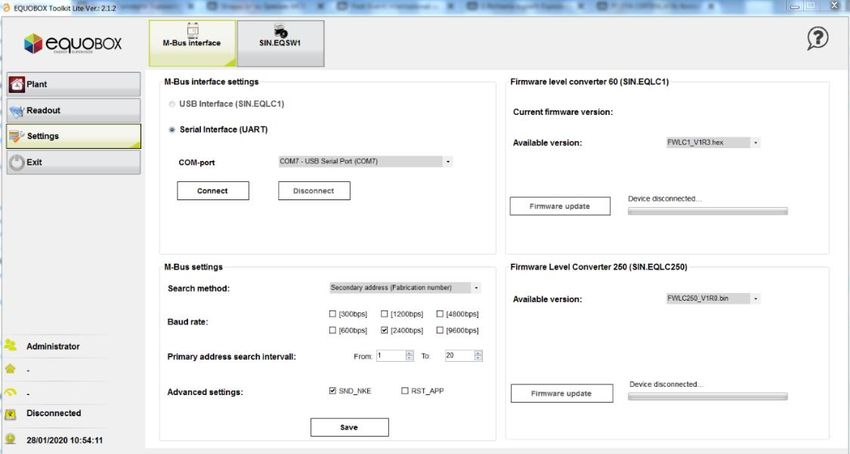
EQUOBOX TOOLKIT LITE – User Manual Rev. 3.5

                                                                   Figure 8 - Installation Step 8

If necessary, you will be prompted to install the “Visual C++ 2012 Runtime” software on your PC.

                                                                   Figure 9 - Installation Step 9

                                                                  Figure 10 - Installation Step 10

SINAPSI S.r.l. |Via delle Querce 11/13 - 06083 BASTIA UMBRA (PG) – Italy

T.+39 075 8011604 - F.+39 075 8014602|www.sinapsitech.it-info@sinapsitech.it                                                                  5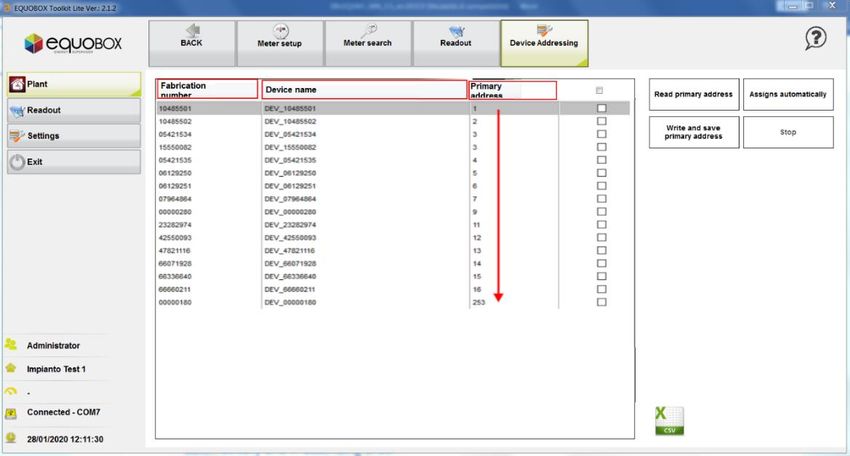
EQUOBOX TOOLKIT LITE – User Manual Rev. 3.5

2. LOGIN

Double-click on the icon to open EQUOBOX Toolkit

The software homepage is a login window where you are prompted to enter your credentials (User
name/Password) which, by default, are:

      •     User name: admin
      •     Password: admin

                                                                           Figure 11 – Log in

When logging in, you can select the language among those available. The selected language setting is
stored by the software and reused for subsequent access.

NOTE: It is recommended that you change your password as soon as possible. See paragraph 3.5

SINAPSI S.r.l. |Via delle Querce 11/13 - 06083 BASTIA UMBRA (PG) – Italy

T.+39 075 8011604 - F.+39 075 8014602|www.sinapsitech.it-info@sinapsitech.it                                                             6
EQUOBOX TOOLKIT LITE – User Manual Rev. 3.5

3. SETTINGS
Section dedicated to SIN.EQSW1 software and communication interfaces settings.

3.1 SIN.EQSW1
This section lets you run the following:

                                                                      Figure 12 - Toolkit Setup

      •     SIN.EQSW1 update
                o SIN.EQSW1 version: reports the version of the Toolkit. You can update it by selecting
                   “Search for online updates”
                o Meters database ver.: shows the version of the meter database currently being used.
                   You can update it by pressing “Search for online updates”
                o Data Backup: select to backup all data acquired and software settings.
                o Restore: Lets you import the file created with the "Data Backup" option

      •     Login credentials
               o Name: name of the user logging in
               o User name: Toolkit user login nickname. Admin by default
               o Password: Toolkit user login password. Admin by default

Press Save to save account settings.

SINAPSI S.r.l. |Via delle Querce 11/13 - 06083 BASTIA UMBRA (PG) – Italy

T.+39 075 8011604 - F.+39 075 8014602|www.sinapsitech.it-info@sinapsitech.it                                                               7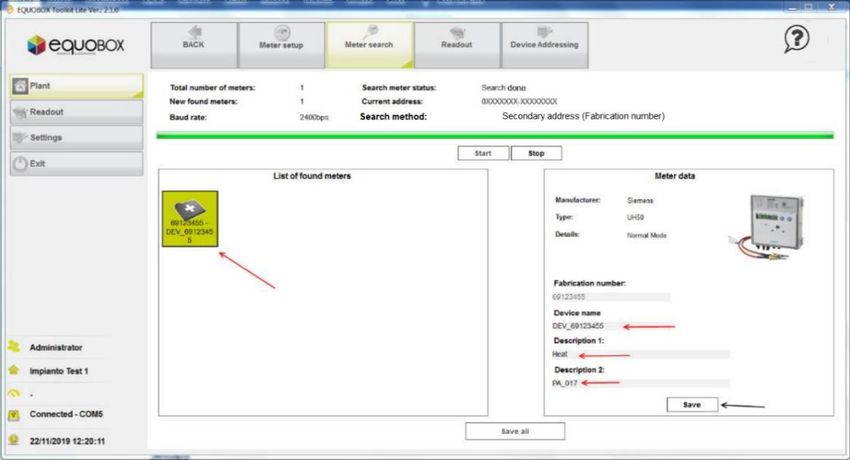
EQUOBOX TOOLKIT LITE – User Manual Rev. 3.5

4. PLANT SECTION
4.1 Homepage
The software homepage is illustrated below:

                                                                           3

                         2

                                                                                                              4

                     1

                                                                       Figure 13 - Homepage

The window is divided into four sections:

     1           Status of the system with the main indications listed below:

                       •                indicates the user who has logged in

                       •                shows the name of the open plant being worked on

                       •                indicates BUS activities

                       •                shows the connection status of the device of the level converter
                                    o     Connected: the device is connected correctly to the PC
                                    o     Init. in progress: check for any fw upgrade for LC1
                                    o     Disconnected: the device is not connected to the PC

                       •                shows the date and time of your PC

                 Main Menu:

                       •                                            open the Plant section
     2
                       •                                            open the readout section

                       •                                            open the settings section

                      •                                             exit the program

SINAPSI S.r.l. |Via delle Querce 11/13 - 06083 BASTIA UMBRA (PG) – Italy

T.+39 075 8011604 - F.+39 075 8014602|www.sinapsitech.it-info@sinapsitech.it                                                             8
EQUOBOX TOOLKIT LITE – User Manual Rev. 3.5
Shows a submenu with the items of the section selected from the main menu.
• PLANT:
1. No open plant being worked on:
▪ Select Plant → Lets you open a plant
▪ New Plant→ Lets you create a new plant
2. With Plant being worked on open and indicated in
▪ Plant Information→ Summary of plant data
3 ▪ Plant settings→ Edit plant data
▪ Wired Section (M-Bus)→ Wired M-Bus plant management
Meter setup → Edit wired meter settings connected to the
opened plant being worked on
Meter Search → Use to search for wired meters connect to
the bus
Readout→ Allows a Readout of all wired meters connected to
the plant
Device Addressing→use to address all or only some of the M-
Bus devices belonging to the system as primary
▪ Wireless Section (W.M-Bus)→ W. M-Bus plant management
Repeater configuration→ Edit SIN.EQRPT868XT (*) repeaters
settings in the opened plant being worked on
Manage access to the Repeater → Use to manage the list of
W. M-Bus meters saved by Repeaters.
▪ Delete Plant → Allows you to delete the plant being worked on
▪ Close Plant → Allows you to close the plant being worked on
• READOUT:
1. No open plant being worked on:
▪ Open Readout→ Allows you to access all the readouts of all the
plants to view the data or create a report in XLS or CSV format
2. With an open plant being worked on (Indicated in section 1)
▪ Open Readout→ Allows you to access all the readouts of the open
plant to view the data or create a report in XLS or CSV format
• SETTINGS:
▪ M-Bus Interface: Allows you to access the settings pertaining to the
use of the level converter
▪ SIN.EQSW1: Allows you to access the settings pertaining to the use of
the software
• EXIT: Program shutdown. (Save any changes before logging out).
• Links to software user guides. If the language used is Italian, the manual in
Italian will be opened, otherwise the manual in English will be opened.
4
This section shows the content according to the selected menu (2) and submenu (3).
* Below will be called Repeater
SINAPSI S.r.l. |Via delle Querce 11/13 - 06083 BASTIA UMBRA (PG) – Italy
T.+39 075 8011604 - F.+39 075 8014602|www.sinapsitech.it-info@sinapsitech.it 9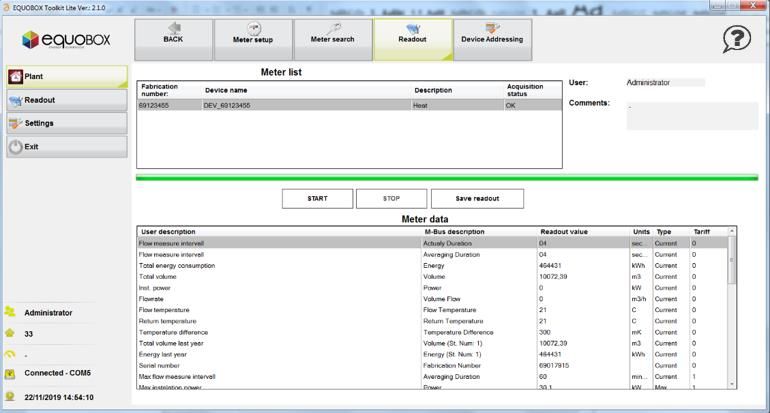
EQUOBOX TOOLKIT LITE – User Manual Rev. 3.5

4.2 Creating a new plant
To create a new plant, close any open plants, go to Plant in the main menu and select New Plant.

                                                                   Figure 14 – Plant, New plant

Below are the fields to be filled out. Fields highlighted in Red are required

      1. Plant name: associate an unambiguous name to the plant
      2. Plant owner data
         • Name/Company Name
         • Address
         • Phone
         • Email
      3. Building administrator data
         • Name/Company Name
         • Address
         • Phone
         • Email
      4. Plant data
         • Plant Address
         • Installer
         • Installation Date
      5. Acquisition period: sets a schedule to remind the user to manually take a readout. The readout
            range selection does not automatically start a logging process.
      6. Plant Description

Once you press OK the plant is created and the Plant Information screen will be displayed to indicate
that the newly created plant is open to be worked on.

SINAPSI S.r.l. |Via delle Querce 11/13 - 06083 BASTIA UMBRA (PG) – Italy

T.+39 075 8011604 - F.+39 075 8014602|www.sinapsitech.it-info@sinapsitech.it                                                             10
EQUOBOX TOOLKIT LITE – User Manual Rev. 3.5
4.3 Opening an existing plant
Select the Select Plant submenu from the Plant menu
Figure 15 – Plant list - Select plant
A list of plants already saved on your PC will be shown. Select the plant you wish to open for machining
by pressing the Open plant button. The main data of the selected plant are displayed at the side. After
the plant has been opened, the Plant Information panel is displayed where you can consult all the
information relating to the plant, such as the plant name, the number of meters and repeaters
belonging to the plant, the last acquisition date and the date of the next acquisition to be carried out.
Figure 16 – Plant information Panel
Using the Plant settings submenu, it is possible to modify the plant data relating to the property and
installer entered during the plant creation phase. The submenu for changing data is shown below.
SINAPSI S.r.l. |Via delle Querce 11/13 - 06083 BASTIA UMBRA (PG) – Italy
T.+39 075 8011604 - F.+39 075 8014602|www.sinapsitech.it-info@sinapsitech.it 11EQUOBOX TOOLKIT LITE – User Manual Rev. 3.5
Figure 17 – Edit plant settings
4.4 Delete plant
Select the Delete Plant submenu to delete the plant being worked on.
Figure 18 - Delete plant
Press Yes to complete the operation.
Warning, all data concerning the plant including all readout will be permanently deleted.
4.5 Close Plant
Select the Close Plant submenu to close the plant being worked on. Any new meters
identified or readouts performed will not be saved automatically; therefore, before you close it, make
sure that all the data have been correctly stored in the plant being worked on. After the system is
closed, you will return to the Home Page screen (section 4.1).
SINAPSI S.r.l. |Via delle Querce 11/13 - 06083 BASTIA UMBRA (PG) – Italy
T.+39 075 8011604 - F.+39 075 8014602|www.sinapsitech.it-info@sinapsitech.it 12EQUOBOX TOOLKIT LITE – User Manual Rev. 3.5
5. MANAGEMENT OF M-BUS DEVICES ON WIRED SYSTEMS
5.1 SIN.EQLC1 connection
The installation and use of the SIN.EQLC1 level converter* does not require the installation of any
driver.
Follow the steps described below:
1) Switch on SIN.EQLC1 (refer to the SIN.EQLC1 user guide)
2) Wait until the USB Activity LED starts blinking (8-10 seconds after switch-on)
3) Connect the Level Converter device with a MINI USB Type B cable to your PC
Figure 19 - Connecting the SIN.EQLC1 unit
4) Wait for the correct device recognition message from the Operating System.
5) Reboot the operating system if prompted.
5.2 Connecting the SIN.EQLC250
The installation and use of the SIN.EQLC250 level converter* does not require the installation of any
drivers or software.
Follow the steps described below:
1) Power up the SIN.EQLC250 (refer to the SIN.EQLC250 user guide)
2) Wait for the LED Run to light up solidly (after 8-10 seconds from power on)
3) Connect the Level Converter device with the SIN.EQUSB232 cable to your PC
Figure 20 - SIN.EQLC250 Device connection
4) Wait for the message from the Operating System of correct recognition of the device.
5) If required by the operating system, restart the system.
SINAPSI S.r.l. |Via delle Querce 11/13 - 06083 BASTIA UMBRA (PG) – Italy
T.+39 075 8011604 - F.+39 075 8014602|www.sinapsitech.it-info@sinapsitech.it 13EQUOBOX TOOLKIT LITE – User Manual Rev. 3.5
If a no device recognition message appears on the PC screen, use the link
http://www.ftdichip.com/Drivers/VCP.htm to open the site where you can download the driver required
to recognise the SIN.EQRPT868XT device.
The following illustration shows how to select the right driver based on the operating system installed
on your PC and its architecture.
Figure 21– Driver download driver for the SIN.EQRPT868XT unit
* The LC acronym may also be used below
5.3 M-Bus Interface settings and SIN.EQLC1 and SINEQLC250 firmware upgrade
In this section you can configure general LC characters such as connection type (USB or serial
interface), search type, baud rate, scan interval. In addition, if necessary, you can update the firmware.
To access the section click on and then on where you can access
the following menus:
SINAPSI S.r.l. |Via delle Querce 11/13 - 06083 BASTIA UMBRA (PG) – Italy
T.+39 075 8011604 - F.+39 075 8014602|www.sinapsitech.it-info@sinapsitech.it 14EQUOBOX TOOLKIT LITE – User Manual Rev. 3.5
Figure 22 - M-Bus Interface
• M-Bus interface settings
o USB Interface (SIN.EQLC1): to operate with the Sinapsi SIN.EQLC1 level converter via USB/mini
USB cable, simply connect the device to the PC via the mini USB port and power it up. This
option will be activated autonomously when the level converter is connected.
o Serial Interface (UART): Serial Interface (UART): this option can be selected when there is at
least one available COM port on the PC. With this interface it is possible to establish a
connection both with the SIN.EQLC1 level converter and with the SIN.EQLC250 level converter
by connecting to their RS232 bus connector (ABC port) using the SIN.EQUSB232 cable.
Alternatively, it is possible to use an RS232 cable respecting the following connection: A (LC) →
RX (PC), B (LC) → TX(PC), C (LC) → GND(PC).
o COM port: In the drop-down menu all the COM ports active in the PC will be displayed.
Press Connect to connect to the LC using the serial interface.
WARNING: If there are several serial (COM) interfaces in the computer , you must make sure
which COM port the level converter is connected to. Connect the SIN.EQUSB232 cable to check
which COM port it is associated with.
• M-Bus Settings
o Search method: You can select the type of meter search. Refer to your meter datasheet and
LC user guide
▪ Primary Address (ID): Search by address
▪ Secondary Address (Fabrication number)
▪ Primary and Secondary Address: Search by address and fabrication number
o Baud rate: by default the value is 2400bps. For changes, refer to the meter datasheet and the
LC user guide
o Primary Address search interval: Define a search range for ID. The value can range from a
minimum of 1 to a maximum of 250
o Advanced settings:
▪ RST_APP: before starting the meters search, sends the command M-Bus Reset Application (to
be used only if expressly requested by the meter (s))
▪ SND_NKE: sends the M-Bus command to initialize the Slave before reading.
Press Save to store settings
• Firmware Level Converter 60 (SIN.EQLC1)
o Available version: search for available revisions on your PC
Firmware update: press the button to update the SIN.EQLC1 device.
SINAPSI S.r.l. |Via delle Querce 11/13 - 06083 BASTIA UMBRA (PG) – Italy
T.+39 075 8011604 - F.+39 075 8014602|www.sinapsitech.it-info@sinapsitech.it 15EQUOBOX TOOLKIT LITE – User Manual Rev. 3.5
• Firmware Level Converter 250 (SIN.EQLC250)
o Available version: search for available revisions on your PC.
Firmware update: press the button to update the SIN.EQLC250 device. This button is only
available when connecting to a COM port.
o Follow the instructions of the software (Figure 23 A): it is necessary to remove and then
re-power the SIN.EQLC250. After 2 seconds from the power supply, while the Run LED is
flashing, press the "PROG" key in the device and keep it pressed until the updating
process starts (Figure 23 B). After the update has been successful (Figure 23 C) the level
converter will be ready for use.
Figure 23 (A) – Update indications Figure 23 (B) – Firmware update in progress
Figure 23 (C) – Successful firmware update Figure 23 (D) – Update error
After the Firmware Update button has been pressed, the software waits for up to 60 seconds for the
operations indicated to be performed. If after this time it does not detect anything, it closes the update
process by reporting an error during the update procedure (Figure 23 D) and returns to the normal
state waiting for any actions.
5.4 Wired section (M-Bus)
Click to open the wired M-Bus plant submenu.
Figure 24 – Wired Section (M-Bus) Submenu
5.5 Meter search
Once connected to your PC, using the USB/Micro USB cable with the SIN.EQLC1 device (Level Converter)
or the SIN.EQUSB232 cable to the ABC serial port of the SIN.EQLC1 or SIN.EQLC250, you can search for
meters on the M-Bus chain. This operation is performed every time one or more meters have to be
inserted in the system. Select Meter search from the submenu panel and press the “start” button.
SINAPSI S.r.l. |Via delle Querce 11/13 - 06083 BASTIA UMBRA (PG) – Italy
T.+39 075 8011604 - F.+39 075 8014602|www.sinapsitech.it-info@sinapsitech.it 16EQUOBOX TOOLKIT LITE – User Manual Rev. 3.5
Figure 25 – Meter search
The search mode is performed according to the settings saved in Settings → M-Bus Settings. By default,
the software performs a first search by primary address (Meter ID) in the range from 1 to 250, then
completes the search by secondary address (Meter Fabrication number). The default communication
speed is 2400bps. During the search, the status bar shows the status of activity on the bus and the
progress of the search. If the search is done, by default, by primary address and then by secondary
address, the search progress in the status bar is shown separately. That is, first the progress for
primary, then it is reset and indicates the progress for secondary.
Figure 26 – Meter search
The items that indicate the progress of the search are:
• Total number of meters: indicates the overall number of meters found during the search.
• New found meters: indicates the number of new meters found during the search.
• Baud rate: indicates the speed with which the level converter queries the meters in the M-Bus
chain. The default communication speed is 2400bps and can be changed from the Settings
menu. Check the meter datasheet to verify the communication speed in the event that there is
no response.
SINAPSI S.r.l. |Via delle Querce 11/13 - 06083 BASTIA UMBRA (PG) – Italy
T.+39 075 8011604 - F.+39 075 8014602|www.sinapsitech.it-info@sinapsitech.it 17EQUOBOX TOOLKIT LITE – User Manual Rev. 3.5
• Search meter status: indicate the status of the search
• Current address: indicates the serial number or the primary address that the level converter is
searching at that time. In the event of a search by serial number (secondary address), the
wildcard logic is used to detect all the possible meters in a comprehensive manner.
• Search method: indicates whether the search is carried out by primary address or by secondary
address (serial number).
Search by secondary address is based on the detection of any collision on the bus following the query
of a set of serial numbers, such as 06XXXXXX. There is a remote possibility that some meters cannot
be detected during this search. In such an event, we recommend allocating a primary address from 1
to 250 to the undetected meter and repeat the ID scan of the bus.
The meter search will be completed when all possible serial number are questioned. The Meters Found
list box will gradually show the meters that have responded correctly to the level converter request.
Figure 27 - Saving meters
Based on the M-Bus protocol, all the devices in the chain will respond to the call of the level converter.
The meters in the database recognised by the LC will have their models graphically displayed.
If a meter found in the M-Bus chain does not display the image of its model, it will still be managed
normally; however, additional settings may be required for data provided by the meter (see Meter
Setup).
Every meter found in the M-Bus chain must be named:
• Device Name: enter the identification name of the device. This field will be shown in the Report
section
• Description 1: add a first description to identify the meter. This field will be shown in the Report
section
• Description 2: add a second description to identify the meter.
Press SAVE for each meter found to confirm its addition to the plant being worked on. Once saved, the
meter icon will change its status as described below.
The devices in the M-Bus chain can be queried several times in the event that a device in the chain does
not answer the call. The List of Found Meters will show all the meters in the M-Bus chain, both the new
ones and the ones previously saved.
SINAPSI S.r.l. |Via delle Querce 11/13 - 06083 BASTIA UMBRA (PG) – Italy
T.+39 075 8011604 - F.+39 075 8014602|www.sinapsitech.it-info@sinapsitech.it 18EQUOBOX TOOLKIT LITE – User Manual Rev. 3.5
There is a visual distinction as shown below
• device already saved and added to the plant being worked on
• new device to be saved and added to the plant being worked on
To save the new meters, follow the steps described above.
5.6 Device addressing
It is possible to read, assign and modify the primary addresses of the connected M-Bus devices.
The saved primary addresses of the wired meters of the system are displayed.
Figure 28 – Primary addressing
You can sort the devices in the table in ascending or descending order by clicking in the column header:
• Fabrication number
• Device name
• Primary address
SINAPSI S.r.l. |Via delle Querce 11/13 - 06083 BASTIA UMBRA (PG) – Italy
T.+39 075 8011604 - F.+39 075 8014602|www.sinapsitech.it-info@sinapsitech.it 19EQUOBOX TOOLKIT LITE – User Manual Rev. 3.5
Figure 29 – Sorting devices
In addition, by clicking on the icon at the bottom right, next to the table you can download a
list of devices in the table in CSV format, with field separator ";".
Figure 30 – Download list example
The buttons with which you can perform operations are:
• Assigns automatically: assigns a primary address to the devices in the list in the list
automatically and in ascending order.
• Read primary address: reads the primary addresses of all devices connected to the level
converter.
Figure 31 – Read primary address
SINAPSI S.r.l. |Via delle Querce 11/13 - 06083 BASTIA UMBRA (PG) – Italy
T.+39 075 8011604 - F.+39 075 8014602|www.sinapsitech.it-info@sinapsitech.it 20EQUOBOX TOOLKIT LITE – User Manual Rev. 3.5
When reading the primary addresses, the software using the level converter requests this data
from the plant's meters. From the meter response:
o If the primary address of the meter is different from the one saved previously (perhaps
because it was set up with third-party software), then it is displayed in orange and the
address previously saved is indicated in brackets.
o If the primary address from the reading is identical to the one saved, it is displayed in green.
o If the meter is disconnected or does not respond to internal anomalies, then the message
ERROR is displayed in red and in parentheses any value that has already been saved.
• Write and save primary address: writes the selected primary addresses to the selected devices.
When writing the primary address, you will see the number of the selected device turn orange
during the writing phase and then green when writing successfully.
Attention, there are M-Bus devices to which it is not possible to change the primary address
assigned in this case the corresponding field will be displayed in red.
Figure 32 – M-Bus devices with non-programmable primary address
5.7 Meter Setup
You can change the settings of every previously saved meter by accessing the Meter Setup submenu.
Figure 33 - Meter setup
You can delete any meter added to the plant being worked on by pressing .
Warning, all meter data will be permanently deleted.
SINAPSI S.r.l. |Via delle Querce 11/13 - 06083 BASTIA UMBRA (PG) – Italy
T.+39 075 8011604 - F.+39 075 8014602|www.sinapsitech.it-info@sinapsitech.it 21EQUOBOX TOOLKIT LITE – User Manual Rev. 3.5
Figure 34 - View meters
1. Meter setup
• Fabrication number: indicates the serial number of the selected meter
• Device Name: indicates the name of the device
• Description 1: add a first description to identify the meter
• Description 2: add a second description to identify the meter
• Installation date: indicates the meter installation date. This is set automatically upon
saving the meter as described in the previous chapter.
• Manufacturer Code: indicates the manufacturer code
• Version: indicates the version of the meter.
• Physical medium: indicates the type of value read by the meter
• Baud rate: Indicates the speed with which the meter communicates with the level
converter. Check the meter manual to verify the communication speed.
• Primary Address: shows the primary address of the meter.
Note: this setting does not change the meter address. To change the meter address
refer to the previous paragraph (5.6).
• Addressing: select whether to read by primary or secondary address
• Manufacturer: indicates the manufacturer’s name in the event that the meter in the
database is identified by the level converter.
• Type: indicates the meter model in the event that the meter in the database is identified
by the level converter.
• Details: specifies different configurations for the same meter model.
2. Meter Data
You can select the values to be displayed in the Readout menu. Below is an example regarding a
list of the values that can be selected for a meter. The table shows all the data originated from a
meter query. In the event that the meter is in the database of the level converter, the data in the
“User Description” column will be filled out automatically; otherwise, the user will have to give a
name to the “User Description” fields, which, by default, are the same as the M-Bus Description
field. The same applies to the “Display Data” column. In this case, if the meter is in the LC
database, the data will be preset and can always be changed by the user; otherwise, if the meter
is not recognised, they will be selected directly by the user.
Figure 35 - Selectable Values
SINAPSI S.r.l. |Via delle Querce 11/13 - 06083 BASTIA UMBRA (PG) – Italy
T.+39 075 8011604 - F.+39 075 8014602|www.sinapsitech.it-info@sinapsitech.it 22EQUOBOX TOOLKIT LITE – User Manual Rev. 3.5
5.8 Readout
Access the Readout section to acquire the measurements
Figure 36 - Readout
Press the Start key to start reading the data of each meter in the list. If the level converter is correctly
connected (in case of connection with the serial interface, the COM must be the one to which the device
is actually connected) and a meter reading has been successful, an OK is present on the Reading Status
otherwise, in case of an error, the ERROR message will appear. The data read from the meter and
tabulated in the Meter Data section can be sorted by all the columns present, such as
• User description
• M-Bus description
• Readout value
• Units
• Type
• Tariff
When all meters are correctly read, save the reading to save it in the plant being worked on.
SINAPSI S.r.l. |Via delle Querce 11/13 - 06083 BASTIA UMBRA (PG) – Italy
T.+39 075 8011604 - F.+39 075 8014602|www.sinapsitech.it-info@sinapsitech.it 23EQUOBOX TOOLKIT LITE – User Manual Rev. 3.5
6. READOUT SECTION
6.1 Open Readout
To open an existing readout to view consumption data or generate a report, select Open readout from
the main menu. The list of all the readouts that have been saved will be displayed.
Figure 37 - Readout
Select the filter to display the plants among:
• All plants: shows the readouts of all the plants that have been created.
• Filter by plant: shows only the readouts pertaining to the selected plant.
• All dates: does not filter by date
• Filter by date: shows the readouts performed in the interval between the selected dates.
Select the list you want to open from the readout list and press Open.
Figure 38 – Plant Readouts
The screen is divided into four parts:
• Meter List: shows the list of meters of the plant at the time of the readout
o Fabrication number: indicates the serial number of the selected meter
SINAPSI S.r.l. |Via delle Querce 11/13 - 06083 BASTIA UMBRA (PG) – Italy
T.+39 075 8011604 - F.+39 075 8014602|www.sinapsitech.it-info@sinapsitech.it 24EQUOBOX TOOLKIT LITE – User Manual Rev. 3.5
o Device name: shows the name of the meter
o Description: shows the description if previously added
o Acquisition status: shoes the status for the selected meter
• Acquisition Date: shows the date when the readout was performed
• User: shows the name of the user performing the readout
• Comments: shows notes, if any
• Meter Data: shows the values selected in the Meter Setup section
Show main values only: this item is active by default. It shows only the standard fields set in the meter
based on what was described in chapter Meter Setup (5.7).
Show main values only: when deactivated, it shows all the fields read by the meter
• XLS: sets the export in .xls format
• CSV: sets the export in .csv format
Press Create Report to generate a report according to the settings selected as described above. Select a
name and a path to save it on your PC.
Figure 39 - Defining the saving path
6.2 Excel Report
Below is an example of a report in Excel format generated for a plant with two meters.
Figure 40 – Report Example
Both the xls and csv format report is organised with:
- Header: which shows the name of the operator who has performed the readout, the name of
the plant of the readout, its address, and the date and time of the readout.
- Meter data: This section shows the data pertaining to the meters of the plant at the time of the
readout. It consists of a line that shows the fabrication number and the three descriptions
associated to the meter. The next line shows the heading of the data of that particular meter,
whose readout date is shown in the first column and readout time in the second column. The
next columns show the heading of the meter fields included in the report indicated with the M-
SINAPSI S.r.l. |Via delle Querce 11/13 - 06083 BASTIA UMBRA (PG) – Italy
T.+39 075 8011604 - F.+39 075 8014602|www.sinapsitech.it-info@sinapsitech.it 25EQUOBOX TOOLKIT LITE – User Manual Rev. 3.5
Bus description, User Description, and unit of measure. By default, the report only includes the
fields marked with Data Display in Meter Setup unless the Display only the main fields setting is
unticked before generating the report.
NB: data extrapolated from the system require
• the use of a period to separate thousands
• and a comma to separate tenths
SINAPSI S.r.l. |Via delle Querce 11/13 - 06083 BASTIA UMBRA (PG) – Italy
T.+39 075 8011604 - F.+39 075 8014602|www.sinapsitech.it-info@sinapsitech.it 26EQUOBOX TOOLKIT LITE – User Manual Rev. 3.5
7. SIN.EQRPT868XT DEVICE MANAGEMENT ON WIRELESS PLANT
To access the Radio Section you must first create and open a system.
7.1 Connecting a SIN.EQRPT868XT repeater
Connect the SIN.EQRPT868XT (W. M-Bus Repeater) device with a MINI USB Type B cable to your PC
Figure 41 - Connecting the SIN.EQRPT868XT unit
If a no device recognition message appears on the PC screen, use the link
http://www.ftdichip.com/Drivers/VCP.htm to open the site where you can download the driver required
to recognise the SIN.EQRPT868XT device.
The following illustration shows how to select the right driver based on the operating system installed
on your PC and its architecture.
Figure 42 – Driver download driver for the SIN.EQRPT868XT unit
7.2 Wireless Section (W. M-Bus)
Click to open the W. M-Bus Repeaters plant submenu.
SINAPSI S.r.l. |Via delle Querce 11/13 - 06083 BASTIA UMBRA (PG) – Italy
T.+39 075 8011604 - F.+39 075 8014602|www.sinapsitech.it-info@sinapsitech.it 27EQUOBOX TOOLKIT LITE – User Manual Rev. 3.5
Figure 43 – Radio Section Submenu (W.M-Bus)
Figure 44 – W. M-Bus Repeater Setup
7.3 SIN.EQRPT868XT Repeater Firmware Update
We recommend you always check for a Repeater firmware version release later than the one installed
on the devices during production.
Figure 45 - SIN.EQRPT868XT unit firmware update
1. select the COM port connected to the Repeater
2. select the FW revision available from those in the list (normally the most recent version is the
first one in the list); you can also upload (Upload File) additional firmware versions from the PC
memory
3. click Upgrade Firmware to launch the update procedure; the Press and release the Reset button
on the device and wait message appears
Figure 46 - SIN.EQRPT868XT firmware update indications
SINAPSI S.r.l. |Via delle Querce 11/13 - 06083 BASTIA UMBRA (PG) – Italy
T.+39 075 8011604 - F.+39 075 8014602|www.sinapsitech.it-info@sinapsitech.it 28EQUOBOX TOOLKIT LITE – User Manual Rev. 3.5
3
Figure 47 - press reset button
4. next, the Press and release the Reset device button to complete the update message appears
4
Figure 48 - Firmware updated and reset required
7.4 Access to the Repeater
In the Manage access to Repeater section there are the following fields:
• COM Port: All the real or virtual serial ports of the PC are present.
• Password login: set the password if the Repeater to which you connect has a different
password from the default one (standard password)
• Serial Number: field automatically filled in at the Repeater connection
• Standard password: tick to apply the standard login password
Figure 49 – Connecting the SIN.EQRPT868XT unit
1. if known, select the COM port connected to the repeater, otherwise select AUTO
2. leave the Standard password ticked (or if a password other than the standard was previously
set on the repeater, untick and enter the password in Login password)
Figure 50 – Connect to Repeater with new password
3. click Connect to connect the repeater
4. check for the connection established message
NOTE: By pressing the Disconnect button, the Repeater is first restarted. During this phase it is
recommended to wait a few seconds before disconnecting the power supply.
SINAPSI S.r.l. |Via delle Querce 11/13 - 06083 BASTIA UMBRA (PG) – Italy
T.+39 075 8011604 - F.+39 075 8014602|www.sinapsitech.it-info@sinapsitech.it 29EQUOBOX TOOLKIT LITE – User Manual Rev. 3.5
NOTE: Disconnecting the USB cable from the PC without pressing the Disconnect button, the software
recognizes the disconnection of the device by updating its status.
7.5 Change Repeater Login Password
To protect repeaters against undesired login, their login passwords can be changed (from the factory
default) in Repeater configuration. Establish a connection with the repeater connected to the PC, see
paragraph 7.1.
Figure 51 – Change Repeater Password
1. check for the tick in the Change password box
2. set the new password in New Password (use maximum 15 numbers and/or upper or lower case
letters) and re-enter it on Confirm Password
3. click Save configuration to save the new password in the Database
4. click Send configuration to Repeater to write the new password in the repeater memory
Then, to connect, simply log in as indicated in paragraph 7.4:
1. if known, select the COM port connected to the repeater, or select Auto
2. untick the Standard password box
3. set the (new) repeater password
4. click Connect to connect the Repeater
5. check for the connection established message
If you forget the new password and cannot connect to the repeater,
Figure 52 – Authentication failed
To allow access to the Repeater again, a new password must be set using the recovery password that
must be requested from Sinapsi customer service.
SINAPSI S.r.l. |Via delle Querce 11/13 - 06083 BASTIA UMBRA (PG) – Italy
T.+39 075 8011604 - F.+39 075 8014602|www.sinapsitech.it-info@sinapsitech.it 30EQUOBOX TOOLKIT LITE – User Manual Rev. 3.5
Figure 53 – Using the Recovery Password
1. enter the Recovery Password you received from Sinapsi in the Recovery Password field
2. enter a new password of your choice for the repeater in the New Password field
3. repeat the same new password in the Confirm password field
4. click Set new password to set the new password in the repeater memory and to connect to the
repeater
The following message indicates that the operation was successfully completed.
Figure 54 – Reset Password
7.6 Setting a Mesh Network Address (on RTU) and on Repeaters
To avoid interference between several adjacent systems, assign a different Mesh Network ID to the
SIN.EQRTU1T or SIN.EQRTUEVO1T of each system.
The setting is made on the SIN.EQRTU1T or SIN.EQRTUEVO1T through its web interface:
Settings/Wireless Devices/Wireless Setup/Mesh Network Setup.
Figure 55 – Change Mesh network address on SIN.EQRTU1T device
The same Mesh Network ID should also be set on all Repeaters in the network for the RTU1T they
communicate with.
Establish a connection with the repeater connected to the PC
Set the Mesh network address of your choice
SINAPSI S.r.l. |Via delle Querce 11/13 - 06083 BASTIA UMBRA (PG) – Italy
T.+39 075 8011604 - F.+39 075 8014602|www.sinapsitech.it-info@sinapsitech.it 31EQUOBOX TOOLKIT LITE – User Manual Rev. 3.5
Figure 56 – New settings on SIN.EQRPT868XT unit
1. select the Mesh ID (0÷255 – factory settings = 1)
Note 1: we recommend you do not change the Channel Mesh (13) since changing it may also
change the repeater transmission power.
2. Click Save configuration to save the repeater settings in the software Database (EQUOBOX
Toolkit)
Note 2: the following message will be displayed (click OK)
Figure 57 – Repeater NOT synchronized with the saved configuration
3. click Send configuration to Repeater to write the new settings in the repeater memory.
4. click Read current configuration to check whether written on the repeater
Note: the following message will be displayed (click OK)
Figure 58 (A) – Repeater configuration reading Figure 58 (B) – Synchronized Repeater with the saved configuration
The following fields are also included in the Repeater Configuration to edit other settings on the
repeater
• Serial number: repeater serial number (unmodifiable)
• Description 1: lets you add the first repeater description
SINAPSI S.r.l. |Via delle Querce 11/13 - 06083 BASTIA UMBRA (PG) – Italy
T.+39 075 8011604 - F.+39 075 8014602|www.sinapsitech.it-info@sinapsitech.it 32EQUOBOX TOOLKIT LITE – User Manual Rev. 3.5
• Description 2: lets you add the second repeater description
• Installation date: lets you set the repeater installation date.
• Change Password: tick to change the repeater default password
• New Password: lets you enter a new login password for the repeater (can only be changed if the
Change Password box is ticked)
• W. M-Bus Mode: if the devices that have to communicated with the repeater use a mode other
than the factory set mode (C1+T1+T2), change (S1, S1+S2, T1, T1+T2, T1+S1) the repeater W. M-
Bus mode
Note: if the repeater is in a Mesh network under a RTU1T or RTUEVO1T, these settings should only
be made on the RTU that automatically transmits them to all repeaters in the same Mesh network.
Figure 59 – Wireless mode change on SIN.EQRTU1T device
7.7 Uploading a list of available W. M-Bus devices in the plant on repeaters
Note: the list can only be uploaded on repeaters with firmware version FWRPT1_V1R20.hex or later; the
list causes operating faults on devices with earlier firmware versions.
Still referring to the installation, represented in Figure 50, the various Repeaters receive the W. M-Bus
signal from devices in its plant but can also receive the signal from devices in adjacent plants.
If one or more Repeaters receive the signal from more than 500 devices (Max 500 for each Repeater),
those over the number 500 are ignored and could, actually, belong to the plant to be monitored.
In this case, a file with a list of devices that belong to the relevant plant must be uploaded to the
Repeater (Maximum 500); after uploading the file, signals from devices not included in the list are
ignored by the Repeater. The file, which must be called list.rpt, must be a CSV file with a format like that
indicated in next Figure
Figure 60 – list.rpt file format
Establish a connection with the repeater connected to the PC, see paragraph 7.1, Figure 41.
Click on the Meter List submenu item to open the screen with the following four “buttons”
SINAPSI S.r.l. |Via delle Querce 11/13 - 06083 BASTIA UMBRA (PG) – Italy
T.+39 075 8011604 - F.+39 075 8014602|www.sinapsitech.it-info@sinapsitech.it 33EQUOBOX TOOLKIT LITE – User Manual Rev. 3.5
Figure 61 – Meter list management screen
Click the Import list file "button" to select a file to be imported from the PC memory; the imported list is
displayed in the Send Meter List to repeater window.
Figure 62 – Plant Meter List
When the operation is finished the following messages are shown:
Figure 63 – Request for confirmation of upload of list and completed operation message
The following fields are also included in the Manage meter list section
• Read meter list from repeater: click to read the file with the list of devices from the repeater
memory
Figure 64 – Reading present list of the repeater
• Erase list from Repeater: click to delete the file with the list of devices from the repeater
memory.
SINAPSI S.r.l. |Via delle Querce 11/13 - 06083 BASTIA UMBRA (PG) – Italy
T.+39 075 8011604 - F.+39 075 8014602|www.sinapsitech.it-info@sinapsitech.it 34EQUOBOX TOOLKIT LITE – User Manual Rev. 3.5
Figure 65 – Reading present list of the repeater
SINAPSI S.r.l. |Via delle Querce 11/13 - 06083 BASTIA UMBRA (PG) – Italy
T.+39 075 8011604 - F.+39 075 8014602|www.sinapsitech.it-info@sinapsitech.it 35EQUOBOX TOOLKIT LITE – User Manual Rev. 3.5
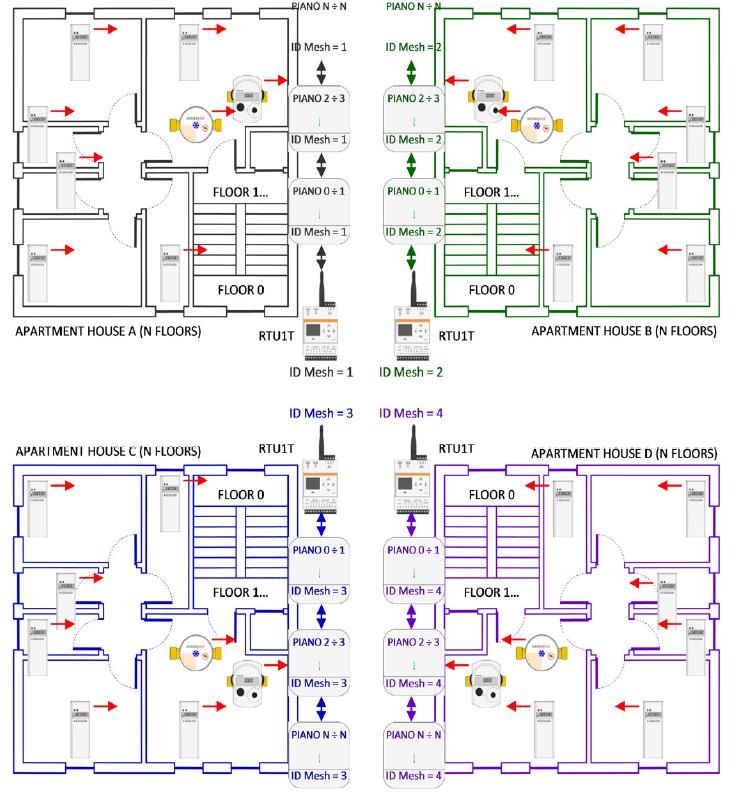
7.8 Special cases
An installation is illustrated below where, either for different property reasons or for the number of
devices to be monitored over 500 (Max 500 for each SIN.EQRTU1T unit), four different SIN.EQRPT868XT
repeater networks are required. Obviously, the following also applies when 2, 3, 5 or more repeater
networks are required.
Figure 66 – Installation with 4 SIN.EQRPT868XT repeater networks
To avoid interferences between different plants, assign a different Mesh network ID to each
SIN.EQRTU1T plant. The same Mesh network ID should also be set on all Repeaters in the network for
the RTU1T they communicate with.
SINAPSI S.r.l. |Via delle Querce 11/13 - 06083 BASTIA UMBRA (PG) – Italy
T.+39 075 8011604 - F.+39 075 8014602|www.sinapsitech.it-info@sinapsitech.it 36You can also read