Sony Xperia Configurator
   User Instructions
←
→
Page content transcription
If your browser does not render page correctly, please read the page content below
Sony Xperia Configurator User Instructions
This document is published by:                             This document is published by Sony Mobile
Sony Mobile Communications Inc.,                           Communications Inc., without any warranty*.
1-8-15 Konan, Minato-ku, Tokyo 108-0075, Japan             Improvements and changes to this text necessitated
                                                           by typographical errors, inaccuracies of current
www.sonymobile.com                                         information or improvements to programs and/or
                                                           equipment may be made by Sony Mobile
© Sony Mobile Communications Inc., 2009-2014.              Communications Inc. at any time and without notice.
All rights reserved. You are hereby granted a license to   Such changes will, however, be incorporated into new
download and/or print a copy of this document.             editions of this document. Printed versions are to be
                                                           regarded as temporary reference copies only.
Any rights not expressly granted herein are reserved.
                                                           *All implied warranties, including without limitation
First released version (October 2014)                      the implied warranties of merchantability or fitness for
                                                           a particular purpose, are excluded. In no event shall
Revision 1.0                                               Sony or its licensors be liable for incidental or
                                                           consequential damages of any nature, including but
                                                           not limited to lost profits or commercial loss, arising
                                                           out of the use of the information in this document.
Contents 1 Introduction: About the Sony Xperia Configurator .................................................. 4 2 Install the Software ................................................................................................ 4 2.1 System Requirements ........................................................................................ 4 2.2 Install Sony Xperia Configurator ......................................................................... 4 2.2.1 Set Master Password ....................................................................................... 4 2.3 Install Configuration Agent .................................................................................. 5 2.4 Deactivate Configuration Agent .......................................................................... 5 2.5 Uninstall Sony Xperia Configurator ..................................................................... 5 3 How to Use Sony Xperia Configurator ................................................................... 6 3.1 The Sony Xperia Configurator Interface .............................................................. 6 3.2 Create and Manage Profiles ............................................................................... 6 3.2.1 Create a New Profile ........................................................................................ 7 3.2.2 Import a Profile ................................................................................................ 7 3.2.3 Duplicate a Profile............................................................................................ 7 3.2.4 Delete a Profile ................................................................................................ 7 3.2.5 Export a Profile ................................................................................................ 8 3.2.6 Install a Profile on a Device ............................................................................. 8 3.3 Configure a Profile .............................................................................................. 8 3.3.1 General ............................................................................................................ 9 3.3.2 Password ......................................................................................................... 9 3.3.3 Restrictions .................................................................................................... 10 3.3.4 Wi-Fi .............................................................................................................. 12 3.3.5 VPN ............................................................................................................... 13 3.3.6 Email ............................................................................................................. 15 3.3.7 Exchange ActiveSync .................................................................................... 16 3.3.8 Digital Certificates .......................................................................................... 17 3.3.9 Security & Privacy .......................................................................................... 17 3.3.10 Applications ................................................................................................. 17 3.3.11 Shortcuts ..................................................................................................... 17 3.4 Applications ...................................................................................................... 18 4 How to Install a Configuration on a Device .......................................................... 18 4.1 Configuration State ........................................................................................... 18 4.2 Mandatory Fields .............................................................................................. 19 4.3 Connect a Device to the Sony Xperia Configurator ........................................... 19 4.4 Install a Configuration ....................................................................................... 20 5 Error Messages ................................................................................................... 22
1 Introduction: About the Sony Xperia Configurator
Sony Xperia Configurator can be used to create, configure, and install configuration profiles on Sony
devices; including smartphones and tablets.

2 Install the Software
2.1 System Requirements

Before installing the software, please ensure that the minimum system requirements and other pre-
requisites are met. (See Table 1: System Requirements).

Item                                                  Requirements

Computer OS                                           Windows 7, Windows 8

Device OS                                             Android 4.2.2 or later

CPU                                                   Pentium 1.8 GHz or higher

Memory                                                1 GB or more internal memory

Hard Drive Space                                      100 MB when installed

Display Resolution                                    1024x768 pixels resolution or higher

Table 1: System Requirements

2.2 Install Sony Xperia Configurator

To install Sony Xperia Configurator, open the setup file and follow the installation wizard.

Note: The setup requires the .NET framework which can be downloaded from Microsoft’s webpage
      (http://www.microsoft.com/net). Install the .NET framework and restart the Sony Xperia
      Configurator setup.

2.2.1 Set Master Password

When Sony Xperia Configurator is started for the first time, the user will be prompted to set a master
password. The password must contain a minimum of 4 characters. (See Figure 1: Master Password).

The master password must be entered on every login.
Figure 1: Master Password
2.3 Install Configuration Agent
For Sony Xperia Configurator to be able to access the device, the Configuration Agent application must
be installed on the device.
Note: All devices from the Xperia Z3 family and onwards will have the Configuration Agent
preinstalled.
1. To be able to install the Configuration Agent, USB debugging must be enabled on the device.
Go to Settings > Developer Options and enable USB debugging.
Note: For Android 4.2.2 and later, the Developer Options screen is hidden by default. To
make it available, go to Settings > About Phone, and tap Build Number 7 times. Return to the
previous screen to find the Developer Options.
2. Start Sony Xperia Configurator.
3. Connect the device to the computer. The installation will start automatically.
2.4 Deactivate Configuration Agent
To deactivate the Configuration Agent on the device, go to Settings > Security > Device
Administrators, find Configuration Agent and uncheck the box next to it and click Deactivate.
Note: If Configuration Agent is deactivated, all settings made on the device using Sony Xperia
Configuration will be lost.
2.5 Uninstall Sony Xperia Configurator
To uninstall Sony Xperia Configurator from your computer, go to Control Panel > Programs > Programs
and Features and double-click on Sony Xperia Configurator in the list view.3 How to Use Sony Xperia Configurator
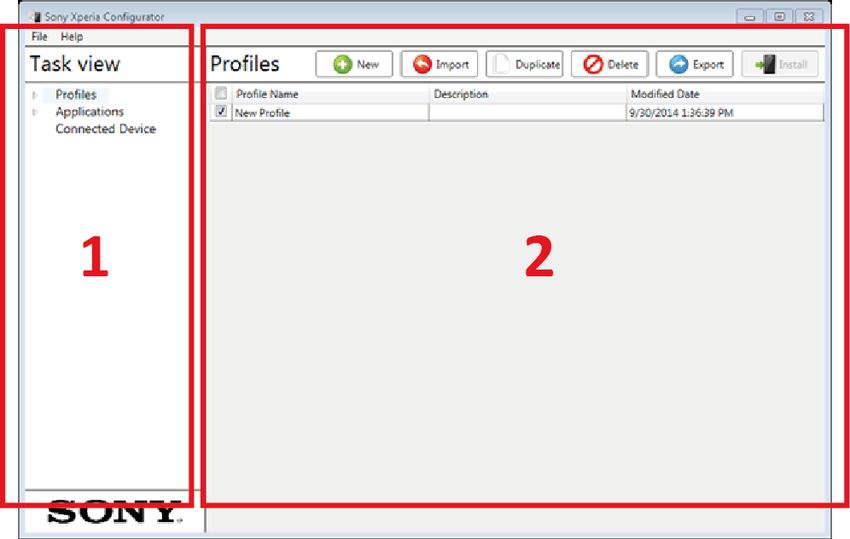
3.1 The Sony Xperia Configurator Interface
To the left in the Sony Xperia Configurator interface is the Task View panel. (See area marked with “1”
in Figure 2: The Sony Xperia Configurator Interface). The Task View panel contains a tree view with
three nodes; Profiles, Applications, and Connected Device.
• Clicking Profiles will display the profiles settings in the right panel of the interface. (See area
marked with “2” in Figure 2: The Sony Xperia Configurator Interface).
(See chapter 3.2 Create and Manage Profiles for more information).
• Clicking Applications will display the applications settings in the right panel of the interface.
(See area marked with “2” in Figure 2: The Sony Xperia Configurator Interface). (See chapter
3.4 Applications for more information).
• Connected Device will display any Sony device connected to the PC. (See chapter 4.3 Connect
a Device to the Sony Xperia Configurator for more information).
Figure 2: The Sony Xperia Configurator Interface
3.2 Create and Manage Profiles
All configuration profiles are created and managed in the Profiles view, accessed by clicking Profiles in
the Task View. (See Figure 3: Task View and Figure 4: Profiles View)Figure 3: Task View Figure 4: Profiles View 3.2.1 Create a New Profile Click New to create a new configuration profile item. (See Figure 4: Profiles View). This function is also available from the File menu; Go to File > New Profile. 3.2.2 Import a Profile Click Import to import profiles. (See Figure 4: Profiles View). When prompted, verify the import by entering an import password. (See Figure 5: Import/Export Password). This function is also available from the File menu; Go to File > Import > Configuration Profile. The import password is the password used when the profile was exported. (See chapter 3.2.5 Export a Profile). Figure 5: Import/Export Password 3.2.3 Duplicate a Profile Duplicate a profile item by checking the checkbox in front of the profile item, followed by clicking Duplicate. (See Figure 4: Profiles View). 3.2.4 Delete a Profile Delete a profile item by checking the checkbox in front of the profile item, followed by clicking Delete. (See Figure 4: Profiles View).
3.2.5 Export a Profile

Export one or more profiles by checking the checkbox in front of each profile item to export, and click
Export. (See Figure 4: Profiles View). When prompted, verify the export by setting an export password.
(See Figure 5: Import/Export Password). This function is also available from the File menu; Go to File >
Export.

3.2.6 Install a Profile on a Device

Install a profile by checking the checkbox in front of the profile item, followed by clicking Install. (See
Figure 4: Profiles View). The profile will be installed on the connected device. (See chapter 4.4 Install a
Configuration for more information).

Note: A profile can also be installed from within the Configure Profile view.

3.3 Configure a Profile

All profiles listed in the Profiles panel can be configured in the Configure Profile view. Select a profile
item in the Task View to activate the Configure Profile view.

Clicking on any of the Configuration Settings items in the Configure Profile view will display their
individual settings. (See Figure 6: Configure Profile View).

Note: Older Sony devices do not support all features that Sony Xperia Configurator supports. When
      an older device is connected some configuration settings will be grayed out in the Configure
      Profile view. When you install the profile, these grayed out settings will not be applied on the
      device.

When a Configuration Setting is applied, click Save to save it to the profile. (See Figure 7: Discard and
Save Buttons).

Click Discard to revert a Configuration Setting to its last saved state. (See Figure 7: Discard and Save
Buttons).
Figure 6: Configure Profile View
Figure 7: Discard and Save Buttons
3.3.1 General
These settings can be used to apply general settings to the profiles, e.g. name and description.
• Profile Name: Set the profile name.
• Description: Enter a description of the profile.
3.3.2 Password
These settings can be used to apply password security on the device. Check the Password checkbox to
enable the password settings.
• Password: Check the Password checkbox to enable the password settings.• Change Password: Check the Change Password checkbox to set a new password on the
device. If the device already has a password, the existing password will be replaced.
o Default Password: Set a password for the device.
o Confirm the Entered Password: Confirm the password.
• Allow Simple Password: Allow setting a simple password on the device.
• Password History: Set the number of entries to retain in the password history. This prevents
the user from re-using these passwords.
• Password Quality: Set the quality required for password on the device.
o Unspecified: No restrictions on the password quality will be set.
o Face Unlock: At least the “Face unlock” option must be used as password on the
device (e.g. a PIN, a pattern, or an alphanumeric password is also allowed).
Note: The Face unlock feature requires an Xperia smartphone with
Android version 4.0 or later, equipped with a front camera.
o Something: A password must be set, but no password restrictions must be met.
o Numeric: Passwords containing numeric, alphabetical and special characters are
allowed.
o Alphabetic: Passwords containing alphabetical, numeric, or special characters are
allowed.
o Alphanumeric: The password must contain at least alphabetic AND numeric
characters.
o Complex: The password must meet complexity requirements. Set the number of
minimum complex characters required for the password; 0-5 characters.
• Minimum Password Length: Set the minimum length of the password; 4-16 characters.
• Maximum Time before Auto-Lock: Set the maximum time before auto-lock; no limit, or 15
seconds to 10 minutes.
3.3.3 Restrictions
These settings can be used to apply restrictions to certain device functions.
Check the Restrictions checkbox to enable the restrictions settings. The restrictions settings are
divided into two tabs; Functionality and Applications. (See Figure 8: Functionality and Applications
tabs.
Figure 8: Functionality and Applications tabs.3.3.3.1 Functionality
• Allow Screenshot Capture: Allow screenshots to be taken in other ways (e.g. through ddms).
• Allow SD Card: Allow the user to mount/use SD cards.
• Allow Apps from “Unknown Sources”: Allow installation of non-Market applications.
• Allow Tethering: Allow tethering (i.e. using one device as a modem for another device).
• Allow Wi-Fi: Allow Wi-Fi to be enabled by user or third party applications.
• Bluetooth: Allow Bluetooth to be enabled by user or third party applications.
• Allow Local Sync: Allow local sync (i.e. sync Outlook contacts, calendar, and tasks).
• Allow Infrared: Allow infrared connections to and from the device.
• Allow Roaming: Allow data roaming.
o Set a Data Roaming Limit: Enable a data roaming limit.
Data Roaming Limit: Set the number of megabytes allotted per 30 day period.
The limit cannot be lower than 5 MB.
o Allow Sync while Roaming: Allow sync while data roaming is enabled.
• Allow SMS/MMS: Allow SMS/MMS to be sent.
• Allow Keyguard Widget: Set keyguard widget restrictions.
o Allow all widgets: No keyguard widget restrictions.
o Disable Camera: Disable the keyguard secure camera.
o None: Disable all keyguard widgets.
• Allow Location (GPS): Allow location via GPS to be used.
3.3.3.2 Applications
• Allowed tab
o Allow YouTube: Allow the YouTube application to be used.
o Allow Browser: Allow the default Android browser or Chrome browser to be used.
o Allow Play Store: Allow to install/update packages from Play Store.
o Allow Camera: Allow the camera to be used to take photos and videos.
• Whitelist/Blacklist tab: Enter an application’s package name in the Add New Package Name
field. Add the package name by clicking Add. Use the arrow buttons to move the name from
the Available Packages field to either the Blacklist field or the Whitelist field. (See Figure 9:Whitelist and Blacklist).
Note: The packages added to the blacklist will not be possible to run on the device. If
packages are added to the white-list, no other packages will be possible to run on the device.
System applications are not affected by the whitelist/blacklist restrictions.
Figure 9: Whitelist and Blacklist
3.3.4 Wi-Fi
These settings can be used to configure how the device connects to wireless networks. Check the Wi-Fi
checkbox to enable the Wi-Fi settings. Use the “+” and “-” buttons to add and remove Wi-Fi networks.
• Network SSID: Enter the network SSID (i.e. the network name).
• Static IP Configuration: Check this box to enable static IP configuration.
o IP Address: Enter the static IP address.
o Subnet Mask Length: Enter the subnet mask length as bit counts (e.g. 24 =
255.255.255.0; 16 = 255.255.0.0; 8 = 255.0.0.0).
o Default Gateway: Enter the static IP default gateway.
o Primary DNS: Enter the static IP primary DNS.
o Secondary DNS: Enter the static IP secondary DNS.
• Link Security Type: Select an encryption protocol from the drop-down list. Select Open to
disable encryption protocols.3.3.5 VPN
These settings can be used to configure how the device connects to wireless networks via VPN. Check
the VPN checkbox to enable the VPN settings. Use the “+” and “-” buttons to add and remove VPN
accounts.
Note: A field indicated with an asterisk (*) and a red border is mandatory. (See chapter 4.2
Mandatory Fields for more information).
• Connection Name: Enter a VPN account name to be displayed on the device.
• VPN Type: Select a VPN type from the drop-down list.
o PPTP
VPN Server: Enter the host name or IP of the VPN server.
Username: Enter a user name for connection certification.
User Password: Enter a user password for connection certification.
DNS Search Domain: Enter a DNS search domain for connection certification.
DNS Servers: Enter DNS servers.
Forwarding Routes: Enter internal forwarding routes.
Enable Encryption: Check the Enable Encryption checkbox to enable
encryption.
o L2TP/IPSec PSK
VPN Server: Enter the host name or IP of the VPN server.
L2TP Secret: Enter the L2TP secret for connection certification.
Username: Enter a user name for connection certification.
User Password: Enter a user password for connection certification.
DNS Search Domain: Enter a DNS search domain for connection certification.
Identifier: Set the IPSec identifier.
User Pre-Shared Key: Enter the pre-shared key for authentication.
DNS Servers: Enter DNS servers.
Forwarding Routes: Enter internal forwarding routes.
o L2TP/IPSec RSA
VPN Server: Enter the host name or IP of the VPN server. L2TP Secret: Enter the L2TP secret for connection certification.
Username: Enter a user name for connection certification.
User Password: Enter a user password for connection certification.
User Certificate: Enter the alias of the user certificate to use, or select an
added certificate by clicking Select. (See chapter 3.3.8 Digital Certificates).
CA Certificate: Enter the alias of the CA certificate to use, or select an added
certificate by clicking Select. (See chapter 3.3.8 Digital Certificates).
Server Certificate: Enter the alias of the server certificate to use, or select an
added certificate by clicking Select. (See chapter 3.3.8 Digital Certificates).
DNS Search Domain: Enter a DNS search domain for connection certification.
DNS Servers: Enter DNS servers.
Forwarding Routes: Enter internal forwarding routes.
o L2TP/IPSec Xauth PSK
VPN Server: Enter the host name or IP of the VPN server.
Username: Enter a user name for connection certification.
User Password: Enter a user password for connection certification.
DNS Search Domain: Enter a DNS search domain for connection certification.
Identifier: Set the IPSec identifier.
User Pre-Shared Key: Enter the pre-shared key for authentication.
DNS Servers: Enter DNS servers.
Forwarding Routes: Enter internal forwarding routes.
o L2TP/IPSec Xauth RSA
VPN Server: Enter the host name or IP of the VPN server.
Username: Enter a user name for connection certification.
User Password: Enter a user password for connection certification.
User Certificate: Enter the alias of the user certificate to use, or select an
added certificate by clicking Select. (See chapter 3.3.8 Digital Certificates).
CA Certificate: Enter the alias of the CA certificate to use, or select an added
certificate by clicking Select. (See chapter 3.3.8 Digital Certificates). Server Certificate: Enter the alias of the server certificate to use, or select an
added certificate by clicking Select. (See chapter 3.3.8 Digital Certificates).
DNS Search Domain: Enter a DNS search domain for connection certification.
DNS Servers: Enter DNS servers.
Forwarding Routes: Enter internal forwarding routes.
o L2TP/IPSec Hybrid RSA
VPN Server: Enter the host name or IP of the VPN server.
Username: Enter a user name for connection certification.
User Password: Enter a user password for connection certification.
CA Certificate: Enter the alias of the CA certificate to use, or select an added
certificate by clicking Select. (See chapter 3.3.8 Digital Certificates).
Server Certificate: Enter the alias of the server certificate to use, or select an
added certificate by clicking Select. (See chapter 3.3.8 Digital Certificates).
DNS Search Domain: Enter a DNS search domain for connection certification.
DNS Servers: Enter DNS servers.
Forwarding Routes: Enter internal forwarding routes.
3.3.6 Email
These settings can be used to configure which email accounts to use for this device. Check the Email
checkbox to enable the Email settings. Use the “+” and “-” buttons to add and remove email accounts.
Note: A field indicated with an asterisk and a red border is mandatory. (See chapter 4.2 Mandatory
Fields for more information).
• Email Address: Enter the user’s email address.
• Incoming Email Server: Set incoming email server information.
o Account type: Select the account type; IMAP or POP3.
o Mail Server and Port: Enter the host name or IP address for incoming emails.
o Username: Enter the user name to use when connecting to the incoming email server.
o Password: Set a password.
o Security type: Select a security type for incoming email; None, SSL, or TLS.
• Outgoing Email Server: Set outgoing email server information.
o Mail Server and Port: Enter the host name or IP address for the outgoing email server.o Username: Enter the user name for the outgoing email server.
o Security Type: Select a security type for outgoing email; None, SSL, or TLS.
o Accept All Certificates: Check the Accept All Certificates checkbox to accept all
certificates sent by the outgoing email server.
3.3.7 Exchange ActiveSync
These settings can be used to configure which Exchange ActiveSync accounts to use for this device.
Check the Exchange ActiveSync checkbox to enable the Exchange ActiveSync settings. Use the “+” and
“-” buttons to add and remove email accounts.
Note: A field indicated with an asterisk and a red border is mandatory. (See chapter 4.2 Mandatory
Fields for more information).
• ActiveSync Account Name: Enter the Exchange ActiveSync account name.
• ActiveSync Host: Enter the Exchange ActiveSync server address.
• Use Secure Connection (SSL): Check the Use Secure Connection (SSL) checkbox to use the SSL
security type for incoming and outgoing email.
• Domain: Enter the account domain.
• User: Enter the Exchange ActiveSync account user name
• Email Address: Enter the Exchange ActiveSync email address.
• Password: Set an Exchange ActiveSync password.
• Accept All Certificates: Check the Accept All Certificates checkbox to accept all certificates
sent by the email server.
• Set Authentication Certificate: Enter the name of the client certificate to use, or select an
added certificate by clicking Select. (See chapter 3.3.8 Digital Certificates).
• Set S/MIME Certificate: Enter the name of the S/MIME certificate to use, or select an added
certificate by clicking Select.
• Sync Email: Allow emails to be synced.
• Sync Contacts: Allow contacts to be synced.
• Sync Calendar: Allow calendar to be synced.3.3.8 Digital Certificates
These settings can be used to import and setup the digital certificates to use for this device. Check the
Digital Certificates checkbox to enable the Digital Certificates settings. Use the “+” and “-” buttons to
add and remove digital certificates.
• Certificate File: Enter the name of the client certificate to use, or import a certificate by
clicking Import.
• Certificate Use: Set the usage for the imported certificate; Choose VPN and apps, Wi-Fi, or
Email from the drop-down menu.
• Alias: Enter an alias for the imported certificate.
• Password: Set a password for the certificate.
3.3.9 Security & Privacy
These settings can be used to apply security and privacy settings on the device. Check the Security &
Privacy checkbox to enable the Security & Privacy settings.
• Set External Storage Encryption: Check the Set External Storage Encryption checkbox to
encrypt all external storage. If external storage encryption is set, it will not be possible to use
the SD card on the device until it has been encrypted. If the user chooses to encrypt the SD
card, the internal memory also has to be encrypted.
3.3.10 Applications
These settings can be used to select which applications to install on the device. Check the Applications
checkbox to enable these settings.
To add applications to the profile, check the checkbox next to the applications. (See Figure 10:
Applications).
Figure 10: Applications
See chapter 3.4 Applications for more information on how to import applications.
3.3.11 Shortcuts
These settings can be used to configure home screen shortcuts to install on the device. Check the
Shortcuts checkbox to enable these settings. Click Add to create a shortcut. To delete a shortcut, check
the checkbox next to the shortcut in the list view and click Delete.
• Label: Enter a home screen label for the shortcut.• URI: Enter the URI for the shortcut (i.e. “http://”, “file://”, or a valid package name e.g.
“com.android.chrome”).
3.4 Applications
These settings can be used to import applications into the Sony Xperia Configurator for installation on
a device.
Click Import to import an application. This function is also available from the File menu; Go to File >
Import > Application.
To delete an application imported to the Sony Xperia Configurator, check the checkbox next to the
application in the list view and click Delete.
Imported applications appear under Applications in the Task View. (See Figure 11: Applications).
Figure 11: Applications
Note: For information on how to select applications to install on the device, see chapter 3.3.10
Applications.
4 How to Install a Configuration on a Device
This chapter will explain how to install the configuration made in Sony Xperia Configurator on a device.
4.1 Configuration State
The Configuration State indicates what state the Configuration Setting items are in. (See Figure 12:
Configuration State).
There are three states:
• Not configured: This means that the particular configuration setting is not set. A profile option
in this state will not be installed on the device.
• Not saved: This means that a mandatory field in a configuration setting is not set. This state
will also be displayed if a change made in a configuration setting has not been saved.
• Configured: This means that the particular configuration setting is set.Figure 12: Configuration State 4.2 Mandatory Fields A field indicated with an asterisk (*) and a red border, is mandatory; it has to be filled with data otherwise the profile cannot be saved or installed on a device. If a mandatory field is empty when the profile is saved, the setting icon will be indicated with a red border and the Configuration Status will change to “not saved”. (See Figure 13: Mandatory Fields). Figure 13: Mandatory Fields 4.3 Connect a Device to the Sony Xperia Configurator When a device is connected, a security dialog will appear on both the PC and on the device. The user must verify that the connection is genuine by comparing the numbers on the device and on the PC.
1. On the device, click OK to confirm the numbers displayed on the PC and on the device. (See
       Figure 14: Confirm Configuration).

        Figure 14: Confirm Configuration

    2. If a connection is successful, the name of the device will be listed under Connected Device in
       the Task View. (See Figure 15: Connected Device).

        Figure 15: Connected Device

4.4 Install a Configuration

Follow these steps to install a configuration profile on a device.

Note: Some devices do not support all Sony Xperia Configurator features. When these devices are
      connected, some configuration settings will be grayed out in the Configure Profile view. When
      you install the profile, these grayed out settings will not be applied on the device. The
      installation dialog will say the installation was successful, even though the grayed out settings
      were not applied.

    1. In the Profiles list, check the checkbox next to the profile to install. (See Figure 16: Install a
       Profile on Device).

    2. Click the Install button.
       Note: Installing a new profile overrides the existing profile on the device.
       Note: It is also possible to install a profile from the Configure Profile view. (See 3.2.6 Install a
       Profile on a Device).
Figure 16: Install a Profile on Device
3. An installation dialog appears. (See Figure 17: Installation Dialog).
Figure 17: Installation Dialog
4. When the installation dialog displays “installations successful”, the installation has completed
successfully. (See Figure 18: Installation Successful).
Figure 18: Installation Successful5 Error Messages
This chapter describes error messages that may appear when installing profiles using the Sony Xperia
Configurator. Each message listing in Table 2 contains the message statement, an explanation of the
probable causes of the message, and a recommended action.
Error Message Statement Explanation Recommended Action
“VPN_PROFILE: Keystore is locked/not The VPN account This can be fixed by fixed by
initialized.” could not be setting a password on the
created because device. The device must be
the Keystore in password protected to be
the device has not able to create VPN accounts.
been initialized.
“POP_IMAP_ACCOUNT: An email account • If the account existing on
RESULT_DUPLICATE_ACCOUNT” with that mail the device is the correct,
server and user nothing needs to be done:
name already error can be ignored.
exists on the
device. • If the account on the
device needs to be updated,
the account needs to be
“EAS_ACCOUNT_WITHOUT_CLIENT_CERTIFICATE: An Exchange
removed manually in the
RESULT_DUPLICATE_ACCOUNT” ActiveSync
device, and then the profile
account with the
can be installed again.
“EAS_ACCOUNT_WITH_CLIENT_CERTIFICATE: same Active Sync
RESULT_DUPLICATE_ACCOUNT” host and user • If a new account should be
name already created, the server and/or
exists. user name needs to be
changed in the profile, and
then install the profile again.
“CERTIFICATE: Failed because screen lock is not Certificates could A password or PIN must be
activated.” not be installed set on the device to make it
because the possible to install
device is not certificates.
locked by a
password.
Table 2: Common Error MessagesTrademarks and acknowledgements All product and company names mentioned herein are the trademarks or registered trademarks of their respective owners. Any rights not expressly granted herein are reserved. All other trademarks are property of their respective owners. Visit www.sonymobile.com for more information.
You can also read