User Manual Manual del usuario - Gazebo With NettiNG 10 ft. x 10 ft. Glorieta coN malla de 10 Pies x 10 Pies - Aldi

Page created by Joshua Ayala
 
CONTINUE READING
User Manual Manual del usuario - Gazebo With NettiNG 10 ft. x 10 ft. Glorieta coN malla de 10 Pies x 10 Pies - Aldi
USA

                      User Manual
                      Manual
                      del usuario

   Gazebo With Netting 10 ft. x 10 ft.
   Glorieta con malla de 10 pies x 10 pies

                                        English.... Page 3
                                        Español.... Página 14
AFTER SALES SUPPORT 							                                     1
   1800 599 8898 			                          support@tdcusainc.com
MODEL: 7884-17 PRODUCT CODE: 21994-17 04/2017
USA

                                                                                                                                    Getting Started

Contents                                                            Getting Started

                                                                    Identify all parts packaged in carton against the parts
 Getting Started ..................................         3       list. Remove all protective materials and place parts on
                                                                    a non-abrasive surface to avoid scratching. If any parts
 Parts List .............................................   4       are missing or damaged, DO NOT attempt to assemble.
                                                                    Please contact our customer service center (Monday-Friday
 Assembly Instructions ........................             6       9:00am – 5:00pm EST) at 1-800-599-8898.

 Warranty ............................................      12      Caution
                                                                    Read all the instructions before assembly. Failure to do so may result in faulty
                                                                    assembly and potential injury! Assemble product on a soft, non-abrasive
                                                                    surface such as a carpet or cardboard to avoid damaging the item. Seek assis-
                                                                    tance to assemble bulky or heavy items. After final alignment, make sure all
                                                                    bolts and nuts are securely tightened with screw covers pressed in place.

                                                                 AFTER SALES SUPPORT 							                                     3
                                                                    1800 599 8898 			                          support@tdcusainc.com
                                                                 MODEL: 7884-17 PRODUCT CODE: 21994-17 04/2017
USA                                                                                   USA

                                           Pack Contents / Parts                                                                             Parts List

   Pack contents / parts
    A   Panel                                                                                                                                I
                                                                                        K
    B   Panel                                                                                                                                H
                                                                                        J
                                                                                                                                             C
    C   Corner Canopy Rib                                                     N
                                                                                                                                             D
                                                                                                     G
                                                                                                             E         F
    D   Canopy Middle Rib
    E   Cross Beam
                                                                                                                                                 B
    F   Cross Beam Connector                                                      M

    G   Corner Connector
    H   Canopy Two Tier Ribs
                                                                                  L
    I   Connector
    J   Main Canopy
    K   Small Canopy                                                                                 A                     O            P        Q
                                                                                            R
    L   Netting Panel
    M   Corner Shelf
    N   Plastic Ring
    O   Rope                                                                          Description    Qty                       Description       Qty
                                                                          A   Panel                      4       J   Main Canopy                  1
    P   M6 x 14mm Screws
                                                                          B   Panel                      4       K   Small Canopy                 1
    Q   M6 x 30mm Screws                                                  C   Corner Canopy Rib          4       L   Netting Panel                4
    R   Stake                                                             D   Canopy Middle Rib          4       M Corner Shelf                   4
                                                                          E   Cross Beam                 8       N Plastic Ring                  32
                                                                          F   Cross Beam Connector       4       O Rope                           4
                                                                          G   Corner Connector           4       P   M6 x 14mm Screws            16
                                                                          H   Canopy Two Tier Ribs       4       Q M6 x 48mm Screws              28
                                                                          I   Connector                  1       R   Stake                       12

4							                                        AFTER SALES SUPPORT    AFTER SALES SUPPORT 							                                     5
  support@tdcusainc.com						                          1800 599 8898      1800 599 8898 			                          support@tdcusainc.com
MODEL: 7884-17 PRODUCT CODE: 21994-17 04/2017                          MODEL: 7884-17 PRODUCT CODE: 21994-17 04/2017
USA                                                                                USA

                                          Assembly Instructions                                                              Assembly Instructions

                                                                                                  G                                      E
                                                                                                                   E
                                                                                                       A
                                                                                 B
                                                                                                  Q                    P             F

                                                                            Fig. 1: At the top corner, place the Corner Connector (G) first into
                                                                            the corner of the attached panels, then connect left panels (A)
                                                                            and right panels (B) with screws (Q).

                                                                            Fig. 2: Use screws (P) to connect two cross beams (E) and Cross
                                                                            Beam Connector (F). Leave one hole empty for step in Fig. 9.

                                                                                      E   Q                        Q             M
                                                                                              Q        E

                                                                                 Q
                                                                                  B                            A

                                                                            Fig. 3: Use screws (Q) to connect Cross Beam (E) to left panel (A)
                                                                            and right panel (B). Fasten all screws to tighten frame together.

                                                                            Fig. 4: Put the Corner Shelf (M) onto left panel (A) and right
                                                                            panel (B).

6							                                        AFTER SALES SUPPORT    AFTER SALES SUPPORT 							                                     7
  support@tdcusainc.com						                          1800 599 8898      1800 599 8898 			                          support@tdcusainc.com
MODEL: 7884-17 PRODUCT CODE: 21994-17 04/2017                          MODEL: 7884-17 PRODUCT CODE: 21994-17 04/2017
USA                                                                               USA

                                          Assembly Instructions                                                             Assembly Instructions

                                                                                                                                         C
                                                                                                 H
                                                                                                                        G
                                                                                  C

                                                                            Fig. 5: Insert Corner Canopy Rib (C) into Canopy Two Tier Rib (H).

                                                                            Fig. 6: Insert Corner Canopy Rib (C) into Corner Connector (G).

                                                                                   I   H                     I                           D
                                                                                                     D                            F
                                                                                            H

                                                                           H                                                                  P
                                                                                                                    D

                                                                            Fig. 7: Insert Canopy Two Tier Rib (H) into Connector (I).

                                                                            Fig. 8: Insert Canopy Middle Rib (D) into Connector (I).

                                                                            Fig. 9: Lock up Canopy Middle Rib (D) to Cross Beam Connector
                                                                            (F) with screws (P).

8							                                        AFTER SALES SUPPORT    AFTER SALES SUPPORT 							                                     9
  support@tdcusainc.com						                          1800 599 8898      1800 599 8898 			                          support@tdcusainc.com
MODEL: 7884-17 PRODUCT CODE: 21994-17 04/2017                          MODEL: 7884-17 PRODUCT CODE: 21994-17 04/2017
USA                                                                    USA

                                                       Assembly Instructions                                                      Assembly Instructions

            K

                                                                   E
                                J
                                                  L

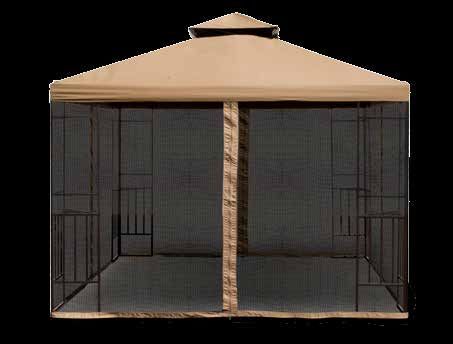
     Fig. 10: Put Small Canopy (K) on small top. Then fully spread the
     Main Canopy (J).

     Fig. 11: Use Plastic Ring (N) to hang Netting Panel (L) to Cross
     Beams (E).

                                                      O
            B             A

        R                                                      R
                          R

    Fig. 12: Use Stake (R) to fix the assembled gazebo on ground.

    Fig. 13: To enforce stability, loop Rope (O) onto the corner of the
    Main Canopy (J) and tie the other end of the Rope (O) to Stake
    (R).

10							                                                    AFTER SALES SUPPORT    AFTER SALES SUPPORT 							                                     11
  support@tdcusainc.com						                                       1800 599 8898      1800 599 8898 			                          support@tdcusainc.com
MODEL: 7884-17 PRODUCT CODE: 21994-17 04/2017                                       MODEL: 7884-17 PRODUCT CODE: 21994-17 04/2017
USA

                                                                                                                    WARRANTY CARD
                                                                                                                    GAZEBO WITH NETTING

                                                                                     Your details:

                                                                                     Name

                                                                                     Address

                                                                                                                            E mail

                                                                                     Date of purchase
                                                                                     * We recommend you keep the receipt with this warranty card. You must include a copy of your receipt

                                                                                     Location of purchase

                                                                                      Description of malfunction:

  Note: In case of adverse weather conditions or strong wind, please
  remove the Main Canopy (J) from the gazebo.

  The gazebo is designed to provide shade only. Do not use this gazebo
  in strong wind and rain. Wind and rain can damage the gazebo and
  could result in injury to you and others. It is not waterproof and not
  intended for use in the rain. The water will sit easily at the canopy               Return your completed
                                                                                                                                                                                               7884

  fabric and severely damage the gazebo. Do not use or set up in rain,                warranty card with the faulty
                                                                                                                                                    USA   1800 599 8898

  wind or stormy conditions.                                                          product to:                                                         support@tdcusainc.com
                                                                                                                                                MODEL:
                                                                                      TDC USA, Inc.                                             GAZEBO WITH NETTING        MODEL: 21994-17   04/2017
  This product is designed for leisure use only and is not a shelter against          14 Madison Road
  adverse weather conditions.

                                                                                                                                                                                            2
                                                                                      Fairfield, NJ 07004                                      Phone lines available
                                                                                                                                              Monday to Friday
                                                                                      United States of America                                9am - 5pm EST.

12							                                                   AFTER SALES SUPPORT
                                                                                      support@tdcusainc.com
                                                                                                                                                                                      YEAR WARRANTY
  support@tdcusainc.com						                                      1800 599 8898
MODEL: 7884-17 PRODUCT CODE: 21994-17 04/2017
Aldi Inc. Full Warranty Conditions                                                  1. When storing, do not repack your gazebo until completely dry.
                                                                                    2. This gazebo must be assembled by two adults or more.
Dear Customer:
                                                                                    3. This gazebo canopy must not be left attached in windy or extreme
The ALDI warranty is a full warranty offering you the following benefits:              conditions.
                                                                                    4. Loading limit of the hook is 10 lbs.
 Warranty period: 2 years* from date of purchase.
                                                                                    5. Steel components for garden accessories and furniture are treated with
                                                                                       rust inhibiting paint that protects them from rust. However, due to the na-
 Costs:              Free repair / exchange or refund.                                 ture of steel, surface oxidation (rusting) will occur if this protective coating
                     No transport costs.                                               is scratched. This is a natural process. To minimize this condition, it is rec-
                                                                                       ommended that care be taken when assembling and handling the product
 ADVICE              Please contact our service hotline by phone, email or             in order to prevent the paint from being scratched. If scratching or damage
                     fax before sending the device. This allows us to provide          occurs, it is recommended that the area be touched-up immediately with
                     support in the event of possible operator errors.                 rust inhibiting paint. Surface rust can be removed easily using a very light
                                                                                       application of common cooking oil. If surface oxidation (rusting) occurs and
In order to make a claim under the warranty, please send us:                           no measures are taken to correct it, the oxidation may start dripping on
          The faulty item with all component parts, the original receipt and the       the deck or patio, which may cause damaging strains that may be difficult
          warranty card properly completed.                                            to remove.
The warranty does not cover damage caused by:
        Accident or unanticipated events (e.g. lightning, wind, water, fire).
        Improper use or transport.
        Failure to follow safety and maintenance instructions.
        Other improper treatment or modification.                                                                     WARNING
                                                                                         Keep all flame and heat sources away from this tent
After the expiration of the warranty period, you may wish to have your product         fabric. This tent is made with fabric that meets CPAI-84 specifications
repaired at your own expense. You will be notified of the repair costs in               for flame resistance. It is not fire proof. The fabric will burn if left in
advance.                                                                                             continuous contact with any flame source.

This warranty gives you specific legal rights, and you may also have other rights
which vary from state to state but this warranty is not intended to exceed
statutory minimum requirements beyond what is included above.

This warranty does not limit the statutory obligation of the seller arising
from any implied warranties. The period of warranty can only be extended in
accordance with applicable law.

Neither the service company nor ALDI will assume any liability for data or
settings stored on any returned product.
USA

                                                                                                                               Para comenzar

Contenido                                                        Para comenzar

                                                                 Compare todas las piezas incluidas en la caja con la lista de
 Para comenzar ..................................        14      piezas. Quite todos los materiales de protección y ponga
                                                                 las piezas sobre una superficie no abrasiva para evitar que
 Lista de piezas ....................................    15      se rayen. Si falta alguna pieza, NO intente ensamblar la
                                                                 unidad. Llame a nuestro centro de atención al cliente (de
 Instrucciones de ensamblaje ..............              17      lunes a viernes de 9:00 a.m. a 5:00 p.m. EST) al
                                                                 1-800-599-8898.
 Garantía ............................................   22
                                                                 Precauciones
                                                                 Lea todas las instrucciones antes de ensamblar la unidad. ¡No hacerlo puede
                                                                 resultar en un ensamblaje incorrecto, lo que puede ocasionar lesiones!
                                                                 Ensamble la unidad sobre una superficie blanda y no abrasiva, tal como una
                                                                 alfombra o cartón, para evitar dañarla. Pida ayuda para ensamblar las partes
                                                                 pesadas y voluminosas. Tras la alineación final, asegúrese de que todos
                                                                 los pernos y tuercas estén firmemente apretados y estén cubiertos con los
                                                                 embellecedores.

                                                              AFTER SALES SUPPORT 							                      SERVICIO POSVENTA
                                                                                                                              17
                                                                 1800 599 8898 			                          support@tdcusainc.com
                                                              MODEL: 7884-17 PRODUCT CODE: 21994-17 04/2017
USA                                                                                                 USA

                                            Contenido de la caja / Piezas                                                                                 Lista de piezas

   Contenido de la caja / Piezas
    A   Panel                                                                                                                                                      I
                                                                                               K
    B   Panel                                                                                                                                                     H
                                                                                                J
                                                                                                                                                                  C
    C   Varilla de esquina del toldo                                                  N
                                                                                                                                                                  D
                                                                                                                      G
                                                                                                                               E       F
    D   Varilla central del toldo
    E   Travesaño
                                                                                                                                                                       B
    F   Conector de travesaño                                                             M

    G   Conector de esquina
    H   Varillas de dos niveles del toldo
                                                                                           L
    I   Conector
    J   Toldo principal
    K   Toldo pequeño                                                                                                A                     O             P              Q
                                                                                                    R
    L   Panel de malla
    M   Estantería de esquina
    N   Anillo de plástico
    O   Soga                                                                                   Descripción                Cant.                     Descripción             Cant.
                                                                                  A   Panel                                4       J       Toldo principal                        1
    P   Tornillos y tuercas M6 x 14 mm
                                                                                  B   Panel                                4       K       Toldo pequeño                          1
    Q   Tornillos y tuercas M6 x 30 mm                                            C   Varilla de esquina del toldo         4       L       Panel de malla                         4
    R   Estaca                                                                    D   Varilla central del toldo            4       M Estantería de esquina                        4
                                                                                  E   Travesaño                            8       N Anilla de plástico                       32
                                                                                  F   Conector de travesaño                4       O Soga                                         4
                                                                                  G   Conector de esquina                  4       P       Tornillos y tuercas M6 x 14 mm     16
                                                                                  H   Varillas de dos niveles del toldo    4       Q       Tornillos y tuercas M6 x 30 mm     28
                                                                                  I   Conector                             1       R       Estaca                             12

SERVICIO POSVENTA
18							                                               AFTER SALES SUPPORT    AFTER SALES SUPPORT 							                      SERVICIO POSVENTA
                                                                                                                                               19
   support@tdcusainc.com						                                 1800 599 8898      1800 599 8898 			                          support@tdcusainc.com
MODEL: 7884-17 PRODUCT CODE: 21994-17 04/2017                                  MODEL: 7884-17 PRODUCT CODE: 21994-17 04/2017
USA                                                                             USA

                                   Instrucciones de ensamblaje
                                           Assembly Instructions                                                       Instrucciones de ensamblaje
                                                                                                                              Assembly  Instructions

                                                                                                  G                                      E
                                                                                                                   E
                                                                                                      A
                                                                                 B
                                                                                                  Q                      P           F

                                                                            Figura 1: En la esquina superior, coloque primero el Conector
                                                                            de esquina (G) en la esquina de los paneles ensamblados, a
                                                                            continuación, conecte el panel izquierdo (A) y derecho (B) con
                                                                            los tornillos (Q).

                                                                            Figura 2: Use los tornillos (P) para conectar los dos travesaños
                                                                            (E) y el Conector de travesaño (F). Deje un agujero vacío para el
                                                                            paso en la Figura 9.

                                                                                      E   Q                        Q             M
                                                                                              Q        E

                                                                                 Q
                                                                                  B                            A

                                                                            Figura 3: Use los tornillos (Q) para conectar el Travesaño (E) al
                                                                            panel izquierdo (A) y al derecho (B). Apriete todos los tornillos
                                                                            para asegurar el marco.

                                                                            Figura 4: Coloque la Estantería de esquina (M) en el panel
                                                                            izquierdo (A) y el derecho (B).

20							                                         SERVICIO
                                                AFTER SALESPOSVENTA
                                                            SUPPORT    SERVICIO POSVENTA
                                                                        AFTER SALES SUPPORT 							                                    21
  support@tdcusainc.com						                          1800 599 8898       1800 599 8898 			                         support@tdcusainc.com
MODEL: 7884-17 PRODUCT CODE: 21994-17 04/2017                          MODEL: 7884-17 PRODUCT CODE: 21994-17 04/2017
USA                                                                                   USA

                                    Instrucciones de Instructions
                                           Assembly  ensamblaje                                                      Instrucciones de ensamblaje

                                                                                                                                              C
                                                                                                  H
                                                                                                                          G
                                                                                  C

                                                                            Figura 5: Inserte la Varilla de esquina del toldo (C) en la Varilla
                                                                            de dos niveles del toldo (H).

                                                                            Figura 6: Inserte la Varilla de esquina del toldo (C) en el Conector
                                                                            de esquina (G).

                                                                                    I   H                     I                               D
                                                                                                       D                            F
                                                                                             H

                                                                           H                                                                      P
                                                                                                                      D

                                                                            Figura 7: Inserte la Varilla de dos niveles del toldo (H) en el
                                                                            Conector (I).

                                                                            Figura 8: Inserte la Varilla central del toldo (D) en el Conector (I).

                                                                            Figura 9: Asegure la Varilla central del toldo (D) al Conector de
                                                                            travesaño (F) con los tornillos (P).

22							                                         SERVICIO
                                                AFTER SALESPOSVENTA
                                                            SUPPORT    SERVICIO POSVENTA
                                                                        AFTER SALES SUPPORT 							                                    23
  support@tdcusainc.com						                          1800 599 8898       1800 599 8898 			                         support@tdcusainc.com
MODEL: 7884-17 PRODUCT CODE: 21994-17 04/2017                          MODEL: 7884-17 PRODUCT CODE: 21994-17 04/2017
USA                                                                    USA

                                              Instrucciones de ensamblaje                                                 Instrucciones de ensamblaje

            K

                                                                   E
                                J
                                                  L

     Figura 10: Coloque el Toldo pequeño (K) sobre la parte superior
     pequeña. Luego extienda por completo el Toldo principal (J).

     Figura 11: Use la Anilla de plástico (N) para colgar el Panel de red
     (L) a los Travesaños (E).

                                                      O
            B             A

        R                                                      R
                          R

    Figura 12: Use la Estaca (R) para fijar la glorieta ensamblada en
    el suelo.

    Figura 13: Para dar más estabilidad, amarre la Cuerda (O) a la
    esquina del Toldo principal (J) y ate el otro extremo de la Cuerda
    (O) a la Estaca (R).

24							                                                      SERVICIO
                                                             AFTER SALESPOSVENTA
                                                                         SUPPORT    SERVICIO POSVENTA
                                                                                     AFTER SALES SUPPORT 							                                    25
  support@tdcusainc.com						                                       1800 599 8898       1800 599 8898 			                         support@tdcusainc.com
MODEL: 7884-17 PRODUCT CODE: 21994-17 04/2017                                       MODEL: 7884-17 PRODUCT CODE: 21994-17 04/2017
TARJETA DE GARANTÍA
                                                                                                              GLORIETA CON MALLA

                                                                            Sus datos:

                                                                            Nombre

                                                                            Dirección

                                                                                                                    Correo electrónico

                                                                            Fecha de la compra*
                                                                            * Le recomendamos que guarde el recibo con esta tarjeta de garantía. Debe incluir una copia de su recibo.

                                                                            Lugar de la compra

                                                                             Descripción de la avería:

Aviso: En caso de malas condiciones meteorológicas o viento fuerte,
quite el Toldo principal (J) de la glorieta.

La glorieta está diseñado para dar sombra solamente. No use esta
glorieta bajo viento y lluvia fuertes. El viento y la lluvia pueden dañar
la glorieta y podrían causarle lesiones a usted y a los demás. No es
                                                                                                                                        SERVICIO POSVENTA                                7884
impermeable y no se ha diseñado para utilizar en la lluvia. El agua se       Devuelva su tarjeta de garantía
                                                                             completada junto con el producto
                                                                                                                                            USA   1800 599 8898
asentará fácilmente en la tela del toldo y dañará grandemente a la
                                                                             defectuoso a:                                                        support@tdcusainc.com
glorieta. No utilizar o ensamblar bajo la lluvia, el viento o condiciones                                                              MODELO:
tormentosas.                                                                 TDC USA, Inc.                                             GLORIETA CON MALLA          MODELO: 21994-17     04/2017
                                                                             14 Madison Road

                                                                                                                                                                                   2
                                                                                                                                      Las líneas telefónicas
Este producto está diseñado para el esparcimiento y no es un refugio         Fairfield, NJ 07004
                                                                                                                                      están disponibles de
contra las condiciones meteorológicas adversas.                              United States of America                                 lunes a viernes, de
                                                                             support@tdcusainc.com                                    9 a.m. a 5 p.m. EST

                                                                                                                                                                             AÑOS DE GARANTÍA
Condiciones de la garantía completa
                                                                                        1. No guarde la glorieta sino hasta que se haya secado completamente.
de Aldi Inc.
                                                                                        2. Esta glorieta debe ser ensamblada por dos o más adultos.
Estimado cliente:                                                                       3. El toldo no debe permanecer instalado en condiciones extremas o de
                                                                                           viento.
La garantía ALDI es una garantía completa que le ofrece los siguientes beneficios:
                                                                                        4. El peso máximo soportado por el gancho es de 10 libras (4.5 kg).
 Período de garantía:     2 años a partir de la fecha de la compra.                     5. Los componentes de acero para accesorios y muebles de jardín están
                                                                                           tratados con pintura antióxido que los protegen contra el óxido. No
 Costos:                  Reparación/sustitución gratis o reembolso.                       obstante, debido a la naturaleza del acero, puede producirse oxidación
                          No hay costos de transporte.                                     superficial si el recubrimiento antióxido se raya; esto es un proceso natural.
                                                                                           Para minimizar las probabilidades de que esto ocurra, se recomienda
 AVISO                    Póngase en contacto con nuestra línea directa de atención
                          por teléfono, correo electrónico o fax antes de retornar el
                                                                                           tener cuidado al ensamblar y manejar el producto, a fin de evitar que la
                          producto. Esto nos permite proporcionar ayuda en caso de         pintura se raye. Si se producen daños o rayas, se recomienda pintar el
                          posibles errores del operador.                                   área inmediatamente con pintura antióxido. El óxido superficial puede
                                                                                           eliminarse fácilmente con una aplicación muy ligera de aceite normal de
Para hacer una reclamación bajo la garantía, por favor envíenos:                           cocina. Si se produce oxidación superficial y no se toma ninguna medida
         El artículo defectuoso junto con todas las piezas, el recibo de compra            para resolver el problema, el óxido puede comenzar a gotear sobre el
         original y la tarjeta de garantía completada de manera apropiada.                 balcón o patio, y provocar manchas difíciles de eliminar.

La garantía no cubre a los daños ocasionados por:
          Accidentes o eventos imprevistos (por ejemplo, rayos, viento, agua, fuego).
          Uso o transporte inadecuados.
          Incumplimiento de las instrucciones de seguridad y mantenimiento.                                            ADVERTENCIA
          Otro tratamiento o modificación inadecuados.
                                                                                               MANTENER LAS LLAMAS Y LAS FUENTES DE CALOR ALEJADAS
Después del vencimiento del período de garantía, tiene la posibilidad de mandar a            DEL TEJIDO DE ESTE TOLDO. Este toldo está fabricado con un tejido
reparar su producto si usted corre con los gastos. Se le notificará por adelantado el         que cumple con la norma CPAI-84 de resistencia a las llamas. No es
costo de reparación.                                                                        ignífugo. El tejido arderá si entra en contacto continuo con una llama.

Esta garantía le otorga derechos legales específicos y es posible que también tenga
otros derechos que pueden variar de un estado a otro, pero no tiene como fin
exceder los requisitos legales mínimos que aquí se incluyen.

Esta garantía no limita la obligación legal del vendedor derivada de cualquier
garantía implícita. El período de garantía solo se puede extender hasta donde lo
permita la ley.

Ni la compañía de servicio ni ALDI asumen ninguna responsabilidad por los datos o
configuraciones que puedan haberse almacenado en cualquier producto retornado.
USA

DISTRIBUTED BY• DISTRIBUIDO POR:
ALDI INC., BATAVIA, IL 60510
www.aldi.us

                                                        2
 AFTER SALES SUPPORT •
 SERVICIO POSVENTA                         7884
      USA   1800 599 8898
            support@tdcusainc.com
                                                     YEAR WARRANTY
 MODEL / NO DEL MODELO :                            AÑOS DE GARANTÍA
 GAZEBO WITH NETTING/GLORIETA CON MALLA   04/2017
You can also read