User's Guide. Prinect DFE 2021 - Equipment
←
→
Page content transcription
If your browser does not render page correctly, please read the page content below
Prinect DFE

              Equipment

              User’s Guide.
              Prinect DFE 2021.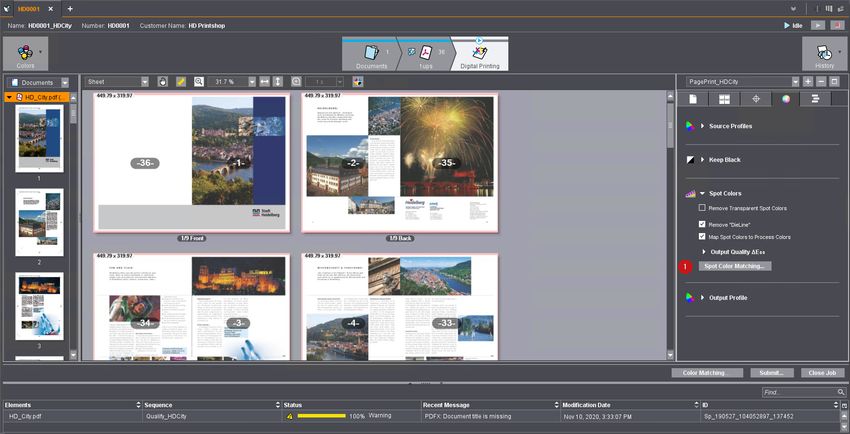
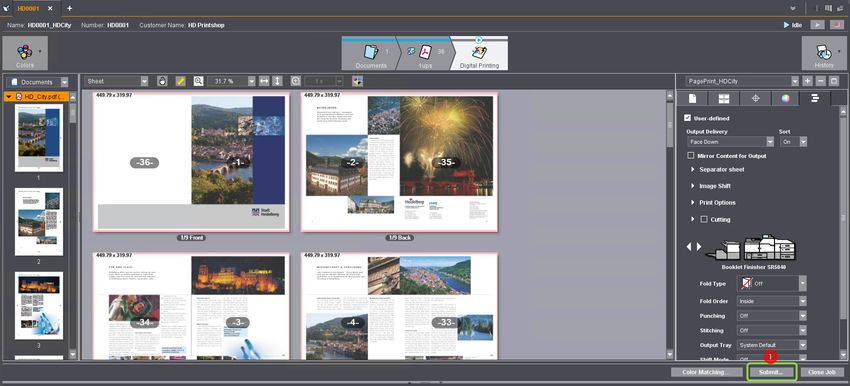
Table of Contents
Table of Contents

Prinect Signa Station 1
Prinect DFE 1

Table of Contents
3

Before you start ...
             About This Documentation . . . . . . . . . . . . . . . . . . . . . . . . . . . . . . . . . . . . . . . . . . . . . . . . . . 5

                          What you should already know . . . . . . . . . . . . . . . . . . . . . . . . . . . . . . . . . . . . . . . . . . . . . 5
                          Further Documentation . . . . . . . . . . . . . . . . . . . . . . . . . . . . . . . . . . . . . . . . . . . . . . . . . . . 5
                          Symbols and Styles . . . . . . . . . . . . . . . . . . . . . . . . . . . . . . . . . . . . . . . . . . . . . . . . . . . . . . 6
                          Important Information . . . . . . . . . . . . . . . . . . . . . . . . . . . . . . . . . . . . . . . . . . . . . . . . . . . . 6

Introduction
             Basic Concept of Prinect DFE . . . . . . . . . . . . . . . . . . . . . . . . . . . . . . . . . . . . . . . . . . . . . . . . 7

                          What are the Components of a Prinect DFE? . . . . . . . . . . . . . . . . . . . . . . . . . . . . . . . . . . . 7
                          How Do I Use Prinect DFE? . . . . . . . . . . . . . . . . . . . . . . . . . . . . . . . . . . . . . . . . . . . . . . . . 8
                          How Does Licensing Work? . . . . . . . . . . . . . . . . . . . . . . . . . . . . . . . . . . . . . . . . . . . . . . . . 9
                          Sequence Templates . . . . . . . . . . . . . . . . . . . . . . . . . . . . . . . . . . . . . . . . . . . . . . . . . . . . . 9
                            Basic sequence templates . . . . . . . . . . . . . . . . . . . . . . . . . . . . . . . . . . . . . . . . . . . . . .               10
                            Group Templates . . . . . . . . . . . . . . . . . . . . . . . . . . . . . . . . . . . . . . . . . . . . . . . . . . . . .          10
              Job Processing Workflow . . . . . . . . . . . . . . . . . . . . . . . . . . . . . . . . . . . . . . . . . . . . . . . . . . . 11

                          Set up Customers . . . . . . . . . . . . . . . . . . . . . . . . . . . . . . . . . . . . . . . . . . . . . . . . . . . . . . . 13
                          Create a Job . . . . . . . . . . . . . . . . . . . . . . . . . . . . . . . . . . . . . . . . . . . . . . . . . . . . . . . . . . . 16
                            Components of a job . . . . . . . . . . . . . . . . . . . . . . . . . . . . . . . . . . . . . . . . . . . . . . . . . .            18
             Set up Cluster of Digital Presses                         . . . . . . . . . . . . . . . . . . . . . . . . . . . . . . . . . . . . . . . . . . . . . 19

             Configure Sequence Templates . . . . . . . . . . . . . . . . . . . . . . . . . . . . . . . . . . . . . . . . . . . . . 23

                          Configure a Qualify Sequence . . . . . . . . . . . . . . . . . . . . . . . . . . . . . . . . . . . . . . . . . . . . . 24
                          Configure a PagePrint Sequence . . . . . . . . . . . . . . . . . . . . . . . . . . . . . . . . . . . . . . . . . . . 26
                            "Accept approved pages only" Option . . . . . . . . . . . . . . . . . . . . . . . . . . . . . . . . . . . . . . 27
                            "AutoImposePDF" Option . . . . . . . . . . . . . . . . . . . . . . . . . . . . . . . . . . . . . . . . . . . . . . . 27
                            "Digital Printing" Step . . . . . . . . . . . . . . . . . . . . . . . . . . . . . . . . . . . . . . . . . . . . . . . . . 27
                          Create a Group Template . . . . . . . . . . . . . . . . . . . . . . . . . . . . . . . . . . . . . . . . . . . . . . . . 33
             Configure the Digital Printing Terminal . . . . . . . . . . . . . . . . . . . . . . . . . . . . . . . . . . . . . . . . 36

                            Configure the automatic output mode . . . . . . . . . . . . . . . . . . . . . . . . . . . . . . . . . . . . . . 37
                            Set up the cluster configuration . . . . . . . . . . . . . . . . . . . . . . . . . . . . . . . . . . . . . . . . . . 37
             Automatic Workflow by Dragging-and-Dropping Document Files . . . . . . . . . . . . . . . . . . . . . 40

             Automatic Workflow in the Hotfolder Mode . . . . . . . . . . . . . . . . . . . . . . . . . . . . . . . . . . . . . 40

Prinect DFE – User’s Guide                                                                                                                                       3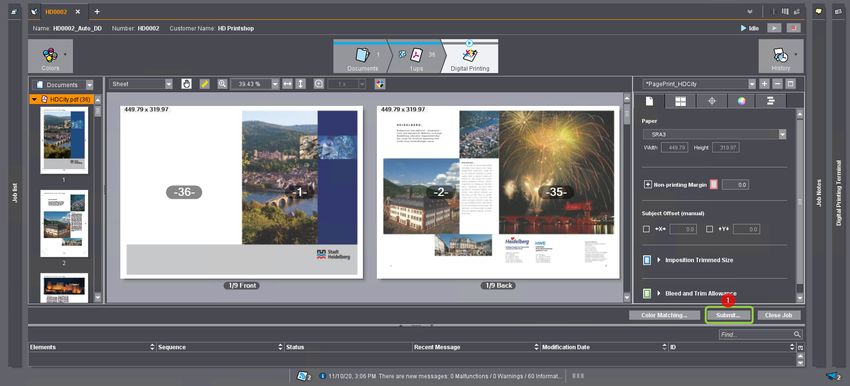
Table of Contents

Manual Creation of a Print Job
    Manual Creation of a Print Job . . . . . . . . . . . . . . . . . . . . . . . . . . . . . . . . . . . . . . . . . . . . . . 41

    Create and Edit a Job . . . . . . . . . . . . . . . . . . . . . . . . . . . . . . . . . . . . . . . . . . . . . . . . . . . . . 41

      Create a New Job . . . . . . . . . . . . . . . . . . . . . . . . . . . . . . . . . . . . . . . . . . . . . . . . . . . . . . . 41
      Edit a New Job . . . . . . . . . . . . . . . . . . . . . . . . . . . . . . . . . . . . . . . . . . . . . . . . . . . . . . . . 46
         Add documents . . . . . . . . . . . . . . . . . . . . . . . . . . . . . . . . . . . . . . . . . . . . . . . . . . . . . . 46
         Edit colors . . . . . . . . . . . . . . . . . . . . . . . . . . . . . . . . . . . . . . . . . . . . . . . . . . . . . . . . . . 50
         Set up and output digital printing . . . . . . . . . . . . . . . . . . . . . . . . . . . . . . . . . . . . . . . . . . 51

Automatic Creation and Output of New Jobs using Drag-and-Drop
    Automatic Creation of New Jobs using Drag-and-Drop . . . . . . . . . . . . . . . . . . . . . . . . . . . . . 61

      Prerequisites for the Drag-and-Drop Mode . . . . . . . . . . . . . . . . . . . . . . . . . . . . . . . . . . . . 61
      Prepare a Print Job . . . . . . . . . . . . . . . . . . . . . . . . . . . . . . . . . . . . . . . . . . . . . . . . . . . . . 61
      Automated Output of Documents . . . . . . . . . . . . . . . . . . . . . . . . . . . . . . . . . . . . . . . . . . 64
         Output Other Documents . . . . . . . . . . . . . . . . . . . . . . . . . . . . . . . . . . . . . . . . . . . . . . . 68

Automatic Creation and Output of Print Jobs in the Hotfolder Mode
    Create New Print Jobs by Copying PDF Files to a Hotfolder. . . . . . . . . . . . . . . . . . . . . . . . .                         69

      Prerequisites for the Hotfolder Mode . . . . . . . . . . . . . . . . . . . . . . . . . . . . . . . . . . . . . . . .             69
         Disable Preview Handler in Windows Explorer . . . . . . . . . . . . . . . . . . . . . . . . . . . . . . . . 70
      Prepare a Print Job . . . . . . . . . . . . . . . . . . . . . . . . . . . . . . . . . . . . . . . . . . . . . . . . . . . . . 71
         Set up a Qualify sequence for the hotfolder mode . . . . . . . . . . . . . . . . . . . . . . . . . . . . . 71
         Create a group template for automatic job creation . . . . . . . . . . . . . . . . . . . . . . . . . . . . 75
      Automatic creation of print jobs . . . . . . . . . . . . . . . . . . . . . . . . . . . . . . . . . . . . . . . . . . . . 76
         Create a hotfolder job template . . . . . . . . . . . . . . . . . . . . . . . . . . . . . . . . . . . . . . . . . . . 76
    Create a New Job by Filing to the Hotfolder . . . . . . . . . . . . . . . . . . . . . . . . . . . . . . . . . . . . . 79

      Prepare Document File Names . . . . . . . . . . . . . . . . . . . . . . . . . . . . . . . . . . . . . . . . . . . . . 79
      Create and Start a Print Job . . . . . . . . . . . . . . . . . . . . . . . . . . . . . . . . . . . . . . . . . . . . . . . 79
         Output Other Documents . . . . . . . . . . . . . . . . . . . . . . . . . . . . . . . . . . . . . . . . . . . . . . . 84

Index

4                                                                                                                        Version 2021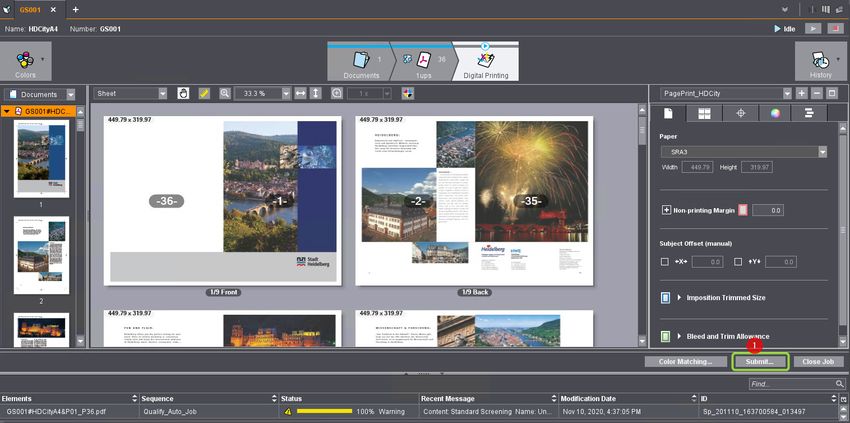
Before you start ...
Before you start ...

About This Documentation
This documentation applies to version 2021 of the Prinect DFE (Digital Front End).
The Prinect DFE is a digital printing workflow system fully based on the Job Definition Format (JDF).
Prinect DFE is a component of the Heidelberg Prinect product range.
This documentation provides you with an overview of Prinect DFE. Furthermore, an example is used
to illustrate how a typical process is set up and run.

What you should already know
We assume that you are familiar with the Windows® and Mac OS X® operating systems that are sup-
ported by this application. You should also be familiar with the processes and terms used in a digital
print shop workflow.

Further Documentation
You can find more information in the following documentation:
               • in the enclosed "How to get started" leaflet

               • in Heidelberg Prinect Licensing - User

               • in the Online Help for the Prinect Cockpit

Prinect DFE – User’s Guide                                                                           5
Before you start ...

Symbols and Styles
The following typographical conventions are used in this manual:
        • References to other chapters and sections are blue (on the screen) and underlined.

          Example: See section "Symbols and Styles", page 6.

        • Quotation marks are used to indicate menus, folders, functions, hardware conditions, switch
          settings, system messages, etc.

          Example: Set the switch to "off".

        • Menus, functions and sub-functions are separated by ">".

          Example: Select "File > Open...".

        • A plus sign is used to indicate that several keys have to be pressed at the same time.

          Example: Press Alt+A.

Important Information
Important information in the text is indicated by symbols at the side which are used as follows:
              Warning: Contains information that must be taken into consideration to protect the user
              from injury.

              Caution: Contains information that must be taken into consideration to prevent damage to
              hardware or software.

    i
    i
              Note: Contains important general or supplementary information about a specific topic.

              Prerequisite: Lists requirements which must be fulfilled before the steps which follow can
              be performed.

6                                                                                            Version 2021
Introduction
Introduction

Basic Concept of Prinect DFE . . . . . . . . . . . . . . . . . . . . . . . . . . . . . . . . . . . . . . . . . . . . . . . . . . . 7
   What are the Components of a Prinect DFE? . . . . . . . . . . . . . . . . . . . . . . . . . . . . . . . . . . . . . . 7
   How Do I Use Prinect DFE? . . . . . . . . . . . . . . . . . . . . . . . . . . . . . . . . . . . . . . . . . . . . . . . . . .8
   How Does Licensing Work? . . . . . . . . . . . . . . . . . . . . . . . . . . . . . . . . . . . . . . . . . . . . . . . . . .9
   Sequence Templates . . . . . . . . . . . . . . . . . . . . . . . . . . . . . . . . . . . . . . . . . . . . . . . . . . . . . . .9
      Basic sequence templates . . . . . . . . . . . . . . . . . . . . . . . . . . . . . . . . . . . . . . . . . . . . . . . . 10
      Group Templates . . . . . . . . . . . . . . . . . . . . . . . . . . . . . . . . . . . . . . . . . . . . . . . . . . . . . . . 10
Job Processing Workflow . . . . . . . . . . . . . . . . . . . . . . . . . . . . . . . . . . . . . . . . . . . . . . . . . . . . . 11
   Set up Customers . . . . . . . . . . . . . . . . . . . . . . . . . . . . . . . . . . . . . . . . . . . . . . . . . . . . . . . . 13
   Create a Job . . . . . . . . . . . . . . . . . . . . . . . . . . . . . . . . . . . . . . . . . . . . . . . . . . . . . . . . . . . . 16
      Components of a job . . . . . . . . . . . . . . . . . . . . . . . . . . . . . . . . . . . . . . . . . . . . . . . . . . . . 18
Set up Cluster of Digital Presses . . . . . . . . . . . . . . . . . . . . . . . . . . . . . . . . . . . . . . . . . . . . . . . . 19
Configure Sequence Templates . . . . . . . . . . . . . . . . . . . . . . . . . . . . . . . . . . . . . . . . . . . . . . . . . 23
   Configure a Qualify Sequence . . . . . . . . . . . . . . . . . . . . . . . . . . . . . . . . . . . . . . . . . . . . . . . 24
   Configure a PagePrint Sequence . . . . . . . . . . . . . . . . . . . . . . . . . . . . . . . . . . . . . . . . . . . . . . 26
      "Accept approved pages only" Option . . . . . . . . . . . . . . . . . . . . . . . . . . . . . . . . . . . . . . . 27
      "AutoImposePDF" Option . . . . . . . . . . . . . . . . . . . . . . . . . . . . . . . . . . . . . . . . . . . . . . . . 27
      "Digital Printing" Step . . . . . . . . . . . . . . . . . . . . . . . . . . . . . . . . . . . . . . . . . . . . . . . . . . . 27
   Create a Group Template . . . . . . . . . . . . . . . . . . . . . . . . . . . . . . . . . . . . . . . . . . . . . . . . . . . 33
Configure the Digital Printing Terminal . . . . . . . . . . . . . . . . . . . . . . . . . . . . . . . . . . . . . . . . . . . 36
      Configure the automatic output mode . . . . . . . . . . . . . . . . . . . . . . . . . . . . . . . . . . . . . . . 37
      Set up the cluster configuration . . . . . . . . . . . . . . . . . . . . . . . . . . . . . . . . . . . . . . . . . . . . 37
Automatic Workflow by Dragging-and-Dropping Document Files . . . . . . . . . . . . . . . . . . . . . . . . .40
Automatic Workflow in the Hotfolder Mode . . . . . . . . . . . . . . . . . . . . . . . . . . . . . . . . . . . . . . . .40

Basic Concept of Prinect DFE
Prinect DFE provides functionalities for an automated Prinect workflow for output on Heidelberg or
Gallus digital presses. This workflow spans steps ranging from preparation of the digital job data to
output of the production run at the digital press and finishing of the printed products.

What are the Components of a Prinect DFE?
Prinect DFE is built up on the model of a server-client architecture. The core of the system consists
of a central database and components that control all the processes in the system and that regulate
communication flow between the single components. Important basic data like for example, printing
materials, user or customer data, color profiles, are stored in the MDS (Master Data Store). Job pro-
cessing is done by "engines".
The user interface of the Prinect DFE is the "Cockpit" that can be installed as a client application on
several computers in the network environment.

Prinect DFE – User’s Guide                                                                                                                   7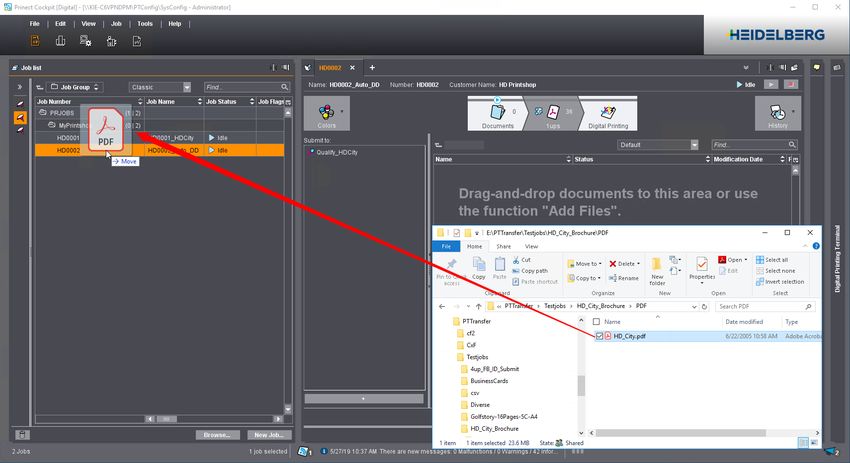
Introduction

    DFE server PC                                                          Additional Cockpit work-
                                                                           station

     Prinect Cockpit                                                         Prinect Cockpit

     Communication services, Mas-                                            Prinect Color Toolbox
     ter Data Store

     Prinect engines

     High Performance
     Renderer (only for Primefire /
     Labelfire)

     Prinect Color Toolbox

How Do I Use Prinect DFE?
The "Cockpit" is the central user interface for all work that a user does on Prinect DFE. You can install
this program in a Windows and in a Mac OS X operating system environment. You can perform the
following tasks in the Cockpit:
    • Edit basic system settings (create users and customers, enter spot colors, etc.)

    • Configure processing steps for automated job processing and

    • create jobs, compile job components (input files, sheet layouts), view and monitor jobs, submit
      jobs or job data for processing or for approval, check the job status.

A licensed, if possible latest, version of the Adobe Acrobat Professional software should be installed
on each workstation using the Prinect Cockpit. This software is not included in the shipment of the
Heidelberg Prinect software. The operator of the Prinect software is responsible for seeing to it that
Acrobat Professional is installed on each Cockpit computer before installing the Cockpit.

8                                                                                           Version 2021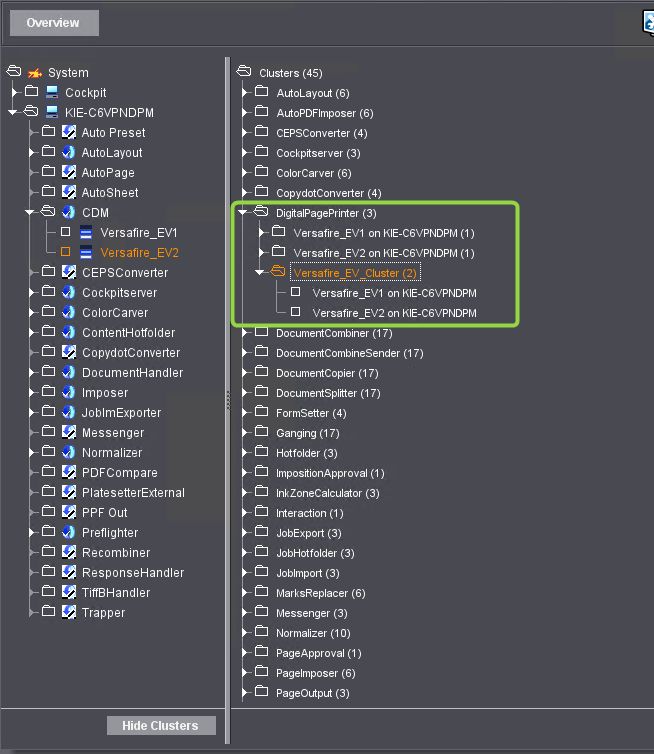
Introduction

How Does Licensing Work?
Each installation of the Prinect DFE software includes installation of all the software components,
irrespective of the licenses purchased. The number of options that you can use on a permanent basis
is controlled by a license key. The "Prinect Licensing" module controls the enabling of the options and
administration of the licenses. Prinect Licensing consists of two software components, the License
Server and the License Manager. The licenses are enabled online via the Heidelberg Trust Center or
locally by a dongle (USB stick).

 i
 i
         Note: As of version 2019, only online licensing is supported for full installations.

Online licensing is based on an online protection certificate that is enabled during installation of the
software. For this purpose, before installation of the Prinect DFE software, an installation code is
required that triggers activation. The certificate is connected to real or virtual hardware and is auto-
matically renewed daily. If the Internet connection to the Heidelberg Trust Center should fail tempo-
rarily, the existing certificate continues to be valid for 30 days. Administration of online licensing is
through the Prinect Maintenance Center and the Prinect License Manager.
The License Server and the License Manager interact in a "client-server architecture". Administration
of the licenses is done in the License Server whereas the License Manager depicts the user interface.
The License Server (perhaps plus dongle) is usually installed on the Prinect DFE server. In bigger sys-
tem environments with a number of Prinect servers, it may be advisable to set up a dedicated License
Server PC.

 i
 i
         Note: You can find details about licensing in the "Heidelberg Prinect Licensing – User

Sequence Templates
In the Cockpit, the processing operations are configured as "sequence templates" that are to run in
the output workflow. Sequence templates contain all the key settings that are required for correct
printing. These templates only have to be set up once and after that they can be used for any number
of print jobs that need the same setup. For that reason, it is generally enough to enter a few basic
data when creating a new print job and to select the matching sequence templates or a group tem-
plate. See "Group Templates", page 10. All the output parameters are predefined in the sequence
templates and do not need to be reconfigured.

Prinect DFE – User’s Guide                                                                              9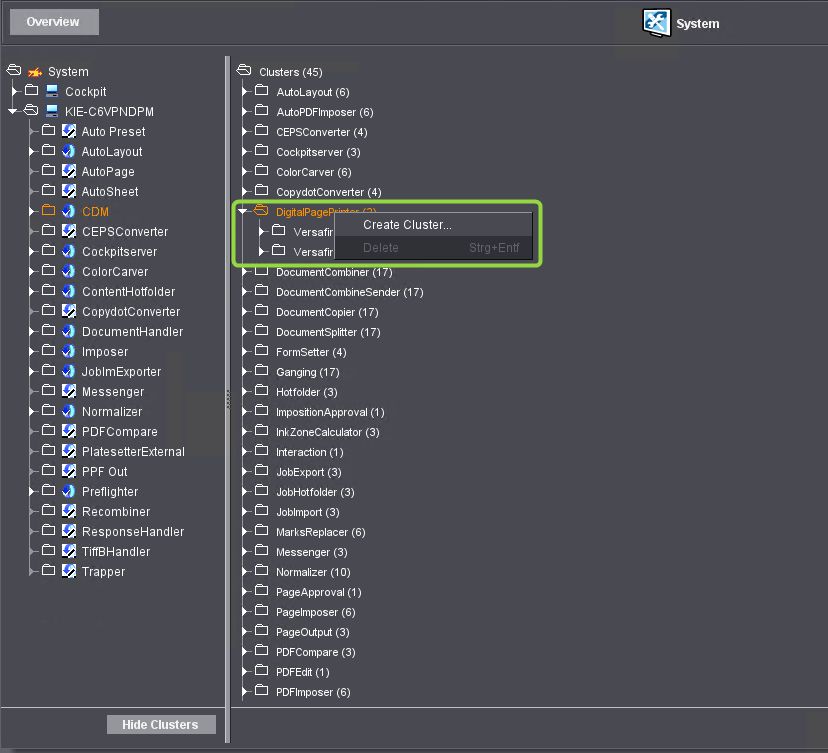
Introduction

Basic sequence templates
The most important sequences are "Qualify" and "PagePrint". Other types of sequences are available
for advanced workflow options, depending on the licensing options you have.
     • The Qualify sequence makes sure that the input documents are available in a format suitable for
       the subsequent processes. In this sequence, the documents are checked in a "preflight" step, for
       example, for the presence of all required fonts, correct image resolution, use of transparency
       elements, etc. and, if necessary, corrected. You can customize the preflight settings to suit your
       needs. PostScript documents are converted to a cleansed PDF format in a "Normalizing" step.

     • In a PagePrint sequence, output to a digital press is configured. In this case, the majority of the
       print parameters are defined interactively during job processing.

Group Templates
To configure automated processing, you can group several sequence templates to "group templates".
In a group template, you can link single sequences by drawing connecting lines between them. These
kind of linked sequence templates can run automatically one after the other without intervention
from the user. You can save different processing setups as different group templates.

10                                                                                           Version 2021
Introduction
Job Processing Workflow
The graphic below shows you a diagram of the basic workflow in processing job files in the Prinect
DFE workflow:
Files from a customer or from are generated as PDF or PDF/VT files.
an editorial department
Preparation (Qualify) PagePrint Digital Printing Terminal
Digital Press
Prinect DFE – User’s Guide 11Introduction
1. A new job is created in the Prinect Cockpit when the input files are on hand. If you expect a
number of print jobs for a certain customer, you can create a job group where you can group the
jobs of this customer. Furthermore, it is advisable to enter the customer data (name, contact,
etc.) into the Prinect customer administration and assign the new job to the customer.
2. When you create a new print job, you can at this stage assign "sequence templates" or a group
template to the job.
3. A print job opens in the Cockpit after it is created. You can now check its settings and, if neces-
sary, change them. For example, you can modify single sequence templates or configure color
settings (color order, handling of spot colors, etc.).
4. After that, the job files are added to the job. You can define a job as "started" when you are cre-
ating it. In this case, the job files are processed straight away, usually with a Qualify sequence
which contains a preflight step that checks the files for possible errors (missing fonts, image res-
olutions too low, etc.).
5. Alternatively, you can also define job templates for creating new print jobs automatically. In this
case, you only have to drag-and-drop the PDF files you wish to output to a hotfolder. In this pro-
cess, a new job with the defaults of the job template is created automatically (section
"Automatic Creation of New Jobs using Drag-and-Drop", page 61).
6. Each of the pages must be imposed for output to a digital press. This is done interactively in the
"Digital Printing" step. Generally, this controls the whole print run, including finishing.
7. When the "Digital Printing" step is completed, the print jobs are submitted to the Digital Printing
Terminal (part of the Prinect Cockpit). You can use the Digital Printing Terminal in two modes:
· In the automatic mode; the print jobs are submitted automatically to the digital press.
· In the manual mode; the operator controls the order of printing.
8. The print jobs arrive at the digital press from the Digital Printing Terminal and are output on the
press.
12 Version 2021Introduction
Set up Customers
In daily work with the Prinect DFE workflow, the edited jobs are normally assigned to the customers
concerned. For this purpose, Prinect DFE has its own customer administration. Customer data are
filed in the Master Data Store and are available at various points in the Prinect environment.
i
i
Note: Details about customer administration can be found in the Online Help of the Prinect
Cockpit.
For example, you set up a "virtual customer" to be able to assign a customer to the demo jobs.
1. Go to "Administration" and click "Customers" (1).
2. Customer administration opens. Click the "New" button. The "Create Customer" dialog opens:
Enter the following customer data:
· Sector: Business
· Name: HD Printshop
Prinect DFE – User’s Guide 13Introduction
· Customer ID: 0001
· Nickname: HDP
3. Click "Open" beside "Person". The "Create Person" dialog opens:
Enter the following personal details:
· Title: Mr.
· First Name: Peter
· Family Name: Bauer
· Nickname Pete
· Language: German
These details about the contact are enough for our purposes. In "Communication Channels",
you can enter data such as phone number, mobile number, e-mail address, fax number or Web
address.
Confirm the "Create Person" dialog with "OK".
Then confirm the "Create Customer" dialog also with "OK".
14 Version 2021Introduction
4. The "Customers" window now displays your new customer at the top left of the customer list.
Mark your customer and fill out the "Address" section.
· Street: Hauptstraße 1
· Postal Code: 10111
· City: Berlin
· Region: Berlin
· Country Code: DE
· Country: Germany
5. Confirm your inputs with "Save". Close the "Customers" window by clicking "Overview".
Prinect DFE – User’s Guide 15Introduction
Create a Job
All the elements involved in the processing of documents are combined to form "jobs". You are
prompted to enter the following information when creating a new job:
• Basic job data
· Job Number
You must assign a job number to each job. A job number generally consists of a number
of letters and/or digits. The job number identifies each job in the DFE system. For that
reason, each job must have a unique job number. This is checked when you enter a new
job number. If the job number you entered already exists, the number displayed is red
and you cannot enter any more data until you enter a job number that is not yet used.
· Job Name
The job name is the identifier that is used to display a job in the Cockpit user interface.
The job name, too, must also be unique in the system. This means that you must give
each job a job name that is not yet used as a job name in the system. After you enter the
job number, hit the Tab key. The job number is copied automatically to the "Job Name"
box. You can use the job number also as the job name or you can edit this entry.
· Documents
This is where you can assign document files to a job while you are creating it. To do this,
click "Browse" and select the document files in the file system. You can also skip this
step and add the document files later after the job is created and opened.
· Job Group
Generally, it is advisable to create each job in its own job group. This lets you use a sep-
arate group, for example, for each customer you have or you create a "pool group" for
single jobs of various customers. A group structure that already exists in the system is
entered in this box. The group must be selected before you click "New Job". By clicking
"Change", you can select a different, available group or create a new group and select it.
· Job Home
In this box, you set the folder in which all the job-specific data in the file system will be
filed. Normally, the job files are filed in the "PTJobs" system folder (e.g. E:\PTJobs) of the
Prinect server and there in the "Jobs" subfolder. A subfolder with the name of the job
group is created in the "PTJobs" folder. A folder with the job name is created in this sub-
folder. All the job-specific data are filed in this folder. You must click the lock icon if you
do not wish to use this default. This releases the linking between job group and job folder
and you can use "Change" to select another folder for the job files. We recommend that
you do this only in exceptional cases because the defaults ensure that the job files can
be found fast in the system. The "PTJobs" folder is shared in the network, meaning that
the job files can be accessed by other computers in the system environment, for
16 Version 2021Introduction
example, by other Cockpit computers. In addition, the central location of all job files
facilitates a backup of the data.
• Customer Data
Assignment of customer data to a job is optional but we strongly recommend that you use the
Prinect customer administration (see section "Set up Customers", page 13) and assign customer
data to each job. In the "Customer Name" list box, select the customer name from customer
administration. The "Customer ID" and "Nickname" boxes are then filled automatically.
· Customer Job ID
The assigned Prinect job number is entered by default in this box. This is where you can
enter customer job numbers in the case that your customers use their own job numbers
that are different to the Prinect job numbers.
· Customer Job Name
Similar to a customer job number, this is where you can enter a different customer job
name.
• Processing
In this step, you can assign one or more sequence templates or group sequence templates to the
job with "Add". By doing this, you define how the job will be processed in the Prinect system.
You can still edit each of the steps set in the sequence templates after the job is created. This is
where you can save the selected sequences as a template for new jobs generated automatically
(see also chapter "Automatic Creation and Output of New Jobs using Drag-and-Drop", page 61).
You can skip this step for the time being and assign the required sequence templates later in the
open job.
• Scheduling
In this step, you can enter details about the following scheduling data:
· Responsible
This is where the Prinect user who is responsible for processing the job is entered. By
default, this is the name of the user logged in to the Cockpit. Using "Select", you can
select a different name from the Prinect user administration. The user must have the
required permissions in the Prinect system.
· Set Due Date
You can select a date for the scheduled due date by clicking the calendar icon. This date
is for logging only and does not control the time printing will run.
· Job type
You can select one of the following job types in the list box: Production, Product, Prelim-
inary job, CAD (for packaging printing), Reuse, Job Template.
Prinect DFE – User’s Guide 17Introduction
· Job Priority
You can assign a priority to each job. For example, this lets you set that very urgent jobs
are given a higher priority and are processed before other jobs.
· Pages
Generally, the job data or information from the customer tells you how many pages the
job has. Together with the planned delivery quantity, you can estimate how big a job will
be.
· Delivery quantity
The delivery quantity indicates how many copies of each page will be printed.
The new job is created after you click "Finish" and opens immediately if this option is enabled.
Components of a job
A job contains a number of components that are set up or edited as "sections" or "steps". After the
job is set up, you start it and the steps are run one after the other.
A job contains the following sections or steps:
• "Product Description" section
This is where data like delivery quantity and details about the customer for whom the job was
created are entered.
•
This is where the processing sequences or group sequences are added to the job. You can edit
each of the sequence settings separately in this step.
• "Properties" Section
This is where other properties like delivery quantity, pages planned in a job, predecessor job
details or gang job details are recorded.
• "Colors" Section
The use of the process colors is configured in this step.
• "Printing Process" Section
This is where parameters relating to the printing process (e.g. print order, input/output profile)
are displayed or configured.
• "Documents" Step
Document (PDF files) are added to the job in this step.
18 Version 2021Introduction
• "Pages" Step
Page lists are defined in this step and the document pages are assigned to the page list place-
holders.
• "Digital Printing" Step
In the "Digital Printing" step, pages are imposed interactively and you set output and finishing
options. Furthermore, this step has options for examining the imposed sheets in detail (magni-
fier function, etc.) and you can, for example, view a preview of a finished booklet in which you
can also scroll through.
• "History" Section
List of the actions performed throughout the job.
Set up Cluster of Digital Presses
You can combine two or more Versafire digital presses (Versafire EV/EP or later) to one cluster. Then
you can submit print jobs to the cluster. This means that only when printing starts is a decision is
made as to which of the presses in the cluster is to be driven for printing. As a result, you have opti-
mum utilization of these digital presses because the machine with the highest availability is always
driven. In the Digital Printing Terminal of the Prinect Cockpit, you can select one of the machines or
the cluster and submit the print jobs accordingly.
i
i
Note: When setting up a cluster, you should note that the presses involved have properties
of the same value, e.g. that they have the same paper size, the same printing materials and
the same colors as well as the same finishing options, if required, because presses config-
ured in the cluster are operated in "Load Balancing". In other words, it is automatically
decided during operation which machine is to be driven.
Prerequisite: At least two suitable digital presses are available and set up in the Prinect
DFE system environment. In the following example, two Versafire EV digital presses are to
be combined to one cluster.
Proceed as follows to set up a cluster made up of digital presses:
1. Select the Prinect Server in the tree view to the left and click "Show Clusters".
2. Mark "DigitalPrinter" in the right pane and select "Create Cluster" in the context menu.
Prinect DFE – User’s Guide 19Introduction
3. Enter a name for the cluster and confirm with "OK".
The cluster is created. The presses must now be assigned to the cluster.
4. In the left pane, below "CDM" select the first Versafire machine and select "Add to Cluster" in
the context menu.
20 Version 2021Introduction
The "Add Device to Cluster" dialog opens:
5. Select the cluster created beforehand, in the example "Versafire_EV_Cluster", and confirm with
"OK".
Prinect DFE – User’s Guide 21Introduction
6. Repeat steps 4 and 5 for the second Versafire machine. Now both Versafire machines are
included in the cluster.
7. Check the setup by clicking the triangle in front of "DigitalPagePrinter" in the right pane. The
content of this item displays. If you click the triangle in front of "Versafire_EV_Cluster", the two
digital presses in the cluster display:
8. Now you can switch back to the "normal" view by clicking "Hide Clusters".
22 Version 2021Introduction
Configure Sequence Templates
Prerequisite: In order for the "PagePrint" sequence needed for digital printing to be avail-
able, a suitable digital press must be set up on the Prinect DFE. In addition to installation
of the press, the machine must be set up in the Prinect Cockpit in "Administration > System
> CDM". You will find details about the connection of digital presses in the Online Help of
the Prinect Cockpit in "Connecting Machines > Connecting Digital Presses". You can also set
up clusters for Versafire presses (EV and EP or later). See "Set up Cluster of Digital Presses",
page 19.
To configure the sequence templates needed for the examples below, proceed as follows:
1. Go to "Administration" and click "Templates".
2. The "Templates" window opens. Click the folder icon beside "Sequence Templates" to display
the single sequence items.
Prinect DFE – User’s Guide 23Introduction
Configure a Qualify Sequence
1. Highlight the "Qualify" sequence type (1) and click "New" (2).
The setup section for a new Qualify sequence opens:
24 Version 2021Introduction
Set this sequence as follows:
2. Leave "Normalizing", "Split Document" and "Destination" disabled or as they are.
3. Enable "Hotfolder" and leave the defaults as they are.
4. Enable the "Preflight" option and display the parameters by clicking the small triangle before the
checkbox.
5. Click "Browse" in the "Heidelberg Preflight Profile" section of the "Actions" tab. Select the
"CMYKDefault.hpp" profile.
6. Click "Save as":
Prinect DFE – User’s Guide 25Introduction
7. Type in "Qualify_HDCity" as the name and select "HD Printshop" as the customer with "Edit" in
"Customer ID". Confirm the "Save Template" dialog with "OK".
8. Click "Close". The sequence overview displays.
Configure a PagePrint Sequence
Prerequisite: A "PagePrint" sequence is available only if at least one digital press is con-
nected to and set up on Prinect DFE.
In the "Templates" view, highlight "PagePrint" in "Sequence Templates" and click "New".
26 Version 2021Introduction
"Accept approved pages only" Option
This option is designed for an "approval workflow". When this option is enabled, only PDF pages with
an "approved" status will be processed. You will find more details about the approval workflow in the
Online Help of the Cockpit. We will leave this option disabled.
"AutoImposePDF" Option
This option is always enabled and cannot be used.
"Digital Printing" Step
In this step, you can set up parameters for paper, pages, layout, print marks, color as well as print
and finishing settings of the press and save them as a template.
Selection of the digital press
In the "on" list box select the digital press for which you will set up this PagePrint sequence template.
If there is only one digital press in the system, this press is automatically entered.
i
i
Note: You can combine several Versafire digital presses (Versafire EV/EP or later) to one
cluster. In this case, you can select a cluster of digital presses in the "on" list box instead of
a single digital press. See also "Set up Cluster of Digital Presses", page 19. Then the digital
presses in the cluster are driven with the parameters of this PagePrint sequence.
Configuration of paper and page settings
1. Open the "Digital Printing" step and in the "Paper and page settings" tab set, for example, an A3
paper grade as the paper:
Prinect DFE – User’s Guide 27Introduction
The paper grades are set up at the press and these data are sent to the Prinect Cockpit. If
required, you can select a different paper grade from the "Paper" list box. If you change the
paper size, the new size displays at once in the preview pane.
(2). On some digital presses it is possible to print the cover pages (the first two and last two pages
of the PDF document) on different paper. In the example, the cover pages are to be printed on
the same paper as the content pages.
i
i
Note: In the page preview, the cover pages are highlighted by a dark yellow label.
3. Leave "Non-printing Margin" as it is (0,0). This can be a good idea for some jobs, for example,
where logos or business cards are not to be printed right up to the edge of the paper.
4. Leave "Subject Offset (manual)" disabled.
i
i
Note: This option lets you manually set the horizontal and vertical spacing between the sin-
gle subjects on the printing material. You can use this, for example, for printing labels.
5. In "Imposition Trimmed Size" leave "From PDF" as it is. Likewise, leave "Scale" as "100%" and
"Page Policies" as "Fit to Size". "Expected Orientation" is set to "Portrait" and cannot be changed
if "From PDF" is set.
6. In the "Bleed and Trim Allowance" section enter 3.0 mm in the "Bleed" box . Then hit the Tab
key. The new value is applied to the preview. Set "Trim Allowance" to "Automatic".
28 Version 2021Introduction
Configuration of the layout settings
1. Go to the "Layout settings" tab and select the "booklet layout" (1).
2. Select "Saddle Stitch" in the “Binding" list box (2).
3. Enable "AutoArrange Folding Sheets" (3).
4. Enter a value of 0.1 mm in "Creeping" (4).
5. Enter a value of 1.0 mm in "Back Margin" (5).
Leave all other settings as they are.
i
i
Note: Use the "custom layout scheme" button (6) to open a Layout Scheme Editor where
you can create a custom layout scheme. You can find details about this in the Online Help
of the Cockpit (F1 key).
Prinect DFE – User’s Guide 29Introduction
Configuration of the print mark settings
1. Go to the "Print mark settings" tab. Because no print marks will be used in this example, leave
all the options disabled or disable any checked options.
30 Version 2021Introduction Configuration of the color settings 1. Go to the "Color settings" tab and open "Source Profiles". 2. Leave "Enable CMYK Color Management" and "Use Embedded Profiles" enabled. 3. If needed, you can customize the "Keep Black", "Spot Colors" and "Output Profile" sections by clicking the respective triangles. These settings are not changed in our example. Details about these parameters can be found in the Online Help of the Prinect Cockpit. Prinect DFE – User’s Guide 31
Introduction

Configuration of print and finishing settings

1.   Go to the "Print and finishing settings" tab.
2. Leave the "User-defined" option enabled.
3. Set "Face Down" in "Output Delivery" (1).

32                                                   Version 2021
Introduction

4. Set "Sort" to "On" (2).
5. Set "Interposer upper tray" in "Separator sheet" (3) (the options you can select depend on the
   setup of the digital press).
6. In "Image Shift" (4), leave the values as they are at "0.0".
7.   In "Print Options", leave the value for screening as it is or set the value you want (5). The options
     available for selection depend on the connected press.
8. Leave "Create Compucut Data" disabled in "Cutting" (depends on the press) (6). Cutting data in
   Compucut format are created if this option is enabled. These data can be assessed by a com-
   patible cutter and used for cutting. You can select the folder for these data by clicking the folder
   icon.
9. A figure of the finisher installed at the digital press displays in the graphic (7). If necessary, select
   a different finisher matching your setup by scrolling forwards or backwards with the arrows.
10. Set the other finisher settings to suit your needs. These finishing options depend on the installed
    finisher.

Save sequence template
11. Click "Save as", assign "HD Printshop" as the customer and save the sequence template as
    "PagePrint_HDCity". Close the window with "Close".

Create a Group Template
For the processing of a job it is not absolutely necessary to create a group template but the use of
group templates facilitates the processing of further print jobs that need similar processing steps. A
group template will be created to illustrate how you define and use a group template.
1.   In "Administration > Templates", mark "Group Templates" in the sequence overview and click
     "New".
     The empty setup window of a group template opens.

Prinect DFE – User’s Guide                                                                               33
Introduction
2. Open the "Qualify" folder and select "Qualify_HDCity" (1).
3. Then click "Add Template" (2).
An icon for the Qualify sequence is created in the workspace.
4. Repeat steps 2 and 3 also for the "PagePrint_HDCity" sequence. The workspace now displays as
follows:
34 Version 2021Introduction 5. In the workspace, select "AutoArrange" in the context-sensitive menu. The icons are placed side by side and aligned. 6. Save the group template as "HDCity_Group_Template" using "Save as". 7. Close the group template and quit the "Templates" window by clicking "Overview". All the sequence templates needed for a basic workflow are now configured. Prinect DFE – User’s Guide 35
Introduction

Configure the Digital Printing Terminal
The Digital Printing Terminal is the link between the submitted Prinect print job and the digital press.
You will find details about the prerequisites and operation of the Digital Printing Terminal in the
Online Help of the Prinect Cockpit (1).
You can configure the Digital Printing Terminal for two modes:
     • for the manual output mode or

     • for the automatic output mode.

In the manual output mode, you can customize which print jobs will be sent in which order to the
press.
In the automatic output mode, the print jobs are submitted automatically to the press in the order in
which they arrive at the Digital Printing Terminal.
You open the Digital Printing Terminal by clicking its button (1) in the section toggle.

If more than one digital press, an additional CTP device or a cluster of digital presses is set up on the
Prinect Manager, you can select the output device or cluster you wish to control in the Digital Printing
Terminal in the device list box (3).
The layout and the contents of the windows of the Digital Printing Terminal are refreshed if you
change the output device. This means that the jobs and details of the new output device you set dis-
play in them.

 i
 i
           Note: The "Jobs" view also has a "Digital Printing Terminal" section. This view is designed
           to give you a fast overview of the progress of digital printing. However, you cannot control
           printing from this view.

36                                                                                          Version 2021
Introduction
Configure the automatic output mode
The automatic output mode is set by default after installation. You can switch to the manual output
mode by disabling "Automatic Output Mode". To do this, click the "Device configuration" button (2).
The "Device configuration" dialog opens:
In this dialog, you can disable "Automatic Output Mode".
The automatic output mode will stay enabled for the workflow described in this documentation.
Set up the cluster configuration
Prerequisite: In order to configure and use clusters of digital presses, you must have set up
at least one cluster. See "Set up Cluster of Digital Presses", page 19. In this case, the job
must be submitted to a cluster of digital presses. This requires a suitably configured Page-
Print sequence. See "Configure a PagePrint Sequence", page 26.
If you want to use several digital presses in a cluster, you can set up the way the print jobs will be
distributed in the Digital Printing Terminal. Then the cluster of these digital presses is offered in the
device list box (3). In a cluster, the print jobs can be distributed among the single machines of the
cluster by different criteria. In this way, the machines of a cluster can be used more efficiently than
individual machines. You configure the distribution details in the "Cluster setup" dialog.
When you select a cluster, the Digital Printing Terminal view changes to the effect that only the "Print
History" and "Cluster Setup" buttons display in the global status panel. In the cluster view, you can
use the "Machine" column in each table for sorting or grouping.
When you click one of the machine icons of the cluster, the cluster view changes to the view of that
machine.
Prinect DFE – User’s Guide 37Introduction Accept automatically distributed print jobs When you select this option, the digital press concerned is made available for automatic distribution of print jobs in a cluster if "Machine-specific" is selected in the "Automatic Output Mode" option in the "Cluster Setup" dialog. Cluster setup "Automatic Output Mode" option If you activate this option, the automatic output mode is enabled, i.e. incoming digital print jobs are immediately submitted to that printing press which corresponds to the activated criteria under "Allow Automatic Match for" and which is available next. If you deactivate this option, the print jobs which are submitted to the cluster, are collected in the "Waiting Print Jobs" area. Here you can open the "Start with Settings" window with the respective context menu item, and select the machine of the cluster to output the job: 38 Version 2021
Introduction

         Prerequisite: This list box is only available if a cluster is selected in the device list box.

"Allow Automatic Match for" options
You can use these options to confine automatic distribution of print jobs. If you activate one ore more
of these options, the print jobs are distributed automatically, corresponding to the activated criteria.

Prinect DFE – User’s Guide                                                                                39
Introduction
• Printing material
The printing material parameters like size, grammage, paper grade, grain direction etc. are
taken into account when selecting a press, i.e. the press whose printing material settings best
match the respective job will be driven.
• Output Profile
When this option is enabled, output is matched to the default ICC profile of the selected paper
on the press. However, this matching is done only if the machine type automatically assigned
differs from the machine type originally assigned or if there was a change in paper.
• Quality Options
When you enable this option, print jobs are also submitted to machines in a cluster that do not
have quality options like "Edge Enhancement" or "Maximum Inking", even if these parameters
were enabled for the submit process. In this case, these quality options are ignored.
• Output Tray
When you enable this option, printing is automatically matched to the existing output tray
parameters of the press in the cluster. Finishing options like stitching, punching or folding are
always taken into account. This means that if a machine in the cluster does not have the finish-
ing options configured in the job, it is not automatically selected.
Automatic Workflow by Dragging-and-Dropping
Document Files
You can use the DFE for automated job processing where new print jobs are created automatically
when you drag-and-drop document PDFs in the job list of the Cockpit. In this process, it is enough to
save the required sequences as a template in a new print job. You can find details about this work-
flow in the chapter "Automatic Creation and Output of New Jobs using Drag-and-Drop", page 61.
Automatic Workflow in the Hotfolder Mode
Another variant of automated job processing works using special folders called "hotfolders". A new
print job is created automatically whenever document files enter such a hotfolder. You can find
details about this workflow in the chapter "Automatic Creation and Output of Print Jobs in the
Hotfolder Mode", page 69.
40 Version 2021Manual Creation of a Print Job
Manual Creation of a Print Job
Manual Creation of a Print Job . . . . . . . . . . . . . . . . . . . . . . . . . . . . . . . . . . . . . . . . . . . . . . . . . 41
Create and Edit a Job . . . . . . . . . . . . . . . . . . . . . . . . . . . . . . . . . . . . . . . . . . . . . . . . . . . . . . . . 41
Create a New Job . . . . . . . . . . . . . . . . . . . . . . . . . . . . . . . . . . . . . . . . . . . . . . . . . . . . . . . . 41
Edit a New Job . . . . . . . . . . . . . . . . . . . . . . . . . . . . . . . . . . . . . . . . . . . . . . . . . . . . . . . . . .46
Add documents . . . . . . . . . . . . . . . . . . . . . . . . . . . . . . . . . . . . . . . . . . . . . . . . . . . . . . . .46
Edit colors . . . . . . . . . . . . . . . . . . . . . . . . . . . . . . . . . . . . . . . . . . . . . . . . . . . . . . . . . . .50
Set up and output digital printing . . . . . . . . . . . . . . . . . . . . . . . . . . . . . . . . . . . . . . . . . . 51
Manual Creation of a Print Job
This chapter shows you how to create a print job (example: "HDCity" booklet) manually and edit it up
to printing.
i
i
Note: The examples shown in this documentation solely demonstrate operation and must
not be understood as imperative instructions.
Create and Edit a Job
After you prepared the sequences that are needed (see the section "Configure Sequence Templates",
page 23), all the prerequisites required for creating a new job are met.
Prerequisite: All the prerequisites required for creating a print job in the Prinect DFE are
now listed once again below:
· Job file: HD_City.pdf in the example
· Customer: HD Printshop
· Sequence templates: "HDCity_Group_Template" with "Qualify_HDCity" and "Page-
Print_HDCity" sequences.
Create a New Job
1. In the Prinect Cockpit, go to "Jobs" and click "New Job". The "Create new Job" dialog opens:
Prinect DFE – User’s Guide 41Manual Creation of a Print Job
2. This dialog has four views that you can go between with "Next" or "Back". First fill out the boxes
in the "Basic job data" view.
· Assign a job number. You can take the job number, for example, from the job ticket of a
customer job. Job numbers must be unique in the Prinect DFE system environment. This
means that each job number can be assigned only once. In this example, we will assign
"HD0001" as the job number.
· Your next step is to assign a job name. Job names as well must be unique. When you go
to the "Job Name" box, the job number is copied automatically to this box. You can use
the job number e.g. as a prefix for the job name or overwrite it. We will assign
"HD0001_HDCity" as the job name.
· In the "Documents" box you can now assign the documents (supplied by the customer)
to the job. You can also do this step later in the created job. We will not assign any doc-
uments at this point.
· By default, "Job Group" and "Job Home" are linked. This means that if you define a new
job group, a folder of the same name will be created automatically for this job group. We
want to create a new job group and click "Change". The "Select Group" dialog opens:
42 Version 2021Manual Creation of a Print Job
• Click the plus sign beside "PRJOBS". Another edit box dis-
plays.
• We will assign "MyPrintshop" as the group name and click
"OK". The "Select Group" dialog closes.
3. Enable the "Start Job" option. Leave "Maximize Job View" disabled.
4. Click "Next" to open the "Customer Data" view:
Prinect DFE – User’s Guide 43Manual Creation of a Print Job 5. Select "HD_Printshop" in the "Customer Name" list box. This item is taken from customer administration of Prinect DFE. "Customer ID" and "Nickname" are also taken from there. "Cus- tomer Job ID" and "Customer Job Name" are copied from the basic job data you defined before- hand. You can overwrite these items if you have other customer job data that differ from the job data set in the Prinect system. We will leave these items as they are. 6. Click "Next" to open the "Processing" view: In this view, you can add prepared sequence tem- plates to the job. Click "Add". The "Select Templates to Add" dialog opens: 44 Version 2021
Manual Creation of a Print Job

7.   Select "HDCity_Group_Template" and click "OK". The group template contains all the sequence
     templates needed for processing this job.

 i
 i
         Note: You could also add Qualify and PagePrint as separate sequence templates. In this
         case, the same functionality would be available.

Prinect DFE – User’s Guide                                                                        45
Manual Creation of a Print Job
8. Enable "Save as default". Then the "HDCity_Group_Template" will be assigned automatically to
all new print jobs. If required, you can undo this assigned template by marking the group tem-
plate and clicking "Remove" and then assign other sequence templates or group sequence tem-
plates. In addition, the group template is enabled for automated job processing (see chapter
"Automatic Creation and Output of New Jobs using Drag-and-Drop" and chapter "Automatic
Creation and Output of Print Jobs in the Hotfolder Mode"). Click "Next". The "Scheduling" view
opens. In this view, you can select the person responsible, enter a due date, set the job type and
assign a priority. Leave these settings as they are. Enter "36" in the "Planned Pages" box. Enter
"5000" in the "Planned Amount" box.
HD
9. All the data needed for creating the new job are now entered. Click "Finish".
The new job is created and opens in the "Job" view. Double-click the caption bar of the "Job" view
to maximize the width of the window.
i
i
Note: In the "Job" view, several jobs can be open at the same time. Each job opens in its
own tab. You can open another tab by clicking the "plus" sign above the job tabs. In this
new tab, you can open another job without closing the jobs opened so far. You can find
more details about this in the Online Help of the Cockpit in "The Heidelberg User Interface
> Open Jobs View".
Edit a New Job
After you created the new job, you must run some steps in the open job.
Add documents
1. Go to the "Documents" step. In this step, the document files that will be edited and finally
printed are copied to the Prinect workflow.
46 Version 2021Manual Creation of a Print Job 2. To add the document PDF files to the job, you can either drag-and-drop the files from the file system (Windows Explorer, Macintosh Finder) to the window (1) or you can open a file selection dialog with the "Add Files" button (2). 3. Click "Add Files". The "Add Files" dialog first displays the content of the "PTConfig" folder on the Prinect server. 4. In the "Look in" list box, go to the "PTDocs" folder of the Prinect server. Open the "Testjobs\HDC- ity\PDF" folder here (this job is an example; you can also use other suitable PDF files). Prinect DFE – User’s Guide 47
Manual Creation of a Print Job

5. Highlight the "HD_City.pdf" file and click "OK".

48                                                    Version 2021
Manual Creation of a Print Job

Add documents using drag-and-drop
As an alternative to the "Add" button, you can also add PDF documents to the "Documents" step by
dragging-and-dropping them from a Windows Explorer window (or Macintosh Finder window):
1.   In addition to the Prinect Cockpit, open the Windows Explorer and go to the folder where the
     files you want are located.

2. In the example, mark "HD_City.pdf", drag it holding down the left mouse button to the "Docu-
   ments" area in the open job or to the "Documents" icon and let go of the mouse button. Adding
   documents using drag-and-drop to the step icon works even if the step is not open at that
   moment.

Because the job was activated before you added the files, the PDF documents are processed imme-
diately by the "Qualify_HDCity" sequence. After processing is finished, the documents will have
"Completed" as their status.

Prinect DFE – User’s Guide                                                                      49
Manual Creation of a Print Job
Edit colors
In this step, you will check whether the documents you added have spot colors. Spot colors are
replaced by CMYK process colors for digital printing. Normally, the PDF files contain the "recipes" for
spot color replacement. In our example, we will show how you can define or modify a spot color
replacement in the job settings.
1. Click the small arrow in the top left icon (1) and select "Colors".
The colors found in the loaded documents display in this view. For example, in the "HDCity"
booklet, "PANTONE 281 CV_cmyk" displays as a spot color in addition to the CMYK process col-
ors:
50 Version 2021Manual Creation of a Print Job
2. The CMYK substitute values for this spot color display in the relevant table column. These values
were already in the PDF files. You can overwrite the values for C, M, Y and K if you wish to
change this "color recipe". The result displays immediately in the spot color patch.
After your input, the information in the "Source" column switches automatically from "PDF" to
"Job". This indicates that spot color replacement for this color no longer uses the definition in
the PDF document but that it was modified as a "job setting" and is applied in this form to the
current print job. You can create a new spot color with the "New Color" button. You can import
spot colors available in Prinect DFE to the job with "Import Colors". Confirm changes to the set-
tings with "Save".
3. In our example, leave the default settings as they are.
Set up and output digital printing
i
i
Note: You can find details about these options in the Online Help of the Prinect Cockpit >
"Digital Printing Step" (invoke with the F1 key).
Go to the "Digital Printing" step. In this step, you can interactively impose (PDF) documents on a (dig-
ital) press sheet, set delivery and finishing options as well as configure the color settings of the press
and submit the imposed press sheet for output.
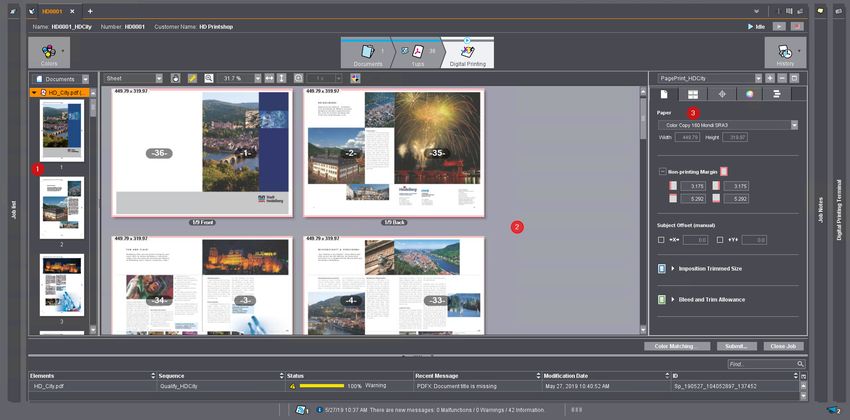
The window structure is as follows:
• The left part of the window (1) is where the single pages display.
• The preview pane (2) shows a preview of the sheet layout. The appearance of the sheet layout
depends on the imposition parameters configured in the right-hand area of the window. You can
choose between different views and use various tools to see detailed information about the
pages shown.
Prinect DFE – User’s Guide 51You can also read