UWA Apply Guide for Agents - VERSION 2.0 JULY 2020 - The University of Western Australia
←
→
Page content transcription
If your browser does not render page correctly, please read the page content below

UWA Apply
 Guide for Agents

            VERSION 2.0 JULY 2020
Welcome to
       UWA Apply

                                                           UWA Apply is The University of Western
                                                           Australia’s (UWA) system for advising, lodging
                                                           applications, submitting documents and
                                                           accepting offers for UWA undergraduate and
                                                           postgraduate coursework courses.

                                                           This is a new and evolving system and as such
                                                           we’d appreciate your feedback, including
                                                           comments on any functionality you would like
                                                           to see, as well as any bugs or issues you
                                                           encounter when using the system. You can
                                                           complete the feedback survey here or email
                                                           your feedback and questions, as well as any
                                                           suggestions you have for this guide, to
                                                           agentsupport@uwa.edu.au.

                                                           We love screenshots and descriptions of what
                                                           you are doing. Please include them where
                                                           possible to assist us with refining the system
                                                           to best suit your needs.

                                                           This guide will be continually updated based
                                                           on your feedback. For the latest version,
                                                           please visit:

                                                           uwa.edu.au/study/for-agents

GETTING THE MOST FROM UWA APPLY

Look out for tip boxes throughout this guide to give you extra
advice and helpful tricks for using the system.

                                                                                                  2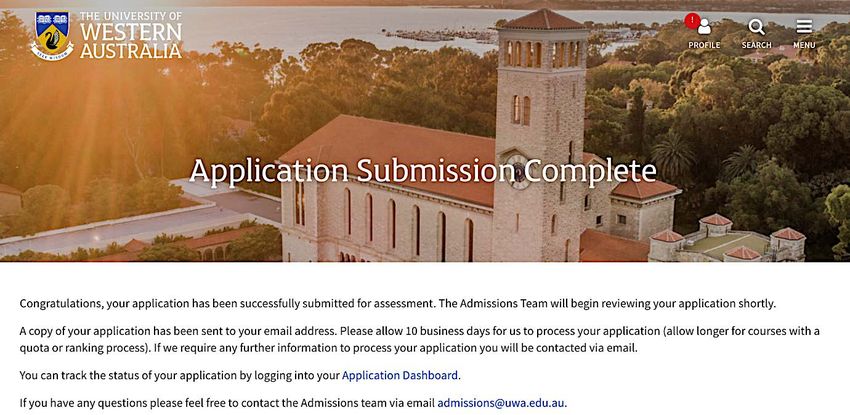
TABLE OF CONTENTS

Welcome to UWA Apply                                                 2

Getting Started                                                      4

Logging in to UWA Apply                                              5

Adding Users from your Agency                                        6

Creating Administrators for your Account                             7

Creating Counsellors on your Account                                 7

Lodging an Application for an Applicant                              8

       Step 1: Creating an Applicant Record in the Agent Dashboard   8

       Step 2: Viewing as the Applicant                              9

       Step 3: Starting or Continuing an Application                 10

       Step 4: Applicant Type                                        11

       Step 5: Course Selection                                      12

       Step 6: Course Details                                        14

                  Direct Pathway to Postgraduate Course              14

                  Admission Pathway                                  14

                  Advanced Standing (Credit)                         15

                  Other Supporting Documentation                     15

       Step 7: Qualifications                                        16

       Step 8: Personal Details                                      18

       Step 9: Review and Submit                                     20

Uploading Documents after Application Submission                     22

Accepting an Offer                                                   24

       Step 1: Viewing as the Applicant                              24

       Step 2: Start the Acceptance                                  25

       Step 3: Meet Conditions                                       26

       Step 4: Under 18s                                             27

       Step 5: Sponsorship                                           28

       Step 6: Contract Acceptance                                   29

       Step 7: Payment                                               31

       Step 8: Finalising the Acceptance                             33

Deferring an Offer                                                   34

Appendix                                                             35

                                                                          3
GETTING STARTED
Once the International Agent Management team has created your account/s, you will receive an automated
email from the system as below. Please follow the link to confirm your email and set a password for your
agency administration account.

   TIP 1: REGISTERING FOR UWA APPLY

   Do not register directly for an account via the UWA website – you must contact the
   International Agent Management Team on agentsupport@uwa.edu.au for your account to be
   set up correctly.

                                                                                                      4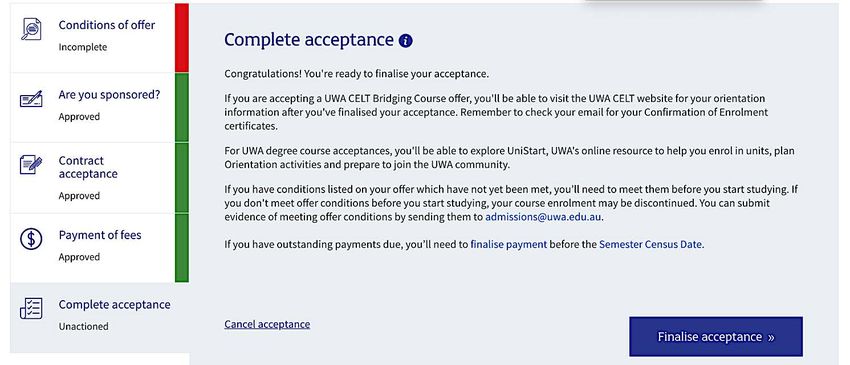
LOGGING IN TO UWA APPLY
In your browser, go to uwa.edu.au/study and click the login button on the top right of the screen.

You can then log in with the email address and password you just set. This will bring you to your agent
dashboard.

Your agent dashboard is where you can view your agency’s applications. To filter your applications according
to status, you can use the boxes next to the search bar. The box on the right allows you to filter according to
semester intake, while the box on the left allows you to filter according to the application status.

For the application status, the system will let you filter for the following statuses:

    •   Needs Review
    •   Offers Ready
    •   Offers Waiting
    •   No Offer
    •   Under Assessment
    •   Offer Accepted
    •   Needs Review & Offers Waiting

    TIP 2: THE BEST BROWSER EXPERIENCE

    To ensure that you have the best user experience with UWA Apply, we recommend that you
    update to the latest version of Chrome, Firefox or Safari.

                                                                                                             5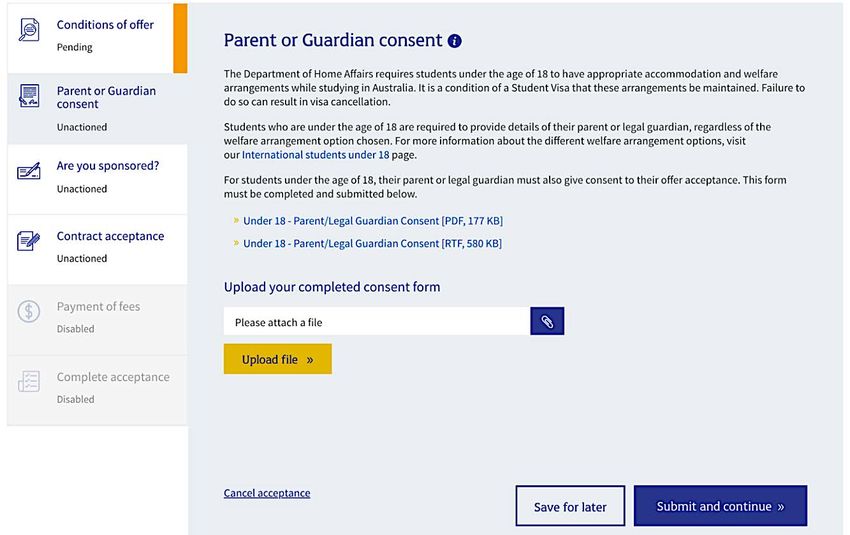
ADDING USERS FROM YOUR AGENCY
Before submitting applications for your applicants, you need to set up your agency account.

Using the search bar, you can type the user’s first name, last name or full name to display their details on
screen.

To add a user for your agency, click ‘Users’ in the top right-hand corner.

   MY AGENCY (AG-000)

   Agent

If you click ‘Add User’ a pop-up will appear where you can add the user’s details.

   MY AGENCY (AG-000)                                                                               AGENTDASHBOARD

    Agent

Once you click ‘Add’, the user will receive a verification email, similar to the one on page 4 of this guide, to
create their account.

    TIP 3: USING THE SCROLL FUNCTION

    The arrow buttons located in the top right corner of your agent dashboard will allow you to
    move between different pages of your dashboard.

                                                                                                                     6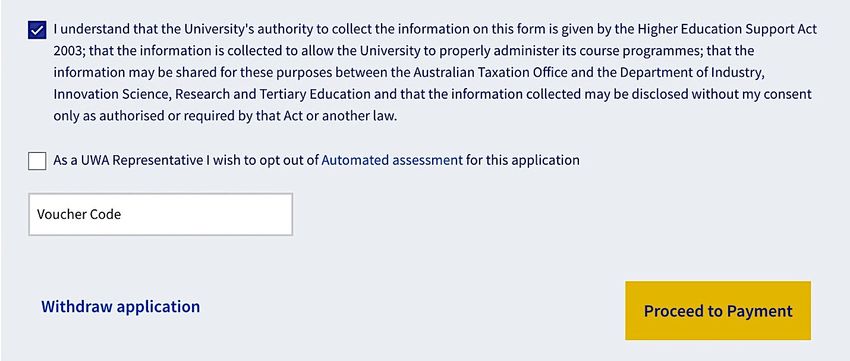
CREATING ADMINISTRATORS FOR YOUR ACCOUNT

Administrators are the access masters of your account – they can create other administrators and create
counsellors in your agency, as well as lodge applications for applicants. All administrators can see the details
for all counsellors and applicants associated with your agency branch.

   TIP 4: CHOOSING YOUR ADMINISTRATORS

   You can define administrator accounts depending on how your agency is structured. For example, you
   may only want one head office administrator account or you may want an administrator account for
   every office in your organisation.

   The number of users you create does not impact where UWA Admissions will send email
   communications. All offer letters and other communications will continue to go to the single email
   address that you have previously nominated to UWA.

CREATING COUNSELLORS ON YOUR ACCOUNT

Counsellors are the users who will lodge applications to UWA. They cannot create other counsellors or
administrators. Counsellors can see all applicants under your agency branch, as well as create new applicants.

   TIP 5: MANAGING THE COUNSELLORS ON YOUR ACCOUNT

   You can create as many counsellors as you want, but we suggest that you link each counsellor account
   to the counsellor’s company email. When your staff member leaves the company, be sure to delete
   their account.

   UWA Apply works best when you create an account for everyone who will be lodging applications on
   the system. Having multiple people logging into the same account will impact on the functionality of
   the system.

                                                                                                              7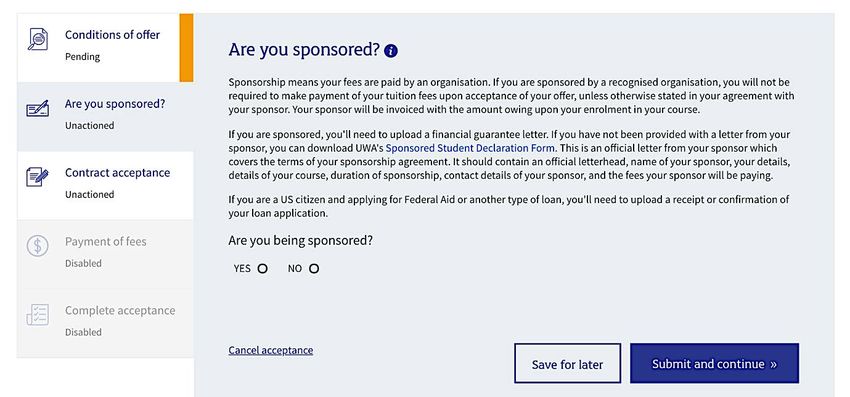
LODGING AN APPLICATION FOR AN APPLICANT
Step 1: Creating an Applicant Record on the Agent Dashboard

Click the ‘Add Applicant’ button on the agent dashboard.

  MY AGENCY (AG-000)

  Agent
  Agent

A pop-up will appear where you can add the applicant’s details to create their record in the UWA Apply
system.

The applicant will receive an email from the system asking them to verify the account. Please note, you do
not need to wait for them to verify the account; however, please encourage your client to do so as it may
make future steps in the application and acceptance process easier and faster.

If the applicant already has an account with UWA (if, for example, they were with another agent or have an
application with UWA directly), they will be asked to confirm and verify their relationship with your agency.

   TIP 6: EMAIL COMMUNICATIONS FROM UWA APPLY

   The applicant’s email address is their unique identifier in UWA Apply, so ensure that you enter the
   applicant’s email and not your company email. The email cannot be changed so be sure to enter it
   correctly. Please note that the relevant counsellor email will be copied into all pre-submission emails
   sent to the applicant and the nominated agency email address will receive all post-submission
   communications from UWA Admissions.

                                                                                                             8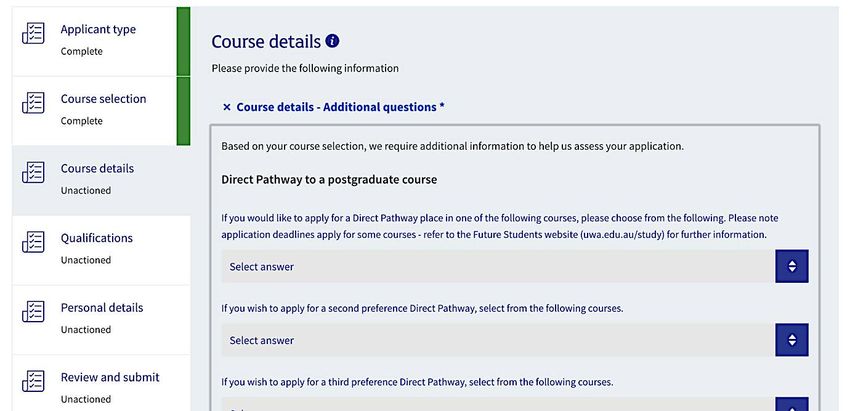
TIP 7: ONE APPLICATION AT A TIME

   Opening multiple tabs in UWA Apply within the one browser may cause odd behaviour. We
   recommend working on only one applicant at a time. If you already have an impersonation session
   running, you will be directed to clear the old session before continuing (see screenshot below).

   MY AGENCY (AG-000)                                                                         AGENTDASHBOARD

   Agent

Step 2: Viewing as the Applicant

To lodge an application for your newly created applicant, click ‘View as’.

To make an application read only, so that the applicant cannot edit their application, click the person icon
and click ‘Make Read Only’. If the applicant already has a UWA Student ID it will appear in the person icon
box with their email.

                                                                                                               9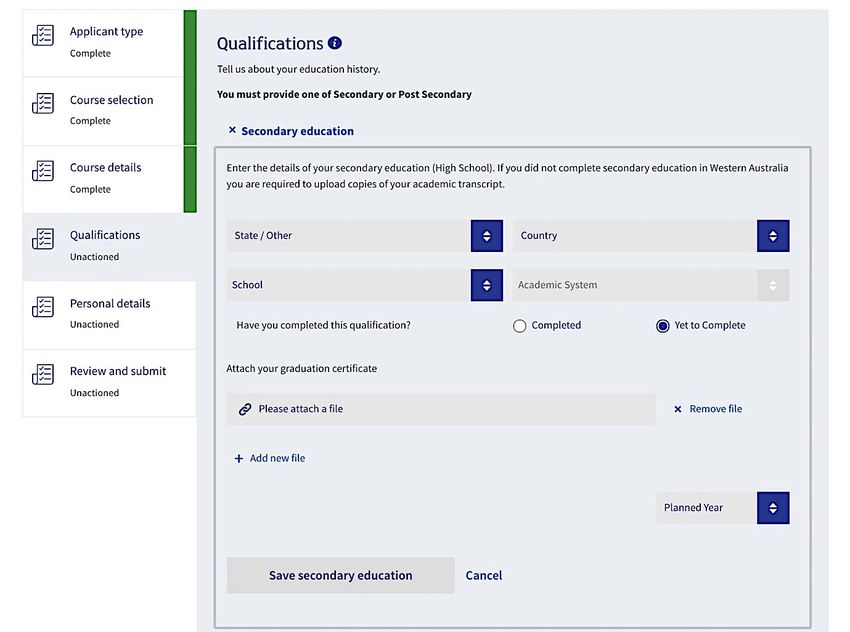
TIP 8: REMOVING AN APPLICANT FROM YOUR DASHBOARD

   If you need to remove an applicant from your agent dashboard, click on the person icon and then click
   ‘Remove’. Please note that this will not delete any of the applicant’s data from the system; it will only
   remove the applicant from your agent dashboard.

Step 3: Starting or continuing an application

After you click on ‘View as’ you are taken to the applicant dashboard. This is referred to as ‘impersonation’ and
gives you the same view as what the applicant sees if you have allowed write access for them.

Click the ‘Start my Application’ or ‘Continue application,’ button.

                                                                                                               10
TIP 9: USING UWA APPLY TO ADVISE YOUR APPLICANTS
If an applicant was previously with another agent, or has lodged an application directly, their
application history will appear here if transferred.
Similarly, if the applicant has saved courses they will appear on this page. We recommend that you
also use the ‘save’ functionality when you are counselling your applicants, as this will allow you to
quickly access courses of interest, as well as view information on relevant careers based on the
applicant’s selected courses.
TIP 10: UNDERSTANDING ‘IMPERSONATION’
The yellow ribbon at the bottom of the screen will notify you which applicant you are impersonating. If
you would like to look at a different applicant and return to your agent dashboard click on the ‘End
impersonation’ button.
Step 4: Applicant Type
The first step is to select the citizenship type. Once you start selecting answers in this system, the subsequent
questions will adapt in response to your answers.
International Student Visa is the choice most agents will make for applicants who require a student visa.
Please note that no commission is payable for applicants of the following types: Australian Citizen, New
Zealand Citizen, Australian Permanent Resident, Australian Temporary Resident and Humanitarian Visa.
11After selecting the citizenship type, select the application type.
Step 5: Course Selection
The next step is to select the UWA course the applicant wishes to study. If you or the applicant have previously
saved courses against their profile, their preferences will pre-fill here.
12Each application can have up to six (6) preferences. These preferences will be assessed by UWA Admissions
in descending order. Assessment of preferences will stop after an offer has been made for the highest
preference, or if no offer is made.
After each preference is selected, please click ‘Save course’. You will then be able to enter the next preference.
For each preference, a course location, intake period and major/specialisation (if applicable) must be chosen.
The system will only give you the available options for the selected course.
Once all the preferences are filled, or no more preferences are desired, click continue.
TIP 11: MORE THAN SIX (6) COURSE PREFERENCES?
If more than six (6) preferences are required, you can submit the current application and start another.
Only one in progress and unsubmitted application is allowed for an applicant at one time.
TIP 12: CHANGING COURSE PREFERENCES OR MAJOR SELECTION
Course preferences and majors/specialisations cannot be changed after submission. If an applicant
wishes to change preferences or their major/specialisation, please contact UWA Admissions and state
the updated first preference course or major. Conversely, you can submit a new application via the
system (the applicants’ details will pre-fill in the new application).
TIP 13: SELECTING THE MEDICAL SCIENCES MAJOR
Please note that the Medical Sciences major will not appear in the drop-down box if you select the
Bachelor of Biomedical Sciences course for your applicant. Instead, the system will ask you at Step 6 if
your applicant would like to be considered for a place in the Medical Sciences major.
13Step 6: Course Details
Direct Pathway to a Postgraduate Course
This question is for applicants who wish to have a Direct Pathway to a UWA postgraduate course.
If you applicant does not want a Direct Pathway, or does not have a preference, please select ‘I do not wish to
apply for a Direct Pathway’ from the drop-down menu.
Admission Pathway
If you select ‘yes’ to this question, UWA will try to find entry into your applicant’s course if they do not meet
the admission requirements.
Please select yes if your applicant would like a package with the UWA Centre for English Language Teaching
(CELT) or a package of a Graduate Certificate and Masters course package.
TIP 14: HOW TO ANSWER THE ADMISSION PATHWAY QUESTION
If, for example, an applicant applying for the Master of Business Information and Logistics
Management does not have the marks to get a direct offer and ‘yes’ is selected for UWA to offer a
pathway, the applicant will receive a package offer for a Graduate Certificate in Commerce and the
Master of Business Information and Logistics Management. If ‘no’ is selected, the application will be
assessed as ineligible.
14Advanced Standing (Credit)
This question indicates if the applicant would like to be considered for advanced standing and to have
previous tertiary study credited towards their degree.
Other Supporting Documentation
Here you can also upload any additional documents that you may need to submit (note that there are
upcoming questions for academic transcripts, English Language Competency and identification
documents).
TIP 15: WHEN TO UPLOAD SUPPORTING DOCUMENTATION
Use the ‘Other Supporting Documentation’ upload to attach any files required as part of the admission
requirements for your applicant’s chosen course. For example, this is where you would upload the
Personal Statement required for applying for a Master of Teaching.
You may also use the upload function if you have received all supporting documentation in one scan
from the applicant and do not wish to separate the documents. Please ensure you consult and meet
our scanned document requirements.
15Step 7: Qualifications
At this step you will complete the details of the applicant’s qualifications. Depending on the applicant’s course
preferences, you will be required to submit either secondary school or post-secondary/tertiary qualifications.
For example, if a medicine direct pathway is selected, UWA Admissions will require ISAT (International
Students Admissions Test) results.
Please upload clear scans as per UWA’s document guidelines and ensure all sides of the document are
uploaded.
TIP 16: COMPULSORY QUESTIONS
To assist you with progressing your applications as quickly as possible, look out for compulsory
questions that are marked with an asterisk ( * ). These questions must be answered in order for you to
submit the application.
16You will also be required to upload evidence that your applicant satisfies UWA’s English Language
Competency requirements. If an applicant has not undertaken an English test yet, but is planning to, please
indicate the ‘Planned Year’ and upload proof that the applicant is planning to take the test (for example, a
booking confirmation receipt).
TIP 17: ENSURING THAT YOU HAVE SUPPLIED REQUIRED INFORMATION
As you complete the application steps, the tabs on the left of the screen will become green, indicating
that they are complete. If a tab is coloured orange, this means further information is required.
17Step 8: Personal Details
The applicant’s personal details are completed on this screen. Please ensure that you enter the details as per
the applicant’s passport.
We also require the applicant’s contact details. Use the applicant’s address and phone number and not your
agency’s contact details. If available, please use the applicant’s Australian address.
18At this stage, we require you to indicate whether or not the applicant will require OSHC (Overseas Student
Health Cover) organised through UWA and, if so, what type of cover is required.
Finally, we require you to upload your applicant’s proof of citizenship. We recommend uploading a clear
colour photo of the applicant’s passport.
19Step 9: Review and Submit
At this stage, you can review the selections you have made in the scroll down box. You are then required to
read the conditions, indicate acceptance and press the ‘Proceed to Payment’ box.
If you have a fee-waiver/voucher code provided to you by the International Agent Management team, you
can enter it in the text box located below the terms and conditions. You can also opt out of automated
assessment for the application.
20TIP 18: WHAT IS AUTOMATED ASSESSMENT?
For applicants of certain nationalities and academic backgrounds, UWA Apply uses automated
assessment – a business logic tool that automatically assesses and issues offer to applicants based on
the answers in their application. Documents submitted in these applications will only be assessed
where an applicant or their agent chooses to accept the offer.
If you would like to ensure that a UWA Admissions Assessment Officer assesses the submitted
application against the course entry requirements, ensure you check the ‘opt-out’ tick box.
Please note that, as of July 2020, automated assessment only applies to 6% of applications submitted
to UWA.
If you do not have a fee-waiver/voucher code, you can proceed to our secure payment gateway.
TIP 19: RESOLVING PAYMENT ISSUES
In an effort to prevent credit card fraud, our payment gateway may sometimes block payment. If you
continually encounter this issue, please contact agentsupport@uwa.edu.au.
21Once you select ‘Pay Now’, the application will be submitted and complete.
UPLOADING DOCUMENTS AFTER APPLICATION
SUBMISSION
If you need to upload further documents to a previously submitted application you can do so directly via the
agent dashboard or via the applicant profile during impersonation.
Upload documents on the agent dashboard
On the agent dashboard, click the plus (+) button to the left of the applicant’s name to expand the box so that
you can see further details of their application. Click the ‘Document Upload’ link.
22When the Document Uploader pop-up appears, select the file type from the dropdown menu, attach the file
and click ‘Submit’.
Upload documents during impersonation
Alternatively, you can impersonate the applicant by clicking the 'View as' button. You will then be taken to
the applicant's profile where you can select the 'Document Upload' link from the applications card. The
Document Uploader will then appear (as above), which will allow you to select the file type and attach and
submit the relevant documents.
23ACCEPTING AN OFFER
Once an offer has been made by UWA Admissions, the application status will be updated on the agent
dashboard and a green tag will highlight that a new offer is available. You will also see some additional
buttons where the offer letter and the conditions of the offer letter will be available. You can now commence
the acceptance process.
Step 1: Viewing as the Applicant
To accept an offer for your applicant, click ‘View as’.
TIP 20: ADDING HISTORICAL APPLICANTS FROM AGENTCONNECT
If you are actioning an offer for an application submitted with the old system (agentConnect), a screen
will appear with the applicant’s name and email address. Pressing submit will create their account in
UWA Apply and you will be able to continue the acceptance process.
24Step 2: Start the Acceptance
On the applicant dashboard you will see all available offers and the options to Accept, Defer or Decline.
Click the ‘Accept’ button next to the course you wish to accept or, if the acceptance has already been started,
click the ‘Continue’, button. This will open our ‘Acceptance Wizard’ which will commence the acceptance
process.
TIP 21: ACCEPTING PACKAGE OFFERS
If you’re accepting a package offer, please note that you can only accept one course offer at time and
in the order that the courses will be undertaken by the applicant. For example, for a CELT + Degree
package, the CELT bridging course must be accepted first, not the degree course.
25Step 3: Meet Conditions
If the offer has any outstanding conditions, please upload the required documents to satisfy these
conditions here.
Once the documents have been uploaded and you click ‘Submit and continue’ they will be checked by UWA
Admissions. You will be notified via email when the conditions have been met, the tab in the acceptance
wizard will change from orange to green, and the status on the agent dashboard will change from
Conditional Offer – Pending to Unconditional offer (see Appendix).
Please note that, if you are in the process of satisfying a condition, you should not cancel out of the acceptance
until you have received acknowledgement from UWA Admissions that the document has been assessed.
This tab will not appear if the applicant has an unconditional offer.
TIP 22: ACCEPTING OFFERS WITH ELC CONDITIONS
Many offers with academic or English conditions can be accepted without uploading documents to
satisfy these conditions. If this applies to a particular applicant’s case, the application status field on the
agent dashboard will state ‘Conditional Offer’ with a green tick.
26Step 4: Under 18s
If the applicant is under 18 years of age at the time of course commencement, the ‘Parent or Guardian
consent’ tab will appear. The Under 18 Consent form will need to be downloaded, completed and uploaded
for approval by UWA Admissions. Once confirmed, you will receive an email and the acceptance tab will
change from orange to green, allowing you to proceed with the acceptance.
TIP 23: TRACKING THE PROGRESS OF YOUR ACCEPTANCE
The progress tabs will appear red prior to submission, orange after submission and prior to UWA
Admissions approval and green when complete.
27Step 5: Sponsorship
Some applicants are sponsored by a third party: for example, a government body, employer or diplomatic
organisation. If the applicant is sponsored, select ‘yes’, enter the name of the sponsor and upload the required
documents, including evidence of financial guarantee. Once this is approved by UWA Admissions you will
receive an email and the acceptance tab will change from orange to green, allowing you to proceed with the
acceptance.
If the applicant is not sponsored, select ‘no’ and continue to the next tab.
28Step 6: Contract Acceptance
Due to the requirements of the Education Services for Overseas Students Act (2000) (ESOS Act), the applicant
must accept their contract themselves. You have two options to facilitate the applicant’s acceptance:
1. Click ‘Notify Applicant’. The applicant can then log in to UWA Apply and accept the contract digitally.
This will be the quickest method and will allow either you or the applicant to proceed immediately to
payment. If the applicant has not previously set up their UWA Apply account, they will need to set up
a Pheme account now. They must read through the whole contract before they will be able to select
the box to accept the terms and conditions of the Acceptance Contract and the Refund Policy.
2. Download and print a copy of the acceptance contract, have the applicant sign it and upload the
scanned copy to UWA Apply. This will go to UWA Admissions for confirmation against the passport
and for approval, which may delay the acceptance process. After UWA Admissions approval is given,
you will be able to proceed to payment. As UWA Admissions will need to process the uploaded
document, this option will always be less efficient than option 1.
2930
Step 7: Payment

This tab will show you the amount due to finalise acceptance and will direct you to our payment gateway for
Western Union or Credit Card payments. You can also upload your proof of payment here for TT (telegraphic
transfer) or bank cheque payments.

We encourage online payments via our Western Union gateway, as it has a faster processing time, which in
turn leads to faster processing of your offer acceptance. If you have opted to make payment via an alternative
payment method (telegraphic transfer or cheque) you can click on the ‘Alternative payment methods’ link,
which will open an uploader where you can attach and upload the evidence of payment.

Once the payment is received and confirmed by UWA Admissions, the Confirmation of Enrolment (CoE) will
be issued by UWA Admissions and the acceptance can be finalised.

   TIP 24: PAYMENT FOR CELT PACKAGE OFFERS

   If you are accepting a CELT package offer on behalf of an applicant, the acceptance process on UWA
   Apply is the same as for UWA courses. Please note, however, that whether payment is made directly
   via UWA Apply or not, you will need to email proof of payment and a scanned copy of the applicant’s
   passport (if not already supplied) to enrolments-celt@uwa.edu.au. CELT will then issue the CoE for all
   courses in the package.

                                                                                                            31
Paying by Telegraphic Transfer
You will need to quote the following details:
Name of Bank Westpac Banking Corporation
Payment To The University of Western Australia
Account Name The University of Western Australia – General Account
Branch & Account Number 036054 - 304688
IBAN 036054304688
Payment Details Student ID & Full Name
Instructions to Banker Send telegraphic transfer on ‘Credit account and advise’ terms
Address University Campus
UWA Guild Village, Hackett Drive
CRAWLEY WA 6009
SWIFT Code WPACAU25
Please notify UWA Admissions immediately upon making a telegraphic transfer by submitting a copy of the
bank receipt of the transfer by uploading it in UWA Apply.
Paying by Bank Draft / Cheque
Mail cheques or bank drafts made payable to ‘The University of Western Australia’, to the following address:
Associate Director
Admissions M353
The University of Western Australia
35 Stirling Highway
PERTH WA 6009 Australia
Be sure to include the applicant’s student ID to link the payment to the correct applicant. You are also
required to upload a scan of the bank draft/cheque to UWA Apply as proof of payment.
32Step 8: Finalising the Acceptance
After payment has been approved by UWA Admissions, you will receive an email and the CoE will be made
available on UWA Apply. At this time, you can finalise the acceptance in the Acceptance Wizard, which will
allow the applicant to continue to enrolment using UniStart.
33DEFERRING AN OFFER
If your applicant is unable to accept their offer, but would like to be considered for another intake, select the
defer link from their available offers.
Once you click on the link you will be asked to confirm the intake when the applicant wishes to commence
their studies and to confirm their deferment.
Bachelor of Arts – Music: Electronic Music and Sound Design(BP001) – Semester 1, 2021
34APPENDIX I: APPLICATION AND OFFER STATUSES IN UWA
APPLY
On your agent dashboard you will be able to see the status of your agency’s applications and offers. Below is
a guide to understanding these statuses.
Before an application is submitted
Status Description (what the status means)
The applicant does not have any applications
An application has been started, but has not been submitted
The application was withdrawn prior to submission
After an application is submitted, prior to an outcome being available
Status Description (what the status means)
The application has been submitted and is being transferred to the
Admissions database
The application has been received by UWA Admissions and is being
prepared for assessment
The application has been received by UWA Admissions; however,
outstanding documents are required before an outcome is reached
A higher preference within the same application is being assessed. This
preference will not be assessed unless the applicant does not receive an
offer for their higher preference
The application is being assessed by the relevant faculty
Assessment is being finalised. This status is used after the faculty
assessment is complete. UWA Admissions may need further
information prior to recording the application outcome
The application is being ranked. This status is used for quota-based
courses. Outcomes for applications that require ranking will be held
until all applications are assessed and ranked
The application has been withdrawn by the applicant or agent
35Outcome of an application
Status Description (what the status means)
Offer of Admission (unconditional). Can be accepted and CoE issued
Offer of Admission subject to conditions. Can be accepted and CoE
granted before satisfying conditions
Offer of Admission subject to conditions. Conditions have been satisfied
or waived. Can be accepted and CoE issued
Offer of Admission subject to conditions. Further documentation is
needed to satisfy conditions and complete acceptance
Other transfer application approved
Application submitted after deadline or incorrectly
Applicant not eligible for an offer
Offer of Admission withdrawn by UWA
Response to an offer
Status Description (what the status means)
Acceptance in progress. The applicant or agent has started the offer
acceptance process, but has not yet completed the process
The applicant has paid their full first payment as stated in their offer
letter and a CoE has been issued. The applicant can now complete the
acceptance process in UWA Apply and then proceed to enrolment
Offer accepted. Acceptance process complete
Offer of Admission subject to conditions. Offer can be accepted and CoE
granted before satisfying conditions
Offer of Admission declined by the applicant or agent
Offer deferred and awaiting reassessment
Applicant or agent did not respond to the offer and the offer has now
expired
36APPENDIX II: AGENT ASSOCIATION AND UWA APPLY
If, when you follow the instructions at Step 1 to add an applicant, you received the below pop-up notice
informing that the user already exists this means that the applicant is already associated with another UWA
agency or had applied directly to UWA.
The applicant will receive an email requesting that they confirm that they would like your agency to
represent them.
Hi Ho-seok,
Agency office My UWA Agency 2
37When they click on the link they will be directed to their applicant dashboard where they can approve your
request to be their agent.
Ho-seok
My UWA Agency
Please note that you will need to complete a Nomination of Agent Form with the applicant and send it to
agentsupport@uwa.edu.au for your agent association to be confirmed and to received commission for the
applicant.
38CONTACT
FOR FURTHER INFORMATION OR
ASSISTANCE
EMAIL agentsupport@uwa.edu.au
VISIT uwa.edu.au/study/for-agents
CRICOS Code 00126G
39You can also read