Uwazi - Jun 21, 2022 - UWAZI Documentation
←
→
Page content transcription
If your browser does not render page correctly, please read the page content below

Uwazi

Jun 21, 2022
Contents

1   Administrator’s guide                                                                                                                        1
    1.1 Introduction to Uwazi . . . . . . . . . . . . . . . . . . . . . . . . . . . . .     .   .   .   .   .   .   .   .   .   .   .   .   .    1
    1.2 Glossary of Terms . . . . . . . . . . . . . . . . . . . . . . . . . . . . . . .     .   .   .   .   .   .   .   .   .   .   .   .   .    2
    1.3 MANAGING YOUR COLLECTION’S SETTINGS . . . . . . . . . . . . .                       .   .   .   .   .   .   .   .   .   .   .   .   .    3
        1.3.1    How to configure your account . . . . . . . . . . . . . . . . . . . .      .   .   .   .   .   .   .   .   .   .   .   .   .    3
        1.3.2    How to create, edit and delete users . . . . . . . . . . . . . . . . .     .   .   .   .   .   .   .   .   .   .   .   .   .    4
        1.3.3    How to configure your collection’s general settings . . . . . . . . .      .   .   .   .   .   .   .   .   .   .   .   .   .    6
        1.3.4    How to track your collection’s web analytics . . . . . . . . . . . . .     .   .   .   .   .   .   .   .   .   .   .   .   .    7
        1.3.5    How to configure a Contact Form or Submission Form . . . . . . .           .   .   .   .   .   .   .   .   .   .   .   .   .    8
        1.3.6    How to customise your collection’s map configurations . . . . . . .        .   .   .   .   .   .   .   .   .   .   .   .   .    8
    1.4 BUILDING YOUR INFORMATION ARCHITECTURE . . . . . . . . . . .                        .   .   .   .   .   .   .   .   .   .   .   .   .    9
        1.4.1    How to create templates . . . . . . . . . . . . . . . . . . . . . . .      .   .   .   .   .   .   .   .   .   .   .   .   .    9
        1.4.2    Understanding properties . . . . . . . . . . . . . . . . . . . . . . .     .   .   .   .   .   .   .   .   .   .   .   .   .   11
        1.4.3    Select and Multiselect properties . . . . . . . . . . . . . . . . . . .    .   .   .   .   .   .   .   .   .   .   .   .   .   11
        1.4.4    Geolocation property . . . . . . . . . . . . . . . . . . . . . . . . .     .   .   .   .   .   .   .   .   .   .   .   .   .   13
        1.4.5    Relationship property . . . . . . . . . . . . . . . . . . . . . . . . .    .   .   .   .   .   .   .   .   .   .   .   .   .   14
        1.4.6    Generated ID property . . . . . . . . . . . . . . . . . . . . . . . .      .   .   .   .   .   .   .   .   .   .   .   .   .   17
    1.5 WORKING WITH ENTITIES IN YOUR COLLECTION . . . . . . . . . .                        .   .   .   .   .   .   .   .   .   .   .   .   .   18
        1.5.1    Understanding view and edit permissions for entities . . . . . . . .       .   .   .   .   .   .   .   .   .   .   .   .   .   18
        1.5.2    How to add new entities to the Library . . . . . . . . . . . . . . . .     .   .   .   .   .   .   .   .   .   .   .   .   .   18
        1.5.3    How to directly add PDFs to the Library . . . . . . . . . . . . . . .      .   .   .   .   .   .   .   .   .   .   .   .   .   19
        1.5.4    How to add entities in bulk with CSV import . . . . . . . . . . . .        .   .   .   .   .   .   .   .   .   .   .   .   .   19
        1.5.5    How to edit properties on multiple entities . . . . . . . . . . . . . .    .   .   .   .   .   .   .   .   .   .   .   .   .   21
        1.5.6    How to use Copy From . . . . . . . . . . . . . . . . . . . . . . . .       .   .   .   .   .   .   .   .   .   .   .   .   .   22
        1.5.7    How to export entities . . . . . . . . . . . . . . . . . . . . . . . . .   .   .   .   .   .   .   .   .   .   .   .   .   .   22
        1.5.8    How to print entities . . . . . . . . . . . . . . . . . . . . . . . . .    .   .   .   .   .   .   .   .   .   .   .   .   .   23
    1.6 ORGANISING & EXPLORING YOUR COLLECTION . . . . . . . . . . .                        .   .   .   .   .   .   .   .   .   .   .   .   .   23
        1.6.1    How to view entities and documents . . . . . . . . . . . . . . . . .       .   .   .   .   .   .   .   .   .   .   .   .   .   23
        1.6.2    OCR PDFs within Uwazi . . . . . . . . . . . . . . . . . . . . . . .        .   .   .   .   .   .   .   .   .   .   .   .   .   24
        1.6.3    Configuring and using the filters sidebar in the Library . . . . . . .     .   .   .   .   .   .   .   .   .   .   .   .   .   24
        1.6.4    How to search within your collection . . . . . . . . . . . . . . . . .     .   .   .   .   .   .   .   .   .   .   .   .   .   27
        1.6.5    How to sort entities in the Library . . . . . . . . . . . . . . . . . .    .   .   .   .   .   .   .   .   .   .   .   .   .   28
        1.6.6    How to create a table of contents . . . . . . . . . . . . . . . . . . .    .   .   .   .   .   .   .   .   .   .   .   .   .   28
        1.6.7    How to create References . . . . . . . . . . . . . . . . . . . . . . .     .   .   .   .   .   .   .   .   .   .   .   .   .   28
        1.6.8    How to create Relationships between entities in the Information Hub        .   .   .   .   .   .   .   .   .   .   .   .   .   29
    1.7 CUSTOMISING YOUR COLLECTION’S DESIGN . . . . . . . . . . . . .                      .   .   .   .   .   .   .   .   .   .   .   .   .   30

                                                                                                                                                 i
1.7.1 How to configure your collection’s main navigation menu . . . . . . . . . . . . . . . . . . . 31
1.7.2 How to add pages to your collection . . . . . . . . . . . . . . . . . . . . . . . . . . . . . . 32
1.7.3 How to display entities as stylised pages . . . . . . . . . . . . . . . . . . . . . . . . . . . . 33
1.7.4 Add a contact form to a page . . . . . . . . . . . . . . . . . . . . . . . . . . . . . . . . . . 38
1.7.5 Add a submission form to a page . . . . . . . . . . . . . . . . . . . . . . . . . . . . . . . . 39
1.8 TRANSLATING YOUR COLLECTION . . . . . . . . . . . . . . . . . . . . . . . . . . . . . . . . 40
1.8.1 How to configure the available languages for your collection . . . . . . . . . . . . . . . . . 41
1.8.2 How to translate the Uwazi interface . . . . . . . . . . . . . . . . . . . . . . . . . . . . . . 41
1.8.3 How to translate the contents of your collection . . . . . . . . . . . . . . . . . . . . . . . . 42
1.8.4 Managing translations over time . . . . . . . . . . . . . . . . . . . . . . . . . . . . . . . . 44
1.9 VISUALISING & ANALYSING YOUR COLLECTION’S DATA . . . . . . . . . . . . . . . . . . . 45
1.9.1 How to access the API for your instance . . . . . . . . . . . . . . . . . . . . . . . . . . . . 45
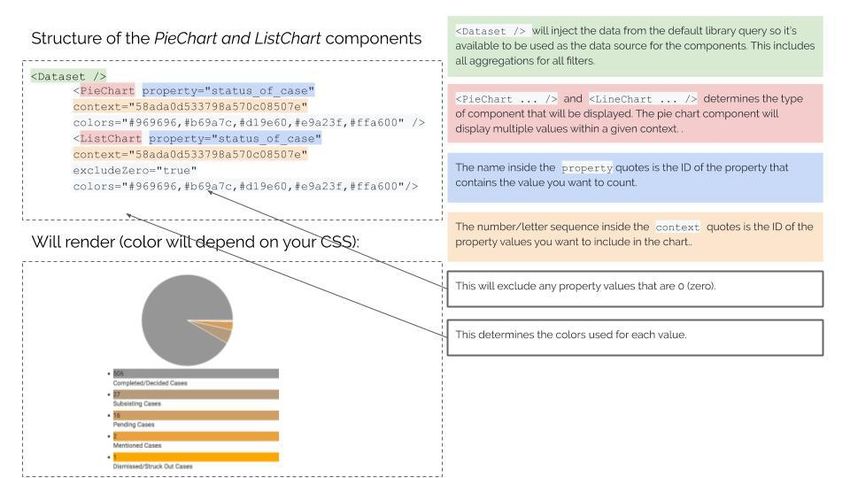
1.9.2 How to build data visualisation components . . . . . . . . . . . . . . . . . . . . . . . . . . 46
1.9.3 How to display your information on a map . . . . . . . . . . . . . . . . . . . . . . . . . . . 51
1.9.4 How to configure EntityInfo components . . . . . . . . . . . . . . . . . . . . . . . . . . . 54
1.9.5 Value component . . . . . . . . . . . . . . . . . . . . . . . . . . . . . . . . . . . . . . . . 54
1.10 INTEGRATIONS AVAILABLE IN UWAZI . . . . . . . . . . . . . . . . . . . . . . . . . . . . . . 55
1.10.1 Tella . . . . . . . . . . . . . . . . . . . . . . . . . . . . . . . . . . . . . . . . . . . . . . . 55
1.11 REPORTING PROBLEMS IN UWAZI . . . . . . . . . . . . . . . . . . . . . . . . . . . . . . . . . 57
2 Systems administrator’s guide 59
2.1 Install Uwazi on your server . . . . . . . . . . . . . . . . . . . . . . . . . . . . . . . . . . . . . . . 59
2.2 Backup . . . . . . . . . . . . . . . . . . . . . . . . . . . . . . . . . . . . . . . . . . . . . . . . . . 60
2.3 Multi-tenancy . . . . . . . . . . . . . . . . . . . . . . . . . . . . . . . . . . . . . . . . . . . . . . 61
2.3.1 The most basic working example . . . . . . . . . . . . . . . . . . . . . . . . . . . . . . . . 61
2.3.2 Serving the web app . . . . . . . . . . . . . . . . . . . . . . . . . . . . . . . . . . . . . . 62
2.3.3 Maintenance scripts . . . . . . . . . . . . . . . . . . . . . . . . . . . . . . . . . . . . . . . 63
2.4 Set up the PDF Metadata Extraction . . . . . . . . . . . . . . . . . . . . . . . . . . . . . . . . . . . 63
2.5 Set up the PDF Paragraphs Extraction . . . . . . . . . . . . . . . . . . . . . . . . . . . . . . . . . . 63
2.6 Set up the Twitter crawler service . . . . . . . . . . . . . . . . . . . . . . . . . . . . . . . . . . . . 64
ii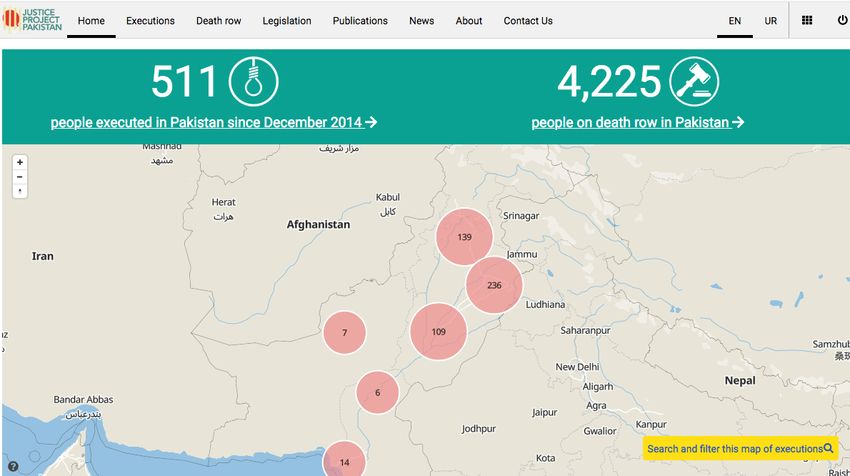
CHAPTER            1

                                                                                        Administrator’s guide

1.1 Introduction to Uwazi

Uwazi is an open-source database application that allows you to organise a collection of information and, in the
process, reveal previously hidden patterns, relationships and opportunities for action. It is developed by HURIDOCS
(Human Rights Information and Documentation Systems), an NGO that, for the past four decades, has equipped
human rights defenders with tools and strategies to mobilise information.
In Swahili, Uwazi means “openness,” and it was based on this principle that Uwazi was born. Human rights groups
deal with enormous amounts of data, accumulating years’ or even decades’ worth of facts and materials that support
the case for change. However, without safe, efficient and collaborative ways of managing it all, many of the insights
contained in these collections will remain closed off to the very people who need them most.
Uwazi was first launched in 2017 as a tool to improve access to regional jurisprudence. In consultations with human
rights defenders, we had learned that it was difficult for them to not only locate a relevant court ruling, but to also see
how it fit into the bigger picture: case documents needed to be connected to the judgment document, which needed to
be connected to the deciding judge’s case history, and so on. We thus designed Uwazi as a program for organising a
collection of documents that went beyond just metadata (such as title, author, date published, etc.)—because within
the substance of a document lies important information to highlight, tag, organise, and relate to other documents.
But it soon became clear that Uwazi had potential to be much more than document management software. Human
rights defenders don’t just work with collections of PDFs and text documents—they also gather troves of information,
observations, geolocation points, multimedia files and other data that can be hard to parse in bulk.
We have since expanded Uwazi, creating a database application that is helpful for a wide selection of changemakers,
from activists, lawyers and policymakers who conduct human rights work, to academics, archivists, media organisa-
tions and others who work to make a difference in the world.
Initial Uwazi development received significant financial support from the MacArthur Foundation and the Center for
Justice and International Law (CEJIL). Uwazi continues to be updated and refined on a regular basis by the team at
HURIDOCS, which is funded through a combination of grants, payments for services and individual donations.
Our in-house software engineers openly document the development of Uwazi on GitHub. At HURIDOCS, we believe
that any technology being developed for human rights work needs to be open source. Open-source development does

                                                                                                                         1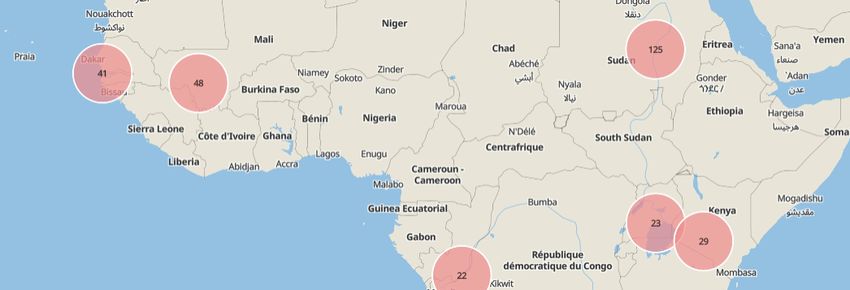
Uwazi

not guarantee utility or security, but it does facilitate input from a wide selection of people—human rights defenders,
developers, security experts—whose expertise is fundamental to a successful product.

1.2 Glossary of Terms

    • Collection refers to the database that you are building with the Uwazi software. This can also be called your
      Instance.
    • Connection - A word that is sometimes used to describe a Relationship, which is a feature that allows Entities
      to be connected to one another.
    • Cookies are bits of information shared by the websites you visit and stored on your computer’s hard drive. They
      help improve your web browsing experience as they “remember” your preferences from previous visits.
    • CSS is a language that describes how HTML elements should be displayed.
    • CSV File is a comma-separated values file that can be imported into Uwazi. It is particularly helpful when you
      have a large number of datapoints that need to be migrated into your Collection.
    • Data Model refers to the logical structure of your Collection or, in other words, how the different types of
      Entities in your collection are organised and how they relate to one another.
    • Entity - In Uwazi, an entity is a type of information in your Collection (e.g. court, person, event). It con-
      tains Properties, can hold Primary Documents and/or Supporting Files, and can have Relationships to other
      Entities.
    • Favicon is an icon that appears in the browser tab and bookmarks.
    • Filters are criteria that narrow down the types of Entities shown at a given moment in the Library. There are
      two different kinds: Primary Filters, which are derived from the types of entity Templates that exist in your
      Collection, and Secondary Filters, which are derived from specific Properties within an entity Template.
    • Instance is your specific copy of the Uwazi software. In other words, it refers to your Collection.
    • Landing page is the first page that visitors see when they arrive at your Instance.

    • Library       is the place where all of your Entities are displayed together for easy access.
    • Metadata is data that provides information about other data. In Uwazi, it usually usually describes the types of
      Properties included in an Entity.
    • Primary Document is the main PDF that can be displayed, read and highlighted within an Entity in Uwazi.
    • Property is a descriptive attribute that is assigned to Entities (e.g. author, significance, status, etc).
    • Published Entities are seen by the public (if the Instance is set to public) or everyone who has access to the
      instance (if the Instance is set to private).
    • Relationship - In Uwazi, a Relationship allows Entities to be connected to each other. We sometimes use the
      term Connection to describe the same feature.
    • Relationship Types are different types of Relationships that you can establish between or even within Entities.
      Each has a descriptive name that captures the essence of the Relationship.
    • Reference connects selected content in a PDF to something else. References can be made to other selected
      content in the same Primary Document, to other selected content in another Primary Document, to an entire
      other Primary Document, or to another Entity.
    • Restricted Entities exist in the Library but have not been Published yet. They are only accessible to Admin
      and Editor users as well as select individuals who have been granted explicit permission.
    • Supporting Files are attachments in any format (e.g., .doc, .txt, .jpg, .mp3, etc) that are relevant to an Entity.

2                                                                                 Chapter 1. Administrator’s guide
Uwazi

    • Templates are a starting point for new Entities in Uwazi. They can be built and customised with different
      properties for each type of Entity.
    • Thesauri / Thesaurus - In Uwazi, Thesauri refer to lists of terms that are referenced in Select and Multiselect
      properties. Thesauri is the plural form of the word thesaurus.
    • User is anybody who has login credentials to your Instance. There are different types of user roles (Admin,
      Editor, Collaborator) and access levels.
    • ZIP File is a compressed format that you need to use with the CSV Import feature when adding Entities that
      contain Primary Documents and/or Supporting Files.

1.3 MANAGING YOUR COLLECTION’S SETTINGS

1.3.1 How to configure your account

Change your account information

Step 1: Log into your instance.
Step 2: Navigate to the Settings area and click Accounts.
Step 3: You can change your email address here, as well as your account password.

Recover your password

Step 1: At the login screen, click Forgot Password?.
Step 2: You will receive an email from the no-reply@uwazi.io account. Follow the instructions.
    • If you cannot find this recovery email, please check if it has been filtered into your Spam folder.
    • To reinforce your account’s security, we recommend that you use unique and long passwords (a-Z, 0-9, &%).
    • Watch a screencast.

Enable two-factor authentication

To add an extra layer of security to your Uwazi instance:

1.3. MANAGING YOUR COLLECTION’S SETTINGS                                                                           3
Uwazi

Step 1: Log into your instance.
Step 2: Navigate to the Settings area and click Accounts.
Step 3: You will see Two-Step Verification, click on Protect Your Account.
Step 4: Open Authy or Google Authenticator and generate your verification code.
Step 5: Enter the code and click Confirm. If you have successfully enabled two-factor authentication, your account
settings will reflect this.
    • Watch a screencast.

Login with two-factor authentication

Step 1: Log into your instance with your credentials.
Step 2: You will be prompted to input your authentication code. Enter the code from Authy or Google Authenticator.
If the code is approved, you will be logged in.
    • Watch a screencast.
    • FAQs related to Google Authenticator
    • FAQs related to Authy

1.3.2 How to create, edit and delete users

Understanding user permissions

If you work in a team or in collaboration with other people, Uwazi allows administrators to create new users with
specific permissions to help you update your collection. Uwazi currently supports three different kinds of roles:

4                                                                            Chapter 1. Administrator’s guide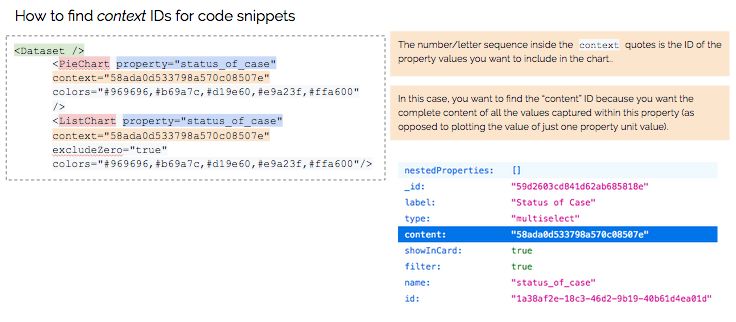
Uwazi

    • Admin role has the ability to create, see and edit all Entities; change all settings throughout the Uwazi instance;
      and add new users
    • Editor role has the ability to create, see and edit all Entities
    • Collaborator role has the ability to create new Entities and can be invited to see and edit other on an individual
      basis

Add new users to your collection

Step 1: Only an Admin can create new users. Navigate to the Settings area and click Users.
Step 2: You will see a list of all the current users who have access to your collection.

1.3. MANAGING YOUR COLLECTION’S SETTINGS                                                                               5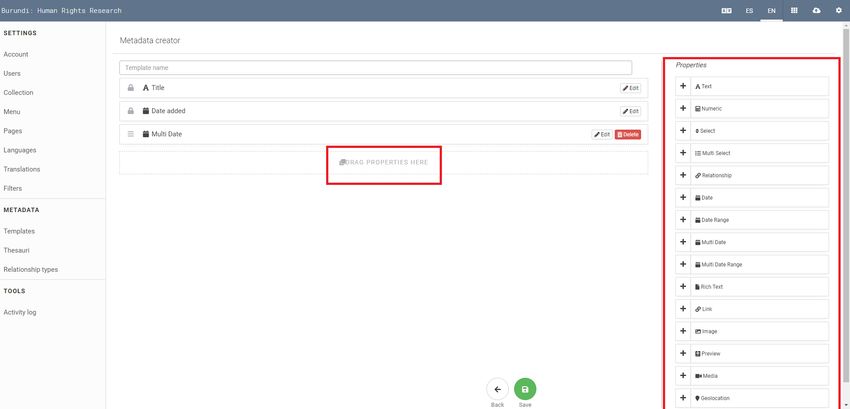
Uwazi

Step 3: You can create new users by clicking the green Add User button at the bottom. Here, you can also edit or
delete users, as necessary.
Step 4: Enter a username, their email address and select a role (Admin, Editor or Collaborator) for them.
Step 5: Once this information is entered, click the green Save button and an email will be sent to that person with a
link that allows them to set their own password.

Create new user groups

Step 1: Only an Admin can create new users. Navigate to the Settings area and click Users.
Step 2: On the Users tab, you will see a list of all the current users who have access to your collection. Switch to the
Groups tab.
Step 3: You can create new groups by clicking the green Add Group button at the bottom. Here, you can also edit or
delete users in that group, as necessary.
Step 4: Assign a Name of the group and add the usernames that you want to include.
Step 5: Once this information is entered, click the green Create Group button.

1.3.3 How to configure your collection’s general settings

You can control various basic aspects of your instance by navigating to the Settings area, then clicking on Collection
in the left sidebar. If you make any changes, please ensure that you click Save.

Change the name of your collection

The name is “Uwazi” by default, but you can change it to anything you like.
    • Watch a screencast.

Customise the favicon

A favicon is the icon representing your Uwazi collection that appears in browser tabs or in bookmarks. If you want to
replace the Uwazi icon for your own:
Step 1: Convert your image into .ico (icon) format. To do so, you can search the internet for an .ico converter. Save
the resulting file on your local drive.
Step 2: On the left sidebar under Tools, click on Uploads. Select Browse Files to Upload and upload the image that
you converted to the .ico format. Once your image uploads, copy the URL. (It will begin with /assets)
Step 3: Navigate back to the Settings area. Under Custom Favicon, toggle the option on and paste the above URL.
Step 4: Click Save, and be sure to reload the webpage after updating your favicon.

Set your landing page

The landing page is the first thing visitors will see when they arrive at your Uwazi instance. By default, the landing
page is set to the full Library    without any Filters applied.
However, you can set any page from within your Uwazi instance to act as the landing page instead. Toggle on the
option to Use Custom Landing Page and paste the relative URL in the box. A relative URL starts with a slash / and
skips the domain name. For example:

6                                                                              Chapter 1. Administrator’s guide
Uwazi
• A Page: /page/dicxg0oagy3xgr7ixef80k9
• A Library query: /library/?searchTerm=test
• A Entity: /entity/9htbkgpkyy7j5rk9
Customise the default Library view
All of the Entities in your collection live in the Library and can be viewed on demand as cards, in a table or on
a map (as long as entities have an associated geolocation). Based on your preference, you can choose to set a default
view. Learn more about organising and exploring your collection.
Change the date format
You may change the date format, based on your preference.
Make your collection private (or public)
If you are handling sensitive information or you just want your collection to be accessible only to users with login
credentials, you can toggle on the option to make the instance private.
By activating this option, your information will not be crawled by search engines, and visitors will be prompted with a
login screen when trying to access any part of your collection: the Library, individual Entities, the landing page, etc.
Show cookies policy on your site
Cookies are bits of information used by some websites you visit and stored on your computer’s hard drive. Uwazi uses
cookies to deliver an optimal experience for users and visitors alike. If you would like to display a notification about
the use of cookies upon first visit to your instance, toggle on the option to Show Cookie Policy.
Support for non-Latin characters in the names of properties
Older instances of Uwazi have an option called Non-Latin Characters Support. It enhances support for non-Latin
languages as default languages, specifically in the names of Properties within Templates. Toggling on this option
triggers an automatic update of all properties, a process that could take several minutes and will likely change the
URLs of Filters in the Library . Menus or links that use such URLs will need to be updated manually afterward.
• If you are not facing issues with your template property names, we recommend leaving this option alone.
• If you do not see this option available in the Settings area under Collection, it is because support for non-Latin
characters is activated in newer instances of Uwazi by default, so you do not need to take any action.
1.3.4 How to track your collection’s web analytics
If you want to track analytics related to the web traffic that visits your collection, Uwazi supports both Google Ana-
lytics and Matomo.
Step 1: Find your unique ID.
• FAQ on how to set up a Google Analytics ID to track website visits.
• If you are hosting your Uwazi instance with HURIDOCS, we provide Matomo Analytics as part of the hosting.
Please contact us to activate your account.
1.3. MANAGING YOUR COLLECTION’S SETTINGS 7Uwazi
Step 2: Navigate to the Settings area and click on Collection in the left sidebar.
Step 3: Toggle on the option for Google Analytics or Matomo Analytics, depending on your preference, and add the
unique ID. Click the green Save button.
1.3.5 How to configure a Contact Form or Submission Form
Mailer configuration
If your instance is hosted by HURIDOCS, then your mail system is already configured. If you are hosting an instance
on your own server, then you can configure your own SMTP or any other mail server.
• This is a JSON configuration object that should match the options values required by Nodemailer, as explained
here.
• This setting takes precedence over all other mailer configuration. If left blank, then the configuration file in
/api/config/mailer.js will be used.
Contact form configuration
If you have added a Contact Form to a custom Page within your collection, you must set the email address that
receives the information from that form. Learn more about adding Pages to your collection.
Step 1: Navigate to the Settings area and click on collection in the left sidebar.
Step 2: Toggle on the option of Contact Form and set the Receiving Email address.
Step 3: You can also set a different address as the Sending Email. This email address will appear as the sender of
emails associated with the contact form. If no email address is set, no-reply@uwazi.io will be used.
Step 4: Click the green Save button.
Submission form configuration
If you have added an Intake or Submission Form to a custom Page within your collection, it must be configured to
work properly. Learn more about adding Pages to your collection.
Step 1: Navigate to the Settings area and click on collection in the left sidebar.
Step 2: Toggle on the option of Public Endpoints.
Step 3: Select the Template(s) that need to be whitelisted.
Step 4: In the case that submissions should be sent to a different Uwazi instance than the one where the form is found,
add the URL of that destination instance.
Step 5: Click the green Save button.
1.3.6 How to customise your collection’s map configurations
Map provider
Uwazi uses Mapbox as the default map provider. However, you have the option to choose Google Maps as your map
provider instead.
• Note: Changing the map provider for a collection requires a personal API key.
8 Chapter 1. Administrator’s guideUwazi
Step 1: Navigate to the Settings area and click on Collection in the left sidebar.
Step 2: Under Maps, you can change the map provider for your collection.
Step 3: A default API key for the online map service is provided with Uwazi, but you can swap it for your own API
key. Input the map API key in the space provided.
• Detailed guidelines on how to set up a Google Maps API key can be found here.
Step 4: Click the green Save button.
Map starting point
Step 1: Navigate to the Settings area and click on Collection in the left sidebar.
Step 2: To set your own default geolocation, drag the map and click to select the destination, or enter the latitude and
longitude, if known.
Step 3: Click the green Save button.
1.4 BUILDING YOUR INFORMATION ARCHITECTURE
1.4.1 How to create templates
An Uwazi collection is made up of types of information called Entities that live in the Library . An entity has
Properties, can hold Primary Documents and/or Supporting Files, and can have Relationships to other entities.
Before you can create an entity in the Library, you must create a Template for it, which gives an entity a standardised
structure.
To create a template:
Step 1: Navigate to the Settings area and click on Templates.
Step 2: Click on the green Add Template button.
Step 3: Name your template and select a color for it. The combination of the name and color will be used to label
entities that utilise this template in the Library .
Step 4: On the right side of the screen is a list of Properties. Drag and drop one property at a time onto the template,
or click on the plus icon to add the property.
1.4. BUILDING YOUR INFORMATION ARCHITECTURE 9Uwazi
Step 5: For each property, click Edit and give it a Name or Label. Configure any necessary settings required for the
particular property in question. Be sure to review the other options available for the property, which may include the
following:
• Priority Sorting means that this property will be used as default sorting criterion in the Library.
• Generated ID in the Name property means that Uwazi will assign an automatically generated unique ID code
as the name of the entity.
• Select List: For Select and Multiselect properties, you must choose which Thesaurus will be used for this
property.
• Hide Label means that this property will be displayed without its Name or Label.
• Required Property will prevent the entity from being saved if this property isn’t filled in.
• Show in Cards means that when the entities in the Library are viewed as cards, this property will be displayed
on the card, making it visible without having to click on an entity to see it in its entirety.
– Note: The cards in the Library will also show a person’s current sorting criterion even if that property is
not configured to Show in Cards. For example, this happens frequently with the Date Added property,
which is the default sorting criterion in the Library. When the cards are sorted by “date added”, the Date
Added property is visible in the cards to demonstrate why the cards are in their current order.
• Use as Filter makes it possible to use this property as a filter in the Library. When someone visits the Library
and selects the corresponding type of template among the Primary Filters in the Library’s sidebar, the option
to further filter all of the entities by this property will then appear. Learn more about how to configure filters.
• Default Filter makes it so the property always shows as a filter in the Library’s sidebar by default, no matter if
the corresponding type of template among the Primary Filters is selected or not.
• Full Width will show this property using the full width available (applies to Media, Image, and Preview
properties).
Step 6: Remember to click on Save after creating or making changes to each template.
• Watch a screencast.
• If you intend to add your entities in bulk using CSV import, remember that the property names on these templates
must match the property names in the CSV file. Learn more about CSV import.
10 Chapter 1. Administrator’s guideUwazi
1.4.2 Understanding properties
Properties are descriptive attributes that are assigned to entities. All entity templates include three default properties:
Name, Date Added and Date Modified. The rest are up to you! You can add as few or as many as you wish. Each
property that you add to your template will provide a consistent space to include details about the entity.
There are several types of properties available, including:
• Plain text
• Numeric
• Single select (requires a Thesaurus)
• Multiselect (requires a Thesaurus)
• Relationship (to create connections between this type of entity and another type)
• Date, date range, multi date, multi date range
• Rich text
• External link
• Image (to attach an image)
• Preview (to display a thumbnail image of the first page of a Primary Document)
• Media (to embed image, video or audio)
• Geolocation (to add latitude and longitude coordinates that can be displayed on a map)
• Generated ID (to assign an automatically generated unique ID code to each entity)
Some properties are a bit more complex and/or require extra steps to configure them correctly. These include Select
and Multiselect, Geolocation, Relationships and Generated ID.
1.4.3 Select and Multiselect properties
A Select property allows you to assign a single attribute to your entity from a dropdown list of predefined terms. A
Multiselect property allows you to assign several attributes to your entity from a checklist of predefined terms. Before
you can add either a Select or Multiselect property to a template, you must create your list of predefined terms. In
Uwazi, this list is called a Thesaurus.
How to create thesauri
Step 1: Navigate to the Settings area and click on Thesauri. Here you will see all the Thesauri that have been created
so far.
1.4. BUILDING YOUR INFORMATION ARCHITECTURE 11Uwazi
Step 2: Click on the green Add Thesaurus button.
Step 3: Name your Thesaurus.
Step 4: Add terms to your Thesaurus by typing them in the spaces provided.
Step 5: Organise your Thesaurus. There are three main ways to organise the terms on your list:
• Moving items around by dragging and dropping
• Clicking the blue Sort button to order the items alphabetically
• Grouping certain terms together. Click on the Add Group button. Give the group a name. Underneath the
name, you can add terms by typing them in the spaces provided. Alternatively, you can drag and drop existing
terms into the group.
Step 6: When you have finished, click Save.
How to import thesauri from a csv file
It may be that you have a list of terms already prepared that you would like to include in a Thesaurus. Typing the
terms one by one could become tedious, so for situations such as these, Uwazi makes it possible to upload in bulk by
preparing and then importing a comma-separated values (CSV) file. This import feature can be used to add terms to
new or existing Thesauri.
Step 1: Create a CSV file on your computer:
• If you only have one language configured in your instance, then you should only have one column in your file.
The column label should be the name of the language written in English (e.g. English, Russian, Spanish).
• If you have more than one language configured in your instance and you want to import a list of terms at the
same time as their corresponding translations, then each language should have its own separate column. Use the
name of the language written in English (e.g. English, Russian, Spanish).
– Note: If your CSV file has columns for languages that are not configured in your Uwazi instance, they will
be ignored. Learn more about enabling different languages in Uwazi.
Step 2: Populate the CSV file with the terms. Each term should occupy its own row. For example, here’s a sample
CSV file viewed as plain text:
English,French,German
12 Chapter 1. Administrator’s guideUwazi
Man,Homme,Mann
Woman,Femme,Frau
Child,Enfant,Kind
And here’s the same file viewed in a spreadsheet program:
• Note: Avoid including duplicate values in the same column, as this will cause a validation error and prevent the
import from working successfully.
Step 3: Save the CSV file in UTF-8 format on your computer.
Step 4: Navigate to the Settings area and click on Thesauri. Click on the green Add Thesaurus button and give the
Thesaurus a name. Alternatively, if you would like to add to an existing Thesaurus, click the Edit button next to it.
Step 5: Click the blue Import button. Using the file browser to navigate your computer’s storage, find and select the
CSV file. Once the import has finished, the terms will appear in the Thesaurus.
Step 6: Click the green Save button.
• If you imported more than one language, navigate to the Settings area and click on Translations. Click on the
Thesaurus name, and you will see all the terms and their translations that have been imported. Learn more
about translating an Uwazi collection.
• It is not currently possible to import Thesauri that are already organised into groups. You will need to first
import a Thesaurus as described above, and then while working within Uwazi you can organise the terms into
whichever groupings you want.
How to configure a Select or Multiselect property
Step 1: Once you have created your Thesaurus, navigate to the Settings area and click on Templates. Locate the
template to which you want to add a Select or Multiselect property and click Edit.
Step 2: Drag and drop the Select or Multiselect property from the right side of the screen into the template, or add it
by clicking on the plus icon next to the property.
Step 3: Click Edit and give the property a Name or Label. Using the Select List dropdown, choose the Thesaurus
that you want to reference in this property.
Step 4: Review the other options for the property as explained previously in this chapter. When you have finished,
click Save.
1.4.4 Geolocation property
The Geolocation property allows you to add latitude and longitude coordinates to an entity, which can then be dis-
played as a point on a map. An entity template can have multiple Geolocation properties. Depending on the order in
which they appear on the template, these geolocation points can be displayed separately on their own individual maps
or together in one combined map within the entity.
1.4. BUILDING YOUR INFORMATION ARCHITECTURE 13Uwazi How to display multiple geolocation properties on separate maps within the same template Step 1: Navigate to the Settings area and click on Templates. Locate the template to which you want to add Geoloca- tion properties and click Edit. Step 2: Drag and drop the Geolocation property from the right side of the screen into the template, or add it by clicking on the plus icon next to the property. Step 3: Click Edit and give the property a Name or Label. Review the other options for the property as explained previously in this chapter. Step 4: Repeat the above process until you have created all of the Geolocation properties that you want. Step 5: Using the drag and drop function, move the Geolocation properties around so that they are not adjacent to each other on the template. In other words, they should be separated by one or more other non-Geolocation properties. This ensures that each Geolocation property will display on its own separate map, each labeled with the Name or Label that you have given it. Step 6. When you have finished, click Save. How to display multiple geolocation properties on one combined map within the same template Step 1: Navigate to the Settings area and click on Templates. Locate the template to which you want to add Geoloca- tion properties and click Edit. Step 2: Drag and drop the Geolocation property from the right side of the screen into the template, or add it by clicking on the plus icon next to the property. Step 3: Click Edit and give the property a Name or Label. Review the other options for the property as explained previously in this chapter. Step 4: Repeat the above process until you have created all of the Geolocation properties that you want. Step 5: Using the drag and drop function, move the Geolocation properties around so that they are all adjacent to each other on the template. In other words, they should not be separated by any other non-Geolocation properties placed between them. When Geolocation properties are ordered one after the other, they will display on one map labeled Combined Geolo- cations. Step 6. When you have finished, click Save. 1.4.5 Relationship property A Relationship property allows you to create a connection to another entity template. The connection can be basic, such that it points in general to a different template. The connection can also be more complex, such that it inherits a specific property from another template. Before you can add a Relationship property, you must first create the Relationship Type that will be used to define the nature of the connection. How to create relationship types Step 1: Navigate to the Settings area and click on Relationship Types. 14 Chapter 1. Administrator’s guide
Uwazi

Step 2: Click on the Add Connection button. Give the Relationship Type a descriptive name.
Step 3: Click Save.

How to configure a basic relationship property

Step 1: Once you have created the Relationship Type, navigate to the Settings area and click on Templates. Locate
the template to which you want to add a Relationship property and click Edit.
Step 2: Drag and drop the Relationship property from the right side of the screen into the template, or add it by
clicking on the plus icon next to the property.
Step 3: Click Edit on the newly added property, and give it a descriptive Name or Label.
Step 4: Using the dropdown list called Relationship*, select the Relationship Type that you would like to use as part
of this property. (The * indicates that it is mandatory.)
Step 5: By default, the property will allow you to create a connection to any entity template (“Any entity or document”).
However, you also have the option to restrict a connection to only entities that use one specific template. To do so,
click on the Entities dropdown list and select whichever template you want.
    • Note: The dropdown won’t contain the template that is currently being edited. Learn more about how to connect
      entities of the same template.
Step 6: Review the other options for the property as explained previously in this chapter. When you have finished,
click Save.
Now, whenever you create a new entity using the template that includes this Relationship property, you will be
presented with a multiselect list of all the existing entities in your collection which meet the criteria that you have
configured (i.e. a connection to another specific template or a connection to “Any entity or document”). Simply select
the relevant existing entity (or entities) from the list, and then its Name property will be displayed as part of the new
entity’s metadata.
    • Note: You can also establish a basic connection on an ad hoc basis between entities by creating a Relationship
      directly in the Information Hub of an entity (without utilising the Relationship property). Learn more.

1.4. BUILDING YOUR INFORMATION ARCHITECTURE                                                                           15
Uwazi
How to configure a relationship property that inherits a property from another template
If you would like to configure a Relationship property that inherits a property from another template, you can follow
the previously explained process for configuring a basic Relationship property with a few modified or additional steps:
Step 5 modified: By default, the property will allow you to create a connection to any entity template (“Any entity or
document”). However, in order to activate the more advanced option of inheriting properties from another template,
you must specify the template from which you want to inherit. To do so, click on the Entities dropdown list and select
the relevant template.
Step 6 modified: If you choose a specific template in the previous step, another option will automatically appear: a
checkbox called Inherit Property. Tick the box and a dropdown will appear containing all of the properties contained
within the other template that you have selected. Choose a property from the list to inherit. Be sure to also review the
other options for the property as explained previously in this chapter.
Step 7: Review the other options for the property as explained previously in this chapter. When you have finished,
click Save.
Now, whenever you create a new entity using the template that includes this Relationship property, you will be
presented with a multiselect list of all the existing entities in your collection which meet the criteria that you have
configured (i.e. a connection to another specific template that inherits one of that template’s specific properties).
Simply select the relevant existing entity (or entities) from the list, and then the property that you have chosen to inherit
will be displayed as part of the new entity’s metadata.
How to configure a relationship property that inherits multiple properties from another template
If you would like to configure a Relationship property that inherits multiple properties from another template, you can
follow the previously explained process for configuring a basic Relationship property with a few modified or additional
steps:
Step 5 modified: By default, the property will allow you to create a connection to any entity template (“Any entity or
document”). However, in order to activate the more advanced option of inheriting properties from another template,
you must specify the template from which you want to inherit. To do so, click on the Entities dropdown list and select
the relevant template.
Step 6 modified: If you choose a specific template in the previous step, another option will automatically appear: a
checkbox called Inherit Property. Tick the box and a dropdown will appear containing all of the properties contained
within the other template that you have selected. Choose a property from the list to inherit. Be sure to also review the
other options for the property as explained previously in this chapter.
Step 7: Repeat the above process as many times as needed: add another Relationship property to the template,
ensuring that it is configured with the same template from the Entities dropdown list and the same Relationship Type
as previously selected.
Step 8: When you have finished, click Save.
Now, whenever you create a new entity using this template, within each of these Relationship properties you will
be presented with a multiselect list of all the existing entities in your collection which meet the criteria that you have
established (i.e. a connection to another specific template that inherits one of that template’s specific properties).
Select the relevant existing entity (or entities) from the list contained within whichever Relationship property happens
to appear first. Once you do, the same entity (or entities) will also be automatically selected on the other Relationship
properties.
• Note: When you inherit multiple properties in this way, any changes made to one of the Relationship properties
of an entity that utilises this template will affect the other Relationship properties on this template that share the
same connection. For example, If you untick a particular entity within one Relationship property, it will also
16 Chapter 1. Administrator’s guideUwazi
automatically be unticked in the other Relationship properties. This is because you have ultimately created one
connection with multiple inheritance of properties, instead of multiple separate connections.
Once you save the new entity, the properties that you have chosen to inherit will then be displayed as part of the new
entity’s metadata.
When to inherit properties from other entities
Depending on how you have chosen to structure your collection (in other words, your data model), it can be useful for
one entity to inherit a property from another entity because it prevents you from having to enter the same information
over and over again.
Here’s a simple example: Imagine that there is a type of entity template in your collection called Country. This entity
includes all sorts of details about individual countries, including their geolocation on a map.
Now, imagine that you want to create another type of entity template called Person. You want this template to include
all sorts of details about individual people, including the geolocation of their country of birth on a map.
The geolocation of countries is information that already exists in your collection – as a property on the Country entity
template – so you can opt to “inherit” it by setting up a connection between the Person template and the Country
template. You would do so by following the steps outlined in the previous section:
• Define the Relationship Type (e.g. “Country geolocation”)
• Add a Relationship property to the Person template
• Select the previously defined Relationship Type from the dropdown list
• Select the Country template from the Entities dropdown list
• Select the Inherit Property checkbox
• Choose the Geolocation property to inherit
From this point on, whenever you create a new Person entity in the future, you will be able to select which specific
Country entity – from among all of the Country entities in your collection – is connected to the person. Simply select
the relevant country and click Save. By doing so, the new Person entity will include the same Geolocation information
that is already found on the selected Country entity.
1.4.6 Generated ID property
Adding a Generated ID property to a template means that any time an entity is created using that template, Uwazi
will assign it an automatically generated unique ID code. Depending on the configuration you choose, the Generated
ID can be just another property on the template or it can take the place of the template’s default text-based Name
property.
How to add a generated id property to a template
Follow the steps for creating an entity template and adding properties as explained previously in this chapter. Gener-
ated ID will appear among the property options listed on the right side of the screen. When finished, click Save.
How to use a generated id as the name/title of an entity
Follow the steps for creating an entity template as explained previously. In the Name property, select the checkbox
Generated ID to activate the option. When finished, click Save.
1.4. BUILDING YOUR INFORMATION ARCHITECTURE 17Uwazi
• You do not have to add a separate Generated ID property for this feature to work. If you do add a separate
Generated ID property, each entity that you create using this template will consequently have two different
unique ID codes assigned to it.
1.5 WORKING WITH ENTITIES IN YOUR COLLECTION
1.5.1 Understanding view and edit permissions for entities
An Uwazi collection is made up of types of information called Entities that live in the Library . An entity has
Properties, can hold Primary Documents and/or Supporting Files, and can have Relationships to other entities.
Some examples of entities might include a court, a case, a specific person, a report or an event.
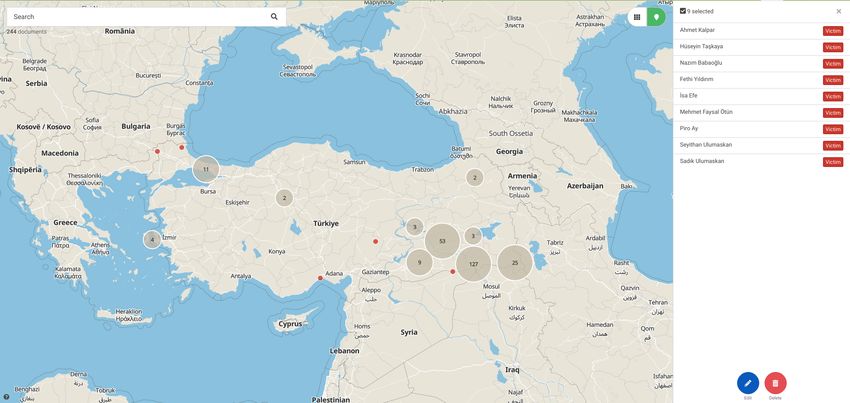
In the Library, an entity can be viewed as a card, in a table or on a map (as long as it has an associated geolocation),
and can also be filtered according to its Properties. Learn more about how to organise and explore your collection.
By default, the visibility of newly created entities is Restricted. In practice, this means that only the user who created
an entity as well as all users with Admin or Editor permissions can see and edit it.
In order to make an entity visible to everyone who has access to your Uwazi collection, you must click the entity’s
Share button and explicitly share it with the Public. (Keep in mind that if your entire Uwazi collection is configured to
be private, Public in this case strictly refers to everyone who possesses login credentials. Learn more about configuring
the accessibility of your collection.)
For users with login credentials to an Uwazi collection, there are two sets of blue filters that help quickly sort through
the visibility settings of different entities. The first set refers to the visibility of all of the entities on a global level:
• Restricted, meaning that only a selected subset of users are able to see and/or edit the entity
• Published, meaning that everyone with access to the collection is able to see the entity
The second set of filters indicates which particular entities have been explicitly shared with your individual user
account or with a specific user group to which you belong:
• Shared as Viewer, meaning your individual user account or a specific user group to which you belong has been
given permission to see the entity
• Shared as Editor, meaning your individual user account or a specific user group to which you belong has been
given permission to edit the entity
1.5.2 How to add new entities to the Library
Remember, before you can create a new entity, make sure you have already created a corresponding template. Learn
more about how to create templates.
To create a new entity:
Step 1: Click on the Library icon in the top navigation menu.
Step 2: On the bottom right hand side of the screen, click on the Create entity button.
Step 3: Select which template to use from the list, give the entity a name and fill in any of the properties that you want
to include. (You may always come back to add, edit or delete this information later.)
Step 4: Click the Save button once you have finished.
Step 5: If the entity is intended to feature any PDFs (Primary Document), click the Upload PDF button in the right
sidebar and select the desired PDF(s) from within the file browser.
18 Chapter 1. Administrator’s guideUwazi
If the entity is intended to feature any other attached materials (Supporting Files), click the Add Supporting File
button and select the desired file(s) from within the file browser.
Step 6: Decide who should be able to see and edit the entity. By default, the new entity is only visible to you and other
users with Admin or Editor permissions. To change these settings, click on the Share button in the right sidebar.
Add any new users (individuals or groups) who should have access to the entity, choose if they should be able to see
and/or edit the entity, and click Save changes. Remember, if you’d like the entity to be available to everyone who has
access to your Uwazi collection, make sure to share it with the Public.
• If you are documenting information about human rights violations using the mobile app Tella, you can also add
new entities to your Uwazi collection directly from Tella. Learn more about the Tella-Uwazi integration.
1.5.3 How to directly add PDFs to the Library
Uwazi particularly supports the management of collections of documents in PDF format. Numerous functions can be
carried out when a PDF is uploaded as a Primary Document within an entity, such as conducting full text search,
creating a clickable table of contents, creating text references, and more.
If many of the entities in your collection feature “primary” PDF documents, it could become tedious to create entity
after entity, giving them a title and filling in any properties, and only after they are saved, finally adding a PDF.
For situations such as these, Uwazi makes it possible to upload PDF(s) directly into the Library as a first step without
the prior creation of an entity:
Step 1: Click on the Library icon in the top navigation menu.
Step 2: On the bottom right side of the screen, click on the Upload PDF(s) to Create button.
Step 3: Select the desired PDF(s) from within the file browser. (To select more than one file, hold down the CTRL key
or the Command key before clicking.)
Step 4: Once uploaded, the PDF will appear attached to a new entity in the Library with a Name property that is
automatically filled in with the PDF file’s name.
Step 5: You can edit the name of the entity by automatically pulling out the content in the PDF file. Click on the View
button in the right sidebar to view your file, and click on the Edit button.
Step 5 optional: Within the document, use the cursor to highlight the text that you want to use as the name of the entity.
Click to fill, written in blue, will appear in the sidebar. Click on Click to fill, and the highlighted text will appear as
the name. You can also edit other aspects of the entity in the sidebar. Make sure to save any changes you make.
Step 6: Decide who should be able to see and edit the entity. By default, the new entity is only visible to you and other
users with Admin or Editor permissions. To change these settings, click on the Share button in the right sidebar.
Add any new users (individuals or groups) who should have access to the entity, choose if they should be able to see
and/or edit the entity, and click Save changes. Remember, if you’d like the entity to be available to everyone who has
access to your Uwazi collection, make sure to share it with the Public.
1.5.4 How to add entities in bulk with CSV import
It may be that you have a large pre-existing collection of data points or materials that you want to add to your Uwazi
collection. Doing so one by one would be a tedious task, so for situations such as these, Uwazi makes it possible to
upload in bulk by preparing and then importing a Comma-Separated Values (CSV) file.
1.5. WORKING WITH ENTITIES IN YOUR COLLECTION 19Uwazi
Import entities without documents or supporting files
Remember, before you can import entities in bulk, make sure you have already created a corresponding template.
Learn more about how to create templates.
Step 1: Create a CSV file on your computer. It should include a column for each of the properties that are included on
the entity’s template. Import works by matching property names – therefore, be meticulous in using the same column
labels in the CSV file as the property names on the template in Uwazi. As well, be sure to follow these guidelines:
• Property names are not case sensitive, which means you can use either lowercase, capitals or a combination of
both.
• The first column should be called “Title” and is required in your CSV file. This is where you will put the Name
property of each entity.
• There is no need to include the Date Added property because it is filled automatically during the import into
Uwazi.
• If you have a Geolocation property, its corresponding column must be styled
[name-of-your-geolocation-property]_geolocation, replacing the bracketed text with
the actual name of your geolocation property (e.g. detention place_geolocation).
Step 2: Populate the CSV file with your data. Certain properties must follow a specific format:
• If you have opted to use a Generated ID property for the Name of your entities, leave the rows underneath the
“Title” column blank. They will be filled automatically during the import into Uwazi.
• If you have a Link property, the URLs must contain the http or https protocol (e.g. https://www.example.com).
Omitting the protocols will cause the import to fail.
• For properties with multiple values, the pipe symbol | should be used as the separator. Do not include spaces
between. For example:
– For a Multiselect property: Arbitrary arrest|Illegal search|Enforced
disappearance
– For a Link property (which follows the format of label|URL): Website|https://www.
example.com
– For a Geolocation property (which follows the format of latitude|longitude): 46.204391|6.
143158
• If you have a Select or Multiselect property that utilises a Thesaurus containing terms which are organised into
groups, do not include the names of the groups. Instead, simply include the terms that are contained within the
groups. Upon import, Uwazi will automatically assign them to their corresponding groups.
– For example, imagine that your entity template has a Select property called Country. This property
utilises a Thesaurus that contains the terms Bangladesh, Cambodia, and India, which are all con-
tained within a group named Asia. In your CSV file in the rows under the column labeled Country, the
only possible terms that should appear there are Bangladesh, Cambodia or India, depending on the
information contained in each corresponding entity. Nowhere should the group name Asia appear.
• If you have a basic Relationship property, include the name of the other entity which is connected to the entity
in question. In the case of multiple values, use the pipe symbol | as the separator and do not include spaces
between each value.
– The entities which form the other half of the Relationship must already exist in your collection. Otherwise,
the import will not work correctly. Learn more about configuring Relationship properties.
• If you have a Relationship property that inherits a property from another template, follow the same guidance as
above: Include the name of the entity which is the source of the inherited property. Do not include the inherited
20 Chapter 1. Administrator’s guideUwazi
property itself. In the case of multiple values, use the pipe symbol | as the separator and do not include spaces
between each value.
– The entities which are the source of the inherited properties must already exist in your collection. Other-
wise, the import will not work correctly. Learn more about configuring Relationship properties.
Step 3: Save the CSV file in UTF-8 format on your computer.
Step 4: Go to the Library of your Uwazi collection and on the bottom right side of the screen, click on the Import
CSV button. Using the file browser to navigate your computer’s storage, find and select the CSV file.
Step 5: Next, select the template that corresponds to the entities you want to upload, using the dropdown menu.
Step 6: Finally, click the Import button. Once the entities are uploaded into your collection, they will appear in the
Library. You may need to refresh your screen to see them.
Remember, after an import has been done, editing of entities should take place within Uwazi.
Import entities that contain a Primary Document
If the entities that you would like to import contain a Primary Document, you can follow the previously explained
process for importing entities in bulk with a few additional or modified steps:
Step 1 continued: Add a column in your CSV file with the name File.
Step 2 continued: In the File column, fill in the file name of each entity’s Primary Document (e.g. Example
Doc1.pdf).
Step 3 continued: Be sure to name the CSV file as import.csv. Then, compress the CSV file and all of the PDFs
into a single ZIP file. The CSV file and the PDFs should all live alongside each other in the root directory of the ZIP
file (i.e. not nested in a folder).
Step 4 modified: Using the file browser to navigate your computer’s storage, find and select the ZIP file.
Import entities that contain Supporting Files
If the entities that you would like to import contain Supporting Files, you can follow the previously explained process
for importing entities in bulk with a few additional or modified steps:
Step 1 continued: Add a column in your CSV file with the name Attachments.
Step 2 continued: In the Attachments column, fill in the file name of each entity’s corresponding Supporting File
(e.g. Example1.jpg). If an entity contains multiple Supported Files, use the pipe symbol | as the separator and
do not include spaces between (e.g. example.doc|sample.jpg).
Step 3 continued: Be sure to name the CSV file as import.csv. Then, compress the CSV file and all of the
Supporting Files into a single ZIP file. The CSV file and the Supporting Files should all live alongside each other in
the root directory of the ZIP file (i.e. not nested in a folder).
Step 4 modified: Using the file browser to navigate your computer’s storage, find and select the ZIP file.
1.5.5 How to edit properties on multiple entities
It may be that you need to make the same edit(s) across a large number of entities in your Uwazi collection. Doing so
one by one would be time-consuming, so for situations such as these, Uwazi makes it possible to edit multiple entities
at once.
Step 1: Go to the Library of your Uwazi collection. If you prefer to use the Cards View, select all of the entities
that you want to edit using your operating system’s multiselect commands:
1.5. WORKING WITH ENTITIES IN YOUR COLLECTION 21You can also read