Visoglide Plus Patio Assembly and Installation Guide - so you think all window companies are the same... think again!
←
→
Page content transcription
If your browser does not render page correctly, please read the page content below
so you think all window companies are the same... think again!

 Visoglide Plus Patio Assembly and Installation Guide
so you think all window companies are the same... think again!

     Thank you for choosing to buy our aluminum Patio doors, this step by step guide has been
     designed to show you how to successfully assemble (if supplied in kit form) and install your
     new Patio Door

     It is vital that you follow each step and carry out all checks as detailed in this document to
     ensure your patio is assembled and installed correctly.

     If your Patio doors are not installed square, plumb and level it could lead to
     operational problems and may cause damage to the profile or gearing.

       Tools you will require to assemble and              Important things to check before you
       install patio                                       start assembling the Patio

          o   A suitable drill for securing the fixings        o   Check off the parts against the list
              through the frame and into the wall.                 to ensure you have all parts
          o   Good quality frame fixings.                          required.
          o   Six foot spirit level for ensuring frame         o   Ensure you check all parts for
              is fitted plumb and level. For large                 damage and report them prior to
              patios we recommend the use of a                     assembly.
              laser level.                                     o   Ensure you have a large enough
          o   Good quality silicone to seal the                    clear area to work and this is
              perimeter, we recommend low                          suitably protected to prevent
              modulus neutral cure silicone.                       damage to parts during assembly.
          o   A five meter tape measure.                       o   Check the paperwork and ensure
          o   A selection of plastic packers that                  you fit the patio the correct way
              are used for squaring the frame in                   round.
              the opening and preventing
              distortion when tightening frame
              fixings.
          o   Glazing Shovel.
          o   Putty Knife.
          o   Rubber Mallet.

                                                           Important - Please Read
                                                          The frame must be assembled and
                                                          installed square and plumb to avoid
                                                          the doors catching when opening and
                                                          closing this will also cause the gearing
                                                          to be stiff to lock. Check the
                                                          dimensions with a tape or string line,
                                                          Ensure the frame is fixed and level on
                                                          each side.
                                                          We recommend the use of a cavity
                                                          tray for installations first floor and above

 2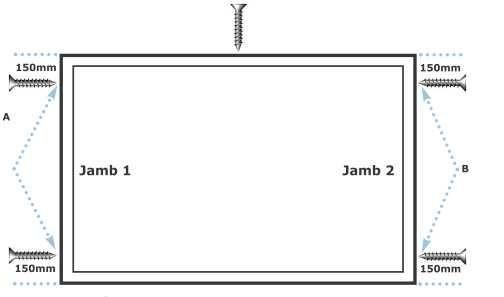
Parts List
                                        Frame Sections
Outer Frame Section                                                     4
                                            Sashes
Sliding Sashes                                                Depends on style
Fixed Sashes                                                  Depends on style
                                       Outer Frame Parts
Outer Frame Cleats ( ACVG510 )                                          8
                                                 2 Track      2 Track       3 Track     3 Track
Outer Frame Chevrons ACVG520                                   Flush                     Flush
                                                     8           12           12           16
Cill and Head Cover ACVG514                              2                 2
Cill and Head Cover ACVG515                                                2
                             Head Extensions & Cill’s as required
        NOTE FOR PATIOS WITH ALL SASHES SLIDING NO CILL & HEAD COVERS REQUIRED
                                    Sash Dependent Parts
                                                  1 Fixed Sash      2 fixed sashes
Fixed Sash Securing Screw (75mm Drill point)
                                                         7                14
Number Door Sashes                                   2            3           4
Patio Stops                                          2            4           4
Drainage cover Caps                                  3            4           5
Anti-Lift ACVG529 (25mm fixing screws                2            6           6
provided)
Interlock End cap (65mm fixing screw                     2              3                4
provided)
Interlock Cover ( Aluminum )                             2              4                4
Bridge Packers                                                 2 per sliding sash
                                        Over size Patios
Joining Screws (25mm)                                                   4
                                        Ancillary Items
Mitre Glue                                                              1
Clear Silicone                                                          1
2.5mm Allen Key                                                         1

18mm Wide         Cleat Blocks   Frame Chevron   Mitre Glue      Silicone             2.5mm Allen Key
Frame Cleat

                                                                                                  3
so you think all window companies are the same... think again!
Patio Door assembly Instructions
Your Patio door has been fully manufactured
and the disassembled for reassembly on site,
please follow these instructions carefully
Step 1: Outer Frame Assembly (flat pack only)
1. Lay out the frame with the drained section at the bottom and the section with the
keep fitted at the correct side for the handing of the doors ordered (Check
Paperwork – always viewed from outside). Depending on the door size the head and
cill section may be supplied in 2 sections straight cut at the join, you will find that one
section will already have an aluminium jointing section fitted. To complete the join
simply apply silicone along the length of the exposed aluminium jointing sections and
around the end of the frame section, (this is important to prevent any leaks at this
point). Slide the outer frame sections together (see images 1, 2 & 3), and ensuring the
profile edges are lined up flip the profile over and using the screws provided insert
them into the pre-drilled holes. Wipe off any excess silicone from the face of the
profiles.
Image 1 Image 2 Image 3
2. You can now start assembling the outer frame. Apply the provided mitre glue
to the end chambers of the profile (see image 4); N.B. if it is a 3 track patio
there will be 3 chambers. Fit the chevrons into the end of the patio frame (see
image 5). Coat the ends of the profile in the silicone provided.
Image 4 Image 5
3. Insert the metal cleats, one in each chamber as shown in image 6 (for a 3 track
patio insert 1 extra in center), attach the next piece of outer frame see image 7
Image 6 Image 7
44. Insert the cleat blocks through the pre-punched holes, ensuring that the grub
screw is facing towards the corner of the profile (images 8 & 9).
Image 8 Image 9
6. Using the 2.5mm Allen key provided, tighten the grub screws on each cleat by
inserting the Allen key through the small round pre-punched hole (image 10).
Wipe off any excess silicone from the join and check the mitres. Image 11 shows
a badly formed mitre; this occurs when the Allen screws are tightened too
much in one direction. To remedy this loosen off the screws on the edge that is
inset, (image 11), then tighten the screws on the opposing edge. Once the
mitre is even (as in Image12) ensure that the Allen screws are all tight.
Image 10 Image 11
5. Repeat the above steps on the other corners until all sections of the frame are
joined. Once assembled check to ensure the frame is square, we recommend
checking the measurements as indicated in Diagram 1 below.
Image 12
Diagram 1
5so you think all window companies are the same... think again!
7. If a head extension has been supplied, fit this with the screws provided, applying
a bead of silicone along the join before screwing into place.
8. If a cill is required, fit this next ensuring that you fix from the underside of the cill
into the outer frame and not down through the outer frame into the cill. Again,
ensure you apply a bead of silicone along the inside edge of the cill before
joining it. The cill end caps must also be fitted and sealed in place with a bead
of silicone, without the end caps water can back track into the fabric of the
building.
Fix from underside of the cill into the
outerframe and not down through
the outerframe into the cill
6Step 2: Installing the Outer Frame
1. Offer up the assembled outer frame
to the prepared opening, using a 6
foot level ensure that Jamb 1 is
plumb, once satisfied fit 2 temporary
fixings 150mm from each corner (A).
At this stage it is important not to fully
tighten these fixings.
Diagram 2
2. Repeat this process on Jamb 2, again using a 6 foot level to ensure the cill and jamb
are both level (B).
3. Ensure installation packers are used behind frame fixings to prevent distortion and
hold the frame square. Failure to use these could pull apart the aluminium corners.
4. Using a 6 foot level check the cill is flat with no dips or rises, use installation packers to
help achieve this. This is vital to ensure that the doors slide smoothly.
5. Once you are happy the frame is in square and plumb place an additional fixing
through the head of the patio at the center, again using installation packers.
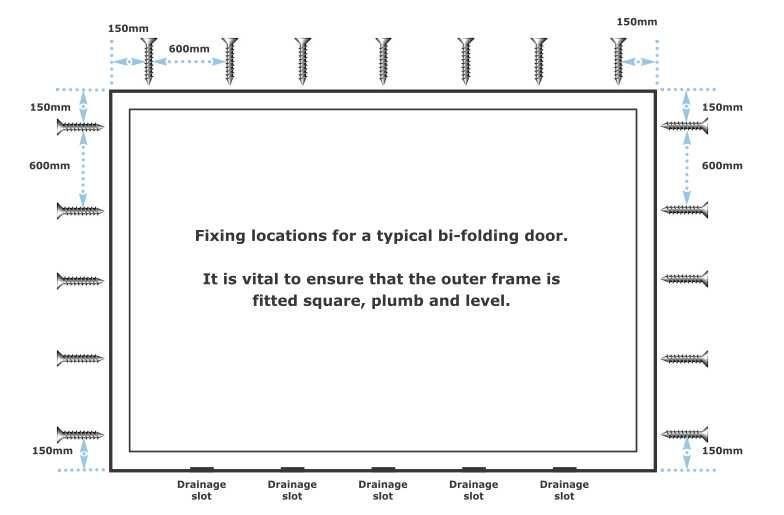
6. You can now continue to place the rest of the fixings (at 600 centers max) around
the head and jambs as per Diagram 3, not forgetting to tighten the temporary fixing
screws from the first 2 steps.
Fixing locations for a typical patio door.
It is vital to ensure that the outer frame is
fitted square, plumb and level
Fixing locations for a typical patio door.
Diagram 3
7so you think all window companies are the same... think again!
Step 3: Fitting the Sashes
1. If there is a fixed sash you need to fit this first, it will be the sash without any holes for the
handle. Position the sash into the frame by tilting the top and lifting the sash in, it will be
easier to do this towards the locking side of the outer frame as the fix sash support
blocks will be in the way. If all the sashes are sliding this will not be an issue. Once the
sash is in the frame slide it over the support blocks until it is tight to the Jamb.
2. Use the 75mm drill point screws to attach the fixed sash to the outer frame, fit the
screws through the pre-drilled holes in the glazing support packet which is fitted to the
sash, fix the 3 on the jamb fist before moving to the bottom and finally the top section.
3. Now position the sliding sash into the outer
frame, again by tilting the top and lifting it
into position. In order to prevent the doors
being removed you will now have to fit the
anti-lift blocks to the top and bottom of the
sliding sash, see diagrams 4 & 5.
4. Insert the anti-lift block (ACVG529) to the
top and bottom of the sliding sashes using
the 2 x 25mm screws provided.
5. Clip on the pre-cut aluminium interlock
section (VG530) using a rubber mallet,
being careful not to damage it. Diagram 4
6. Fit the ACVG530 plastic covers to the
aluminium interlock section using the
65mm screws provided, finally inserting the
plastic caps (ACET190) to cover the
screws.
Diagram 5
7. On the locking side of the sash
insert the anti-lift blocks (ACVG529),
securing them with the 2 x 25mm screws
provided and then inserts the rubber
buffer.
Unless specified we will fabricate the
patio doors with the slider on the inside
88. With the sashes installed the top and bottom aluminium covers need to be fitted into
the outer frame, please note that there are no covers if all the sashes slide. The covers
are prepped ready to fit but are left 20mm long and must be cut to size onsite to
accommodate for small variation during installation. Once you have measured and
cut the covers you can simply clip them in using a rubber mallet, being careful not to
damage them. See Diagram 6
Diagram 6
9so you think all window companies are the same... think again!
Step 4: Glazing the patio sashes
To glaze the sashes and “toe and heel” the units correctly please follow the steps detailed
below. “Toe and heeling” the glass in the correct way will allow the doors to work smoothly
and avoid problems operating the door. To ensure that the glazing packers don’t move we
recommend that you silicone them in place, it is also important to ensure that they do not
obstruct any drainage holes and that the packers are wide enough to sit under both panes
of glass to avoid damaging the spacer bar.
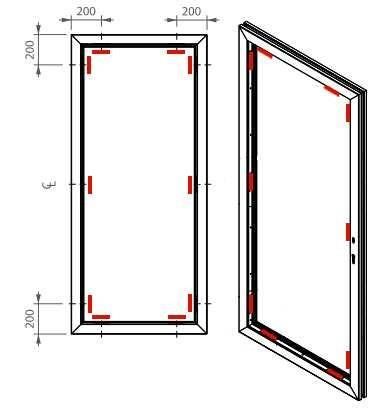
1. Starting with the fixed sash, fix the glazing
packers into the glazing rebate as per
Diagram 7. It is important that the packers are
positioned in the correct location.
All sashes should have 2 Bridge packers
(as supplied) fitted to the bottom of the
sash before fitting wedge packers.
2. Insert the glass unit; push in more glazing
wedge packers between the glass and the
packers to ensure that the glass unit is held in
tightly. The glazing wedge packers should be
tight enough to hold the unit in place without
inserting the beads.
3. Once you are happy that the unit is sat
squarely in the sash offer up the glazing beads,
placing the short ones in first. You should take Diagram 7
care not to scratch the beads when f i t t i n g
them. If you find the bead too tight, lightly file off the end and remove any sharp
edges.
4. Finally insert the 5mm internal wedge gasket (ACVG34 - as shown below). Mitre one
end of the gasket and using the point push it between the bead and the glass, to
ease this is you can spray it with soapy water. Make sure you fit the gasket all the
way round, ensuring that you don’t stretch it.
5. Repeat the above steps for the other sashes. Once the installation is complete
remove any protective tape and clean down the frames and glass.
10Step 5: Finally checking and adjusting your new Patio door
1. Once the door is fully installed check the track to ensure that any debris is removed
and that the patio glides smoothly.
2. Push the sliding door towards the locked position, checking the sash jamb and frame
jamb are plumb. Check that the door locks smoothly, it may be necessary to adjust
the height of the sliding door in order to ensure that the locks are properly lined up.
3. To adjust the height of the doors you need to remove the aluminium cover
(ACVG530) on the side of the sliding door, (see step 3: Fitting the sashes for details on
how to remove the cover), Once you have removed the ACVG530 cover from the
sliding sash you will then be able to access the adjustment screw. Insert a long PZ3
screwdriver under the sash to reach the adjuster screw, turning it clockwise will raise
the sliding sash up to 4mm, turning it anti-clockwise will lower the sliding sash up to
4mm.
4. Adjust, test the operation of the doors and readjust as required until you are happy
with the operation of the doors. It is advisable to lubricate any moving parts/tracks
with silicone spray before demonstrating the product to the customer.
ACVG530 cover
needs removing
in order to adjust
Diagram 8
sash height
Adjuster screw
11Post installation
Providing that you have followed the instructions detailed in this booklet your doors will operate without any
problems, if you find that the sashes are catching at all go through the list below and check to ensure that you
have assembled and fitted the patio doors correctly.
Check that the outer frame has been installed plumb, true and parallel.
Check the diagonal measurements from corner to corner, these should be the same.
Check to ensure that the head of the frame has the correct fixings and is not bowing down.
Check to ensure that the cill is flat and does not have any rise and falls.
Check to ensure that the sashes have been correctly toe and heeled.
Check to ensure that the track is free from debris and dust; spray the track and the wheels with silicone spray.
Ensure that any excessive sealant is cleaned off immediately, this is especially important with plaster and cement
as the chemicals are harmful to the paint finish so should be rinsed off immediately.
General use
It is important that you look after your doors and you should follow the guidance below to prolong the life of your
new doors.
Remember to lubricate all moving parts at least twice a year.
Regularly clean the aluminium with a mild detergent and a soft cloth, using abrasive materials will cause damage
to the paint finish.
Providing that the doors have been assembled and installed correctly there will be no need to adjust or move
any moving parts.
Regularly clean the track to ensure it is free from debris and dust, spray the track and wheels with a
silicone spray.
No.5 The Works, Waterside South, Lincoln LN5 7JD Tel. 01522 512525 Fax. 01522 567651
www.sternfenster.co.uk email:sales@sternfenster.co.uk
Version 5, June 2018
We reserve the right to make changes to the product specification as technical developments dictate and without prior notice.
Pictures shown in this brochure are for illustrative purposes only and are not binding in specification or detail.
For technical reasons associated with colour reproduction, the colours shown give only an indication of shade, no guarantee can be given that they will exactly match the actual product finish.You can also read