VPN IPSec Tunnels in OCI - IaaSGeek
←
→
Page content transcription
If your browser does not render page correctly, please read the page content below
VPN IPSec Tunnels in OCI

                           July 2019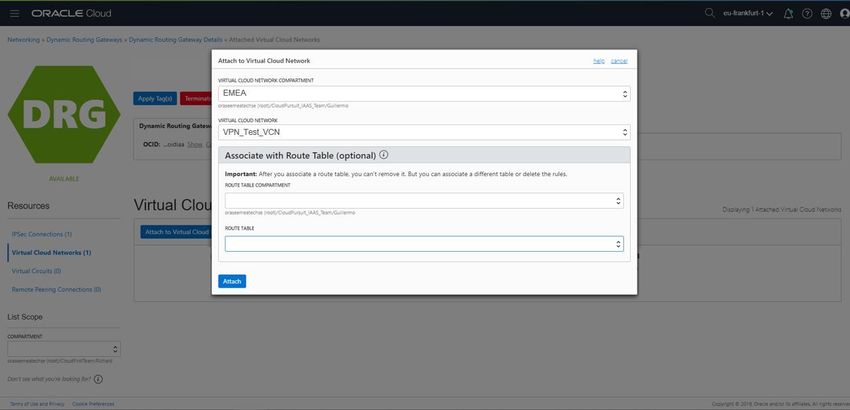
Contents
Disclaimer ...................................................................................................................................................... 3
What’s IPSEC VPN .......................................................................................................................................... 3
   Goal of this document ............................................................................................................................... 3
   Scope of the document ............................................................................................................................. 4
VPN IPSec Tunnels Concepts ......................................................................................................................... 5
   VPN IPSec Tunnels on Oracle Cloud Infrastructure ................................................................................... 5
   Network concepts ..................................................................................................................................... 7
VPN IPSec configuring steps .......................................................................................................................... 9
VCN setup: Create Virtual Cloud Network (VCN)......................................................................................... 10
VCN setup: Create DRG ............................................................................................................................... 12
VCN setup: Attach DRG to a VCN ................................................................................................................ 13
VCN setup: Create a Route table for VPN.................................................................................................... 14
VCN setup: Create New Security List for the Subnet ................................................................................... 15
VCN setup: Create New Subnet ................................................................................................................... 16
VCN setup: Customer Premises Equipment (CPE) ....................................................................................... 18
VCN setup: Create IPSEC Connecting from CPE to DRG .............................................................................. 19
VCN setup: Configuring VPN Device (router) on Premises .......................................................................... 20
VCN setup: Installing Libreswan 3.22 .......................................................................................................... 22
VCN setup: Configuring Libreswan 3.22 ...................................................................................................... 22
   Configuring Libreswan ............................................................................................................................. 24
   Configuring Libreswan.- ipsec.conf.......................................................................................................... 24
   Configuring Libreswan.- /etc/ipsec.d/shared.secrets .............................................................................. 27
   Running Libreswan.- Creating the tunnel ................................................................................................ 28
VCN setup: Accessing the OCI network from any machine in the network ................................................. 31
References .................................................................................................................................................. 33

Disclaimer
This disclaimer informs readers that the views, thoughts and opinions expressed in the text belong
solely to the author, and not necessarily to the author’s employer. This document was prepared
or accomplished by Luis Catalán and Guillermo Ruiz in their personal capacity.
What’s IPSEC VPN
Internet Protocol security (IPSec) is a framework of open standards for helping to ensure private,
secure communications over Internet Protocol (IP) networks through the use of cryptographic
security services. IPSec supports network-level data integrity, data confidentiality, data origin
authentication, and replay protection. Because IPSec is integrated at the Internet layer (layer 3), it
provides security for almost all protocols in the TCP/IP suite, and because IPSec is applied
transparently to applications, there is no need to configure separate security for each application
that uses TCP/IP.
IPSec helps provide defense-in-depth against:
Network-based attacks from untrusted computers, attacks that can result in the denial-
of-service of applications, services, or the network
Data corruption
Data theft
User-credential theft
Administrative control of servers, other computers, and the network.
You can use IPSec to defend against network-based attacks through a combination of host-based
IPSec packet filtering and the enforcement of trusted communications.
Goal of this document
This document explains step-by-step the VPN IPSec tunnel configuration in Oracle Cloud
Infrastructure. It’s helpful to know the basics of networking before following the steps outlined in
this white paper. You’ll work with your on-premises network engineer who will configure the on-
premises VPN device along with the steps described in this white paper.
This document helps you complete all the necessary steps in Oracle Cloud Infrastructure. You’ll
have the necessary configuration data (passphrase and IP address) required to complete the
configuration of on-premises.
Scope of the document
The scope of this document is limited to a quick start guide for deploying VPN IPSec tunnels to
connect from on-premises to Oracle Cloud Infrastructure. This document outlines some best
practices, and should not be used as a full reference guide to VPN IPSec tunnels.
The document will include a quick guide around a well-known Open Source product called
Libreswan which is the facto IPSEC standard on Linux platforms in order to create a software based
IPSEC Router solution for on-premises data centers
Readers of the current document should first:
Be familiar with the fundamentals of the Oracle Cloud Infrastructure
o https://cloud.oracle.com/bare-metal
Have a background in VPN IPSec tunnel functionality:
o https://en.wikipedia.org/wiki/IPsec
Get familiar with Libreswan and Linux administration
o https://libreswan.org/
o https://www.tutorialspoint.com/unix/unix-quick-guide.htm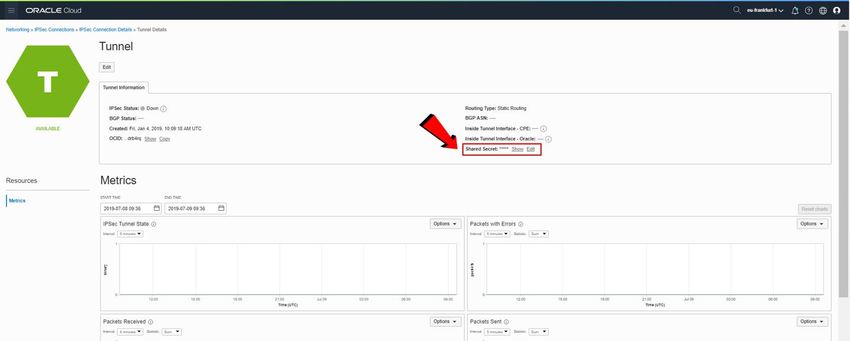
VPN IPSec Tunnels Concepts
IPSec stands for Internet Protocol Security or IP Security. IPSec is a protocol suite that encrypts the
entire IP traffic before the packets are transferred from the source node to the destination. IPSec
can be configured in two modes:
Transport Mode: IPSec only encrypts and/or authenticates the actual payload of the
packet, and the header information stays intact.
Tunnel Mode (supported by Oracle): IPSec encrypts and/or authenticates the entire
packet. After encryption, the packet is then encapsulated to form a new IP packet that
has different header information.
IPSec VPN site-to-site tunnels offer the following advantages:
No need to buy dedicated expensive lease lines from one site to another, as public
telecommunication lines are used to transmit data.
The internal IP addresses of both the participating networks and nodes are hidden from
external users.
The entire communication between the source and destination sites is encrypted,
significantly lowering the chances of information theft. Oracle Cloud Infrastructure
supports only the tunnel mode of VPN IPSec and is offered as self-service using the web
console
VPN IPSec Tunnels on Oracle Cloud Infrastructure
VPN IPSec service provides a connection between a customer’s on-premises network and Oracle
Cloud Infrastructure Virtual Cloud Network (VCN). It consists of multiple redundant IPSec tunnels
that can use static routes or dynamic routing to route traffic.
IPSec tunnels connect Dynamic Routing Gateway (DRG) and Customer Premises Equipment (CPE)
that are created and attached to the VCN. By default, two IPSec tunnels are created on Oracle
Cloud Infrastructure. This provides redundancy in case a tunnel fails. Each tunnel has configuration
information (that is, Oracle Cloud Infrastructure endpoint IP address and secret key for
authentication) that are configured on your on-prem router.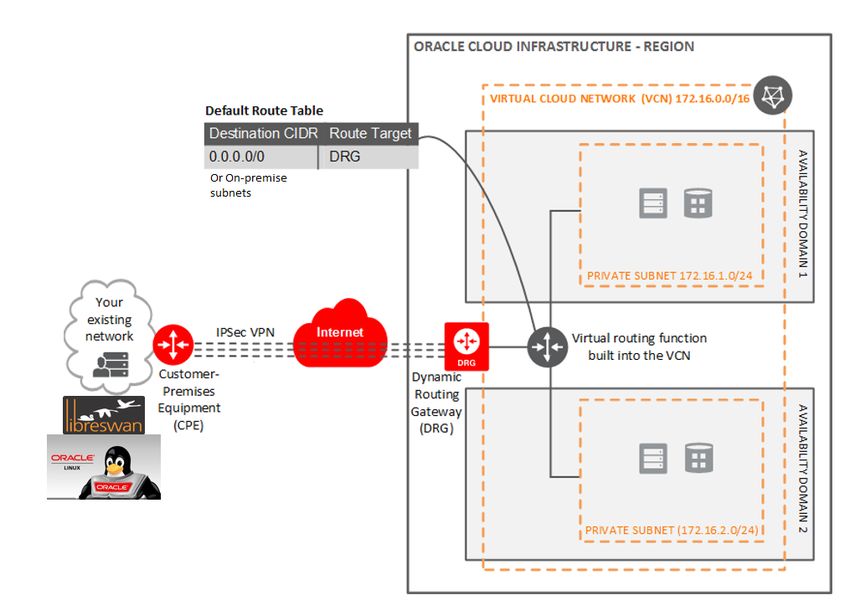
This document explains how to configure VPN IPSec tunnels from on-premises to Oracle Cloud
based on Infrastructure datacenters using the web consoles for the OCI part and Libreswan +
Oracle Linux as a Software-based IPSEC router for the on-premises part.
Network concepts1

Oracle Cloud Identifier (OCID)

Oracle Cloud Identifier (OCID) is a unique name assigned to every resource you provision on Oracle
Cloud Infrastructure. The OCID is an auto-generated string and is used by support engineers to
identify your cloud resource when working with any support tickets. Customers can’t choose a
preferred value for OCID and can’t modify it for the life of cloud resource. You also use OCIDs
extensively when working with REST APIs.

Virtual Cloud Network (VCN)

Virtual Cloud Network (VCN), also known as Cloud Network, is a software-defined network that
you set up on the Oracle Cloud Infrastructure platform. Think of VCN as an extension of your on-
premises to the cloud, with firewall rules and specific types of communication gateways. A VCN
covers a single, contiguous CIDR (range of IP addresses) block of your choice. A VCN is a regional
resource, meaning it covers all the availability domains (ADs) within a region.
Oracle Cloud Infrastructure VCN supports VCN size ranges of /16 to /30 and you can’t change the
CIDR of a VCN after it's created. The VCN’s CIDR should not overlap with your on-premises
network. So work with your on-premises network administrator to get an available range of IP
addresses (CIDR) that can be used with the VCN.

Subnet

A subnet is a subdivision of a cloud network (VCN). It consists of a contiguous range of IP addresses
that don’t overlap with other subnets within the same VCN. You build a subnet by specifying the
CIDR (range of IP addresses), Availability Domain, and a user-friendly name for the subnet.
Originally subnets were designed to cover only one Availability Domain (AD). They were AD-
specific and you had to have one subnet per AD in a region. Now subnets can either be AD-specific
or regional. Both can coexist within the same architecture.
Subnets have virtual network interface cards (VNIC), which attach to instances. You can label a
subnet as private when you create it, which means VNICs in the subnet can’t have a public IP
address. https://en.wikipedia.org/wiki/Private_network https://en.wikipedia.org/wiki/IP_address
A subnet is associated with security lists, route tables, and DHCP (Dynamic Host Configuration
Protocol) options to control what traffic is allowed to flow in which direction (DRG or IG for

1
 Some of concepts here has been taken from document: Deploy VPN IPSec Tunnels on Oracle Cloud Infrastructure
White Paper
public/private traffic). You can’t change security lists or route table attachments once a subnet is
built, however you can change the rules of security lists and route tables. Note, you can’t alter the
CIDR after a subnet is built.
Virtual Network Interface Card (VNIC)
A Virtual Network Interface card (VNIC) resides in a subnet and gets attached to an instance to
enable connections to the subnet’s VCN. Each instance has a default primary VNIC that is created
during instance launch and can’t be removed. If needed, you can add secondary VNICs to an
existing instance (in the same AD as the primary AD).
Dynamic Routing Gateway (DRG)
Dynamic Routing Gateway (DRG) is a virtual router that provides a path for private traffic between
Oracle Cloud Infrastructure cloud network (VCN) and the on-premises (datacenter) network. DRG
is a standalone resource on Oracle Cloud Infrastructure and is designed to give you the full
flexibility to attach or detach to a different VCN as per business needs. A DRG is required for both
VPN IPSec tunnels and FastConnect virtual circuits. A network administrator might think of the
DRG as the VPN headend on their Oracle Cloud Infrastructure service.
Internet Gateway (IG)
Internet Gateway (IG) is an optional virtual router that you can add to a VCN for internet
connectivity. It provides internet access to your VCN and is controlled by the route tables and
security list configuration on the subnet level. In addition to IG, you must have the following to
access internet from the compute instance:
Routing rule in the route table that points to the IG.
Appropriate port open in the security list, e.g., Port 80/443 must be opened for Web Server
Traffic.
Note: Having an Internet Gateway alone DOES NOT expose your subnet to the internet unless you
satisfy the above conditions.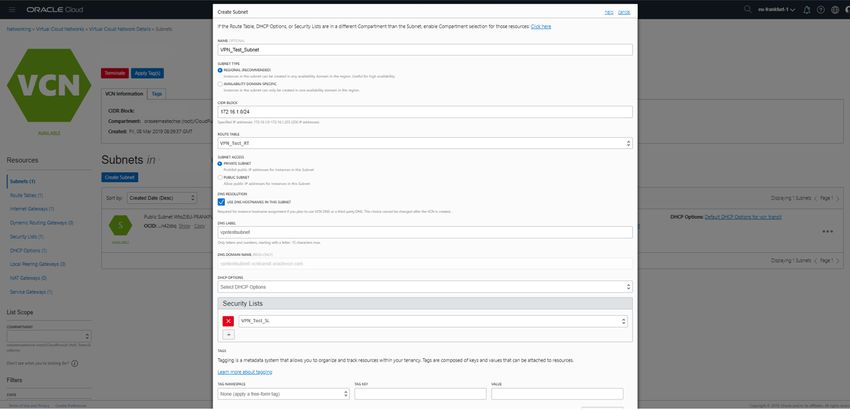
Security Lists

Security lists are virtual firewall rules for your VCN on Oracle Cloud Infrastructure. These security
lists consist of ingress and egress rules that specify the destination (CIDR) and type of traffic
(protocol and port) allowed in and out of instances within a subnet. A security list gets attached to
the subnet when you create a subnet and you can change the traffic type and destination
dynamically.
Example:
An ingress security rule in security lists with source CIDR 10.100.200.0/24 with destination port 22
of TCP protocol allows all ingress traffic from on-premises IP addresses (10.100.200.0/24) to
Oracle Cloud Infrastructure instances on port 22 for SSH connection.

Route Table

Route tables are virtual route tables where you configure traffic rules using DRG, IG, NAT Gateway
(NAT GW) or Local Private Gateways (LPG). The route table rules provide mapping for the traffic
from subnets via gateways to a destination outside the VCN, e. g., private traffic flows using DRG
and public traffic flows using IG. You can build multiple route tables within a VCN or use the default
route table.

VPN IPSec configuring steps

The following picture represents the network diagram of the working sample that will be included
in this document as a reference.

                                                                 SUBNET_BE_RT
                                                       192.168.1.0/24               DRG

                                                                                                                          SUBNET_FE_RT
                                                                    SUBNET_BE                  SUBNET_FE
                                                                                                                  0.0.0.0/0          IGW
                                                       AD-1

                        Client Public IP

                       141.143.209.7

                                           INTERNET
                                                                                                                               INTERNET
                                                       AD-2

                                                                172.16.1.0/24               172.16.2.0/24   IGW
                                             IPSec

      On-prem CIDR:
      192.168.1.0/24
                                                       AD-3

       Client DC

                                                                           VCN 172.16.0.0/16
                                                                           Client Tenant

                                                       Oracle Cloud Infrastructure Region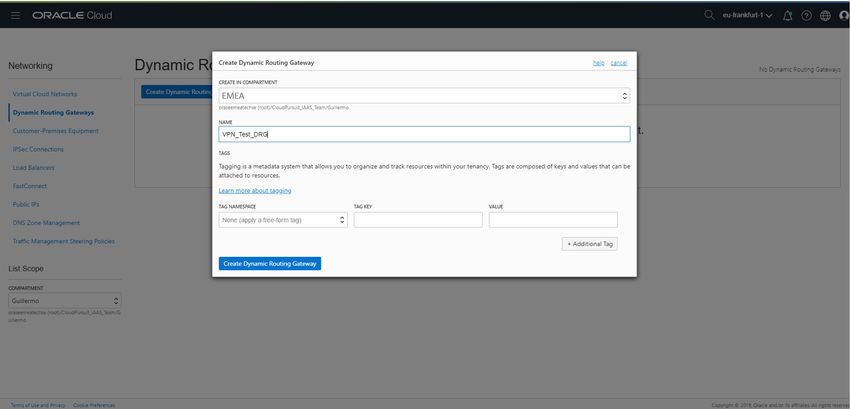
VCN setup: Create Virtual Cloud Network (VCN)
1. Log in to the Oracle Cloud Infrastructure Console.
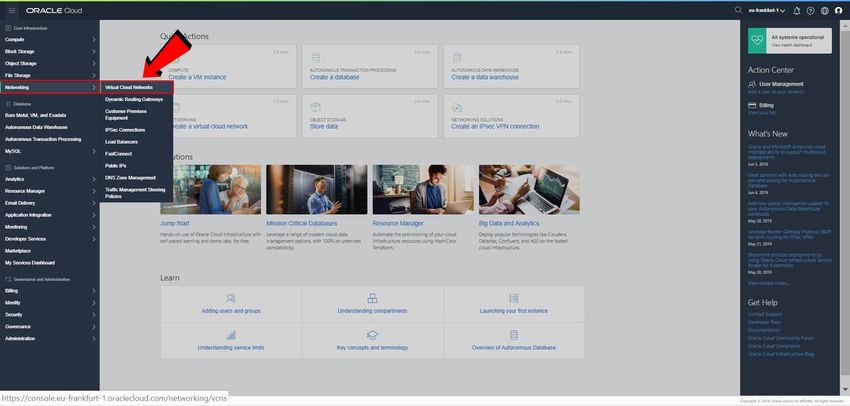
2. From the Navigation menu, select Networking and then select Virtual Cloud Networks.
3. Click Create Virtual Cloud Network.
4. Create a new VCN with the following settings:
• Select the compartment where you want to build the VCN. i.e. EMEA
• Define a Name for the VCN what will be used as a reference• Note you can select ‘Create Virtual Cloud Network plus related resources’ or
just the VCN. If you select the option with related resources, the following
resources will be generated together with the VCN:
One class A CIDR (CIDR: 10.0.0.0/16)
DNS will be enabled
Internet Gateway and routes toward it.
Default Security List
In this example, a VCN named VPN_Test_VCN is created through the ‘Create Virtual Cloud
Network Only’ option. A CIDR block 172.16.0.0/16 has been defined.VCN setup: Create DRG
1. From the Networking menu, on the left panel, select Dynamic Routing Gateway.
2. Click Create Dynamic Routing Gateway.
Select the Compartment where you want to create the VCN and give a name to your DRG.
i.e. VPN_Test_DRGVCN setup: Attach DRG to a VCN
In order to route the incoming packets to the correct VCN, we need to attach a DRG to a given
VCN. Perform the following tasks:
1. From the Networking menu, click in Dynamic Routing Gateway.
2. Select the DRG defined in the previous step. In our case VPN_Test_DRG.
3. From the left panel click on Virtual Cloud Networks
4. Click Attach to Virtual Cloud Network
5. Ensure you are on the right compartment, and select the Virtual Cloud Network you
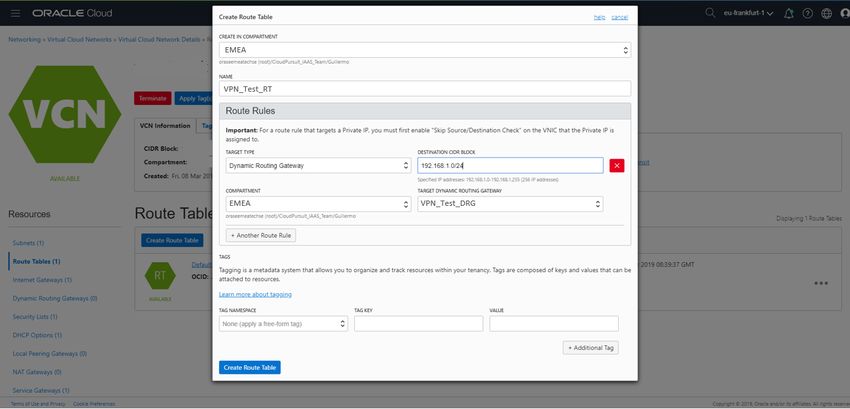
created in the previous step (e.g. VPN_Test_VCN). Then click Attach:VCN setup: Create a Route table for VPN
This is one of the key steps that needs to be done in order to make sure all the IP packages are
routed back to the on-prem network when accessing the OCI instances.
In order to create a route table follow these steps:
1. From the Networking menu, click in Virtual Cloud Network
2. Click the VCN you created in previous steps (e.g. VPN_Test_VCN)
3. On the left panel, select Route Tables
Note there is a Default Route table for the VCN however we will create a specific
routing table for the VPN connectivity.
4. Click Create Route Table.
5. Provide the following information:
Name: VPN_Test_RT
Add in the Route Rule the on-prem CIDR Block. If you have more subnets
on the on-prem networking “participating” in the VPN tunnel, please add
them as well.
Target Type: Dynamic Routing Gateway
Destination CIDR Block: 192.168.1.0/24 (on-prem CIDR)
Compartment: (e.g. EMEA) Target Dynamic Routing Gateway: VPN_Test_DRG
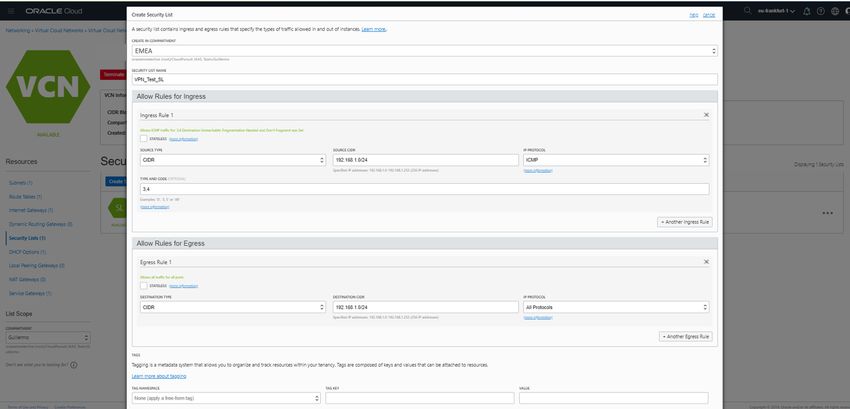
VCN setup: Create New Security List for the Subnet
We need to make sure that the Security List are completed in order to allow ingress and egress
traffic through the tunnel. Follow the next steps:
1. From the Networking menu, click in Virtual Cloud Networks and select your VCN.
2. In the VCN menu, on the left panel, click in Security Lists
3. Click in Create Security List, define a name (e.g. VPN_Test_SL) and define the
following ingress and egress rules:
Add Rule for Ingress (allow ICMP type 3,4 for MTU discovery)
https://en.wikipedia.org/wiki/Path_MTU_Discovery
Source CIDR – 192.168.1.0/24 (On-premises CIDR)
IP Protocol – ICMP
Type and Code – 3,4
Add Rule for Egress (allow outgoing TCP traffic on all ports to on-premises)
Destination CIDR – 192.168.1.0/24 (On-premises CIDR)
IP Protocol – All Protocols Add Rule(s) for Ingress if you want all the traffic to be allowed from On –
premises. For all traffic choose:
Source CIDR 192.168.1.0/24 (On-premises CIDR)
IP Protocol – All protocols
VCN setup: Create New Subnet
We will now create a subnet within the VCN. The CIDR chosen will be compatible with the VCN
CIDR (smaller block of IP addresses). Remember, Oracle supports a single encryption domain. All
the instances linked to this subnet will have access to the customer on-premises networks/hosts.
We will attach the route table and security list that we have created before. The steps are:
1. In the Virtual Cloud Network menu, click Subnets
2. Click on Create Subnet
3. Provide a name for the VCN (e.g. Subnet_BE)
4. Select Regional subnet type (recommended)
5. Select the Route Table you created in previous steps (e.g. VPN_Test_route)
6. Select Private subnet. This subnet will only have access through VPN.
7. Leave the defaults for DNS and DHCP
8. Select the Security List you created before (e.g. VPN_Test_SL)9. Click Create So far we have created a DRG, attach it to the target VCN in OCI, created Security list to allow ingress and egress traffic from/to tunnel, Route Tables to make sure packets gets routed to the DRG and a Subnet to finally receive all the traffic. Now, for the sake of the test, you need at least one Compute instance attaching to the subnet that we have created. We will use an Oracle Linux 7.X attached to VPN_Test_Subnet
VCN setup: Customer Premises Equipment (CPE)

This step will require the Public IP from where our on-prem network will be connecting from.
This way we make sure that ONLY traffic from this Public IP address is accepted towards our OCI
VPN setup. Follow these steps:
   1. From the Navigation menu, select Networking and then select Customer Premises

   2. Click on Create Customer-Premise Equipment
   3. Set the Name and Public IP address of your on-prem network device, the one that will be
      used to create the tunnel.
VCN setup: Create IPSEC Connecting from CPE to DRG
Now we will create an IPSec connection to the CPE object and provide required routing
information.
1. From the Networking menu, select IPSec Connections
2. Click Create IPSec Connection
3. Provide a Name for the connection. Select the Compartment and the CPE you created
before. Choose the DRG created in previous steps and define the on-premises Subnet or
Subnets that will be connecting to and from OCI VCN.
Once you click in Create IPSec Connection you should see something like this:Click on ( ) and navigate to the details. Under Tunnel information you should see two endpoints that have been created. Notice that NO tunnel is UP yet. VCN setup: Configuring VPN Device (router) on Premises Regarding Oracle documentation, Oracle have tested the following CPEs with Oracle Cloud Infrastructure IPSec VPN connections: Checkpoint 2200 (R75.40) Libreswan (version 3.23-4) Cisco ISR (CISCO IOS 15.x or later) NEC IX3315/IX2106 (version 10.1.16) Cisco IOS (version 15.4(3)M3) Openswan Cisco ASA (version 9.7.1 or later) Palo Alto PA-500 (PanOS 6.0.6) Fortinet Fortigate (FortiOS 5.0.x or later) WatchGuard Firebox (v12) Juniper SRX (JunOS 10.2 or later) Yamaha RTX 1210/RTX830 (14.01.28/15.02.03) Juniper MX (JunOS 10.2 or later)
In this document we will deploy Libreswan version 3.22 (older version were seen to be unstable).
You can download the software from https://libreswan.org/
In order to use libreswan you will need a Linux 7 release. For this example we have used VMware
and CentOS 7.4 64 Bits.
The Network configuration for this example will be:
Bridge Mode: Connected directly to the physical Network
Replicate physical network connection state
Configure adapters: Chose the NIC connected to the current network
Note that Oracle uses asymmetric routing across the multiple tunnels that make up the IPSec VPN
connection. Even if you configure one tunnel as primary and another as backup, traffic from your
VCN to your on-premises network can use any tunnel that is "up" on your device. Please, configure
your firewalls accordingly.VCN setup: Installing Libreswan 3.22 At the time of writing this doc, the current verison of Libreswan 3.20 appears unstable on the IP address assigned on VMware. Libreswan 3.22 fixed this issue but was not yet available on yum repositories. We strongly recommend to install Libreswan 3.22 https://download.libreswan.org and install it manually. Please follow the README.md to download the necessary packages and compilation libs. Once libreswan is installed you can verify that the right version is installed by executing the command “ipsec version” [root@localhost ~]# ipsec version Linux Libreswan 3.22 (netkey) on 3.10.0-693.11.6.el7.x86_64 VCN setup: Configuring Libreswan 3.22 Turning Linux instance into a IP Router Now we will configure Libreswan and enable IP forwarding feature in order to turn our Linux Instance into a Router. The following configuration parameters are needed to enable IP forwarding and fix some little issues around Linux preventing sending some bogus ICMP redirects messages. As Root, under /etc/sysctl.conf [root@localhost etc]# cat sysctl.conf # sysctl settings are defined through files in # /usr/lib/sysctl.d/, /run/sysctl.d/, and /etc/sysctl.d/. # # Vendors settings live in /usr/lib/sysctl.d/. # To override a whole file, create a new file with the same in # /etc/sysctl.d/ and put new settings there. To override # only specific settings, add a file with a lexically later # name in /etc/sysctl.d/ and put new settings there. # # For more information, see sysctl.conf(5) and sysctl.d(5).
net.ipv4.ip_forward = 1

# rp_filter protects against packets "appearing out of nowhere". It is not

# always clear to the kernel that a packet appeared as a result of decryption.

# One such case is using KLIPS or MAST IPsec stacks, as they receive on one

# interface but inject the packet on another interface. Another known case is

# "appendix mode" using the XFRM/NETKEY stack. Here, packets are receiving,

# decrypted and sent onwards on the same single interface. (these can also cause

# bad redirects, see below

net.ipv4.conf.default.rp_filter = 0

net.ipv4.conf.all.rp_filter = 0

# when using 1 interface for two networks when using NETKEY, the kernel

# kernel thinks it can be clever by sending a redirect (cause it cannot

# tell an encrypted packet came in, but a decrypted packet came out),

# so it sends a bogus ICMP redirect

net.ipv4.conf.all.send_redirects = 0

net.ipv4.conf.default.send_redirects = 0

net.ipv4.icmp_ignore_bogus_error_responses = 1

net.ipv4.conf.default.log_martians = 0

net.ipv4.conf.all.log_martians = 0

# seems the martian settings are not always enough. If not receiving packets

# try running this:

# for n in eth0 mast0 ipsec0 ipsec1 all default ; do

#   sysctl net.ipv4.conf.$n.rp_filter=0;

# done

#

# these are non-ipsec specific security policies you should use

net.ipv4.conf.default.accept_source_route = 0

net.ipv6.conf.default.accept_source_route = 0

net.ipv4.conf.all.accept_redirects = 0

net.ipv6.conf.all.accept_redirects = 0

net.ipv4.conf.default.accept_redirects = 0

net.ipv6.conf.default.accept_redirects = 0
Reboot the instance:
[root@localhost ~]# systemctl reboot

Once the instance is rebooted, it will redirect any received IP packet that is not actually targeting
any IP beloging to itself.

Configuring Libreswan

It is strongly recommended to read libreswan documentation and samples
(https://libreswan.org/wiki/Configuration_examples, https://libreswan.org/wiki/). For this
example we already provide the parameters that will work against OCI.

Configuring Libreswan.- ipsec.conf

Ipsec.conf will store the connections entries that will represent the tunnel itself.

# /etc/ipsec.conf - Libreswan IPsec configuration file

# Uncomment when using this configuration file with openswan

#version 2

#

# Manual:      ipsec.conf.5

config setup

       # which IPsec stack to use, "netkey" (the default), "klips" or "mast".

       # For MacOSX use "bsd"

       protostack=netkey

       #

       # Normally, pluto logs via syslog. If you want to log to a file,

       # specify below or to disable logging, eg for embedded systems, use

       # the file name /dev/null

       # Note: SElinux policies might prevent pluto writing to a log file at

       #        an unusual location.

       logfile=/var/log/pluto.log

       #

       # Do not enable debug options to debug configuration issues!
#
# plutodebug "all", "none" or a combation from below:
# "raw crypt parsing emitting control controlmore kernel pfkey
# natt x509 dpd dns oppo oppoinfo private".
# Note: "private" is not included with "all", as it can show confidential
# information. It must be specifically specified
# examples:
# plutodebug="control parsing"
# plutodebug="all crypt"
# Again: only enable plutodebug when asked by a developer
#plutodebug=none
#
# Enable core dumps (might require system changes, like ulimit -C)
# This is required for abrtd to work properly
# Note: SElinux policies might prevent pluto writing the core at
# unusual locations
dumpdir=/var/run/pluto/
#
# NAT-TRAVERSAL support
# exclude networks used on server side by adding %v4:!a.b.c.0/24
# It seems that T-Mobile in the US and Rogers/Fido in Canada are
# using 25/8 as "private" address space on their wireless networks.
# This range has never been announced via BGP (at least up to 2015)
virtual_private=%v4:10.0.0.0/8,%v4:192.168.0.0/16,%v4:172.16.0.0/12,%v4:25.0.0.0/8,%v4:10
0.64.0.0/10,%v6:fd00::/8,%v6:fe80::/10
# For example connections, see your distribution's documentation directory,
# or https://libreswan.org/wiki/
#
# There is also a lot of information in the manual page, "man ipsec.conf"
#
# It is best to add your IPsec connections as separate files in /etc/ipsec.d/
#include /etc/ipsec.d/*.conf
conn hometype=tunnel
authby=secret
pfs=yes
keyexchange=ike
leftid=141.143.209.7
leftsourceip=192.168.1.103
leftsubnet=192.168.1.0/24
right=130.146.14.52
rightid=130.146.14.52
rightsubnet=172.16.1.0/24
aggrmode=no
left=192.168.1.103
ike=aes128-sha256;modp1536
esp=aes128-sha1;modp1536
rightnexthop=%defaultroute
initial-contact=yes
dpddelay=60
dpdtimeout=240
dpdaction=restart
auto=start
where:
Parameter Description
LeftID How the left participant (On-premises) should
be identified for authentication; defaults to
left. Can be an IP address. It should be the
Public IP address of the On-premises network
where the tunnel will be connected from
LeftsourceIP The IP address for this host to use when
transmitting a packet to the other side of this
link. Relevant only locally, This should be the
private IP address assigned to the Linux
machine
LeftSubnet Private subnet behind the left participant (On-
premises), expressed as network/netmaskRight/Rightid This is the Public IP address of one of the
tunnels assigned when creating the IPSec
tunnel.
rightsubnet This is the subnet/subnets that we are
targeting in OCI. In our example
172.16.1.0/24
Notice the rest of the parameters are related to DPD (Dead peer detection ), IKE, ESP ciphers and
integrity checking (hashing) , PFS (Perfect Forward Secrecy) which are compatible with OCI
Configuring Libreswan.- /etc/ipsec.d/shared.secrets
Now we will configure the shared secrets associated to the tunnel in order to be able to
authenticate against it.
This is achieved via /etc/ipsec.d/shared.secrets file as follows:
[root@localhost ipsec.d]# cat shared.secrets
141.143.209.7 130.146.x.x : PSK
"QFhoHbPJM9YSpZcMbN09xvrsVl9b66_xe.dBb.rnmH_q.4NP5y.l6mFGkNLZwv0X"
141.143.209.7 130.146.x.x : PSK
"MPa9MB6tvIaaSgeek.7WmsmKi_CC.en317742sfrrBCq2saEQQUKbRG00MgViPRc"
The pre-shared key can be obtained by navigating to Networking > IPSec Connections > IPSec
Connection Details > Tunnel > View Details.As shown in the following picture, the Shared Secret is located under the Tunnel Information. In addition you will also have a preview of the different metrics that can be configured for the IPSec connectivity. You can view or simply edit the shared secret to accommodate your requirements: Shared.secrets structure: “Public On-premises IP address” “OCI IPSec Connection Tunnel IP address”: PSK “Shared secret key” Running Libreswan.- Creating the tunnel The first command to initialize ipsec stack is:
[root@localhost ~]# ipsec start
Redirecting to: systemctl start ipsec.service

Notice the call is being delivered to ipsec.service daemon.

Now if the auto=start entry under ipsec.conf is setup, the tunnel will be auto started. If not, you
will need to execute:

[root@localhost ~]# ipsec auto --add home
002 added connection description "home"

[root@localhost ~]# ipsec auto --up home
[root@localhost etc]# ipsec auto --start home
002 added connection description "home"
002 "home" #1: initiating Main Mode
104 "home" #1: STATE_MAIN_I1: initiate
106 "home" #1: STATE_MAIN_I2: sent MI2, expecting MR2
002 "home" #1: sending INITIAL_CONTACT
108 "home" #1: STATE_MAIN_I3: sent MI3, expecting MR3
002 "home" #1: Peer ID is ID_IPV4_ADDR: '129.146.14.52'
004 "home" #1: STATE_MAIN_I4: ISAKMP SA established {auth=PRESHARED_KEY cipher=aes_128
integ=sha2_256 group=MODP1536}
002             "home"              #2:             initiating             Quick             Mode
PSK+ENCRYPT+TUNNEL+PFS+UP+IKEV1_ALLOW+IKEV2_ALLOW+SAREF_TRACK+IKE_FRAG_ALLOW+ESN_NO        {using
isakmp#1 msgid:ddd61c07 proposal=AES_CBC_128-HMAC_SHA1_96-MODP1536 pfsgroup=MODP1536}
117 "home" #2: STATE_QUICK_I1: initiate
003 "home" #2: ignoring informational payload IPSEC_RESPONDER_LIFETIME, msgid=ddd61c07, length=28
004 "home" #2: STATE_QUICK_I2: sent QI2, IPsec SA established tunnel mode {ESP/NAT=>0xa39a854f
To verify connectivity, SSH to your Linux machine (VMware) and ping the compute instance deployed in OCI. In our case: If you want to make sure the tunnel gets established automatically on every Linux VM reboot, you will need to enable ipsec.service
systemctl enable ipsec.service
Please make sure that the entry auto=start is present in ipsec.conf .
VCN setup: Accessing the OCI network from any machine in the network
Now that we have the tunnel up and running, let’s make sure that any machine in our on-prem
network is able to access OCI. Since we have setup Linux with IP forward enabled, we just need to
add a permanent route to any machine in the on-prem network as follows:
Windows 10
Run a console as Administrator:
C:\WINDOWS\system32>route add 172.16.1.0 mask 255.255.255.0 192.168.1.103
OK!
Where:
172.16.1.0 mask 255.255.255.0 is the OCI subnet we are targeting through the
tunnel
192.168.1.103 is the IP address of the VM Linux machine running LibreswanLinux Add: ip route add 172.16.1.0/24 via 192.168.1.103 Where: 172.16.1.0 mask 255.255.255.0 is the OCI subnet we are targeting through the tunnel 192.168.1.103 is the IP address of the VM Linux machine running Libreswan You should now be able to reach any OCI compute instances attached to the 172.16.1.0/24 subnets. OCI machines will be able to reach the on-prem 192.168.1.0/24 subnet as well.
References

Libreswan Official Documentation: https://libreswan.org/

Libreswan configuration:
https://docs.cloud.oracle.com/iaas/Content/Network/Reference/libreswanCPE.htm?Highlight=shared%
20secret

Oracle Cloud Infrastructure VPN Connect:
https://docs.cloud.oracle.com/iaas/Content/Network/Tasks/managingIPsec.htm
You can also read