Welcome to the Efficiency Maine Annual Heat Pump Basics Module.
←
→
Page content transcription
If your browser does not render page correctly, please read the page content below
Welcome to the Efficiency Maine Annual Heat Pump Basics Module.

                                                                  1
This module is divided into 10 sections. You need not complete all sections at once --
simply come back to the training module and pick up where you left off. However, if
you leave in the middle of a section, when you return you’ll have to start that section
over so it’s best to take breaks after you click on the “next lesson” button at the end
of a section.

This training will cover an introduction of Efficiency Maine, including rebates and
loans, and we’ll explain becoming a registered residential vendor or a commercial
qualified partner.
Next we’ll address heat pump myths and facts, selection, sizing, placement,
insulation, operation, and some other heat pump considerations.

                                                                                          2
The first section is an introduction to Efficiency Maine.

                                                            3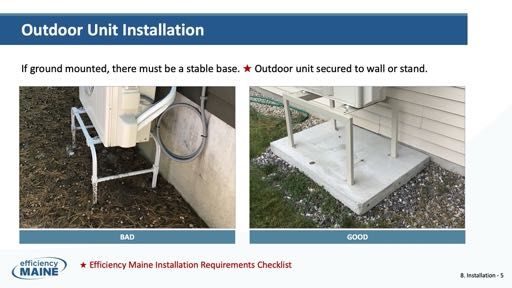
Efficiency Maine offers rebates, loans, sales brochures, and technical information to
help residential and commercial trade allies sell and install energy efficiency
products. Efficiency Maine offers rebates, loans, brochures and marketing support
designed to motivate customers to call our Residential Registered Vendors.

Restrictions on our funding require all rebated installations be cost-effective. Unlike
an LED bulb or ENERGY STAR clothes washer, the cost-effectiveness of a heat pump
depends a lot on its placement, sizing, selection, installation, and use.

                                                                                          4
Heating, cooling, and lighting of buildings are responsible for almost one-third of
Maine’s greenhouse gas emissions. Maine has recently set targets to help the state
transition to cleaner heating and cooling systems. These include
• A target in state statute to promote the installation of at least 100,000 new heat
   pumps in Maine by 2025; and
• A target in Maine’s climate action plan to achieve, by 2030, 130,000 homes using
   between 1-2 heat pumps and an additional 115,000 homes using a whole-home
   heat-pump system.
The climate action plan also calls for the installation of at least 15,000 new heat
pumps in income-eligible households by 2025.

                                                                                       5
This graph gives you an idea of the opportunity before us. As of 2020, tens of
thousands of heat pumps have been installed in homes and businesses across
Maine..

But, as you can see, we’re going to need to grow that number considerably to meet
the state’s targets.

                                                                                    6
That’s where you come in and why we’ve asked you to view this video every year so
you can continue to meet our rebate program eligibility requirements.

As you know, Efficiency Maine inspects thousands of heat pump installations each
year and observes the very best practices.

This video is intended to share those best practices.

We plan to update it on an ongoing basis to make sure all Residential Registered
Vendors receive the benefit of what we learn.

However, this video is not intended to replace industry training or what installers
learn from working alongside more experienced peers.

                                                                                      7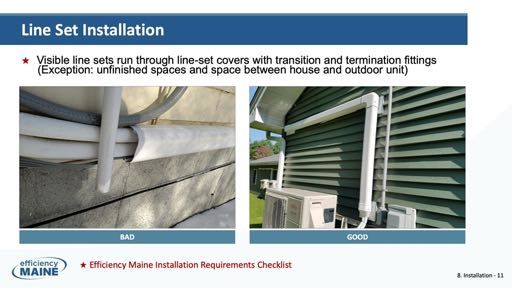
This is the end of the introduction. To move ahead to the next section on Rebates and
Loans, click the “Next Lesson” button below this video window.

                                                                                        8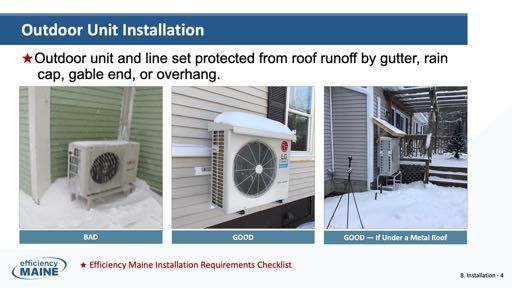
This section will cover Efficiency Maine rebates and loans.

                                                              9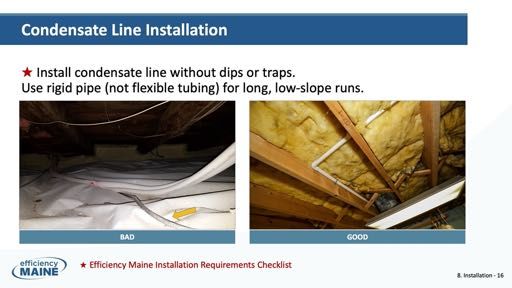
We offer rebates up to $2,400 per home and up to $1,600 per heat pump in
commercial buildings. There’s no cap on the number of heat pumps that can be
installed in a commercial building. Rebates are only available for heat pumps that are
installed by Residential Registered Vendors or commercial Qualified Partners.

For more details on rebates and eligibility criteria please visit efficiencymaine.com.

                                                                                         10
In addition to rebates, we have residential heat pump loans.
In addition to rebates, we have residential heat pump loans.
Customers can borrow up to $15,000 at a 4.99 to 5.99 percent Annual Percentage
Rate with up to 10-year terms.
Residential Registered Vendors interested in offering Efficiency Maine loans to their
customers can contact us to get their own loan website login ID and password.
11This completes the section on rebates and loans. Click the “Next Lesson” button to
advance to the section on “Becoming a Residential Registered Vendor or Commercial
Qualified Partner.”
12Section 3 covers Becoming a Residential Registered Vendor or Commercial Qualified
Partner under Efficiency Maine’s programs.
13Some of the benefits of being a Residential Registered Vendor -- also referred to as an
RRV -- are access to rebates and loans as a tool for selling upgrades, as well as
exposure on our website’s Vendor Locator, free brochures, and a monthly program
update e-newsletter. There is no fee to register.
To give you an idea of how our marketing can benefit you, in a typical year, Efficiency
Maine runs ads in newspapers and magazines, and on Google, Facebook, and radio
that reach millions of readers and listeners statewide. Our website receives more
than 125,000 in-state visits per year and 40,000 searches on our Vendor Locator tool.
Efficiency Maine requires RRVs to sign the Efficiency Maine participation agreement
and code of conduct document, and have general liability and workers’ compensation
insurance.
In addition, there are three heat-pump- specific requirements. One member of each
heat pump installation crew must have:
• EPA Section 608 Certification.
• Heat pump installer training provided by a manufacturer of ENERGY STAR® heat
pumps, or an Efficiency Maine Registered Trainer.
The certificate from this one-hour, free Efficiency Maine Annual Heat Pump Basics
training video.
14The benefits of becoming a Commercial Qualified Partner are similar and will allow
you to access heat pump rebates for your commercial customers. The requirements
for becoming a Qualified Partner are outlined here. You can register to become a
Qualified Partner or Residential Registered Vendor -- or both -- on the Efficiency
Maine website.
15To help customers find Residential Registered Vendors and commercial Qualified
Partners we have locator tools on our website. Over 40,000 visitors use our vendor
locator search tool each year.
16To help you with marketing, Efficiency Maine has several free heat pump brochures,
including an overview of heat pump technology, information about rebates, and heat
pump user tips.
Efficiency Maine also offers a “Quick Guide to Home Heating” brochure that helps
customers compare the annual cost of heating with a heat pump to other heating
systems.
You can download these from our website or if you’d like free, professionally printed
copies, call our Call Center at 866-376-2463.
17One key document that acts as the foundation for this training -- and that we will
refer to throughout -- is the Residential Heat Pump Installation Requirements
Checklist.
The checklist must be completed for every residential heat pump rebate.
As we go through this presentation, we’ve placed a red star next to the mandatory
items.
18Finally, we have a team of field inspectors that visit 10 to 15% of residential heat
pump installations to ensure that installations comply with our program guidelines.
Field inspectors also look to find and share best practices with all installers. This helps
us improve quality standards in the industry.
This free offering is available to all participating homeowners.
Efficiency Maine inspectors use the Installation Requirements Checklist as the basis of
their inspections. An inspection report is always shared with the homeowners and,
with the homeowner’s permission, those reports may also be shared with the
installer.
19TThis completes the section on becoming a trade ally in Efficiency Maine Programs.
Click the “Next lesson” button below to move to the next section on heat pump
myths and facts.
20One of the things that you know as a heat pump installer is that there are a lot of
misconceptions about the technology, even with more and more people installing
them in their homes and businesses. Let’s go over a few of the more common myths
so you have more resources to share with your customers when they come up.
21That fact is that as long as a heat pump system is properly designed, there should be
no need for backup. Some heat pumps work at temperatures as low as negative 15
degrees Fahrenheit. It is increasingly common for new houses to be heated and
cooled exclusively with heat pumps. Older homes are also converting exclusively to
heat pumps.
22Though they lose efficiency as the outdoor temperature drops, even at temperatures
near zero degrees Fahrenheit, rebate-eligible heat pumps can be nearly 200%
efficient.
This is far more efficient than any combustion systems.
23While it is important to have a well insulated home, a properly sized heat pump can
be used to heat virtually any home.
Tens of thousands of Maine homes successfully heat with heat pumps and most are
not superinsulated.
24Myth: Multi-zone systems cost less than multiple single-zone units.
Multi-zone systems typically cost more to operate, and with the higher rebates
available for single-zone systems, they can cost less to install.
25While this is true for furnaces and boilers, it is not true for heat pumps. Heat pumps
save the most energy when allowed to maintain a constant temperature. In fact, a
Department of Energy study from 2015 found that leaving the thermostat at a
constant temperature uses roughly half the amount of energy as nightly setbacks.
That’s why we recommend that people, “set it and forget it.”
26While it’s true that heat pumps lose efficiency in very cold weather, they are far more
efficient than furnaces and boilers, even at temperatures below zero degrees
Fahrenheit.
27There is some truth to the fact that boilers can leak when turned off, but the solution
is not to keep your boiler on. Instead of using the boiler, try replacing the gaskets or
draining it if it is not in use.
28You do not need to keep the system running to make sure the pipes don’t freeze. If
you are worried about frozen pipes, you can add insulation to basement walls or even
just add antifreeze to the distribution system.
29That concludes our heat pump myths and facts section. You can find more frequently
asked questions about heat pumps on the Efficiency Maine website. As a heat pump
installer you can help dispel these myths to ensure customers save the most and get
the most out of their systems.
To move to the next section, click the “Next Lesson” button on the lower right hand
side of your screen.
30In this section, we’re going to talk about heat pump selection for indoor and outdoor
unit types.
31Let’s start with indoor unit types, namely wall units, floor units, ceiling cassettes, and
ducted.
On the next slide we’re going to talk about some of the advantages and
disadvantages of each.
32Wall units are by far the most popular. They’re the most efficient, and can condition
the largest area because they have a high volume of air going through them. Because
they’re mounted high on the wall, they are rarely obstructed by furniture.
The drawback of a wall unit is that because they’re up high, they tend to be the most
visible.
Floor units are much less obtrusive. However, they tend to be less efficient, tend to
have less capacity, and their airflow is often impeded by furniture, which reduces the
amount of area that they might condition.
Ceiling cassettes are nearly invisible, which is considered a big advantage. They tend
to be somewhat less efficient and may have less capacity.
Ducted units are also nearly invisible, and they’re really good for small rooms and
well-insulated homes if they’re ducted within the thermal envelope. On the other
hand, ducted units risk significant heat loss if they’re improperly insulated. They can
be sensitive to open and closed doors, unless the supply and return is in the same
room. And they tend to heat all the rooms in the zone regardless of whether there’s a
need to do so.
33Another point to address is single-zone vs. multi-zone systems.
Single-zone heat pumps, which are by far the most popular, tend to be more efficient.
They can throttle down to lower speeds without cycling on and off, which can save
energy in the shoulder seasons.
They only heat and cool rooms that need it .
Single-zone units also allow users to have each room in a different mode: for
example, AC, dehumidify and fan.
And depending on the efficiency of the unit, single zones may be eligible for a larger
rebate from Efficiency Maine.
They can more effectively dehumidify.
Another advantage of single zones is that by having multiple single zones instead of a
single multi-zone, you have a backup -- if one were to break, the other zones would
still be operable.
Because multi-zone outdoor units connect to more than one indoor unit, they can be
less expensive to install, easier to clean, and require fewer outdoor units than buying
34several single-zone heat pumps.
The disadvantage of a multi-zone system is they tend to deliver heat to all the
connected indoor units at once as long as one of them is calling for heat -- even if the
others are not calling for heat. One tip to minimize this issue is to avoid having one
outdoor unit serving more than one floor.
34This concludes the section on “selection.” Next, we’ll talk about sizing. Please click on
the “Next Lesson” button to move forward.
35Now, let’s discuss sizing.
36The first point is that bigger is not always better.
Oversized units can cost more to buy and, because they’re likely to cycle more, they
can cost more to operate. As we saw in the earlier graphs, cycling can waste a lot of
energy.
Oversized units may also “super cool” in air conditioning mode, which can make the
room feel clammy. The reason for this is that the unit may adjust the temperature
without removing all the humidity.
Lastly, larger units tend to have lower-rated efficiencies, which means they may have
higher operating costs.
37Another general sizing principle is that small units can have big capacities at low
temperatures. Even if they have overall lower capacity, small heat pumps tend to
perform well at low temperatures, which is an important feature in our climate.
So, we recommend matching the maximum capacity at design temperature to the
heating load at design temperature, rather than the rated capacity.
And you’ll want to use the heating load of the zone that the heat pump is heating,
not necessarily the entire house.
38That concludes our section on sizing. To move on to the placement section, please
click the “Next Lesson” button on the lower right.
39We are now going to discuss placement of the indoor unit and outdoor unit, as well
as placement of the line-set and condensate line. Let’s begin with indoor unit
placement.
40Here are some of the criteria to consider:
First, try to maximize the space that can be heated or cooled. You’re looking for big,
open spaces. That will increase the cost-effectiveness of the heat pump installation
because more of the heat provided by the whole-house system will be offset.
Likewise, putting the heat pump in the most frequently used room can help
homeowners save the most energy and money.
However you want to be careful about the indoor unit’s interaction with existing
thermostats. We’ll talk about that more in a moment.
You might want to consider locating your indoor units where they’ll be accessible for
easier cleaning; for instance, not high on a cathedral ceiling.
Also consider the impact of staircases. It’s very difficult for heat to go past a staircase
that goes up. And it's difficult for air conditioning to bypass a stairwell that goes
down.
41Continuing on indoor unit placement, it’s tough to move air through doorways and
can be very difficult to move air down a dead-end hallway. Every house is different so
these are just general rules of thumb.
One approach to consider when evaluating the location of the indoor unit is to first
look for a location where a wall unit could be mounted.
If there aren’t any good opportunities -- for example a room with many windows --
then you might look for a place where a floor unit might be installed.
If you can’t find a space for either a wall unit or a floor unit, you might then consider
a ceiling cassette or a ducted unit.
By going in this order, you will have the advantage of trying to get the most efficient
indoor unit first, before exploring other indoor unit options.
Picking spots that are easy to wire and plumb also makes sense. It’s easiest to run
line-set through spaces like a closet, unfinished stairwell, or garage. You may find your
customers are happiest if you avoid putting condensate pumps in bedrooms, because
they can make noise during the air conditioning season.
42Now let’s address heat pump placement in relation to existing thermostats for the
whole-house heating system.
If a heat pump zone and the boiler zone overlap completely, meaning the heat pump
can heat the entire zone that the boiler heats, then you’re in great shape. The
homeowner will just need to set the heat pump for comfort, and set the boiler down
so that it will only come on if the heat pump can’t meet the heating demand.
43This next slide talks about a more challenging installation.
If the heat pump zone includes the boiler thermostat, but it can’t heat the entire
boiler zone, that may create competition between the central boiler and the heat
pump. To maximize the savings and effectiveness of the heat pump, we recommend
trying to create two separate zones.
First, move the boiler thermostat out of the heat pump zone. Then, in the area where
the heat pump can reach, try to disable or minimize heat from the central boiler or
furnace.
This might mean closing dampers on the radiator or closing furnace ducts. This lets
the heat pump heat one zone and the boiler or furnace heat the other, so there’s no
conflict.
44Now let’s move from siting the indoor unit to line-set placement.
First of all, from an aesthetics, heat loss, and installation cost point of view, it makes
sense to minimize line-set lengths. If the manufacturer has minimum lengths you’ll
want to honor those.
45It’s ideal to minimize the visible indoor line-set as much as possible. You may be able
to use drop ceilings or take advantage of closets, attics, basements, stairwells,
crawlspaces, or garages. This will make for a less obtrusive and more visually pleasing
installation. While this won’t impact efficiency, it may help you get more referrals.
46Another consideration for line-set placement is protection of the outdoor unit.
The picture on the left shows an unprotected line-set that could be hit with snow
coming off the roof, bumped by a passing lawn mower, or other hazards. The unit
shown on the right is a protected line-set -- with a roof and a cover.
There are a couple other unrelated problems in the picture. On the left you can see
the one unit is blowing its exhaust into the other’s intake, which is not ideal. You can
also see that it’s mounted on the ground which may work fine for air conditioning but
will not work as well when snow accumulates on the ground.
47A good practice for line-set placement is to keep line-sets vertical or horizontal, not
diagonal.
48On the left we have three line-set covers next to each other, rather than just one
containing all three line-sets.
On the right hand side you can see multiple line-sets going through one line-set cover,
which is more aesthetically pleasing for the customer.
49Another best practice that we’ve observed is keeping the line-set near gutters, trim or
other existing wires, to avoid cluttering up open spaces.
In this case, on the left, you see two line-sets a few inches away from each other and
a third a couple feet away; and they’re white on red siding. In the right photo, the
line-set is right next to a gutter of the same color, blending into the side of the house.
50Another good practice is to try to avoid installation on visible sides of the house.
Here on the left you can see a home needing a heat pump on the far end of the
house. Instead of putting the heat pump on the end, it was placed on the front of the
house. In fact, there are three on the front of the house, which is covered with line-
sets and outdoor units.
On the right, the outdoor unit is tucked onto a foundation underneath a deck and the
result is an unobtrusive installation.
51Now we’ll discuss outdoor unit placement. The red star on the slide means that this is
a requirement on our Installation Requirements checklist.
To be eligible for rebates, units must be mounted at least 18 inches above the nearest
surface below it -- whether that’s a deck or the ground -- unless they are protected
from snow. On the left you can see two problems. The first is that one of the units is
blowing into the other. Second, they’re on the ground so these units, while they may
work in the summer, will need to be shoveled out in the winter.
In the right photo, you can see that the unit is up off the ground clear from snow.
52Unobstructed airflow is critical. Placement locations should avoid shrubs, risks of
snow drifts or any structures that may block airflow.
Customers may be tempted to obscure units for aesthetic reasons, but the placement
must have access to unobstructed air flow. On the left is an example of two units
obstructing each other.
53Another installation requirement is the outdoor unit must not interfere with a
walkway, porch, window, or door. Placement should also consider how to prevent icy
patches on walkways.
These two installations probably could have been done differently. The one on the
left creates an ice hazard for the door right next to it. On the right, you can see that
the outdoor unit partially blocks the stairs to the house.
54Avoid placing outdoor units near dryer vents. Sometimes the lint that comes out of a
dryer vent can collect on a heat pump, causing it to clog prematurely and require
cleaning.
55When choosing the outdoor location, consider serviceability. The one on the left,
installed between stories, will be difficult to service. The one on the right is at a
convenient, serviceable height.
56Lastly, consider the noise impact of the outdoor unit when choosing a location. You
can reduce the noise the unit will generate by installing it at the base of the wall or at
the corner of the house rather than the middle of the wall.
57That concludes the placement section. Please click the “Next Lesson” button on the
lower right hand side of the screen to move on to the installation section.
58Now, let's talk about installation.
59The first step in indoor unit installation is to make sure the unit is level so the
condensate drains properly. This is a requirement for rebates.
60TThe next step is to make sure to observe all service clearances.
61On the exterior, we also need to make sure that the outdoor unit is level and plumb.
This is also an installation requirement.
62Installers must also ensure the outdoor unit and line-sets are protected from roof
runoff by a gutter, rain cap, gable end, or overhang.
On the left you can see the outdoor unit is installed beneath a roof valley of a house
where a significant amount of ice and snow have come down on both the outdoor
unit and line-set. Snow and ice can wreak havoc on the line-set between the outdoor
unit and the house.
The middle photograph shows a better installation. You see a rain cap is protecting
the outdoor unit from rain and it’s close to the house to protect the unit from falling
ice.
In the right hand photo, the installer has put a custom roof over the outdoor unit.
This is critical under a metal roof where a lot of snow and ice can fall at once. Proper
protection is a requirement of our Checklist.
63If the unit is ground mounted, it needs to be on a stable base. As seen here, a
concrete pad is a better option than a stand directly on the ground. The outdoor unit
also must be secured to the wall or stand. This is a requirement of our Checklist.
64Now, let’s talk about all outdoor unit mounting options.
There are three general approaches.
Wall mounts are effective because they keep the units up off the ground, away from
rakes and mowers. However, as we discussed before, if the wall mount is attached to
the wooden framing of the house it can transmit noise inside. A better option is a
ground stand, which can minimize noise. However, there are drawbacks to a ground
stand. Depending on how they’re installed, they may be susceptible to frost heaves.
One thing to consider if you’ve put in a ground stand is a ground stand with
adjustable legs. In the spring, if you see that the unit has shifted due to frost heaves,
you can adjust the stand and get the unit level again.
The best bracket is what we’ve shown here, a foundation bracket, which bolts onto
the foundation of the house. It gets the unit off the ground and avoids noise
transmission.
65Another way to reduce the risk of noise is to use rubber isolation gaskets between
the outdoor units and the brackets, and between the brackets and the house, as seen
here.
66Moving on to line-set installation, as you know, line-set installation requirements vary
depending on manufacturer.
In order to be eligible for a rebate, line-sets must be purged with nitrogen, pressure
tested, and evacuated according to either the manufacturer's instructions. If the
manufacturer does not offer instructions, the Efficiency Maine procedure should be
followed.
In addition to these requirements, Efficiency Maine has compiled recommendations,
listed here, based on conversations with manufacturers, distributors and installers.
67Continuing with line-set installation best practices, we encourage all installers to
follow the triple evacuation procedure to ensure proper functioning of the system.
68Please follow manufacturer guidelines regarding the tightening of flare connections.
We’ve included the torque charts from major manufacturers here.
69Another Efficiency Maine requirement is that visible line sets be inside of line-set
covers with transition and termination fittings. The only exception to this
requirement is if the line set is running through unfinished spaces and/or the space
between the house and the outdoor unit.
On the left, you can see that there are no termination fittings. The termination
fittings, which you see on the right, secure the cover to the house. These fittings look
good aesthetically and provide structural support to the cover. Line-set covers
themselves are not structurally strong.
70Another best practice is that insulation covers the full length of the line sets and
there should be no exposed copper. In the left photo you can see the installer cut the
insulation back to make it easier to install the line-set, and created a point of energy
loss. In the right-hand photo you can see the installer did an excellent job of restoring
the insulation cover and covering all the copper.
71Another rebate requirement is to seal all floor, wall, and ceiling penetrations. You can
see in the left photo there is an opportunity for water, snow, varmints, and insects to
come in next to that line-set.
In the right-hand photo, the penetration is well sealed.
72Another best practice we’ve talked about is protecting a line-set from falling ice if it’s
below a metal roof. Installers should be certain that the line set is always supported.
The right-hand picture shows a line-set cover that’s properly fastened to the house. In
the left-hand photo, it’s draped and only supported by zip ties. And you’ll also notice
that the line set in the picture on the left is coiled vertically. If a line set has to be
coiled, it should be horizontal. This is a requirement of our Checklist.
73When possible, try to match the color of the line-set cover to the house. In the
picture on the right, the line-set cover blends better than the picture on the left.
74Remember to install condensate lines without dips or traps. This avoids having
condensate back up into the indoor unit. Indeed, with even a small dip, water can
back up multiple feet in the line. This is a requirement of our Checklist.
In fact, when possible, use rigid pipe.
In the photo on the left, you see a dip. In the photo on the right, you see a rigid pipe.
75Lastly let’s cover the installation of the electrical connection. Make sure the
disconnect box’s wiring is secured with a lock, strap tie, or a box that provides some
means of protection. This work must be done by a licensed electrician.
76This concludes the section on Installation. Click the “Next Lesson” button to move on
to heat pump operation.
77Let’s review heat pump operation.
78Next, we’re going to talk about heat pump operation.
While you know how to operate a heat pump, your customers may not. We see that
some customers don’t get the most out of their heat pump because they don’t know
how to use it as well as they could. We send customers tips electronically and in the
mail to help them, but we also require that installers go through heat pump tips as
part of our Checklist. After reviewing the tips with customers, you can also direct
them to the Efficiency Maine website for additional educational resources.
We’ll review some of those tips now and why we include them. Reviewing these best
practices can limit call backs and customer dissatisfaction. And as we discussed
earlier, using the heat pump correctly can help customers save energy and increase
savings.
79Some of the basics that we ask you to cover as part of the installation are how to
power on and off the unit, how to rinse the filter, how to switch between heating and
cooling modes, how to change the temperature set point, how to adjust the airflow
direction, and how to call for service. These tips are intended to help customers get
the most from their heat pumps.
80You’ll remember from earlier in the presentation that turning down the heat pump at
night to save energy was one of the common myths we see. Encouraging
homeowners to set it and forget it will help them get the most from their system and
ensure that the system operates most efficiently.
81Another important tip to share with customers is the need to keep the outdoor unit
clear from obstructions. We recommend that outdoor units for heat pumps, in
general, be professionally inspected every year and cleaned as necessary.
We’ve heard from installers that the best time to clean a unit would be at the end of
the air conditioning season when the unit has been blowing more dust than you
would typically see in the snowy winter.
In addition, you may want to let your customers know that, besides keeping the
outdoor unit unobstructed and protected from falling ice and snow from the roof,
heat pumps can take care of themselves in the winter. It can be a bit alarming to see
an outdoor unit frost up, so you may want to share with your customers that they
don’t need to worry about it.
82As we discussed above in the myths and facts, section, it’s important to reiterate that
heat pumps work year round.
High-performance heat pumps are the most efficient heating system, even on the
coldest winter day. If you have both a heat pump and a furnace/boiler, your heat
pump is the more energy-efficient choice.
83The next user tip is about temperature and thermostat use.
We recommend that customers set their thermostat for their comfort. This
temperature may be higher than what they are used to with their boiler or furnace.
For instance, someone who may set their furnace to 68 degrees Fahrenheit may find
that this is similar to setting their heat pump to 70 degrees.
At Efficiency Maine, we encourage customers not to worry about the number, just set
it for comfort.
And as we discussed in the siting section, we also recommend that to get maximum
savings customers should prioritize their heat pump. Meaning use the heat pump
whenever you can and only use the furnace or boiler as needed. Setting the heat
pump temperature higher than the whole-house system will help.
84Another tip is to give the heat pump its own zone. You may have already walked the
homeowner through the relationship between the heat pump and the thermostat for
the central system. If not, talk with the homeowner about how they may interact.
Here’s how we talk about it in the heat pump tips:
Step 1 -- To prevent the boiler/furnace from competing with the heat pump, close
dampers/radiators in spaces heated by the heat pump.
Step 2 -- To prevent the heat pump from interfering with the boiler/furnace
thermostat, move the thermostat out of range of the heat pump.
85We suggest avoiding the “Temperature auto-mode,” which may not be intuitive to a
new heat pump user. This is an important tip to share with homeowners because a
system put in auto mode may accidentally switch to heat mode in the middle of a
cool summer night, or to AC mode on a sunny winter afternoon.
86On the other hand, your customers may want to start off with “Auto Fan” and see if
that works for their space.
If that doesn't spread the heat far enough, they can adjust the fan’s speed up or
down according to their needs. We have also found that helping customers with air
flow direction can ensure heat pump satisfaction.
Aiming warm air directly at an occupant can actually make them feel chilled, so
generally we would direct warm air away from occupants and cool air at occupants.
87Reviewing these tips and other aspects of operation can help ensure customer
satisfaction and savings.
Now that we have gone over operation tips, we can finish up with a few other
considerations. Please click the “Next Lesson” button to move to the final section.
88In this final section, we’ll briefly address some other considerations.
89If your customer is switching entirely away from a boiler, they may find the boiler
starts to leak once it’s turned off.
There are two ways you can avoid this problem. First, consider installing rubber
gaskets on the boiler. That may prevent leaking when it cools. Another option is to
drain the boiler and distribution system if they are not going to be used.
Another consideration is how to prevent frozen pipes. Some boilers unintentionally
heat the basement, keeping pipes above freezing. If the boiler is shut off, the pipes
won’t be heated and can freeze.
One solution for this is to consider insulating the basement walls between the pipe
and the outdoors. But be mindful of where the pipes are in relation to the insulated
basement walls -- don't leave the pipes on the outside of the insulation, which might
make them more likely to freeze. Another option is to consider adding some
antifreeze into the distribution system.
90In order for ducted heat pumps to qualify for rebates, the ductwork needs to be
sealed to avoid air leakage and insulated to minimize heat loss. The ducts should be
sealed using duct mastic or UL-181-rated tape, and must be insulated to at least R8.
91Thank you for your attention during this training and thanks for your good work
helping people in Maine save energy everyday.
If we can be of help, please give us a call at (866) 376-2463 or visit our website,
efficiencymaine.com.
92You can also read