Workers' Compensation eFiling - INTERVENOR USER GUIDE OFFICE OF ADMINISTRATIVE HEARINGS 600 NORTH ROBERT STREET, SAINT PAUL, MN 55101 - Minnesota.gov
←
→
Page content transcription
If your browser does not render page correctly, please read the page content below
Workers’ Compensation

                                   eFiling

   INTERVENOR USER GUIDE

          OFFICE OF ADMINISTRATIVE HEARINGS

600 NORTH ROBERT STREET, SAINT PAUL, MN 55101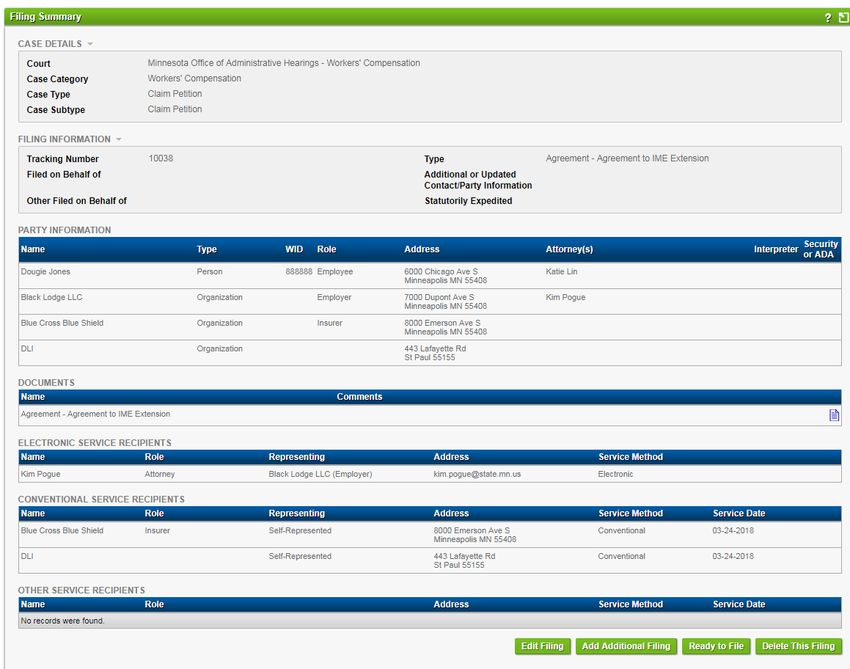
CONTENTS
I.     Introduction ...................................................................................................................................... 2

II.    Registration and Setup..................................................................................................................... 3
                   Deactivate Previous Accounts ............................................................................................ 3
                   Register as an eFiler ........................................................................................................... 5
                   i. Confirm and Finalize ..................................................................................................... 7
                   ii. Notify OAH .................................................................................................................... 8
                   Log In .................................................................................................................................. 9
                   User Administration Screen ................................................................................................ 9
                   Set Up Your Personalized Home Screen ......................................................................... 11
                   Notifications ....................................................................................................................... 12
                   i. Email Notifications ....................................................................................................... 13
                   ii. eFiling Application Notifications .................................................................................. 13
                   iii. Select Notification Preference ................................................................................... 16
                   Reset Password ................................................................................................................ 16

III.   Update Contact Information and Service Email Address............................................................... 17
                   Notify OAH (for Notices and Orders) ................................................................................ 17
                   Update Name or Mailing Address ..................................................................................... 17

IV.    Case Numbers and Case Search .................................................................................................. 18
                   Case Numbers = WID + Dispute Codes + Random# ....................................................... 18
                   Case View ......................................................................................................................... 19
                   Prepare to Search ............................................................................................................. 19
                   Get a Complete List of Your Cases .................................................................................. 19
                   Search for a specific case with the WID number: ............................................................. 20
                   Search for a specific case with a party or attorney’s name: ............................................. 21

V.     eFile a Document on an Existing Case .......................................................................................... 22
                   Log In ................................................................................................................................ 22
                   Enter Case and Filing Information .................................................................................... 23
                   Upload Document(s) ......................................................................................................... 24
                   Enter Service Information ................................................................................................. 26
                   Review Filing Summary .................................................................................................... 27
                   Electronic Service ............................................................................................................. 29
I.     Introduction
Any party to a Workers’ Compensation case at the Office of Administrative Hearings (OAH)
can eFile. Using OAH’s new eFiling system is voluntary at this time.

When you register, you’ll get all of the benefits of the new system – including these:

       a.     Faster filing and service with associated savings of time and cost;

       b.     Electronic, immediate service to and from other registered users;

       c.     Immediate up-to-date access to all documents in any of your cases from
              any computer or mobile device;

       d.     Intuitive, easy-to-use system; and

       e.     Saves trees!

Once you have a registered eFiling account, you will automatically receive eService from
other parties on your cases who are registered eFilers. If you do not register for eFiling,
however, other registered parties will not be able to serve you electronically through the
new system. Your decision not to register will force all other parties to serve you in paper,
unless you have authorized other forms of service as allowed by Minn. R. 1415.0700,
subp. 2 (2016). Whether you register for eFiling or not, most filers will not continue to
receive paper service from OAH. Whether you sign up for eFiling or not, beginning on
March 26, 2018, OAH started electronically serving all attorneys, insurers, self-
insured employers, third party administrators and rehabilitation providers, as now
allowed by Minn. Stat. § 176.285, subd. 2 (2016).

Under current law, beginning June 1, 2018, the following documents are the only
ones that must be filed with DLI and not OAH:

       •      Requests for .106 administrative conferences (and related documents
              including motions to intervene in pending conferences at DLI), regardless
              of the amount in dispute, unless primary liability is disputed;
       •      Claim Petitions that only identify medical or rehabilitation disputes, unless
              primary liability is disputed;
       •      Requests for med/rehab dispute certification under Minn. Stat. § 176.081,
              subd. 1(c) (and related documents); and
       •      Objections to penalties assessed by DLI;
       •      Any other documents that OAH does not take action on (NOPLDS, NOBPs,
              FROIs, Rehab Plans/amendments, other required compliance forms, etc.).
Any documents not listed above should be filed directly with OAH, not DLI. Dual
filing is NO LONGER REQUIRED.

                                             2
Updated 6/1/2018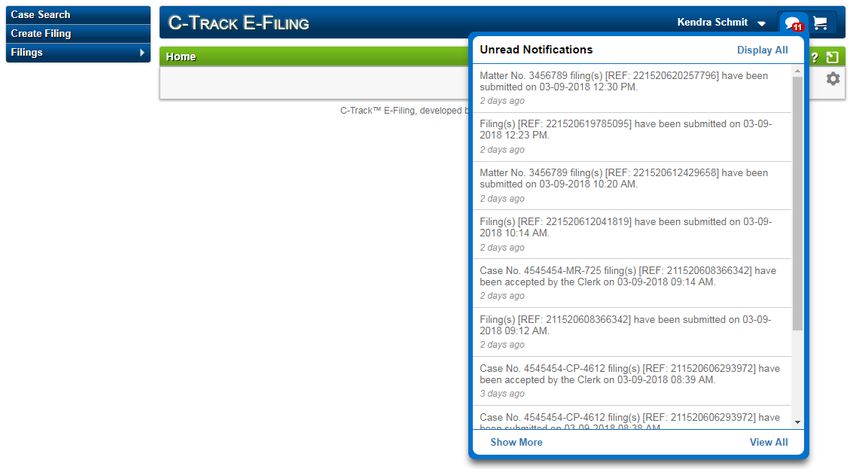
We’ve worked hard to design the eFiling system to be easy to understand and simple to
use. We hope you’ll give it a try, and that you’ll find that it meets your clients’ needs for
faster, cheaper and more reliable processing of contested Workers’ Compensation claims.

II.    Registration and Setup
       Deactivate Previous Accounts
If your organization’s staff have previously created their own individual eFiling accounts,
those accounts should be deactivated by following these steps.

       1.     Click the Workers’ Compensation eFiling link on OAH’s
              website: http://mn.gov/oah.

       2.      Enter Username.

       3.     Enter Password.

       4.     Click Login.

       What happens next? The eFiling Home screen appears and your registered
       first and last name display in the top right header of the Home screen banner.

                               Image: eFiling Home screen

       5.     Click the down arrow icon         to the right of your username in the top
              right corner from any screen in eFiling.

       What happens next? The User Account menu appears.

                                             3
Updated 6/1/2018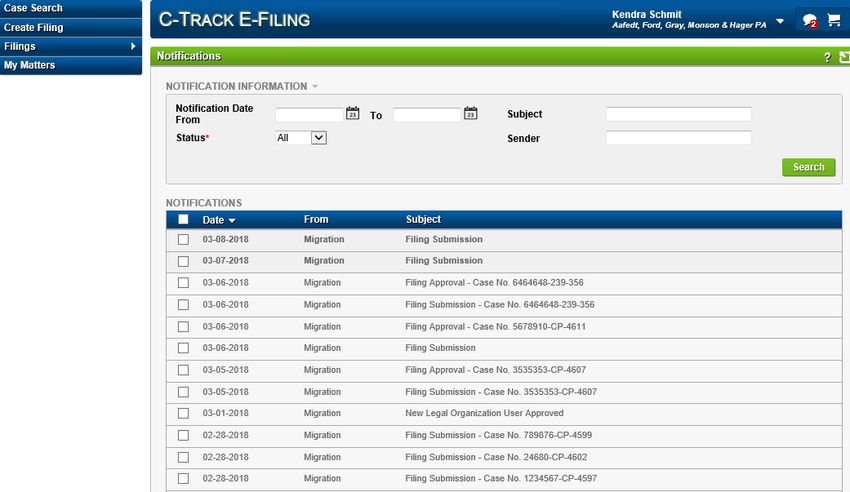
Image: User Account menu

       6.     Click My Account.

       What happens next? The User Administration screen appears.

                          Image: User Administration screen

       7.     Click Deactivate Account.

                                          4
Updated 6/1/2018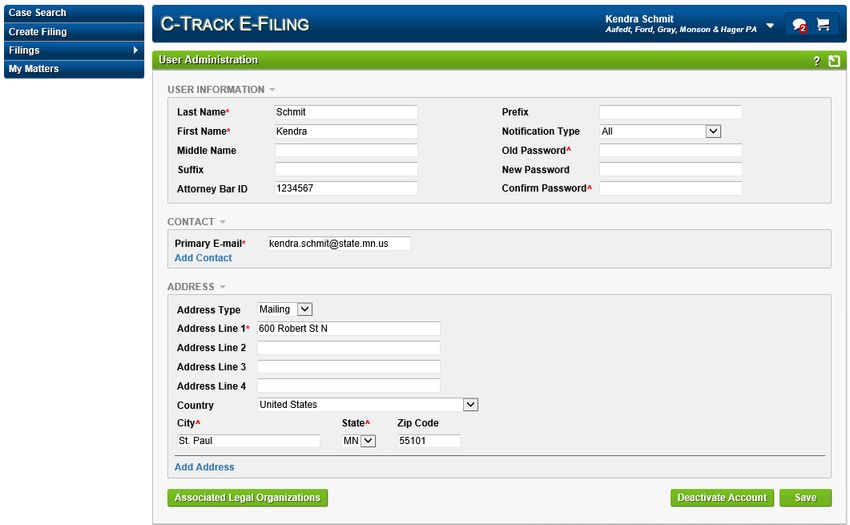
Register as an eFiler
NOTE: Intervenors should only create one account for the entire
organization. Individuals should not create separate accounts. If your
organization’s staff have already created separate accounts, please
see Section II A of this guide to deactivate them.
1. Click the Workers’ Compensation eFiling link on OAH’s
website: http://mn.gov/oah.
2. Review the eFiling Terms and Conditions.
3. Click Register as an eFiler.
Image: eFile Registration / Log In screen
What happens next? The eFile Registration screen appears.
5
Updated 6/1/2018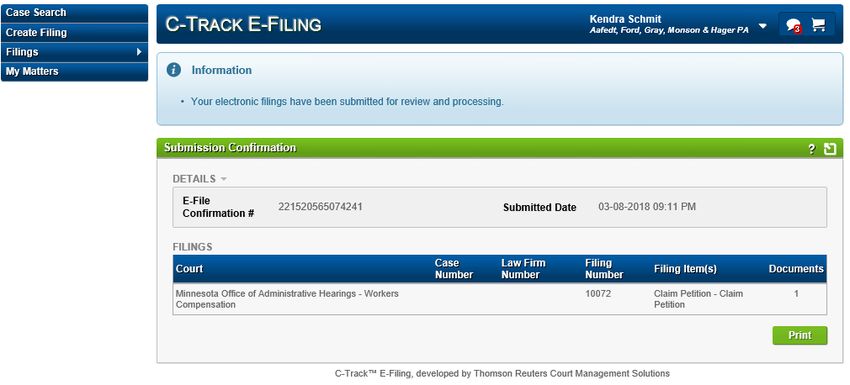
Image: eFile Registration screen

In the User Information section:

       4.     Enter a Username. Your username must be unique. If your username is
              already taken, the system will prompt you to choose another.

       5.     Enter your organization’s name in the Last Name and First Name fields
              (for example, for Health Partners, enter Health in the First Name field and
              Partners in the Last Name Field).

       6.     Enter a Password.

       7.     Confirm Password.

In the Contact section:

       8.     Enter a Primary email. This is the email at which your organization will
              receive eService notifications and system notifications. Note that all OAH
              eService for the entire organization can be sent to only one email
              address.

                                            6
Updated 6/1/2018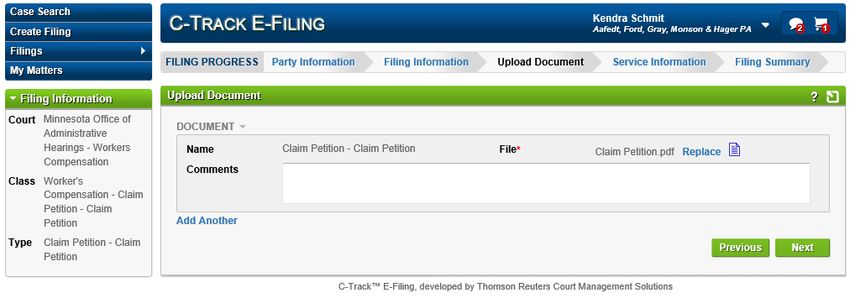
In the Address section:

       9.     Enter your mailing address using Address Line 1 through Address Line
              4.

       10.    Enter your City.

       11.    Select your State.

       12.    Enter your Zip Code.

       13.    Click Next.

   What happens next? The User Pending Approval screen appears.

                            Image: User Pending Approval screen

              i.     Confirm and Finalize
       1.     Log into the email account that you entered as your Primary Email on the
              Registration form.

       2.     Open the eFiling account confirmation email from OAH. If you do not receive
              the account confirmation email immediately, wait a few minutes and check
              your spam folder.

       3.     Click the link provided in the email. The email will appear similar to the figure
              below.

                                              7
Updated 6/1/2018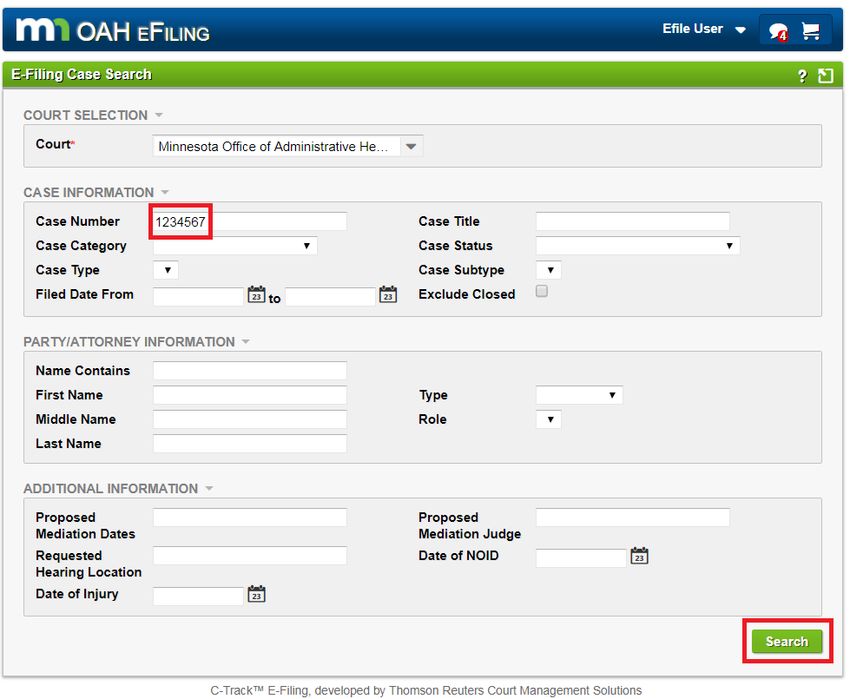
Image: eFiling Email Confirmation example

       What happens next? A browser window opens and navigates to the eFiling
       Login screen.

                              Image: eFiling Login screen

              ii.   Notify OAH
       1.     In addition to your eFiling registration, OAH must add your email
              address to its database. Once your registration is complete, please
              email OAH.WCeFiling@state.mn.us to request that OAH update your
              contact information in its files.

                                          8
Updated 6/1/2018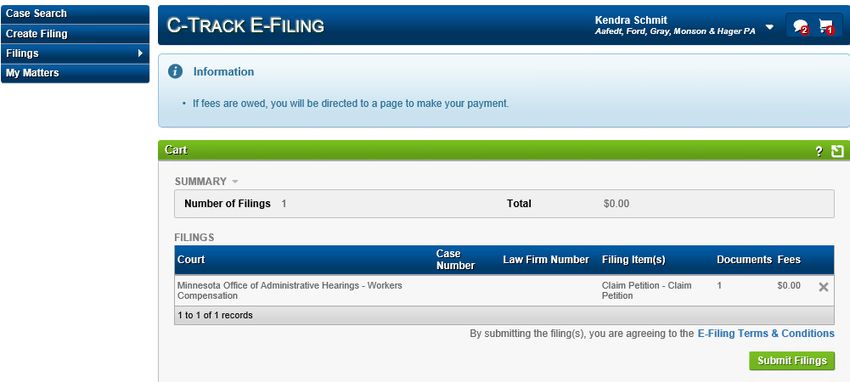
Log In
1. Enter Username.
2. Enter Password.
3. Click Login.
What happens next? The eFiling Home screen appears and your registered
first and last name display in the top right header of the Home screen banner.
Image: eFiling Home screen
User Administration Screen
User Administration lets you update your contact information and change your eFiling
password.
NOTE: Please remember that updating your contact information in
the eFiling system does not update your contact information in OAH’s
Files. So whenever you update your contact information in eFiling,
please remember to send an email to OAH
(OAH.WCeFiling@state.mn.us) with that same update so we can
change our files. Thanks!
1. To access the User Administration screen, click the down arrow icon
to the right of your username in the top right corner from any screen in
eFiling.
What happens next? The User Account menu appears.
9
Updated 6/1/2018Image: User Account menu
2. Click My Account link.
What happens next? The User Administration screen appears.
Image: User Administration screen
The User Administration screen has six sections. You can update your User
Information, change your Password, add and edit Email and Address contact
information.
10
Updated 6/1/2018Set Up Your Personalized Home Screen
The eFiling logo in the top banner of every screen is a link to your Home screen.
Image: Home screen – Home link
eFiling offers a variety of information for preview on your home screen through widgets.
You control which widgets appear in your personal Home screen. No widgets display
until you choose which widgets you want to display. To choose widgets:
1. From the eFiling Home screen, click the grey gear icon at the far
right of the screen.
What happens next? The Edit Dashboard window appears.
Image: Edit Dashboard window
2. Click the checkboxes for the widgets you wish to see. To select all of the
widgets, click the check box in the header of the Widgets box.
11
Updated 6/1/20183. Click Save.
What happens next? The selected widgets are added to your Home screen.
Image: Home screen – Widgets added
4. To rearrange your widgets, click and drag the header of any widget to a
new location on the screen.
5. To remove widgets from your home screen, again click the Configure
icon.
6. Uncheck the boxes for widgets that you want to remove from the Home
screen.
7. Click Save.
What happens next? The selected widgets are removed from your Home
screen.
Notifications
OAH Notices and Orders are always sent via email regardless of the notification
preference chosen in the eFiling system. System notifications only relate to your own
filing submissions and electronic service from other parties. You receive notifications
from the eFiling system when:
12
Updated 6/1/2018• You receive electronic service from other parties;
• You submit a filing;
• OAH accepts your filing.
You can choose between three ways to receive notifications:
• Via email sent to the email address(es) listed in your registration;
• In the eFiling application only (not recommended unless you will log in
at least once per day to check for new notifications);
• Both via email and in the eFiling application (selected by default upon
registration).
i. Email Notifications
If you choose to receive notifications via email, you will receive an email from OAH with
a direct link to the filed document. When other parties serve you electronically, you must
log in to the eFiling system to view the document.
Image: Example email notification
ii. eFiling Application Notifications
If you choose to receive eFiling application notifications only, you will not receive an email
notice from OAH. You will only be notified of new filings via the Notifications icon in the
eFiling system. For this reason, OAH does not recommend selecting this option
unless the user will log in at least once per day to check for new notifications. To
view notifications in eFiling:
1. Click the Notification icon.
13
Updated 6/1/2018Image: Home screen - Notifications
What happens next? The Notifications quick view window is exposed.
Image: Home screen - Notifications quick view window
2. Click on any notification in the list to view it in detail. Click View All to view
all your notifications on a new page.
What happens next? The Notifications screen appears.
14
Updated 6/1/2018Image: Notifications screen
By default, the screen displays all notifications with a status of Unread. You can search
notifications by Date, Subject, Status and From.
3. Click any header in the Notifications table to sort the information in
ascending / descending order:
• Date column –the date the system sent the notification to you
• From column –the name of the sender
• Subject column – a description of the notification; includes a case
number if one exists for the filing
4. Click any notification to view more details. Click on the details to open the
relevant Filing Summary.
• Use the Checkbox Column to select specific notifications to mark
as read or unread. Use the checkbox in the table header to select
all notifications to mark as read or unread
• Mark Read button – marks the selected notifications as Read and
reduces the Notification icon number displayed at the top of all
eFiling screens.
15
Updated 6/1/2018• Mark Unread button – marks the selected notifications as Unread
and increases the Notification icon number displayed at the top of
all eFiling screens
iii. Select Notification Preference
1. Click your name in the upper-right corner of the eFiling application.
2. Click My Account.
3. Make your selection from the Notification Type dropdown menu.
4. If you opt to receive notifications in the eFiling application only, you
should log in at least once per day to check for new notifications.
OAH recommends selecting both email and eFiling notifications to ensure
that no service is missed.
5. Click save.
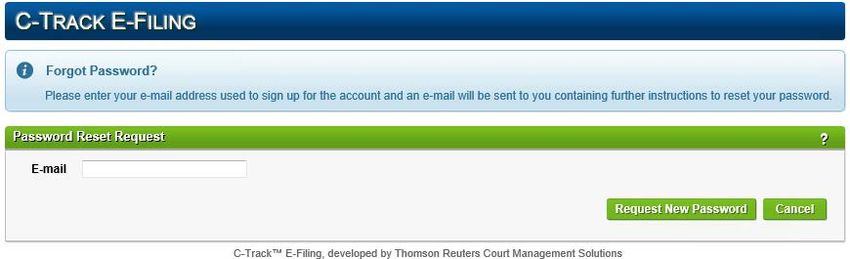
Reset Password
1. Should you forget your password, click the Forgot Password? link on the
eFiling Login screen.
Image: Login screen – Forgot Password Link
What happens next? The Forgot Password Information message and
Password Reset Request page appear.
16
Updated 6/1/2018Image: Password Reset Request page
2. Enter the email address you provided on the Registration form.
3. Click Request New Password.
4. An email is sent to the email account on file. Follow the instructions in the
email to reset your password.
III. Update Contact Information and Service Email
Address
Contact information can be updated in the eFiling system. Each user controls the email
address(es) that receive electronic service.
Notify OAH (for Notices and Orders)
If your contact information changes at any time, you must notify OAH of the change in
addition to taking the steps shown below. Updating your information in the eFiling
system does not also update your contact information in OAH’s files – so please
remember to tell us directly via email to OAH.WCeFiling@state.mn.us. Thanks!
Update Name or Mailing Address
1. Notify OAH of the changed information as described above.
2. Click your name in the upper-right corner of the eFiling application.
3. Click My Account.
4. Update information as necessary.
5. Click Save.
17
Updated 6/1/2018IV. Case Numbers and Case Search
Case Numbers = WID + Dispute Codes + Random#
The design of the new system requires that OAH assign a case number to all filings.
Building upon the WID, OAH has tried to make the case number identifier as intuitive as
possible. Each case number is made up of three components:
Example: Case No. 12345678-CP-98765
WID = 12345678 + Dispute Type Code (CP = Claim Petition) + Random Number
The system will generate the random number. You will need to know the employee’s
WID and the dispute type to which your filing relates in order to eFile a new case.
Below is a list of the dispute types and their associated dispute type codes:
Dispute Type Dispute Type Code
239 Request 239
Asbestos ASB
Claim Petition CP
Mediation MDT
Medical/Rehabilitation request MR
Objection to Penalty Assessment OPA
Other OTH
Petition for Contribution or PCR
Reimbursement
Petition for Temporary Order TO
Wage Benefits Discontinuance DISC
18
Updated 6/1/2018 NOTE: Because the new system has to assign a case number to
each filed matter, every dispute type involving the same
employee, employer and date(s) of injury is a different case with
a different case number. For example, a 239 dispute and a Claim
Petition involving the same parties and date(s) of injury will constitute
two cases: 1234567-239-98765 and 1234567-CP-43210. You will
know they are related because they share the same WID. You
can find both cases by searching with the WID.
Case View
After you have been identified as a party or attorney to a specific case, you can see:
• A list of parties and attorneys
• A list of docket entries and related documents filed at OAH
• Any Notices or Orders issued by OAH
• The name of the block assigned judge
• The date, time and location of the next scheduled proceeding before a
Workers’ Compensation Judge
• The case number, case title, and case type
All existing disputes that were open and pending at OAH as of March 26, 2018 are
available to view in the eFiling system. If a dispute was closed prior to March 26, 2018,
it is not available to view in eFiling.
If no party has identified you as a party to the case, you will not have access to view the
case or find the case number in eFiling. In this circumstance, you should contact the
other parties to obtain the case number.
Prepare to Search
1. Log into eFiling
2. Click Case Search in the left navigation.
Get a Complete List of Your Cases
1. On the Case Search screen, select Minnesota Office of Administrative
Hearings – Workers’ Compensation from the Court dropdown.
2. Leave the rest of the page blank.
3. Click Search.
19
Updated 6/1/2018Image: Search for a list of all your own cases
Search for a specific case with the WID number:
1. Enter the WID in the Case Number field.
2. Click Search.
20
Updated 6/1/2018Image: Search for a case by WID
Search for a specific case with a party or attorney’s
name:
1. Enter the party or attorney’s last name in the Name Contains field.
2. Click Search.
21
Updated 6/1/2018Image: Search by party or attorney name
V. eFile a Document on an Existing Case
Before you begin to create an eFiling on an existing case, make sure you have the
following information:
• Names, addresses and emails for all parties and their attorneys (if
applicable)
• The case number. (For information about the components that make up
the case number, please review section IV, part A of this guide.)
• The document(s) you wish to eFile, in Microsoft Word or PDF format
Log In
1. Enter Username.
2. Enter Password.
3. Click Login.
22
Updated 6/1/2018Enter Case and Filing Information
1. From the home screen, click Create Filing from the left menu.
What happens next? The Create Filing screen appears.
Image: Create Filing screen
2. Select a Court. For now, there is only one option (Minnesota Office of
Administrative Hearings – Workers Compensation).
3. Select Existing Case from the Filing Category dropdown.
4. Enter the Case Number.
5. Select the Document Type. This field represents the specific type of
document you are uploading. For example, you may choose Motion for
the document type.
6. Select Document Subtype. Some Document Types only have one option
for Document Subtype. If you choose one of those Document Types, the
Document Subtype field will prefill. For example, you may choose Motion
to Intervene for the document subtype.
7. Click Next.
What happens next? The Filing Information screen appears.
23
Updated 6/1/2018Image: Filing Information screen
7. Check Statutorily Expedited if applicable law requires that your filing be
expedited.
8. Check a Filed on Behalf of check box in the Filer Information section.
a. If the party you are filing for is not listed, leave the check boxes blank and
type the party’s name in the Other Filed on Behalf of box.
b. If you entered a party name in the Other Filed on Behalf of box, type the
party’s name, mailing address and email address in the Additional or
Updated Contact/Party Information box at the top of the page.
9. Click Next.
What happens next? The Upload Document screen appears. The name of
the document to be uploaded is pre-populated based on the Filing Type and
Filing Subtype you selected.
Upload Document(s)
The Upload Document screen has a single section. It will allow you to upload Microsoft
Word and PDF files (25 megabyte limit) as well as audio and video files (1 gigabyte
limit) when used as exhibits.
24
Updated 6/1/2018 NOTE: OAH prefers that documents be submitted in Word format. If
you upload PDF files, OAH prefers that documents be created in a
word processing application, and then saved as a PDF file before
eFiling. This process allows OAH to annotate filed documents. You
should not print documents on paper and scan them as PDF files
unless doing so is necessary to prepare the documents for eFiling,
as this process does not allow for annotation. Most word processing
programs can convert documents to PDF files through a “save as”
functionality, and free PDF conversion software is available online.
Image: Upload Document screen
1. Click Browse or Choose File. (This button language changes based on
the Internet browser used). The name of the document to be uploaded is
pre-populated based on the Filing Type and Filing Subtype you selected
on the previous screen.
2. A browser window opens to allow you to navigate to a file on your
personal computer that you want to upload.
3. Select the file you want to upload.
4. Click Open.
What happens next? You return to the Upload Document screen. The
document title appears to the right of the Browse/Choose File button.
5. If necessary due to the file size limits, click Add Another to upload
multiple parts of the same document. Do not use Add Another to submit
multiple filings at once.
6. Click Next.
25
Updated 6/1/2018Enter Service Information
The Service Information screen organizes parties based on their service method:
a. Electronic Service Recipients lists parties that have opted in to receive
eService. All Electronic Service Recipients will receive service via the
eFiling application. You do not need to serve Electronic Service Recipients.
The eFiling system will serve these recipients.
b. Conventional Service Recipients lists parties that have not opted in to
receive eService, and so must be served by mail, fax, personal service or
other means authorized by law. You are responsible for serving all
Conventional Service Recipients.
NOTE: Click the Apply to All icon that appears to the right of the
Service Method and Service Date fields to apply the data in those
fields to all recipients.
Click the Date Picker icon to access a calendar which lets you
select a month and day to populate the field.
1. Select Service Method for each party.
2. Enter a Service Date for Conventional Service Recipients.
3. Click Next.
Image: Service Information screen
26
Updated 6/1/2018Review Filing Summary
What happens next? The Filing Summary screen appears. The Filing
Summary screen shows all information entered on the previous screens.
Image: Filing Summary screen
1. Review all the information on the screen in detail before proceeding. If
necessary, you can edit information in two ways:
a. Click the relevant link in the Filing Progress bar at the top of the screen
to navigate to that particular screen
OR
b. Click Edit Filing at the bottom of the screen to navigate back to beginning
of the Filing Progress – the Party Information screen.
2. If necessary, click Add Associated Filing to add a separate filing that
belongs to the same case. Associated filings appear as separate Docket
Entries on the case.
27
Updated 6/1/20183. If you wish to remove the filing, click Delete This Filing at the bottom of
the screen to move the filing to the Draft queue. You can completely
delete the filing from the Draft Filings Queue by clicking Filings > Draft in
the left navigation.
4. When you have verified all the information in your submission, click Ready
to File.
What happens next? The Cart screen appears.
Image: Cart screen
5. Review the information in the Filings section.
To remove a filing from the Cart, click the X at the far right of any line item. When you
remove a filing from the Cart, a Confirm window requires that you OK the removal. The
filing is moved to the Draft queue, found through Filings > Draft in the left navigation
menu.
6. Click Submit Filings.
What happens next? The Submission Confirmation screen appears. This
information can be accessed at any time from the left navigation menu via Filings >
Submitted.
28
Updated 6/1/2018Image: Submission Confirmation screen
NOTE: The Print button opens a separate browser window to save
or print a PDF of the Submission Confirmation.
You have successfully eFiled a document on an existing case!
What happens next? OAH processes the filing. You will be notified that the
filing has been accepted via email or in the eFiling application, based on the
Notification preference you selected in section II, part G of this guide.
Image: Filing Acceptance Confirmation Email
Electronic Service
Once your filing is submitted, any party that was listed as an electronic service recipient
is served electronically with your filing immediately. When the filing is eServed, the party
receives an email similar to the notification shown below, and can access the filed
document(s) by clicking on the provided link:
29
Updated 6/1/2018Image: eService Notification to served party
30
Updated 6/1/2018You can also read