2019 MOSAIC TILE

INSTALLATION GUIDE
←
→
Page content transcription
If your browser does not render page correctly, please read the page content below
2019 MOSAIC TILE INSTALLATION GUIDE
Mosaic Sheets Installation process

Equipment and Tools

                        Diamond disc
                                         Finish
                         used to cut
                                          Nails
                         mosaics

                          1/16 - 3/16V
                          Notch Trowel   Sponge

                            Grout        Bucket
                             Float

                                         Un-Sanded
                            Level
                                            Grout
preparation process of Substrate: It is a requirement that substrate should be compact, clean and effectively flat and free of cracks and dirt. The wire and nylon brush can be utilized in washing the surface in case of any residue. If it’s not possible for the brush to clean the whole residue one can utilize sandblasting or bead blasting. The uneven surface area should be fixed and also compound leveling might be required to ensure there is a flat surface. The crack suppression patch or membrane are used to fix the small cracks. In case there are large cracks, one need to get an engineer to assess since they might bring challenges in the future. Enough time is required to make sure that the substrate has settled following the recommendations of the manufacturers. It is advisable not to directly install mosaic tiles over drywall or plywood. Laying Mosaic: The mosaic sheets should be inspected before installation process to ensure that materials have no defects. The other step is that the point of starting where to begin guidelines which will assist in layout to be symmetrical and straight while installing. The trowel size depends on how thick the mosaic tiles are, meaning that the smaller the material it is in the same way that the trowel is small. Unless the customer specifies otherwise, the mosaic should be laid on mastic which is thinset or white to avoid any form of changing the color. The white thinset is normally recommended to utilize to the glass and also for particular other transparent and light products to make sure that there is no discoloration to the background.
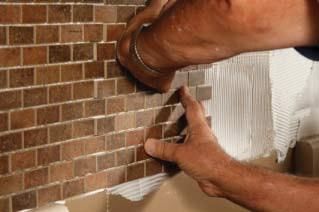
Immediately after the marking of the starting grid, a thinset layer should be
applied to utilize the flat side trowel which is v-notched. The notched side is
also utilized to be over the thinset ensure that there is a uniform depth.
It is also important to apply appropriate adhesive to the area enough to tile in 15
mins since the quickly dries.
Immediately the adhesive is completely spread within
the surface begin laying the mosaic
sheet down.
The other step involves pressing the mosaic sheet utilizing the grout
float against the surface to ensure that there is a perfect adhesion. By
the use of the same tool ensure correction of any errors in alignment
by lightly tapping sheet’s sides.
When the sheets begin to slide down, then place just a few finish nails
within the line of last grout on the top ensure its in place and move to
the other tile.
After every section is complete, utilize the damp sponge to wash away any remaining residues
within the thinset that might exist between the tiles. Thinset normally needs 24 hours minimum
for curing, and for more check of time, kindly check the recommendation of the manufacturers.
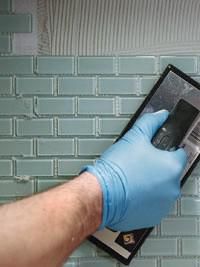
Grouting and Last Cleaning:Apply the grout within the tiles utilizing
the grout float. Utilize also the
horizontal and vertical stroke to ensure
spreading of the grout. To ensure that
every joint is effectively fixed, apply
pressure to it.
The fresh grout is diagonally stroked
especially the grout float long edge to
remove grout which are excess and
then clean it using the wet sponge.
It is recommended that Un-sanded grout is used for mosaic sheets because of the small grout
joints. The sanded grout should not be used on polished glass mosaics because there is the risk of
scratching the material. Epoxy grouts should not be used for the glass mosaic tiles unless the
manufacturer specified.
Immediately the grout is completely set and also dry and also if there is still remaining residue
utilize nylon brush to clean up and then utilize the grout sealer in relation to instructions of
manufacturers.
Cutting Mosaic process utilizing Wet Saw:
To cut the mosaic within the wet saw, place a piece of hard plastic or tile down to cutting tray. It
is important to ensure that the mosaic is not falling towards the wide opening within the blade
channel tray to ensure that there is a straight good cut.You can also read