A Guide to Home-heating Oil Tanks - 2014 1st Edition
←
→
Page content transcription
If your browser does not render page correctly, please read the page content below
A Guide to Home-heating
Oil Tanks
2014 • 1st Edition
© Yukon Government
All rights reserved

A Guide to Home-Heating Oil Tanks

ISBN 978-1-55362-689-3

This publication was developed in partnership between
Aboriginal Affairs and Northern Development Canada and
the Yukon Housing Corporation.

To download this PDF document visit
http://www.housing.yk.ca/publications.html

Additional printed copies are available at Yukon Housing Corp.
410 Jarvis St. Whitehorse, Yukon Y1A 2H5

Printed April 2014.
2014 • 1stAEdition
            Guide to Home Heating Oil Tanks

Hot Line Numbers
            24-Hour Yukon Spill Line: 867-667-7244 (collect calls accepted)
            24-Hour B.C. Spill Line: 1-800-663-3456

You Have a Legal Obligation to Report Spills!
All home-heating oil tank spills must be reported so that appropriate action can be taken to confine the spill and
restore the site. Call the Spill Hotline as soon as you notice an oil spill from a home-heating oil tank.

If the person responsible for the spill does not attempt to confine the spill or to restore the site, an Environmental
Protection Officer has the authority to order the responsible person to take action.

Home-heating Oil Tank Permits
You need a permit for the removal of an existing home-heating oil tank and the installation of a new
home-heating oil tank.

In Whitehorse
City of Whitehorse – Planning & Development Services
4210 4th Ave., Whitehorse
867-668-8340
Fee: $55
(the fee doubles to $110 if the initial application for the permit occurs after the work is completed)

Outside Whitehorse
Government of Yukon – Building Safety Branch
2071 2nd Ave. (main administration building)
867-667-5741
Fee: $25 minimum fee
(the actual permit fee is dependent on the cost of the installation)

For written verification for decommissioning an underground tank
Government of Yukon - Fire Marshal’s Office
91790 Alaska Highway
Whitehorse, YT Y1A 5X7
867-667-5230
Fee: $25 minimum fee
(the actual fee is dependent on the volume of the home-heating oil tank)

Acknowledgements
We acknowledge the assistance of the Government of Nunavut—Department of Environment and the
Government of Northwest Territories—Department of Environment and Natural Resources for permission to
use information and photos from their Homeowners’ Guides to Oil Tanks. We also would like to thank industry
specialist, Rod Corea, NRG Resources for his valuable input and recommendations.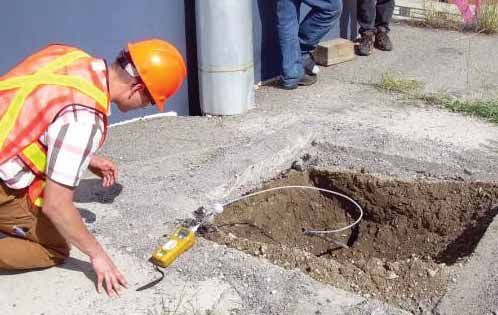
This guide was produced by the Yukon Housing Corporation in collaboration with Aboriginal Affairs and
Northern Development Canada, the Yukon Government’s Office of Building and Safety Standards, the
Yukon Government’s Department of Environment, and the Yukon Fire Marshal’s Office. The guide was
also reviewed by an independent industry professional.

This guide was produced in response to public inquiries and to an increase in home-heating oil tank
leaks reported to Yukon Housing Corporation and the territorial and federal government Departments
of Environment.

An Important Note About This Guide:
First Nation offices, homeowners and residents should consult with a certified oil burner mechanic1 to
answer questions and address problems involving their home-heating oil tank and furnace system.

This guide is intended to provide general information only. It is not a complete manual on the proper
installation and maintenance of home-heating oil tanks, accessories or heating systems. It will guide the
homeowner on what to look for before small problems become large ones and to help maintain home
safety. Ultimately, it is the responsibility of the homeowner to ensure their home-heating oil tank is
inspected and serviced by a certified oil burner mechanic to ensure safety and proper functioning.

Yukon Housing Corporation, Aboriginal Affairs and Northern Development Canada, the Yukon
Government’s Office of Building and Safety Standards, the Yukon Government’s Department of
Environment, the Yukon Fire Marshal’s Office and any other party involved assume no responsibility
for any consequences arising from use of the information provided in this guide. Any reliance or action
taken based on the information provided in this guide is the sole responsibility of the user.

An Introduction to Slicky
This is Slicky. Everytime you see him in this guide he’ll be giving you tips to help
you keep your home and property safe from fuel oil leaks and to prevent related
problems caused by fuel spills.

            1    A certified oil burner mechanic may also be called a certified oil burner technician, depending upon which province or
                 territory granted their trade certification.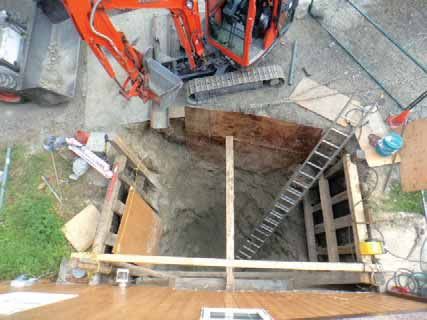
A Guide to Home Heating Oil Tanks

Table of Contents
         Why read this guide? . . . . . . . . . . . . . . . . . . . . . . . . . . . . . . . . . . . . . . . . . . . . . . . . . . . . . . . . . . . . . . . . . . . . .2
         Why should I check my home-heating oil tank? . . . . . . . . . . . . . . . . . . . . . . . . . . . . . . . . . . . . . . . 4

         Preventative maintenance checklist

         To function properly and safely, your home-heating oil tank should:
                      Be in a safe location and protected from physical damage . . . . . . . . . . . . . . . . . . . . 6
                      Have protection for all fuel lines and fittings . . . . . . . . . . . . . . . . . . . . . . . . . . . . . . . . . . . . 9
                      Have proper support and restraints, and . . . . . . . . . . . . . . . . . . . . . . . . . . . . . . . . . . . . . . . 12
                      Be sloped towards the outlet . . . . . . . . . . . . . . . . . . . . . . . . . . . . . . . . . . . . . . . . . . . . . . . . . . 14

         Protect your home-heating oil tank from leaks by:
                      Keeping your home-heating oil tank full to reduce condensation . . . . . . . . . . . . . 15
                      Detecting water in your home-heating oil tank. . . . . . . . . . . . . . . . . . . . . . . . . . . . . . . . . 17
                      Adding a home-heating fuel additive before fill up . . . . . . . . . . . . . . . . . . . . . . . . . . . . .18
                      Removing water before freeze up and after spring thaw. . . . . . . . . . . . . . . . . . . . . . .19
                      Checking the tank’s physical condition regularly . . . . . . . . . . . . . . . . . . . . . . . . . . . . . . 20
                      Looking for drips and ground staining. . . . . . . . . . . . . . . . . . . . . . . . . . . . . . . . . . . . . . . . . . 21
                      Checking fittings, valves and fuel lines . . . . . . . . . . . . . . . . . . . . . . . . . . . . . . . . . . . . . . . . . 22
                      Booking an annual inspection by a certified oil burner mechanic . . . . . . . . . . . . 26
                      Addressing problems immediately when they arise . . . . . . . . . . . . . . . . . . . . . . . . . . 27

         Tips when replacing your home-heating oil tank . . . . . . . . . . . . . . . . . . . . . . . . . . . . . . . . . . . . . 30
         Transferring oil into a new home-heating oil tank . . . . . . . . . . . . . . . . . . . . . . . . . . . . . . . . . . . . . . 31
         Home-heating oil tank movement and leveling. . . . . . . . . . . . . . . . . . . . . . . . . . . . . . . . . . . . . . . 32

         Home-heating oil tank spills . . . . . . . . . . . . . . . . . . . . . . . . . . . . . . . . . . . . . . . . . . . . . . . . . . . . . . . . . . . 34
         Fuel spill clean up and next steps . . . . . . . . . . . . . . . . . . . . . . . . . . . . . . . . . . . . . . . . . . . . . . . . . . . . . . 37
         What the law says. . . . . . . . . . . . . . . . . . . . . . . . . . . . . . . . . . . . . . . . . . . . . . . . . . . . . . . . . . . . . . . . . . . . . . 38
         Appendices . . . . . . . . . . . . . . . . . . . . . . . . . . . . . . . . . . . . . . . . . . . . . . . . . . . . . . . . . . . . . . . . . . . . . . . . . . . . . 40
                                                                                                                                                                              .
         Additional information . . . . . . . . . . . . . . . . . . . . . . . . . . . . . . . . . . . . . . . . . . . . . . . . . . . . . . . . . . . . . . . . . 42
         Spill report lines . . . . . . . . . . . . . . . . . . . . . . . . . . . . . . . . . . . . . . . . . . . . . . . . . . . . . . . . . . . . . . . . . . . . . . . . 43
Why should I read this guide?
    There have been an increasingly high number of spills from home-heating oil tanks, resulting
    in very expensive clean-up costs.

    Home-heating oil tank spills can result in contamination of soil, groundwater, and sewer
    systems. Clean up can cost tens of thousands of dollars and ground water can be rendered
    unusable for 20 years or more.
    Did you know?
    One drop of oil can render up to 25 litres of water unfit for drinking.
    (Source: Environment Canada)

    Indoor spills can cause extensive damage to your home and contents and the presence of
    harmful vapours can make the home unliveable for a lengthy period of time. Fumes can
    infiltrate homes through the sewer system, basement floor and foundation walls.

    Home-heating oil tanks and piping need to be regularly inspected and maintained to prevent
    damage, corrosion and leaks.

    Use of This Guide
    This guide can help you to:
    •   Reduce the chance of an home-heating oil tank leak or spill
    •   Protect your home, property and the environment
    •   Reduce expensive clean-up and legal costs
    •   Manage risk to satisfy insurance requirements

    This guide is not a legal document and is not intended to be a complete manual on
    the installation and maintenance of home-heating oil tanks and accessories. The
    information in this guide was created to supplement the annual inspection and service
    of your home-heating oil system by a certified oil burner mechanic.

    Who is This Guide For?
    •   Homeowners, buyers, property managers, renters, band offices, and First Nation
        community members

2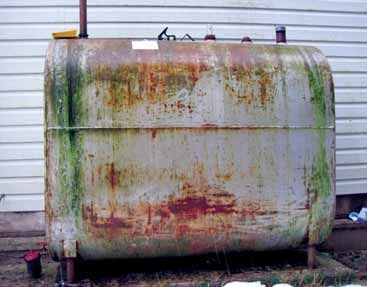
A Guide to Home Heating Oil Tanks

         What is the Primary Cause of Home-heating Oil Tank Leaks or Spills?
         •      Microbial Influenced Corrosion (MIC) is the internal corrosion of the steel in a home-
                heating oil tank by bacteria present in water that accumulates in the tank
         •      MIC is caused by bacteria that produce an acidic environment which accelerates the
                corrosion of the steel, and creates sludge which can plug oil lines and filters.
         •      Corrosion occurs primarily on the tank bottom where condensate water gathers
         •      Damage caused by MIC is easy to miss, as it occurs from the inside-out, in the form of
                pinhole leaks or tiny holes

         Are There Any Other Causes of Leaks and Spills
         Yes:
         •      Unprotected tanks and fuel lines
         •      Insufficient support and restraints
         •      Careless filling
         •      Lack of preventative maintenance

         What You Should Know About Home-heating Oil Tanks:
         Modern home-heating oil tanks are available in a variety of materials. Polyethylene and
         fibreglass models are more corrosion-resistant than steel, and are also UV-resistant.

         Steel tanks can be fitted with a seamless polyethylene lining, to reduce the risk of internal corrosion
         by separating the steel from potentially corrosive tank contents.

         These options are more expensive than a basic steel tank, but will greatly reduce the risk of spills.

         What Can I Do?
         •      Follow the Home-heating Oil Tank Checklist provided at the end of this guide
         •      Enlist the services of a certified oil burner mechanic to do an inspection, provide expert
                advice and make repairs

                                                                                                                  3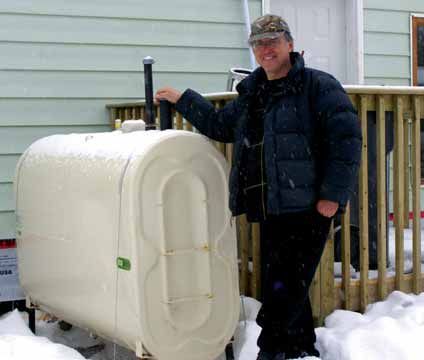
Why should I check my home-heating
    oil tank?
    The following events could have been avoided if the home-heating oil tanks had been
    properly inspected and maintained:

    Case 1 - A tankful a month!
    A homeowner thought it odd when he went through a full tank of home heating fuel in one
    month during the winter. When he called for a refill, the fuel delivery truck driver noticed that
    fuel had leaked onto the ground from the two-year-old above-ground home-heating oil tank
    under the deck.

    Although the tank showed no obvious signs of failure – no loose fittings, no ruptures, no
    leaky seams – when the tank was picked up, the remaining fuel began leaking from the wall
    of the tank.

    The clean-up cost was $20,000 and the insurance company denied the claim. This was a low
    cost clean-up. Some clean-ups or remediations have been in excess of $100,000.

    Case 2 - Didn’t think a new tank would fail
    A homeowner with a recently installed above-ground tank returned home from work
    and smelled a faint odour of fuel. The homeowner examined the crawlspace to look
    for leaks and check the furnace but could not find anything. By morning, the smell was
    overpowering. When the owner checked the home-heating oil tank, there was a steady
    trickle of oil from a small hole in the bottom.

    Two dump-truck loads of contaminated soil were removed and treated at a local facility.
    The excavator had to dig down to the footings and underneath the house to extract the
    contaminated soil in the crawl space.

    The insurance company initially turned down the claim. With legal assistance, the homeowner
    was able to recoup $30,000 of the cost and $1,500 for a new tank. The insurance company did
    not cover the cost of legal fees.

4
A Guide to Home Heating Oil Tanks

         Case 3 - Owners must pay for cleanup
         A local government was faced with an oil spill at one of their houses and had to relocate the
         house to begin excavation. The contaminated material had to be transported to Whitehorse for
         treatment. The clean-up cost was over $500,000 and the site must now be monitored as part
         of the clean-up requirements.

         Since internal corrosion likely affected the life-span of the old, single-wall fuel tank, the local
         government is now replacing all single-wall metal tanks with double-walled fibreglass or
         polyethylene tanks that have a 30-year life expectancy. (Most insurance companies will not
         insure single-wall tanks anymore.)

         Case 4 - Insurance doesn’t cover everything...
         A homeowner noticed that their furnace had stopped running and called a certified oil burner
         mechanic to investigate. The mechanic discovered the homeowner’s heating oil tank had
         emptied onto the ground beside the house. Some of the oil had escaped under the house
         while the rest contaminated adjacent properties. The cause? Water had collected in the one-
         inch diameter drip leg of the home-heating oil tank, froze and then burst the drip leg. The entire
         tank contents (over 950 litres or 250 gallons) spilled onto the ground. The total clean-up cost
         was $115,000, with the homeowner’s insurance company covering only half. The homeowner
         had to borrow money from the bank to pay the remainder of the bill.

                                                         Get your fuel
                                                         tank checked!

                                                                                                               5
Preventative Maintenance
    Checklist
    To function properly and safely, your home-heating oil tank should:

    Be in a safe location and protected from
    physical damage
    Install your heating oil tank as close as possible to your heating appliance. Your tank should be
    in a safe place, out of children’s reach, where it will not be struck by vehicles or other physical
    hazards such as wind, falling trees, ice, or snow. Ensure that fuel lines are visible to prevent
    being stepped on and the fuel service provider has easy access to the tank for fuel delivery.

    Outdoor Tank:
    Protect your outdoor tank from physical damage and leave space around it for air movement
    and for ease of inspection of the tank. Remove plant growth in, under, and around your tank.

    Ensure your outdoor tank does not block doorways or windows, including basement
    windows. As a courtesy to your fuel service provider, keep pathways and steps leading to
    your home-heating oil tank fill pipe free of snow and other debris.

    Tanks must satisfy installation codes, building codes, zoning requirements, distance from
    property lines, power lines and power poles.

    If your home-heating oil tank is located in an unsafe location, have it moved by a professional as
    soon as possible. If there is no other suitable location for the tank, get it protected with a solid,
    immovable barrier such as steel-concrete posts anchored into the ground, concrete barriers and/
    or overhead protection with snow guards on the roof.

    Indoor Tanks:
    Fuel oil that is stored indoors is kept warm and burns more efficiently. Indoor tanks are also
    protected from hazards such as falling ice and snow, internal corrosion from condensation,
    vandalism, ground shifting, running water and vehicle impacts.

6
A Guide to Home Heating Oil Tanks
Vehicle bumpers could contact this unprotected Protect the tankk from vehicle im
impa
impact
pact with
ith posts
p iff
tank. It is likely leaning due to a bumper having no other location is possible.
sible.
pressed against it.
If you have an indoor tank, place it in the lowest level of the building, such as a crawlspace or
basement. If you locate it elsewhere, (inside an attached garage that is not the lowest floor),
ensure that it is inside an extra container at least the same size as the tank, or on a drip pan
fitted with an alarm. If this isn’t possible, use anti-siphon valves . Regardless, an extra system of
containment is a good idea.
Your indoor tank should be inspected regularly for signs of leakage, oil stains and odours in the
basement. Vent and fill pipes must terminate outdoors to prevent fuel leaks or vapour intrusion
into the living space.
Oil vapours are not only dangerous from a combustible viewpoint but are a potential health
hazard to occupants and can cause headaches, nausea, dehydration, and dizziness.
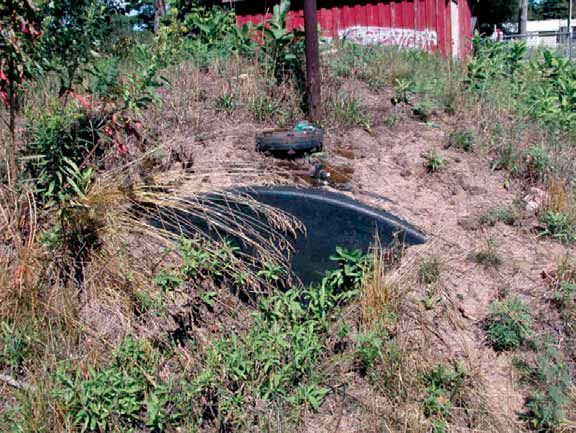
An indoor tank with secondary containment.
Notice the fill and vent pipes terminate outdoors.
7Underground Tank:
Most insurance companies no longer provide coverage for underground tanks. Please check
with your insurance provider.
Contact the Yukon Fire Marshal’s Office at (867) 667-5230 for information on how to remove
an underground tank or, if the tank cannot be removed, how to correctly decommission the
tank in place. For B.C. residents, please contact your local Fire Marshal office.
Removing or replacing an underground tank is never a simple process – even if machinery can easily access
the location. Contact a certified oil burner mechanic for information on requirements to correctly disable an
underground tank if it cannot be removed.
8A Guide to Home Heating Oil Tanks
Have protection for fuel lines and fittings
A fuel line connects your heating oil tank to your furnace or boiler. Your fuel line should be
as short as possible and protected from physical damage. If you must use a long fuel line,
ensure it is structurally supported along the entire length to prevent shifting and rupturing.
There should be easy access to the line for periodic inspection.
All fuel line connections, including connections to the oil filter, must be tight. Connections
that appear dirty or dark could be a sign that oil is beginning to weep. These connections
should be checked by a certified oil burner mechanic.
Oil filters are located between your burner and home-heating oil tank and filter out dirt and
impurities. They should be located indoors near your heating appliance and should
be changed yearly. Filters should not be located outside as they filter impurities in the oil,
including water, which can freeze and rupture the filter housing. You should conduct regular
inspections of your fuel lines and schedule annual inspections by a certified oil burner
mechanic, not only to have any water removed but inspected as part of your best practices!
Buried single-wall fuel lines are no longer permitted because they are susceptible
to rupturing and are difficult to inspect. Ruptures in underground fuel lines can go
undetected for months or even years. These leaks can create huge spills over time and
result in costly clean-ups.
Prevent Falling Ice and Accumulated Snow
Protect your fuel lines and home-heating oil tank from falling ice, especially if they are below
the slope of a roof. Get the lines re-routed by a professional if the lines are subject to this
hazard. or find a way to shield them such as installing snow guards on the roof.
Accumulated snow can add unnecessary weight to the tank. Drifting snow can hide a fuel
line making it susceptible to rupture or damage. A rupture is most likely to occur along the
weakest, unsupported section of line, typically adjacent to the tank.
Clear snow away from the tank and fuel lines and ensure the lines are visible to prevent
accidental damage. If necessary, have your home-heating oil tank and lines moved to an area
that is less subject to drifting snow or snow accumulation. If a leak occurs while the line is
buried in snow, it can remain undetected for months.
9Keep the area around tanks clear of snow to eliminate the chance of someone accidentally stepping on the fuel line
and allowing the fuel supplier access to the tank for filling and inspection.
10A Guide to Home Heating Oil Tanks
Remember:
• Protect fuel lines from being stepped on, kicked or bumped accidentally
• Protect fuel lines from vehicles, lawnmowers, getting caught by garden hoses or extension
cords, or children playing.
• Prevent fuel lines from coming into contact with corrosive material
• Ensure fuel lines buried in cement are inside secondary containment tubing or replaced
with above-ground lines, and the abandoned lines purged of oil
• Protect interior fuel lines from physical damage – especially if they run across the floor to
the burner. If possible, cover them with permanently secured protection plates
• Replace copper lines that are kinked
11Use Proper Support and Restraints
Follow Seismic and Flood Restraint Requirements
An average full home-heating oil tank (950 litre capacity) weighs about 807 kilos. In the event
of an earthquake, the tank could topple or the stand could collapse. Tank stands, pads and
restraints must withstand these forces and must be cross braced and bolted (with proper
authority’s approval) to a solid concrete pad to prevent tipping. The ideal foundation for a tank
is a large reinforced concrete pad with the metal tank or tank stand firmly bolted down.
Home-heating oil tanks must meet the seismic restraint requirements for the seismic zone
you live in. Ensure your home-heating oil tank is installed in accordance with the Residential
Home-Heating Oil Tank Restraints for Yukon Communities. Follow seismic and flood
restraint requirements, found here: http://www.community.gov.yk.ca/buildingsafety/forms.html
While at the website, scroll down to Residential Fuel Tank Restraints for Yukon Communities to
select your community.
Remember:
Wooden tank stands are prohibited by the Building Code and should never be used.
Patio stones or sidewalk blocks should not be used as a base for the foundation of any home-
heating oil tank because they do not provide enough stability.
Never fasten the home-heating oil tank to the wall of a building because wall construction is
not strong enough to hold the tank in place. A proper base with a solidly connected tank and
tank stand is the best defense against tipping and spilling.
The ground under the tank must be non-organic, undisturbed and well compacted to prevent
settling of the pad over time.
Tank Supports and Foundation
The area around and under the pad should consist of material that will allow water to drain
away from the tank. If water is allowed to accumulate, the freeze and thaw movement of the
pad can cause movement which will damage piping or even topple a tank.
Home-heating oil tanks can also topple over during the spring thaw if the flow of melted
water compromises tank bases and stands. Place the concrete pad out of the path of spring
water channels.
Older tank installations that have tank saddles instead of pipe legs supporting the tank are
prone to collapsing, as these supports retain water and promote rust between the tank
saddle and tank bottom.
12A Guide to Home Heating Oil Tanks
Approved Tank Restraint Systems:
Tank legs must be secured to the slab or pads.
A properly installed fiber glass tank on a solid pad A double-bottom home-heating oi tank
with restraints to keep it from toppling in a seismic on reinforced concrete pads placed on a
event. The restraint system must be engineered or compacted, granular base.
follow certified designs for the local area.
For details, contact Yukon Community Services, Building and Safety Standards Branch.
13Be sloped towards the outlet
Your home-heating oil tank should slope 1/4 inch per foot towards the outlet to aid in water
drainage and to prevent corrosion within the tank.
Do not slope the tank away from the outlet as water and sludge will collect in the tank
where it cannot be drained or removed easily. This water and sludge accumulation will
contribute to corrosion.
A tank with a bottom outlet is better than a tank with an end outlet. A bottom outlet allows
accumulated water to easily exit the tank and run to the filter to be collected.
Note: A fibreglass/polyethylene tank can be installed horizontal without a pitch.
Notice the top of this tank slopes towards
rds the lleft side of
the picture. This tank also has a bottom outlet. These two
features will keep water from accumulating and causing
corrosion in the tank. The arrows in the picture illustrates the
correct slope of the tank towards the outlet.
14A Guide to Home Heating Oil Tanks
Protect your tank from oil leaks by:
Keeping your home-heating oil tank full
to reduce condensation
A full home-heating oil tank helps to reduce water condensation. Whenever air temperatures
rise, water condenses on the cooler surfaces of the tank including the inside. The fuller the
tank, the less surface area there is for water accumulation. The water runs down the inside
tank walls and collects on the bottom of the tank. Microbes flourish in this environment and
accelerate corrosion on the tank’s bottom. This is called Microbial Induced Corrosion (MIC)
and was discussed earlier in this guide.
The bacteria also generate sludge which can plug oil filters and cause heating appliance problems.
Remember:
• Bacteria need water to grow
• Keep the tank as full as possible (80%) to minimize condensation, especially in the summer
months, but if your tank is susceptible to overfilling remember to leave an unfilled space
(headspace) at the top
• Headspace in the tank allows for fuel expansion without causing leaks
• Slope the tank towards the drain to allow water to flow out of the tank and be captured in the
fuel filter
• Use a tank that drains from the bottom instead of from the end of the tank to drain water
• Use a home-heating fuel additive to displace the water; it will also help eliminate sludge
and bacteria
Warning:
If your tank exhibits a dark line of corrosion along the very bottom of the interior
this is an indicator of MIC inside your tank. Do not touch this dark line as your tank
could be perforated and begin to leak. You should contact a professional to replace
your tank as soon as possible.
Pay Attention to Temperature Change
Leaks can occur when the fuel in a tank expands due to warmer temperatures. If there is not
enough expansion room or headspace at the top of the tank, the fuel will expand, back up
the fill pipe, and spill onto the ground. These spills are usually small, yet can have the same
effect as a larger spill if they happen regularly.
15Remember:
One drop of oil can render up to 25 litres of water unfit for drinking.
The most effective way to ensure there is ample headspace between the fuel level and the
top of the tank is to use an oil level gauge and a vent whistle.
It is the responsibility of the fuel delivery person to not overfill the tank.
Vent Whistle
A vent whistle will ensure your tank retains the required headspace when filled. A vent
whistle is a device that fits directly onto the home-heating oil tank at the base of the vent
pipe. It whistles like a tea kettle while the tank is being filled. The noise stops once the level
of oil reaches the bottom of the whistle inside the tank. This signals that the tank is full (with
some head space) and the delivery person can turn off the flow of fuel.
Your fuel delivery person can advise you if your vent whistle is working properly. This is not
an adjustable device. Contact a certified oil burner mechanic if you are told or notice your
tank whistle is not working properly.
Picture of a vent whistle component. The silver Note the method in which fuel leaves both tanks (end-
portion of the whistle in unseen inside the tank. wall feed configuration). The drawback to these tanks
When the level of the oil reaches the bottom of this is that water and sludge can accumulate as pictured in
tube, the whistling stops. the bottom tank. Bottom-feed systems have recently
been introduced to eliminate this condition.
16A Guide to Home Heating Oil Tanks
Ensure Your Fuel Oil Level Gauge is Working
All tanks must be fitted with a functional fuel oil level gauge. This is critical for the fuel
delivery person.
The easiest way to ensure your fuel oil level gauge is working correctly is to monitor it for a
few weeks during the winter. If the reading does not change, there may be a problem with
the gauge. Gauges can get cracked, stuck or frozen. If the display glass is cracked, water
can leak into the top of the tank. Broken or malfunctioning gauges should be replaced
or repaired as soon as possible. The gauge should be equipped with a heavy gauge steel
protector to prevent damage.
A cracked or missing gauge is especially dangerous for indoor home-heating oil tanks. A
broken gauge may allow fumes or liquid oil to enter a house, and may prevent the vent
whistle from whistling (since the air escapes through the broken gauge and not through
the vent whistle).
Picture of a glass gauge. Picture of a heavy gauge steel protector.
This will keep your glass gauge safe.
17Detecting water in your tank
Sludge and water accumulate on the bottom of the tank and can be checked by dipping the
tank using “water finding paste” at the end of a dipping stick, like checking the oil in your
car. If the paste turns a different colour, as indicated on the product box (usually purple), the
home-heating oil tank has water in it.
Test for Water
The most current version of the code recommends that “all tanks located in unconditioned
space or outdoors shall be tested for water at the bottom of the tank. Where found, the water
shall be removed.” (B139-09 clause 15.2.3)
Adding a fuel additive before fill up
Add a fuel additive to displace small amounts of water in the bottom of the home-heating
oil tank. Some additives contain biocides which kill and decompose bacteria preventing
sludge from forming. Additives also assist in clearing your tank of water and sludge if they
are present.
If any water is discovered in your tank during an inspection, it should be removed
immediately by a professional.
18A Guide to Home Heating Oil Tanks
Removing water before freeze up
and after spring thaw
The following procedures should not be attempted by the homeowner. A certified oil burner
mechanic or fuel delivery person should have the training and the tools to avoid creating
an oil spill, and is conversant with regulations related to fuel oil storage and disposal of
contaminated fuel or hazardous materials.
Home-heating oil tanks should have accumulated water removed every spring. The most
serious corrosion damage to home-heating oil tanks occur in the non-winter months when
the water is not frozen. Corrosion forms from the inside out at the bottom of the tank, due to
the accumulation of water.
Remember:
Keep your tank full at the beginning of summer to reduce condensation inside
the tank.
In some installations a drip leg may be used to collect accumulated water. The drip leg
should never be used to support a tank. If the drip leg touches the ground or extends
below the level of the tank pad, it must be removed (B139 code requirement).
The green arrow points to an example of a drip leg.
Since drip legs are not easy to maintain, we do not
recommend using them. It is better to eliminate
water in the tank rather than letting it drain into the
drip leg, where it can freeze and rupture.
19Checking the tank’s physical
condition regularly
Check the home-heating oil tank’s exterior surface for rust, corrosion or dents that may
weaken or make the tank susceptible to rupture and leakage. Look for bent or pinched lines,
cross-threaded fittings, a broken or cracked fill gauge, cracked or weeping weld seams, or
broken or heaved base support pads.
Even if the tank looks okay from the outside, the steel on the inside may be extremely thin
and weak in areas due to internal corrosion. Be careful when running your hand over rust
bubbles or spots on the tank. Do not attempt to remove rust or paint. Do not clean the
bottom or sides of your tank when it contains oil.
Remember:
The most serious corrosion damage to home-heating oil tanks occurs from the inside
out at the bottom of the tank, due to water build up. If you notice a dark line along the
bottom of your home-heating oil tank, have your tank inspected without delay to
determine if it needs to be replaced.
Check Certification Plates
Check for a metal certification plate that shows ULC (Underwriters’ Laboratories of Canada)
or CSA (Canadian Standards Association). Most insurance companies require proof of this
certification before they will provide homeowner coverage.
Consult a certified oil burner mechanic if you don’t have documentation in your home files
or on the tank to show that your tank has been installed in accordance with CAN/CSA B139
– Installation Code for Oil-Burning Equipment. For most homeowners, this information is
itemized on the building inspection report.
ULC certification plate, standard, double-wall,
steel above-ground home-heating oil tank. ULC certification plate, standard, single-wall,
steel above-ground home-heating oil tank.
20A Guide to Home Heating Oil Tanks
Looking for drips and ground staining
Ground staining may be a sign that fuel is dripping, leaking or has been spilled from the
home-heating oil tank. Any evidence of leaks or spills should be investigated and only
repaired by a professional immediately.
Remember:
It is the owner’s legal responsibility to have contaminated soil remediated. It is everybody’s
responsibility to report spills to the spill line (see page 43).
*See Government of Yukon Environment Act, page 40.
Obvious soil staining.
To protect the floor below an indoor home-heating oil tank, a drip tray should be placed
under the whole tank, or under the valve and filter to catch potential oil drips. Some of these
devices come with built-in-alarms to alert the homeowner if a leak occurs.
A drip pan under the filter inside
a dwelling. The entire tank could
have a pan installed beneath it
for better protection. Note the
appearance of fuel staining on
the tank.
Potential home buyers are advised to inspect the area around the home-heating oil tank
for signs of past fuel spillage. This will make clean up a condition of purchase instead of the
new homebuyer being responsible for potential cleanup costs in the future. The inspection
should be followed up by a certified oil burner mechanic, a qualified home inspector, or
engineer if there is suspected contamination.
21Checking fittings, valves and
fuel lines
All fittings and valves should be inspected regularly for rust, corrosion or other physical
defects. Be sure to check for signs of leakage or weeping—a thin film of oil developing
around the joints. If you find or suspect any of these defects, contact a certified oil burner
mechanic to inspect and have repairs completed immediately.
This break is obvious—most are not. A close
inspection of piping should be carried out on a
regular basis.
Remember:
It is a legal requirement to have a functioning, approved, shut-off valve as close to the tank outlet
as possible.
There are Two Types of Manual Valves:
1. Gate valves were often used in the past, with a round handle like a small steering wheel. A
gate valve is prone to leaking around the stem if partially open, so always ensure that valves
are either fully opened or fully closed.
2. Ball valves are more common now in newer installations. These valves have a single lever.
1 2
22A Guide to Home Heating Oil Tanks
Automatic Valves
Automatic valves (which include anti-siphon valves) are also used, but not required on most
home-heating oil tank installations. The automatic valve is usually installed in addition to a
manual valve. These valves will not allow fuel to flow free from a tank if piping develops a leak.
Fusible Link / Anti-siphon Valve
A fusible link valve is an optional safety valve designed to shut off the fuel supply in the event
of a fire. Typically, a fusible link valve is installed at the furnace.
Anti-siphon Valve
It is advantageous to have an automatic valve located at the tank when the tank or oil level is
above the height of the oil burning appliance - for example when a tank is installed inside an
attached garage with the furnace in the basement. The following clauses from the B139 Code
provide the requirements for the use of an anti-siphon valve:
6.4.5 c When the total capacity of tanks connected to one supply line exceeds
2500 litres (550 gal), all connections for the transfer of oil to and from the
consuming appliance shall be situated at the top of the tank, transfer shall be by
pump only, and means shall be provided to prevent siphoning, except where oil
types #5 and #6 are used.
A suitable, automatically operated device, designed to shut off the fuel supply in case of
breakage of the supply piping, shall be installed when more than one burner is supplied from
a single pump set.
Note: This requirement provides protection if the supply piping between an upstream
pump and the burner is broken.
These valves operate with the use of a diaphragm that requires a minimum suction draw
from the pump at the appliance before fuel is allowed to pass through it.
Without a sufficient vacuum draw from the pump, oil cannot free flow from the tank by the
siphoning action of a broken line. These valves are commonly referred to in the oil industry as
an “oil safety valve” or OSV, although the term is actually a trademark of Webster Industries.
An example of an anti-siphon valve This is an example of an automatic shut off valve.
for a top of tank fuel hook-up.
23Check Fill and Vent Pipes & Use a Rain Cap to Keep Water Out
Check your fill and vent pipes. The height of the vent pipe above the fill pipe must be at least
6 inches, although it is recommended that it be at least 12 inches higher than the fill pipe.
Ensure the home-heating oil tank vent pipe is clear and free of obstruction. Clear snow,
leaves, insect nests and other debris from the fill and vent pipes to allow the tank to vent
properly and to ensure accessibility for the delivery person. Inspect the fill and vent pipes and
the area around the tank for spills, before and after each fill.
Both fill and vent pipes should be fitted with rain caps to prevent water from entering the
tank. A rain cap should be attached to the fill pipe with a hinged or threaded configuration to
prevent accidental loss of the cap. Vent caps prevent rain water from entering the tank, but
allow air to escape. Most caps can be locked to prevent tampering or theft of heating oil.
After each fill, ensure the rain cap is secure. If your cap is broken, replace it with a proper cap.
TOP
BOTTOM
A screw-on rain cap is commonly used in Yukon - Example of various tank components. From
effective if secured after every fill. Be sure to replace bottom to top: 1) filler cap, 2) oil return, 3) fuel
this cap should it be lost. gauge, 4) leak detection port, 5) vent (with vent
whistle), 6) double walled tank interstitial vent.
An example of a lockable flip open
rain cap. These can be purchased
at fuel tank supply stores.
Flex Connectors
Flex connectors are designed and intended to allow for minor shifting of either the home-heating
oil tank stand or the building. They are not intended to compensate for misaligned fittings.
A flex connector or a horizontal loop of tubing allows for expansion, contraction and minor
movement in the line from the tank to the building and should be well protected.
24A Guide to Home Heating Oil Tanks
A properly installed flex connector should be in an “S” shape to accommodate any shifting. It
should never be aligned in a straight line.
A flex connector installed correctly. Note the handles have been
removed for the gate valves to prevent children and vandals from
tampering with them.
Flex connectors are often used at the burner to compensate for vibrations. They must be free
to flex – and must never pass through a floor or wall.
The lines to this burner are flexible and allow minor The loop in this oil line serves the same purpose as
servicing of the burner without disconnecting lines a flex connector and is more common. The loop of
and spilling oil. copper tubing will compensate for movement in the
tank without leaking. (note – this fuel line and shut-
off valve could easily be stepped on and should
have a protective covering).
Check Flex Connectors
The steel weave or corrugation on the exterior of the flex connector provides its strength. It
must fit tightly around the inner lining. The flex connector should not be compressed along
its long axis. You can check this by grasping it with your hand. If the metal weave is loose, and
you can compress the weave by hand, then the flex connector needs to be replaced.
*The use of flex connectors is fairly rare in Yukon. There is no legal requirement to use them.
25Booking an annual inspection by a
certified oil burner mechanic
Call a certified oil burner mechanic to conduct an annual inspection of your heating system,
including the home-heating oil tank and fuel lines.
Have your oil burning appliance serviced and a combustion analysis completed. The
mechanic should, (as required in the oil code CSA B 139 ) carefully inspect the integrity of the
combustion appliance, heat exchanger and flue (chimney).
A standard inspection checklist for home-heating oil tanks and furnaces is on the Yukon
Community Services website at http://www.community.gov.yk.ca/buildingsafety/oil_fired_reg.html
Remember:
Fuel oil within the heating system becomes a hazardous material if it leaks out. It costs less
to prevent an oil leak than to fix or clean up a spill.
End of the road? Don’t take the risk. Book an inspection.
26A Guide to Home Heating Oil Tanks
Addressing problems immediately
when they arise
Insurance Company
Insurance policies may or may not cover the costs associated with a home heating oil spill.
Insurance companies may refuse to pay for the clean up if a spill was preventable (i.e. if the
homeowner or resident did not take proper precautions and conducted routine regular
inspections and maintenance).
Remember:
Homeowners should always consult their insurance company to see what their
policy covers, and their obligations in terms of personal responsibility and liability.
When insuring your home, insurance companies will ask for a checklist or questionnaire to
be completed regarding the oil burning storage system and appliances. These checklists or
questionnaires are seldom completed accurately and could result in a claim being refused.
If you need assistance to complete these forms, contact a certified oil burner mechanic and
have this done by an expert.
Ask questions! Many insurance companies cover only limited costs associated with oil spills.
Your policy may provide coverage for clean-up in your neighbour’s yard, or damage to your
house, but it may not cover your own yard. As clean-up of contaminated soil can be extremely
expensive, find out exactly what your insurance policy covers.
As a general rule, if the spill was preventable with regular maintenance and inspections,
insurance policies are unlikely to cover clean-up costs.
Many Insurance Companies are Now Inspecting Tanks Prior to
Insuring Them and Require Home-heating Oil Tanks to:
• be free of rust and have no signs of leakage
• have proof of certification plates, often from a specified certification body (ULC or CSA)
• be located off the ground (as per Seismic Restraint Requirements, see page 9).
• have fuel lines protected by a cover
• be located away from high traffic areas
• be inspected by a building inspector when installed
27Fuel Company
The person delivering the heating oil is required to stay with the fuel nozzle at all times
during the re-fuelling of your home-heating oil tank, even though fuel delivery nozzles are
equipped with an automatic shut-off to prevent spills.
There is no substitute for human supervision. Incorrect practices should be reported to the fuel
company immediately.
Remember:
To avoid unintentional spills, personally filling your home heating oil tank in-between
deliveries is not recommended. It is also important to know that when a tank has “run dry”,
elevated amounts of sludge and water can enter your fuel line, fittings and filter. This is a
concern in the colder months as your lines and fittings can freeze once the furnace shuts-off
due to a lack of fuel.
An overhead view of a residential fuel oil spill being remediated.
28A Guide to Home Heating Oil Tanks
This double-wall fibreglass tank is also fitted with an inspection port to This drawing illustrates the structure
check for leakage. of a double bottom tank. The area
most subject to corrosion is the tank
bottom. These tanks are fitted with
an inspection port which allows you
to see if the tank has failed.
Fibreglass single-wall home-heating oil tank.
Note the protective shield over the fuel outlet
valve and piping.
*Note: All of the tanks above do not have seismic restraints and do not adhere to code.
29Tips for replacing your
home-heating oil tank
When it is time to replace your home-heating oil tank, consider the high environmental and
financial cost of an oil spill when making your new purchase. All homeowners, including First
Nations governments and communities, are urged to place a high priority on quality.
Consult with your insurance company to determine what type of professional installation they
will cover. Contact a certified oil burner mechanic for advice on the most appropriate home-
heating oil storage system.
This guide recommends replacing your old tank with one that meets the new Canadian
Standards Association (CSA) standards for home-heating oil tanks, such as a double-wall or
double-bottom tank. Some installations are using fibreglass tanks, which come in single and
double-wall configurations, both of which are acceptable.
When Replacing Your Home-heating Oil Tank, Several Options Exist:
Single-wall Steel Home-Heating Oil Tanks are not recommended.
These tanks are susceptible to corrosion from both the outside and the inside of the tank. 2
Double-wall or Double-bottom Steel Home-Heating Oil Tanks
Double-wall steel tanks are more expensive than single-wall tanks, but are more durable. If the
inner wall corrodes, oil will fill the outer tank and not spill onto the ground. Water must still be
drained from the inner tank on a regular basis to minimize corrosion. A double-wall tank must
be fitted with an inspection port to allow for easy, regular monitoring of the interstitial space
for any signs of leaks. A double-wall tank may last longer than a single-wall tank, but will still
eventually fail and need replacing. Keep an eye on the inspection port.
Single-wall or Double-wall Fibreglass Home-Heating Oil Tanks
Fibreglass home-heating oil tanks have many attractive features but are more expensive
than typical steel tanks. These home-heating oil tanks do not rust and corrode like steel
tanks and typically last longer. Fibreglass tanks come in both single-wall and double-wall
construction and are lightweight compared to steel tanks. As with all tanks, accumulated
water should be drained on a regular basis to help prevent the formation of sludge in the oil
storage system. Double-wall tanks should be fitted with an inspection port.
30A Guide to Home Heating Oil Tanks
Double-wall Polyethylene/Steel Home-Heating Oil Tanks
Similar to the double-wall steel tank, this tank has a space between the two tank walls. The
inner tank is made of high density polyethylene. The outer wall is made of galvanized steel
that is resistant to exterior corrosion. The tank can be fitted with an optical leak alarm. The
outlet for this tank is on the top rather than on the bottom or the end of the tank. 1
Second-hand Home-heating Oil Tanks
Purchasing second-hand or reusing home-heating oil tanks for any new
installation is NOT permitted by code.
Building inspectors cannot provide approval on used or second hand oil tank installations,
and insurance companies will not insure them.
Home-heating oil tanks must be properly disposed of once they have reached the end of
their life cycle. Talk to a professional about the disposal of your home-heating oil tank.
Transferring Oil into a New Tank (prohibited under CSA B139-09)
When replacing your home-heating oil tank, it is not recommended to transfer the old fuel
into your new tank unless it is filtered. The old fuel may contain sludge, acid, microorganisms
and water which will give corrosion a head start on causing problems. Contact your fuel
provider for questions about transferring fuel.
The remaining sludge, oil and water mixture is considered a special waste and must be
disposed of as required under the “Special Waste Regulations”. Contact your fuel supplier for
more information.
2. CSA recently amended the Installation Code for Oil-Burning Equipment. At time of publication, the revisions were
not yet in force in Yukon. However, we anticipate that in the near future all above ground metallic home-heating oil
tanks will be required to be double walled, double bottomed, or be installed within secondary containment. Single-
walled steel tanks will not be permitted.
31Home-heating Oil Tank Installation, Movement and Leveling
Do not move a home-heating oil tank! Moving a home-heating oil tank increases the
opportunity for damage and tank failure. If you need to move your tank, wait until it is empty
and call an expert!
Tanks shipped directly from a manufacturer come with temporary transport sealing plugs to
keep water out and protect the fitting threads. All caps/plugs must be removed and replaced
with proper fittings. Any condensation or ice formed in the tank during shipping and storage
should be removed before installation. The tank should never be filled until it is properly
installed and inspected by a qualified installer or by an accredited inspector.
Tanks are shipped with protective plugs. This tank also needs to be painted during installation to reduce the
formation of exterior surface rust.
Remember:
Painting a tank should only be completed when it is first installed. Never repaint an old tank.
32A Guide to Home Heating Oil Tanks
Get your fuel
tank checked!
33Home-heating Oil Tank Spills
If you’re faced with a leak or an oil spill, follow these steps:
First Response - outside leak or spill
• Stop the flow of oil at its source
• If the leak is in the oil line, turn off the shut-off valve at the tank outlet
• Plug the hole, if it is safe to do so
• Place a container under the oil leak and monitor the fuel level in it
• Contain spilled oil using whatever materials are available (pails, rags, newspapers,
peat moss, cat litter, absorbent pads, sheets of plastic, etc.). Never flush spilled oil or
contaminated materials down the drain or sewer
• Use absorbent material to mop up the spill
• Turn off your furnace to keep it from attempting to ignite without a fuel supply
• Call the 24 hour Yukon Spill Report Line 867-667-7244 (collect calls are accepted)
or B.C. 1-800-663-3456
• Call your heating oil supplier for transferring remaining oil from the leaking tank
• Contact your insurance company as soon as possible
• Take pictures of the spill and record details
Remember:
Not reporting a spill is an unlawful act!
34A Guide to Home Heating Oil Tanks
First Response – inside leak or spill
• Turn off the power to your furnace at the emergency switch for the oil burner
• Turn off the shut-off valve at the tank outlet
• Plug the hole, if it is safe to do so
• Watch for floor drains; prevent fuel from entering
• Heating oil is a combustible liquid and the vapours are highly flammable, so eliminate
all ignition sources (smoking, flames or any electrical appliance located in the vicinity of
the leak)
• Fumes from spilled oil can accumulate in confined spaces and be very dangerous – be aware
• Contain spilled oil using whatever materials are available (pails, rags, newspapers,
peat moss, cat litter, absorbent pads, sheets of plastic, etc.). Never flush spilled oil or
contaminated materials down the drain or sewer
• Never use a shop vacuum to clean contaminated fuel material – the electric motor will
spark and cause ignition of the vapours
• Put contaminated materials into a metal container with a proper lid and store outside to
prevent possible combustion and ignition of the contaminated material. Never store this
container inside your living space!
• Call the 24 hour Yukon Spill Report Line 867-667-7244 (collect calls are accepted)
or B.C. 1-800-663-3456
• Call your oil supplier for transferring any remaining oil from the leaking tank to a
suitable container
• Contact the Environmental Programs Branch and your local fire department for
information on how to store and dispose of contaminated materials (see yellow pages/
phone book – Oil Spill Clean Up & Control)
• Contact your insurance company as soon as possible
These actions will minimize the impact of the spill on the environment, your property and your
neighbour’s property.
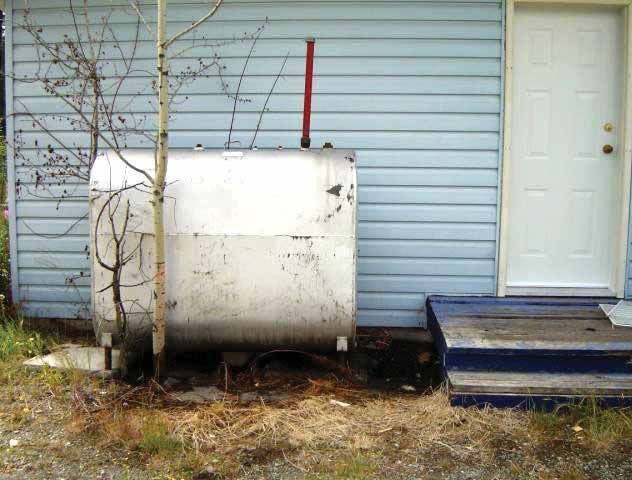
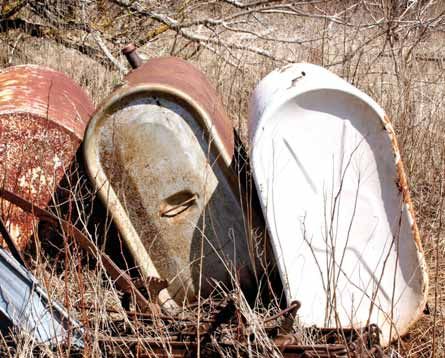
35An obvious home-heating oil tank spill. The extent of the spill needs to
be determined.
Testing will determine the extent of
excavation required to remediate
this spill.
Rust and pitting like this means that
this tank is at the end of its life, get
it replaced!
36A Guide to Home Heating Oil Tanks
Clean-up and Next Steps
Clean-up consists of the removal and disposal of contaminated soil and possible replacement
of your home-heating oil tank.
The clean-up must be done with instruction from the Government of Yukon’s Environmental
Programs Branch, and in most cases, is carried out by a contractor trained and licensed to
handle environmental waste. It may be necessary to have an engineering firm assess the
extent of the spill and provide instruction on the clean-up required.
After the clean-up is completed, installation of a new storage system and/or piping should be
done by a certified oil burner mechanic.
For every installation, a building permit is required. Once completed, this work needs to be
inspected by a City of Whitehorse or Government of Yukon inspector to ensure it complies
with all codes and standards.
Engineer testing level of contamination in the soil. Sample bottles prepared for testing lab
to determine parts per million of oil in
contaminated soil.
The Final Word!
If in doubt, call a professional!
37What the Law Says
Government of Yukon Environment Act
Remember:
The Environment Act is based on the “polluter pays” principle. (i.e: the person who owns or has
possession, charge, or control of the spilled substance is responsible for the clean-up.)
It is the legal and financial responsibility of the person responsible for the spill to clean up all
home-heating fuel leaks and spills on all properties, drinking water systems and waterways.
The Environmental Programs Branch (EPB) of the Government of Yukon is responsible
for developing and implementing legislation and policy under the Government of Yukon
Environment Act. This includes ensuring that spills and contaminated sites are assessed and
remediated.
EPB will direct the responsible party to restore the affected area to a condition reasonably
equivalent to what existed prior to the spill. The Environment Act applies to all lands in the Yukon
including private land.
Other Government of Yukon Legislation
• Spills Regulations
• Contaminated Sites Regulation
• Storage Tank Regulations
• Special Waste Regulations
The above listed legislation and regulations are available at http://www.gov.yk.ca or by
contacting your local Government of Yukon Environment Office.
Canadian Standards
For most provinces and territories, the CAN/CSA B139-04 or B139-09 Edition of the – Installation
Code for Oil-Burning Equipment is in force.
Canadian Standards Association (CSA)
Canadian Standards Association, Installation Code for Oil Burning Equipment (CSA B-139-04).
http://www.shopcsa.ca
Canadian Standards Association, Installation Code for Oil Burning Equipment (CSA B-139-09)
http://www.shopcsa.ca
38A Guide to Home Heating Oil Tanks
Underwriters Laboratories of Canada has been publishing standards for Canadians for 60 years
and provided technical expertise to manufacturers. A ULC mark on a product means that ULC has
tested and evaluated representative samples of that product and determined that they meet ULC’s
requirements. In addition, products are periodically checked by ULC at the manufacturing facility to
make sure they continue to meet ULC requirements.
Underwriters’ Laboratory of Canada (ULC)
Aboveground Steel Tanks for the Storage of Combustible Liquids Intended To Be Used as
Heating and/or Generator Fuels
National Standard of Canada. CAN/ULC-S602-03,
http://www.orderline.com/detail.asp?group=448
Underwriters’ Laboratories of Canada
Aboveground Non-metallic Tanks for Fuel Oil
ULC/ORD-C80.1-00,
Canadian Underwriter—Canada’s Insurance and Risk Magazine
For complete article – “Total System Containment”
http://www.canadianunderwriter.ca/issues/story.aspx?aid=1000389788
Seismic Restraint Engineered Drawings
The tank must meet the seismic restraint requirements for the seismic zone you live in. Refer
to the following website for seismic restraint engineered drawings specific to your location.
http://www.community.gov.yk.ca/buildingsafety/forms.html
Scroll down to - Residential Fuel Tank Restraints for Yukon Communities and select
your community.
Contact Government of Yukon Building and Safety Standards Branch at (867) 667-5741 or
City of Whitehorse Building Inspections at (867) 668-8340.
3940
Appendix 1
Inspection Checklist
Remove water and sludge from Remove grass, weeds, snow To prevent overfilling and to
your tank every year. and ice from around your tank. allow for heat expansion,
only fill your tank to nominal
Get help from your fuel Make it easy to see if you capacity (~80%).
supplier as they have the have a leak and easy to fix it
training and tools. if it happens. Keep your tank filled during
spring and summer to
minimize condensation.
Add a fuel conditioner
to remove bacteria and
displace water.You can also read