248 BAY SERIES WWW.SEAPROMFG.COM - Sea Pro Boats
←
→
Page content transcription
If your browser does not render page correctly, please read the page content below
248 BAY SERIES

Owner’s Manual and
Quick-Reference Guide
2017                                 WWW.SEAPROMFG.COM
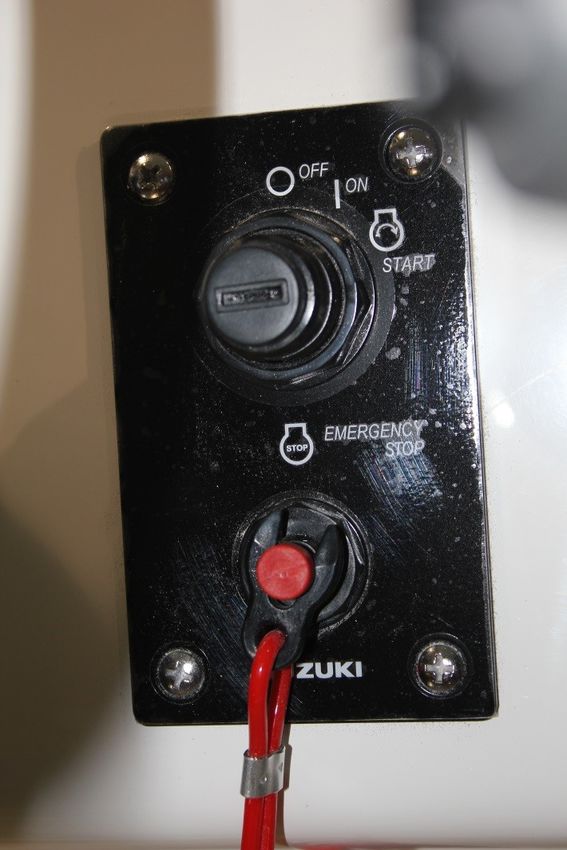
TABLE OF CONTENTS
Table of Contents                                 2          Static Jack Plate                                    26
Introduction                                      3          Hydraulic Jack Plate                                 27
Model Information                                 4          Power-Pole®                                          27
Key Information                                   5          Raw Water Wash Down                                  28
Specifications                                    6          Fresh Water System                                   29
Standard Features                                 7   Fuel System
Optional Features & Hull Color Options            8          Integrated Fuel System                               30
Hull Identification Number                        9          Fuel System Diagram                                  31
Boating Safety                                               Fuel System Performance                              32
       General Safety                            10          Fuel / Water Separator                               33
       U.S.C.G. Minimum Required Equipment       11   Maintenance                                                 34
       Carbon Monoxide Warning                   12   Storage                                                     37
       Boating Navigation Rules                  13   Recommissioning                                             38
       Safety Labels                             15   Schematics & Wiring Diagrams
       Pollution Regulations                     16          Deck Wiring Diagram                                  39
Systems and Components                                       Hull Wiring Diagram                                  40
       Helm Station                              17          Battery Wiring Diagram                               41
       Battery Selection Switch                  17          Amp Power Wiring Diagram                             42
       Engine Shutdown Safety Switch             18          Dash & Helm Switch Panel Diagram                     43
       Engine Controls                           19          Inside Helm Console Wiring Diagram                   44
       Steering Controls                         20          Trolling Motor Power Panel Wiring Diagram            45
       Helm Switch Panel                         21          Hard Top (Optional) Switch Panel Diagram             46
       Compass                                   21          Hard Top (Optional) Wiring Diagram                   47
       Bilge Pump                                22          Wiring Color Codes                                   48
       Livewells & Sea Cocks                     23   Warranty                                                    49
       Navigation / Anchor Lighting              25   Contact Information                                         50
       Trim tab Control                          26

2                                                                                                        248 BAY SERIES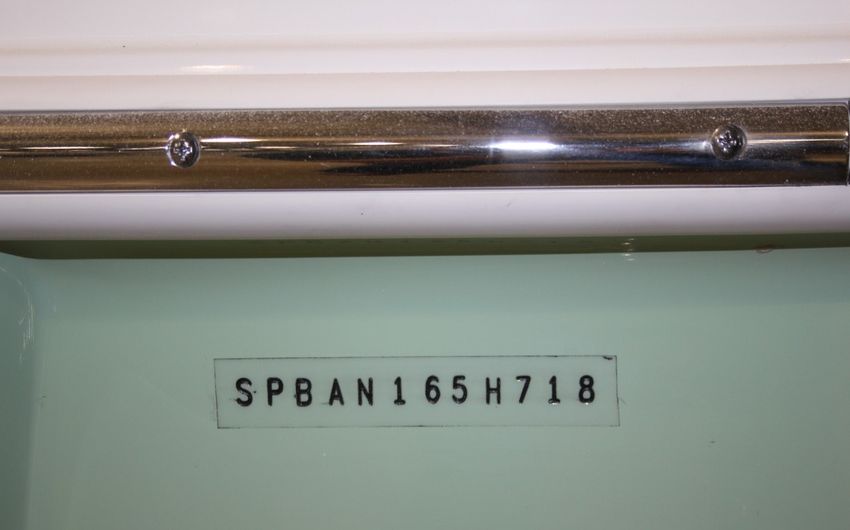
THE RETURN OF A LEGEND...
We want to Personally welcome you to the SEA PRO team and are excited that you are part
of The Next Wave!

Lorem Ipsome epsilom, place holder wording, letter from Jimmy and Preston to the new SEA
PRO BOAT owners thanking them for their purchase and for being part of the Team.

Visit our website at www.seapromfg.com for information on the entire SEA PRO model line
up.

From the entire SEA PRO family, thank you for purchasing one of our boats. We know it
will bring you many years of enjoyment.

                          Jimmy Hancock and Preston Wrenn

248 BAY SERIES                                                                             3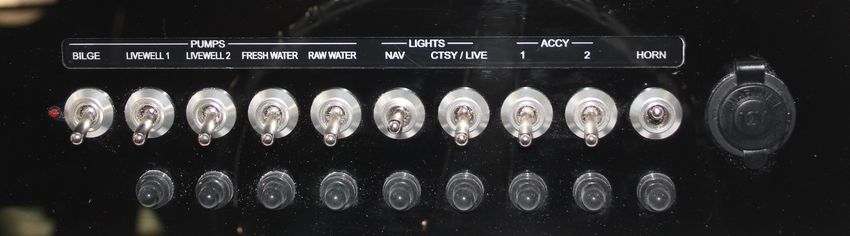
2017 MODEL INFORMATION
This manual contains information on the following SEA PRO models:
BAY SERIES
248
NOTE:
This manual is being provided as a reference and informational tool. SEA PRO BOATS suggests that you maintain a copy
of this manual on board for future use and reference. The information contained is subject to change.
When your SEA PRO boat requires Service, Maintenance or Warranty Work, it should be taken to an Authorized and Approved
SEA PRO BOATS dealer. To find a SEA PRO BOATS dealer near you call 1-803-694-2644.
Ver. 1.0.248.17
4 248 BAY SERIES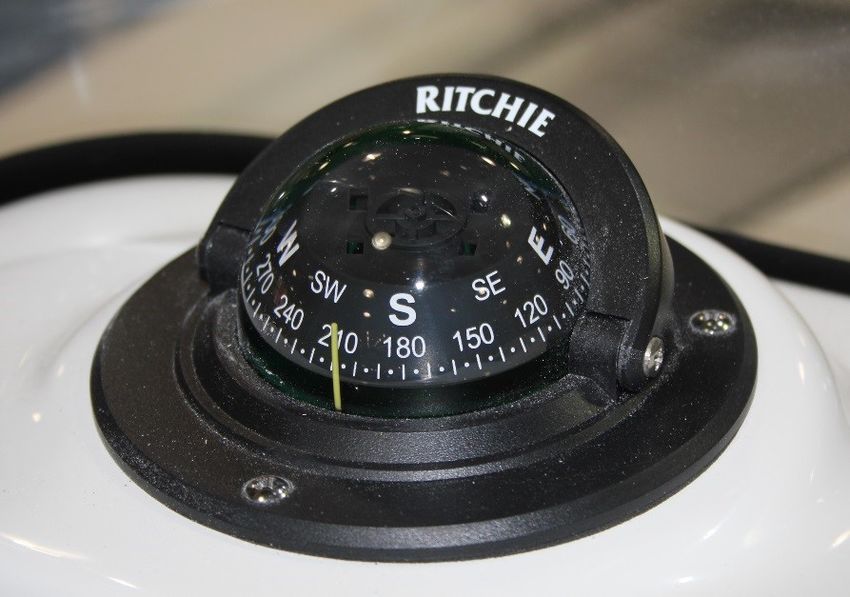
KEY INFORMATION

         BOAT INFORMATION
         MODEL #:                       HULL SERIAL #
         PURCHASE DATE:                 REGISTRATION #:
         IGNITION KEY #:

         ENGINE INFORMATION
         ENGINE MAKE:                   MODEL #:
         SERIAL #:

         PROPELLER INFORMATION
         MAKE:                          # OF BLADES:
         DIAMETER:                      PITCH:
         PART #

         OPTIONAL EQUIPMENT
         MAKE:                          MODEL #:
         SERIAL #:

         DEALER INFORMATION
         NAME:                          PHONE #:
         STREET ADDRESS:                CITY:
         STATE:                         ZIP CODE:
         SALES PERSON:

248 BAY SERIES                                            5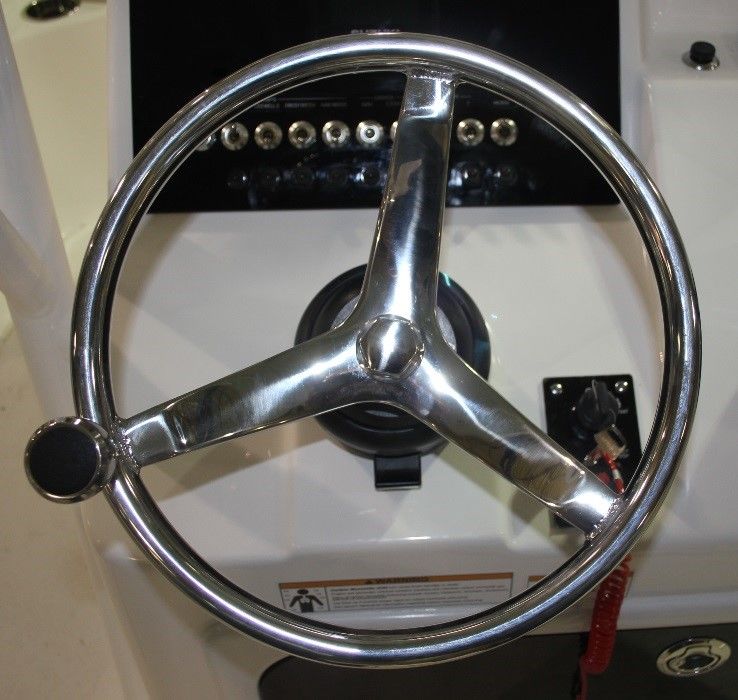
SPECIFICATIONS

                               248 SPECIFICATIONS
    Length                         24’ 8”
    Beam                            8’ 9”
    Fuel Capacity                  70 Gal
    Max Horse Power                300 H.P.
    Live Well (2 EA.)              30 Gal
    Deadrise @ Transom             15 Degrees
    Draft                          15”
    Fish Box                       150 Quarts
    Dry Weight (No Motor)          3000 LBS.

6                                                   248 BAY SERIES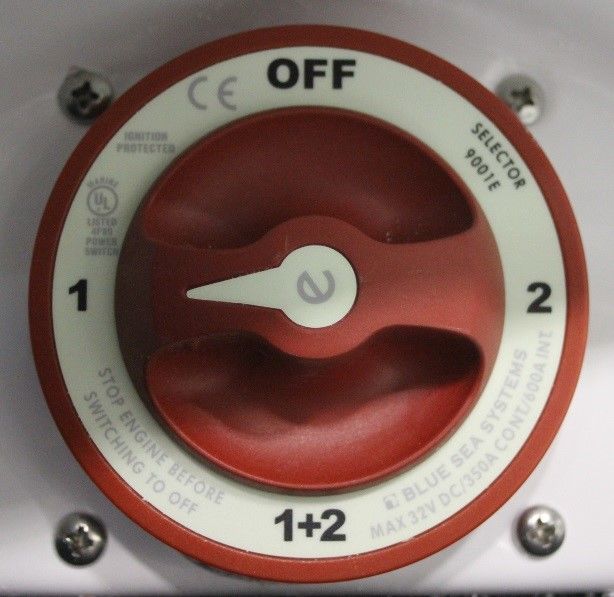
STANDARD FEATURES
•   Hand Laid Fiberglass Hull                                •   Aerated and Pressurized Bait Wells (2) with LED Lighting
•   100% All Composite Construction = No Rot                     and No Clog Drain System

•   10 Year Transferable Hull Warranty                       •   Easy Access Lazarette for Batteries and Seacocks

•   Lifetime Hardware Warranty                               •   Easy Access Trolling Motor Battery Floor Locker

•   5 Year Bow to Stern Warranty                             •   Trolling Motor Panel with TM Plug and Trim Switch

•   Hydraulic Tilt Steering                                  •   Automatic Bilge Pump

•   Composite Transom                                        •   Deluxe Console with Storage

•   Engineered Custom Fiberglass Stringer System             •   Windshield

•   SIMRAD Electronics                                       •   Compass / Horn

•   Custom High Volume Cockpit Drains                        •   Stainless Steel Cup Holders (6)

•   All Stainless Steel Forged Thru Hull Fittings            •   LED Courtesy Lights

•   All Stainless Steel Pop Up Cleats (5)                    •   Yachts Style Non Skid

•   Stainless Steel Rub Rail                                 •   1/2 Swim Platform with 3-Step Ladder

•   Stainless Steel Steering Wheel with Knob                 •   Deluxe Stainless Steel Bow and Stern Eyes

•   Custom Powder Coated Leaning Post                        •   Raw Water Washdown System

•   Custom Dash with Stainless Steel Switches                •   Stainless Steel Flush Rod Holders (4)

•   Forward and Rear Casting Decks                           •   Dual High Speed Pickups with Sea Cocks

•   Pop Up Rear Bench Seat with Dry Storage                  •   Polk Audio Sound System with 4 Speakers

•   Bow Lockable Rod Storage (2) with LED Lighting           •   12 volt DC Outlet

•   Large Insulated Fish Box                                 •   Dual Battery Switch

•   Custom Anchor Locker                                     •   Static (Manual) Jack Plate

•   Under Gunwale Rod Storage with Reel Pads
•   Under Gunwale LED Lighting

248 BAY SERIES                                                                                                          7
OPTIONAL FEATURES & HULL COLOR OPTIONS
Optional Features:                                     • Fresh Water Tank with Pull-Out Shower

• Custom Soft T-Top with Radio box                     • Hydraulic Jack Plate

• Deluxe Fiberglass T-Top                              • Bow and/or Stern Casting Chair

• Trim Tabs                                            • Custom Canvas Options (Spray Shield, Gull Wings, etc.)

• SIMRAD Electronics                                   • Fender Pro Bumper Attachments

• Deluxe Stereo Upgrade (Amp, Sub, 2 add’l Speakers)   Hull Color Options:
• Power Pole
• Deluxe Leaning Post with Tackle Storage
• Deluxe Tackle Storage (2)
                                                             I CE BLUE                           PLATINUM
• Tempered Glass Windshield
• Motor Guide Xi5 Trolling Motor
• Battery Charging System
                                                            SEA FOAM                              BLACK
• Pump Out Head
• Porta Potty
• Underwater Lights
• Bow & Stern Casting Chairs                                 ROYAL                               CAROLINA
• Flip-Up Leaning Post Bolsters
• Deluxe Café (Brown) Upholstery
• Bow Cushion                                             SEA CREATURE                            WHITE
• Helm Pad
• Mister Cooling System
• Turbo Swing Ski Tow
                                                                                SHARK GREY
• Optional Hull Colors

8                                                                                                    248 BAY SERIES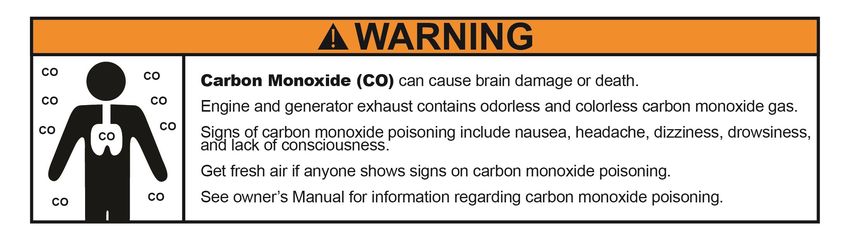
HULL IDENTIFICATION NUMBER & REGISTRATIONS

SEA PRO BOATS has a permanent record of your boat’s Hull Identification Number. This Hull Identification Number is
recorded during the manufacturing process. The Hull Identification Number is a 12 digit code located on the right
side of the transom, just under the rub rail. When contacting your dealer regarding maintenance or warranty
inquiries, please have your Hull Identification Number and SEA PRO Model Number on hand. This information can also
be found on your copy of the SEA PRO Warranty Certificate. Federal and State Laws require a power boat to be
registered in the state of primary use. Registration numbers and validation stickers must be displayed according the
local and state regulations. The registration certificate must be kept on board when boating. The Hull Identification
Number is required on the registration form. The Hull Identification Number should be included on all documents
and correspondence with the dealer or SEA PRO BOATS.

                                                     SPB XX XXX X X XX

                                                                                 •   Model Year (2 digits)
                                                                                 •   Year of Build (1 Digit)
                                                                                 •   Month of Build (1 Digit)
                                                                                 •   Serial Number (3 Digits)
                                                                                 •   Model Identification (2 Digits)
                                                                                 •   Manufacturer’s I.D. Code (3 Digits)

248 BAY SERIES                                                                                                         9
BOATING SAFETY
                                                       GENERAL SAFETY
NOTICE: As a boat owner or operator, YOU are                    people are swimming or participating in other water
responsible for Your Personal Safety, the Safety of Your        activities nearby, and when in close proximity to
Passengers , and the Safety of Other Boaters. SEA PRO           structures and other boats
BOATS suggests taking a Boating Safety Course in order         • Knowing the rules of the water and practicing them at
to prepare for safe and enjoyable experiences on the            all times
water. Boating Education Programs are offered by
                                                               • Being familiar with the traffic and geography of the
various organizations, such as the U.S. Power Squadron,
                                                                body of water on which your are boating
United States Coast Guard Auxiliary, and State and Local
Boating Authorities.                                           • Keeping safe distances from fishermen and boats not
                                                                under power
More information can be found by contacting the U.S.
Coast Guard’s Boating Safety Division website:                 • Being mindful of your wake. You are responsible for
                                                                any damage caused
      www.uscgboating.org
                                                               • Maintaining and ensuring your boat and it’s systems are
      1-800-368-5647
                                                                in proper working order
                                                               • Keeping all Legally Mandated Equipment is in proper
Boating Safety Means:                                           working condition
• Know the limitations of your boat and the capabilities
 and knowledge of the operator
• Never operate your boat while under the influence of
 drugs or alcohol
• Be aware of Your Passenger’s Safety at all times

• Reduce speeds when visibility is limited, in foggy
 weather, in rough waters, in congested areas, when

10                                                                                                           248 BAY SERIES
BOATING SAFETY
U.S. COAST GUARD MIINIMUM EQUIPMENT REQUIREMENTS FOR RECREATIONAL VESSELS
The U.S. Coast Guard requires that every recreational SOUND PRODUCING DEVICES:
vessel maintain the following minimum safety equipment Horn or whistle recommended to signal intentions or
in working condition at all times while your boat is in position. Your SEA PRO boat comes standard with an
operation. SEA PRO BOATS also recommends that you electric horn. SEA PRO BOATS recommends maintaining a
consult with your State and Local Boating Authorities secondary sound producing source on board at all times
for any additional equipment and safety requirements . in case of emergency situations.
PERSONAL FLOTATION DEVICES (PFD’S): NAVIGATION LIGHTS:
One Type I, II, III or V per person plus one Type IV throw Sidelights, stern light, masthead light and a 360o all-
able device. PFD’s must be Coast Guard Approved, around white anchor light capable of being lit
wearable by the intended user and readily accessible. The independently from the red/green/white running lights.
Type IV throw able device must be located such that it is
ADDITIONAL SUGGESTED EQUIPMENT:
immediately available.
In addition to the Minimum Required Equipment, SEA PRO
FIRE EXTINGUISHERS:
BOATS suggests the following items are on board for a
For Vessels up to 26’ in length: One B-I any type. safe boating experience:
For Vessels 26’ to 39.4’: One B-II or two B-I.
For Vessels 40’ to 65’: One B-II and one B-I or three B-I. • First Aid Kit
• Compass (properly adjusted)
VISUAL DISTRESS SIGNALS (ON COASTAL WATERS, GREAT
• Charts & Maps of the waters and local area
LAKES, AND RIVER MOUTHS GREATHER THAN 2 MILES
• Waterproof Flashlights
WIDE):
• Mooring Lines
Minimum of (3) day-use and (3)night-use or (3) day/night
• Tool Kit (basic hand tools, Bulbs, Fuses)
combination pyrotechnic devices. Non-pyrotechnic
substitutes: (1) orange flag (day-use) and (1) electric • Marine Radio
S-O-S signal light (night-use).
248 BAY SERIES 11BOATING SAFETY
Carbon Monoxide (CO)
passenger begins to suffer from any of these symptoms,
immediately move them to fresh air and investigate
possible causes. Immediately take corrective action and
seek Medical Attention if necessary.
Carbon Monoxide is a colorless, odorless, poisonous gas Carbon Monoxide can accumulate anywhere around the
that is contained in the exhaust produced by engines, vessel, especially near back decks, swim platforms, the
generators and other fuel burning appliances. When helm and inside enclosed areas.
inhaled it prevents the absorption of oxygen and can be Potential causes of Carbon Monoxide gas accumulation
fatal. and/or concentration include:
Signs and Symptoms of Carbon Monoxide poisoning may • A blockage of exhaust by a nearby obstruction,
include: dock, or barrier
• Headache • Idling in place for a prolonged period of time
• Weakness • Operating the vessel at a slow speed
• Dizziness • Operating the vessel at a high bow angle
• Nausea or Vomiting • Wind blowing from the rear (Stern) toward
• Shortness of breath occupants
• Confusion • Exhaust from other vessels nearby or in confined
areas
• Blurred Vision
Always maintain good air circulation across the areas of
• Drowsiness occupancy. Inspect the exhaust systems regularly.
• Loss of consciousness Operate any fuel burning appliances in areas with good
Do not confuse carbon monoxide poisoning with ventilation and where fresh air can circulate.
seasickness or intoxication. If the vessel operator or a
12 248 BAY SERIESBOATING SAFETY
BOATING NAVIGATION RULES
RIGHT OF WAY
In general, vessels with less maneuverability (Privileged) have right-of-way over more agile vessels (Burdened).
Following is an example of vessels that have right-of-way:
• Emergency Craft
• Vessels aground or not under command
• Vessels with restricted maneuverability
• Vessels engaged in fishing
• Vessels not under power (rowboats, canoes, sailboats, etc.)
There are three types of situations you may encounter with other vessels in which the Navigation Rules apply.
Meeting Head-On:
When two vessels meet head-on, neither has the right-of-way. It is preferred that both vessels decrease speed and
turn to the right in order to pass port-to-port. Each vessel may sound the horn or other sound producing device
with one short blast signaling a port-to-port pass.
248 BAY SERIES 13BOATING NAVIAGATION RULES CONT.
Crossing: Overtaking / Passing:
When two vessels will cross paths, the vessel to the right When a vessel (Burdened) overtakes or passes another
is the Privileged Vessel, and has right-of-way, and holds vessel (Privileged) from behind, the vessel being passed
course and speed. The Burdened Vessel must yield and has the right-of-way. The passing vessel must make any
pass to the rear (stern) of the privileged vessel. As with adjustments necessary to maintain safety and to remain
meeting head-on, both vessels may sound the horn or out of the way of the vessel being passed. The vessel
other sound producing device with one short blast. being passed should maintain it’s course and speed.
If passing on the Port If passing on the Star-
side, each vessel may board side, each vessel
sound the horn with two may sound the horn with
short blasts one short blast
14 248 BAY SERIESBOATING SAFETY
Safety Labels:
SEA PRO BOATS wants you and your passengers to have a
Safe and Enjoyable boating experience. Warning and
informational labels are located on your SEA PRO boat
calling attention to important information and potential
safety concerns. SEA PRO BOATS encourages you to
become familiar with these labels and their location. If
any of these labels become damaged, please contact your
local SEA PRO BOATS authorized dealer for replacements.
300 H.P. MOTOR 350 H.P. MOTOR
248 BAY SERIES 15POLLUTION REGULATIONS Annex V of Marine Pollution (MARPOL) 73/78 prohibits throwing, discharging, or depositing any refuse matter of any kind (including trash, garbage, oil, and other liquid pollutants) into the waters of the United States. The Federal Water Pollution Control Act prohibits the discharge of oil or oily waste upon or into any navigable waters of the United States. This prohibition includes any discharge that causes a film or discoloration of the surface of the water, or causes a sludge or emulsion beneath the surface of the water. Violators are subject to substantial civil and/or criminal sanctions, including fines and imprisonment. The U.S. Coast Guard regulations strictly prohibit dumping of plastic refuse or other garbage mixed with plastic upon or into the waters anywhere. Plastic refuse kills fish, birds, and marine wildlife, can interfere with vessel propellers and can clog water and cooling intakes, and litters the shore and beaches. 16 248 BAY SERIES
SYSTEMS & COMPONENTS
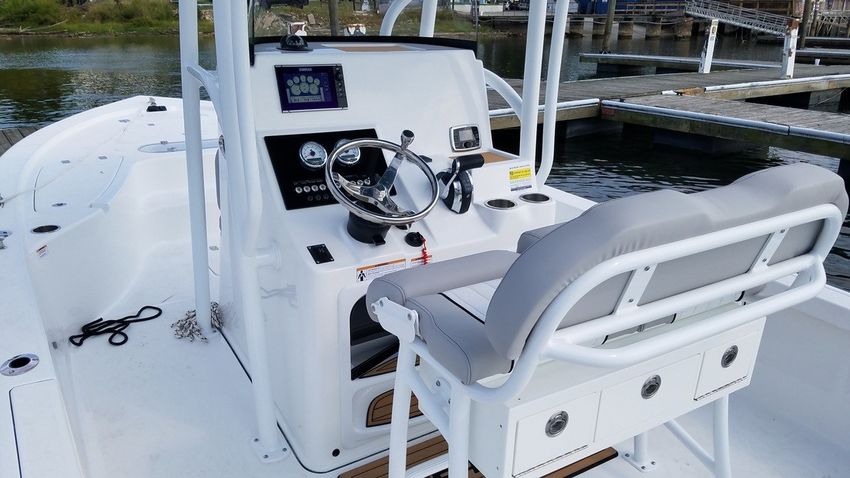
Helm Station:
The Helm Station is located in the Cockpit of the Vessel,
and is the area equipped with the tools and features that
allow operation of the vessel.
• Battery Selector Switch
• Engine Shutdown Safety
Switch
• Engine Controls
This switch allows the operator to provide power to and
• Steering Controls
disconnect power from the operating systems.
• Helm Switch Panel
There are four (4) switch positions (OFF, 1, 2, 1 +2) that
• Instrumentation & provide the following functions:
Navigation (*Optional Equipment)
OFF: In this position, power is disconnected from all
• Audio / Stereo (*Optional Equipment) systems, and should be used when the vessel is being
• Compass stored or not in use. This prevents any unnecessary
*See Owner’s Manuals for Optional Equipment Installed power drain from the batteries should an operating
system be accidentally left on.
Battery Selector Switch Compartment & Switch:
1 or 2: In these positions, all power and current is
supplied from either the Starboard (1) or Port (2) battery,
and the charging current from the engine will be
directed to the selected battery. The opposite battery is
now completely isolated, and does not provide any
current to the operating systems nor does it receive any
charging current from the engine.
1+2: In this position, both of the batteries are now
connected in parallel, with both providing power and
Located at the lower part of the Helm is a compartment current to the operating systems and receiving charging
which contains the Battery Selector Switch. current from the engine.
248 BAY SERIES 17SYSTEMS & COMPONENTS
Engine Shutdown Safety Switch:
Your SEA PRO boat is Equipped with an Engine Shutdown When the switch clip is pulled/removed from the
Safety Switch. The Safety Switch is located below the Shutdown Switch, the engine will immediately be shut
Shift/Throttle Control Unit, on the Ignition Panel, and down. This Shutdown control is designed so that if an
includes the following components: emergency occurs, the engine will be shut down and the
vessel will not become out of control or a runaway
vessel. The Engine shutdown will occur should the
operator leave the Helm/Controls, be accidentally
Shutdown Switch knocked down inside the vessel or be ejected overboard
from the vessel. The lanyard should be long enough to
prevent inadvertent Engine Shutdown.
Switch Clip
Before starting the engine, take the following steps:
• Ensure the Switch Clip is fully secured in the
Shutdown Switch
• Ensure the Lanyard is not tangled or wrapped
Lanyard around any objects
• Secure the Lanyard Operator Clip to the Vessel
Operator
Lanyard Operator Clip
WARNING: Never remove or modify the Engine Shutdown
Safety Switch. Regularly check that the Shutdown
Switch is in working condition. Should the Shutdown
Switch become inoperable and does not shut down the
Engine when the Switch Clip is removed, have the switch
repaired before continuing to operate your vessel.
18 248 BAY SERIESSYSTEMS & COMPONENTS
Engine Controls: Specifications.
Located on the main horizontal surface, and to the right Every Engine and Shift/Throttle Control unit comes with
of the steering are the Engine Controls. These consist of a function allowing the engine to be operated at a higher
the Ignition, Shift/Throttle Control and Engine Tilt/Trim than idle RPM range while in Neutral for Cold Starting
Control. and Warm-Up purposes.
Ignition: Every engine comes with a specific Key and/or Refer to the Engine Owner’s Manual for Operation and
Push button ignition control. Placing the key into the Specifications.
panel and either turning to the right or pushing the
button will engage the engine starter and will start the
Engine Power Trim / Tilt: All engines mounted on a SEA
motor. Refer to the Engine Owner’s Manual for
PRO boat have a Trim & Tilt control module located on
Operation and Specifications.
the binnacle lever. This
control module allows the
Shift/Throttle Control: Your Sea Pro boat comes with a operator to control the
binnacle style lever that controls the forward, reverse position of the outboard
and neutral gear selection, as well as the throttle motor while at the helm.
control. of the motor. Trim refers to the position and
Neutral = Straight Up and Down range of travel of the motor
within the first 20 degrees.
Forward = 1st detent position forward of Neutral.
This is the range for operating your vessel while on
Reverse = 1st detent position aft of neutral. Plane. Trimming the motor “down” refers to bringing it
Advancing the binnacle lever beyond the 1st detent in closer to the transom. Trimming the motor “up” refers
either direction increases the throttle demand. to moving it further away. Utilize the Trim to adjust the
angle the vessel will run in the water to optimize
Your Shift/Throttle control system also includes a
performance. Tilt refers to the position of the motor
Neutral Safety Switch that prevents the engine from
beyond the first 20 degrees and is used when travelling in
being started while the binnacle lever is in any position
shallow water or trailering of your vessel.
other than Neutral. Thus preventing accidental
movement of the vessel when starting the engine. Refer to the Engine Owner’s Manual for Operation,
Maintenance and Specifications.
Refer to the Engine Owner’s Manual for Operation and
248 BAY SERIES 19SYSTEMS & COMPONENTS
There is a secondary Trim Control located at the Bow, in steering wheel in five positions for comfort. Activate
the panel provided for the plug in of a trolling motor. the tilt lock lever below the steering wheel to adjust the
This rocker switch will allow position. Releasing of the lock lever will lock the
the operator to adjust the Trim steering wheel into the desired angle and position.
of the motor while operating
the vessel during trolling, and
during fishing activities. Easy Access Reservoir:
There is a reservoir fill cap
located on the helm for adding
Steering Controls: hydraulic fluid and for service.
Your SEA PRO boat has
been equipped with a
Stainless Steel Steering
Wheel and Hydraulic
Steering System. The helm If your SEA PRO boat has been equipped with a steering
unit includes a reservoir system other than hydraulic, please refer to the Engine
and pump that pumps Owner’s Manual for Operation, Maintenance and
hydraulic fluid to the Specifications.
steering cylinder located
on the motor bracket
causing the motor to turn.
5-Position Tilt:
The Steering System also
includes a Tilt Wheel
Feature, which allows the
operator to position the
20 248 BAY SERIESSYSTEMS & COMPONENTS
Helm Switch Panel:
The Helm Switch Panel contains all of the Activation • LIGHTS - CTSY/LIVE: This is a three-positon switch.
Switches and Circuit Breakers that control the Horn and Middle is the Off position. Up activates all of the
12-volt features installed on your vessel. This panel also vessel’s courtesy lights as well as the livewell lights.
includes a 12-volt Power Accessory Port. The circuit Down activates only the livewell lights.
breaker for each switch/function is located directly • ACCESSORRY - 1, 2, and 3: These activate any 12-Volt
below that switch, and can be reset by pushing in the Custom installed features or equipment
button.
• HORN: Activates the vessel’s horn and has an auto-
reset position feature
The 12-Volt Power Accessory Port maintains power as
long as the Battery Selector Switch is in an “on” position.
FPO
Compass:
Your SEA PRO boat comes standard with a Explorer
• PUMPS - BILGE: Activates the bilge pump located in the Surface Mount compass. Please refer to the compass
bilge instructions for compensating and adjusting your
• PUMPS - LIVEWELL 1 & LIVEWELL 2: Activates the pumps compass once all electrical equipment and unique
that supply water to the livewells electronics are installed in your vessel, and once the
vessel is located in it’s operational area.
• PUMPS - FRESH WATER: Activates the pump that supplies
fresh water to the boat’s fresh water & shower system
• PUMPS - RAW WATER: Activates the pump that supplies
raw water to the boat’s washdown system
• LIGHTS - NAV: This is a three-position switch. Middle is
the Off position. Up activates the Navigation,
Instrumentation and Compass lighting. Down activates
only the Anchor Light
248 BAY SERIES 21SYSTEMS & COMPONENTS
Bilge Pump:
The Bilge of your SEA PRO boat can be accessed through NOTE: The bilge pump is wired to have a constant power
the Bilge Door located just forward of the transom. supply from the batteries, even when the Battery Selector
Switch is turned to the “OFF” position. This allows the
bilge pump to operate when the vessel is left unattended.
A Bilge Pump has been It is important to keep debris and build up away from the
installed to remove any Free-Float switch to prevent unnecessary pump operation
excess water accumulation and drain of the batteries.
that may collect during
NOTE: Regulations prohibit the discharge of fuel or oily
operation in rough waters,
waste in the navigable waters of the U.S. The bilge pump
due to weather conditions,
is not intended to pump fuel or oily waste overboard. If
or other scenarios.
there is a build up of fuel or oily waste in the bilge, use
other methods of removal or seek the assistance of a
The bilge pump can be manually operated with the switch marine service professional.
located on the Helm Switch Panel labeled “PUMPS -
BILGE”, and is also automatically activated by a Free-Float
Refer to the Bilge Pump Owner’s Manual for further
switch that turns the pump on when water collects
instructions, maintenance, and specification
inside of the bilge to a predetermined level. This allows
information.
the pump to perform it’s operation when the vessel is left
unattended.
The water will exit the bilge
via a Thru-Hull fitting
located on the starboard side
of the vessel, at the rear.
22 248 BAY SERIESSYSTEMS & COMPONENTS
Live Wells: Located under the rear
bench seat are the drain
Your SEA PRO 248 BAY BOAT is equipped with two (2) 30-
valves for each of the
gallon pressurized Full-Fill livewells, one located on the
livewells. The port valve
forward deck, and one located on the stern deck.
controls the livewell
located at the bow
(forward livewell), and the
starboard valve controls
the aft livewell.
CLOSED OPEN
These livewells come with a customized clear acrylic lid
with the SEA PRO logo engraved into the acrylic.
The full-fill, pump operated, feature reduces water
turbulence inside of the compartment, providing a more
stable environment, thus reducing stress and fatigue and
resulting in healthier, longer lasting bait. The drain valves are closed when the handle is in a
Vertical position, and are open when moved to a
Horizontal position.
The Livewell pumps and seacocks can be accessed through
Prior to operating your livewell pumps, ensure you have
the lazzarette door located in the floor of the cockpit.
performed the following steps for each of the livewells
you intend to use:
1. Open the Seacock located at the bottom of the pump.
This allows water to enter the pump via the thru-hull
fitting. Running your livewell pump dry could result
OPEN
in damage to the pump.
CLOSED
2. Close the Drain Valve by moving the valve handle into
The seacock is closed when the handle is in a horizontal a Vertical position. This will close the drain and
position, and is open when moved to a vertical position. allow water to fill the livewell tank.
248 BAY SERIES 23SYSTEMS & COMPONENTS 3. Open the flow control valve (rotating counter- clockwise), located at the top of the livewell, to allow water to flow from the pump into the livewell. 4. Turn the livewell pump on by flipping the switch on the Helm Switch Panel that correlates to the livewell you are intending to operate. Once the water is pumping into the livewell, and has filled the tank completely, adjust the flow control valve to regulate the flow of water so there is a balance between the incoming water flow and the exiting water flow through the overflow valve. Rotating counter- clockwise will open the valve, allowing more flow, while rotating clockwise will close the valve, reducing the flow. To drain your Livewells, flip the switch on the Helm Switch panel to turn the pump off, close the seacock, and position the drain valve to a Horizontal position in order to open the valve. Refer to the Pump Owner’s Manual for further instructions, maintenance, and specification information. 24 248 BAY SERIES
SYSTEMS & COMPONENTS
Navigation / Anchor Lighting:
Your SEA PRO boat has been equipped with navigation           For vessels without a T-Top:
lights that are required by the U.S. Coast Guard. The use     The mounting receptacle is located at the stern, on the
of navigation lights are required during the time             starboard side of the vessel. Flip open the cover and
between sunset and sunrise, and during any period of          insert the 360o Light Pole and rotate clockwise to lock
low visibility (fog, rain, etc.).                             into place.
The sidelights on your vessel are
bright LED’s and have been
incorporated into the rub rail and
located at the bow.
To activate the Navigation Lights, flip the 3-way switch on

                                                              For vessels with a T-Top :
                                                              If your vessel has been outfitted with a T-
                                                              Top, this 360o light will be located on the
the Helm Switch Panel labeled “LIGHTS - NAV” Up.              top, at the rear. The light is mounted on
The starboard (right) side light is GREEN and the Port        an adjustable, lever-lock, base that allows
(left) side light is RED.                                     it to be stowed in a horizontal position,
                                                              and then raised into a vertical position
                                                              for use. Unlock the base by flipping the
The 360o all-around/anchor light is also LED                  lever down, position the light as desired,
and is WHITE, and it mounted on a stainless                   then flip up the lever to lock into place.
steel pole.

248 BAY SERIES                                                                                                          25
SYSTEMS & COMPONENTS
Trim tab Control:
Trim Tabs are an option that may be installed on your SEA The Port and Starboard
PRO boat. The Trim Tabs will be attached at the transom, Trim Tabs can be
close to the bottom edge, Port and Starboard. operated independently.
LED’s provide visual
indication of the
position of each tab, and
control labels indicate
BOW Down or UP
operation.
Refer to the Owner’s Manual for further operation,
Trim Tabs are used to adjust the level of the vessel fore maintenance and specification information.
(front) and aft (back), thus adjusting how the vessel
performs while in operation. “trimming” the tabs down
causes upward pressure of the water to increase the Static Jack Plate:
riding level of the transom, which will lower the bow. A “Static” (manually adjusted) Jack
Benefits of a properly “trimmed” boat can: Plate has been installed on your SEA
• Increase operator visibility PRO boat as a standard feature. A
• Decrease time required to get vessel on plane Jack Plate can improve the
• Increase fuel economy
performance of any boat by allowing
you to raise and lower your
• Decrease wear on the engine
outboard motor, positioning the
• Improve steering operation motor height in a precise position for
• Increase speed and performance the current conditions.
• Balance weight distribution The Z-LockTM Manual Jack Plate;
• Correct listing caused by strong cross winds
• eliminates side to side slippage.
• Improve handling in choppy or rough water
• Has 5” of vertical adjustment.
The control panel for the Trim tabs is located on the
• Made from Aircraft Grade Aluminum.
Helm.
26 248 BAY SERIESSYSTEMS & COMPONENTS
Hydraulic Jack Plate: Power-Pole®:
A hydraulically controlled Jack Your SEA PRO boat may have a Power-Pole®
Plate is and optional feature that shallow water anchor system installed as
may have been added as an an optional equipment upgrade. The
equipment upgrade. The ATLAS™ Power-Pole® system uses a hinged light
Hydraulic Jack Plate; weight metal arm that extends down and
• Can lift the motor from away from a the boat’s transom.
bottom to top in less than A hydraulic pump drives the integrated
8 seconds. fiberglass spike into the bottom to hold
• Has a self contained hydraulic pump system (no the boat in the prime position. The Power-
reservoir or lines to install) Pole® Blade™ edition is stronger, faster,
• Has 7” of vertical adjustment.
and better. You can securely stop on
command in a depth up to 10 feet. Anchor lengths come
in either 8 or 10 foot lengths, and hold in fresh or
The control switch panel is located on saltwater. The rugged Everflex™ spike is virtually
the helm and provides the operator unbreakable and stows away quickly and quietly into the
with the ability to adjust the height of pocket design of the aerodynamic system.
the Jack Plate on-the-fly with the
hydraulic pump. This is a toggle The system comes with two control units.
activated switch. The Surface Mount Switch is
traditionally mounted on the helm
and features three speed settings,
Top performance comes from a combination of Engine independent control of multiple
Trim and Engine Height. All boats differ as to what the anchors and a double click Auto Up/
best combination is. Down feature.
Refer to the Jack Plate Owner’s Manual for further
operation, maintenance and specification information.
The take anywhere Key Fob features
Manual or double-click Auto Up/
Down controls
248 BAY SERIES 27SYSTEMS & COMPONENTS
Raw Water Washdown:
Your SEA PRO 248 is equipped with a Raw Water The outlet connection includes a tethered
washdown feature. The ability to rinse down the deck cap that should remain in place on the
and other parts of the boat helps to maintain the outlet when the system is not in use.
condition, cleanliness and value of your boat. The system
supplies water from a pump via a thru-hull fitting and
1. Open the Seacock located at
seacock to a standard hose connection.
the bottom of the port
The pump is located in the livewell pump. The seacock is
Lazzarette compartment, closed when the handle is in
in the cockpit, along with a horizontal position, and is
the livewell pumps. The open when moved to a OPEN
washdown pump accesses vertical position.
water through the same
2. Remove the water outlet cap and connect a hose with
seacock and thru-hull
a standard garden hose fitting.
fitting as the port
livewell pump. Therefore 3. Activate the pump by flipping the switch on the Helm
it is imperative that the seacock lever be in the open Switch Panel labeled “PUMPS - WASHDOWN”.
position prior to using the washdown system. The Regularly check all fittings and
washdown pump is activated by the “PUMPS - connections for leaks and
WASHDOWN” switch located on the Helm Switch Panel. periodically check the inline strainer
The water outlet and standard garden hose connection located at the pump and clean when
are located at the aft, necessary..
below the starboard Be sure to remove the hose, replace the outlet cap, and
storage compartment. It FPO close the port livewell pump seacock when use of the
will be next to the deluxe washdown system is complete.
tackle storage
compartment if your SEA Refer to the Pump Owner’s Manual for further
PRO 248 has been instructions, maintenance, and specification
outfitted with them. information.
28 248 BAY SERIESSYSTEMS & COMPONENTS
Fresh Water System: the helm, mounted on the port side helm wall.
Turn the pump on to pressurize and use the system by
Your SEA PRO 248 may be equipped with an optional Fresh
flipping the switch on the Helm Switch Panel labeled
Water Tank and Shower system. A freshwater pump
“PUMPS - FRESH WATER”
delivers water to fixtures onboard the boat. Pressurized
water systems make life aboard more comfortable by
It is always a good idea to completely drain the remaining
providing water “on tap” for showers and other
water from the fresh water tank after each outing. This
applications.
will ensure that there is no standing water to become
The Fresh Water Tank Fill Cap and stagnant and not usable. It is recommended to sanitize
Inlet and the Shower Unit Cap the fresh water tank and system as part of a regular
and Hand-held Shower are maintenance schedule.
located on the port side of the
Helm Station. To sanitize this system:
• Dilute 1/4 cup of household bleach for each 15 gallons
of capacity into a gallon of water. Add this solution to
Shower Unit Cap the tank and Fill with fresh water.
• Let stand for three hours.
Fresh Water Tank Fill Cap • Completely drain the tank using the shower unit.
• Fill the tank with clean fresh water, and let stand for
an additional two to three hours.
• Completely drain the tank.
To access and use the hand-held shower
unit, flip the Shower Unit Cap up and • If there is a smell of bleach remaining in the tank,
gently withdraw the Shower Unit from perform an additional fresh water rinse.
the compartment. Note the position of
the trigger so that replacement and
storage of the Shower Unit is correct.
The pump for the Fresh Water System is located inside of
248 BAY SERIES 29SYSTEMS & COMPONENTS
Fuel System: • Hydrocarbon Emissions released into the
atmosphere: Improper venting and vapor
Diurnal Vapor and Emission Control Integrated control can allow untreated hydrocarbon
Fuel System: emissions to be released into the atmosphere.
Your SEA PRO boat has been outfitted with a • Fueling Spit-Back and Spillage: over-filling of
Technologically Advanced marine fuel system that fuel and the unchecked increase in pressure can
exceeds the Performance, Safety and Environmental cause fuel to dangerously spit back through the
Protection Criteria as outlined and required by the fueling fill cap onto the operator and polluting
Environmental Protection Agency, U.S. Coast Guard and waterways and the environment.
Marine Industry standards and practices. This fuel
The Fuel Tank in your SEA PRO boat has been
system meets Fuel Tank Permeation requirements,
manufactured using a ceramic coated aluminum. This
Hydrocarbon Emission controls, Proper Fuel Vapor
tank material increases the fuel system’s performance;
Release and Elimination of Fuel Spit-Back events.
• The ceramic coating helps to insulate the fuel
What is Diurnal Vapor?
tank contents which decreases the temperature
The temperature variation that occurs during the variance, decreasing the effects of fuel expansion
normal day-night cycle of each 24 hour day is and fuel vapor pressure increases.
called a Diurnal Temperature Cycle. The heat of
• Tank structure strength and consistency also
ambient air during the day can cause gasoline
helps to decrease the effects of fuel expansion
temperatures to rise inside of a tank, causing fuel
and fuel vapor pressure increases by creating
expansion and an increase of fuel vapors.
physical stability.
This fuel expansion and increase in vapors can increase
Most marine fuel systems can be broken into two
pressure build up in a fuel tank and system causing the
categories, Passive Purge and Vapor Pressure Relief. most
following problematic issues to occur;
recreational vessels have either one or the other
• Fuel Tank Vapor Permeation: During the height installed as it’s primary system to control Diurnal Vapor.
of a diurnal cycle, a tank that has been Your SEA PRO boat has been built with a Hybrid Fuel
manufactured using a permeable (permitting system comprised of BOTH of these.
liquids or vapors to pass through) material will
The Fuel System Diagram on the next page has each
release more fuel vapors into the environment
component labeled and shows the configuration of the
than allowed by regulations.
SEA PRO Hybrid Fuel System.
30 248 BAY SERIESSYSTEMS & COMPONENTS
Fuel System Diagram:
Fuel Vapor Deck Fill / Vent Com-
bination Cap
P-Trap & Thru
Hull Exit Carbon Canister
Deck Fill Inlet
Fuel Inlet Control Valve
Grade Valve (In-Line or On-tank)
Fuel Limit
Vent Valve
Fuel Tank Anti Siphon Valve
248 BAY SERIES 31SYSTEMS & COMPONENTS
Diurnal Vapor and Emission Control Integrated of the harmful hydrocarbons, and releases it through
Fuel System Performance: the P-Trap.
Normal Fuel Filling Event: If the tank is filled to the level that causes the Fuel Limit
Vent Valve to close, the Grade Valve will allow the
the fuel nozzle is inserted into the Fuel Inlet, and as fuel emissions to travel the same path, through the Carbon
begins to enter the tank, there will be a slight immediate Canister and through the P-Trap.
increase of tank pressure that is managed as the Fuel
When the ambient temperature decreases, the contents in
Limit Vent Valve vents air and fuel vapors;
through the Carbon Canister and ultimately out
the fuel tank will condense. Fresh air is allowed to enter
through the P-Trap through the P-Trap, the Carbon Canister, the Fuel Limit
and the through the fuel Vapor & Fresh Air Vent Vent Valve and into the tank, allowing the system to
line and out through the vent in the Fuel Cap breath, stopping a potential vacuum effect.
When the fuel level reaches the Fuel Limit Vent Valve
Sensor, at a pre-determined safe level, the valve closes
Over Pressurization or Prolonged Inclination of
and halts the exiting air and fuel vapors. This causes an the Fuel Tank:
immediate increase in pressure that triggers the Inlet Due to extreme temperature fluctuations, or a prolonged
Control Valve to close, stopping the flow of fuel into the period of inclination, the fuel level of vapor pressure
tank. When the Inlet Control Valve closes, the fuel fills could cause both the Fuel Limit Vent Valve and the Grade
the inlet line, reaching the filling nozzle. The fill nozzle Valve to close, halting the normal vapor escape. Pressure
will turn off and the fuel flow will stop when the tank is will continue to build inside of
full and prior to fuel spitting back out of the deck fill. the tank, and will build above
After the filling event is complete, the pressure will the Fuel Inlet Control Valve.
gradually decrease inside of the tank, the Inlet Control This creates a potentially unsafe
Valve will open, and the balance of the fuel in the inlet environment. To alleviate this
line will be released into the tank. situation, there are sensors
Diurnal Emission Control: built into the Deck Fill Cap that
will open the vent valve inside
When the ambient temperature increases, fuel expansion of the Deck Inlet, releasing the
occurs and vapor pressure increases. The Fuel Limit Vent pressure and relieving the
Valve will allow the emissions to escape through the system. Once the cause is corrected, the system will
Carbon Canister, which scrubs and cleans the fuel vapor return to the normal venting operation.
32 248 BAY SERIESSYSTEMS & COMPONENTS
If the P-Trap is closed or blocked from allowing vapor to the engine. Water can rust and corrode internal engine
escape through the system, the vapors will escape parts. Microbes can grow in the presence of water,
through the Fuel Vapor & Fresh Air Vent line, and creating sludge and clogging the engine and it’s
through the vent in the Deck Inlet. components.
The fuel travels into the Fuel / Water Separator and
through a coalescing micron filter that changes small
Fuel / Water Separator:
water particles into larger droplets. Being that water is
Every SEA PRO boat is fitted with a Fuel /
heavier than fuel, these droplets fall by gravity, to the
Water Separator. This filter is located in
lower part of the filter, with the clean fuel floating on
the bilge compartment, and normally
top. The clean fuel exits the top of the separator and on
mounted to a vertical wall or surface.
to the engine.
Water is the most common contaminant
It is imperative to regularly inspect the bowl, or lower
found in fuel, and is common found in
part, of the separator. As the separator performs it’s job,
the fuel system of recreational vessels.
water will continue to collect in the lower unit.
• Ethanol-boosted gas attracts Eventually, if the water is not drained from the unit, and
water in vessels that go unused it collects to the top of the exiting connection,
for prolonged periods. contaminated fuel will begin to travel to the engine
• The air space inside of a fuel tank that is less-than- causing performance issues and potential damage.
full contains moisture. Over time, moisture It is also recommended to change your Fuel / Water
condenses inside of the tank. Separator’s filter media during regular service intervals.
• Water can intrude fuel storage tanks through It is YOUR responsibility to determine maintenance and
poorly sealed fuel caps and vents. care intervals based on your usage of the boat and the
• Water can be introduced into the fuel directly by operating environment.
the supplier. Refer to the Engine Manufacturer Owner’s Manual for
Water is heavier than fuel, and over time, water can further instructions, maintenance, and specification
collect at the bottom of the fuel tank with the fuel information, or contact your local SEA PRO BOATS
floating on top. This water will enter the fuel lines going authorized dealer for assistance and further
to the engine and must be removed in order to protect information.
248 BAY SERIES 33MAINTENANCE
Routine Care & Maintenance: dirt / debris, ensure your SEA PRO boat has been
thoroughly washed and rinsed prior to waxing.
NOTE: Refer to the individual Manufacturer Owner’s
Use a high quality was designed for marine gel
Manuals for detailed information related to Service,
coats. Refer to your SEA PRO BOATS authorized
Care, Maintenance and Repair of those specific
dealer for suggested brands.
components.
• General Hull and Deck Surface Washing: Always
Routine inspection and maintenance of your SEA PRO
use a cleaning agent that is suggested for use on
boat and it’s systems ensures safe boating experiences and
marine gel coats. If using a pressure washer to
prolongs the life of your boat and it’s systems.
clean these surfaces, it is important that a Wide
The following information is for general guidelines only. Pattern nozzle is used, and the spry head is
It is YOUR responsibility to determine maintenance and continuously in motion. Do not concentrate high
care intervals based on your usage of the boat and the pressure on a small area. A pinpoint nozzle or
operating environment. This information may not cover concentrated stream could damage the finish and
all systems or additional components that have been surface of your boat. SEA PRO BOATS does not
customized or installed by the dealer or owner. recommend pressure washing of the Helm and
• Hull Exterior: Algae and Slime growth can affect Console. Damage could be done to the
the performance and overall look. This growth electronics, gauges, and controls.
can be removed with a coarse towel or soft • Stainless Steel Trim & Fittings: Even though
bristle brush. If the growth is severe, or has been stainless steel is corrosion resistant, it still
allowed to dry and harden on the boat surfaces, requires care and maintenance. The presence of
it may be necessary to seek the services of a salt particles can cause spots, pitting and
professional hull cleaning company. Refer to corrosion. Frequently wash and clean the
your SEA PRO BOATS authorized dealer for stainless steel trim and fittings with a mild soap
assistance. or solution suitable for use on stainless steel. A
• Gel Coat: The gel coat will be protected and last coating of cleaning wax will help maintain the
longer with regular cleaning and waxing. It is finish and sheen. Apply with a clean, soft cloth,
recommended to wax your exterior surfaces at allow to dry, then polish and buff with additional
least twice per year. Your usage and operating clean, soft cloths. Never use abrasive cleaners,
environment may dictate additional waxing abrasive pads, or strong solvents.
intervals. Do not wax over growth or surface
34 248 BAY SERIESMAINTENANCE
• Cushions and vinyl materials: Saltwater, dirt, for proper cleaning of the terminals and
debris, chemicals, and UV rays can cause damage maintaining proper fluid levels. Batteries will
to these materials over time, causing them to self-discharge during extended periods of non-
discolor, lose their texture, and tear. Remove use, and should be recharged properly prior to
ordinary dirt and surface debris with a mild being put into service. Disconnect the battery
detergent and a soft cloth. More stubborn terminals (Negative (-) first) and remove the
stains can be removed with a solvent solution. battery from the boat for proper recharging
Refer to your SEA PRO BOATS authorized dealer according to the Battery Owner’s Manual.
for assistance and suggestions. To prevent • Steering Controls: Inspect and check the
mildew, keep these surfaces dry and do not let hardware and connections at the helm, stern and
moisture accumulate and stand for long periods engine to ensure they are tight and leak-free. If
of time. your boat has a hydraulic steering system
• Tempered Glass Windshield: Always use a installed, regularly check the fluid reservoir and
commercially available glass cleaner or a mixture top off as necessary.
of water and vinegar to clean your windshield. • Hardware, Fasteners and Fittings: Regularly
Dry and polish the glass with soft cloths. Never clean all hardware, hinges, latches, cleats and
use harsh chemicals or abrasive materials. fittings with approved marine cleaners or a mild
• Instrumentation and gauges: Never use abrasives soap solution. Ensure all fasteners are tight and
or harsh chemicals, as these will cause damage to secured. Repair or replace any items that need
the surface and components. Refer to the specific attention. As with Stainless Steel, a marine grade
Manufacturer Owner’s Manual for detailed wax application can extend and maintain the
cleaning procedures. finish and sheen.
• Battery: Always turn the Battery Selector Switch • Aluminum Hardware: Frequently wash and clean
to the “OFF” position prior to servicing the the aluminum hardware with a mild soap or
battery. Ensure the battery terminals are clean. solution suitable for use on aluminum. A coating
Ensure the cable connections are tight, secure with aluminum metal protectant or A coating of
and clean. When removing a battery from the cleaning wax will help maintain the finish and
boat, remove the Negative (-) cable first. When re- sheen. Never use abrasive cleaners, abrasive pads,
installing a battery, always attach the Negative (-) or strong solvents.
cable last. Refer to your Battery Owner’s Manual
248 BAY SERIES 35MAINTENANCE
• Livewells, Coolers, Fish boxes: Rinse and • Seacocks, Pumps & Valves: Regularly check the
Completely drain the water in these areas after fittings and valves of each seacock and pump for
each use. This will help lesson the chance of leaks and proper operation. Clean or replace
stagnation and unwanted growth. strainers and filters as necessary.
To sanitize these compartments:
• Dilute 1/4 cup of household bleach for each
15 gallons of capacity into a gallon of
water. Add this solution to the
compartment and Fill with fresh water.
• Let stand for three hours.
• Completely drain each compartment.
• Fill each compartment with clean fresh
water, and let stand for an additional two
to three hours.
• Completely drain each compartment.
• If there is a smell of bleach remaining in the
compartment, perform an additional fresh
water rinse.
As an alternative to using a bleach solution:
• Mix a few tablespoons of baking soda in a
gallon of water. Use the solution with a
rag or soft bristle brush to scrub the
surfaces of each compartment.
• Completely rinse and drain each
compartment using a hose and fresh water.
36 248 BAY SERIESSTORAGE
Storing your SEA PRO boat for an extended period of non lubricant.
-use requires special preparations to prevent damage to Fresh Water Washdown: If your SEA PRO boat has a fresh
the boat and it’s systems. water washdown system installed, turn on the pump,
The following information is for general guidelines only. open all connections and outlets, and drain all water
Always refer to the manufacturer Owner’s Manuals for from the fresh water tank and lines. Run the pump until
specific instructions and information pertaining to those the system is completely empty. Add a non-toxic
systems and components. antifreeze solution to the tank. Run the pump until the
It is always a good idea to consult your SEA PRO BOATS antifreeze solution is running out of all connections
approved dealer or a certified marine technician before and outlets.
performing Winterization and Storage procedures. Raw Water Washdown: Open the seacock that supplies
Fuel System: Fill the tank completely (100%) full with water to the raw water washdown pump allowing all
fresh fuel and add a quality fuel stabilizer, following the water to drain from the system. Open the cap at the
manufacturer’s instructions, to provide stability and outlet connection. Run the raw water washdown pump
corrosion protection. This also prevents the formation for a short time to drain any residual water in the pump
of varnish and “gumming” of the lines and pump. and lines. Remove the inline strainer and empty any
water in the strainer and lines.
Engine: Replace the engine oil and filter. Flush the
engine with fresh water and let it completely drain. Livewell Pumps & Seacocks: Open all seacocks, allowing
“Fog” the engine with a corrosion-preventing fogging oil all water to drain from the pumps and lines.
according to the engine manufacturer’s Drains, Manifold and Bilge Plug: Open the drain plug and
recommendations. Run fuel (ensure the fuel system has check that all debris has been cleaned and removed from
been treated with fuel stabilizer) through the engine. around all drains, the single port manifold, and the
This ensures that all fuel lines and the engine contain bilge drain plug. This ensures that any moisture that
fuel that has a stabilizer mixed with it. enters the boat can drain properly.
Lower Unit: Replace gear oil, checking for any moisture Batteries: Remove the batteries and perform the
which could show a sign of deteriorating seals. necessary maintenance as outlined in the Manufacturer
Propeller: Remove the prop and apply a coating of grease Owner’s manual. Store the batteries out of the boat and
to the shaft and threads. in a safe location. Clean the cable terminals and apply a
coat of battery cable grease.
Grease Fittings: treat all fittings with the recommended
248 BAY SERIES 37RECOMMISSIONING AFTER WINTERIZATION OR STORAGE
After your SEA PRO boat has been winterized or put into and outlets. Drain the system and sanitize the
storage, it is necessary to perform proper steps to tank and lines.
prepare it for use and operation. • Dilute 1/4 cup of household bleach for each
The following information is for general guidelines only. 15 gallons of capacity into a gallon of
Always refer to the manufacturer Owner’s Manuals for water. Add this solution to the fresh water
specific instructions and information pertaining to those tank and fill with fresh water.
systems and components. • Let stand for three hours.
It is always a good idea to consult your SEA PRO BOATS • Turn on the pump and completely drain the
approved dealer or a certified marine technician before fresh water tank and all connections and
putting your vessel back into service. lines.
• Inspect the hull for any damage. • Fill the fresh water tank with clean fresh
• Inspect the battery cables and electrical wiring water, and let stand for an additional two
for any loose connections. to three hours.
• Check the bilge pump and free-float switch for • Turn on the pump and completely drain the
proper operation. fresh water tank and all connections and
• Inspect the fuel system for any leaks or damages. lines.
• Check the complete engine for any damage, • If there is a smell of bleach remaining in the
cracks, or leaks caused by freezing conditions. compartment, perform and additional fresh
water rinse.
• Check all hoses, clamps and valves for proper
fitting and operation. • Check and lubricate the Steering System.
• Check all compartments and the bilge area for • Check all Navigation / Anchor lighting for proper
any debris or nesting animals. Remove and clean operation.
as necessary. • Check fire extinguishers and all U.S. Coast Guard
• Install drain plugs, Filters, and in-line strainers. required safety equipment for proper operation.
• Install charged and properly maintained batteries. • Check all controls, gauges, electronics and other
related equipment for proper operation.
• Fill the fresh water tank and thoroughly flush
out all antifreeze solution from all connections
38 248 BAY SERIESSCHEMATICS & WIRING DIAGRAMS 248 Bay - Deck Wiring Harness Diagram: 248 BAY SERIES 39
SCHEMATICS & WIRING DIAGRAMS
248 Bay - Hull Wiring Harness Diagram:

40                                                            248 BAY SERIES
SCHEMATICS & WIRING DIAGRAMS
248 Bay - Battery Wiring Harness Diagram:

248 BAY SERIES                                                41
SCHEMATICS & WIRING DIAGRAMS
248 Bay - Amp Power Wiring Diagram:

42                                                           248 BAY SERIES
SCHEMATICS & WIRING DIAGRAMS
248 Bay - Dash & Helm Switch Panel Diagram:

248 BAY SERIES                                                43
You can also read