ACH Client Reference Guide - ACH Client Reference Guide - RBC Bank
←
→
Page content transcription
If your browser does not render page correctly, please read the page content below
ACH Client Reference Guide

                     ACH Client
                  Reference Guide
                             Version July 2021

1|Page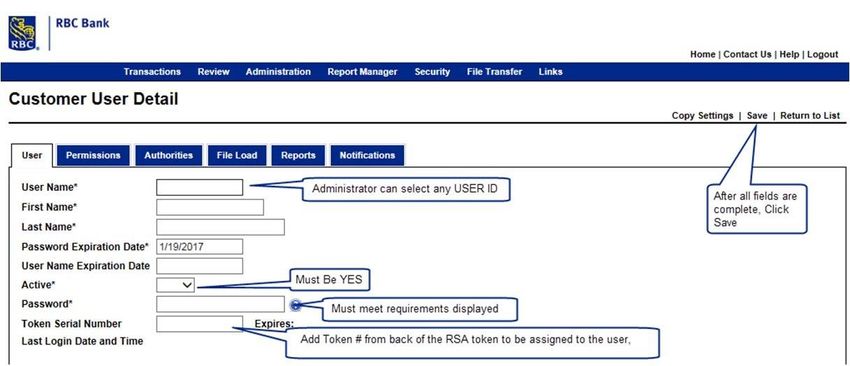
ACH Client Reference Guide

Contents
System Requirements ............................................................................................................................................................. 3
Setting Up a Desktop Short-Cut .............................................................................................................................................. 3
User Set Up and Administration ............................................................................................................................................. 4
Add Additional Users (Administrator Only) ............................................................................................................................ 4
Adding a New User ................................................................................................................................................................. 5
Exceptions and Suspicious Email Responses ........................................................................................................................ 11
Client Homepage and Category Definition ........................................................................................................................... 11
Creating a Payment............................................................................................................................................................... 11
   Client Input – PPD Category (Payment to an Individual) .................................................................................................. 12
   Client Input – CCD Category (Payments to Suppliers/Vendors) ....................................................................................... 14
Releasing a File for Processing .............................................................................................................................................. 16
   Cut off Times ..................................................................................................................................................................... 19
Report Manager .................................................................................................................................................................... 20
   Transaction Verification Report ........................................................................................................................................ 21
   Suspicious Transaction Report .......................................................................................................................................... 21
   Transaction Submission Report......................................................................................................................................... 22
Appendix – A ......................................................................................................................................................................... 23

2|Page
ACH Client Reference Guide

System Requirements
Below is a reminder of the minimum system requirements to ensure your computers/systems are compatible with RBC
Bank ACH Client:

   • Microsoft® Windows Vista® Business, Windows® 7, 8 or 10
   • Internet connection
       • DSL, Cable, or other “always-on” connection
   • Browsers:
       • Microsoft Internet Explorer® versions 8 - 10
           Note: Only Microsoft Internet Explorer can be used with scanning categories such as ARC, BOC, POP, and
           RCK.
       • Google Chrome™ version 32 and above
       • Mozilla Firefox® version 29 and above
   • 2.0 GHz or faster processor with 512 MB of RAM
       • 1 GB recommended

Setting Up a Desktop Short-Cut
The following steps will help you set up a desktop short-cut, this is optional but helps to ensure you are always just a
click away from being able to login:

Right-click an empty space on your PC’s desktop and choose New | Shortcut.
             • Select the Browse button.
             • Browse to the C: drive, to Programs or Program Files (or Program Files (x86) for 64-bit systems), and
                then to your preferred browser’s executable file.
             • Internet Explorer/iexplore.exe
             • Mozilla Firefox/firefox.exe
             • Google/Chrome/Application/chrome.exe
             • Choose the executable file name and select OK.
             • iexplore.exe
             • firefox.exe
             • chrome.exe
             • At the end of the line already inside the location box, enter one space and then type the URL address
                for your ACH Client site, as provided by RBC Bank.

For example:
     https://goldleafach.com/ach/?__________ (Series of alphanumeric characters, specific to your company)
            • Select Next.
            • Enter a name for the shortcut and select Finish.

3|Page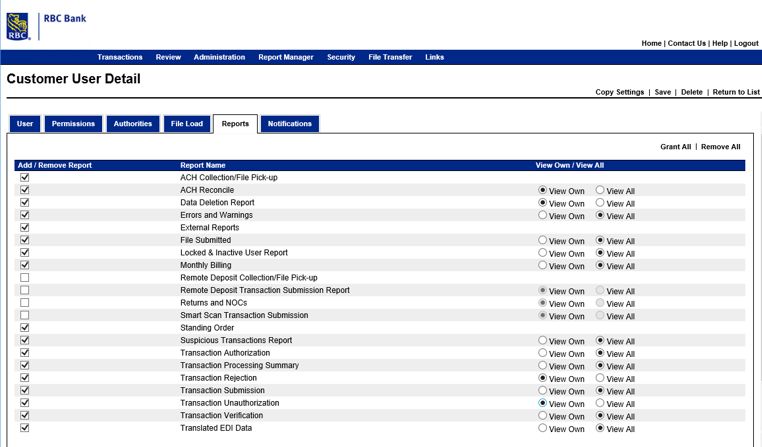
ACH Client Reference Guide

User Set Up and Administration
Each client’s initial user will be set up as the administrator for the business. The company’s administrator will
be responsible to set up additional users and will email RBC Bank US Business Banking- Servicing
rbcbankusbusinessbanking@rbc.com so their tokens can be assigned and installation instructions can be sent.
In addition, the administrator can determine if dual control is required for your business/organization.

RBC Bank uses direct token authentication. The following steps have to be completed one time for all new
users the first time they log-in.
   • Enter your User Name on the login page and select Login.
   • Enter your initial Password and select Continue. (You will be prompted to change your Password.)
            o Passwords are always case sensitive (but User Names are not).
            o Passwords must be alphanumeric, and RBC Bank requires passwords to contain at least one
                uppercase alphabetical character, one lowercase alphabetical character, and one special
                character.
                NOTE: Special characters include: ! ” # $ % & ’ ( ) * + , - . / : ; = ? @ [ ] \ ^ _ ` { } | ~ < >
            o Passwords must be at least eight positions in length.
            o Passwords expire every 90 days
            o You cannot reuse any of your prior eight passwords.

   Establish your challenge questions:
           o Select three different, secret Security Challenge Questions; enter your Answers to the
              questions; and select Continue. (Answers to the challenge questions must only contain letters,
              numbers, and spaces.)
           o Confirm your secret Challenge Questions, and select Continue.

Add Additional Users (Administrator Only)
The next section includes instructions for Adding a New User. Once the additional users are set up, please
email RBC Bank US Business Banking- Servicing rbcbankusbusinessbanking@rbc.com so their tokens can be assigned
and installation instructions can be sent. RBC Bank is required to email each user directly.

4|Page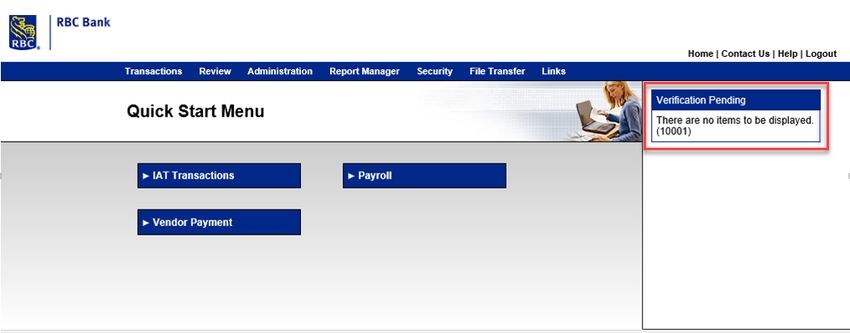
ACH Client Reference Guide

Adding a New User
Hover over Security on Home Page menu options, Scroll down and Click Customer Users:

From the Customer User List, Click Add.

When setting up a user, there are 5 tabs that must be reviewed and/or completed:
   •   User – is the main input page where the new user is identified
   •   Permissions – determines what the user can or cannot do
   •   Authorities – determines if user has authority to perform certain functions
   •   File Load – is updated only when loading a pass-through file
   •   Reports – determines the reports a user can see
   •   Notifications – determines the types of notification a user will receive

On the User Tab, all fields noted with an * must be completed as they are required fields. The screen below
provides some additional support with the completion of the fields.

NOTE: Click SAVE on each tab or after completing all tabs.

5|Page
ACH Client Reference Guide

  NOTE: There are separate documents with instructions for installing the software tokens on a mobile/smart device or
  PC. Refer to Appendix A for a copy of the instructions. If not, please contact RBC Bank US Business Banking-
  Servicing rbcbankusbusinessbanking@rbc.com

  Complete the permissions tab for each user as applicable (example of a set-up below)

6|Page
ACH Client Reference Guide

7|Page

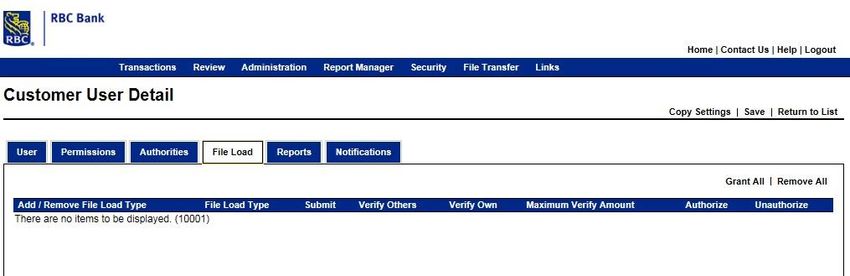
ACH Client Reference Guide

On the Authorities tab, select the authorities per user as to the specifications of your company.

File Load tab: The File Load tab is only required if the customer is set up to process pass-through files.

8|Page
ACH Client Reference Guide

On the Reports tab, select the report access per user as to the specifications of your company.
(Example of a set-up below)

9|Page
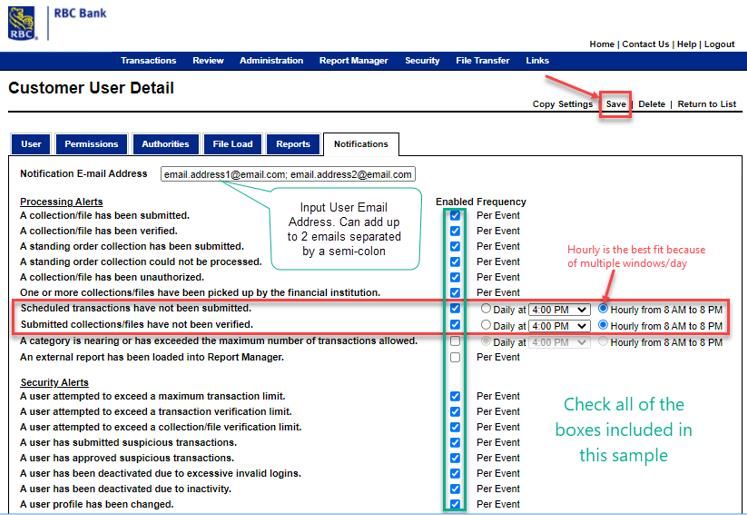
ACH Client Reference Guide

On the Notifications tab, you must include at least 1 up to 2 email addresses for the user and check the boxes
as noted in the sample.

NOTE: There are 3 ACH windows/day. Hourly reminders will remind you every hour OR you can select to only be reminded
once/day. RBC Bank recommends hourly.

10 | P a g e
ACH Client Reference Guide

Exceptions and Suspicious Email Responses
All clients are set up and required to receive exception emails and suspicious activity emails. In both scenarios all files
are either suspended or cannot be process until the stipulation is remediated.

Client Homepage and Category Definition
Each client’s homepage will be set up to reflect the types of transactions you indicated you would complete during your
set up interview. If a transaction (ACH Category type) is not set up you will have to contact ACH Support to add the
additional category to your profile. You can have multiple options within the same category, for example you might have
PPD category for hourly employees and exempt (monthly employees). The categories RBC Bank currently supports are:

    •   PPD - Prearranged Payment and Deposit – intended to pay a person, most often used for payroll
    •   CCD - Cash Concentration and Disbursement – intended to pay a non-person, most often used to pay
        vendors/suppliers
    •   IAT – International ACH Transaction – although RBC Bank does not currently support paying vendors and/or a
        person located outside the US, there are situations when payments have to be classified as an IAT and processed
        using the IAT transaction. For example, if you are processing a payroll and on the day you create the file move
        the exact amount of the file from RBC to RBC Bank via a North to South transfer it is now considered an IAT
        transaction. Note: This is for informational purposes only.

Homepage:

Creating a Payment
From the Homepage, Click the type of Category (file) you need to create. You can add payment details by clicking Quick
Edit for both a CCD (Vendor Payment) and a PPD (Payroll/Personal Vendor Payment).

11 | P a g e
ACH Client Reference Guide
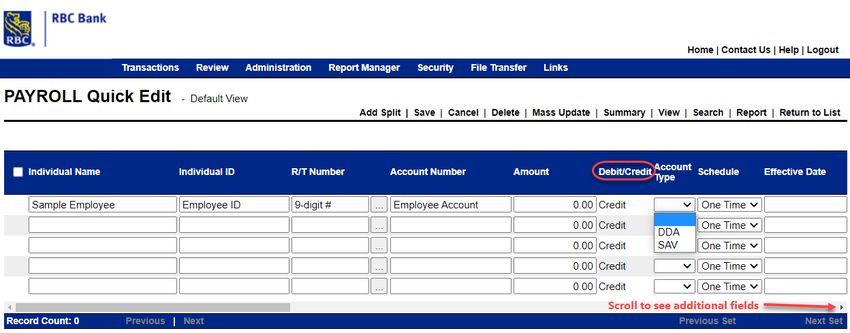
Client Input – PPD Category (Payment to an Individual)
From the Category Homepage, click Quick Edit.
Complete the fields as noted and Click Save.
• Individual Name – employee/person being paid
• Individual ID – employee or other information that identifies the payee (this can be alpha or numeric)
• R/T Number – the receiving bank routing and transit number
• Account Number – the payees account number
• Amount – the amount to be paid
• Debit/Credit – will always be credit
• Account Type – DDA (Checking) or Savings
• Schedule – One Time or Recurring
• Effective Date – date the payment should post the recipient’s account
• Pre-note – can be check to send a “test” to confirm the bank and account information is accurate and valid.
CAUTION: If a pre-note is submitted, an active transaction cannot be scheduled for three business days
• Is Active – You click the box to indicate the employee/payee is an active arrangement
• Addenda – is a field you can use to provide additional information about the payment
• Custom Fields – can be created and specific to the client and/or payee to help provide information to aid in
credit and/or accounting.
12 | P a g eACH Client Reference Guide Additional fields: NOTE: Must click the “Is Active” box for the transaction to be sent. 13 | P a g e
ACH Client Reference Guide
After you have completed all the fields, you must click SAVE.
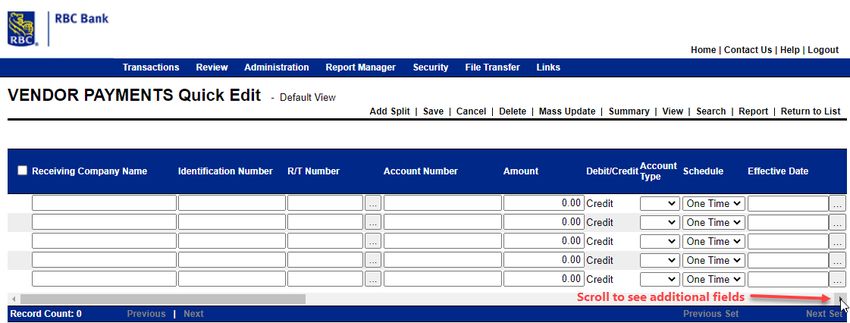
Client Input – CCD Category (Payments to Suppliers/Vendors)
From the Category Homepage, Click Quick Edit
Complete the fields as noted and Click Save.
• Receiving Company Name – the name of the vendor/supplier being paid
• Identification Number – a number or other information that identifies the payee (this can be alpha or numeric)
• R/T Number – the receiving bank routing and transit number
• Account Number – the payees account number
• Amount – the amount to be paid
• Debit/Credit – will always be credit
• Account Type – DDA (Checking) or Savings
• Schedule – One Time or Recurring
• Effective Date – date the payment should post the recipient’s account
• Pre-note – can be checked to send a “test” to confirm the bank and account information is accurate and valid
CAUTION: If a pre-note is submitted, an active transaction cannot be scheduled for three business days
• Is Active – You click the box to indicate the employee/payee is an active arrangement
• Addenda – is a field you can use to provide additional information about the payment
• Custom Fields – can be created and specific to the client and/or payee to help provide information to aid in
credit and/or accounting.
14 | P a g eACH Client Reference Guide Additional Fields: 15 | P a g e
ACH Client Reference Guide

After you have completed all the fields, you must click SAVE.

Releasing a File for Processing
Upon saving on the Quick Edit input screen, the transaction file has been created. You must now complete a series of
steps to submit, verify, and release the file to RBC Bank for processing.

16 | P a g e
ACH Client Reference Guide

NOTE: The process is the same for both types of files.

Complete the following:
    •   Hover over the Transactions menu item, then scroll down to either Payroll or Vendor Payments.
    •   Click the Check Box beside the transaction that is ready to be reviewed and released (authorized)
    •   Click Submit and then Click Selected or Submit All
               o   Selected allows you to submit only the file check if there are multiple files in the list
               o   You will be prompted to enter a control amount (control amount is the sum of all your transactions)

17 | P a g e
ACH Client Reference Guide
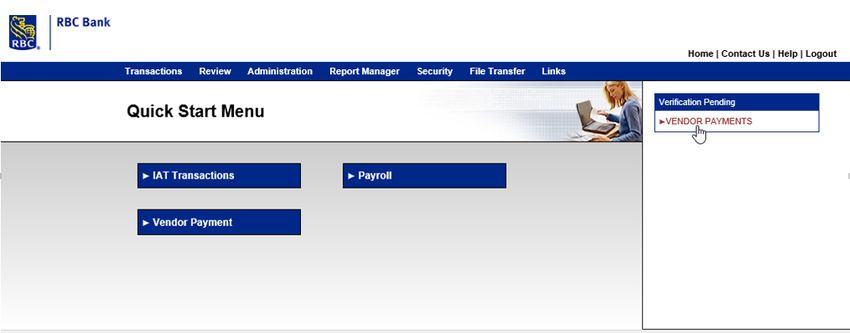
• Once the 2 step above are completed, on your Home page on the Right Side you will see the file displayed as
Pending Verification:
If there are suspicious transactions, the following will display:
18 | P a g eACH Client Reference Guide
Once approved:
• Click Review, Verify Transaction and select one of the following:
o Verify
o Verify All (will verify all files waiting to be verified)
o Reject (only of there is an error and/or you have decided to not send the file)
o Reject All (will reject all files waiting to be verified)
Important Reminder: The funds will be debited as soon as RBC Bank processes the file. Your transactions
must be funded when the file is submitted.
Cut off Times
Cut off times for submitting and verifying ACH files:
First file pick up time: 1:00 pm EST
Second file pick up time: 3:00 pm EST
Final file pick up time: 6:00 pm EST
RBC Bank U.S. observes U.S. federal holidays. https://www.federalreserve.gov/aboutthefed/k8.htm
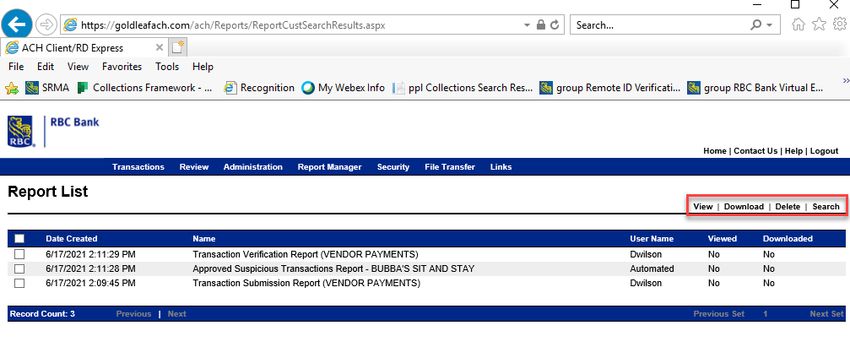
19 | P a g eACH Client Reference Guide Report Manager To view reports, Click Report Manager from the Home Page main menu: NOTE: The action buttons are circled in red above. Click the box associated with the report then click the action desired. All activity is tracked. The following is available to search reports: 20 | P a g e
ACH Client Reference Guide

Transaction Verification Report

Suspicious Transaction Report

21 | P a g e
ACH Client Reference Guide

Transaction Submission Report

22 | P a g e
ACH Client Reference Guide

Appendix – A

How to download the token license to a PC:

Installing Software
Tokens on PC_Client Version.pdf

How to download the soft token to a smart/mobile device:

 Installing Tokens
on Mobile Device_Client Version.pdf

The end.

23 | P a g e
You can also read