Administration Guide
      January 2014
←
→
Page content transcription
If your browser does not render page correctly, please read the page content below
Administration Guide
January 2014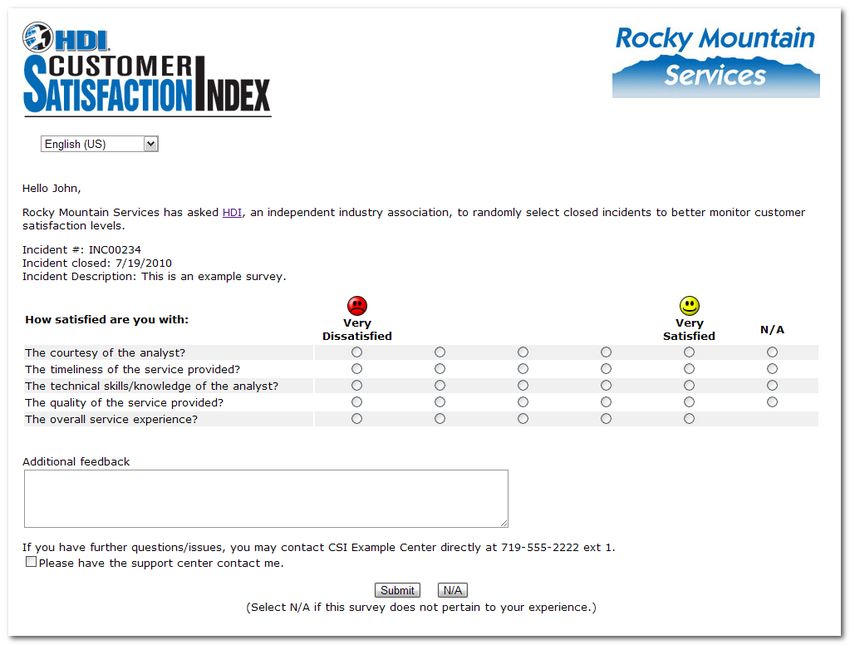
Table of Contents
INTRODUCTION ..................................................................................................................................................... 4
    CSI SECURITY ................................................................................................................................................................6
SETUP .................................................................................................................................................................... 7
    INITIAL CSI SETUP ..........................................................................................................................................................7
    TICKETING SOFTWARE CONFIGURATION..............................................................................................................................9
       Incident Notification Template .............................................................................................................................9
            Support Center Key .......................................................................................................................................................... 10
            Required and Optional Closed-Incident Elements............................................................................................................ 10
            More advanced incident notification examples. .............................................................................................................. 12
    TESTING .....................................................................................................................................................................14
       Entering Test Mode .............................................................................................................................................14
       Exiting Test Mode ...............................................................................................................................................15
       Survey Request e-mail .........................................................................................................................................16
       Survey..................................................................................................................................................................17
       Errors ...................................................................................................................................................................18
ADMINISTRATION ................................................................................................................................................ 19
    LOGIN SCREEN .............................................................................................................................................................19
    SITE NAVIGATION .........................................................................................................................................................20
    ACCOUNT SETUP ..........................................................................................................................................................21
       Company Info ......................................................................................................................................................21
       Company Logo ....................................................................................................................................................22
       Support Centers...................................................................................................................................................23
            Adding a Support Center .................................................................................................................................................. 24
            Removing a Support Center ............................................................................................................................................. 24
            Archiving a Support Center .............................................................................................................................................. 25
            Reactivating a Support Center.......................................................................................................................................... 26
            Entering Test Mode .......................................................................................................................................................... 26
            Exiting Test Mode ............................................................................................................................................................. 26
            Editing a Support Center .................................................................................................................................................. 27
               Info .............................................................................................................................................................................. 27
               Demographics .............................................................................................................................................................. 28
               Survey Sampling .......................................................................................................................................................... 29
               Survey Options ............................................................................................................................................................ 30
               Questions ........................................................................................................................ Error! Bookmark not defined.
               Notification Addresses ................................................................................................................................................ 38
               Branding ...................................................................................................................................................................... 39
               Alerts ........................................................................................................................................................................... 41
      Logins ..................................................................................................................... Error! Bookmark not defined.
      Opt-Out Maintenance .........................................................................................................................................45
    GOALS .......................................................................................................................................................................46
      Support Center ....................................................................................................................................................46
      Company Goals ...................................................................................................................................................47
    REPORTS ....................................................................................................................................................................48
      Standard Report Interface...................................................................................................................................48
            Ad Hoc Report .................................................................................................................................................................. 48
            Saved Reports................................................................................................................................................................... 49
            Scheduled Reports ........................................................................................................................................................... 50
        Dashboard ...........................................................................................................................................................51
        Review Incidents .................................................................................................................................................52
        Agent Reporting ..................................................................................................................................................53
        Monthly Summary...............................................................................................................................................56
        Weekly Summary ................................................................................................................................................57

Page 2 of 60                                                                      © HDI 2014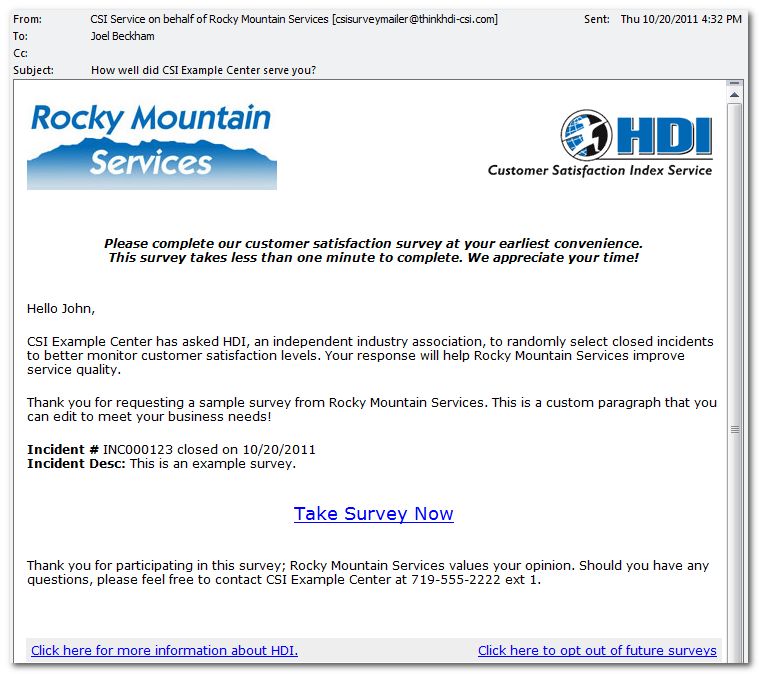
Yearly Comparison ..............................................................................................................................................57
    Quarterly Comparison .........................................................................................................................................58
    Raw Data ............................................................................................................................................................59
    International .......................................................................................................................................................59

Page 3 of 60                                                          © HDI 2014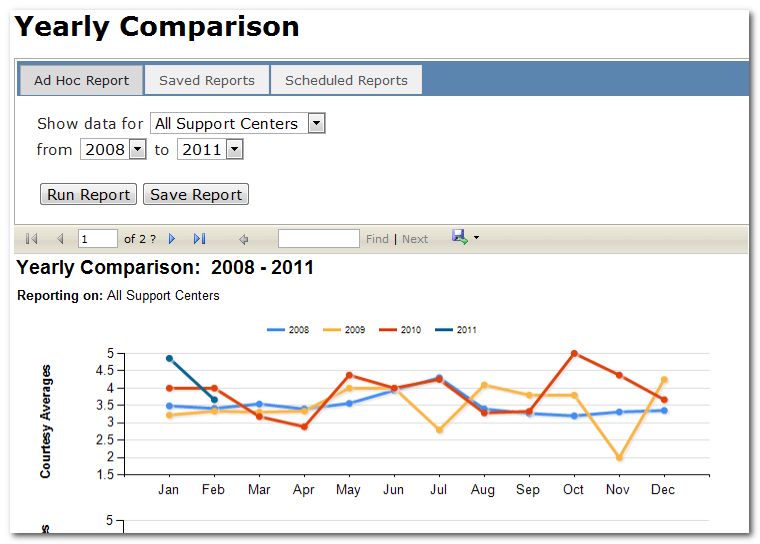
INTRODUCTION

The purpose of this document is to provide reference information to assist you with maintaining your
Customer Satisfaction Index (CSI) account. This guide is divided into 2 sections:
    1. “Setup” beginning on page 7 covers first time setup of CSI. It is more “step-oriented” and
       includes only the information that is needed to get started quickly.
    2. “Administration” beginning on page 19 covers the CSI Administrative website in great detail. The
       order of this section follows the order of the CSI Navigation Menu.

As you are undoubtedly aware, HDI’s CSI product is a secure and reliable third-party survey tool
designed specifically for the IT Service and Support industry. Survey results can be compared between
support centers within client organizations and/or benchmarked against the industry, as a whole. We’re
convinced these results can heighten employee awareness of industry standards, develop meaningful
and measurable performance metrics, and ultimately increase customer loyalty and retention rates.

CSI Is Not the Ultimate Survey System… Just the Most Meaningful

HDI intends to provide IT Service & Support organizations with a simple to sign up for and simple to use
low cost service that will allow them to easily obtain technical customer satisfaction benchmark
information. The key word is simple. CSI does a few basic things well and is not cluttered with fancy,
seldom used options.

Instead, CSI seamlessly integrates with existing call tracking systems without the installation of any HDI
software. This will ease installation and allow subscribers to be immediately operational. Once set up,
CSI will be transparent to the support center. The support center merely continues to do its job using its
existing software. The service’s value becomes evident over time as historical data builds up and trends
become apparent.

These trends are provided through pre-configured reports distributed via email on a weekly or monthly
basis. Subscribers can also download incident and response data from CSI to plug into their own
systems, which allows for extended analysis possibilities.

Page 4 of 60                                 © HDI 2014
Information Accessibility and 508(c) Compliance Statement
Thinkhdi-csi.com recognizes the importance of making information accessible to all users, regardless of
their need for assistive technology. In order to do so, we have committed to providing an accessible
interface for your customers. We are committed to keeping these end-user pages & emails compliant
with section 508(c) of the Rehabilitation Act of 1973, and 36 CFR 1194.22 (Web-based Internet
Information and Applications). In order to assist our Educational and Government users, a summary of
the aforementioned compliance has been documented to match the Voluntary Product Accessibility
Template (VPAT) format.

Page 5 of 60                                © HDI 2014
CSI Security
CSI stores as little information as possible concerning a support center’s clients. Most of the incident
notification data is optional and typically won’t be sent to the service. Access to the CSI service is via a
secure website, using SSL encryption and is protected by login id and password.

If a client’s incident descriptions typically contain confidential information, they can and should choose
not to send the descriptions. Any descriptions that are sent to CSI are only stored if that incident
generates a survey request. Further, the text of the description is only displayed on the survey request
e-mail and/or the survey if the client specifically configures CSI to display it. If a description is ultimately
stored, it is stored in an encrypted form.

Client e-mail addresses are never stored. They are only held in memory from the point the e-mail is
machine read until the survey request is queued to be sent, typically milliseconds. If no request is sent,
the e-mail address is removed from memory and never stored. If an e-mail address is used for a survey
request, a unique signature is generated from the e-mail address and the actual email address
discarded. This signature is a one-way hash that cannot be converted back to the original address. This
signature is the only item stored, and allows CSI to ensure that people are not over-surveyed and that
opt-outs are honored.

CSI Reports are distributed only to the specified e-mail addresses that the client provides. Clients also
have the option of specifying a password that must be provided before the report can be downloaded.
All CSI Reports are stored in encrypted form and are only decrypted during the download process.
Download access is also via an SSL connection.

Hyperlinks that are placed in survey request e-mails, report download e-mails, etc. use embedded
parameters to identify the particular survey, report etc. These parameters include encrypted data that
have multiple levels of verification. Altering these parameters in an attempt to access someone else’s
survey or report will simply render the link useless.

Page 6 of 60                                    © HDI 2014
Setup
Setting up the CSI service involves the following steps:
    1. Account set-up via CSI’s administrative website, which requires the input of basic company and
        support center information. (“Initial CSI Setup” on page 7)
    2. Configure your support center’s existing ticketing software to enable it to send closed incident
        information to the CSI service. The instructions for this part vary depending on which software is
        used by your company. (“Ticketing Software Configuration” on page 9)
    3. Testing. (“Testing” on page 14)

Initial CSI Setup
There are 4 quick steps to configuring your CSI account:
   1. Sign in: From the CSI Landing page (http://www.thinkhdi-csi.com) click “Sign in” in the upper
        right. Use the username and password provided to you. For additional details, refer to “Login
        Screen” on page 19.
   2. Set Company Information: Navigate to “Company Info” under the “Account Setup” menu item.
        Verify that the information appearing here is correct, filling out any missing details. Please
        choose the “Industry” field carefully as this determines who you are benchmarked against. This
        setting can be changed at any time. Click “Save Changes” when done. For additional details,
        refer to “Company Info” on page 21.

    3. Upload a logo: Navigate to “Company Logo” under “Account Setup”. Click “Choose File” and
       navigate to an image of your company’s logo. Please note that the image must be a jpg, gif, or
       png. Click “Save Changes”. The image you just uploaded will appear at the top of screen. For
       additional details, refer to “

Page 7 of 60                                 © HDI 2014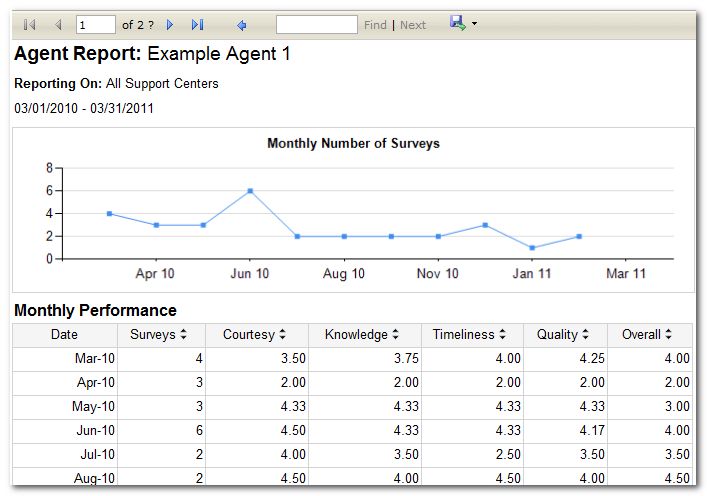
Company Logo” on page 22 of this guide.

   4. Create a Support Center: Navigate to “Support Centers” under “Account Setup”. Click “Create
      New” to create a new Support Center. Fill out the details on the “info” tab and click “Save”.

       Once saved, the Support Center key will appear. You will need this key in the configuration of
       your ticketing software. For additional details, refer to “Adding a Support Center” on page 24.

Page 8 of 60                                © HDI 2014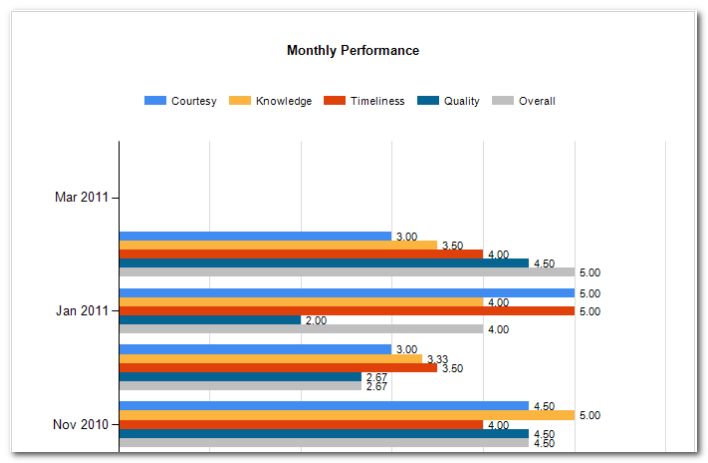
You may also wish to set an email address to be notified whenever CSI receives data containing
        errors. This can be especially helpful during testing. To do this, select the “Notification
        Addresses” tab and enter in an email address in the “Incident Data Errors” field. Click “Save”.

Ticketing Software Configuration
When at least one Support Center has been created in CSI, you may begin configuring your ticketing
software. Basically, you want to configure the ticketing software to send CSI an email (referred to as the
Incident Notification) whenever a ticket is closed. This email must use a template that contains specific
pieces of information which CSI needs in order to send a survey.

Incident Notification Template
Ideally, your customers will receive survey request emails as soon as their incident has been resolved.
Modern incident management systems usually feature the ability to send emails with variable data upon
events, such as an incident closure. To begin using CSI, your business’ ticketing system(s) will need to be
configured to send incident notification emails to the CSI service.

The e-mail address to send incident notifications is: data@thinkhdi-csi.com.

The body of the incident notification e-mail is a simple xml structure. The following is an example of a
minimal incident notification. The data may be included in the body of the e-mail or it may be sent as a
file attachment. CSI looks for a file attachment first and will use the first attachment that is found. The
file name is ignored. If there are no attachments, CSI uses the body of the e-mail. CSI does not use the
subject line. Here is a typical example:

Page 9 of 60                                  © HDI 2014
32348
dave.smith@global.not
2005-05-26 15:20:34
Dave
Smith
Password needs to be reset.
The data that is shown underlined comes from the particular incident and is plugged into the
surrounding xml structure by your support center software. The underlining is just for the purpose of
emphasis. Also note that the indentions are not necessary and are for readability purposes only. Your
xml will look different than the examples since each support center software application tends to have
its own proprietary format for referencing data in its incidents. For example some software uses place
markers to denote references to data:
…
$CurrRec.CallRefNbr$
$CurrRec.CallerEmail$
…
Please address any configuration issues related to your support center software directly to your vendor.
Support Center Key
The support center key referenced in the above example is unique to each support center. This key is
obtained by navigating to “Support Centers” under the “Account Setup” menu item and selecting “Edit”
next to your Support Center. The key can be found in the grey box at the top.
The key is case sensitive and must be copied precisely. This key identifies which support center the
incident data belongs. Incorrect keys will cause the data to be rejected.
Required and Optional Closed-Incident Elements
The xml structure contains only a few required elements and several optional elements. The required
elements must be present for CSI to properly sample the incident and send a survey request. The
optional elements are stored if a survey request is sent and are made available to the support center as
part of the data download feature. Any incident notification data errors that are detected will be
reported back to the support center. Refer to “Errors” on page 18 for instructions on setting the email
addresses to be notified of errors.
Page 10 of 60 © HDI 2014The following elements are required.
- Up to 50 chars. The original incident identification used by the support
center. This might be the call ticket number, reference number, etc. This value is presented in
the survey request e-mail and the survey to help remind the survey recipient as to which call the
survey pertains.
- Up to 300 chars. The e-mail address that will be used for the survey request e-mail.
- The date and time that the incident was closed. By default CSI accepts
MM/DD/YYYY hh:mm:ss, but can be customized to accept most date formats.
The following elements are optional but are commonly included:
- The first name of the person that will receive the survey request.
- The last name of the person that will receive the survey request.
- Up to 100 chars. Primary support center agent associated with call ticket.
- The incident description. This description can optionally be displayed in the survey
request e-mail and/or the survey.
- Indicates what language the survey recipient would prefer. The list of valid
values will grow as the request e-mail and the survey itself are translated to other languages. If
specified, the survey request e-mail and the survey will be produced in the request language.
The survey will provide the option of switching languages ‘on the fly’ using the language icons at
the top of the survey page. Currently, the supported langhint values are:
o zh-cn (Chinese – Simplified)
o cs-cz (Czech)
o da-dk (Danish)
o en-us (English – US)
o en-gb (English – UK)
o fi-fi (Finnish)
o fr-fr (French)
o fr-ca (French / English)
o de-de (German)
o el-gr (Greek)
o hu-hu (Hungarian)
o is-is (Icelandic)
o it-it (Italian)
o ja-jp (Japanese)
o ko-kr (Korean)
o nb-no (Norwegian)
o nl-nl (Dutch)
o pl-pl (Polish)
o pt-br (Portuguese - Brazil)
o ro-ro (Romanian)
o ru-ru (Russian)
o sr-latn-rs (Serbian – Latin)
o es-mx (Spanish - Mexico)
o es-cl (Spanish – Chile)
o es-es (Spanish – Spain)
o sv-se (Swedish)
o tr-tr (Turkish)
Page 11 of 60 © HDI 2014The following elements are optional and are not used by CSI. If provided and a survey request is sent,
these data elements will be stored and made available to the company via the data download feature.
These data elements can be utilized however the company wishes:
- Up to 100 chars. Secondary support center agent associated with call ticket.
- Up to 100 chars. Major 'organization code' associated with caller/call ticket.
- Up to 100 chars. Minor 'organization code' associated with caller/call ticket.
- Up to 100 chars. Sub 'organization code' associated with caller/call ticket.
- Up to 100 chars. Major 'call type' category associated with call ticket.
- Up to 100 chars. Minor 'call type' category associated with call ticket.
- Up to 100 chars. Sub 'call type' category associated with call ticket.
- Up to 100 chars. Location associated with call ticket.
More advanced incident notification examples.
An example that includes all optional data elements:
32348
dave.smith@global.not
8/26/2010 15:20:34
Dave
Smith
Printer making crunching sound.
D Lister
A Rimmer
Corporate
Account Analysis
Ops
Computer Hardware
Printer
Paper Jam
Colorado Springs
en-us
Page 12 of 60 © HDI 2014An example of a minimal incident notification with multiple incidents:
48
dave.smith@global.not
8/26/2010 15:20:34
Dave
Smith
50
fred.jones@global.not
08/26/2010 16:12:01
Fred
Jones
An example of a minimal incident notification with multiple incidents and multiple support centers:
32348
dave.smith@global.not
2005-05-26 15:20:34
Dave
Smith
Password needs to be reset.
32248
julie.roberts@global.not
2005-05-24 15:00:34
Julie
Roberts
Network is down.
000038
fred.jones@rms.not
2005-06-23 12:25:24
Fred
Jones
Lost access to voice-mail.
Page 13 of 60 © HDI 2014Testing Entering Test Mode To test that your ticketing software has been configured correctly, you can place one of your CSI Support Centers into Test Mode. This will cause all surveys to be redirected to a single specified email address which will allow you verify that the surveys appear correctly. To enter test mode, navigate to “Support Centers” under the “Account Setup” menu item. Next to the Support Center you wish to place in Test Mode, select “Test” under the “Status” drop-down. A form will ask you to enter the email address to which all surveys will be redirected. Once entered, click “Enter Test Mode”. The background behind the Support Center changes to yellow to indicate that it is in test mode. All surveys to this Support Center will now be redirected to the specified email address. Page 14 of 60 © HDI 2014
Exiting Test Mode
Once testing is completed, exit test mode by selecting “Active” in the status drop down.

Select “Exit Test Mode” in the confirmation that appears.

Once test mode is exited, the test data will be automatically removed at 11:30 PM MST that night. You
may begin sending in production data immediately without needing to wait for the test data to be
removed.

Page 15 of 60                               © HDI 2014
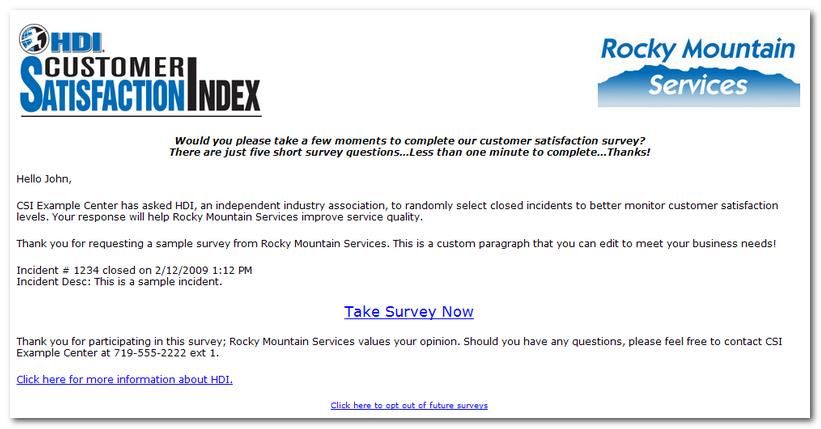
Survey Request e-mail
Below is a screen shot of a typical survey request e-mail. This example shows the optional company
logo, the company name, incident id, closed date/time and optional short description.

Page 16 of 60                               © HDI 2014
Survey
When the recipient clicks “Take Survey Now”, he or she will see the following survey in their browser.
Note that the introductory text is similar to the survey request e-mail. The main survey questions are
group together and are required. If the respondent submits the survey without answering all the
required questions, the survey will be presented again with the missing questions highlighted. The
“Additional feedback” question is not required.

Page 17 of 60                               © HDI 2014
Errors
If CSI receives an incident notification which contains an error, CSI will send an error alert to the email
address specified in “Incident Data Errors”. “Incident Data Errors” can be found on the “Notification
Addresses” tab when editing a Support Center. The error alert email is titled “CSI had trouble loading an
incident” and contains a brief description of the error. A copy of the data which caused the error is
included as an attachment.

Page 18 of 60                                 © HDI 2014
Administration
CSI’s administration interface is accessed via your internet browser. CSI’s address is
https://www.thinkhdi-csi.com. Entering the short version of the address www.thinkhdi-csi.com will also
work. This address will take you to CSI’s login screen. The website uses SSL to ensure your information is
encrypted while accessing the website.

Login Screen
To access the login screen from the CSI landing page, click “Sign In” in the upper right.

Enter your username and password and click “Login”

Should you forget your password you can click on “Forgot Password?”

Enter your username and click “Reset Password”. A new temporary password will be e-mailed to you.

Page 19 of 60                                 © HDI 2014
Site Navigation
Once logged in, you will have full access to the administration tool. The major
components of the tool are accessible via the Site Navigation menu. This menu is
always located on the left side of the page. Clicking on a section causes it expand
revealing a sub-menu. Selecting a sub-menu option will take you to that page. It is
broken into the following sections:
Account setup – provides options for configuring your contact
information, support centers, logins, etc.
Goals – provides options for configuring company and support center
goals
Reports – provides access to all of CSI’s reports
Each of these sections is outlined below.
The administration tool has a timeout feature that will automatically log you out if
there is no navigation activity for 30 minutes.
Page 20 of 60 © HDI 2014Account Setup
Company Info
“Company Info” located under “Account Setup” accepts data pertaining to the overall company account.
Note that you can change this information at any time.
Company Name This is the name of your company. This name will appear in report headers
where appropriate.
Industry Select the industry that most closely aligns with your company’s industry. If your
industry is not represented in the list, please select “Other”. Industry
comparisons are based on your company’s current industry selection.
City The city where the company is located.
State The state where the company is located.
Zip Code The zip code where the company is located. This data may be used for
geographical proximity-based reporting in the future.
Country The country where the company is located.
Primary Contact This is the name, email address and phone number for the primary contact for
your CSI account. This information is used if HDI needs to contact you regarding
your account as well as to notify you of upcoming maintenance or issues with
CSI.
Secondary Contact This is the email address and phone number for a secondary contact for your CSI
account.
When finished making updates to the company logo, click the “Save Changes” button.
Page 21 of 60 © HDI 2014Company Logo
“Company Logo” located under Account Setup allows you to upload a logo which will be displayed
alongside the survey request email and the actual survey. Use the “Choose File” button to upload your
logo file in a .jpg, .gif, or .png format (no more than 100KB and 400 pixels wide x 150 pixels high). You
should see the logo at the top of this page after you click “Save Changes”.
Remove Existing Logo Check this box if you wish to remove a previously uploaded company logo.
Display company logo on This allows you to choose which side of the survey request e-mail and
survey an uploaded company logo will appear. It also determines which
side it will appear in the administration tool.
When finished making updates to the company logo, click the “Save Changes” button.
Page 22 of 60 © HDI 2014Support Centers
“Support Centers” located under “Account Setup” allows you to set up one or more support centers so
that CSI can determine customer satisfaction scores. Each support center will be tracked separately.
Each support center is automatically assigned a “support center key” which is used to identify its closed
incidents to CSI.
Some companies may have a single support center that they wish to track as if it were multiple, separate
support centers. This may be based on some criteria such as call type, etc. Separate support centers may
be defined in CSI if your support center software is flexible enough to supply the appropriate “support
center key” based on your criteria.
All currently defined support centers are displayed in a grid:
The following actions are available:
Create New Creates a new support center.
Edit Edits an existing support center.
Remove Removes an existing support center. This option will delete all historical data related to
this support center and any outstanding survey requests will become invalid. This
option requires a confirmation. See “Archiving a Support Center” on page 25 for an
alternative.
Change Status The Status drop-down allows you to change the current status of a support center. The
following status options are available:
Active – This is the default. An active support center will actively send out
surveys and collect results.
Test – All surveys will be redirected to a single email address for testing
purposes. Upon selecting this option, you will be asked to enter the email
address to be used for testing.
Archived – This lets you indicate that a support center is no longer active and
won’t be sending any more closed incident notifications. Any outstanding
survey can be completed and the support center will still appear in reports,
etc.
Page 23 of 60 © HDI 2014Adding a Support Center To add a support center, click “Create New” on the “Support Centers” page found under the “Account Setup” menu item. Fill out the fields on the “info” form. The rest of the sections are unavailable until you click “Save”. Once saved, a support center key will appear at the top. Removing a Support Center This option removes an existing support center. This option will delete all historical data related to this support center and any outstanding survey requests will become invalid. This option requires a confirmation. The confirmation message will indicate how many outstanding survey requests are based on the support center. If a survey request recipient attempts to take a survey that is based on a removed support center, they will receive an “Invalid Survey Request” message. See “Archiving a Support Center” on page 25 for an alternative. Removing a support center cannot be undone. Page 24 of 60 © HDI 2014
Archiving a Support Center
This feature allows you to archive an existing support center. This lets you indicate that a support center
is no longer active and won’t be sending any more closed incident notifications. Any outstanding survey
can be completed and the support center will still appear in reports, etc.

A confirmation is required to archive a support center:

Once archived, the support center appears in red:

Page 25 of 60                                © HDI 2014
Reactivating a Support Center
An archived support center can be reactivated through the status drop-down by choosing “Active”:

A confirmation dialog is shown. Click “Yes, I’m Sure” and the support center will be reactivated.

Entering Test Mode
To test that your ticketing software has been configured correctly, you will want to place one of your CSI
Support Centers into Test Mode. This will cause all surveys to be redirected to a single specified email
address which will allow you verify that the surveys appear correct.

To enter test mode, refer to “Entering Test Mode” on page 14.

Exiting Test Mode
To exit test mode, refer to “Exiting Test Mode” on page 15.

Page 26 of 60                                © HDI 2014
Editing a Support Center
Selecting “Edit” on the Support Centers screen takes you to the section which allows you to make
changes to your support center. At the top you can see the support center name, the support center
key, and the status of the selected support center.

The support center settings are broken down into a number of sections. You can navigate to each
section by selecting its corresponding icon. Each section is detailed below.

Info
The info section allows you to modify the support center’s name, description and address. The support
center’s name will appear in reports, etc.

Page 27 of 60                              © HDI 2014
Demographics
The demographics section allows you to choose an industry for the support center as well as set other
demographic details. Select the industry that most closely aligns with your support center’s industry. If
your industry is not represented in the list, please select “Other”. Industry comparisons in reports are
based on your support center’s current industry selection.

Page 28 of 60                                © HDI 2014
Survey Sampling
Send no more than X Prevents individuals from being over-surveyd . An example would be 1 survey
surveys per X days per per 30 days. CSI will look back over the previous 30 days to determine if that
end user person has already reached his/her limit.
Requested sampling % Indicates the percentage of incidents you wish to be selected for the survey.
Click “change” to bring up a calculator which helps you set this value.
For example, given the following settings:
Send no more than 1 surveys per 30 days per end user.
Requested Sampling %: 50%
Users are allowed to opt-out. See “Survey Options” on page 30 for configuring opt-outs.
CSI chooses incidents to be surveyed as follows:
1. For this example CSI receives 100 incidents from you.
2. CSI chooses 50% (Requested Sampling %) to receive surveys, so that’s 50 incidents.
3. CSI removes incidents for users who have been surveyed recently (Send no more than 1 surveys
per 30 days). For this example, let’s say that removes 7 incidents, leaving 43.
4. CSI removes incidents for users who have opted out. For this example, let’s say that’s 5 incidents
leaving 38.
5. CSI sends surveys to the remaining 38 incidents.
Page 29 of 60 © HDI 2014Survey Options
The “Survey Options” section allows you to configure a number of options on your surveys.
Survey Options
Display incident Checking this box will add the incident description to the survey page. Support
description in survey centers that support confidential applications or sensitive information may wish
to leave this box unchecked.
Allow survey recipient to Checking this box adds an option to the bottom of the survey that allows your
request that the Support customers to indicate they want to be contacted by your support center. When
Center contact them your customer checks this box, you receive an email alert to “Survey Alerts”
address found in the “Notification Addresses” section.
Allow a survey recipient This feature allows the original survey recipient to revisit their survey link within
to resubmit their survey the allotted period and resubmit the survey with corrected answers. Please note
within ___ minutes of that the survey recipient’s browser must have cookies enabled in order for this
original submission. feature to work. This ensures that no one else can make corrections to the
survey. To be notified of a survey being resubmitted, see ”Survey Alerts” on
Page 30 of 60 © HDI 2014Page 41.
Survey Request Email Options
Display intro paragraph in Shows / Hides the paragraph beginning with, “Please complete our customer
survey request email satisfaction survey at your earliest convenience.”
Display first paragraph in Shows / Hides the paragraph beginning with, “{Support Center Name} has
survey request email asked HDI, an independent industry association…”
Display last paragraph in Shows / Hides the ending paragraph beginning with, “Thank you for
survey request email participating in this survey;”
Display description in Checking this box will add the incident description to the body of the survey
email request email that contains a link to the survey. Support centers that support
confidential applications or sensitive information may wish to leave this box
unchecked.
Display opt-out link Checking this box will include a link in the Survey Request Email that allows the
user to opt their email address out from any future surveys. Company
administrator (Primary contact) will be notified as users opt-out.
Custom Paragraph This allows you to enter up to 4000 characters of copy to the Survey Request
Email which appears under the opening paragraph. A translation can be
provided for each available language by selecting the desired language and then
entering the text. HTML is not allowed. This offers you an opportunity to
communicate with your users anything specific to your support environment
you feel is pertinent.
Customize Incident Labels This section allows you to override the default Incident labels in the Survey and
Survey Request Email. Please note that this does not affect the labeling in
reports. The following options are available:
Use default label (“Incident”). This is the default setting and labels
incidents with “Incident” (or the translated equivalent).
Use single custom label. This setting lets you specify a single alternative
label to use in place of “Incident.” Translations can be provided for each
Page 31 of 60 © HDI 2014available language by adding the language through the “Add Language”
drop-down.
Use a label based on the beginning characters of the Incident ID. This
setting allows a different label to be used based on the Incident ID
prefix. The condition specified in the “When” column is matched against
the Incident ID to determine the label to use. For example, with the
rules specified below, an Incident ID of “CS312524234” would be
labeled as “Case” and an Incident ID of “SRV-0001234” would be labeled
as “Service Request. Translations can be provided for each rule by
adding the language through the “Add Language” drop-down.
Page 32 of 60 © HDI 2014This is an example of the Survey Request Email with the label overridden as “Service Request”: And the Survey with the overridden label: Page 33 of 60 © HDI 2014
Questions
The “Questions” section allows you add custom questions to your surveys. There are 2 areas on this
page:

You Custom Question Bank. This contains the questions you have created and is shared by all of your
Support Centers.

Shared Question Bank. These are questions that are shared by all CSI users. In the future, these
questions may be benchmarked.

To add a new question to your question bank, click “Create New Question”.

Page 34 of 60                               © HDI 2014
On the create question page, enter the text of your question. Also enter a short name which will be used
on the reports. Since space is limited on the reports, the report header name will be used in place of
printing the entire question.

Next, choose the type of answer. There are 3: Scale, Freeform, and True / False.

Beneath the Answer Type selection, relevant form fields will appear depending on the type of answer
you choose. For this example question, we chose “True / False”:

Page 35 of 60                               © HDI 2014
Along with these options, there are settings which control how the question is displayed. After choosing
the display control, click “Display” to see a preview of how the question will appear.

Once done, click the “Create Question” button. The new question appears in “Your Custom Question
Bank” for all of your Support Centers.

To use this question on the survey, select either the Q1 or Q2 radio button next to this question
depending on if you want this to be the 1st or the 2nd custom question on your survey. There is no limit
to the number of questions you can have in your question bank, but you can only select up to 2 at any
time per support center to use on your surveys.

To include this question in your reports, check the “Report” checkbox.

Note: The question in your custom question bank are shared by all of your Support Centers, but the Q1,
Q2 and Report settings are specific to each individual support center. This allows you to select different
questions to use for each of your Support Centers if you wish to do so.

Page 36 of 60                                 © HDI 2014
An example of a survey with the new custom question:

Reporting on Custom Questions

Currently, custom questions are reported in the “Raw Data” Report. The question appears to the right of
the standard questions and uses the Report Header you chose earlier:

Page 37 of 60                               © HDI 2014
Notification Addresses
Survey Alerts This address receives notices when survey alerts are triggered. It also receives a
notice when the “Please have the support center contact me” on the survey is
checked. To configure alert conditions, see “Survey Alerts” on page 41.
Incident Data Errors If CSI receives an incident notification email from a support center that contains
errors, CSI will send an error notification to this address.
Multiple email addresses may be entered by separating them with commas or semicolons.
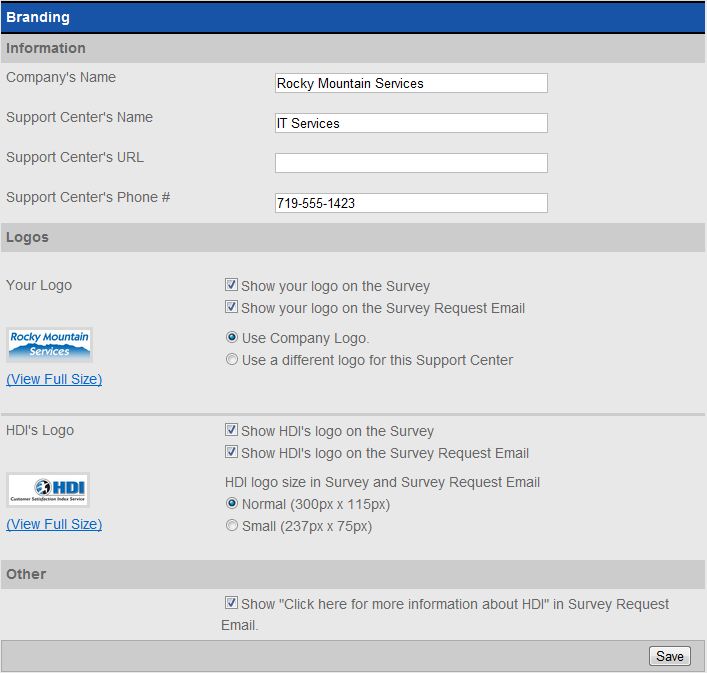
Page 38 of 60 © HDI 2014Branding The information in the branding section is displayed on the Survey and Survey Request Email. These values default to your Company Info settings, but can be overridden here. You may also provide contact information for your Support Center, as well as configure how your logo and the HDI logo are displayed. Page 39 of 60 © HDI 2014
Using the above settings results in a survey email that looks like this:

Page 40 of 60                                 © HDI 2014
Survey Alerts
This feature allows you to define survey response alerts for the selected support center. If a submitted
survey includes a response that matches one of the survey response alerts, an e-mail is sent to the
“Survey Alerts” e-mail address specified in the “

Page 41 of 60                                © HDI 2014
Notification Addresses” section. An alert can be used to be notified immediately of very poor or even
very favorable responses. The alert e-mail identifies the incident ID, the date/time closed and provides a
link to the submitted survey. The survey will highlight the alerted responses.

Alert Configuration - Core Questions
For each survey question, select the responses that you feel deserve immediate attention.

Page 42 of 60                                © HDI 2014
Alert Configuration – Custom Questions
Figure 1: The custom questions you create are also able to trigger alerts.

Page 43 of 60                                         © HDI 2014
Figure 2: The alerts for custom questions may be maintained while creating / editing these questions.

Page 44 of 60                                        © HDI 2014
Logins
Login Maintenance allows you to add, edit, and delete users. It also allows you to change passwords.
Passwords must be between 5 and 10 characters in length and require at least one numeric digit.

Click “Create New Login” to create a new login. Enter the appropriate information and click ‘Save
Changes’.

Please note that upon creation, a temporary password will be generated and sent to the specified email
address.

To modify an existing login or reset its password, click Edit.

Page 45 of 60                                  © HDI 2014
Opt-Out Maintenance
Opt-Out Maintenance allows single and multiple opt-outs. An e-mail address that is opted-out will not
receive any survey requests. This feature also allows you to reinstate previous opt-outs. Add the email
addresses separated by a semicolon or comma. Multiple addresses should be grouped according to
whether you wish to opt-out or reinstate the addresses. If configured in the “Survey Options”, users may
also opt out on their own via a link in the Survey Request Email.

You can check the status of an email address at any time by clicking on the “Check Status” button.

Page 46 of 60                               © HDI 2014
Goals
Support Center
This feature allows you to establish goals for survey response average scores. Goals can be set for each
of the survey questions and cover the time period from the start date until the next goal is set. Goals are
used in reports to compare actual survey response scores to goals.

Select the appropriate survey question and then select a starting date on the calendar. An established
goal will remain in effect until a different goal is set. Then, the next goal takes over. The small graphic
symbol appearing on the calendar indicates a date where a goal period began. Goals range from 1 to 5
and are decimal values (for ex: 3.75). 1 is the lowest possible score (Very Dissatisfied) and 5 is the
highest (Very Satisfied). To set a goal, navigate to the start date that you want the goal to begin. Enter
the goal in the text box and click ‘Set Goal’. To remove a goal, select any date for which that goal is in
effect and click ‘Remove Goal’.

Page 47 of 60                                 © HDI 2014
Company Goals
Company goals are established just like support center goals described above. Company goals allow
company-wide goals to be established for each survey question. Company goals are used for reporting
purposes to compare actual company-wide survey response scores to goals.

Page 48 of 60                              © HDI 2014
Reports
The CSI Portal provides a number of reports to show the data it has collected. These range from raw
data to summarizations by week and month. These reports can be viewed, downloaded, and scheduled
through the portal. The majority of the reports use a standard interface which is outlined in the next
section.

Standard Report Interface
Typically, the reporting pages use a standard reporting control. It contains 3 tabs: Ad Hoc Report, Saved
Reports, and Scheduled Reports.

Ad Hoc Report
The Ad Hoc Report tab is for running reports right from the page. Enter the parameters you want for the
report, and then click “Run Report”.

The report appears below:

Page 49 of 60                                © HDI 2014
Reports are typically broken up into a number of pages. Use the page navigation controls in the toolbar
to navigate between pages:

To search through the report, such as for an incident ID, use the search control:

The report can be exported to a number of different formats through this control:

Saved Reports
If you would like to preserve the settings you have selected for the report, click the “Save Report”
button:

Enter a name for the report in the popup that appears. The saved report shows up on the “Saved
Reports” tab:

Clicking the name of the saved report on the Saved Reports tab causes that report to load with the
settings you saved.

Page 50 of 60                                © HDI 2014
Note: Saved Reports save your date selections as rolling dates meaning that when you load the saved
report in the future, the dates will have rolled forward according to how much time has passed.

Scheduled Reports
Once a report has been saved, clicking the “Schedule” button next to it allows you to schedule the saved
report for automatic delivery.

Select either weekly or monthly delivery. Then choose the recipients for the report. The list on the left is
a list of all users who have a login to your account. These users receive an email containing a link to the
report and are allowed to change the report settings when viewing the report. If you do not want to
grant a user access to the account but wish to send them a report, add their email address to the
“Additional Email Addresses” on the right. These users receive a link to download the report only. This
link expires after 30 days.

Clicking “Save” adds the scheduled report to the “Scheduled Reports” tab:

Page 51 of 60                                 © HDI 2014
Dashboard
Upon logging in, you will be directed to the Company Statistics Dashboard. This page provides various
statistics related to your account. The initial display is a summary of data for all of your support centers.
If you wish to see statistics for a particular support center, select that support center from the
dropdown list.

The Weekly Alerts Dashboard displays graphs showing the number of survey results and alerts received
each week over the past 8 weeks.

Page 52 of 60                                 © HDI 2014
Review Incidents
The review incidents page shows you completed surveys for the specified timeframe. Clicking the link in
the “Incident ID” takes you to the actual survey. Surveys which triggered an alert are highlighted in pink.

Page 53 of 60                                © HDI 2014
Agent Reporting
CSI can help you track and determine the service performance of individual agents in your support
center. To enable Agent Reporting within CSI, your incident notifications will need to include the
 field. As surveys are completed, CSI updates this report nightly.

Upon accessing the Agent Reports, you will be presented with a summary of the overall performance of
all agents within your company.

Page 54 of 60                               © HDI 2014
Click an Agent’s name in the “Agent” column to drill down on that agent. Drilling down reveals a
breakdown of the agent’s stats per month:

The second page contains a graph of these numbers:

Page 55 of 60                               © HDI 2014
And finally, the 3rd page contains all of the comments this agent has received:

To return to the master agent list, click the back button on the toolbar:

Page 56 of 60                                 © HDI 2014
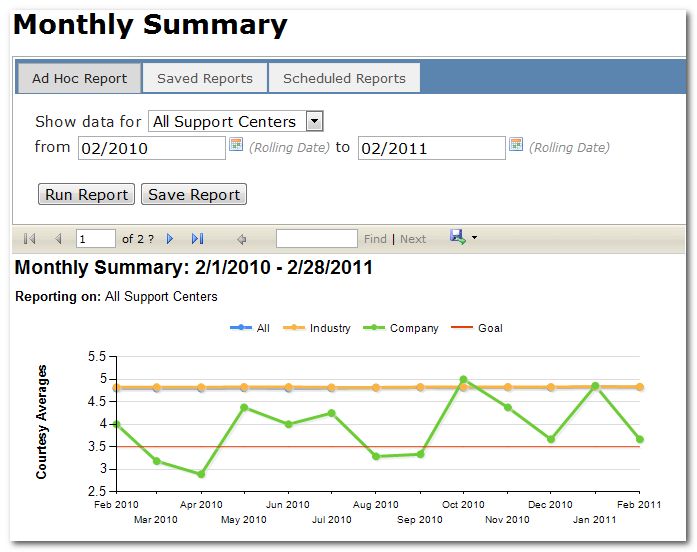
Monthly Summary
The Monthly Summary report shows you summarized data by month and includes comparisons to your
industry. The first page contains charts for each question:

The second page contains a table of the data for each question:

Page 57 of 60                               © HDI 2014
Weekly Summary
The weekly summary presents a similar report to the Monthly Summary except that it summarizes the
data by week instead of month.

Yearly Comparison
The yearly comparison shows you a year over year comparison by month of your scores. The first page
contains graphs:

The second page contains the data in a table:

Page 58 of 60                               © HDI 2014
Quarterly Comparison
The quarterly comparison presents a similar report as the Yearly Comparison, but is broken down by
week and is separated into quarters. The first 4 pages correspond to the quarters.

The second set of 4 pages contain the data in tables:

Page 59 of 60                                © HDI 2014
Raw Data
This feature allows you to access your raw data, including incident notification data and the survey
responses generated by each notification. Downloading this report to excel allows for extended analysis
possibilities.

Each row contains all of the incident data that you sent to CSI and the survey scores and additional
feedback if the survey has been completed.

International
This report provides a breakdown of CSI survey volumes and average scores by country.

Page 60 of 60                                © HDI 2014
You can also read