Application on Substrates with Recesses - Application on Substrates with Recesses - 3M
←
→
Page content transcription
If your browser does not render page correctly, please read the page content below
Application on Substrates with Recesses                                                                     Instruction Bulletin 5.46
                                                                                                                Revision A, January 2018
Application on Substrates with Recesses

Commercial Solutions Division
•   3M™ Envision™ Print Wrap Film LX480mC
•   3M™ Envision™ Print Wrap Film SV480mC
•   3M™ Print Wrap Film IJ180mC-10
•   3M™ Print Wrap Film IJ180mC-114
•   3M™ Print Wrap Film IJ180mC-120
•   3M™ Print Wrap Film IJ180mC-10LSE
•   3M™ Print Wrap Film IJ180mC-10SLS

General Information
This Bulletin is specifically for the application of 3M™ Envision™ Print Wrap Film LX480mC, 3M™ Envision™ Print Wrap Film SV480mC,
3M Print Wrap Film IJ180mC-10, 3M™ Print Wrap Film IJ180mC-114, 3M™ Print Wrap Film IJ180mC-120, 3M™ Print Wrap Film IJ180mC-
10LSE and 3M™ Print Wrap Film IJ180mC-10SLS used for substrates with recesses.
Important Notice
3M™ Wrap Film is not intended for wet applications. Residual water will cause lifting in the recesses after application.
Some products mentioned in this document might be available only in certain regions.

Selecting the Appropriate Print Film
Different type of recesses and application technique are causing different stress to the graphic. The table below lists typical kind of
challenging recesses and recommended 3M products to use.
The tables below assume the application without making relief cuts or using adhesion promoters. Making relief cuts enable the non-
stretched, stress free graphic to adhere in the recess.
The usage of adhesion promoters can aid to increase the performance of film in recesses and reduce the risk of film lifting. Please consider
the impact of reduced removability when using adhesion promoters.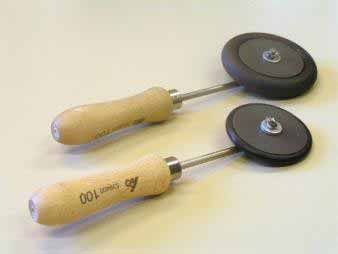
Application on Substrates with Recesses
Stretching Capabilities of Wrap Film Graphic Constructions
Application Methods
A Follow Contour of the substrate - no heating
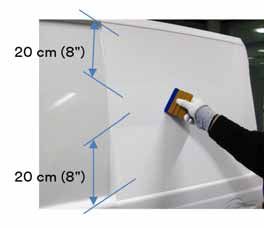
B Heat stretch - minimum of 20 cm (8") away from recess
C Bridge the area, heat and stretch
Graphics Protection & Inks
3M™ Envision™ Gloss Wrap Overlaminate 8548G, 3M™ Envision™ Luster Wrap Overlaminate 8549L, 3M™ Envision™
Best Matte Wrap Overlaminate 8550M, most Solvent Inkjet Inks, Latex Inks, GSLXr SuperFlex Ink
3M™ Scotchcal™ Gloss Overlaminate 8518, 3M™ Scotchcal™ Luster
Overlaminate 8519, 3M™ Scotchcal™ Matte Overlaminate 8520, 3M™ Scotchcal™ Gloss Overlaminate 8528,
Good 3M™ Scotchcal™ Ultra-Matte
Overlaminate 8915, 3M™ Wrap Overlaminate Series 8900, 3M™ Screen Print Dirt Resistant Gloss Clear 1920DR,
3M™ Screen Print UV Gloss Clear 9740i, 3M™ Screen Print UV Gloss Clear 9760LX, most UV Inkjet Inks
Important Notice
To achieve stretching capability with 9740i or 9760LX, you have to follow optimal processing conditions. For detailed information, please
refer to the respective product bulletin.
Surface Description Example Application Method IJ180mC LX480mC/SV480mC Inks & Protection
Good
Single Recess
Channel B Best
Good
Wide Corrugations
(i.e. Van Roof) C Best
Good
Multi Dimensional
Concave
(i.e. Door Handle)
C Best
Good
Small V-Shape
Channel A Best
U-Shape Recess C - Best
Single Recess With
Additional Adjacent B - Best
Combined Recesses
(i.e. Front Wheel
Well)
B - Best
Good
Micro-V Channel Requires inlays Best
Good
License Plate Holder Requires inlays Best
Please contact 3M in case your kind of recess is not listed in the above table.
2 Instruction Bulletin 5.46 - Revision A, January 2018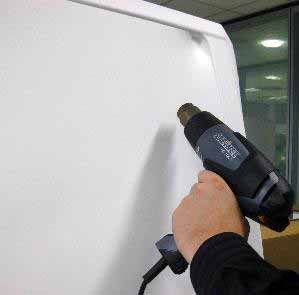
Application on Substrates with Recesses
Surface Preparation
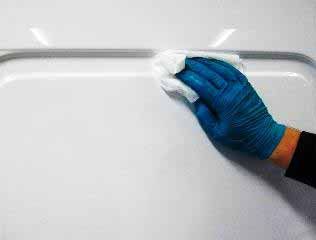
All substrates must be considered contaminated. Clean the substrate immediately before applying the film. Dust and other contaminants
can collect quickly on the substrate and prevent the film from adhering properly.
1. Use a solution of 1 ounce of liquid dishwashing detergent, such as Joy or Dawn, per gallon of lukewarm water to thoroughly clean the
vehicle. Rinse with water.
Avoid soaps or preparations that contain waxes, oils or lotions; some window cleaners contain waxes! Be aware that the chemicals used
in some automated vehicle washing equipment may prevent good film adhesion.
Pay particular attention to cleaning the front and rear of the vehicle and areas where the film will be wrapped around, like doors and
body seams.
2. Dry the surface thoroughly with clean, lint-free paper towels. A heat gun may be used to apply moderate heat and accelerate the drying.
Moisture prevents the adhesive from adhering correctly, can cause bubbles, and can freeze in cold environments. Any moisture trapped
beneath the graphic will cause the graphic to fail prematurely.
Inadequate drying after cleaning as well as from application solutions.
Condensation can occur at low installation temperatures (below 15°C or 60°F), so having a dry surface is critically important.
3. Wipe the surface again with a solvent-based cleaner. Refer to the list of cleaners, below. Be sure that the cleaner does not damage the
vehicle's paint.
Note: Car wax can greatly reduce graphic adhesion. Solvent-based cleaners must be used to thoroughly remove any wax residue.
Saturate a clean paper towel with the cleaner.
With the saturated towel, wipe the surface where the graphic will be installed 12" (30 cm) beyond this area.
Before the cleaner evaporates from the substrate, wipe the surface with a dry, lint-free paper towel. As the paper towel becomes dirty,
discard it. A dirty towel will simply move the dirt around, rather than remove it.
4. In order to further improve the adhesive performance, 3M recommends to repeat Step 3 using isopropyl alcohol (IPA) as the cleaner.
If using industrial grade IPA, mix a solution of 2 parts IPA to 1 part water.
If using 70% rubbing alcohol, do not dilute it.
Note: IPA evaporates very quickly. Always wipe the surface before it evaporates. The evaporation rate increases in warm and/or windy
environments.
Solvent-based Cleaning Products
This list of solvent-based cleaners is provided for your convenience; other acceptable
cleaners may be available. 3M does not endorse any particular chemical manufacturer
or supplier.
• Sherwin Williams R7K156 Sher-Will-Clean™
• Sherwin Williams R7K158 Sher-Will-Clean™
• PPG DX/SX330 Cleaner
• DuPont Prep-Sol Cleaning Solvent 3919S
• SPS – Surface Preparation System
Instruction Bulletin 5.46 - Revision A, January 2018 3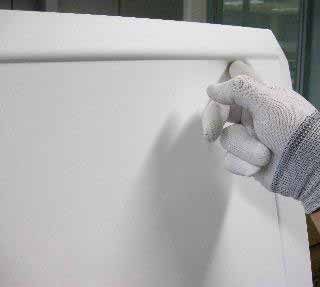
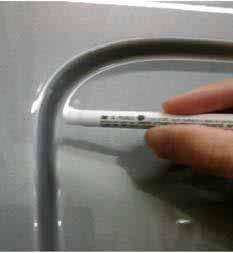
Application on Substrates with Recesses

Application
This instruction bulletin shows how to apply graphics into the following two types of recesses.

Single Recess using application method "B": Heat                       U-Shape Recess using application method "C": Bridge
stretch - minimum of 20 cm (8") away from recess.                      area, heat and stretch.

Premasking and Prespacing Tapes
The use of Application Tape is not required on laminated graphics. However, depending on environmental conditions (high temperature) it
may be an advantage for a trouble free application. The use of Application Tape is recommended for clear coated samples.
For large format graphics 3M™ Premasking Tape SCPM-19 and 3M™ Premasking Tape SCPM-44X can be used. 3M™ Prespacing Tape
SCPS-100 or 3M™ Prespacing Tape SCPS-55 is suitable for pre-spaced graphics or logos.

Adhesion Promoters
The usage of adhesion promoters within the recess area will increase the adhesion of the graphic. It is considered an extra level of insurance
to avoid film lifting.
Repositionability and removability will be lost in areas where adhesion promoters are used.
3M offers two options to promote good adhesion to the vehicle body: 3M™ Primer 94 and 3M™ Adhesion Promoter 111.

3M™ Primer 94
If you choose to use 3M Primer 94 or other adhesion promoters, apply it to:
• The deepest part of any channel
• Both sides of any silicone bead
Apply film within 5 minutes to 60 minutes after Primer 94 application.

Break the glass inside the primer 94 ampules to activate. Apply primer 94 to the deepest part of the channel.

4                                                                                       Instruction Bulletin 5.46 - Revision A, January 2018
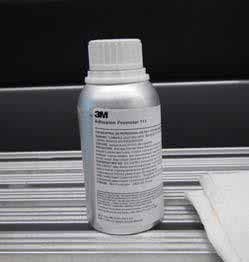
Application on Substrates with Recesses

3M™ Adhesion Promoter 111
Using 3M™ Adhesion Promoter 111 is another option for promoting adhesion to vehicle substrate.
Important Note
3M™ Adhesion Promoter 111 should only be applied to recessed areas, edges, and areas of high stress, due to its ability to promote
adhesion. Promoter 111 may leave adhesive behind during removal.
Important Note
Be sure to clean beyond areas where the film will be wrapped, such as the backside of the doors, all painted surfaces and
behind rubber moldings.

Wet 3M™ Adhesion Promoter 111 on a lint free cloth and wipe the cloth in the recessed areas and edges.

Health and Safety
When handling any chemical products, read the manufacturers' container labels and the Safety Data Sheets (SDS) for important health,
safety and environmental information. To obtain SDS sheets for 3M products go to 3M.com/SDS, or by mail or in case of an emergency
with any equipment, call your local Technical Service and always follow the manufacturers' instructions for safe operation.
State Volatile Organic Compound (VOC) regulations may prohibit the use of certain chemicals with VOC's in graphic arts coatings and
printing operations. Check with you local environmental authorities to determine whether use of this solution may be restricted or prohibited.

Pre-application Instruction
This Instruction Bulletin provides detailed procedures and tips for a successful, durable graphic application. Failure to follow these
procedures may result in graphics with wrinkles and/or lifting from contoured areas.
•   Maintain the vehicle and ambient temperatures between +16°C (60°F) and +32°C (90°F).
•   Ensure the application environment is clean and well lit.
•   Sweep the work area clean to remove any lose dirt or particles.
•   Use a clean table top for handling the graphics. Do not place the graphics on the floor.
•   If washed in an automatic car wash, do not select "spot-free rinse" option.
•   Ensure the vehicle surface is completely dry.

Instruction Bulletin 5.46 - Revision A, January 2018                                                                                        5
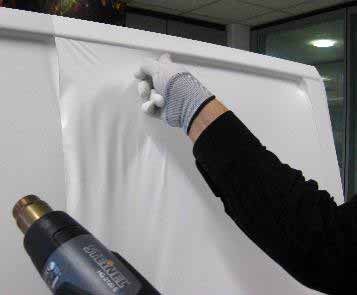
Application on Substrates with Recesses

Application Tools
Beside manual application, specially developed hand-rollers can be used for the application of the film into recessed areas. The hand-rollers
(3M™ Roller S and L) allow the film to be applied with uniform, continuous pressure and low friction.

(3M™ Roller S and L)
When applying manually, wear textile gloves to lower the friction between finger and film.

Application to Single Recess
(Method B)

Position the film and apply it from the top and fix the edges of the contours.

In case of applying the graphic within the recess area, do not apply closer than 20 cm (8") to the recess. To minimize the risk of lifting,
it is essential, to have sufficient amount of material left.
Use firm, even application pressure. The use of 3M™ PA-1 Gold Squeegee with thin and soft sleeve (e.g. microfibre) is recommended.
Wetting of sleeves helps to avoid scratches on film surface during application.

6                                                                                       Instruction Bulletin 5.46 - Revision A, January 2018
Application on Substrates with Recesses

Heat the film around the recess area with a professional heat-gun to a temperature of +30°C (85°F) to +50°C (120°F) using IJ180mC and
+50°C (120°F) to +60°C (40°F) using LX480mC/SV480mC.
Applying heat to areas of film 20 cm (8") beyond the recess area will reduce the tension of the film when being applied in the recess area.

Apply the film into the recess either with your thumb or with the hand roller (3M™ Roller L or S).

After the film is completely applied into the recess, apply the film on the remaining area within the recess.

Instruction Bulletin 5.46 - Revision A, January 2018                                                                                      7
Application on Substrates with Recesses

Due to the 3M™ Comply™ technology, trapped air can easily be removed without causing air bubbles.

Application to U-Shape Recess
(Method C)
When planning the film application in the recess area, make sure you leave a path for the air to escape.
• Position the panel onto the substrate and fix the panel with magnets or masking tape on the top.
• Roll the panel up to the top.- Remove the liner carefully from the film.
• Start the application on the flat part of the substrate and bridge the film over the recess (deep channel).

Films require high squeegee pressure to avoid air entrapment between film and substrate. Therefore the use of 3M™ PA-1 Gold Squeegee
with thin and soft sleeve (e.g. microfibre) is recommended. Wetting of sleeves helps to avoid scratches on film surface during application.

Apply the film into the recess either with your thumb or with the hand roller (3M™ Roller L or S).

8                                                                                      Instruction Bulletin 5.46 - Revision A, January 2018
Application on Substrates with Recesses

When applying manually, wear textile gloves to lower the friction between finger and film. Heat the film around the recess area with a
professional heat-gun to a temperature of a minimum of 50°C (120°F).
Start film application in the recess in the deepest point first (1). Then continue at the opposite point of the recess (2). Last apply the film in
the middle part of the recess (3).

(1) Deepest point first:

                                                                        1
                      1

(2) Opposite side:

                            2
                                                                                   2

                  1
                                                                            1

Instruction Bulletin 5.46 - Revision A, January 2018                                                                                             9
Application on Substrates with Recesses
(3) Centre:
2
3 2
1 1
3
Post-Heating of Film Applied to Single Recesses and U-Shape Recesses
For application on recesses, post-heating is required. Ensure that no air bubbles are left trapped between the substrate and the film by
re-heating the film in the recessed areas and deep channels with a hot-air gun. By doing this, overlooked air bubbles can be detected.
Air bubbles between the film and the substrate must be removed with the air release tool.
After checking air bubbles, the film should be heated to a temperature of +95°C (200°F) to 110°C (230°F). Re-roll immediately the film with
the small hand-roller in the recessed areas and deep channels. This softens the adhesive, closes remaining air channels and ensures good
final adhesion.
10 Instruction Bulletin 5.46 - Revision A, January 2018Application on Substrates with Recesses The hand-rollers (3M™ Roller S and L) allow the film to be applied with uniform, continuous pressure and low friction. Post-Heating of Overlaps Important: In order to avoid lifting at the overlaps of the panels, post-heating of the overlaps with the hot-air gun of at least +100°C (210°F) to 120°C (250°F) is necessary to avoid lifting failures. CAUTION: Re-heating of the film and repressing the film into the recesses and deep channels is a quality control to assure a proper application without air bubbles. Omitting this can lead to lifting failures! Finishing the Installation To finish the installation re-heat all edges to check film stays free of tension at +40°C (100°F) to +60°C (140°F).Maintain the vehicle at an ambient temperature above +16°C (60°F) for at least 12 hours, but longer if possible, before exposing it to either a cold or wet climate. This allows the film's adhesive bond to build and strengthen.The vehicle may be washed by hand or in a touchless automated car wash after more than 24 hours using normal vehicle washing solutions. Dry the graphics to prevent hard water stains. Do not use high pressure spray directed at the edges of the film, which can degrade and lift the edges of the film. For fast heating of larger film areas the use of Infrared heater (2000 W, e.g. TERM 2000 CVH from company Burda Worldwide Technologies GmbH) is another option. Instruction Bulletin 5.46 - Revision A, January 2018 11
Application on Substrates with Recesses

Remarks
Important notice
This bulletin provides technical information only.
All questions of warranty and liability relating to this product are governed by the terms and conditions of the sale, subject, where applicable,
to the prevailing law.
Before using, the user must determine the suitability of the product for its required or intended use, and the user assumes all risk and liability
whatsoever in connection therewith.
As outdoor graphics age, natural weathering occurs causing a gradual reduction in gloss, slight colour changes, some lifting of the graphic
at the edges or around rivets, and ultimately a minor amount of cracking.
These changes are not evidence of product failure and are not covered by a 3M warranty.
Additional information
Visit the web site of your local subsidiary at www.3Mgraphics.com for getting:
• More details about 3M™ MCS™ Warranty and 3M™ Performance Guarantee
• Additional instruction bulletins
• A complete product overview about materials 3M is offering

Responsible for this bulletin:
Commercial Solutions Division
3M Center
Building 220-12E-04
St. Paul, MN 55144

Commercial Solutions Division        3M Canada                    3M México S.A. de C.V.               3M Puerto Rico, Inc.
Hermeslaan 7                         PO Box 5757                  Av. Santa Fe No. 55                  350 Chardon Avenue
1831 Diegem, Belgium                 London, ON N6A 4T1           Col. Santa Fe, Del. Alvaro           Suite 1100
                                     1-800-265-1840               Obregón México D.F. 01210            San Juan, PR 00918
                                     Fax 519-452-6245             General 5255-5270-0400               General 787-620-3000
                                                                  Fax 5255-5270-2277                   Fax 787-620-3018

Commercial Solutions Division                © 3M 2018. All rights reserved.
3M Center, Building 220-12E-04               3M, Controltac, Comply, Envision, MCS, Panagraphics and Scotchcal
St. Paul, MN 55144                           are trademarks of 3M Company.
                                             Used under license in Canada.
1-800-328-3908                               All other trademarks are property of their respective owners.
3M.com/Graphics                              Revision A, January 2018. Please recycle.
You can also read