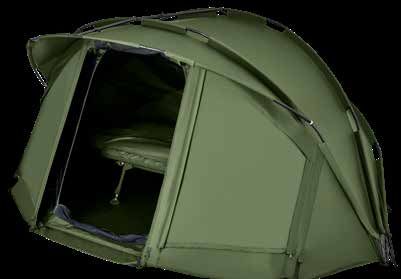
SLXv3 - ASSEMBLY INSTRUCTIONS - BIVVY ONE-MAN - Trakker
←
→
Page content transcription
If your browser does not render page correctly, please read the page content below
SLXv3
BIVVY ONE-MAN                                      BIVVY TWO-MAN
     201205                                                     201405

  ASSEMBLY INSTRUCTIONS
              Please read carefully before using this product
SLXv3 BIVVY ONE-MAN BIVVY TWO-MAN
201207 201407
ASSEMBLY
1. Lay out the groundsheet where you want to erect your 2. Place the SLX V3 in the centre of the groundsheet, 3. The assembled frame should be wider than the 4. Peg out the rings at the rear of the bivvy, using the
SLX V3 Bivvy, with the elasticated pegging points on kneel down and open out the bivvy poles, plugging groundsheet. Attach the two rings on the inside edges groundsheet as a rough guide. Please note: The
the underside. The doorway is indicated by a small together the frame sections as you go. Ensure all the of the base plates to the hooks on the groundsheet. groundsheet is slightly oversized to allow for uneven
Trakker label. If it is windy, it is advisable to use a spigots are fully inserted. You should also assemble This tensions the frame and takes up the play in ground, so do not stretch it out too tight. The pegs
couple of pegs to hold the groundsheet in place. the porch pole during this process and locate it onto the spigots. If the bivvy is to be used without the should also go through the elasticated rings on the
the porch knuckles. groundsheet, you can use the tension strap supplied groundsheet, which will hold it in place. The SLX V3
to tension the frame. It is important you do not over- comes supplied with hardened steel pegs, which are
tension the frame. adequate for good ground conditions, but specialist
pegs may be required for gravel, sand, etc.
DISASSEMBLY
1. To disassemble the SLX V3, firstly remove the wrap
if it is in place and then unpeg each of the pegging
points and collapse the frame. Release the tension by
disconnecting the frame from the groundsheet and
pull the porch pole from its two lugs.
2. Starting from the centre, unplug the frame sections
and twist them approximately 90 degrees to prevent
them plugging back together. It may help if you shake
the pole slightly as you unplug the frame sections,
5. Now insert two pegs through the rings at either side of 6. Ensure the groundsheet is positioned over the draught 7. The frame support system (supplied) should now be as this will help release the spigot. Fold the arms into
the door and pull the SLX V3 forward, pegging down skirts around the inside of the bivvy. The door is fitted installed. The frame support system clips onto the the middle as you go, making sure there is no material
again, using the groundsheet as a rough guide. It helps with two-way zips, so it may be opened from the top poles in the centre and pushes the frame forward. This wrapped around the ends of the frame sections
if the door is in a closed position while you do this. or bottom. The door is longer than the bivvy so it supports the SLX V3 Bivvy frame without the need to because this could damage the cover. There is no
On even ground the door should peg out on the middle can act as a draught skirt and be tucked under the peg out the front, however, this will compromise its need to remove the porch pole completely during this
ring; do not over-tension and then peg out the rest groundsheet. stability and should only be done when the weather process; the bivvy will fold away neatly with it in place.
of the pegging points. Create extra tension by looping conditions allow.
the elastics above the pegging points over the plastic
T pegs.SLXv3 BIVVY ONE-MAN WRAP BIVVY TWO-MAN WRAP
201207 201407
FITTING THE INNER CAPSULE
1. Unfold the capsule and place inside the bivvy on top 2. Using the red toggles to locate the capsule centrally, 3. Work your way from back of the bivvy to the front 4. Finish this process at the front of the bivvy by pegging
of the groundsheet with the front door to the front of start at the back of the shelter attaching the toggles in clipping the toggles to the corresponding loops the front pegging points on the capsule through the
the bivvy. the corresponding loops. The rear vent in the capsule situated inside the bivvy. bivvy and groundsheet pegging points.
should be in line with the rear vent on the bivvy.
FITTING THE OPTIONAL WRAP
1. Erect the SLX V3 Bivvy in the correct way, take the 2. Cover the SLX V3 with the wrap,starting by pulling 3. Peg out the two rear pegs by pushing the peg into the 4. Now peg out the rest of the winter wrap. If the wrap
wrap from its carrybag and carefully unfold it. the back of the wrap over the front of the bivvy. If ground approximately 10cm from the bivvy and looping does not look fully tensioned, you can readjust any
it is windy, it may help to pull the wrap towards the the elastic over the plastic T and then come to the of the peg points. Please note: Condensation will still
prevailing wind. front and peg the front two pegs either side of the form in the single skin porch area.
door into position. It helps if the door is in a closed
position while you peg out these points. On even
ground the door should peg out on the middle ring;
do not over-tension.SLXv3 BIVVY ONE-MAN BIVVY TWO-MAN
201207 201407
BIVVY ONE-MAN WRAP BIVVY TWO-MAN WRAP
201207 201407
WARRANTY INFORMATION
STORAGE WARRANTY
Storage is one of the most important aspects of bivvy care. All Trakker shelters and wraps are covered by a 12-Month
Your bivvy should be packed away dry. If packed away wet, Manufacturer Warranty supplied as standard. The
it should be dried within 24-hours of returning from your warranty runs from the date of purchase and covers
session. If the bivvy is left wet, mildew will form, which can replacement at our expense and discretion (with the
severely damage the material and tape seals. It is worth same or similar model from our current range) or repair
checking your bivvy frequently for signs of wear and tear, including parts and labour in the event of a manufacturing
which may require attention. fault appearing with your shelter. Your warranty cover
Remember: Store your bivvy in a cool dry place away from excludes faults arising from misuse, incorrect or negligent
sources of heat. The carry bag should be left unzipped if repairs or “Acts of God”. Fabric damaged caused by
stored for extended periods. Reproof with Fabsil Gold at mildew, incorrect washing or improper storage is not
least once annually. Cleaning and reproofing your bivvy covered by the Trakker warranty.
will strengthen the fabric and improve its ability to repel This guarantee is only valid when used for recreational
water. purposes, not including commercial usage i.e. hiring, use
CLEANING by outdoor centres etc. Please ensure that all products are
– Do not use detergents to clean as they may harm the clean and dry prior to being returned.
proofing. No consequential loss may be claimed
– Never machine wash or tumble dry. under this guarantee.
– Avoid contact with abrasive scrubbing agents/cloths. Your warranty is provided in addition to
– Avoid contact with fuel, oil and chemicals. any statutory rights.
Your warranty does not cover contact with the
aforementioned agents/chemicals.
Trakker Products Ltd Unit C5,
Nunnery Drive Parkway Industrial Estate
Sheffield, S2 1TA
For more information on products Tel: +44 (0)1142 727 783
and a full list of retailers, checkout Fax: +44 (0)1142 725 904
www.trakkerproducts.com Email: info@trakkerproducts.comSLXv3 BIVVY ONE-MAN BIVVY TWO-MAN
201207 201407
MONTAGE
1. Mettez le tapis de sol ou vous voulez ériger votre 2. Mettez le SLXv3 au centre du tapis de sol, agenouillez- 3. Le châssis assemblé devrait être plus étendu que le tapis 4. Fixez les bagues à l’arrière du bivvy, en utilisant le tapis
SLXv3 Bivvy, avec les points de rattachement vous et déployez les mâts du bivvy, et unissez les de sol. Attachez les deux bagues sur les bords intérieurs comme un guide approximatif. Veuillez noter que le tapis
élastiqués sur le dessous. La porte est indiquée par sections du châssis. Assurez-vous que les faussets des plaques de base avec les crochets sur le tapis de sol. de sol est un peu plus grand que le bivvy pour tenir
une petite étiquette Trakker. Si c’est venteux, il serait sont insérés entièrement. Vous devriez assembler le Cela met le châssis sous tension et raidit les faussets. Si compte du sol inégal, donc ne l’étendez pas trop. Aussi,
prudent d’utiliser quelques sardines pour tenir en mât de l’avancée pendant ce processus et le placer vous utilisez le bivvy sans un tapis de sol, vous pouvez les sardines devraient passer par les bagues élastiquées
place le tapis de sol. dans les tasseaux. utiliser la sangle de tension qui est fournie pour mettre le du tapis de sol, qui le tiendra en place. Le SLXv3 est fourni
cadre sous tension. Il est important de ne pas mettre le avec des sardines en acier trempé, qui sont suffisants
châssis sous trop de tension. pour des bonnes conditions de sol, mais il faut utiliser des
sardines spécialisées pour le gravier, le sable, etc.
DÉMONTAGE
1. Pour démonter le SLXv3, premièrement enlevez la
couverture si c’est en place et puis détachez tous les
points de rattachement et pliez le châssis. Relâchez la
tension en séparant le châssis du tapis de sol et tirez
le mât de l’avancée de ses deux tasseaux.
2. Commençant au centre, détachez les sections du
châssis et tordez-les d’environ 90 degrés afin de les
empêcher de rejoindre. Il serait prudent de secouer
légèrement le mât pendant que vous détachez les
5. Maintenant, insérez deux sardines dans les bagues à 6. Assurez-vous que le tapis de sol est positionné sur 7. Il faut maintenant installer le système du support sections du châssis, car cela aidera à relâcher les
chaque côté de la porte et tirez SLXv3 vers l’avant et les bandes de toile contre les courants d’air autour pour le châssis qui est fourni. Le système du support faussets. Pliez les mâts vers le centre en assurant
fixez par terre en utilisant le tapis de sol comme un guide de l’intérieur du bivvy. La porte est équipée des pour le châssis attache sur les mâts au centre et le qu’il n’y a pas de la toile enroulée autour des bouts
approximatif. C’est plus facile si la porte est fermée fermetures éclairs à double sens, donc on peut l’ouvrir pousse vers l’avant. Ceci renforce le châssis du SLXv3 du châssis car cela pourrait endommager le wrap. Il
pendant ce processus. Sur le sol égal la porte doit être du haut ou du bas. La porte est plus longue que le Bivvy sans avoir besoin de fixer le devant par terre, ne faut pas enlever le mât de l’avancée complètement
fixé sur la bague centrale ; ne le mettez pas sous trop bivvy afin d’agir comme une bande de toile contre les pourtant, cela compromettra sa stabilité et il devrait pendant ce processus ; le bivvy se pliera adroitement
de tension. Ne mettez pas les points de rattachement courants d’air et peut être border sous le tapis de sol. seulement être fait lorsque les conditions climatiques avec le mât en place.
sous trop de tension. Vous pouvez créer plus de tension le permettent.
en bouclant autour des sardines les élastiques qui sont
au-dessus des points de rattachement.SLXv3 BIVVY ONE-MAN WRAP BIVVY TWO-MAN WRAP
201207 201407
LE MONTAGE DE LA CAPSULE INTÉRIEURE
1. Dépliez la capsule et mettez-la à l’intérieur du bivvy 2. En utilisant les cabillots rouges pour placer la capsule 3. En travaillant de l’arrière du bivvy à l’avant, attachez 4. Complétez le processus à l’avant du bivvy en mettant
au-dessus du tapis de sol avec la porte vers l’avant du au centre, commencez à l’arrière de l’abri en attachant les cabillots aux boucles correspondantes situées à les boucles sur la capsule par les boucles du bivvy et
bivvy. les cabillots dans les boucles correspondantes. L’évent l’intérieur du bivvy. du tapis de sol.
arrière dans la capsule devrait être conforme à l’évent
arrière du bivvy.
LE MONTAGE DU WRAP OPTIONNEL
1. Érigez le bivvy SLXv3 de la manière normale, sortez le 2. Mettez le wrap sur le bivvy SLXv3 en tirant l’arrière du 3. Fixez les deux sardines à l’arrière en introduisant le 4. Puis, fixez le reste du wrap d’hiver. Si le wrap n’est
wrap du sac de rangement et dépliez-le avec soin. wrap sur le devant du bivvy. Si c’est venteux, il serait sardine dans le sol et en bouclant la bande élastique pas sous la tension correcte, vous pouvez faire des
prudent de tirer le wrap vers le vent dominant. autour du T plastique et puis fixez en position les deux ajustements aux points de rattachement. Veuillez noter
sardines à l’avant à chaque côté de la porte à l’avant. que la condensation se forme encore dans l’avancée à
Il vaudrait mieux que la porte soit fermée pendant revêtement simple.
que vous fixez ces points de rattachement. Sur un
sol uniforme la porte devrait être fixée sur la bague
centrale ; ne la mettez pas sous trop de tension.SLXv3 BIVVY ONE-MAN BIVVY TWO-MAN
201207 201407
BIVVY ONE-MAN WRAP BIVVY TWO-MAN WRAP
201207 201407
INFORMATIONS DE GARANTIE
RANGEMENT LA GARANTIE
Le rangement est un des aspects le plus important du soin Tous les abris et couvertures Trakker sont couverts par
du bivvy. Avant d’emballer votre bivvy, il devrait être sec. une garantie du constructeur de douze mois en standard.
Si vous emballez un bivvy mouillé, il faut le sécher dans La garantie commence dès la date d’achat et couvre le
les vingt-quatre heures. Sinon, la moisissure se forme remplacement du produit à nos frais et à notre discrétion
qui peut endommager gravement la toile et les rubans (avec le même produit ou produit semblable de notre
adhésifs. Il faut examiner fréquemment votre bivvy pour gamme actuelle) ou réparation y compris les pièces et
les signes d’usure, qui peuvent avoir besoin d’être réparés. main d’œuvre en cas de défaut de fabrication avec votre
ATTENTION : Rangez votre bivvy dans un endroit frais et abri. Votre garantie exclue les défauts créés par l’usage
sec loin des sources de chaleur. Il faut laisser ouvert le sac impropre, des réparations incorrectes et négligentes ou
de transport au moyen de la fermeture éclair si le bivvy est cas de « force majeure ». Les dégâts à la toile créés par la
stocké pendant des périodes étendues. Réimperméabilisez moisissure, le lavage incorrect ou le stockage incorrect ne
avec Fabsil Gold au moins une fois par an. Nettoyer et sont pas couverts par la garantie Trakker.La garantie est
réimperméabiliser le bivvy rendra la toile plus forte et plus seulement valable quand le produit est utilisé pour des fins
capable de repousser l’eau. récréatives pas pour l’utilisation commerciale, par exemple
location, utilisation par des centres de plein air. Veuillez-
NETTOYAGE vous assurer que tous les produits sont propres et secs
– N’utilisez pas les détergents car ils pourraient avant d’être retournés. Aucune perte indirecte ne peut être
endommager l’imperméabilisation. réclamée en vertu de cette garantie. Votre garantie est
– Ne jamais laver à la machine ni sécher par culbutage. fournie en plus de tous les droits statutaires.
– Évitez le contact avec les agents de nettoyage et
chiffons abrasifs.
– Évitez le contact avec les combustibles, l’huile et les
produits chimiques.
Votre garantie ne couvre pas le contact avec les agents et
produits chimiques susmentionnés.
Trakker Products Ltd Unit C5,
Nunnery Drive Parkway Industrial Estate
Sheffield, S2 1TA
Pour plus d’informations sur les produits Tel: +44 (0)1142 727 783
et une liste complète des détaillants, visitez: Fax: +44 (0)1142 725 904
www.trakkerproducts.com Email: info@trakkerproducts.comSLXv3 BIVVY ONE-MAN BIVVY TWO-MAN
201207 201407
VERSAMMLUNG
1. Legen Sie den Zeltboden an die Stelle, an der Sie Ihr 2. Platzieren Sie das SLX V3 in der Mitte des Zeltbodens, 3. Der montierte Rahmen sollte breiter als der Zeltboden 4. Befestigen Sie die Ringe der Zeltrückseite, und
SLX V3 Bivvy aufbauen möchten, mit den elastischen öffnen Sie die Zeltstangen, während Sie die sein. Befestigen Sie die beiden Ringe an den verwenden Sie die Zeltplane als groben Anhaltspunkt.
Verankerungspunkten an der Unterseite. Die Türöffnung Rahmenprofile zusammenstecken. Stellen Sie sicher, Innenkanten der Stangen an den Haken am Zeltboden. Bitte beachten Sie: Die Bodenplane ist leicht
ist durch ein kleines Trakker-Label gekennzeichnet. dass alle Zapfen vollständig eingesetzt sind. Sie sollten Das spannt die Rahmen und nimmt das Spiel in überdimensioniert, um unebenen Untergrund
Wenn es windig ist, empfiehlt es sich, ein paar Heringe auch die Vordachstange während dieses Prozesses den Zapfen auf. Wenn das Zelt ohne Bodenplane ausgleiche zu können. Die Heringe sollten auch durch
zu verwenden, um die Zeltplane zu fixieren. zusammenbauen. verwendet werden soll, können Sie den mitgelieferten die elastischen Ringe auf der Bodenplane gehen, die
Spanngurt verwenden, um den Rahmen zu spannen. Es sie in Position halten. Der SLX V3 wird mit gehärtetem
ist wichtig, dass Sie den Rahmen nicht überspannen. Stahl Heringe geliefert, die für gute Bodenverhältnisse
ausreichen.
DEMONTAGE
1. Um das SLX V3 zu demontieren, entferne zuerst den
Wrap, wenn er montiert ist und dann entferne die
Heringe und klappe den Rahmen zusammen. Löse die
Spannung, indem du den Rahmen von der Bodenplatte
löst und ziehe die Vordachstange aus seinen beiden
Laschen.
2. Ausgehend von der Mitte die Rahmenabschnitte
abziehen und verdrehen ungefähr 90 Grad, um zu
verhindern, dass sie wieder zusammenstoßen. Es kann
5. Stecke nun zwei Heringe durch die Ringe an jeder Seite 6. Stellen Sie sicher, dass die Zeltplane über den 7. Das Frame support system (mitgeliefert) sollte jetzt hilfreich sein, wenn du die Stangen leicht schüttelst,
der Tür und ziehe Der SLX V3 nach vorne, befestige Zugrändern im Inneren des Zeltes positioniert ist. Die installiert werden. Das Rahmenstützsystem wird auf die während du die Rahmenabschnitte abziehst, da dies
die Heringe und verwende wieder den Zeltboden als Tür ist mit Zwei-Wege-Reißverschlüssen ausgestattet, Stangen in der Mitte geklemmt und schiebt den Rahmen hilft, den Zapfen zu lösen. Falte die Arme während der
Anhaltspunkt. Es hilft, wenn die Tür geschlossen ist, sodass sie von oben oder unten geöffnet werden kann. nach vorne. Dies unterstützt den SLX V3 Bivvy Rahmen, Fahrt in die Mitte und achte darauf, dass kein Material
während Sie das tun. Auf ebenem Untergrund sollte die Tür Die Tür ist länger als das Bivvy, so dass sie nach innen ohne dass die Front herausgeklemmt werden muss. Es um die Enden der Rahmenabschnitte gewickelt wird,
am mittleren Ring befestigt werden, nicht überspannen. geklappt werden kann. versteckt unter dem Zeltboden. verleiht dem Bivvy unglaubliche Stabilität, sollte aber da dies das Material beschädigen könnte. Es ist nicht
Überspannen Sie nicht die Befestigungspunte. Sorgen nur verwendet werden wenn das Wetter es zulässt. notwendig, die Vordachstange während dieses Vorgangs
Sie für zusätzliche Spannung, indem Sie die Gummizüge vollständig zu entfernen. das Bivvy wird ordentlich
oberhalb der Befestigungspunkte über die Kunststoff-T- damit weggeklappt.
Stifte schieben.SLXv3 BIVVY ONE-MAN WRAP BIVVY TWO-MAN WRAP
201207 201407
BEFESTIGUNG DER INNER CAPSULE
1. Entfalten Sie die Kapsel und legen Sie sie in das Zelt 2. Verwenden Sie die roten Knöpfe, um die Kapsel zentral zu 3. Arbeite dich von der Rückseite des Zeltes bis 4. Beenden Sie diesen Vorgang an der Vorderseite des
auf der Oberseite des Zeltbodens, wobei die vordere lokalisieren, beginnen Sie auf der Rückseite des Bivvy und nach vorne vor und schließe die Kneipen an die Zeltes, indem Sie die vorderen Klettschlaufen an der
Tür zur Vorderseite des Zeltes zeigen sollte. befestigen Sie die Knebel in den entsprechenden Schlaufen. entsprechenden Schlaufen im Inneren des Zeltes. Kapsel durch die Zelt- und Bodenplane-Schlaufen
Die hintere Entlüftungsöffnung in der Kapsel sollte mit der befestigen.
hinteren Entlüftungsöffnung des Bivvy übereinstimmen.
MONTAGE DES OPTIONALE WRAP
1. Errichte das SLX V3 Bivvy wie oben erklärt, nimm den 2. Bedecke das SLX V3 mit dem Wrap, starte damit indem 3. Befestigen Sie die beiden hinteren Heringe, indem du 4. Beenden Sie diesen Prozess an der Vorderseite des
Wrap aus seiner Tragetasche und entfalten ihn. du die Rückseite des Wraps über die Vorderseite des Sie in den Boden drückst. Schlaufe den Gummi über Bivvy, indem Sie die vorderen Fixierschlaufen an der
Bivvy ziehst. Wenn es windig ist, kann es helfen, dies die Heringe, Befestige die beiden vorderen Heringe Kapsel durch die Bivvy- und Bodenplane-Schlaufen
zu zweit tu tun. an beiden Seiten der Tür. Es hilft, wenn sich die Tür fixieren.
in einer geschlossenen Position befindet, während du
diese Punkte befestigst. Auf ebenem Boden sollte die
Tür auf dem mittleren Ring befestigt werden; nicht
Überspannen.SLXv3 BIVVY ONE-MAN BIVVY TWO-MAN
201207 201407
BIVVY ONE-MAN WRAP BIVVY TWO-MAN WRAP
201207 201407
GARANTIEINFORMATIONEN
LAGERUNG GARANTIE
Die Lagerung ist einer der wichtigsten Aspekte der Alle Trakker Zelte und Wraps sind durch eine 12-monatige
Bivvypflege. Ihr Bivvy sollte trocken verpackt werden. Herstellergarantie abgedeckt, die als Standard geliefert
Wenn es nass verpackt ist, sollte es innerhalb von 24 wird. Die Garantie läuft ab dem Kaufdatum und umfasst
Stunden nach der Session getrocknet werden. Wenn den Ersatz auf unsere Kosten und Diskretion (mit dem
das Bivvy nass bleibt, bildet sich Schimmel, der das gleichen oder einem ähnlichen Modell aus unserem
Material und die Klebebanddichtungen stark beschädigen aktuellen Sortiment) oder Reparatur einschließlich Teile
kann. Es lohnt sich, Ihr Bivvy häufig auf Anzeichen von und Arbeit im Falle eines Herstellungsfehlers, der bei Ihrem
Abnutzung zu überprüfen. Denke daran: Lagern dein Zelt Bivvy auftritt. Ihre Garantieabdeckung schließt Mängel
an einem kühlen, trockenen Ort, fern von Hitzequellen. Die aus Missbrauch, fehlerhafter oder nachlässiger Reparatur
Tragetasche sollte bei längerer Lagerung entpackt bleiben. oder “höherer Gewalt” aus.Unsachgemäßes Waschen oder
Versiegelung mit Fabsil Gold mindestens einmal jährlich. unsachgemäße Lagerung verursachte Beschädigungen
Das Reinigen und Nachbessern deines Bivvy wird das sind nicht durch die Trakker-Garantie gedeckt. Diese
Gewebe stärken und seine Fähigkeit verbessern, Wasser Garantie ist nur gültig, wenn sie zu Erholungszwecken
abzuweisen. verwendet wird, ausgenommen kommerzielle Nutzung, d.
H. Mieten, Verwendung durch Outdoor-Zentren usw. Bitte
REINIGUNG stellen Sie sicher, dass alle Produkte sauber und trocken
– Verwende keine Reinigungsmittel zum Reinigen, da sind, bevor sie zurückgegeben werden. Im Rahmen dieser
diese die Versiegelung beschädigen können. Garantie dürfen keine Folgeschäden geltend gemacht
– Niemals in der Maschine waschen oder im Trockner werden. Ihre Garantie wird zusätzlich zu allen gesetzlichen
trocknen. Rechten gewährt.
– Vermeide den Kontakt mit Scheuermitteln / -tüchern.
– Vermeide den Kontakt mit Kraftstoff, Öl und
Chemikalien.
Die Garantie erlischt bei Verwendung von diesen Mitteln.
Trakker Products Ltd Unit C5,
Nunnery Drive Parkway Industrial Estate
Sheffield, S2 1TA
Weitere Informationen zu Produkten und eine Tel: +44 (0)1142 727 783
vollständige Liste der Einzelhändler finden Sie Fax: +44 (0)1142 725 904
unter: www.trakkerproducts.com Email: info@trakkerproducts.comSLXv3 BIVVY ONE-MAN BIVVY TWO-MAN
201207 201407
ASSEMBLAGGIO
1. Stendere il pavimento dove si desiderate montare 2. Posizionare la SLX V3 nel centro del tappeto, mettersi 3. Il telaio assemblato deve essere più largo del tappeto. 4. Picchettare gli anelli sul retro del bivvy, utilizzando il
la vostra SLX V3 Bivvy, con I punti di picchettaggio in ginocchio e aprire tutti i pali del bivvy, innestando Attaccate i due anelli che trovate alle due estremità del tappeto come guida approssimativa. Nota bene: il tappeto
elasticizzati rivolti verso il basso. Il verso della porta tra di loro le sezioni del telaio prima di muoverlo. telaio ai ganci del tappeto. Questa operazione metterà in è leggermente sovradimensionato in modo da non
viene indicato da una piccola etichetta Trakker. Se Assicurarsi che tutti gli innesti siano completamente tensione il telaio e tratterrà innestati gli spigot. Se dovete risultare troppo teso se posizionato su terreni irregolari.
siete in condizioni di forte vento, è consigliabile inseriti. Dovreste inoltre assemblare il palo della utilizzare il bivvy senza pavimento, potete utilizzare la I picchetti vanno fatti passare anche attraverso i punti
l’utilizzo di due picchetti per mantenere il pavimento in veranda frontale durante il processo e posizionarlo cinghia di tensionamento fornita per mettere in tensione di picchettaggio del tappeto, i quali lo terranno fermo in
posizione. nella sua guida. il telaio. E’ importante che non sottoponiate il telaio a una posizione. La SLX V3 viene fornita con picchetti in acciaio
tensione eccessiva. indurito, i quali sono adeguati per per condizioni di terreno
buone, ma picchetti specialisti sarebbero raccomandati
per terreni sabbiosi, sassosi etc.
DISASSEMBLAGGIO
1 Per disassemblare la SLX V3, rimuovere prima il
sovratelo se è stato applicato e poi spicchettare
completamente la tenda appoggiandola sul terreno.
Rilasciare la tensione scollegando il telaio dal
pavimento ed estrarre il palo della veranda dai suoi
due perni.
2 Partendo dal centro, disinnestare le sezioni del telaio
5. Ora inserite due picchetti negli anelli ai lati della porta e 6. Assicurarsi che il pavimento sia posizionato sopra 7. Il Sistema di frame support (fornito) può ora essere posizionandole a circa 90 gradi per evitare che si
tirate in Avanti la SLX V3, picchettateli al suolo usando il tessuto in eccesso attorno all’interno del bivvy. La installato. Fissare il sistema di frame support reinnestino insieme. Potrebbe essere d’aiuto squotere
ancora una volta il tappeto come guida. Se la porta è porta è attrezzata con due zip bidirezionali che le posizionando le clip nel centro dei pali e spingere leggermente i pali mentre li estraete dagli innesti.
in posizione chiusa sarà più semplice eseguire questa permettono di essere aperta verso il basso o verso per tensionare. Questo consentirà alla SLX V3 anche Ripiegare all’interno le sezioni dei pali avendo cura
operazione. Su terreni regolari la porta deve essere l’alto. La porta è più lunga del bivvy per consentirle di di non essere picchettata sul frontale, ma potrebbe che non ci sia del telo avvolto attorno alle estremità
picchettata utilizzando l’anello centrale; non aggiungete essere risvoltata sotto al tappeto. compromettere la sua stabilità e dovrebbe quindi che potrebbe rimanere danneggiato. Non è necessario
inutile tensione. Non aggiungete tensione eccessiva essere fatto solo in condizioni di meteo favorevoli. rimuovere il palo della veranda in questa operazioni; il
nei punti di picchettaggio. Aggiungete tensione extra bivvy può essere riposto via lasciandolo collegato.
avvolgendo gli elastici sopra i punti di picchettaggio
sopra la plastica dei T pegs.SLXv3 BIVVY ONE-MAN WRAP BIVVY TWO-MAN WRAP
201207 201407
MONTARE LA CAPSULA INTERNA
1. Stendere la capsula e piazzarla all’interno del bivvy sul 2. Utilizzare le olivette rosse per centrare la capsula, 3. Proseguire verso la parte frontale del bivvy attaccando 4. Terminare questo processo fino in fondo sulla parte
tappeto con la porta frontale rivolta verso il frontale partire dal retro della tenda attaccando le olivette nei tutte le olivette rosse ai corrispondenti occhielli situati frontale, e picchettare gli appositi anelli della capsula
del bivvy. corrispondenti occhielli. La finestra posteriore della all’interno del bivvy. tra quelli del frontale e quelli del pavimento.
capsula deve essere allineata alla finestra posteriore
del bivvy.
MONTARE IL SOVRATELO OPZIONALE
1. Montare la SLX V3 come indicato precedentemente, 2. Coprire la SLX V3 con il sovratelo, afferrandolo dal 3. Picchettare al suolo i due picchetti posteriori 4. Ora picchettare il resto del sovratelo. Se il sovratelo
estrarre il sovratelo dalla sua borsa di trasporto e retro farlo scivolare sulla tenda, da davanti fin dietro. spingendoli nel terreno e avvolgendo gli elastici non sembra completamente teso, potete risistemare
dispiegarlo attentamente. Se siete in condizioni di forte vento, potrebbe aiutarvi attorno la plastic dei T pegs e poi andare sul frontale ogni punto di picchettaggio. Nota bene: potrebbe
tirare il sovratelo a favore di vento. per picchettare i due punti di ancoraggio ai lati della ancora formarsi condensa nella parte della veranda
porta. Se la porta è in posizione chiusa sarà più ancora a telo unico.
semplice eseguire questa operazione. Su terreni
regolari la porta deve essere picchettata utilizzando
l’anello centrale; non aggiungete inutile tensione.SLXv3 BIVVY ONE-MAN BIVVY TWO-MAN
201207 201407
BIVVY ONE-MAN WRAP BIVVY TWO-MAN WRAP
201207 201407
INFORMAZIONI DI GARANZIA
CONSERVAZIONE GARANZIA
La conservazione è uno degli aspetti fondamentali per la Tutti i teli e le tende Trakker sono coperte da una garanzia
cura del bivvy. Il vostro bivvy dovrebbe essere rigovernato del costruttore di 12 mesi fornita come da standard. La
da asciutto. Se lo richiudete ancora bagnato o umido, garanzia parte dalla data di acquisto e copre sostituzioni
dovrebbe essere poi fatto asciugare all’aria per almeno a nostre spese e discrezione (con lo stesso o il più simile
24 ore dopo la vostra sessione. Se il bivvy viene lasciato modello della nostra gamma corrente) o riparazioni incluse
umido, potrebbe formarsi della muffa che danneggerebbe parti e manodopera in caso di difetti di fabbricazione
seriamente i materiali e le cuciture nastrate. Vale la sulla vostra tenda. La copertura della vostra garanzia
pena controllare frequentemente il proprio bivvy per non include difetti derivanti da errato utilizzo, errate o
verificare che non ci siano segni di usura o rottura che negligenti riparazioni o calamità naturali. I teli danneggiati
potrebbe necessitare di attenzione. Ricorda: conserva il da muffa, lavaggi errati o conservazione inappropriata
tuo bivvy in un luogo fresco e asciutto lontano da fonti di non sono coperti da garanzia Trakker. Questa garanzia è
calore. La borsa di trasporto deve essere lasciata aperta valida esclusivamente quando il prodotto è utilizzato per
se lo si tiene conservato lì dentro per lunghi periodi. scopi ricreativi, non includendo utilizzi commerciali come
Reimpermeabilizzalo con il Fabsil Gold almeno una volta noleggi, centri esterni ecc. Per cortesia assicurarsi che
all’anno. Pulire e reimpermeabilizzare il telo lo aiuta a i prodotti siano ben puliti e asciutti prima di essere fatti
rinforzarsi e migliora la sua capacità di repellere l’acqua. ritirare. Nessun danno conseguente può essere richiesto
sotto questa garanzia. La vostra garanzia è fornita in
PULIZIA aggiunta a qualsiasi diritto legale.
– Non utilizzare detergenti per pulire il telo poiché essi
potrebbero danneggiarlo.
– Mai usare la lavatrice o l’asciugatrice.
– Evitare il contatto con superfici o tessuti abrasivi.
– Evitare il contatto con carburante, oli e agenti chimici.
La vostra garanzia non copre danni dovuti ad agenti
chimici.
Trakker Products Ltd Unit C5,
Nunnery Drive Parkway Industrial Estate
Sheffield, S2 1TA
Per maggiori informazioni sui prodotti a la lista Tel: +44 (0)1142 727 783
completa dei nostri rivenditori visitate il sito: Fax: +44 (0)1142 725 904
www.trakkerproducts.com Email: info@trakkerproducts.comSLXv3 BIVVY ONE-MAN BIVVY TWO-MAN
201207 201407
MONTAŻ
1. Rozłóż podłogę, na której chcesz ułożyć swóje bivvy 2. Umieść SLX V3 pośrodku podłogi, uklęknij i otwórz 3. Zmontowana rama powinna być szersza niż podłoże. 4. Wbij śledzie z tyłu bivvy, używając podłogi jako wzornik
SLX V3, z elastycznymi punktami ku spodzie. Front pałąki namiotu, łącząc ze sobą sekcje ramy. Upewnij Przymocuj dwa pierścienie na wewnętrznych do uzyskanego kształtu. Uwaga: Podłoga jest nieco
oznaczony jest małym logotypem Trakkera. Jeśli się, że wszystkie są ze sobą całkowicie połączone. krawędziach łącznika pałąków podstawy do haczyków ponadwymiarowa, aby umożliwić rozłożenie jej na
jest wietrznie, zaleca się użycie kilku szpilek do w podłodze. Jeśli namiot ma być używany bez podłogi, nierównym terenie, dlatego nie należy jej zbyt mocno
przytrzymania podłogi na miejscu. użyj dostarczonego paska napinającego, aby naprężyć rozciągać. Śledzie powinny również przechodzić przez
ramę. Ważne jest, aby nie przeciążyć ramy. elastyczne pierścienie mieszczące się w podłodze,
które utrzymają ją na swoim miejscu. Model SLX V3
jest dostarczany ze śledziami z hartowanej stali, które
są odpowiednie dla dobrych warunków gruntowych,
natomiast specjalistyczne śledzie będą wymagane dla
żwiru itp.
DEMONTAŻ
1. Aby zdemontować SLX V3, najpierw usuń narzutę, jeśli
jest na miejscu i następnie odepnij każdy z punktów
mocowania i złóż ramę. Zwolnij napięcie, odłączając
ramę od podłoża i odpinając poprzeczki daszka.
2. Rozpoczynając od środka, rozdziel odcinki ramy
5. Teraz włóż dwa śledzie przez pierścienie po obu 6. Upewnij się, że podłoga jest umieszczona wokół 7. Teraz należy zainstalować system wsparcia ramy i przekręć je około 90 stopni, aby zapobiec ich
stronach drzwi i pociągnij SLX V3 do przodu, używając wewnętrznej części namiotu. Drzwi są wyposażone (w zestawie). System podtrzymujący ramę jest ponownemu połączeniu. Pomocne może być lekkie
podłogi jako przykładowego kształtu. Podczas gdy to w dwukierunkowe zamki błyskawiczne, dzięki czemu przymocowany do żebrowań pośrodku i przesuwa potrząśnięcie poprzeczką podczas odłączania sekcji
robisz, utrzymuj drzwi w pozycji zamkniętej. Naciągnij można je otwierać od góry lub od dołu. Drzwi są dłuższe ramę do przodu. Wspiera namiot SLX V3 Bivvy bez ramy, ponieważ pomoże to w ich uwolnieniu. Złóż
materiał poprzez zapętlenie gumek, które znajdziesz od namiotu, dzięki czemu mogą być zawinięte i być konieczności używania śledzi z jego frontu, jednak może boczne sekcje do środka, upewniając się, że nie ma
powyżej punktów mocowania i nałóż je na plastikowe schowane pod podłogą. to obniżyć jej stabilność i powinno być używane tylko materiału owiniętego wokół końców sekcji ramy,
elementy śledzi typu T. wtedy, gdy pozwalają na to warunki pogodowe. ponieważ może to uszkodzić ich powłokę. Podczas
tego procesu nie ma potrzeby całkowitego usuwania
trzpienia przedsionka; bivvy zgrabnie się z nim złoży.SLXv3 BIVVY ONE-MAN WRAP BIVVY TWO-MAN WRAP
201207 201407
DOPASOWANIE WEWNĘTRZNEJ KAPSUŁY
1. Rozłóż kapsułę i włóż do wnętrza bivvy na wierzchu 2. Za pomocą czerwonych łączników, aby umieścić 3. Rozłóż od tyłu bivvy do jego przodu, mocując łączniki do 4. Zakończz ten proces na przodzie namiotu przez
podłogi za pomocą drzwi wejściowych do przedniej kapsułę centralnie, zacznij od tyłu namiotu, mocując odpowiednich pętli znajdujących się wewnątrz bivvy. zamocowanie śledzi przednich pętli na kapsule przez
części namiotu. łączniki w odpowiednich pętlach. Tylne oknow kapsule bivvy i elastyczne pętle w podłodze
powinno znajdować się w jednej linii z tylnym oknem w
namiocie.
DOPASOWANIE NARZUTY (OPCJONALNIE)
1. Ustaw bivvy SLX V3 jak wyżej, wyciągnij narzutę z torby 2. Przykryj namiot SLX V3 narzutą, zaczynając od 3. Wbij dwa tylne śledzie, wciskając je w ziemię i 4. Teraz wyrównaj resztę. Jeśli narzuta nie wygląda w
i ostrożnie rozłóż ją. narzucenia tylnej części poprzez przód namiotu. Jeśli zapętlając elastyk nad plastikowym T, a następnie pełni naprężona, wtedy możesz wyregulować dowolny z
jest wietrznie, pomocne może okazać się narzucenie przejdź do przodu i wbij dwa przednie kołki po obu punktów. Uwaga: Kondensacja nadal będzie powstawać
narzuty w kierunku dominującego wiatru. stronach drzwi. Utrzymaj drzwi w pozycji zamkniętej. na obszarze przedsionka z jedną skórą.
Na równym podłożu drzwi powinny być zamocowane na
środkowym pierścieniu; nie przesadzaj z siłą napięcia.SLXv3 BIVVY ONE-MAN BIVVY TWO-MAN
201207 201407
BIVVY ONE-MAN WRAP BIVVY TWO-MAN WRAP
201207 201407
INFORMACJE NA TEMAT GWARANCJI
Przechowywanie Gwarancja
Przechowywanie jest jednym z najważniejszych aspektów Wszelkie namioty i narzuty marki Trakker objęte są
utrzymania brolly w najlepszej kondycji. Twoje bivvy 12-miesięczną gwarancją producenta dostarczaną w
powinno być suche. Jeśli zostanie zapakowany na mokro, standardzie. Gwarancja rozpoczyna się od daty zakupu
należy go wysuszyć w ciągu 24 godzin od powrotu z nad i obejmuje wymianę na nasz koszt i dyskrecję (z tym
wody. Jeśli bivvy pozostanie mokre, powstanie pleśń, która samym lub podobnym modelem z naszego aktualnego
może poważnie uszkodzić materiał i uszczelnienia taśmowe. asortymentu) lub naprawę obejmującą części i robociznę
Warto często sprawdzać swoją brolly w poszukiwaniu w przypadku błędu produkcyjnego występującego w twoim
oznak zużycia, które mogą wymagać uwagi. Pamiętaj: namiocie. Gwarancja nie obejmuje błędów wynikających
przechowuj biwak w suchym i chłodnym miejscu, z dala z niewłaściwego użycia, nieprawidłowych lub niedbałych
od źródeł ciepła. Torbę należy pozostawić otwartą, jeśli napraw lub “sił wyższych”. Tkanina uszkodzona przez pleśń,
schronienie przechowywane będzie przez dłuższy czas. nieprawidłowe mycie lub niewłaściwe przechowywanie nie
Impregnuj z Fabsil Gold co najmniej raz w roku. Czyszczenie jest objęta gwarancją Trakker’a. Ta gwarancja jest ważna
i impregnowanie twojego bivvy wzmocni tkaninę i poprawi tylko wtedy, gdy jest używana do celów rekreacyjnych, nie
jej zdolność odpychania wody. obejmuje użytku komercyjnego, tj. Wynajmu, użycia przez
centra outdoorowe itp. Przed zwrotem należy upewnić się,
Czyszczenie że wszystkie produkty są czyste i suche.
– Nie używaj detergentów do czyszczenia, ponieważ mogą W ramach tej gwarancji nie można dochodzić
one uszkodzić materiał. odszkodowania za straty wynikłe z tego tytułu. Twoja
– Nigdy nie prać w pralce ani nie suszyć w suszarce.Unikać gwarancja dostarczona jest dodatkowo do twych
kontaktu ze środkami ściernymi. ustawowych praw.
– Unikaj kontaktu z paliwem, olejem i chemikaliami.
Gwarancja nie obejmuje kontaktu z wyżej wymienionymi
detergentami / chemikaliami.
Trakker Products Ltd Unit C5,
Nunnery Drive Parkway Industrial Estate
Sheffield, S2 1TA
Aby uzyskać więcej informacji o produktach i pełnej Tel: +44 (0)1142 727 783
liście sprzedawców detalicznych, wejdź na naszą Fax: +44 (0)1142 725 904
stronę: www.trakkerproducts.com Email: info@trakkerproducts.comSLXv3 BIVVY ONE-MAN BIVVY TWO-MAN
201207 201407
TRAKKERPRODUCTS.COM
TRAKKER PRODUCTS LTD UNIT C5, NUNNERY DRIVE PARKWAY INDUSTRIAL ESTATE SHEFFIELD, S2 1TA
TEL: +44 (0)1142 727 783 | FAX: +44 (0)1142 725 904 INFO | @TRAKKERPRODUCTS.COMYou can also read